 |
|
 06-09-2017, 09:55 PM
|
#241
|
|
Moderator
Join Date: Nov 2006
Location: Ohio
Posts: 12,656
SUN #89
|
Quote:
Originally Posted by Thomascine

That is where the door stop goes. For some reason there are 3 holes but only takes 2 screws. I figured I would put eternabond on the back and then with the butyl tape it should be sealed. And a good test.
|
Ah, OK got it. And yes your method of creating the seal is a good one.
Thanks
John
__________________
__________________
Current Sunlines: 2004 T310SR, 2004 T1950, 2004 T2475, 2007 T2499, 2004 T317SR
Prior Sunlines: 2004 T2499 - Fern Blue
2005 Ford F350 Lariat, 6.8L V10 W/ 4.10 rear axle, CC, Short Bed, SRW. Reese HP trunnion bar hitch W/ HP DC
 Google Custom Search For Sunline Owners Club
|

|

|
|
06-15-2017, 10:55 AM
|
#242
|
|
Senior Member
Join Date: Sep 2016
Location: Virginia
Posts: 814
SUN #8893
|
Good afternoon,
Just a quick update. I ran into more rotted wood on the driver's side which means the siding on that side will have to come off. I was drilling pilot holes for the metal strap to connect the new wood to the existing and the bit went right in. I cut out some of the wall behind the stud and found that the back side of the stud has rotted. Since my tarp is only big enough to completely cover one side of the camper and only part of the other side, I will need to put the passenger side back together - door needs to go back in. This also means more of those tiny staples. I can't seem to catch a break. 
On the bright side, I did take out some of the screws in the upper trim/awning rail. They are rusted but not gooey so hopefully I can just replace them with stainless screws. I also noticed that the awning rail does not include the gutter so there are no gutter rails on the passenger side. I'll have to check the driver side.
Thanks for looking.
Tommie
 
Sent from my SM-N910V using Tapatalk
__________________
1987 Sunline T1550
2012 Ford Expedition EL Limited 5.4L V8, 4WD
"Twenty years from now you will be more disappointed by the things that you didnt do than by the ones you did do..." Mark Twain]
|
|
|
|
|
06-15-2017, 09:24 PM
|
#243
|
|
Moderator
Join Date: Nov 2006
Location: Ohio
Posts: 12,656
SUN #89
|
Bummer on finding more rot
An upside to this, you found it now and not later after you had the wall together.
Yes, those tiny staples and rusted screws you cannot grip are a challenge. I do not know about the older camper materials of the screws, however the year 2000 and up campers, the screws are made from a hardened material. Drilling the heads off does not work short of maybe a carbide bit which I do not have, yet anyway. The standard high speed steel bit or even cobalt bits go dull in a few screws.
I may try one of these. A little pricey but if it works, it's worth it.
https://www.mscdirect.com/product/details/71210124
As for those tiny staples, are they pounded below the surface of the siding? The ones that are at least flush with the siding, I can get under. The ones they shot too deep, those are buggers...most rip out.
Hope this helps
John
__________________
Current Sunlines: 2004 T310SR, 2004 T1950, 2004 T2475, 2007 T2499, 2004 T317SR
Prior Sunlines: 2004 T2499 - Fern Blue
2005 Ford F350 Lariat, 6.8L V10 W/ 4.10 rear axle, CC, Short Bed, SRW. Reese HP trunnion bar hitch W/ HP DC
Google Custom Search For Sunline Owners Club
|
|
|
|
|
06-16-2017, 05:23 AM
|
#244
|
|
Senior Member
Join Date: Sep 2016
Location: Virginia
Posts: 814
SUN #8893
|
Quote:
Originally Posted by JohnB
As for those tiny staples, are they pounded below the surface of the siding? The ones that are at least flush with the siding, I can get under. The ones they shot too deep, those are buggers...most rip out.
John
|
Hi JohnB,
Yes, those little buggers are below the surface and some flush. Very few had any space under them. And to add to my frustrations, the crowns are about a quarter of an inch so a regular flathead screwdriver will not work. I have been using a pick tool to try to get underneath them to loosen them up a bit to cut them or pull them if I'm lucky. The screws, I have a system for getting those out using small vice grips if necessary to loosen them up and that drill bit you recommended a while back has helped a lot.
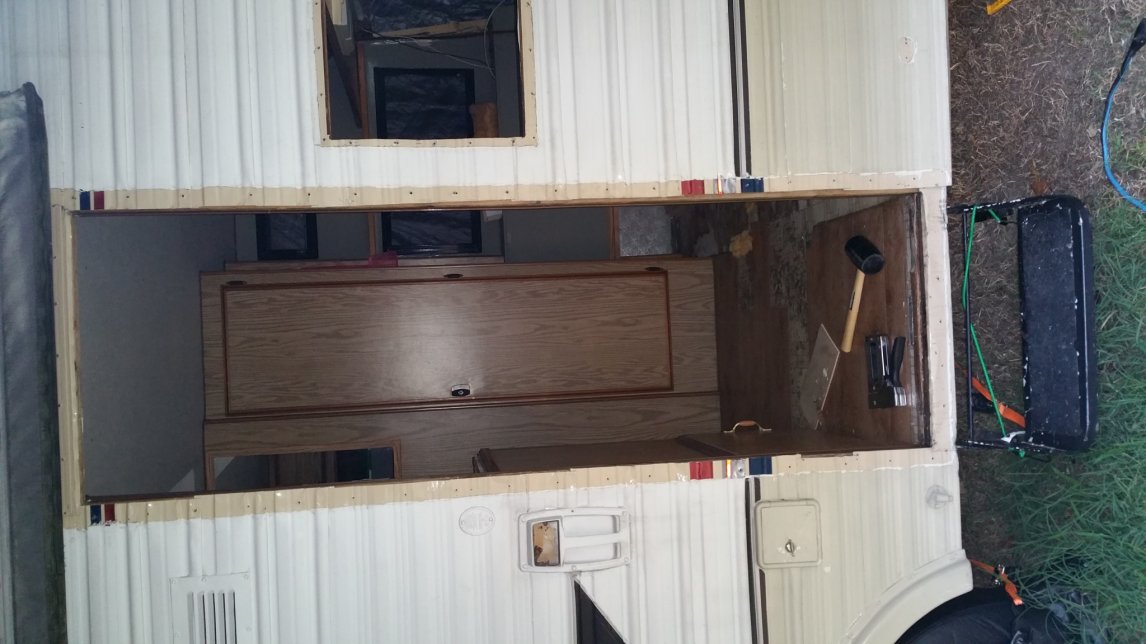
Yeah I was bummed about finding more rot. Got even more bummed about what is involved just to get to it. That side of the camper has the cargo door and panel doors for the frig and hot water heater. And some of the metal siding runs are long, or should I say longer than the other side. It is only a 15 footer after all, LOL. I will have to take a look to see what needs to come off to get the siding off. The stud is towards the top. Fun times! [emoji30]
Question - I was looking around in the back of the camper the other day because there is water damage back there as well. Is it normal for the hot water heater to be sitting on the frame, at least that's what it looks like? There is no flooring underneath it. I'm wondering if the floor there had rotted from a previous leak and they cut out that part of the floor. Maybe a current 1550 owner can let me know.
Thanks,
Tommie  
Sent from my SM-N910V using Tapatalk
__________________
1987 Sunline T1550
2012 Ford Expedition EL Limited 5.4L V8, 4WD
"Twenty years from now you will be more disappointed by the things that you didnt do than by the ones you did do..." Mark Twain]
|
|
|
|
|
06-16-2017, 05:50 PM
|
#245
|
|
Moderator
Join Date: Nov 2006
Location: Ohio
Posts: 12,656
SUN #89
|
Quote:
Originally Posted by Thomascine
Yes, those little buggers are below the surface and some flush. Very few had any space under them. And to add to my frustrations, the crowns are about a quarter of an inch so a regular flathead screwdriver will not work. I have been using a pick tool to try to get underneath them to loosen them up a bit to cut them or pull them if I'm lucky. The screws, I have a system for getting those out using small vice grips if necessary to loosen them up and that drill bit you recommended a while back has helped a lot.
|
To help ease the pain, if you are on 1/4" staples, this 3/16" screw driver may help. The blade is straight with the sides of the shank of the screw driver. This is just one many but Lowes may be near by
https://www.lowes.com/pd/Kobalt-3-16...river/50158907
Or do you have a friend with a grinder who can modify one of your screwdrivers? The ends can be ground to a new size. Granted it may not work as well for a normal screw driver after this, but you are trying to ease the pain of these staples and creating a tool for the job. May have to buy a new screw driver again for normal use.
For the cost, it may be worth a try to have less aggravation. I have also been able to sometimes just get one corner of the screw driver blade under the staple and then twist it pop it up a little and then have a go at it again.
If you can drill the heads of your screws, I'm glad.  They may be a different steel grade then the ones in the newer campers. I was not expecting mine on the T1950 to be hardened screws as hard as they where.
Quote:
Originally Posted by Thomascine
Question - I was looking around in the back of the camper the other day because there is water damage back there as well. Is it normal for the hot water heater to be sitting on the frame, at least that's what it looks like? There is no flooring underneath it. I'm wondering if the floor there had rotted from a previous leak and they cut out that part of the floor. Maybe a current 1550 owner can let me know.
|
That does not look factory. There are for sure clearances needed around a HW heater so they do not overheat. I have seen Sunline even put in dividers over them so someone will not accidentally store something on top of them.
I would guess someone modified what you have. Maybe some one with an older camper close to yours will comment what they have.
Hope this helps
John
__________________
Current Sunlines: 2004 T310SR, 2004 T1950, 2004 T2475, 2007 T2499, 2004 T317SR
Prior Sunlines: 2004 T2499 - Fern Blue
2005 Ford F350 Lariat, 6.8L V10 W/ 4.10 rear axle, CC, Short Bed, SRW. Reese HP trunnion bar hitch W/ HP DC
Google Custom Search For Sunline Owners Club
|
|
|
|
|
06-20-2017, 08:49 PM
|
#246
|
|
Senior Member
Join Date: Sep 2016
Location: Virginia
Posts: 814
SUN #8893
|
Quick Update
Good evening,
Passenger side - ready for wallboard. Door and window cleaned up and ready to be reinstalled. Time to work with the butyl tape. 
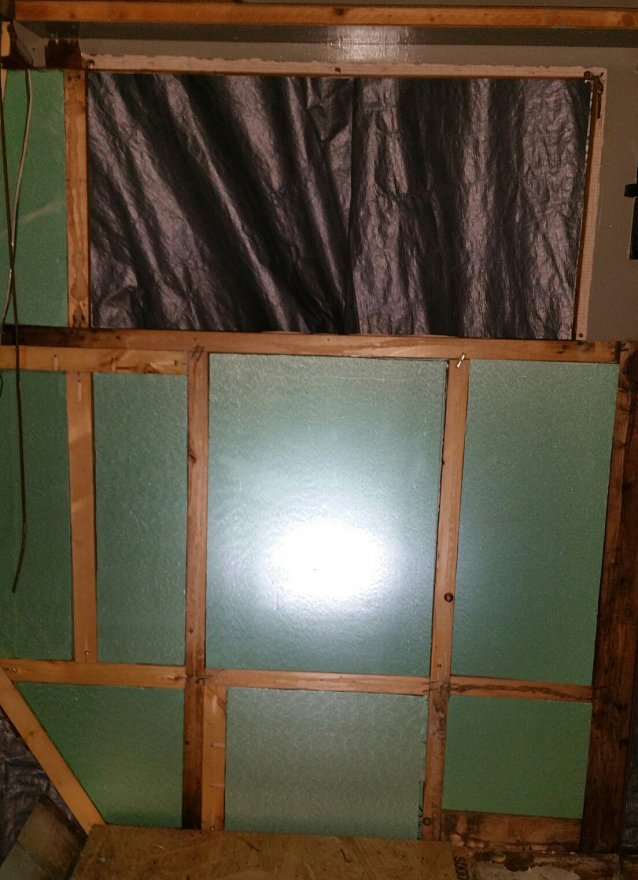
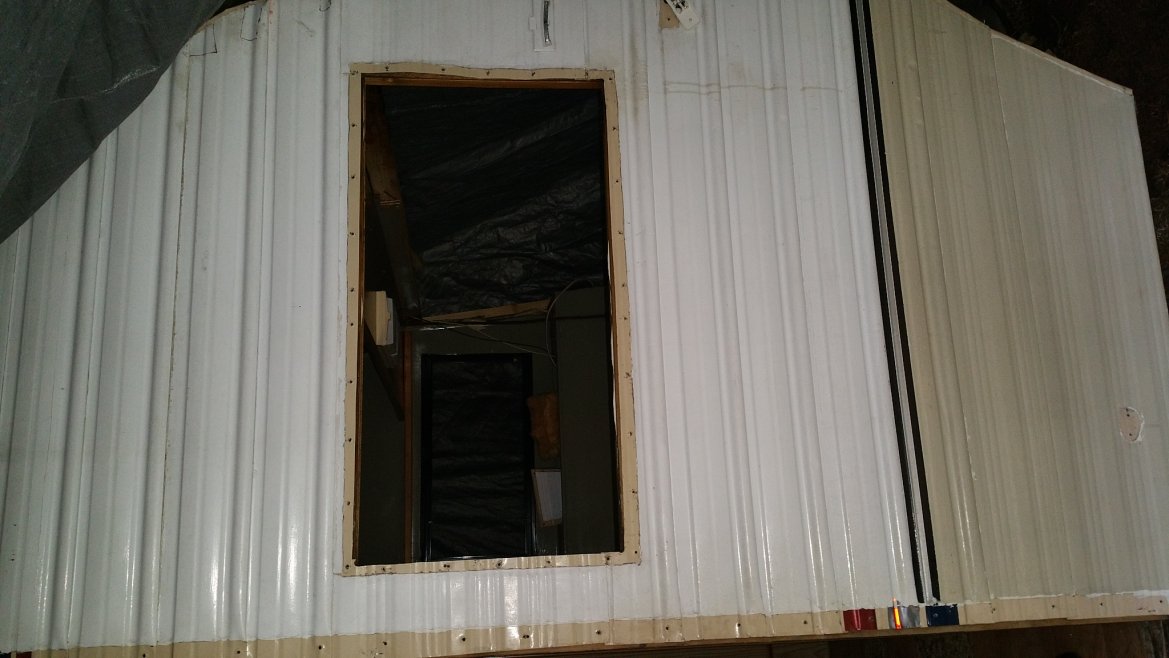
Once the door and window on the passenger side is reinstalled, time to take the driver side apart to replace recently found rotted wood. Not looking forward to it as the driver side seems to be worse than the passenger side.
Slow but still inching along.
Thanks for looking.
Tommie
__________________
1987 Sunline T1550
2012 Ford Expedition EL Limited 5.4L V8, 4WD
"Twenty years from now you will be more disappointed by the things that you didnt do than by the ones you did do..." Mark Twain]
|
|
|
|
|
06-20-2017, 09:38 PM
|
#247
|
|
Moderator
Join Date: Nov 2006
Location: Ohio
Posts: 12,656
SUN #89
|
Looking good!!
Keep up the good work
__________________
Current Sunlines: 2004 T310SR, 2004 T1950, 2004 T2475, 2007 T2499, 2004 T317SR
Prior Sunlines: 2004 T2499 - Fern Blue
2005 Ford F350 Lariat, 6.8L V10 W/ 4.10 rear axle, CC, Short Bed, SRW. Reese HP trunnion bar hitch W/ HP DC
Google Custom Search For Sunline Owners Club
|
|
|
|
|
06-21-2017, 02:37 PM
|
#248
|
|
Moderator
Join Date: Dec 2006
Location: Michigan
Posts: 6,155
SUN #123
|
Looking good! Just think of this side as training for how to do the worse side!
__________________
2007 T-286SR Cherry/Granola, #6236, original owner, current mileage: 9473.8 (as of 6/18/21)
1997 T-2653 Blue Denim, #5471
1979 12 1/2' MC, Beige & Avocado, #4639
Past Sunlines: '97 T-2653 #5089, '94 T-2251, '86 T-1550, '94 T-2363, '98 T-270SR

|
|
|
|
|
06-22-2017, 04:27 PM
|
#249
|
|
Senior Member
Join Date: Sep 2016
Location: Virginia
Posts: 814
SUN #8893
|
Good evening,
So now I'm going to try adding butyl tape to the door frame. I am not sure if you can tell from this picture but there is a slight raise from the side here to where the butyl tape is. Not sure if I should put a double layer of butyl tape to bring it up higher and then put a single layer over where the holes are.? Or double layer both?
Thanks,
Tommie

Sent from my SM-N910V using Tapatalk
__________________
1987 Sunline T1550
2012 Ford Expedition EL Limited 5.4L V8, 4WD
"Twenty years from now you will be more disappointed by the things that you didnt do than by the ones you did do..." Mark Twain]
|
|
|
|
|
06-22-2017, 05:25 PM
|
#250
|
|
Senior Member
Join Date: Apr 2016
Location: Maryland
Posts: 488
SUN #8237
|
Quote:
Originally Posted by Thomascine
Not sure if I should put a double layer of butyl tape to bring it up higher and then put a single layer over where the holes are.?
|
That's probably what I would do. Of course you'll need to add extra butyl to the siding low spots to get a good seal.
__________________
John
2000 T2370
|
|
|
|
|
06-23-2017, 11:31 AM
|
#251
|
|
Moderator
Join Date: Dec 2006
Location: Michigan
Posts: 6,155
SUN #123
|
Quote:
Originally Posted by johnnybgood
That's probably what I would do. Of course you'll need to add extra butyl to the siding low spots to get a good seal.
|
Agreed, x2.
__________________
2007 T-286SR Cherry/Granola, #6236, original owner, current mileage: 9473.8 (as of 6/18/21)
1997 T-2653 Blue Denim, #5471
1979 12 1/2' MC, Beige & Avocado, #4639
Past Sunlines: '97 T-2653 #5089, '94 T-2251, '86 T-1550, '94 T-2363, '98 T-270SR
|
|
|
|
|
06-23-2017, 02:23 PM
|
#252
|
|
Senior Member
Join Date: Sep 2016
Location: Virginia
Posts: 814
SUN #8893
|
Thank you gentlemen!
That's what I thought but since this is my first time working with butyl tape I wanted to make sure.
Thanks again,
Tommie
Sent from my SM-N910V using Tapatalk
__________________
1987 Sunline T1550
2012 Ford Expedition EL Limited 5.4L V8, 4WD
"Twenty years from now you will be more disappointed by the things that you didnt do than by the ones you did do..." Mark Twain]
|
|
|
|
|
06-24-2017, 10:34 AM
|
#253
|
|
Moderator
Join Date: Dec 2006
Location: Michigan
Posts: 6,155
SUN #123
|
Quote:
Originally Posted by Thomascine
Thank you gentlemen!
That's what I thought but since this is my first time working with butyl tape I wanted to make sure.
Thanks again,
Tommie
Sent from my SM-N910V using Tapatalk
|
Whether it's the right process or not, I don't know, but after I install something, I usually go around it and tuck the excess butyl back in with a plastic putty knife, and trim where needed. Just to make sure there's a nice seal all over. It's easy to do with putty tape, it's a little trickier with butyl since it's so sticky, but it's still do able. You can always roll the excess into a little rope and stick pieces in where needed.
__________________
2007 T-286SR Cherry/Granola, #6236, original owner, current mileage: 9473.8 (as of 6/18/21)
1997 T-2653 Blue Denim, #5471
1979 12 1/2' MC, Beige & Avocado, #4639
Past Sunlines: '97 T-2653 #5089, '94 T-2251, '86 T-1550, '94 T-2363, '98 T-270SR
|
|
|
|
|
06-26-2017, 08:28 PM
|
#254
|
|
Senior Member
Join Date: Sep 2016
Location: Virginia
Posts: 814
SUN #8893
|
Entry Door
Good evening,
I am in the process of doing some maintenance to the entry door before reinstalling. I found that the screws at the bottom are rusted so I am in the process of replacing all of the screws. I need to decide what to do with the bottom of the door to keep out water. Not sure how the water got in. It is possible that the previous owner may have done some work to the door as it appears it had been take apart before. The wood is not rotted, still solid so reinstalled the aluminum trim on the top and two sides. Still working on the bottom with the rusted screws, there are a couple that are being a bit of a problem. I will give it a go again tomorrow.
Question: There was a plate screwed to the front of the door. I removed it and would like to keep it off. What do I need to do to seal the holes? Will Dicor seal them or do I need to do more than that?
Question: Is it easier to install with the door in the frame? When removing, it was easier to take it out with the door out first then the frame. I am wondering if the opposite is better for installation.
Thanks for looking.
Tommie
__________________
1987 Sunline T1550
2012 Ford Expedition EL Limited 5.4L V8, 4WD
"Twenty years from now you will be more disappointed by the things that you didnt do than by the ones you did do..." Mark Twain]
|
|
|
|
|
06-26-2017, 10:44 PM
|
#255
|
|
Moderator
Join Date: Dec 2006
Location: Michigan
Posts: 6,155
SUN #123
|
Hi Tommie,
Dicor should be fine for the door plate holes. The top holes might be into wood, the bottom ones are probably only in styrofoam.
These doors are a pretty poor design, they will all rot out and fail eventually. What happens is water runs down the entry door bubbled FRP panel, and the water works its way in to that bottom channel in the valleys of the plastic. I would stuff that channel full of Dicor when you reassemble, or silicone. I think Dicor would be better though. Basically anything to fill the valleys. They finally fixed this in 1997 by changing the door to all galvanized framing instead of the wood. Hopefully yours just needs a new bottom board and the side boards are ok at the bottoms.
JohnB can say for sure, but I think it is best to reinstall the door in the frame. New doors came with plastic shims to space the frame out, so once you remount the door, you could find something to equally space/shim each side out and then reinstall it.
__________________
2007 T-286SR Cherry/Granola, #6236, original owner, current mileage: 9473.8 (as of 6/18/21)
1997 T-2653 Blue Denim, #5471
1979 12 1/2' MC, Beige & Avocado, #4639
Past Sunlines: '97 T-2653 #5089, '94 T-2251, '86 T-1550, '94 T-2363, '98 T-270SR
|
|
|
|
|
06-29-2017, 08:23 PM
|
#256
|
|
Moderator
Join Date: Nov 2006
Location: Ohio
Posts: 12,656
SUN #89
|
Hi Tommie,
Sorry late to the party... Been away for a week.
On the door install, I have normally put the frame in the camper first. I do a dry run with no butyl. Measure the opening, top, middle and bottom and make sure it is square and parallel. Then you can insert a screw or a few in the lower right and left part of the frame as an alignment hole and maybe one in the top left and right corner and if concerned, one in the middle both sides. Mark the holes on the siding. You can use an ice pick or finishing nail in those 6 holes when the time comes with the butyl to line up the frame. If you want to do a dry test fit, then add the door, try it and take it back off.
This also allows you to see of the frame will sit flat to the wall. The walls are not always flat. Sometime the center bows in or out or a top corner is in or out. The door really cannot flex to a large bow and this give you a heads up to address it before mounting the frame.
When that the dry run is all done, then butyl up the door frame and do the short strips in the low spots of the corrugation. Set the frame and align the 6 holes again. That butyl will stick like crazy so moving the frame will be real hard now which is why I do it with the door off. It is so heavy you cannot line it up yourself good with the door on and the butyl will grab and stick wrong most times.
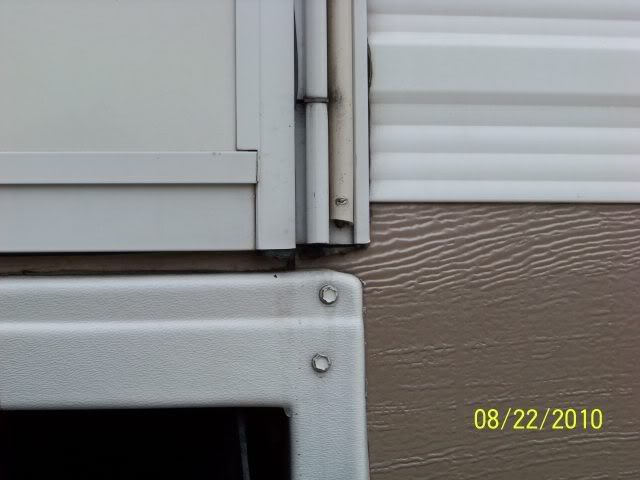
If you are real worried the first time, then once the 6 screws are in with the butyl, test the door again for fit. If it fits and swings good, then leave it in and put the rest of the screws in. If the door swing etc is off and needs to move, get the heat gun to try and warm and move it in direction it needs to go with those screws out. Pending how bad it is you may have to pull the door. With the door on, look for a good even gap all the way around is ideal. Reality is, the gap is parallel on the sides of door to frame and on the top. Just the top gap may be different then the side gap. And the hinge side gap is different then the striker side gap. But all are parallel. You also do not know if the door is square and on your older door, it most likely is not. While perfect is great, it might not be that perfect but will work and has good clearance.
Also look down on the striker side of the door bottom edge to make sure the door is not out of square with the frame. It will show up most times right here. This is a door out of square. See the door is higher then the frame. It can also be lower.
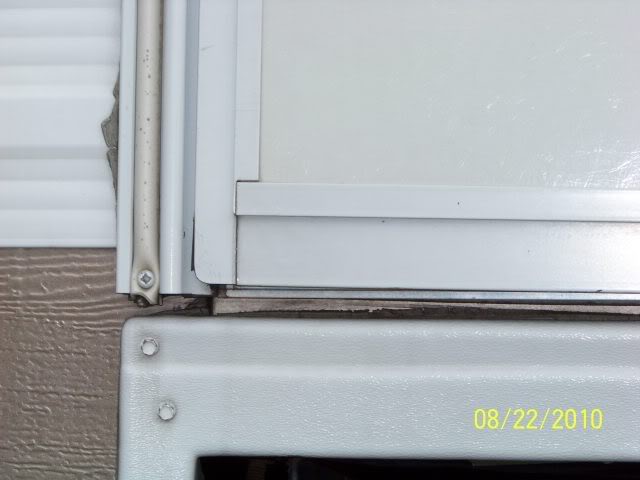
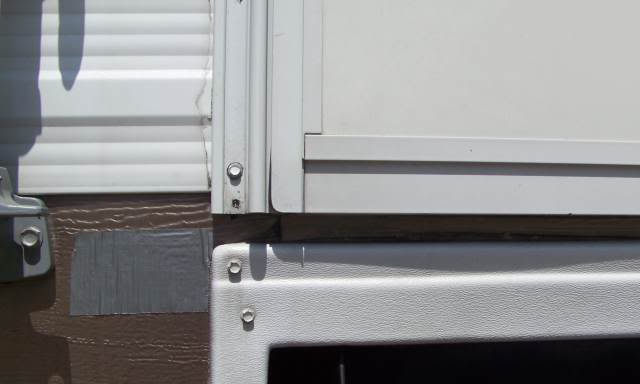
See the hinge side, they are even.
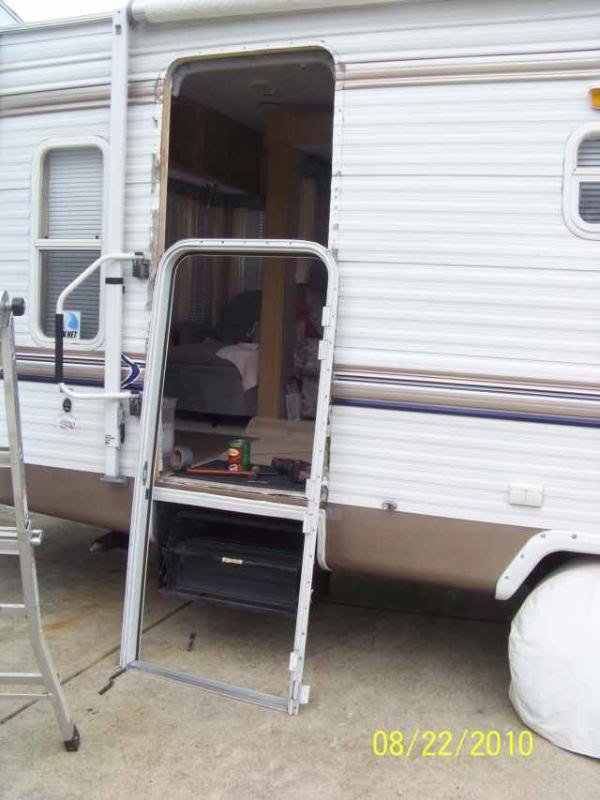
And when it is right, it looks like this
This thread may help. http://www.sunlineclub.com/forums/f7...ics-11717.html
Hope this helps
John
__________________
Current Sunlines: 2004 T310SR, 2004 T1950, 2004 T2475, 2007 T2499, 2004 T317SR
Prior Sunlines: 2004 T2499 - Fern Blue
2005 Ford F350 Lariat, 6.8L V10 W/ 4.10 rear axle, CC, Short Bed, SRW. Reese HP trunnion bar hitch W/ HP DC
Google Custom Search For Sunline Owners Club
|
|
|
|
|
06-30-2017, 07:57 AM
|
#257
|
|
Senior Member
Join Date: Sep 2016
Location: Virginia
Posts: 814
SUN #8893
|
Thanks for the info Sunline Fan and JohnB.
Sunline Fan, I think I caught the door just in the nick of time. I was able to get out the screws at the bottom of the door and they did not look good. When I looked at the wood at the bottom, about 1/16 or 1/8 of a inch of the bottom of that piece was a little soft. I treated with Rot Doctor. I am waiting for it to cure to see if it will work. If not then I will repair it in the Fall. I don't have time right now. I need to get the camper repaired and closed up.
JohnB, I think my door and frame are made different than yours.
The door is surrounded by the frame on all four sides and the pieces on the frame that the door screws to are fixed, they don't come off. There was only one shim and it was at the bottom, the frame was sitting on top of it in the sill. I still have it. Since all of the holes in the door, frame and camper have not changed, I shouldn't have an issue reinstalling the frame and door, right?
Thanks,
Tommie 
Sent from my SM-N910V using Tapatalk
__________________
1987 Sunline T1550
2012 Ford Expedition EL Limited 5.4L V8, 4WD
"Twenty years from now you will be more disappointed by the things that you didnt do than by the ones you did do..." Mark Twain]
|
|
|
|
|
06-30-2017, 10:44 AM
|
#258
|
|
Senior Member
Join Date: Sep 2016
Location: Virginia
Posts: 814
SUN #8893
|
Well it doesn't look like I have enough butyl tape to finish the door. I am going to have to order some more. And pretty quick.
Sent from my SM-N910V using Tapatalk
__________________
1987 Sunline T1550
2012 Ford Expedition EL Limited 5.4L V8, 4WD
"Twenty years from now you will be more disappointed by the things that you didnt do than by the ones you did do..." Mark Twain]
|
|
|
|
|
06-30-2017, 06:28 PM
|
#259
|
|
Moderator
Join Date: Nov 2006
Location: Ohio
Posts: 12,656
SUN #89
|
Quote:
Originally Posted by Thomascine
JohnB, I think my door and frame are made different than yours.
The door is surrounded by the frame on all four sides and the pieces on the frame that the door screws to are fixed, they don't come off. There was only one shim and it was at the bottom, the frame was sitting on top of it in the sill. I still have it. Since all of the holes in the door, frame and camper have not changed, I shouldn't have an issue reinstalling the frame and door, right?
|
Hi Tommie,
I may have not stated what I wanted to say so you could understand it better. Sorry.
My door frame is all one piece too. Meaning all 4 sides (top,bottom, left and right sides) are all connected together. I went and looked at my door reset post and there was no pic of the entire frame  Oh well, see here. It is all connected.
That said, even a door frame that is all connected can be out of square. It can turn into a parallelogram shape instead of a square rectangle. Push up or down on one corner and it will go out of square into a parallelogram. And the door as it attaches to the hinges can hang not true to the frame as one hinge may be sprung or pulled a little. And the door itself may not be a square rectangle to start with. Any of those combos can create an out of square door.
You stated there was a shim before, I'm assuming the shim was on the bottom of the door frame between the frame and the rough opening bottom? If so, someone before was using that shim to shift the door frame into being more square. So, yes reuse the shim.
I sort of lost track of what wall studs you had replaced or corrected. If the door wood frame has not been touched and you ice pick or nail pick the old screw holes in the siding to align the frame, then this should get you real close to where it was before you removed it. The doors usually do not go "exactly" back in the same "exact" spot even if you use all the same holes. If the camper supports jacks are higher or the frame sagging down a little, the door opening can be tweaked out of location. The whole camper is flexible. And your 3/4" wall studs make it even more flexible. And the siding may not be "exactly" in the same spot it come off. It really does not have to be in the exact same spot to work.
Point being, just check the fit of the door to the frame "before" putting all the screws in. Having 6 screws in place around the frame with the door then attached will hold it enough to swing check the door fit.
And unless you verified the door was true and square before you pulled it, does not mean it was actually square before you pulled it. So using the old holes if they never created a true square door can create the same out of square door like it was. Again, just check it before all the screws go in. It is a lot easier to tweak it before all those screws are in and that butyl is in full compression.
You will do OK, I know this is your first time setting a door, you have a good head on your shoulders and will sort it out. Trust your instinct. Unless it is really out of whack, it will work OK.
Hope this helps
John
__________________
Current Sunlines: 2004 T310SR, 2004 T1950, 2004 T2475, 2007 T2499, 2004 T317SR
Prior Sunlines: 2004 T2499 - Fern Blue
2005 Ford F350 Lariat, 6.8L V10 W/ 4.10 rear axle, CC, Short Bed, SRW. Reese HP trunnion bar hitch W/ HP DC
Google Custom Search For Sunline Owners Club
|
|
|
|
|
06-30-2017, 07:23 PM
|
#260
|
|
Senior Member
Join Date: Sep 2016
Location: Virginia
Posts: 814
SUN #8893
|
Thanks JohnB. You have more faith in my abilities than I do. Way out of my league with this stuff.
I checked the squareness of the door opening the other day and it is only off by a tad. There was just the one shim at the bottom. I did not think to check if the door was squared before taking it out.
Thanks for the info. I will check the squareness of the frame in the opening. I was prepping the opening and the frame with butyl tape but ran out. You go through it pretty quick. It may be overkill. But wanted to make sure it is sealed well. I ordered 4 more rolls to finish the door and also have to 2 windows to put back in. I also have a cargo door to take off on the other side. The order should be here tomorrow.
Thanks,
Tommie    
Sent from my SM-N910V using Tapatalk
__________________
1987 Sunline T1550
2012 Ford Expedition EL Limited 5.4L V8, 4WD
"Twenty years from now you will be more disappointed by the things that you didnt do than by the ones you did do..." Mark Twain]
|
|
|
|
|
|
|
Currently Active Users Viewing This Thread: 1 (0 members and 1 guests)
|
|
|
 Posting Rules
|
You may not post new threads
You may not post replies
You may not post attachments
You may not edit your posts
HTML code is Off
|
|
|
|
 » Recent Sunline Discussions
 |
|
|
|
|
|
|
|
|
|
|
|
|
|
|
|
|
|
|
|
|
|
|
|
|
|
|
|
|
|


 Linear Mode

