 |
|
 01-22-2017, 03:53 PM
|
#1
|
|
Senior Member
Join Date: Sep 2016
Location: Virginia
Posts: 814
SUN #8893
|
Water Damage Assessment and Repair
Good afternoon,
I decided to create a new thread since this is no longer about vinyl trim. I went in today to attempt to take out the dinette seats. Made my first mistake. I took out all of the screws at the bottom and back (not an easy task). Tugged and was still hard to get out. Later found out that they were also screwed from the outside. Luckily, I did not do too much damage to the seat. Disappointed that I may have to take of the outside metal siding to get the seat back in again. To be honest, a little scared about that. I am glad I took out the seat because as I started pulling out the damaged paneling, I found that it was still really wet behind the walls. Had to rip out paneling and found that the paneling, studs and insulation were all wet.
The Good
The rot in the floor seems to only come back about 2 to 3 feet. I didn't have a measuring tape outside with me.
The Bad
The rot in the wall studs seem to go up past the window which means we will probably have rip out paneling around and above the window. May have to take out the window and cabinet.
I was surprised how wet it still was in the wall. The camper has been covered since the end of October. We were giving it time to dry out. We will probably have to rip out the rest of the bottom of the front wall so that it really can dry out. It will at least give us time to come up with a game plan.
__________________
__________________
|

|

|
|
01-22-2017, 04:37 PM
|
#2
|
|
Senior Member
Join Date: Apr 2016
Location: Maryland
Posts: 488
SUN #8237
|
Good luck with your project.
You can buy a jig for reinstalling the cabinets, etc from the inside. Can't think of the name of it. Someone will hopefully chime in.
__________________
__________________
John
2000 T2370
|
|
|
|
|
01-23-2017, 03:29 PM
|
#3
|
|
Moderator
Join Date: Nov 2006
Location: Ohio
Posts: 12,656
SUN #89
|
Hi Tommy,
You have a good start into the problem. It is still too early and hard to tell where the water infection started. And it may be multiple places.
And yes, once the water gets in that wall it is very difficult to dry out closed up. The insulation gets soaked like a wet mop and will not dry out or very little. It just festers. If the leak does not stop it will almost never dry out. Opening it up and getting the wet insulation out it can breath.
The cabinets on install, while they where screwed from the outside on day one, they do not have to necessarily have to reinstall from the outside. They can, but as long as you get into the stud from the inside it will hold. Depending on where the studs are you may have to add a board to span over to a stud.
The jig that Johnnybgood was mentioning, I think he was referring to a pocket hole jig. Kreg is a common name in these. https://www.kregtool.com/ They sell them in a lot of places. I have one of the larger kits but my son has this 2 hole small one and it works great, "IF" you need one of these. https://www.amazon.com/Kreg-R3-Pocke...words=kreg+jig
They use these pocket hole screws in about all of the newer camper cabinets to hold the cabinet together. I do not know on your vintage if they used them.
My son and I used them on his camper when we had to reconstruct parts of the wall. You can get good screws in on an angle and they hold very well. Here is one. You can see the pocket holes in the new board added.

It "looks" like your corner may be rotted. This pic. Is the corner soft?

That will need to be addressed if it is rotted. Too early to tell yet if the whole corner is gone or if it went into the side wall some.
Point I wanted to make is the siding which you commented on. Don't let the siding worry you, taking siding off and putting it back on is not that hard to do. In the big picture of this repair, it will be the easier thing. Once you get to knowing the extent of the rot, then you can make the call on to take the siding off. Odds are you may need to take some of the lower siding off at least as once you replace the rotted wood, the siding needs to attach to the new wood studs.
The siding comes off starting at the bottom. Once the first bottom piece is off, it exposes the staples for the piece above it.
The basics on removing the front siding are this.
- Take all the screws out of the left and right front corner at least as high up as needed to get the siding your after off.
- Using a heat gun as needed, heat the molding gently. Do not hold heat gun in one spot long, keep the gun moving. This softens up the putty tape under it.
- Starting at the bottom or top if the whole wall, slowly tug on the end of the molding
- Feel the molding starting to come off, heat more as needed.
- Slowly work your way up or down the wall, pull easy and heat as needed.
- Try and not over pull or you will have a larger job of bending it back in shape.
- It will come off eventually.
- Take out the front window. Same process as the corners. It does not matter which order you take these off in. Window first then corners or the other way around. They all have to come out before the siding can come off if you are taking the whole wall down.
Then the siding. - Clean off the putty tape under the corner molding to expose the siding
- Start at the bottom and take all screws and staples out. To get under the staple, a very fine screw driver gently worked under the head helps start it to come out slightly. Then using vise grips, grab on the staple and pull. Some you may be able to grab directly with the vise grips. While you are trying to be gentle, some times the siding will rip at the staple. This is OK if it small enough. Just try to not make inch plus long rips.
- Once all screws and staples are out, the top of the bottom sheet will pull out of the sheet above it.
- NOTE: They may have caulked the siding on the front wall where the top edge of the lower sheet plugs into the sheet above it. Use heat gun to warm the side lay joint and it will release.
- Once the bottom sheet is off, keep working up the wall.
See staple pulling below


To put it back on, you staple it back in. You start at the top and work your way down the wall. This is lap joint on the bottom of each sheet.
And on the front, you need to butyl caulk the sheets when putting it back on. This keeps the driving raining during towing from going up and over the lap joint. You do not need the caulk on the sides, just the front. 
Your doing good. We are here to help
John
__________________
Current Sunlines: 2004 T310SR, 2004 T1950, 2004 T2475, 2007 T2499, 2004 T317SR
Prior Sunlines: 2004 T2499 - Fern Blue
2005 Ford F350 Lariat, 6.8L V10 W/ 4.10 rear axle, CC, Short Bed, SRW. Reese HP trunnion bar hitch W/ HP DC
 Google Custom Search For Sunline Owners Club
|
|
|
|
|
01-23-2017, 06:05 PM
|
#4
|
|
Senior Member
Join Date: Aug 2015
Location: Connecticut
Posts: 164
SUN #7710
|
Tommy,
You may be able to do most from the inside. Click on my link to see what I have done so far. Like John said,we are here to help.
Steve
http://www.sunlineclub.com/forums/f7...3-a-17433.html
__________________
Steve P
|
|
|
|
|
01-23-2017, 08:12 PM
|
#5
|
|
Senior Member
Join Date: Sep 2016
Location: Virginia
Posts: 814
SUN #8893
|
Good evening,
Thanks to all for the help and advice.
JohnB, I think one of my co-workers has a kreg tool. So I don't have one of my own but do have access to one. It doesn't seem to be expensive so it may be something good to add to our supply of tools. Yes, I believe that when I felt around, the corner was soft but it wasn't dry yet either.
I have a friend coming this weekend to help me take out the other dinette seat and the cabinet. Then we will take out more of the wall. The plan is to take the tarp off (the camper is completely covered right now) and use a water hose to see if we can tell where the water is coming in. Should be easier to see with the wall removed (I hope). Will post more pics once the wall is removed.
Sep, thanks for the link. I will have questions about the floor as some of the front floor boards and plywood will need to be replaced. I can't tell from your pictures how the new wood is attached to the existing good wood. I will ask away when we get to that point.
Questions:
1. Does anyone have any experience with rot doctor? Is it even worth looking into? I wouldn't use it in the corners but wasn't sure if the floor would be a good application. I don't know what we will find when it comes time to pull up the floor.
2. Does it make more sense to do the floor first so that we have somewhere to walk on? Otherwise, I can put down some plywood over the bad part temporarily while we work on the wall.
3. There is an electrical outlet on the wall. Does anyone know if the wiring run through the ceiling or under the floor? I have a 1987 T1550. My friend asked but I am not sure.
4. I know we will need supplies. Lumbar, screws, etc., we can get locally from Lowes and Home Depot nearby. But I am sure that there is other stuff we will need that I will need to order from somewhere like Amazon. They seem to be cheaper than our local RV dealer. Butyl tape, dicor caulk, eternabond tape.......
5. Is there anything that will be helpful in finding the leak? I think Sep said he used blue coloring?
Again, thanks for all the help. It is very much appreciated.
Tommie
__________________
|
|
|
|
|
01-24-2017, 10:25 AM
|
#6
|
|
Moderator
Join Date: Nov 2006
Location: Ohio
Posts: 12,656
SUN #89
|
Hi Tommie,
I answer what I know below our questions. There is no one way to fix this, there are many ways, the one that works the best for you will be: the fixes that fit what you have to work with, how much you want to spend and how long you want it to last are all questions you will sort through.
Quote:
Originally Posted by Thomascine

Questions:
1. Does anyone have any experience with rot doctor? Is it even worth looking into? I wouldn't use it in the corners but wasn't sure if the floor would be a good application. I don't know what we will find when it comes time to pull up the floor.
I have used the Rot Dr. twice now. It is good stuff but I did not use it to try and reconstruct rotted lumber back to structural. I used it mainly to treat wood that was still solid and intact but had water stains and infection. It kills and preserves against the fungus that causes dry rot. You should treat left over wood that is still good, just discolored with something to help prevent the dry rot from coming in a few years.
I have used it on a ceiling 1/8" luan to help bond the ceiling board back together. Here, cutting out the ceiling would of been an issue to match back again. Since we had the roof off, we applied it from the top down. It hardened up real good and made a sound repair.
Heads up, when using the CPES you must use a respirator and rubber gloves. They sell the right respirator on the Rot Dr web site for a good price. The fumes are bad but the respirator takes care of that. And after about 3 to 4 days of the camper being vented, the smell goes away. Product Information
My thoughts on the floor joists or most anywhere else. Where possible, replace all rotted wood with new. On long runs under a floor, wall etc, cut out the rotted wood back to good wood. Screw on new wood, next to the good old wood, with a good overlap (called sister'ing) to replace the rotted. Treat any stained good old wood for dry rot. Cutting out and adding new wood is a lot faster and stronger then trying to rebuild all that structural wood with the Rot Dr.
2. Does it make more sense to do the floor first so that we have somewhere to walk on? Otherwise, I can put down some plywood over the bad part temporarily while we work on the wall.
This is a choice on your part. There is some good logic to doing the floor first. Like you said, you can stand on it. However you have to support the walls somehow if the wall is rotted at the floor line. It all depends on on how much wall is missing. A 1 or 2 foot may self support itself. If 60% of the wall is missing, then you have to deal with that. If you do put the new floor in, you may have to cover it with plastic or something during times of ripping out other rotted wood. Not a big deal, just a thought
3. There is an electrical outlet on the wall. Does anyone know if the wiring run through the ceiling or under the floor? I have a 1987 T1550. My friend asked but I am not sure. I do not know for sure. The wiring can go along the walls, up the wall or down the wall. It is common they jumped from 1 outlet to the next in the shortest easiest way to get there. Someone who has been into a 87 1550 or similar age may know.
4. I know we will need supplies. Lumbar, screws, etc., we can get locally from Lowes and Home Depot nearby. But I am sure that there is other stuff we will need that I will need to order from somewhere like Amazon. They seem to be cheaper than our local RV dealer. Butyl tape, dicor caulk, eternabond tape....... Yes, the online places are the cheapest, you just need to find the right ones. When you get to that point, ask away. There are many online sites that sell the same products. Some have free shipping, some don't. Amazon is becoming a major parts supplier for most anything now a days. But, that said I shop them and other on line retailers and compare. Sometimes Amazon if a better deal, sometimes other places are.
5. Is there anything that will be helpful in finding the leak? I think Sep said he used blue coloring? The water hose wash down you suggested is a place to start. But, it may not pin point the leak if you do not have enough torn out yet. Sometimes the leaks start many feet away and run until the finally drip down. You may not find a gusher, it may be more a few seeping leaks. The damage you have is accumulated from water being in the wall a long time. A year or more. A small leak, not found can accumulate.
Look for tell tale signs. Water marks/stains are good hints. A totally rotted out board really does not tell much as it is so far gone, but stained wood does. Once you see the leak or stain inside, then go outside and look for bad caulking or tiny openings.
Another way some folks have used is light. Inside the camper, put bright light while it is dark outside. Someone inside and someone out side. Pass the light along suspect areas and the person on the outside looks for pin holes etc. This is best once the wall board is off and the light is shining at the siding. Maybe try this dry approach before the wet hose.
Again, thanks for all the help. It is very much appreciated.
Tommie |
Hope this helps
John
__________________
Current Sunlines: 2004 T310SR, 2004 T1950, 2004 T2475, 2007 T2499, 2004 T317SR
Prior Sunlines: 2004 T2499 - Fern Blue
2005 Ford F350 Lariat, 6.8L V10 W/ 4.10 rear axle, CC, Short Bed, SRW. Reese HP trunnion bar hitch W/ HP DC
Google Custom Search For Sunline Owners Club
|
|
|
|
|
01-24-2017, 08:16 PM
|
#7
|
|
Senior Member
Join Date: Aug 2015
Location: Connecticut
Posts: 164
SUN #7710
|
Tommie,
Sorry I spelt your name wrong. For some reason I knew I saw it spelt with the ie and must have had a brain freeze. I'll try my hand at these answers but they will be in red. Keep us posted.
Steve
Quote:
Originally Posted by Thomascine
Good evening,
Thanks to all for the help and advice.
JohnB, I think one of my co-workers has a kreg tool. So I don't have one of my own but do have access to one. It doesn't seem to be expensive so it may be something good to add to our supply of tools. Yes, I believe that when I felt around, the corner was soft but it wasn't dry yet either.
I have a friend coming this weekend to help me take out the other dinette seat and the cabinet. Take as much of the dinette seat off as you can and then then see if you can get a hacksaw blade between the wallboard and the frame so you can cut the screws that are coming from the outside in. If that wall is really wet, you may have to take the wallboard off which will give you more room to saw and the screws will probably be rotted. If you have a dremel multimax with the vibrating blade, you can ease that in instead. Then we will take out more of the wall. The plan is to take the tarp off (the camper is completely covered right now) and use a water hose to see if we can tell where the water is coming in. Should be easier to see with the wall removed (I hope). Will post more pics once the wall is removed.
Sep, thanks for the link. I will have questions about the floor as some of the front floor boards and plywood will need to be replaced. I can't tell from your pictures how the new wood is attached to the existing good wood. I will ask away when we get to that point. Like John said, cut back until you get a solid piece. I ran the "ledger" board from the side to the corner and then along the back under the utility door. I just used my 15 gauge trim nailer and toenailed the old to the new. Then I ran the wall frame along the inside of the ledger and pieced in the missing wall frame in line with what was left. I then took a piece of 3/4" X 1" to either side of the upright making sure that I went from the ledger all the way up past the joint of the old and new wood. I nailed inward from both sides also making sure that I toenailed to the bottom wall frame. This was a pain but I couldn't do the floor until this was done. For the floor, I did about the same. I cut back until I hit good wood. Make note of where the carriage bolts go through the plywood, wood floor frame and metal trailer frame. Once you get the bad wood out, that will loosen up the bolts so you can tap them through and cut them off with a sawzall. I don't like messing with them inside because I don't want to slip and go through the tarp like material below the frame or the aluminum of the walls. I ran the new wood from side to side and toenailed those in place to the old wood and the bottom wall frame. I then ran some scabs between those new pieces running front to back of the camper and toenailed them to the side to side pieces. I then went under the camper and drilled up through the carriage bolt holes and bolted the wood frame to the metal frame with new bolts. I somewhat countersink them into the frame so the new plywood would sit as flat to the frame as possible. Now back to fixing up the rest of the wall studs.
Questions:
1. Does anyone have any experience with rot doctor? Is it even worth looking into? I wouldn't use it in the corners but wasn't sure if the floor would be a good application. I don't know what we will find when it comes time to pull up the floor.
2. Does it make more sense to do the floor first so that we have somewhere to walk on? Otherwise, I can put down some plywood over the bad part temporarily while we work on the wall. See above on how I did the ledger board first before doing the floor.
3. There is an electrical outlet on the wall. Does anyone know if the wiring run through the ceiling or under the floor? I have a 1987 T1550. My friend asked but I am not sure. The 76 Shasta and now the 2000 Sunline had the 110v wiring running horizontal just below the windows. In my pictures, you can see the one line running under the rear window to the corner and then across the side which leads to the outside receptacle.
4. I know we will need supplies. Lumbar, screws, etc., we can get locally from Lowes and Home Depot nearby. But I am sure that there is other stuff we will need that I will need to order from somewhere like Amazon. They seem to be cheaper than our local RV dealer. Butyl tape, dicor caulk, eternabond tape....... I would get some butyl tape and dicor online. I used Tweety's because they had good prices and only charged 7.98 for shipping and I got a bunch of stuff from them. I got the wrong vinyl trim and they did the return no problem.
5. Is there anything that will be helpful in finding the leak? I think Sep said he used blue coloring? Yup, I used the thick food coloring as it was raining out. My problem was, I already fixed the roof and had so much of the inside corner taken apart that I couldn't really tell where it was coming in from. My next idea is to use different colors in different areas to see what I need to dicor. Maybe blue for the back vertical trim and red around the lights and yellow on the top trim. It's been kind of a crap shoot for me and I still have something leaking so maybe John's dark/light trick will work.
Again, thanks for all the help. It is very much appreciated.
Tommie
|
__________________
Steve P
|
|
|
|
|
01-25-2017, 10:00 PM
|
#8
|
|
Senior Member
Join Date: Sep 2016
Location: Virginia
Posts: 814
SUN #8893
|
Good evening,
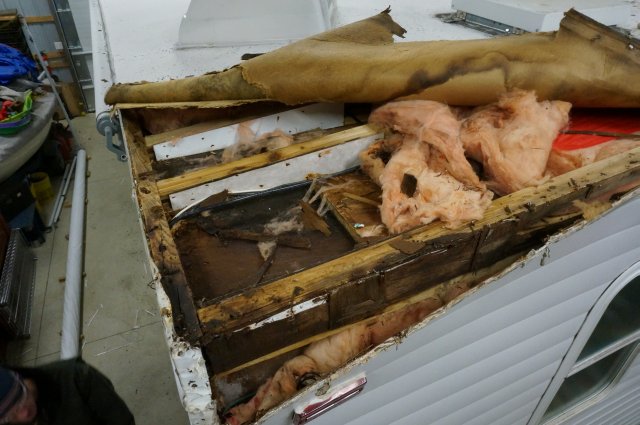
It was in the 60s here today so I decided to take the opportunity to tear out more of the damage wood and paneling. It looks to me like it is leaking at the corners, with one side worse than the other. I still was not able to get out the other dinette seat. I tried to take pictures as best as I could under there.
Wood and insulation under right dinette seat was still wet.

Front left

Front right

Lower front right corner

Front left
Some water staining but not as bad as the right side.

Floor under left dinette seat

Front middle. Most of the flooring in that area is totally rotted out. We will see once it is completely dry.

Front right corner
I think that is it for tonight.
Thanks,
Tommie
__________________
|
|
|
|
|
01-26-2017, 05:03 AM
|
#9
|
|
Senior Member
Join Date: Aug 2015
Location: Connecticut
Posts: 164
SUN #7710
|
It looks familiar, my friend. At least that left corner on top looks good. And yeah, that seat may be a pain to get out but check my notes above. If all else fails, the siding can come off to a point where you can reach those pia screws.
Steve
__________________
Steve P
|
|
|
|
|
01-26-2017, 07:18 PM
|
#10
|
|
Moderator
Join Date: Nov 2006
Location: Ohio
Posts: 12,656
SUN #89
|
Hi Tommie,
Here is a piece of info as you search for the source of leaks. I do not know that this is where your water is coming in, but it may help as you sort this out.
I borrowed one of your pics and drew on it so you can see. Hope that was OK.

The top corners of a camper as shown in red, are a hot spot for leaks. Water running off the roof beats down into the seam between the corner molding and the siding as the water rolls off the front of the camper. If there is any crack in the putty tape under the corner molding, it can allow water to wick into the corner. On the newer Sunlines at least, Sunline used butyl tape in the folded corner of the siding as an extra layer of protection against water entry. This did not mean it would not get infected, but helped slow it down at least unless that seal too was compromised. I really do not know when that practice in the history of Sunline the double seal started. Maybe a member of an older camper that have been into this area can tell us on their year camper if it had the double sealing.
This is what I am talking about the butyl tape between the folded corner and the rear siding. The front is the same concept. The gray butyl is new sealing tape to seal the rear siding panel to the folded corner of the long side siding of the camper

Point is, when that area becomes infected, water works it way down the inside corner, follows the corner wood and goes as far as it can. If the water infection continues, the volume of water keeps pushing down until it hits the vapor barrier on the bottom of the camper. Then it gets stuck inside the vapor barrier. The insulation becomes a soaked mop and the problem just plain gets worse.
The next area is the top and rear of the camper seams between the roof and the front wall and the roof and the back wall. See the yellow circle area.
I myself have not been into a metal roof Sunline to know how they did the front joint. Someone on the forum may be able to help more.
On the rubber roofs, it looks like this.


The very top molding strip has butyl tape under it to create a seal between the front siding and the roof membrane. Then Dicro self leveling caulk is used to create a seal between the roof rubber and the molding and over all the screws heads. This seal is another hot spot. Yours may be put together differently but I'm odds are high there is sealant of either putty tape or caulk involved to create the water barrier. Unless they lapped the metal edges together like a siding joint.
The next area up high, is the infamous gutter rail. Again this is a rubber roof, but the metal roof has a gutter rail too and the roof tin has to mate to the side just the same. Again more putty tape and possibly caulk on your camper.
See here on the rubber roof.
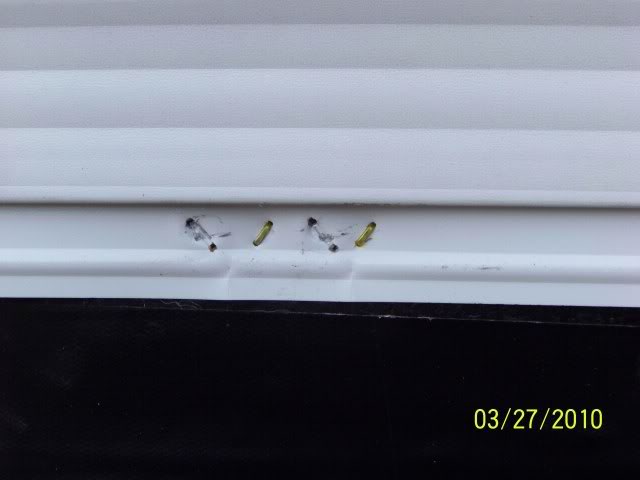
The gutter rail is sealed to the rubber roof with butyl sealing tape. But... see the holes in it from the screws and the green slime mold that was under the vinyl screw cover


When the screw rust, they turn into mini water wicks. As the rusting screw keeps getting worse, the water wick gets bigger. Soon the wood the screw is screwed into rots and the holes gets a lot bigger. On the rubber roofs they have a heavy corrugate liner that can wick water too. It looks like this after the infection starts

And it ends up like this. This camper had some gutter screw wick and rear camper wall top seal water wicking.
Point is, the front and rear corner moldings, the roof line moldings on the front and rear, and the gutter rail are all suspects until proven innocent... Just as roof vent hatches, cargo holes, doors, windows, DOT lights or any other penetration into the camper is. If the outside of the camper had not been disturbed, you could look for cracked sealants in those joints. And they may still be there. A look would not hurt now knowing what to look for. It looked like the prior owner painted the camper and they may have painted or caulked those joints. The problem being, they did it after the water infection. And they may not of even known it was infected.
Just passing this along so you can keep it in the back of your mind as you continue taking off more paneling until you reach the end of the bad wood.
Hope this helps
John
__________________
Current Sunlines: 2004 T310SR, 2004 T1950, 2004 T2475, 2007 T2499, 2004 T317SR
Prior Sunlines: 2004 T2499 - Fern Blue
2005 Ford F350 Lariat, 6.8L V10 W/ 4.10 rear axle, CC, Short Bed, SRW. Reese HP trunnion bar hitch W/ HP DC
Google Custom Search For Sunline Owners Club
|
|
|
|
|
01-28-2017, 03:36 PM
|
#11
|
|
Senior Member
Join Date: Sep 2016
Location: Virginia
Posts: 814
SUN #8893
|
Good afternoon,
Well, my friend came down this morning. Once we took out the other dinette seat, we found that the plywood was very weak. After looking around some, we decided to do something with the floor first so that we will have something to stand on. We did not want to risk going through the membrane.

Did find some holes in the membrane, looks like from rust and deterioration. We discussed putting a thin piece of metal about a foot deep completely across the front to cover the holes.


The rotted support 2x2s and the plywood flooring has been cut out.

Now looking into what we need to put the floor back together so that we can get access to the wall. I didn't realize how bad the floor was but when we put any kind of weight on it, all you could hear was "snap, crackle, pop". I will be going out for lumber tomorrow. It is hard to believe that a lot of this stuff is held together with staples.
That's all for now. Making progress. Thanks to all and my dear friend Amy for getting me this far.
Thanks,
Tommie
__________________
|
|
|
|
|
01-28-2017, 06:12 PM
|
#12
|
|
Moderator
Join Date: Nov 2006
Location: Ohio
Posts: 12,656
SUN #89
|
It looks like the floor rot might stop close to where the flooring still exists. Is that right?
If so, you have good wood to "sister" screw onto with new wood going to the front of the camper.
Your camper has a metal bottom shield. The older ones have been reported to have a metal underbelly. I do not know what year they switched the plastic weave Darco material membrane.
Somewhere under that metal there needs to be a frame member the floor joists lay on. Is it just the frame header at the front wall or is there a left to right steel support between the header and axle area? If you are down on the ground looking up at the frame you can see what crosses left to right on that floor joist area now.
Your doing good!. Just with all that rotted wood taken out, it looks better.
Keep up the good work!
John
__________________
Current Sunlines: 2004 T310SR, 2004 T1950, 2004 T2475, 2007 T2499, 2004 T317SR
Prior Sunlines: 2004 T2499 - Fern Blue
2005 Ford F350 Lariat, 6.8L V10 W/ 4.10 rear axle, CC, Short Bed, SRW. Reese HP trunnion bar hitch W/ HP DC
Google Custom Search For Sunline Owners Club
|
|
|
|
|
01-28-2017, 08:53 PM
|
#13
|
|
Moderator
Join Date: Nov 2006
Location: Ohio
Posts: 12,656
SUN #89
|
Tommie,
If you are going to the lumber yard, suggest getting a bottle of wood glue to put between the new wood and old wood and then screw the 2 floor joists together with a good long overlap.
I have used this type of wood glue before with good results. Tite Bond III
Titebond - Product
Lowe's, Home Depot, Menards etc should have it. You may also want to pilot drill a small hole to be 1/2 to 3/4 of the depth of the screws at the wood joint so you do not split the 2 x 2.
Hope this helps
John
__________________
Current Sunlines: 2004 T310SR, 2004 T1950, 2004 T2475, 2007 T2499, 2004 T317SR
Prior Sunlines: 2004 T2499 - Fern Blue
2005 Ford F350 Lariat, 6.8L V10 W/ 4.10 rear axle, CC, Short Bed, SRW. Reese HP trunnion bar hitch W/ HP DC
Google Custom Search For Sunline Owners Club
|
|
|
|
|
01-28-2017, 09:10 PM
|
#14
|
|
Senior Member
Join Date: Sep 2016
Location: Virginia
Posts: 814
SUN #8893
|
Good evening,
JohnB, thank you. Yes, we cut the plywood flooring back past the good parts of the 2x2s. Then we cut out the rotted parts of the 2x2s and left room to "sister" in new wood. We also had to take out the 2x3 across the front that the 2x2s were attached to. It was completely rotted as well. It was bolted to the front frame with 5 bolts (Rusted beyond recognition. You can barely tell what type they are but looks like 3-inch carriage bolts). I don't remember if there were any additional support underneath. I only remember seeing the membrane, electrical wiring and gas line, I believe.
Any suggestions on the insulation for the floor? I have seen some people that go with the foam insulation when doing repair/replacement.
Thanks,
Tommie
__________________
|
|
|
|
|
01-28-2017, 09:25 PM
|
#15
|
|
Senior Member
Join Date: Sep 2016
Location: Virginia
Posts: 814
SUN #8893
|
Sistering Wood in the Floor
JohnB,
When you say "good long overlap", how many feet are we talking? Will I need to cut the plywood back more? The bathroom is on the left. We don't have a lot of room to go backwards there.
Thanks,
Tommie
__________________
|
|
|
|
|
01-28-2017, 09:57 PM
|
#16
|
|
Moderator
Join Date: Nov 2006
Location: Ohio
Posts: 12,656
SUN #89
|
Tommie,
I forgot to mention one thing on the wood glue, application working temperature.
The Tite Bond III works from 45F and up. If you are working in temps below 45F, then I have used lower temperature construction adhesive. In the construction adhesive I have used Liquid Nails subfloor adhesive. It can be applied between 22 - 120F and is outdoor water resistance rated. http://www.menards.com/main/home-dec...22643425616061
While the lumber yard you are going to may not have the Liquid Nails brand, looks for subfloor construction adhesive and the temp rating on the tube.
On the floor insulation, yes the foam board is good. You can buy it 1.5" and 2" thick. And using a power saw, it cuts nice and clean to fit. It will be more tolerant to water then the fiberglass batt. And yes, costs a little more. Get the pink Owens Corning kind or equivalent brand if you are going foam. It is Extruded Polystyrene Insulation board. http://www.menards.com/main/building...82395407465153
The bolts, yes I'm sure they are rotted out too. On the size, (diameter) maybe you can find a few of the other ones in the camper to measure. They used all the same bolt size for the most part. And yes, carriage bolts is what they used. I do not know if that is a mandate to have to use the carriage bolt head, on a repair like this, hex head works too with a flat washer under the head as you can put a wrench on the head with the wall opened up. The carriage bolts work good when the wood hole is new, fresh wood and no rust on the thread. When the threads rust, odds are high the head will tear out in the wood and spin if you ever wanted to take the nuts off, which is not normal, so a hex head is not much better but more available some times. If you can get the carriage bolts in the right size, it is what will work but not a mandate.
On my camper they are 3/8-16 bolt thread but it is a bigger camper. Yours might be 5/16-18 thread or 3/8-16. I doubt they would use 1/4-20 thread but one never knows.
Thanks
John
__________________
Current Sunlines: 2004 T310SR, 2004 T1950, 2004 T2475, 2007 T2499, 2004 T317SR
Prior Sunlines: 2004 T2499 - Fern Blue
2005 Ford F350 Lariat, 6.8L V10 W/ 4.10 rear axle, CC, Short Bed, SRW. Reese HP trunnion bar hitch W/ HP DC
Google Custom Search For Sunline Owners Club
|
|
|
|
|
01-28-2017, 10:07 PM
|
#17
|
|
Moderator
Join Date: Nov 2006
Location: Ohio
Posts: 12,656
SUN #89
|
Quote:
Originally Posted by Thomascine
JohnB,
When you say "good long overlap", how many feet are we talking? Will I need to cut the plywood back more? The bathroom is on the left. We don't have a lot of room to go backwards there.
Thanks,
Tommie
|
12" is ideal in a perfect world. That said, 8" will work too. I would say, (a judgement call here, ) 6" is about as short on a floor joist in the horizontal position as I would go. The joint has to be as strong as the 2 x 2.
If you are going up the wall vertical butting into old good wood, out in the middle of the wall, cut the old board clean out and put a new stud directly under the old board cut, (old stacked on top of new) so all the load is down on top of the new board. Then screw on/glue on, a lap joint splice across the 2 pieces on the side buried in the wall. The splice board can be 6 to 8" overlap top and bottom of saw cut and can be 3/4" thick as it is not under direct load only holding the 2 x 2 in position.
__________________
Current Sunlines: 2004 T310SR, 2004 T1950, 2004 T2475, 2007 T2499, 2004 T317SR
Prior Sunlines: 2004 T2499 - Fern Blue
2005 Ford F350 Lariat, 6.8L V10 W/ 4.10 rear axle, CC, Short Bed, SRW. Reese HP trunnion bar hitch W/ HP DC
Google Custom Search For Sunline Owners Club
|
|
|
|
|
01-31-2017, 07:20 PM
|
#18
|
|
Senior Member
Join Date: Aug 2015
Location: Connecticut
Posts: 164
SUN #7710
|
Looking good! When I fixed my floor the first time, I used the pink foam insulation from Home Depot but this last time when fixing the floor, some of the foam was eaten away by bugs. I went back to using the bat insulation. I just took the 3 1/2" thick bat and split it in half so it would be the right height for the 2X2s.
Steve
__________________
Steve P
|
|
|
|
|
01-31-2017, 07:40 PM
|
#19
|
|
Senior Member
Join Date: Sep 2016
Location: Virginia
Posts: 814
SUN #8893
|
2x2s
Good evening,
I was looking at getting 2x2s but it seems that the ones carried by Lowes and Home Depot are not spec'd for flooring. Not able to find treated wood rated for flooring at either of them. The lumbar they have that is rated for flooring is not treated. I have purchased treated lumbar but it was always for outdoors. I need to know what I should be getting as this is all new to me.
Thanks for your input.
Tommie
__________________
|
|
|
|
|
01-31-2017, 07:47 PM
|
#20
|
|
Senior Member
Join Date: Sep 2016
Location: Virginia
Posts: 814
SUN #8893
|
Thanks Sep.
I did not realize that the foam would attract bugs. Is it possible to treat the foam with some kind of insect repellent?
Thanks,
Tommie
__________________
__________________
|
|
|
|
|
|
|
Currently Active Users Viewing This Thread: 1 (0 members and 1 guests)
|
|
|
 Posting Rules
|
You may not post new threads
You may not post replies
You may not post attachments
You may not edit your posts
HTML code is Off
|
|
|
|
 » Recent Sunline Discussions
 |
|
|
|
|
|
|
|
|
|
|
|
|
|
|
|
|
|
|
|
|
|
|
|
|
|
|
|


 Linear Mode

