 |
|
 03-28-2017, 10:40 AM
|
#121
|
|
Senior Member
Join Date: Sep 2016
Location: Virginia
Posts: 814
SUN #8893
|
Good afternoon,
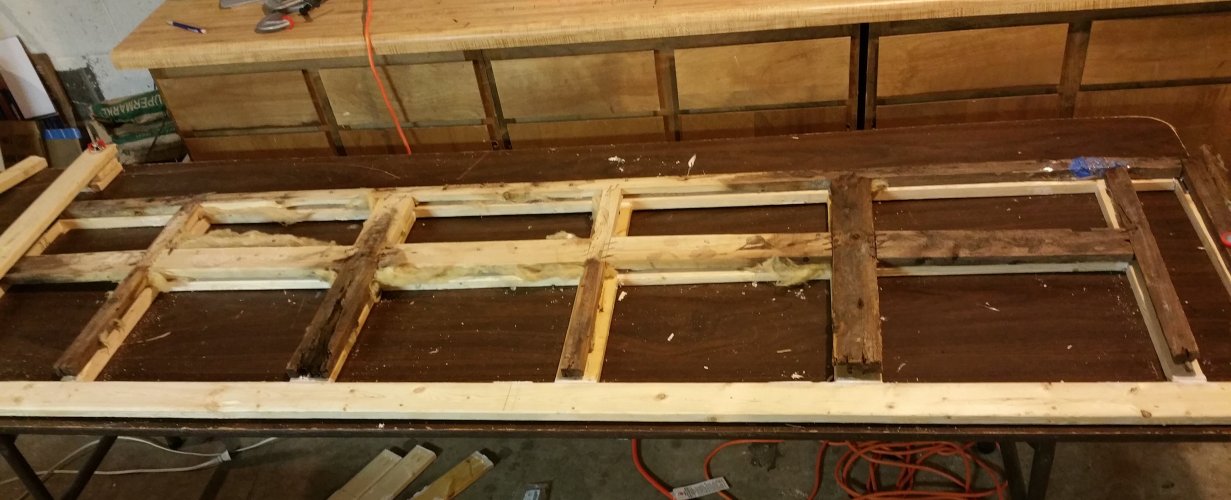
I guess it's true what they say, "The third time's a charm". It took three attempts before I finally got the bottom grid right. I will say that I did not have the original grid out to use as a temple for the first two tries. As I was trying to test fit the new grid, one tug on something and the front framing starting falling apart so I went ahead and took it out and found that my measurements were off yet again.
Second attempt at the bottom

But the third time, I had a template. Not sure where I was going wrong. The old 1x2s were actually .75 x 1.25 but the new is .75 x 1.5. I made the adjustment in my calculations (or so I thought) but... I should have taken the existing out from the begin with. A lesson learned.
Third attempt at the bottom - seems to line up pretty well.
Well, now it's time to start on the middle grid. Let's just hope it does not take me three tries to get it right. The middle grid is in the worst shape. It is like putting together a jigsaw puzzle but at least I have plenty of pictures to use. The measurements on this section has to be pretty close as well because the window, window rock guard and other components for the dinette screw into it.

Quick question. There is wiring that was hanging inside the front wall just below the window. I went looking at other T1550s pics and saw that some had a light in the front. Is this light helpful? Is it some type of always-on porch light of some sort? I am trying to decide if it is worth reinstalling. It can get pretty dark out and I do not see any other exterior lights other than the marker lights on mine. If you have any other suggestions, please let me know. I will say that I am a little leery of drilling any additional holes as this will create an additional entry point of concern for water infiltration. Right now I am just thinking.
Thanks for reading.
Tommie
__________________
1987 Sunline T1550
2012 Ford Expedition EL Limited 5.4L V8, 4WD
"Twenty years from now you will be more disappointed by the things that you didnt do than by the ones you did do..." Mark Twain]
|

|

|
|
03-28-2017, 06:57 PM
|
#122
|
|
Moderator
Join Date: Nov 2006
Location: Ohio
Posts: 12,654
SUN #89
|
Quote:
Originally Posted by Thomascine

Quick question. There is wiring that was hanging inside the front wall just below the window. I went looking at other T1550s pics and saw that some had a light in the front. Is this light helpful? Is it some type of always-on porch light of some sort?
|
Hi Tommie,
The wires "might be" for a hitch area light. All of the newer campers have one, I do not know what model year they started.
See here below the front window and above the LP tanks. And my bike rack frame.

This light has direct power to it. There is a switch on the light fixture itself. So when your outside and need light, you turn it on and off at the light. It works well for us. Your fixture may be long gone but they do sell new fixtures.
Here is a close up of the fixture. The lens is really "unique" and hard to get out. They have to make it pretty hard to get out so it does not fly off towing down the road. You can see the slide switch


Hope this helps
John
__________________
__________________
Current Sunlines: 2004 T310SR, 2004 T1950, 2004 T2475, 2007 T2499, 2004 T317SR
Prior Sunlines: 2004 T2499 - Fern Blue
2005 Ford F350 Lariat, 6.8L V10 W/ 4.10 rear axle, CC, Short Bed, SRW. Reese HP trunnion bar hitch W/ HP DC
 Google Custom Search For Sunline Owners Club
|

|
|
|
03-28-2017, 09:00 PM
|
#123
|
|
Senior Member
Join Date: Sep 2016
Location: Virginia
Posts: 814
SUN #8893
|
Good evening,
Thanks for the info and pics JohnB. It sounds like the light may come in handy. I will give it some thought when it comes time to put it all back together. I have quite a ways to go.
Thanks,
Tommie.
__________________
|
|
|
|
|
03-29-2017, 03:42 PM
|
#124
|
|
Senior Member
Join Date: Apr 2016
Location: Maryland
Posts: 488
SUN #8237
|
This style was on my 1996 and I replaced it last year with an exact replica (matches the other 2 exterior lights). Probably just a cheaper version of John's light.

It's probably one of those things that you wouldn't miss unless you lived with one before. You'd just need to have a flashlight handy.
As far as water intrusion goes. It's just like any other opening, in that you just inspect it regularly. After all you've been through with water intrusion it would be second nature, I'm guessing.
__________________
John
2000 T2370
|
|
|
|
|
03-29-2017, 03:47 PM
|
#125
|
|
Senior Member
Join Date: Sep 2016
Location: Virginia
Posts: 814
SUN #8893
|
Where are your other 2 located? I don't have any other than the marker lights.
Sent from my SM-N910V using Tapatalk
__________________
1987 Sunline T1550
2012 Ford Expedition EL Limited 5.4L V8, 4WD
"Twenty years from now you will be more disappointed by the things that you didnt do than by the ones you did do..." Mark Twain]
|
|
|
|
|
03-29-2017, 07:05 PM
|
#126
|
|
Senior Member
Join Date: Apr 2016
Location: Maryland
Posts: 488
SUN #8237
|
Quote:
Originally Posted by Thomascine
Where are your other 2 located? I don't have any other than the marker lights.
Sent from my SM-N910V using Tapatalk
|
One is the amber porch light by the entrance door and the other is a white light on the drivers side above the hot water heater. My trailer is old school..... have to light my water heater from outside.
__________________
John
2000 T2370
|
|
|
|
|
03-29-2017, 07:56 PM
|
#127
|
|
Moderator
Join Date: Nov 2006
Location: Ohio
Posts: 12,654
SUN #89
|
Quote:
Originally Posted by Thomascine
I guess it's true what they say, "The third time's a charm". It took three attempts before I finally got the bottom grid right. I will say that I did not have the original grid out to use as a temple for the first two tries. As I was trying to test fit the new grid, one tug on something and the front framing starting falling apart so I went ahead and took it out and found that my measurements were off yet again.
But the third time, I had a template. Not sure where I was going wrong. The old 1x2s were actually .75 x 1.25 but the new is .75 x 1.5. I made the adjustment in my calculations (or so I thought) but... I should have taken the existing out from the begin with. A lesson learned.
|
Hi Tommie,
Your doing really good. And your learning a lot in the process. Anyone who have done enough "creating" work of any kind, has made a few errors along the way. As long as you learn from the mistakes, that makes you stronger for the next time.
I "think" I have entered the 3rd stage of "creating"...
The first stage when I was really young. I did not know a whole lot about building things but that did not stop me... I started by taking things apart and seeing how they where built... my mother was always saying, "John your always taking something apart!" There was a lot of errors in building during this time...
As time went on, the 2nd stage started and I sort of perfected it. After you built or fixed enough stuff, you learned the basics of how things went together and then anything new comeing along you just applied some form of what you already learned. Your knowledge base continued to increase constantly. The errors where fewer, but still there.
I am now sort of in the 3rd stage.... the memory thing... numbers and math use to go in my head and stick like glue. I never even took notes! Now I know exactly how I want to do something, but the memory thing gets in the way. You measure the space as 52 1/2" wide. Then you go to the board and mark off 51 1/2". You cut it exactly right. Just it is 1" exactly too short... ")
I have since adopted this trying to resolve the issue:
- Measure 3 times and write it down between each time. Compare notes.
- Read the notes...mark off the board, check at least 2 times
- Cut once.
Most times this works perfectly. And then... darn, the wood grain is going the wrong way...or something else was a muck. errrrrr
Welcome to being human. Keep at it. Once you make it out camping, this rebuild time will melt away and you will have some real good campfire stories...and look back and laugh or cry... about the rebuild.
I'm not sure yet what the 4th stage will be. I'll let you know when I get there 
Keep up the good work
John
__________________
Current Sunlines: 2004 T310SR, 2004 T1950, 2004 T2475, 2007 T2499, 2004 T317SR
Prior Sunlines: 2004 T2499 - Fern Blue
2005 Ford F350 Lariat, 6.8L V10 W/ 4.10 rear axle, CC, Short Bed, SRW. Reese HP trunnion bar hitch W/ HP DC
Google Custom Search For Sunline Owners Club
|
|
|
|
|
03-29-2017, 09:09 PM
|
#128
|
|
Senior Member
Join Date: Sep 2016
Location: Virginia
Posts: 814
SUN #8893
|
Good evening,
Thanks JohnB for all of the inspiring words of encouragement. It is very much appreciated. I was ready to throw in the towel a few days ago. I had to step back for a bit.
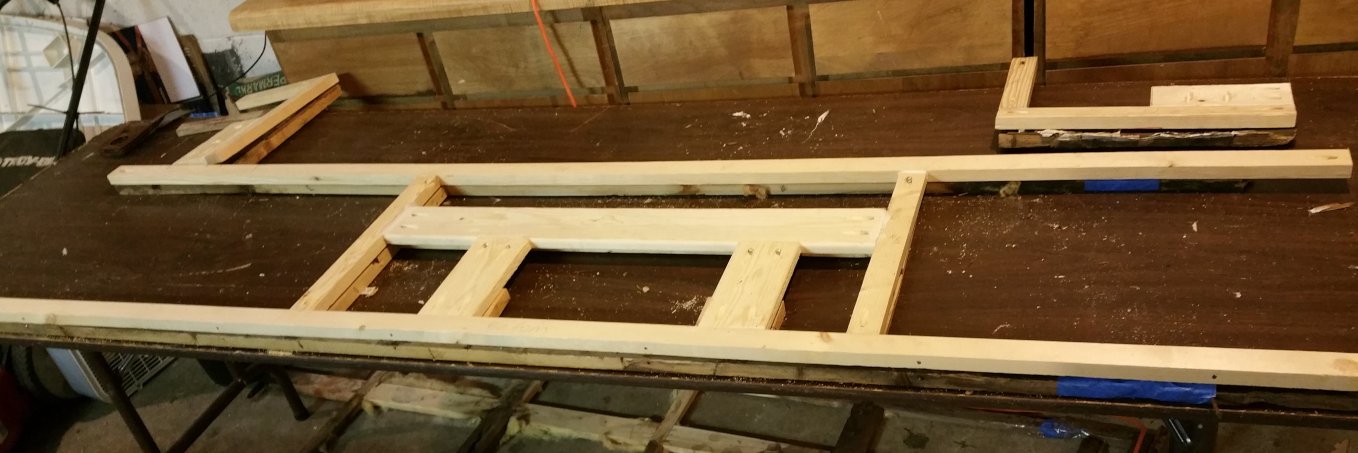
I measured 4 or 5 times and it still did not line up correctly. Really not sure what I was doing wrong. I have put things together before like desks, TV stands, bookshelves, etc. Granted all of the parts and pieces were all pre-manufactured with instructions. But in any case, I hope it is right this time. I will do a test fit this weekend to see if it is close. Still not ready to put any of the new back in yet. I need to work my way up further towards the top. I still do not see where the leaks are except for the couple of suspect areas that I have found so far. The wood around that front window looked pretty clean. The stained wood and rot was in the corners, so far. I do see more stains as I look up higher. I will be pulling more of metal siding loose from the upper front this weekend, weather permitting.
Making progress though. Got the next section completed.
Old

New
That's all for now. Thanks for looking.
Thanks,
Tommie
__________________
|
|
|
|
|
03-30-2017, 04:42 PM
|
#129
|
|
Senior Member
Join Date: Apr 2013
Location: Connecticut
Posts: 759
SUN #5039
|
Notice the AC receptacle under window. Is your wiring AC or DC you were asking about. Also notice the DC socket just to the right of the DC lights under the drop down bunk/cabinet. This is a view of the front of my unit looking toward the tongue.  No light on my 1983 T-1550 on the front. I'm trying to remember what year and model you have. I'm thinking it was a 1987 T-1550.

__________________
TT:1983 Sunline T-1550
TT:1996 Sunline T-2053
TV:2005 Toyota Tundra Double Cab 2UZ-FE i-Force 4.7 L DOHC (MFI) V8 4WD SR5 Automatic
P3 break control
"I know a lot about nothing and nothing about a lot"
|
|
|
|
|
03-30-2017, 04:50 PM
|
#130
|
|
Senior Member
Join Date: Sep 2016
Location: Virginia
Posts: 814
SUN #8893
|
Yes, I have a 1987. What is that just beneath your front window?
Sent from my SM-N910V using Tapatalk
__________________
1987 Sunline T1550
2012 Ford Expedition EL Limited 5.4L V8, 4WD
"Twenty years from now you will be more disappointed by the things that you didnt do than by the ones you did do..." Mark Twain]
|
|
|
|
|
03-30-2017, 06:36 PM
|
#131
|
|
Senior Member
Join Date: Sep 2016
Location: Virginia
Posts: 814
SUN #8893
|
Hi Bunjin.
My apologies. I could not see the whole message on my phone. Now that I can see the entire message. The wires are the black & white wires shown here hanging in the middle. It is not the receptacle as the receptacle is already there and hooked up and working, so are the interior lights. I was wondering if there was a front light at some point like what I have seen in other pics. It is capped off right now with a yellow cap.

Thanks,
Tommie
__________________
|
|
|
|
|
04-02-2017, 07:30 PM
|
#132
|
|
Senior Member
Join Date: Sep 2016
Location: Virginia
Posts: 814
SUN #8893
|
Happy Sunday!
Not much more progress. Trying to make my way up to the top of the front. Ran into more rusted screws. They are rusted so bad the heads are almost completely unrecognizable. No sockets or vice grips will catch onto them.

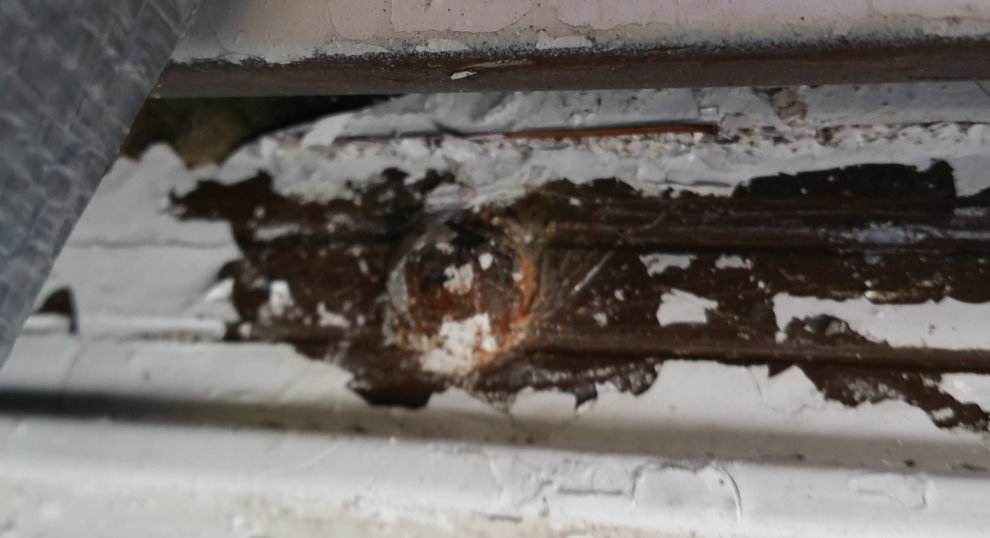
Will probably need to try drilling into them to get them out. In the meantime, I did start pulling out some of the butyl tape. It appears that some of the butyl tape had some of the paper backing still attached. I am guessing that is not a good thing as it would mean that it did not stick properly. If this is the case, then this could be another possible breach. It peeled off very easily.

That's all for now. Thanks for looking.
Tommie
__________________
|
|
|
|
|
04-03-2017, 08:51 AM
|
#133
|
|
Moderator
Join Date: Nov 2006
Location: Ohio
Posts: 12,654
SUN #89
|
Hi Tommie,
The rusted screws... Boy they are in rough shape... drilling the heads off may be one of your last efforts to get them out.
The sealing tape, it may be putty tape or butyl. Sunline used putty tape on the moldings, windows, doors flanges. On rubber roofs, they did use butyl on roof moldings against the rubber. If it was on the corner molding, odds are high it was putty tape. If between the folded edge of siding in the corner joint, it may be butyl. On my 2004 they use butyl in the folded corners. I do not know what they did in the 80's.
I have seen 13 year old good quality butyl still pull apart like taffy and is still good. Putty tape does not even taffy pull on day one. And 13 years later it crumbles. That said, I have seen poor quality butyl pull like taffy on day 1 and 4 years later, it acted like putty tape. Not all butly tape is created equal.
Regardless of which, having the release paper still left on when installed to the camper is a bad thing. That was supposed to come off upon installation. It is only to keep the role of tape from sticking to itself. I do not know if Sunline missed this or a prior owner had the corner off at one time to do something, that was a big miss however it happened. The side with the paper on it had a very poor seal and possibly no seal.
John
__________________
Current Sunlines: 2004 T310SR, 2004 T1950, 2004 T2475, 2007 T2499, 2004 T317SR
Prior Sunlines: 2004 T2499 - Fern Blue
2005 Ford F350 Lariat, 6.8L V10 W/ 4.10 rear axle, CC, Short Bed, SRW. Reese HP trunnion bar hitch W/ HP DC
Google Custom Search For Sunline Owners Club
|
|
|
|
|
04-03-2017, 04:16 PM
|
#134
|
|
Senior Member
Join Date: Sep 2016
Location: Virginia
Posts: 814
SUN #8893
|
Good evening,
Well, I was able to get out the rusted screws. They were in really bad shape.

Had to use my rotary tool to square what was left of the screw heads, sprayed them with WD-40 and then use pliers to get them out.

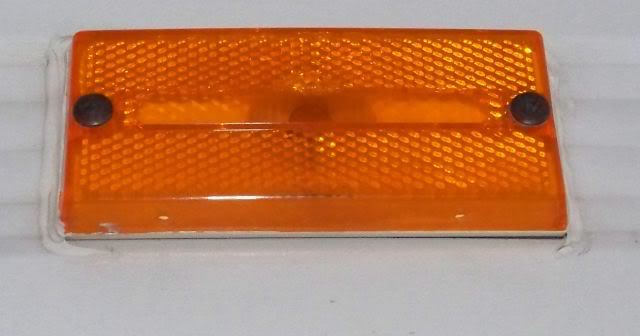
Did more inspection looking for the leaks. As it turns out, it looks like the leaks were mainly from the lights. The marker lights and caulking are in bad shape.


Also found more caulking tape on the driver side with the paper backing still attached. The caulking tape was old and dried out. I was able to peel it away by hand. It peeled away clean.

The wood at the top looks good.


Now to more complications. It seems I run into one obstacle after another. I still need to get at the lower corners to cut out the bad wood.


The passenger side may not be too bad but the driver side has the hamper. Not sure if it is a good idea to bend the metal at the corners. I will have to wait for one of the experts to chime in.
That is all for now. Thanks for looking.
Tommie
__________________
|
|
|
|
|
04-03-2017, 07:05 PM
|
#135
|
|
Moderator
Join Date: Nov 2006
Location: Ohio
Posts: 12,654
SUN #89
|
Hi Tommie,
Good idea on the grinding the screw heads and using the pliers on the screws!  They say, "Necessity is the mother of invention" You had a need and you know the tools you have to work with. Now just to dream up a way to use what you have to get the job done! And you did!
The body lights, yes any of those lights can be a water entry point. It is a classic water infection. How to get around the issue is to use Dicor roof caulk (non leveling) around the top and wrap around to the side of the light to seal the fixture to the siding. To change the fixture, you just cut the caulk. Heat gun warming it removes it with a scraper. Mineral spirits on a rag cleans any left over stuck to the siding, just you need to then get the oily mineral spirits off before caulking. Rubbing alcohol will work if that is all you have and it dries quick
Sunline use to add the caulk just on the top, I later added it on the sides too. The bottom left open.

You can see the caulk on the sides here. This pic was to show the 2 holes drilled in the lens to let the water that can come in through cracks in the plastic, get out.
To your lower frame rot issue.
If the metal is badly corroded, bending it could crack it right off. If the metal is in good shape, it can be bent out and then back. Metal working pliers with long flat blades work best for bending the tabs, but short of having them you can take 2, 3/4" thick narrow boards the width of the tab and clamp them together and bend the tab all at once. The question is, how good is the metal?
There is also, to just remove the bottom 1 or 2 pieces of siding and do not bend the tabs. The good news, all the siding starts from the bottom up. So you only have to remove the bottom pieces needed. Odds are high there is a zillion staples (many, not a zillion.. but it seems that way when taking them out) holding the very bottom piece to the camper bottom wood frame. That is if they are not rusted off totally. You have already overcome how to take siding off the front, the sides is not that much different.
If you want to remove the siding completely, then you will need to remove what ever molding holds the other end of the piece you are taking off. That may not be a bad thing to put new fresh buytl tape on what ever that molding is. By the looks, your putty tape may have reached the end of it's sealing life.
Hope this helps
John
__________________
Current Sunlines: 2004 T310SR, 2004 T1950, 2004 T2475, 2007 T2499, 2004 T317SR
Prior Sunlines: 2004 T2499 - Fern Blue
2005 Ford F350 Lariat, 6.8L V10 W/ 4.10 rear axle, CC, Short Bed, SRW. Reese HP trunnion bar hitch W/ HP DC
Google Custom Search For Sunline Owners Club
|
|
|
|
|
04-03-2017, 08:14 PM
|
#136
|
|
Senior Member
Join Date: Sep 2016
Location: Virginia
Posts: 814
SUN #8893
|
Thanks JohnB. I think when the time comes to put it all back together I may replace the lights. Most of the lenses look pretty frail. I do have mineral spirits and denatured alcohol in the garage that can be used for cleanup. As for the side wall, I will have to think on it. I am a bit nervous about taking anything else apart. LOL...afraid I may not be able to put it all back together. The kid is worried too.
Tommie
__________________
1987 Sunline T1550
2012 Ford Expedition EL Limited 5.4L V8, 4WD
"Twenty years from now you will be more disappointed by the things that you didnt do than by the ones you did do..." Mark Twain]
|
|
|
|
|
04-03-2017, 09:42 PM
|
#137
|
|
Moderator
Join Date: Dec 2006
Location: Michigan
Posts: 6,155
SUN #123
|
Tommie, your original lights are Bargman #99 series, still available I believe:
https://www.amazon.com/Bargman-99-Cl.../dp/B0007Y4Y74
Just search for the same name but with Amber to find amber ones. For the price, it might be worth just replacing the whole thing now.
__________________
2007 T-286SR Cherry/Granola, #6236, original owner, current mileage: 9473.8 (as of 6/18/21)
1997 T-2653 Blue Denim, #5471
1979 12 1/2' MC, Beige & Avocado, #4639
Past Sunlines: '97 T-2653 #5089, '94 T-2251, '86 T-1550, '94 T-2363, '98 T-270SR

|
|
|
|
|
04-04-2017, 08:37 PM
|
#138
|
|
Senior Member
Join Date: Sep 2016
Location: Virginia
Posts: 814
SUN #8893
|
Thanks Sunline Fan. That was my thinking, to go ahead and replace them. The current lights look pretty old and I did find some replacements on Amazon. I don't remember the number. I will verify that they are the #99 series.
Thanks,
Tommie
__________________
1987 Sunline T1550
2012 Ford Expedition EL Limited 5.4L V8, 4WD
"Twenty years from now you will be more disappointed by the things that you didnt do than by the ones you did do..." Mark Twain]
|
|
|
|
|
04-05-2017, 07:35 PM
|
#139
|
|
Senior Member
Join Date: Sep 2016
Location: Virginia
Posts: 814
SUN #8893
|
Quote:
Originally Posted by JohnB
If you are going up the wall vertical butting into old good wood, out in the middle of the wall, cut the old board clean out and put a new stud directly under the old board cut, (old stacked on top of new) so all the load is down on top of the new board. Then screw on/glue on, a lap joint splice across the 2 pieces on the side buried in the wall. The splice board can be 6 to 8" overlap top and bottom of saw cut and can be 3/4" thick as it is not under direct load only holding the 2 x 2 in position.
|
Good evening,
Quick question. Will this work for the corners or will I need to take out the entire board and run a new board the full length of the old board?
Thank,
Tommie
__________________
1987 Sunline T1550
2012 Ford Expedition EL Limited 5.4L V8, 4WD
"Twenty years from now you will be more disappointed by the things that you didnt do than by the ones you did do..." Mark Twain]
|
|
|
|
|
04-05-2017, 08:00 PM
|
#140
|
|
Moderator
Join Date: Nov 2006
Location: Ohio
Posts: 12,654
SUN #89
|
Pics here would help so I know the actual board you are referring to.
I "think" you mean the upper part (upper being above the lower angled siding) of the corner where there was rot on the bottom and good wood up top? Is this the correct location?
This pic, the red circled corner stud

If that is the stud, what are the dimensions of the stud? Is that 3/4" thick by 1 1/2" wide approx? The 3/4 thick is more the concern. Drilling holes in the add on splice board in the 3/4" width direction has to be dead on center so it does not break out or split. And if you can drill that straight and on center, then this needs to be glued and screwed. It would be good to be 6 to 8" above and bellow the joint of new wood to old wood. Also make sure the old wood and the new wood are dead tight against each other so the load pushes by contact from old to new, not having a gap and the load it then through the splice board.
How long is the good old wood that is left? The pic was cut off. If that board is only 12 to 18" long of good usable wood, it may be better to just replace that small piece. If it is 36 to 48" long of good wood, then OK splice if you feel you can pilot drill add on splice. You can try and if it splits apart, (odds exist) then well you just replace it.
Hope this helps
John
__________________
Current Sunlines: 2004 T310SR, 2004 T1950, 2004 T2475, 2007 T2499, 2004 T317SR
Prior Sunlines: 2004 T2499 - Fern Blue
2005 Ford F350 Lariat, 6.8L V10 W/ 4.10 rear axle, CC, Short Bed, SRW. Reese HP trunnion bar hitch W/ HP DC
Google Custom Search For Sunline Owners Club
|
|
|
|
|
|
|
Currently Active Users Viewing This Thread: 1 (0 members and 1 guests)
|
|
|
 Posting Rules
|
You may not post new threads
You may not post replies
You may not post attachments
You may not edit your posts
HTML code is Off
|
|
|
|
 » Recent Sunline Discussions
 |
|
|
|
|
|
|
|
|
|
|
|
|
|
|
|
|
|
|
|
|
|
|
|


 Linear Mode

