 |
|
 01-31-2017, 09:07 PM
|
#21
|
|
Moderator
Join Date: Nov 2006
Location: Ohio
Posts: 12,651
SUN #89
|
Quote:
Originally Posted by Thomascine

Good evening,
I was looking at getting 2x2s but it seems that the ones carried by Lowes and Home Depot are not spec'd for flooring. Not able to find treated wood rated for flooring at either of them. The lumbar they have that is rated for flooring is not treated. I have purchased treated lumbar but it was always for outdoors. I need to know what I should be getting as this is all new to me.
Thanks for your input.
Tommie
|
In the normal building world of a house/home/garage etc 2 x 2's are not considered at all as they are so small. And then there is how many knots are in them which a big knot can cause a big break quick. I do not know if you can buy them this way. I never have.
What I have done for roof rafters, or wall studs is to cut my own out of knot free or tiny knotted good 2 x 4 or larger lumber. In my case, I rip them in a table saw or radial arm saw where it is easy to do. I cut them into shorter lengths and throw out the larger knotted pieces.
Look for 2 x something that is straight and very few knots in it. 2 x 4's can be pile of junk sometimes unless you get high grade ones. 2 x 6, 2 x 8, 2 x 10 or 2 x 12 can have better quality of the board. If you can find scaffold rated lumber, it has very few to no knots in it. You need a "select" or no one grade lumber to get out of the knots. And again, if you only need 3 or 4 foot lengths, then find clear wood that can get that length cut out of it. It might be 8 feet long, but you cut out the 4 foot and cut the 4 inches of bad and pitch it.
Pressure treated seems to be worse for knots unless you can get the higher grade. Again the wider the board, "generally" the less knots. 2 x 4 or 2 x 3's if you can still find them seem to be cut from the left overs. But some of the wider boards are not as bad. It will be pick and choose at the big box stores. The days of the small lumber yards with high pride of quality wood are close to gone. Also since it is treated, the box box stores seem top want to store it outside in the rain....errrr. They then bring the pallet inside and cut the straps and bo'ing... goes the pile into rocking chair runners it warps so bad. It is wet, heavy and when ripped, curves off to the side. Try if your going to use treated, it is dry before you rip it.
Given the right setup, (ripping tooth blade, stable support for the board, a saw edge guide) this can be done with a circular saw too. Just start with a 2 x 8 or larger to help hold the board while ripping with the circular saw. Ideally there is a guide on the saw to make them more even in size. But you can always use the factory planned edge as the top and bottom.
If you have never ripped a board that heavy with a circular saw, see here. They seem to have a U tube on most anything now a days.
How to Make Rip Cuts with a Circular Saw • Ron Hazelton Online • DIY Ideas & Projects
__________________
__________________
Current Sunlines: 2004 T310SR, 2004 T1950, 2004 T2475, 2007 T2499, 2004 T317SR
Prior Sunlines: 2004 T2499 - Fern Blue
2005 Ford F350 Lariat, 6.8L V10 W/ 4.10 rear axle, CC, Short Bed, SRW. Reese HP trunnion bar hitch W/ HP DC
 Google Custom Search For Sunline Owners Club
|

|

|
|
01-31-2017, 09:18 PM
|
#22
|
|
Moderator
Join Date: Nov 2006
Location: Ohio
Posts: 12,651
SUN #89
|
Quote:
Originally Posted by sep
Looking good! When I fixed my floor the first time, I used the pink foam insulation from Home Depot but this last time when fixing the floor, some of the foam was eaten away by bugs. I went back to using the bat insulation. I just took the 3 1/2" thick bat and split it in half so it would be the right height for the 2X2s.
Steve
|
HI Steve, H'mm this is the first I have heard of this with the bugs. Can you expand on the conditions and the type of bug?
Was the board exposed to the outside world or did it have Darco or some other covering over it? They even use certain type of this foam board on homes on the outside of the foundation. It might however be treated.
My camper in the enclosed tank compartment has the 1" Corning pink board in it from Sunline. It is however inside the tank compartment and you cannot see it and the bottom is coroplast to create a cover but the tank compartment is not bug proof for sure.
Need more feedback on how the problem came to be to not do something in the future.
Thanks for bringing this up
John
__________________
__________________
Current Sunlines: 2004 T310SR, 2004 T1950, 2004 T2475, 2007 T2499, 2004 T317SR
Prior Sunlines: 2004 T2499 - Fern Blue
2005 Ford F350 Lariat, 6.8L V10 W/ 4.10 rear axle, CC, Short Bed, SRW. Reese HP trunnion bar hitch W/ HP DC
Google Custom Search For Sunline Owners Club
|
|
|
|
|
02-01-2017, 07:07 PM
|
#23
|
|
Senior Member
Join Date: Aug 2015
Location: Connecticut
Posts: 164
SUN #7710
|
Tommie,
If you look at most pictures of camper framing, it is all about the same and non of it, that I've seen, is pressure treated and if we can find ways to keep the water out of the campers, there really isn't any problem with the HD or Lowes wood. Just look at the dry would in you walls of the camper, it is nothing special. If you are worried about the floor and the weight from people walking on it, you can just sister in the missing pieces and scab in other pieces running the other direction. Plus, you have the metal framing under it so just crawl under the camper and look for the bolts or the holes where the bolts were. I think my carriage bolts were 5/16". I treated my 2x2s with 3 coats of Thompson water seal just so I had something on the wood.
Steve P
Quote:
Originally Posted by Thomascine
Good evening,
I was looking at getting 2x2s but it seems that the ones carried by Lowes and Home Depot are not spec'd for flooring. Not able to find treated wood rated for flooring at either of them. The lumbar they have that is rated for flooring is not treated. I have purchased treated lumbar but it was always for outdoors. I need to know what I should be getting as this is all new to me.
Thanks for your input.
Tommie
|
__________________
Steve P
|
|
|
|
|
02-01-2017, 07:13 PM
|
#24
|
|
Senior Member
Join Date: Aug 2015
Location: Connecticut
Posts: 164
SUN #7710
|
I never thought about it either and it was in 2 sections of the foam. The foam was pitted, the wood rotted away next to it and piles of what looked like saw dust so I assumed it was some kind of ant. It was on the side of the camper where the awning lag bolts come through the side and I had a piece of that Darco (tarp like material that runs between the metal frame and the wood floor frame. I'm not sure what you could treat the foam with.
Steve P
Quote:
Originally Posted by Thomascine
Thanks Sep.
I did not realize that the foam would attract bugs. Is it possible to treat the foam with some kind of insect repellent?
Thanks,
Tommie
|
__________________
Steve P
|
|
|
|
|
02-01-2017, 07:21 PM
|
#25
|
|
Senior Member
Join Date: Aug 2015
Location: Connecticut
Posts: 164
SUN #7710
|
Hi John,
I'm not really sure but I think they were some type of ant. I had a 3"X5" cut in the Darco so I could fudge in a piece of metal plate so I could bolt the awning bracket back onto the camper. At the time I didn't have time to mess with the walls and floor to replace the rotted board so I just did a quick fix. I'm sure that is how the bugs got in and just went to town on whatever they wanted. There was also a lot of saw dust by those affected pieces of foam. And, it was the corning pink stuff so it was pretty beefy.
Steve P
Quote:
Originally Posted by JohnB
HI Steve, H'mm this is the first I have heard of this with the bugs. Can you expand on the conditions and the type of bug?
Was the board exposed to the outside world or did it have Darco or some other covering over it? They even use certain type of this foam board on homes on the outside of the foundation. It might however be treated.
My camper in the enclosed tank compartment has the 1" Corning pink board in it from Sunline. It is however inside the tank compartment and you cannot see it and the bottom is coroplast to create a cover but the tank compartment is not bug proof for sure.
Need more feedback on how the problem came to be to not do something in the future.
Thanks for bringing this up
John
|
__________________
Steve P
|
|
|
|
|
02-02-2017, 05:38 PM
|
#26
|
|
Senior Member
Join Date: Apr 2013
Location: Connecticut
Posts: 759
SUN #5039
|
I would not spray or coat the styrene foam board with anything. It can an will melt with holes from most anything other than water.
I have built models out of styrene foam boards and the trick to being able to spray lacquer base paint (or any other solvent or petroleum type carrier) is to first take tite bond and thin it with water and brush a couple coats onto the foam surface. Then you can coat the surface (at least with primer and acrylic lacquer paint).
Latex paint may very well work in lieu of the tite bond water method. Test first. Personally I like the tite bond water as it may bond better, but that is what testing is all about.
If you decide to go with the styrene board just run a test after the sealing coat and sprayed with the insect or whatever repellent you elect to use. If there is any reaction it will be instant.
To see effects without spending any money put/pour a small amount of any petroleum or solvent onto a styrene coffee cup. It will eat through it in a heart-beat.
I'm not sure if deck rail balusters will work for your joists/studs as a 2"x2" is actually 1.31"x1.31"x42" finished dimension. They are pressure treated.
I wouldn't be concerned about the rating for about 3 reasons off the top of my head.
1) the sister and the plywood will help carry the load. The more you can lap the joint and the glue method described by John will really help here.
2) in this area your floor isn't exactly a floor that will have heavy traffic, as it is under the dinette area. You may not want to stack the table and seating with many hundreds of pounds per-say, but look at how rotted the joist were and yet no one or anything fell through the floor.....right?
3) this area is pretty close to walls and fairly short runs.
BTW. You are doing a fine job! Keep up the work and remember you are hearing from some TT experts (I'm not putting myself in this class by any means as I'm learning myself).
https://www.lowes.com/pl/Deck-balust...ies/4294402479
__________________
TT:1983 Sunline T-1550
TT:1996 Sunline T-2053
TV:2005 Toyota Tundra Double Cab 2UZ-FE i-Force 4.7 L DOHC (MFI) V8 4WD SR5 Automatic
P3 break control
"I know a lot about nothing and nothing about a lot"
|
|
|
|
|
02-03-2017, 11:58 AM
|
#27
|
|
Moderator
Join Date: Nov 2006
Location: Ohio
Posts: 12,651
SUN #89
|
Quote:
Originally Posted by sep
Hi John,
I'm not really sure but I think they were some type of ant. I had a 3"X5" cut in the Darco so I could fudge in a piece of metal plate so I could bolt the awning bracket back onto the camper. At the time I didn't have time to mess with the walls and floor to replace the rotted board so I just did a quick fix. I'm sure that is how the bugs got in and just went to town on whatever they wanted. There was also a lot of saw dust by those affected pieces of foam. And, it was the corning pink stuff so it was pretty beefy.
Steve P
|
Hi Steve,
Thanks for the response. H'mm, wet wood inside and an opening to the outside world. That does sound like a insect magnet.
I looked up on the Owens site as I was sure some of their closed cell foam board is used below grade and literately exposed to earth and is rated to do so.
http://foamular.com/foam/faqs/#appgen
But, if you scroll down where it talks about termites, there are a very aggressive insect and after the wood and the foam board is not going to stop them.
I don't know if the insects in your case where after the foam board as much as the nice wet wood. But, point is well taken and learned. If we are using this foam board in a camper, it should be covered with a plastic or metal barrier to not invite crawling guests.
Nature and campers... there is always a learning. We has a few posts a while ago where I learned, squirrels/chipmunks can actually eat into your rubber LP gas line. I never had that issue, but others have and they had to cover the LP hose with aluminum foil to keep them away.
And then the ants crawling up your electrical cord right into the camper.... That I had happen in June. They where marching up the cord like solders.... In our area this is a summer concern as the ants are active and seem to be attracted to magnetic waves of the power cord. Since this event, I use ant spray on the cord right after setting up. Spray the cord all the way around for about 2 feet up off the ground. Don't miss a spot in the underside, they will go right over that area...
Ants and wet wood, yes I know about them but never gave the foam board a thought. If they are mixed up near the wet wood, I can see them drilling into what ever is in their way.... Seems they like wet moist areas.
Tommie, if you use the foam board, make sure it is covered with your bottom metal skin/membrane based on Steve's learning.
Thanks. Everyday we learn something new on SOC!!!
John
__________________
Current Sunlines: 2004 T310SR, 2004 T1950, 2004 T2475, 2007 T2499, 2004 T317SR
Prior Sunlines: 2004 T2499 - Fern Blue
2005 Ford F350 Lariat, 6.8L V10 W/ 4.10 rear axle, CC, Short Bed, SRW. Reese HP trunnion bar hitch W/ HP DC
Google Custom Search For Sunline Owners Club
|
|
|
|
|
02-04-2017, 07:19 PM
|
#28
|
|
Senior Member
Join Date: Sep 2016
Location: Virginia
Posts: 814
SUN #8893
|
Thanks JohnB, Steve P, and Bunjin. I really appreciate all of the input.
I actually made it to Lowes today and picked up the wood needed to replace the rotted support joists in the floor. It is supposed to be in the 50's tomorrow so I hope to get all of the pieces cut and maybe some screwed/glued in. I was able to find what I needed at Lowes. They actually had 2x2s that are the same dimensions as what is already in the camper. Not the best but as bunjin stated, that area is under the dinette and won't have a lot of traffic. What I found at Lowes looks almost identical to what is already in the camper.
Again, thanks for all of your input and continued support and encouragement. It has helped a great deal!
Tommie
__________________
|
|
|
|
|
02-04-2017, 08:11 PM
|
#29
|
|
Senior Member
Join Date: Aug 2015
Location: Connecticut
Posts: 164
SUN #7710
|
That's good news and 50 is perfect weather as far as I'm concerned. Can't wait to see the progress you make. I was going to try to get some done on mine but ran out of daylight and it gets cold fast when that sun goes down.
Steve P.
__________________
Steve P
|
|
|
|
|
02-05-2017, 08:50 PM
|
#30
|
|
Senior Member
Join Date: Sep 2016
Location: Virginia
Posts: 814
SUN #8893
|
Good evening,
Well, I did not get as much done today as I had hoped. I did get most of the new wood pieces cut. Still have two sister pieces to cut. The 2x3 is ready but the old rusted staples are in the way of putting it in place. The mandrel for my rotary tool is bent. Had to order a new one. It should be here tomorrow. I tried to pull them out with pliers but they were breaking off so I will try cutting them off.
I did find some repair tape that I am trying on the metal membrane in the areas where there are holes. Will check in a couple of days to see how well it is sticking. The label says “permanent waterproof seal”. We shall see.

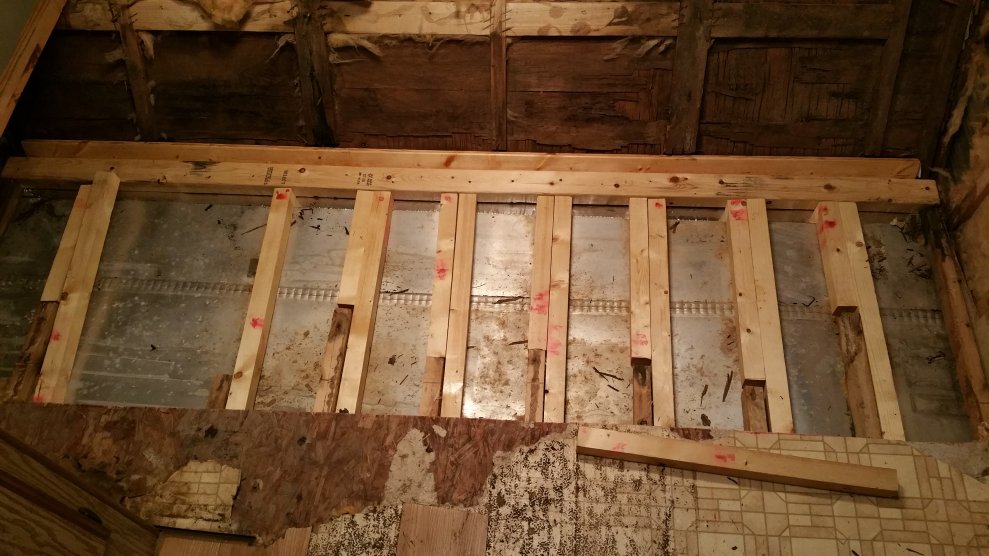
The bad, I did find another bad spot under the hamper. It was still damp too. It looks like I will need to take the front metal off after all but I will deal with that after the floor is secure. For some reason the picture is display sideways.

The good, the new damprid that I put in last week is still dry which means the trailer is drying out. The old one had quite a bit of liquid at the bottom. I am trying not to over think this too much but I need to make sure that I am understanding the “sistering” method. I have never had to do it before. Let me know if this is correct. The blue is where I am putting new wood using wood glue and screws through the side (not sure if this makes a difference).

Also, by the way. I think someone asked if there was any support underneath the camper in that area. There is no metal cross beam in that area. The frame goes around the left, front, and right of the area that I am working on, only the membrane in the middle. If this changes anything, please let me know.
That is all for today. Probably won’t be able to get to anything else until next weekend other than cutting the last couple of sister pieces. Thanks for all the help to this newbie. I cannot tell you how much you have helped me.
Tommie
__________________
|
|
|
|
|
02-06-2017, 10:23 AM
|
#31
|
|
Moderator
Join Date: Nov 2006
Location: Ohio
Posts: 12,651
SUN #89
|
Hi Tommie,
Your doing great!!!
On the sistering method, what you show is good. There is nothing wrong with it and it does give you some more floor joist material to attach to the 2 x 3 then was there originally. Which is a good thing.
There is always more then one way to do these things, and some my not add the extra board that extended straight from the original joist. They would just use the screwed on sister board. But again, these are short in length, it not that much extra wood and your drawing allows more wood to get a good connection to the 2 x 3 laying horizontal which is a good thing as that 2 x 3 is doing all the load carrying to hold up the floor. I'd say, use your method.
Thanks
John
__________________
Current Sunlines: 2004 T310SR, 2004 T1950, 2004 T2475, 2007 T2499, 2004 T317SR
Prior Sunlines: 2004 T2499 - Fern Blue
2005 Ford F350 Lariat, 6.8L V10 W/ 4.10 rear axle, CC, Short Bed, SRW. Reese HP trunnion bar hitch W/ HP DC
Google Custom Search For Sunline Owners Club
|
|
|
|
|
02-06-2017, 03:10 PM
|
#32
|
|
Senior Member
Join Date: Apr 2013
Location: Connecticut
Posts: 759
SUN #5039
|
I also like your method. Your doing just fine!
__________________
TT:1983 Sunline T-1550
TT:1996 Sunline T-2053
TV:2005 Toyota Tundra Double Cab 2UZ-FE i-Force 4.7 L DOHC (MFI) V8 4WD SR5 Automatic
P3 break control
"I know a lot about nothing and nothing about a lot"
|
|
|
|
|
02-06-2017, 08:15 PM
|
#33
|
|
Senior Member
Join Date: Aug 2015
Location: Connecticut
Posts: 164
SUN #7710
|
Cool drawing! That should be fine but if you want to add another joist to the left side of what you show, it wouldn't hurt anything and you would be "sandwiching" the old wood with new. I used that same type of tape on the inside of my aluminum walls that somehow were pitted or just worn/scraped away. They have been on for a month or so and haven't peeled off in the cold we have had.
Keep up the good work and keep those pictures coming.
Steve P
__________________
Steve P
|
|
|
|
|
02-06-2017, 08:55 PM
|
#34
|
|
Senior Member
Join Date: Sep 2016
Location: Virginia
Posts: 814
SUN #8893
|
Thanks Sep.
I am using 2x2s and wasn't sure if putting 2x2s on both sides would be too much. I had considered adding a metal plate on the left side over the join. I will put in what I have cut and then lay the plywood on top to see how it feels and go from there.
I am hoping that the repair tape holds. If it does, I will put down a little more in that area.
Thanks,
Tommie
__________________
|
|
|
|
|
02-06-2017, 09:19 PM
|
#35
|
|
Senior Member
Join Date: Sep 2016
Location: Virginia
Posts: 814
SUN #8893
|
Hello again,
Does anyone know how one would remove the built in laundry basket behind the dinette seat? The wood underneath and behind it needs to be replaced. There are no visible screws except for the screws holding the paneling that covers the water lines to the bathroom. I am trying not to take the aluminum siding off.

Thanks,
Tommie
__________________
|
|
|
|
|
02-07-2017, 09:09 AM
|
#36
|
|
Moderator
Join Date: Nov 2006
Location: Ohio
Posts: 12,651
SUN #89
|
I have not had one of those out, but I will venture a few good guesses.
I would look in the tall cabinet to the left of the storage hole you want to take out. Odds are high there could be a few screws in that tall cabinet going into storage hole.
Another option, using a small mirror and flashlight, look inside the storage hole up along the top for any kind of screw.
The reality most likely is, parts of that storage hole are screwed in from the outside. In these cases, some tricks have been:
1. working a hack saw blade between the wall and the cargo hole. Saw the screw off. This may scratch the wall board and may mess up the cabinet some, but a thin piece of metal between wall and blade may help save the wall.
2. Pulling the cabinet part off the wall once all the other side screws attaching are out. This creates holes in the wall that later need to be addressed.
3. Very carefully sacrificing the cabinet to save the wall. This means destruction of the cabinet to save the wall... But take the cabinet apart and then when you get to the wall area, very carefully cut out the boards around the screws.
4. Take the siding off if you want to save the cabinet and the wall. You know this one, just putting it on the list. Taking the siding off is not that bad and the corner molding needs to come off anyway for other repairs. Think through what you want to save or not.
I have not heard of an approach where there is no damage to the wall or the cabinet short of taking the siding off. Some ways have less damage then others.
A question you will need to ask yourself, what are you going to replace the rotted missing wall board with on the front wall? A choice may be, save the cabinet and sacrifice the wall board. In this case, work it to pulling on the the cabinet gently enough to yank the screws out of the wall but save the cabinet. Then replace the wall board along with the rest of the wall board so it all matches.
Others may have other tricks they have done.
This one is not a easy one if you cannot get to all the screws.
Hope this helps
John
__________________
Current Sunlines: 2004 T310SR, 2004 T1950, 2004 T2475, 2007 T2499, 2004 T317SR
Prior Sunlines: 2004 T2499 - Fern Blue
2005 Ford F350 Lariat, 6.8L V10 W/ 4.10 rear axle, CC, Short Bed, SRW. Reese HP trunnion bar hitch W/ HP DC
Google Custom Search For Sunline Owners Club
|
|
|
|
|
02-07-2017, 11:19 AM
|
#37
|
|
Senior Member
Join Date: Sep 2016
Location: Virginia
Posts: 814
SUN #8893
|
Thanks JohnB.
I have come to the realization that I may not have any choice but to take off the front metal siding. As I move along in this process and now that everything seems to be dried out for the most part, the damage seems to be more extensive and most of the front with the exception of the very middle has to be replaced. I would like to salvage what I can in regards to hampers, cabinets, etc.
I am going to try to take some of the outside bottom front loose this weekend if I can get the floor to a point that I can stand on it.
Thanks again,
Tommie
Sent from my SM-N910V using Tapatalk
__________________
1987 Sunline T1550
2012 Ford Expedition EL Limited 5.4L V8, 4WD
"Twenty years from now you will be more disappointed by the things that you didnt do than by the ones you did do..." Mark Twain]
|
|
|
|
|
02-11-2017, 05:08 PM
|
#38
|
|
Senior Member
Join Date: Sep 2016
Location: Virginia
Posts: 814
SUN #8893
|

Good evening,
Just a quick update. I finished up cutting all of the replacement pieces of wood. Went out to lay them all out and found that the fill-in pieces are about a half a inch too short.
The way I see it, I have two choices: I can either fill in the gaps with small pieces of wood using the subfloor adhesive or I can recut the fill-in pieces since I have plenty of wood left over. The sister pieces should be okay as I cut those about 12 inches longer than their fill-in mates.
I also started trying taking out some of the screws on the front to remove the metal shell. The screws are so badly rusted that it is proving to be quite a task. Quick question. There is some kind of wood paneling of some sort in the front wall. It is so badly damaged that I really cannot tell what it was and didn't know if it has to even be replaced. I was thinking about just taking it out since I planned to use the foam insulation. It appears to only be at the bottom of the front wall. I see no evidence of it on the front upper wall or the side walls.

Well that is all for now. Thanks for looking and for all the help.
Tommie
__________________
|
|
|
|
|
02-11-2017, 07:02 PM
|
#39
|
|
Moderator
Join Date: Nov 2006
Location: Ohio
Posts: 12,651
SUN #89
|
Hi Tommie,
Your gaining. Good for you!!
Your 1/2" length issue... Welcome to the club!!! Most of us have done something link this before, it happens...
Now what to do with it? Technically "if" you "did not" have the 1/2" gap in that location, you are not gaining a tremendous amount of strength if any from having it. Having the sister'ed board glued and screwed on to the original floor joist is where the load bearing strength comes from.
By having the filler board in place even at 1/2" short, glued and screwed to the sister board you are gaining the ability to have a better connection at the 2 x 3.
What I am saying is, from what I can see, you do not have to do anything with that 1/2" gap. Just leave it. If you want to fill it, you can but it will not gain you any more notable strength. Other folks may see a reason that I'm not, so always be open to listening.
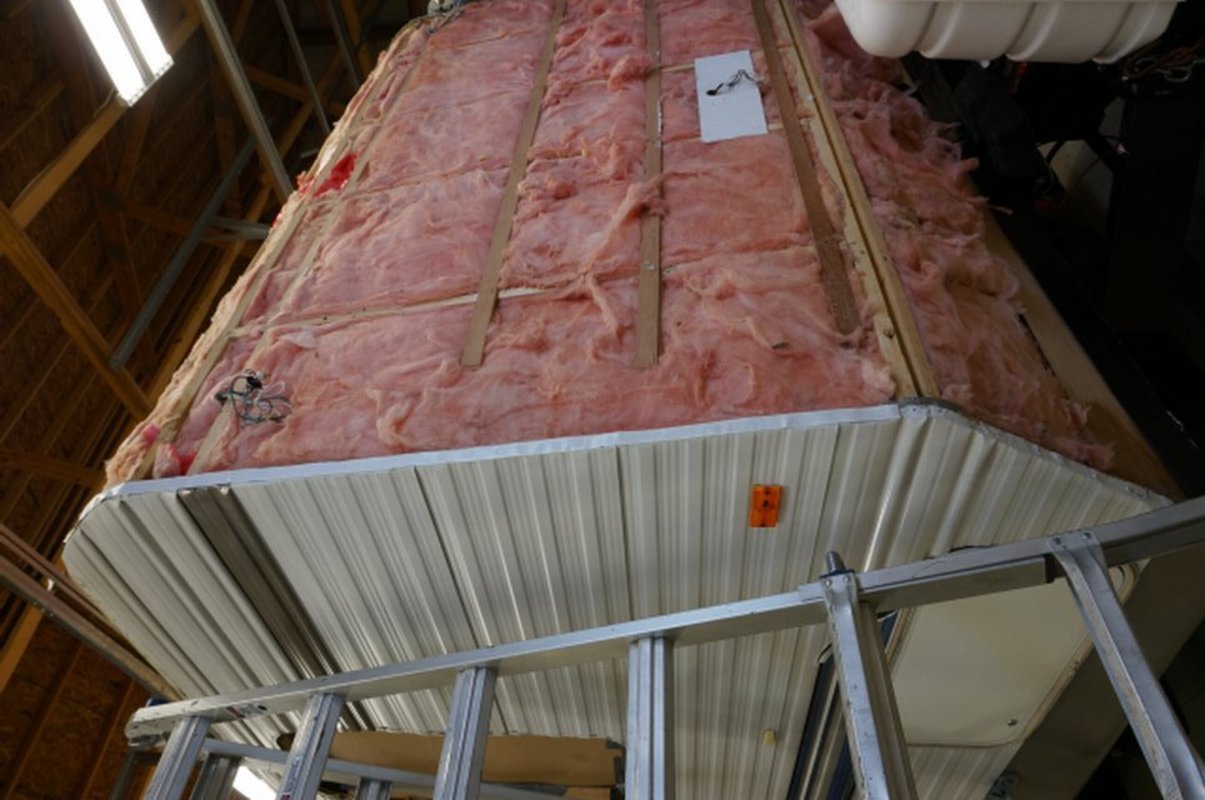
The thin board on the front of the lower part of the camper. Sunline still put that strip of 1/8" laun on even in 2006 models. See here from my Son's camper we rebuilt last year.
This is what it looked like when we took the front siding off. A piece of 1/8" laun board at the bottom

And then what we did with it. We cut 2" foam panels to slide down in between the studs. The though was, the foam board could take any moisture better in this area then the bat fiberglass. If there was any pin hole in the black Darco membrane, the front of the camper gets blasted with water when towing during wet conditions. Granted any moisture is a problem, but I had left over foam board and we used it up.


Now why is it there? I am not 100% sure, but this is what I "think" it is used for.
1. On the front of the camper, that lower piece of siding gains added support to the thin sheet metal skin. Added support meaning a backing board the full width of the camper.
2. It also acts as a full width shim. When the siding corners are folded over, and they put 1/8" butyl sealing tape between the fold, that creates an uneven surface from the corner of the camper to the middle are wall studs. By having this 1/8" laun piece in place, it shims out the siding to get you started with being even straight across the studs.
3. When all stapled and glued to the wall studs, it gives some extra rigidity to the lower lower part of the front wall.
4. On the front and rear walls of the camper, Sunline stapled short shims of 1/8 luan to even out the wall studs with the corners. If they did not do that, the siding on the front and back wall be very wavy as the corners stick out more then the inner wall studs. We used a long straight edge where every siding staple joint went. We then added back the shims Sunline had at the wall studs. Some we made almost full length, others 3" long pieces like they did. This created a straight surface to staple the siding to which created straight siding. See here
You can see the little strips attached at each wall stud

We also like Sunline, added butyl caulk on the front splice joints to seal out water from beating in around that joint when towing. And we had to use a heat gun to soften that joint to get it apart


You can see here the butyl tape which is under the white peal-able release paper.
Hope this helps
John
__________________
Current Sunlines: 2004 T310SR, 2004 T1950, 2004 T2475, 2007 T2499, 2004 T317SR
Prior Sunlines: 2004 T2499 - Fern Blue
2005 Ford F350 Lariat, 6.8L V10 W/ 4.10 rear axle, CC, Short Bed, SRW. Reese HP trunnion bar hitch W/ HP DC
Google Custom Search For Sunline Owners Club
|
|
|
|
|
02-11-2017, 07:31 PM
|
#40
|
|
Senior Member
Join Date: Sep 2016
Location: Virginia
Posts: 814
SUN #8893
|
Thanks JohnB.
The area that I am speaking of is the lower half of the front. This material is behind the wall studs. The insulation was in front of it before I had to remove the insulation because it was wet.

Judging from what you have said, it looks like it will need to be replaced instead of just removed. It is not a problem I just do not want to remove something that is needed.
Thanks again.
Tommie
__________________
|
|
|
|
|
|
|
Currently Active Users Viewing This Thread: 1 (0 members and 1 guests)
|
|
|
 Posting Rules
|
You may not post new threads
You may not post replies
You may not post attachments
You may not edit your posts
HTML code is Off
|
|
|
|
 » Recent Sunline Discussions
 |
|
|
|
|
|
|
|
|
|
|
|
|
|
|
|
|
|
|
|
|
|
|
|
|
|


 Linear Mode

