 |
|
 05-25-2017, 08:05 PM
|
#181
|
|
Moderator
Join Date: Nov 2006
Location: Ohio
Posts: 12,656
SUN #89
|
Actually checking, it seems ABS is used for shower basins in some cases.
Icon with ABS Shower Pan SP200
Lippert with ABS https://store.lci1.com/wsp2432rhspk-...shower-pan-spk
Ameri Kart with ABS Ameri-Kart - Recreational Vehicles (RV) Parts and Tanks | Ameri-Kart
I never looked for an RV shower basin before. ABS may be the thing they make them out of.
__________________
Current Sunlines: 2004 T310SR, 2004 T1950, 2004 T2475, 2007 T2499, 2004 T317SR
Prior Sunlines: 2004 T2499 - Fern Blue
2005 Ford F350 Lariat, 6.8L V10 W/ 4.10 rear axle, CC, Short Bed, SRW. Reese HP trunnion bar hitch W/ HP DC
 Google Custom Search For Sunline Owners Club
|

|

|
|
05-25-2017, 08:12 PM
|
#182
|
|
Senior Member
Join Date: Apr 2013
Location: Connecticut
Posts: 759
SUN #5039
|
I work with plastics a lot and can generally tell. I'll check when I get home to be sure. A little trick/test on some of these plastics is to touch a little area (inconspicuous area) with a "Qtip" dabbed with lacquer thinner, acetone or mek, etc. to see if is affected by the solvent, i.e. tacky. If so it very well may be ABS, styrene, PVC, CPVC, etc. as opposed to Delrin, nylon, polyethylene, polypropylene, etc. Also taking a knife and scraping an edge and feel can help, however this takes experience and can only give a very general guess.
Color can also help. The ABS natural often is that off white that becomes the vanilla color we all like so much.
These pans are thermoformed.
My home shower pan is ABS.
__________________
__________________
TT:1983 Sunline T-1550
TT:1996 Sunline T-2053
TV:2005 Toyota Tundra Double Cab 2UZ-FE i-Force 4.7 L DOHC (MFI) V8 4WD SR5 Automatic
P3 break control
"I know a lot about nothing and nothing about a lot"
|
|
|
|
|
05-25-2017, 08:13 PM
|
#183
|
|
Senior Member
Join Date: Apr 2013
Location: Connecticut
Posts: 759
SUN #5039
|
Quote:
Originally Posted by JohnB

|
Yep!
__________________
TT:1983 Sunline T-1550
TT:1996 Sunline T-2053
TV:2005 Toyota Tundra Double Cab 2UZ-FE i-Force 4.7 L DOHC (MFI) V8 4WD SR5 Automatic
P3 break control
"I know a lot about nothing and nothing about a lot"
|
|
|
|
|
05-25-2017, 08:23 PM
|
#184
|
|
Senior Member
Join Date: Apr 2013
Location: Connecticut
Posts: 759
SUN #5039
|
John,
If one looks at my albums, I have a damaged AC shroud of (ABS) that I rebuilt . In this case added in the area of damage with fiberglass. I just painted it (after it sitting for a couple years) and will add finished photos when I can.
The repair can be treated to some extent as with the repair of the ABS holding tanks (black and grey). The fresh water tanks are poly, which for the most part would need to be plastic welded (a heat process that takes practice to get good at). If you need to color match and fill a gap you can take shavings from some inconspicuous area and dissolve in MEK or acetone to get a paste for gap filling. The evaporation time can be rather lengthy once paste is in place and may need to be done more than once as shrink very well may acquire in larger cracks.
The major difference between a tank repair and the shower pan repair is the tank has a more uniform load whereas the shower pan has a moving concentrated load of ones feet/body.
The ABS shower pan can be "glassed" as well, esp. 1) I haven't had luck finding a 24"x24" replacement for my T-1550 and 2) if it cracked the odds are pretty good the plastic has lost a lot of the polymers and will crack again in some other areas. This a common aging problem, esp. with UV, etc. causing the dried "kiss of death".
The polyethylene can really be damaged by UV as well. It really helps to have UV inhibitors in the composition.
__________________
TT:1983 Sunline T-1550
TT:1996 Sunline T-2053
TV:2005 Toyota Tundra Double Cab 2UZ-FE i-Force 4.7 L DOHC (MFI) V8 4WD SR5 Automatic
P3 break control
"I know a lot about nothing and nothing about a lot"
|
|
|
|
|
05-25-2017, 09:12 PM
|
#185
|
|
Senior Member
Join Date: Apr 2013
Location: Connecticut
Posts: 759
SUN #5039
|
Quote:
Originally Posted by Thomascine
Good evening JohnB.
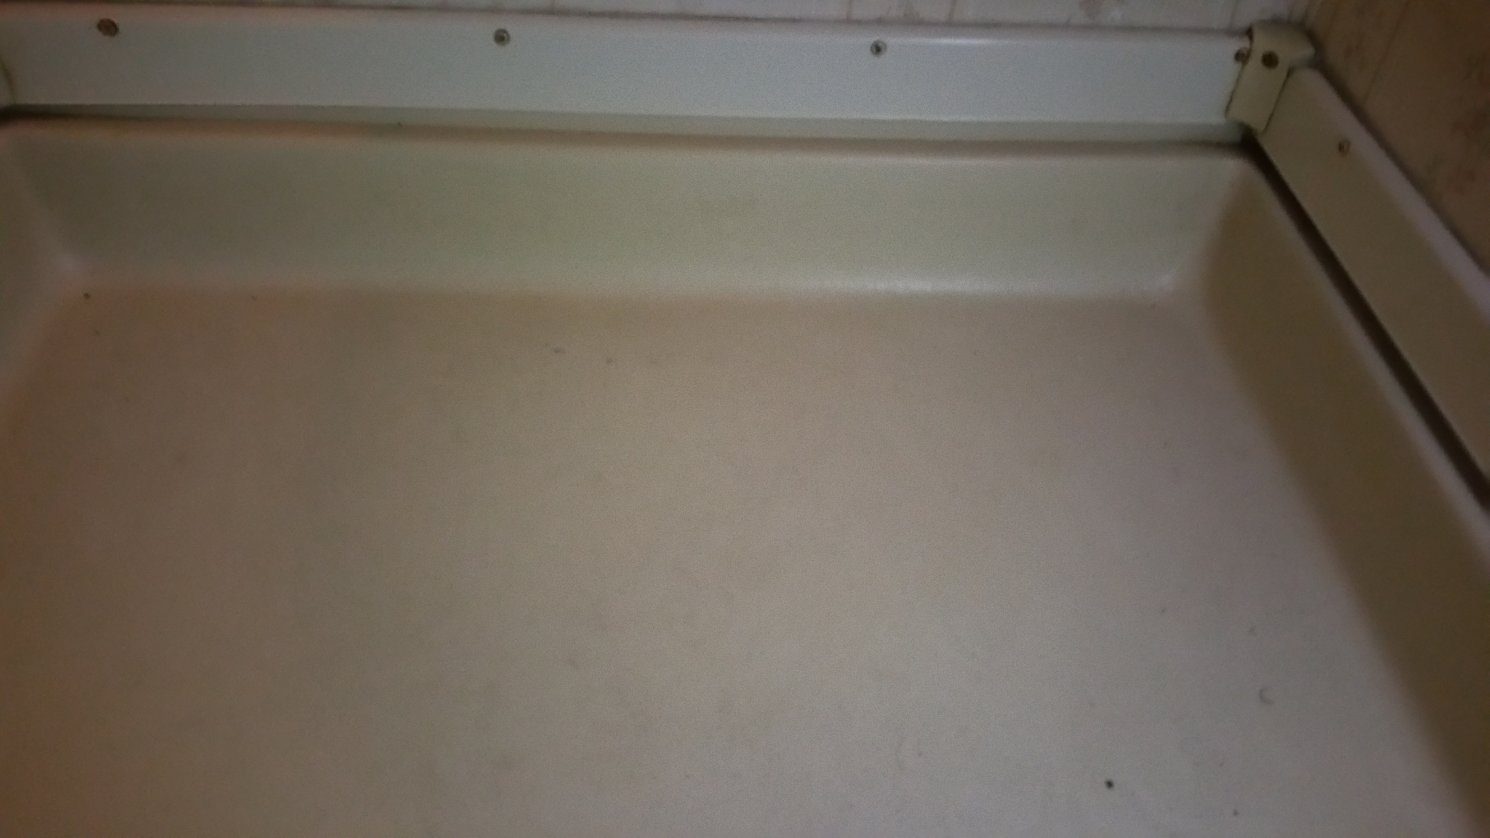
If I remember, the crack is near one of the corners. Tomorrow, I will try to take off the access panel to make sure there is no floor damage. I can feel flooring underneath the pan but the pan does flex a little. I have been looking at some YouTube videos where some people use expandable foam to help support the pan so that it does not flex as much and reduce cracking. I have also found that some people use FlexSeal to repair and seal it. It feels like fiberglass but how can I tell what it is made of?
Thanks,
Tommie
|
I too have considered the FlexSeal approach esp. if I do the solvent repair. This would be in my case my home 34"x34" ABS shower pan, which I also can not find an exact replacement for. I also can't enlarge the footprint either.
__________________
TT:1983 Sunline T-1550
TT:1996 Sunline T-2053
TV:2005 Toyota Tundra Double Cab 2UZ-FE i-Force 4.7 L DOHC (MFI) V8 4WD SR5 Automatic
P3 break control
"I know a lot about nothing and nothing about a lot"
|
|
|
|
|
05-25-2017, 09:13 PM
|
#186
|
|
Senior Member
Join Date: Sep 2016
Location: Virginia
Posts: 814
SUN #8893
|
Good evening.
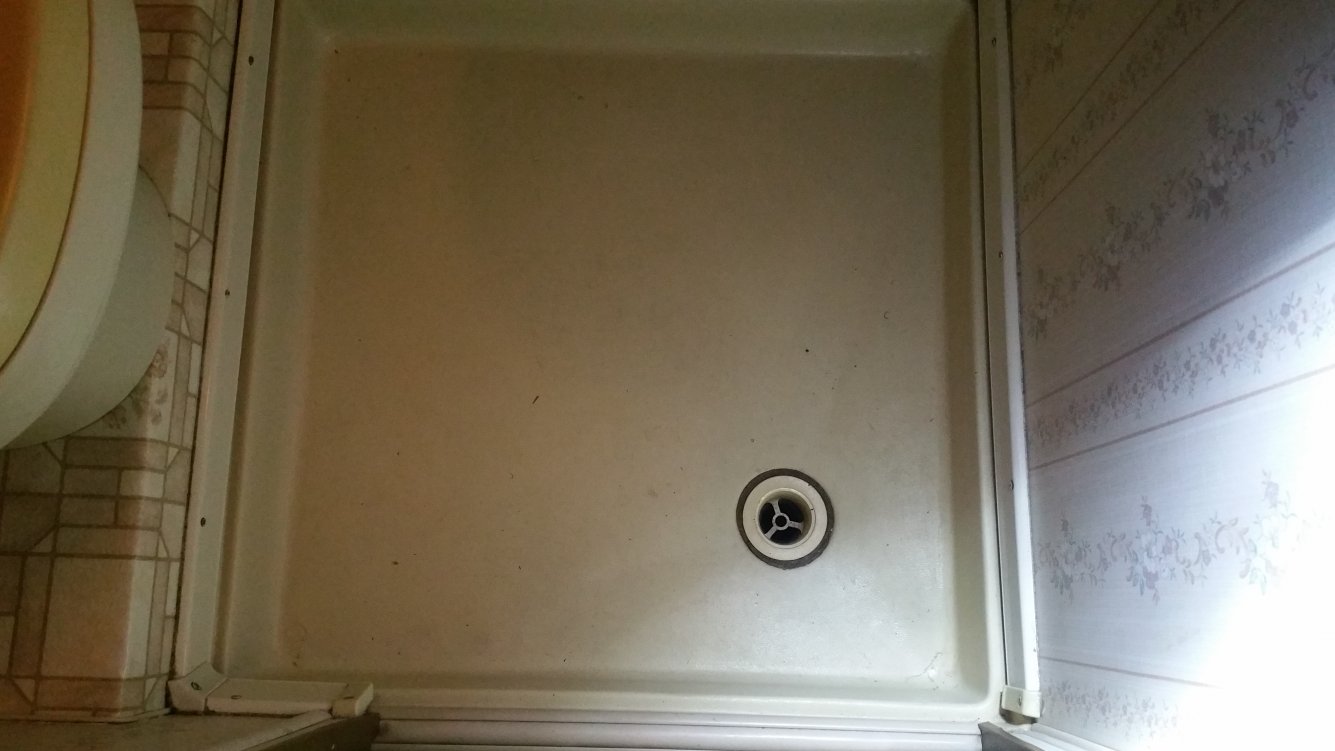
JohnB and Bunjin, thank you for all of the info. I did not have time to take the access panel off to take a look at the bottom of the pan but I will take a look at the links provided. The inside of the pan is textured.
Any thoughts on the FlexSeal solution?
Thanks,
Tommie
__________________
1987 Sunline T1550
2012 Ford Expedition EL Limited 5.4L V8, 4WD
"Twenty years from now you will be more disappointed by the things that you didnt do than by the ones you did do..." Mark Twain]
|
|
|
|
|
05-25-2017, 09:28 PM
|
#187
|
|
Senior Member
Join Date: Sep 2016
Location: Virginia
Posts: 814
SUN #8893
|
Quote:
Originally Posted by bunjin
I too have considered the FlexSeal approach esp. if I do the solvent repair. This would be in my case my home 34"x34" ABS shower pan, which I also can not find an exact replacement for. I also can't enlarge the footprint either.
|
Hi Bunjin,
Have you ever used FlexSeal in any capacity? The advertisements say that it can be used in different applications. Even if it is a temporary fix that will last a few months, this would allow us to get at least 1 or 2 camping adventures in.
Thanks,
Tommie
__________________
1987 Sunline T1550
2012 Ford Expedition EL Limited 5.4L V8, 4WD
"Twenty years from now you will be more disappointed by the things that you didnt do than by the ones you did do..." Mark Twain]
|
|
|
|
|
05-25-2017, 09:59 PM
|
#188
|
|
Senior Member
Join Date: Apr 2013
Location: Connecticut
Posts: 759
SUN #5039
|
I have used FlexSeal. My son tried to seal an area around my chimney/roof flashing with it. I wasn't able to go onto the roof myself (for health reasons, a long story in itself) to check things out. It either didn't work for that purpose or we didn't find the leak.
I also used it to coat a cheap Harbor Freight trailer hitch powder coated cargo carrier and hardware hopefully to stave off early rust. I haven't put that to the test.
FlexSeal can be purchased at Walmart (at least in my town) and Home Depot sells a similar product which is what I can tell pretty much the same thing. I used both on the carrier.
I'm still at my place of work so won't be able to tell for sure but the texture you are seeing I'm pretty sure is what is called "hair cell", a another indicator of one of the ABS's
I think the FlexSeal or it's counterpart would work for you, esp. if your crack isn't opening up like a crevice. The FlexSeal has give, which is needed for the shower pan loaded I mentioned, i.e. moving concentrated feet/ body loads. In time you may have to readdress something, but who knows maybe not!
My pan was damaged on the lip that is under the trim as shown in your pictures. The guy knew he wasn't going to use the pan and kinda just torn it out. His wife was just too large a person to use that shower period. He did a very nice job on the closing of plumbing and floor that I haven't been able to bring myself to undoing it to restore.
My experience is live with the camper awhile before making many changes as what you first think you want to do is not what you will indeed do.
Hope this helps. sorry for going off onto other tangents.
__________________
TT:1983 Sunline T-1550
TT:1996 Sunline T-2053
TV:2005 Toyota Tundra Double Cab 2UZ-FE i-Force 4.7 L DOHC (MFI) V8 4WD SR5 Automatic
P3 break control
"I know a lot about nothing and nothing about a lot"
|
|
|
|
|
05-25-2017, 10:05 PM
|
#189
|
|
Senior Member
Join Date: Sep 2016
Location: Virginia
Posts: 814
SUN #8893
|
LOL...no problem. Thanks for the info. Bunjin. Have a good evening.
Tommie
__________________
|
|
|
|
|
05-25-2017, 10:12 PM
|
#190
|
|
Senior Member
Join Date: Apr 2013
Location: Connecticut
Posts: 759
SUN #5039
|
Tommie,
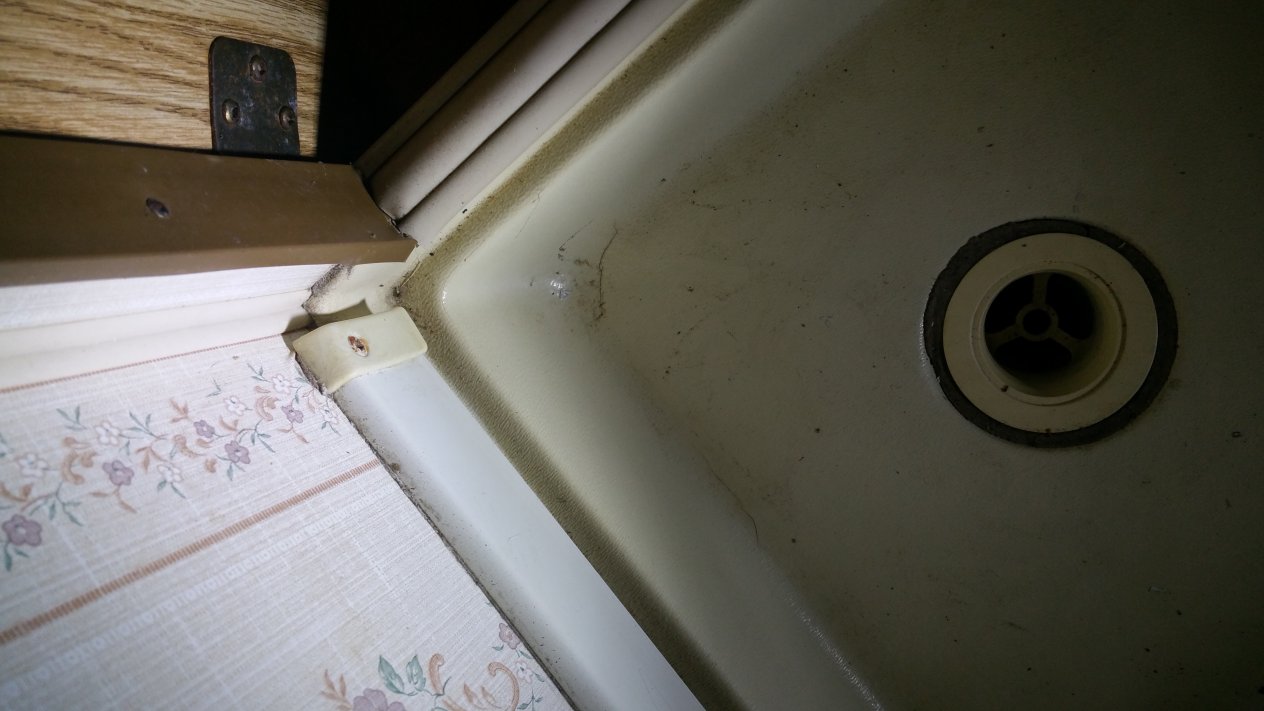
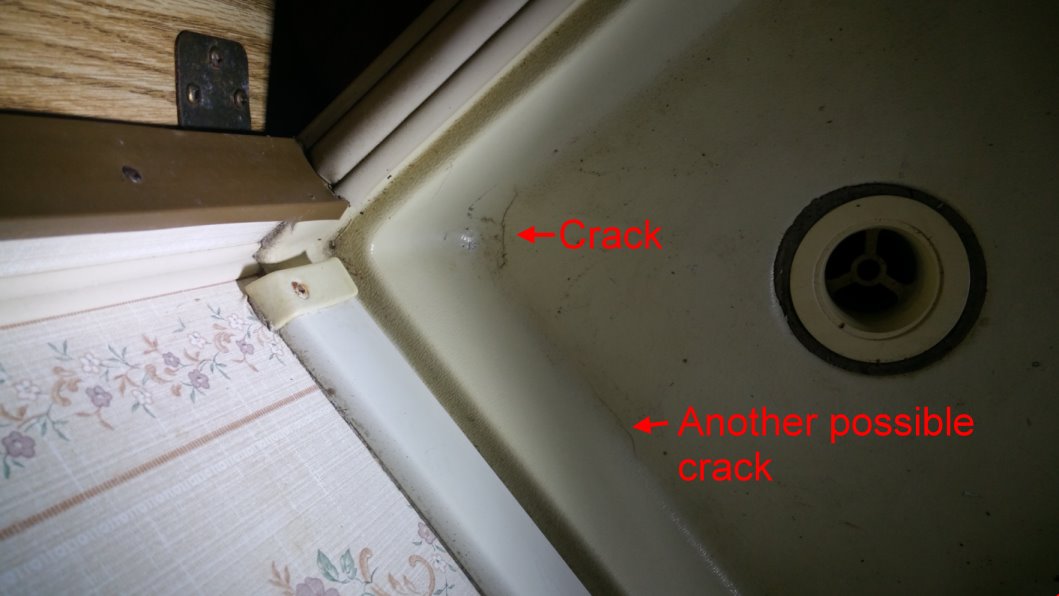
I just looked at you pictures closely and can see your crack. It is still more "hairline" than "crevice". I would get a small can of ABS or multi plastic (ABS, CPVC, PVC, etc.) pipe cement (clear) and coat the crack sparingly after first cleaning well and then spray the clear FexSeal or equalant onto the whole pan. Practice spraying onto say some scrap wood or such first to get the feel for using as it is trickier than the commercials show.
I feel pretty good as to this giving you some time and usage.
__________________
TT:1983 Sunline T-1550
TT:1996 Sunline T-2053
TV:2005 Toyota Tundra Double Cab 2UZ-FE i-Force 4.7 L DOHC (MFI) V8 4WD SR5 Automatic
P3 break control
"I know a lot about nothing and nothing about a lot"
|
|
|
|
|
05-26-2017, 05:56 AM
|
#191
|
|
Senior Member
Join Date: Sep 2016
Location: Virginia
Posts: 814
SUN #8893
|
Thanks Bunjin! I will give it a go.
Thanks,
Tommie
Sent from my SM-N910V using Tapatalk
__________________
1987 Sunline T1550
2012 Ford Expedition EL Limited 5.4L V8, 4WD
"Twenty years from now you will be more disappointed by the things that you didnt do than by the ones you did do..." Mark Twain]
|
|
|
|
|
05-26-2017, 09:03 AM
|
#192
|
|
Member
Join Date: Apr 2017
Location: Virginia
Posts: 61
SUN #9248
|
Great information this will help a lot in my renovation! Thanks for sharing
__________________
|
|
|
|
|
05-26-2017, 05:39 PM
|
#193
|
|
Senior Member
Join Date: Apr 2013
Location: Connecticut
Posts: 759
SUN #5039
|
ABS repairs
Tommie,
For the time being, if I were going to repair and seal the ABS shower base (which by the way is hair cell I verified last night) like you have, I would do one of the following after a good cleaning with soap and water and maybe ammonia water solution.
1) Get a small can of multi plastic cement for plastic plumbing pipe/fitting joinery such as WELD*ON, Oatly, etc. which should be available from Home Depot, Lowes and/or a hardware store. Preferably not water thin, rather a heavier viscosity. Using a cheap artist brush coat the cracks and spread out a little beyond on all sides. The goal is to bandage the cracks to help keep them from spreading. They will never be as strong as the original plastic.
Top coat with FlexSeal or equivalent.
2) Alternative to cement use instant glue and do same. You may have more uses in the future for the glue then the cement. The glue can be gotten in small quantities at Walmart, etc. Hobby stores also sell a vast array of the instant glues. The biggest difference between the glue and the cement is that instant glue is more brittle.
I'll show pictures of the finished AC shroud I repaired by using fiberglass on. As I said earlier, my albums show the original damage.
finished and painted shroud outside back.jpg
inside glass work 2.jpg
inside showing glass work 1.jpg
outside painted front top.jpg
inside glass work 3.jpg I would think your base could also be done in fiberglass in the future if need be.
__________________
TT:1983 Sunline T-1550
TT:1996 Sunline T-2053
TV:2005 Toyota Tundra Double Cab 2UZ-FE i-Force 4.7 L DOHC (MFI) V8 4WD SR5 Automatic
P3 break control
"I know a lot about nothing and nothing about a lot"
|
|
|
|
|
05-26-2017, 07:07 PM
|
#194
|
|
Senior Member
Join Date: Sep 2016
Location: Virginia
Posts: 814
SUN #8893
|
Thanks for all of the information Bunjin. It is very much appreciated. I will probably go the instant glue route since that is something that I make use of in the future for something else. I am up to my eyeballs in trying to put the front back together.
Thanks again.
Tommie
__________________
|
|
|
|
|
05-26-2017, 07:12 PM
|
#195
|
|
Senior Member
Join Date: Apr 2013
Location: Connecticut
Posts: 759
SUN #5039
|
Your doing a great job! Keep it up and enjoy your camper. It is a very nice model.
__________________
TT:1983 Sunline T-1550
TT:1996 Sunline T-2053
TV:2005 Toyota Tundra Double Cab 2UZ-FE i-Force 4.7 L DOHC (MFI) V8 4WD SR5 Automatic
P3 break control
"I know a lot about nothing and nothing about a lot"
|
|
|
|
|
05-26-2017, 07:21 PM
|
#196
|
|
Senior Member
Join Date: Sep 2016
Location: Virginia
Posts: 814
SUN #8893
|
Good evening,
I am trying to put the front corners back together. How close of a fit does it have to be? I really do not have much to go by since the front corners were pretty rotted out and fell apart.


I want to make sure this goes back together right the first time.
Thanks,
Tommie
__________________
1987 Sunline T1550
2012 Ford Expedition EL Limited 5.4L V8, 4WD
"Twenty years from now you will be more disappointed by the things that you didnt do than by the ones you did do..." Mark Twain]
|
|
|
|
|
05-31-2017, 09:38 PM
|
#197
|
|
Moderator
Join Date: Nov 2006
Location: Ohio
Posts: 12,656
SUN #89
|
Quote:
Originally Posted by Thomascine
Good evening,
I am trying to put the front corners back together. How close of a fit does it have to be? I really do not have much to go by since the front corners were pretty rotted out and fell apart.
|
Hi Tommie,
Do you mean how tight is the wood to wood fit, or the metal siding to the wood fit? Or both?
On the wood to wood, I see the front wall angle joint you have a Kreg'ed and that looks real tight. The lower joint of that lower angled board does not yet look finished or is it? It looks like there is lot of gap between the floor wood and the lower front wall.
As a general rule, the tighter the wood to wood fit in this structural situation the better if you can get it. A tight Kreg pocket hole screw fit with glue if you can, is great! However not every joint is always possible like this. The key is the joint is strong, and does not have a lot of wiggle from a loose fit up in the highest strength direction. And the strength direction varies by the joint it is.
In some cases the wood stacked on top of wood pushing down is the high strength direction as the wood itself is taking the load and the screws are only holding it in place from shifting. This is a compression joint. In this case, a large gap between the wood joint would be bad as there is no wood to wood back up the downward pressure surfaces. While you may not get 100% wood to wood, even 80% is good. You just do not want 20% wood to wood and 80% air gap.
On joints that pull themselves apart (as in tension), here again the screws are doing the work as gravity is no longer in the equation. The fasteners have to carry the load being screwed into the wood. In this joint type, good wood contact helps as the screws are then tight and have the most penetration into the wood to gain a grip. A very loose, large gaped joint here could fail quick with much side to side movement.
If you can glue the inside luan wall board to the wall studs across the joint and some staples to hold it until the glue dries, this too helps stiffen up the joint. This trick is not always doable pending location, but use it when you can.
That said, Sunline used large staples on both sides to hold the studs to the lower frame sill. Those staples allowed both flex and pull apart strength until the staples rust out. If you can get your Kreg jig to work in the location, that I would say is better then the staples for strength in most cases. That and some glued wall board over the joint if it can be.
On the metal siding over the top of the wood corner bend, again here the tighter the siding fits the better and shooting staples in to hold the siding to the wood tightens that up a lot. Since you are using old siding reused, it will most likely never be a perfect fit but there should be more of a quantity of close to perfect then very loose areas. As long as the siding is held well to the good wood, the butyl tape and then the corner molding screws add extra strength and the water tight seal needed.
If this does not explain what you are in need of, ask away some more on your concerns.
Keep up the good work. Your doing great!
John
__________________
Current Sunlines: 2004 T310SR, 2004 T1950, 2004 T2475, 2007 T2499, 2004 T317SR
Prior Sunlines: 2004 T2499 - Fern Blue
2005 Ford F350 Lariat, 6.8L V10 W/ 4.10 rear axle, CC, Short Bed, SRW. Reese HP trunnion bar hitch W/ HP DC
Google Custom Search For Sunline Owners Club
|
|
|
|
|
05-31-2017, 10:05 PM
|
#198
|
|
Senior Member
Join Date: Sep 2016
Location: Virginia
Posts: 814
SUN #8893
|
Thanks JohnB.
My concern right now is wood to siding. But from what I'm reading it sounds like I may have to recut the two lower corner pieces because they are not even I think 80% wood to wood.
I do have one of the lower corners and the way it's cut it's not cut on an angle to have a high wood to wood join. I will give it a go and see if I can get to a better fit.
Thanks for the input.
Tommie
Sent from my SM-N910V using Tapatalk
__________________
1987 Sunline T1550
2012 Ford Expedition EL Limited 5.4L V8, 4WD
"Twenty years from now you will be more disappointed by the things that you didnt do than by the ones you did do..." Mark Twain]
|
|
|
|
|
06-03-2017, 10:22 AM
|
#199
|
|
Senior Member
Join Date: Sep 2016
Location: Virginia
Posts: 814
SUN #8893
|
Quote:
Originally Posted by JohnB
Hi Tommie,
Do you mean how tight is the wood to wood fit, or the metal siding to the wood fit? Or both?
On the wood to wood, I see the front wall angle joint you have a Kreg'ed and that looks real tight. The lower joint of that lower angled board does not yet look finished or is it? It looks like there is lot of gap between the floor wood and the lower front wall.
As a general rule, the tighter the wood to wood fit in this structural situation the better if you can get it. A tight Kreg pocket hole screw fit with glue if you can, is great! However not every joint is always possible like this. The key is the joint is strong, and does not have a lot of wiggle from a loose fit up in the highest strength direction. And the strength direction varies by the joint it is.
In some cases the wood stacked on top of wood pushing down is the high strength direction as the wood itself is taking the load and the screws are only holding it in place from shifting. This is a compression joint. In this case, a large gap between the wood joint would be bad as there is no wood to wood back up the downward pressure surfaces. While you may not get 100% wood to wood, even 80% is good. You just do not want 20% wood to wood and 80% air gap.
On joints that pull themselves apart (as in tension), here again the screws are doing the work as gravity is no longer in the equation. The fasteners have to carry the load being screwed into the wood. In this joint type, good wood contact helps as the screws are then tight and have the most penetration into the wood to gain a grip. A very loose, large gaped joint here could fail quick with much side to side movement.
If you can glue the inside luan wall board to the wall studs across the joint and some staples to hold it until the glue dries, this too helps stiffen up the joint. This trick is not always doable pending location, but use it when you can.
That said, Sunline used large staples on both sides to hold the studs to the lower frame sill. Those staples allowed both flex and pull apart strength until the staples rust out. If you can get your Kreg jig to work in the location, that I would say is better then the staples for strength in most cases. That and some glued wall board over the joint if it can be.
On the metal siding over the top of the wood corner bend, again here the tighter the siding fits the better and shooting staples in to hold the siding to the wood tightens that up a lot. Since you are using old siding reused, it will most likely never be a perfect fit but there should be more of a quantity of close to perfect then very loose areas. As long as the siding is held well to the good wood, the butyl tape and then the corner molding screws add extra strength and the water tight seal needed.
If this does not explain what you are in need of, ask away some more on your concerns.
Keep up the good work. Your doing great!
John
|
Here is a picture from the outside of the lower corner on the passenger side. 
If I am understanding correctly I may even have to cut out a piece of this Edge Board here and replace it. I just don't know how I'm going to do it because I don't have anything to cut with outside and not cut the membrane.
Thanks,
Tommie
Very frustrated right now.[emoji30]
Sent from my SM-N910V using Tapatalk
__________________
1987 Sunline T1550
2012 Ford Expedition EL Limited 5.4L V8, 4WD
"Twenty years from now you will be more disappointed by the things that you didnt do than by the ones you did do..." Mark Twain]
|
|
|
|
|
06-03-2017, 12:47 PM
|
#200
|
|
Moderator
Join Date: Nov 2006
Location: Ohio
Posts: 12,656
SUN #89
|
Hi Tommie,
Don't despair, there is always a way...
For the new piece of wood coming down the front on an angle, I'm assuming you can trace the line that needs to be cut and then cut a new board long enough to put in place. Yes/No or is this an area you are having problems with determining that angle to cut at?
Worst case, make a cardboard template that fits. Then transfer to the wood and cut it.
For the floor piece that looks bad on the end, here are a few ways on how to cut that and not cut the bottom aluminum membrane.
Mark off where you want to cut the old out and put new in.
To cut out the old, well it depends on what you have to work with. Do you have electric power out at the camper area? We can work around not having it. Here is a no 120 VAC power method. I'm assuming you have some kind of drill as you have been using it at the camper.
Try this. Find a hacksaw blade. Just the blade, if you do not have a hack saw, you can buy just the blade. They look like this. DEWALT 12 in. 18, 24 and 32-TPI Bi-Metal Hacksaw Blade (3-Pack)-DWHT20558 - The Home Depot
Many brands of them and in this case, do not need to get the Dewalt. For wood cutting look for a smaller tooth per inch (TPI), like a 18 TPI. The 24 and 32 will work, just they are finer cutting and will take longer to cut.
At the top of the board you are going to cut, drill a hole at the top of the board large enough to fit the hack saw blade through. You drill it so the edge of the drill just touches the line you are going to cut. Let the bit drill out wood on the side you are going to throw away.
Take the hacksaw blade and if you have vise grips, grip the blade and lock the pliers to make a handle. The teeth on the blade need to face away from you, this will cut when you push. You may find pulling towards you will work better and not buckle the blade, then turn the blade teeth to point towards you and pull towards you to cut. If you have no vise grips, use pliers.
Insert the blade in the hole and saw down the line to the bottom and stop before dragging the bottom on the aluminum membrane. Turn the blade around and cut up to get the last part of the drilled hole circle out. Then kreg screw in your new board.
If you have access to power, you can use a saber saw (jig saw) in place of the hack saw blade.
Years ago before the age of cordless tools, key hole saws were more common. Now a days all the power tools have sort of took over.
These still exist at least.
A blade holder for the hack saw blade
Stanley 10 in. Mini Hack Saw-15-809 - The Home Depot
A jab saw for wood. Also watch out they make these for drywall too, you want the wood one.
Stanley 6-1/4 in. Jab Saw with Wood Handle-15-206 - The Home Depot
They call this one a compass saw
Stanley FatMax 12 in. Compass Saw-17-205 - The Home Depot
Does this help?
John
__________________
Current Sunlines: 2004 T310SR, 2004 T1950, 2004 T2475, 2007 T2499, 2004 T317SR
Prior Sunlines: 2004 T2499 - Fern Blue
2005 Ford F350 Lariat, 6.8L V10 W/ 4.10 rear axle, CC, Short Bed, SRW. Reese HP trunnion bar hitch W/ HP DC
Google Custom Search For Sunline Owners Club
|
|
|
|
|
|
|
Currently Active Users Viewing This Thread: 1 (0 members and 1 guests)
|
|
|
 Posting Rules
|
You may not post new threads
You may not post replies
You may not post attachments
You may not edit your posts
HTML code is Off
|
|
|
|
 » Recent Sunline Discussions
 |
|
|
|
|
|
|
|
|
|
|
|
|
|
|
|
|
|
|
|
|
|
|
|
|
|
|
|


 Linear Mode

