 |
|
 09-04-2017, 06:22 PM
|
#321
|
|
Moderator
Join Date: Nov 2006
Location: Ohio
Posts: 12,651
SUN #89
|
Quote:
Originally Posted by Thomascine

Woohoo! That seem to fix the issue.
I get the same reading on the voltmeter and the green light on the detector stays on with both battery and shore power. Another problem solved.
|
Hi Tommie,
Glad this fixed you up. Great!
Now that you have your new USB system volt meter wired direct to the battery, (this allows you to monitor the battery and is a good thing) what does the voltage read (whats the number) when you are plugged into shore power and then when you are just on battery?
Your statement was that the number is the same but knowing what that number is tells us something about the charger.
If the battery was at rest, and say reading 12.7 volts which means it is fully charged, the converter might not kick in to add a charge. If that older converter had a float mode, (I doubt it did) it would read 13.2 or in that range when the converter is on but supply very little amperage.
When the battery drains down, 12.6, 12.5 etc, somewhere it has a threshold that it will start charging. I don't know where that number is, it all depends on how they built it. But it will hopefully start to charge at some point. When it does the voltage should jump up and I'm assuming it will be in the 13.6 range which is standard charge. Be on the lookout for any voltage above the 12.7 area, it would need to be in the 13.X volt plus range to really do any charging. When you find this out, report back. It may take a while to drain the battery down for it to kick in. Maybe even days/week worth if you are not using any power.
Those old converters may have been more of an on/off charging setup rather then a tapering up and down voltage setup.
Glad this worked out. Now hopefully the battery charger will start to work when the battery drains down.
Thanks
John
__________________
__________________
Current Sunlines: 2004 T310SR, 2004 T1950, 2004 T2475, 2007 T2499, 2004 T317SR
Prior Sunlines: 2004 T2499 - Fern Blue
2005 Ford F350 Lariat, 6.8L V10 W/ 4.10 rear axle, CC, Short Bed, SRW. Reese HP trunnion bar hitch W/ HP DC
 Google Custom Search For Sunline Owners Club
|

|

|
|
09-04-2017, 06:29 PM
|
#322
|
|
Moderator
Join Date: Nov 2006
Location: Ohio
Posts: 12,651
SUN #89
|
Quote:
Originally Posted by Thomascine
Once everything was connected and working properly, tucked the inline fuse into the back of the box and secured the rest of the wiring, again to protect it from anything moving around in the cargo area.
 |
Your protective box is a good idea. The install came out well Good job! 
I bought one of these new LP detectors like you have, only white, have not had a moment to install yet. I have heard that some folks had to place a tie wrap around the fingers that hold the detector in the mounting bracket so it does not pop out (fall in) of the holding bracket when you push the test button. They may have fixed the plastic tabs to be stronger since the complaints started comeing in.
Did you have to do anything to yours?
Thanks
John
__________________
__________________
Current Sunlines: 2004 T310SR, 2004 T1950, 2004 T2475, 2007 T2499, 2004 T317SR
Prior Sunlines: 2004 T2499 - Fern Blue
2005 Ford F350 Lariat, 6.8L V10 W/ 4.10 rear axle, CC, Short Bed, SRW. Reese HP trunnion bar hitch W/ HP DC
Google Custom Search For Sunline Owners Club
|
|
|
|
|
09-04-2017, 06:59 PM
|
#323
|
|
Senior Member
Join Date: Sep 2016
Location: Virginia
Posts: 814
SUN #8893
|
Thanks JohnB!
Quote:
Originally Posted by JohnB
Your statement was that the number is the same but knowing what that number is tells us something about the charger.
12.6 at first then after charging 12.7 on just battery.
13.4 to 13.5 on shore power (it bounced between the two).
|
Thanks,
Tommie
__________________
1987 Sunline T1550
2012 Ford Expedition EL Limited 5.4L V8, 4WD
"Twenty years from now you will be more disappointed by the things that you didnt do than by the ones you did do..." Mark Twain]
|

|
|
|
09-04-2017, 07:05 PM
|
#324
|
|
Senior Member
Join Date: Sep 2016
Location: Virginia
Posts: 814
SUN #8893
|
Quote:
Originally Posted by JohnB
Your protective box is a good idea. The install came out well Good job!
I bought one of these new LP detectors like you have, only white, have not had a moment to install yet. I have heard that some folks had to place a tie wrap around the fingers that hold the detector in the mounting bracket so it does not pop out (fall in) of the holding bracket when you push the test button. They may have fixed the plastic tabs to be stronger since the complaints started comeing in.
Did you have to do anything to yours?
Thanks
John |
I didn't have to do anything, so far. I made the hole just wide enough and the box as well. Also, I think the box keeps the clamps from going back (out) too far and breaking off or bending. The device fits in the bracket pretty snug. I have no issues pushing the test button. When I did, the device did not budge at all.
Thanks,
Tommie
__________________
|
|
|
|
|
09-04-2017, 07:58 PM
|
#325
|
|
Moderator
Join Date: Nov 2006
Location: Ohio
Posts: 12,651
SUN #89
|
Quote:
Originally Posted by Thomascine
Your statement was that the number is the same but knowing what that number is tells us something about the charger.
12.6 at first then after charging 12.7 on just battery.
13.4 to 13.5 on shore power (it bounced between the two).
|
OK, those are the expected numbers when on shore power. That means the converter is in standard charge mode. The charger works! 
But...keep an eye on the battery liquid level. These older converters did not always taper off the charging and over time boiled out the battery by overcharging it. This can for sure happen if the camper is plugged in non stop 24/7 for weeks on end. If you are just plugged in while camping, then it is not so bad.
Since this converter went right into standard charge at 13.5 volts when the battery started at 12.6 to 12.7 it semi confirms your older converter did not have a float mode which is more of a maintain mode of just keeping your battery topped off. It really should not be charging a lot as the battery is just about 100% charged but that is a charge voltage it is sending the battery. Float mode is around 13.2 volts. Many of the older converters did not have this feature which is why it cooked the batteries out over time.
In the future, a good while out yet after your out having a great times camping.... consider a power converter upgrade to the newer 3 stage converters with a desulfate mode. They are very friendly to your battery and really help when you are boondocking off a generator as your source of recharging. This is not something you have to do right away, that is unless the old converter dies before you get to time the change out to a long time from now. What you have will work, just keep a heads up on the battery level to not go below the cells.
Thanks for reporting back
John
__________________
Current Sunlines: 2004 T310SR, 2004 T1950, 2004 T2475, 2007 T2499, 2004 T317SR
Prior Sunlines: 2004 T2499 - Fern Blue
2005 Ford F350 Lariat, 6.8L V10 W/ 4.10 rear axle, CC, Short Bed, SRW. Reese HP trunnion bar hitch W/ HP DC
Google Custom Search For Sunline Owners Club
|
|
|
|
|
09-04-2017, 07:58 PM
|
#326
|
|
Moderator
Join Date: Nov 2006
Location: Ohio
Posts: 12,651
SUN #89
|
Quote:
Originally Posted by Thomascine
I didn't have to do anything, so far. I made the hole just wide enough and the box as well. Also, I think the box keeps the clamps from going back (out) too far and breaking off or bending. The device fits in the bracket pretty snug. I have no issues pushing the test button. When I did, the device did not budge at all.
Thanks,
Tommie
|
Thanks, Good to know
__________________
Current Sunlines: 2004 T310SR, 2004 T1950, 2004 T2475, 2007 T2499, 2004 T317SR
Prior Sunlines: 2004 T2499 - Fern Blue
2005 Ford F350 Lariat, 6.8L V10 W/ 4.10 rear axle, CC, Short Bed, SRW. Reese HP trunnion bar hitch W/ HP DC
Google Custom Search For Sunline Owners Club
|
|
|
|
|
09-04-2017, 08:22 PM
|
#327
|
|
Senior Member
Join Date: Sep 2016
Location: Virginia
Posts: 814
SUN #8893
|
Thanks JohnB.
At some point I will need to inquire on how to take care of a battery. The current battery is a cheap one that I bought to get the camper going. It is supposed to be maintenance free which I am assuming once it goes you just replace it?
Thanks,
Tommie
__________________
|
|
|
|
|
09-30-2017, 07:30 PM
|
#328
|
|
Senior Member
Join Date: Sep 2016
Location: Virginia
Posts: 814
SUN #8893
|
Quick Update and Request for Ideas
Good evening,
I decided to get back to work on putting the front back together.
Had a friend come by and cut out the opening for the front window and installed the dinette table brackets and front receptacle.

Took a break and worked on curtains last week. Went out today to test fit the front window and decided to test fit the corner molding. Glad I did because it appears that the sides are bowed out and now I have a problem that I do not know how to fix other than taking the front apart. Now that the walls are bowed out the corner trim does not cover all of the existing holes. I have tried resituating the metal siding but no matter how much they are adjusted, some of the holes will still not be covered by the corner molding. The driver side is worse than the passenger side.


A friend suggested finding wider molding. I am looking but have not found any that is wider than what I have. Any ideas? Otherwise, next weekend I will be taking the front apart again to see if I can fix this mess. All I can do is sigh. 
Thanks,
Tommie
__________________
1987 Sunline T1550
2012 Ford Expedition EL Limited 5.4L V8, 4WD
"Twenty years from now you will be more disappointed by the things that you didnt do than by the ones you did do..." Mark Twain]
|
|
|
|
|
09-30-2017, 11:09 PM
|
#329
|
|
Moderator
Join Date: Nov 2006
Location: Ohio
Posts: 12,651
SUN #89
|
Hi Tommie,
Any pics of the siding on the new wall with no molding on yet? Looking for how much room there is between the side wall siding and the ends of the front siding under the molding.
This looks like from the pics that even below the window the molding does not cover the staples/screws. Is that right?
It looks like the wall structure is a lot wider then the siding itself then is used to be. And if this is the case, this not not simple at this point.
Need to see more of what you are up against to maybe suggest a fix.
If you look at this post link, you will see that the front siding can be a little inside the width of the camper. 1/8" to 1/4" the molding will cover, or at least the newer molding. The new molding it 1" wide inside dim. where the screws are. If yours 1" wide inside dim?
http://www.sunlineclub.com/forums/f7...tml#post131682
That front wall we took apart, we did not rebuild the lower wall so the molding went back on the same place it came off.
I'm trying to find out how yours ended up be so far off. The entire wall must be wider. The siding did not shrink while you had it off.
If it comes out that the new wood wall is wider creating this problem, I have some thoughts on how to correct.
1. New molding, like I said the newer moldings are 1" wide "inside" on the screw side. The other leg is 1/2" If this 1" is wider then yours, then yes it could help if it will cover. I have not seen corner molding wider then the 1" but that does not mean they do not make it.
This Ebay hit has some moldings https://www.ebay.com/sch/i.html?_nkw=rv+corner+molding
This one calls out a wider one 1 3/8" and they have a drawing with dimensions on it. It seems to use a little different insert vinyl trim but that can be overcome.
96" White Aluminum Insert Type Corner Molding Four Winds RV 5/8" Leg x 1 3/8" | eBay
Heads up when some sites call out 1 1/4" molding. This may be an"outside" dimension and not the inside dimension.
2. A possible fix but maybe not the nicest looking unless white is going to the the camper color. Pull the corner, get back to clean metal. Put a strip of eternabond over the area and then put the corner back on. It will be water tight, just not the conventional way of doing this.
Having to take that wall all apart is not going to be a simple task. The side walls have to move in too and maybe the floor and cieling.
If that 1 3/8" wide molding I liked will cover the problem, that would be a good option.
Hope this helps
John
__________________
Current Sunlines: 2004 T310SR, 2004 T1950, 2004 T2475, 2007 T2499, 2004 T317SR
Prior Sunlines: 2004 T2499 - Fern Blue
2005 Ford F350 Lariat, 6.8L V10 W/ 4.10 rear axle, CC, Short Bed, SRW. Reese HP trunnion bar hitch W/ HP DC
Google Custom Search For Sunline Owners Club
|
|
|
|
|
10-01-2017, 12:32 AM
|
#330
|
|
Senior Member
Join Date: Sep 2016
Location: Virginia
Posts: 814
SUN #8893
|
Thanks JohnB. I am still shaking my head. That's all I can do right now.
Quote:
Originally Posted by JohnB
Any pics of the siding on the new wall with no molding on yet? Looking for how much room there is between the side wall siding and the ends of the front siding under the molding.
I didn't take any pics of the siding without the molding. Was too frustrated. I will take some tomorrow.
This looks like from the pics that even below the window the molding does not cover the staples/screws. Is that right?
This is correct.
It looks like the wall structure is a lot wider then the siding itself then is used to be. And if this is the case, this not not simple at this point.
I am hoping that if I take out the shims that was put in and trim the wall paneling that I may be able to pull in the walls. Of course this means I am going to have to take some of the front apart, maybe quite a bit.
I'm trying to find out how yours ended up be so far off. The entire wall must be wider. The siding did not shrink while you had it off.
Maybe the shims???
If it comes out that the new wood wall is wider creating this problem, I have some thoughts on how to correct.
The old wood was 1x2 (.75x1.25). The new is 1x2 (.75x1.5).
1. New molding, like I said the newer moldings are 1" wide "inside" on the screw side. The other leg is 1/2" If this 1" is wider then yours, then yes it could help if it will cover. I have not seen corner molding wider then the 1"
I measured the underside of the current molding and it is approximately 1-1/4" wide. I haven't been able to find any much wider. I don't think the 1-3/8 is going to be wide enough. I think my best bet is to take the front apart.
|
Thanks,
Tommie
__________________
1987 Sunline T1550
2012 Ford Expedition EL Limited 5.4L V8, 4WD
"Twenty years from now you will be more disappointed by the things that you didnt do than by the ones you did do..." Mark Twain]
|
|
|
|
|
10-01-2017, 09:15 AM
|
#331
|
|
Moderator
Join Date: Nov 2006
Location: Ohio
Posts: 12,651
SUN #89
|
OK, understand.
Good luck, let us know how it comes out.
__________________
Current Sunlines: 2004 T310SR, 2004 T1950, 2004 T2475, 2007 T2499, 2004 T317SR
Prior Sunlines: 2004 T2499 - Fern Blue
2005 Ford F350 Lariat, 6.8L V10 W/ 4.10 rear axle, CC, Short Bed, SRW. Reese HP trunnion bar hitch W/ HP DC
Google Custom Search For Sunline Owners Club
|
|
|
|
|
10-15-2017, 12:57 PM
|
#332
|
|
Senior Member
Join Date: Sep 2016
Location: Virginia
Posts: 814
SUN #8893
|
Good afternoon,
Aaaaahhhh. I feel a little better now. Kinda got discouraged and took a break. Now back at it. I was able to take out the top grid without damaging it. That was a relief! Trimmed off about quarter inch on both sides. That good old table saw came in handy again. Once the top grid was trimmed and the shims removed from the bottom, I was able to pull in the walls. Now doing a test fit. It is looking a lot better now. Ran into another issue with the wall board. Once the walls were pulled in the wallboard started to buckle or pucker, not sure of the correct term but I am sure you get my meaning. Had to trim it in place so it does not look pretty but once I caulk and cover it with the corner trim you won't be able to even see it. I think I'm back on track, at least I hopes.
Thank you for your continued support. I am absolutely positive that I would not have been able to do any of this without this forum. The advice and other inspiring projects have helped a great deal. I even for the first time ever, made curtains. Did that during my break.
Thanks for reading.[emoji3]
Tommie
 
Sent using Tapatalk
__________________
1987 Sunline T1550
2012 Ford Expedition EL Limited 5.4L V8, 4WD
"Twenty years from now you will be more disappointed by the things that you didnt do than by the ones you did do..." Mark Twain]
|
|
|
|
|
10-15-2017, 09:20 PM
|
#333
|
|
Moderator
Join Date: Dec 2006
Location: Michigan
Posts: 6,155
SUN #123
|
Glad it all worked out Tommie! I'm sure it was a pain to have to tear it apart again, but at least you know it's done right now. Beats trying to fill it with another piece of trim or something.
__________________
2007 T-286SR Cherry/Granola, #6236, original owner, current mileage: 9473.8 (as of 6/18/21)
1997 T-2653 Blue Denim, #5471
1979 12 1/2' MC, Beige & Avocado, #4639
Past Sunlines: '97 T-2653 #5089, '94 T-2251, '86 T-1550, '94 T-2363, '98 T-270SR

|
|
|
|
|
10-16-2017, 11:41 AM
|
#334
|
|
Moderator
Join Date: Nov 2006
Location: Ohio
Posts: 12,651
SUN #89
|
Good for you Tommie!!
Glad this worked out. Painful I know, but in the end you have it back to where it needs to be. We "all" run into theses things, trust me I know... The more of building kinds of work you do, the better you get. But then.... after lots of years of doing it, bam..... oh darn.... Hey, it happens. You learn from it, you fix it, will never forget that again and you become better because of it.
It looks like you back on the getting the front back close to getting buttoned up. Good.
We are still rooting for ya!! Go Tommie Go!
Thanks
John
__________________
Current Sunlines: 2004 T310SR, 2004 T1950, 2004 T2475, 2007 T2499, 2004 T317SR
Prior Sunlines: 2004 T2499 - Fern Blue
2005 Ford F350 Lariat, 6.8L V10 W/ 4.10 rear axle, CC, Short Bed, SRW. Reese HP trunnion bar hitch W/ HP DC
Google Custom Search For Sunline Owners Club
|
|
|
|
|
10-16-2017, 11:48 AM
|
#335
|
|
Senior Member
Join Date: Sep 2016
Location: Virginia
Posts: 814
SUN #8893
|
Thanks JohnB! I literally almost threw in the towel. I was pretty much done with the whole thing. But then I kept reading the posts and saw the progress that people were making and that really helped a lot to get me back on track.
Sent from my SM-P905V using Tapatalk
__________________
1987 Sunline T1550
2012 Ford Expedition EL Limited 5.4L V8, 4WD
"Twenty years from now you will be more disappointed by the things that you didnt do than by the ones you did do..." Mark Twain]
|
|
|
|
|
10-16-2017, 03:57 PM
|
#336
|
|
Senior Member
Join Date: Sep 2016
Location: Virginia
Posts: 814
SUN #8893
|
__________________
1987 Sunline T1550
2012 Ford Expedition EL Limited 5.4L V8, 4WD
"Twenty years from now you will be more disappointed by the things that you didnt do than by the ones you did do..." Mark Twain]
|
|
|
|
|
10-16-2017, 09:49 PM
|
#337
|
|
Moderator
Join Date: Nov 2006
Location: Ohio
Posts: 12,651
SUN #89
|
Hi Tommie,
OK I see a few things. I do not totally understand your note, but let me explain what I am seeing and then maybe a few suggestions on what to do about it. This may answer your questions.
I put these pics in order to help show this better.
I think I have this orientation correct. Tell me if I do not
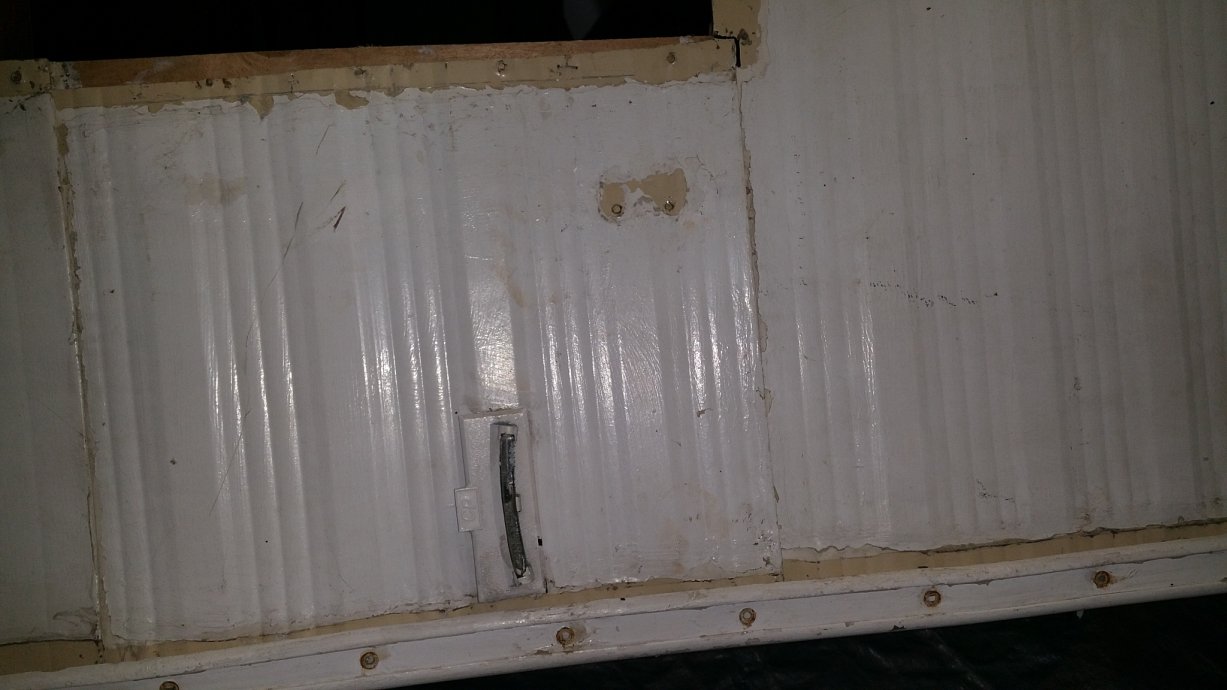
This is the "right" side of camper showing the right side front window as you are inside the camper looking out. The door side of the camper or passenger side of the truck.

You have lined up the siding as good as it ever was, from new maybe even unless someone in the past put different siding on. The white paint by the prior owner lines up and most important, the screw holes are in a straight line up and down like the window frame is. Bottom line, the siding was too short from before you owned it.
Now over the the right side of the front corner. The door side.

The same thing shows up here. The white paint lines up with the siding above it. The screw holes from the corner molding in the siding are again in a straight line. The siding was too short from before you took it apart.
Now to the left side of the camper. The non door side, the driver side.

This pic shows the screw holes are in line. it also shows the siding cannot be moved to the right any further or the siding will overhang into the window opening area and the window frame will hit it.
I did notice that the white paint does not align, but I have a thought on why. The key point, the screw holes in the siding do look they line up with the sheet above and you can confirm they come real close to lining up with the window frame screws.
If these window frame screw holes line up with the siding holes, then the siding is where is always was. What is off is the white paint.

The white is is what the prior owner put on. They painted over the top of what ever was on the camper. Odds are high there was caulk on the side of the window frame to the original tan siding that was peeled away when you cleaned up the siding. The white paint would then be missing where the old caulk was. This is why the white paint line will no longer match. The screw holes in the siding, if they align with the window frame, then the siding is where it always was. The white paint line not lining up due to the caulking really does not matter.
This pic on the left side corner molding area, I cannot see the siding above it but I can see enough that the siding is short from the piece above it. You will have to look if the corner molding screw holes in the sheet above are in line with the tan siding below. And I can tell that piece of siding is very short as the corner screw holes are barely on the sheet. It was always like this.

There may have been caulking on the tan siding here too, I really cannot tell as I cannot see the siding sheet above this one.
This pic shows you have the siding lined up as good as it ever was, even though it seems to be short at the corners.

In this case, you are really not going to make the siding longer then it already is. It was short before you ever started.
Now what to do? In the corner moldings where there will be a larger gap of the front siding coming over the top of the side wall siding, ideal is there was more siding there. But there isn't. In this case to make the best with what you have to work with, is to apply extra butyl over these areas where the siding is short. See this link to BenB's roof repair.
http://www.sunlineclub.com/forums/f7...tml#post131986
We had the same short siding issue on his, just maybe not as pronounced as yours. We applied extra butyl to cover the shortage to create a positive seal that water could not get into that missing siding area. The corner molding still has a full lining of butyl in it as well. You need to warm the extra butyl on the camper and the molding before putting the screws in. When you tighten the screws, it will flow all as one in that corner.
On the window right side is short, make sure the butyl for sure will cover over that area of the short siding to create a seal.
When you are all done with the corner and window moldings and trim off all the excess butyl, you can come back and apply Dicor non sag (non leveling) to the exposed butyl area between the siding and the moldings to create a secondary seal.
What you will end up with is better then it ever was. The siding being longer is for sure makes this better, but that means finding new siding to make this longer. That will be no small task and in the end, I do not know if it will make the seal all that much better. The butyl will outlast any putty tape corner and the Dicor caulked edge will aide in preventing water from ever getting to the butyl.
OK, with all that, does this answers your what to do with it? Is there something I missed? Which could be so ask away if something is not more clear.
Hope this helps
John
__________________
Current Sunlines: 2004 T310SR, 2004 T1950, 2004 T2475, 2007 T2499, 2004 T317SR
Prior Sunlines: 2004 T2499 - Fern Blue
2005 Ford F350 Lariat, 6.8L V10 W/ 4.10 rear axle, CC, Short Bed, SRW. Reese HP trunnion bar hitch W/ HP DC
Google Custom Search For Sunline Owners Club
|
|
|
|
|
10-16-2017, 10:32 PM
|
#338
|
|
Senior Member
Join Date: Sep 2016
Location: Virginia
Posts: 814
SUN #8893
|
Thanks JohnB. That does make sense. I had pretty much made up my mind to put the siding on as is or pictured from earlier. I was trying to make sure that the holes would be covered. I just couldn't see why the driver side was not lining up, always too short. The long bottom piece that goes under the window fits perfect.
Okay, well I took tomorrow off so that I can get the siding done. I need to get this done. It had been raining here and the tarp is now leaking and a little water is getting inside the camper. It should be clear the rest of the week.
Thank you, thank you! I feel a little better now. I thought I was doing something wrong, yet again. Still learning.
Tommie
__________________
|
|
|
|
|
10-17-2017, 12:53 PM
|
#339
|
|
Senior Member
Join Date: Sep 2016
Location: Virginia
Posts: 814
SUN #8893
|
Good afternoon,
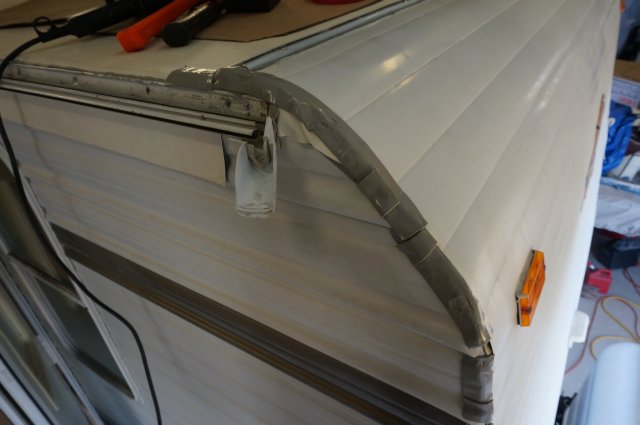
Looking better. Let's see if you can pick out my new problem.
Thanks.
Tommie 
Sent using Tapatalk
__________________
1987 Sunline T1550
2012 Ford Expedition EL Limited 5.4L V8, 4WD
"Twenty years from now you will be more disappointed by the things that you didnt do than by the ones you did do..." Mark Twain]
|
|
|
|
|
10-17-2017, 04:21 PM
|
#340
|
|
Moderator
Join Date: Nov 2006
Location: Ohio
Posts: 12,651
SUN #89
|
Quote:
Originally Posted by Thomascine
Good afternoon,
Looking better. Let's see if you can pick out my new problem.
Thanks.
Tommie
|
H'mm, well I'm not seeing yet anything major but maybe this.
1. There is a slight pucker in the siding at the top of the widow frame. A extra staple may help hold that down until you screw the window frame in. No biggie issue here.
2. There is a slight sag maybe in the wood in the top of the window frame in comparison to the siding in the middle. This might be an optical illusion. Or wood opening is so tight the window does not fit? If so just plane or sand the top of the window frame in place until the window fits. If this is that the siding is short at the top and the window opening is right, well it may have always been that way.
3. You ran out of time to finish the rest.... What is there looks good.
4. Well, I can't tell....
Am I close?
Thanks
John
__________________
__________________
Current Sunlines: 2004 T310SR, 2004 T1950, 2004 T2475, 2007 T2499, 2004 T317SR
Prior Sunlines: 2004 T2499 - Fern Blue
2005 Ford F350 Lariat, 6.8L V10 W/ 4.10 rear axle, CC, Short Bed, SRW. Reese HP trunnion bar hitch W/ HP DC
Google Custom Search For Sunline Owners Club
|
|
|
|
|
|
|
Currently Active Users Viewing This Thread: 1 (0 members and 1 guests)
|
|
|
 Posting Rules
|
You may not post new threads
You may not post replies
You may not post attachments
You may not edit your posts
HTML code is Off
|
|
|
|
 » Recent Sunline Discussions
 |
|
|
|
|
|
|
|
|
|
|
|
|
|
|
|
|
|
|
|
|
|
|
|
|
|


 Linear Mode

