 |
|
 01-12-2024, 03:29 PM
|
#1
|
|
Member
Join Date: Dec 2023
Location: Maine
Posts: 32
SUN #13951
|
2004 T-267 SR roof leak and bunk corner damage
__________________
__________________
|

|

|
|
01-13-2024, 09:30 AM
|
#2
|
|
Moderator
Join Date: Nov 2006
Location: Ohio
Posts: 12,656
SUN #89
|
I will get back to you on this with much more. There is limited time now, but in case you can, get some of this info.
Need pics of all four roof corners: front left and right, rear left and right, and the full length of the front wall roof to siding seam and rear roof to siding seam (left to right across the camper) in good focus. I need to see the caulking condition. Please do what you did on this perfect pic, showing good detail but just backing up a little (about 1 to 2 feet) so I can see more. And the whole seam length.

Here are two other areas to look for.
1. At the rear wall at the bottom piece of the siding at the bumper location, there are many hex head screws along the bottom siding that hold the siding on. Take pics of the hex screws, as they are now showing all of them across the camper. Take in a few pics as needed to get all of them. I am looking for rust on the heads of the screws. If you can, take a 1/4" socket to remove them. You can take each out and look at the threads for rust. Lay screws on the bumper where they came out and take a pic of them to show where they came out of. It matters which screw came out from where to tell where the leaks are or are not. You can put them back in when you are done. See these pics as a reference


Just lay them on the bumper where they came out so we can see the location in relation to the camper.

2. At the front wall, at the bottom piece of the siding, there are many hex head screws along the bottom siding that hold the siding on. Do the same thing as you did on the back wall. Take pics of the heads before you remove anything, then take each out and look at them. Then you can put them back in. See here; rusted heads mean the whole screw is rusted; no need to remove, good looking heads need to be removed as they may have pristine silver threads of a level of rusted heads.

All the bottom siding screws, front, and rear, tell a story of what has happened inside the walls.
Since you are working on a tarp, the roof, back wall, and down the full length of both side walls need to be covered for the winter. If the front wall has rusted screws at the bottom, that front wall and roof seam will need tarping also.
More on your roof pics later; just wanted to get you this info so we can talk to you as you create a plan on what to do come spring before the tarps go on.
Hope this helps
John
__________________
Current Sunlines: 2004 T310SR, 2004 T1950, 2004 T2475, 2007 T2499, 2004 T317SR
Prior Sunlines: 2004 T2499 - Fern Blue
2005 Ford F350 Lariat, 6.8L V10 W/ 4.10 rear axle, CC, Short Bed, SRW. Reese HP trunnion bar hitch W/ HP DC
 Google Custom Search For Sunline Owners Club
|
|
|
|
|
01-13-2024, 12:24 PM
|
#3
|
|
Member
Join Date: Dec 2023
Location: Maine
Posts: 32
SUN #13951
|
Quote:
Originally Posted by JohnB

Need pics of all four roof corners: front left and right, rear left and right, and the full length of the front wall roof to siding seam and rear roof to siding seam (left to right across the camper) in good focus. I need to see the caulking condition. Please do what you did on this perfect pic, showing good detail but just backing up a little (about 1 to 2 feet) so I can see more. And the whole seam length.
|
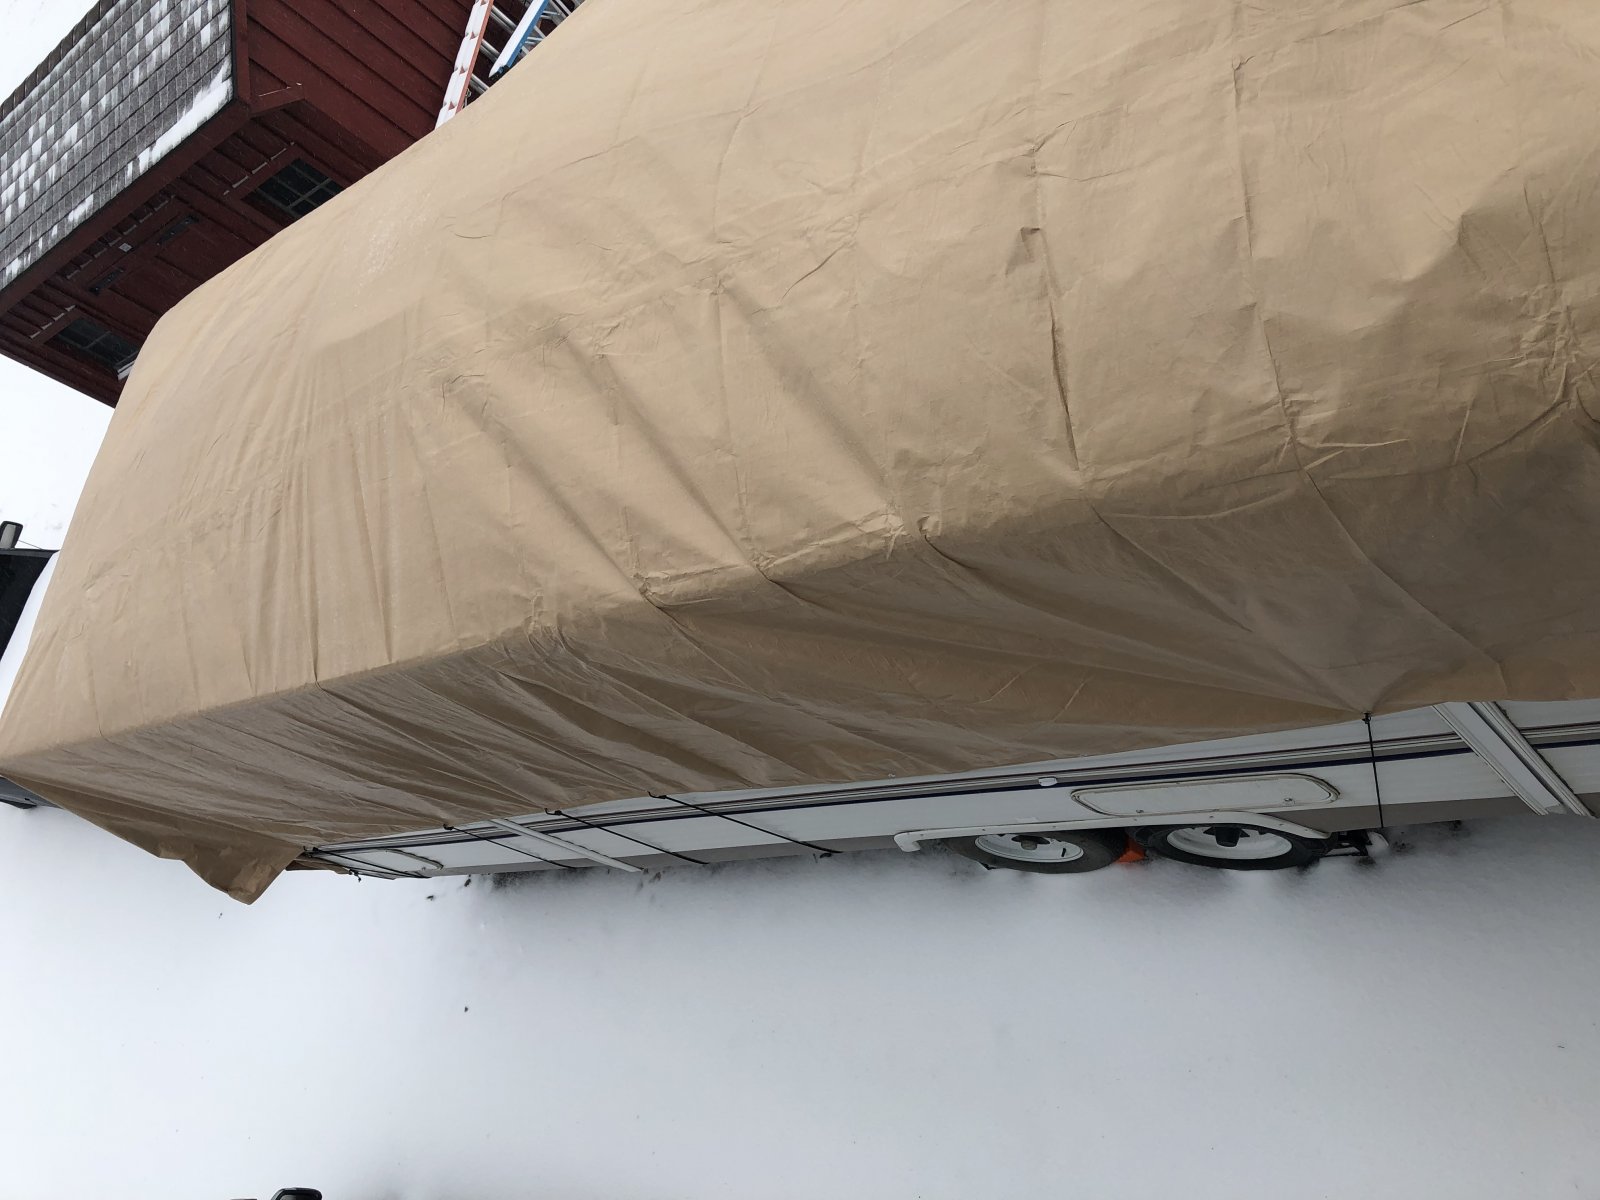
Unfortunately we had to cover the top of the camper yesterday.
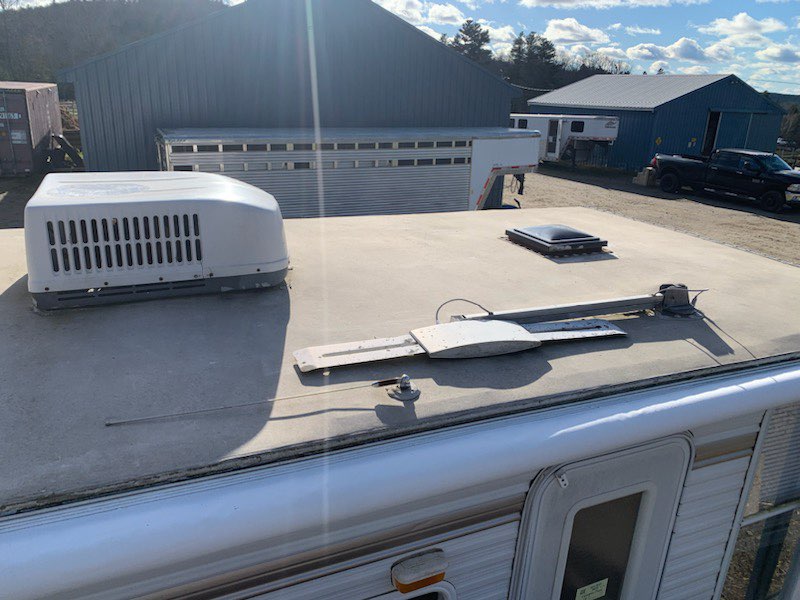
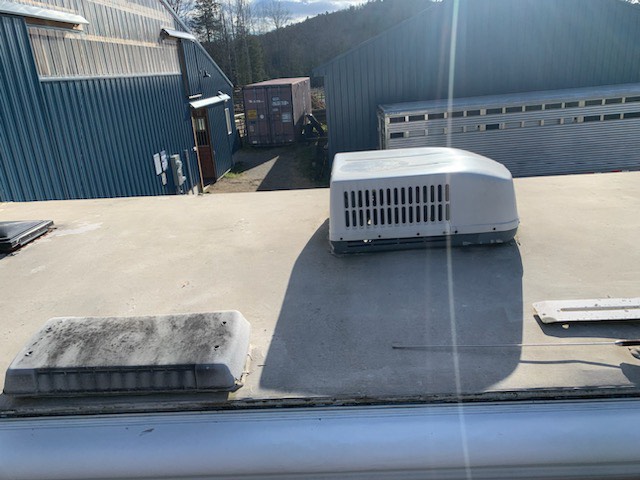
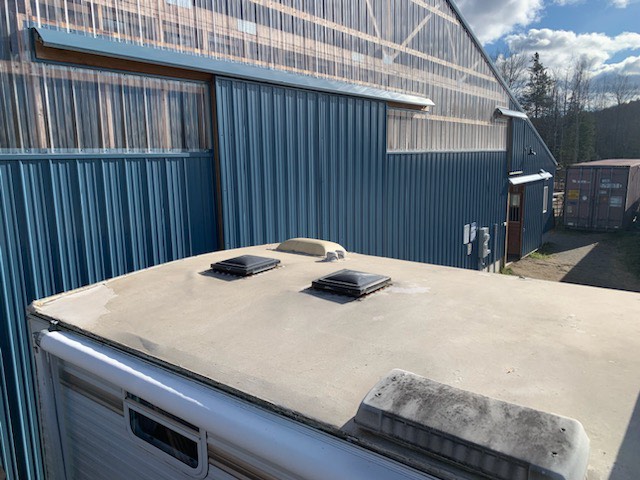
There are more roof photos in the other album but they're not close up. a few might be helpful...
Quote:
Originally Posted by JohnB
Here are two other areas to look for.
1. At the rear wall at the bottom piece of the siding at the bumper location, there are many hex head screws along the bottom siding that hold the siding on. Take pics of the hex screws, as they are now showing all of them across the camper. Take in a few pics as needed to get all of them. I am looking for rust on the heads of the screws. If you can, take a 1/4" socket to remove them. You can take each out and look at the threads for rust. Lay screws on the bumper where they came out and take a pic of them to show where they came out of. It matters which screw came out from where to tell where the leaks are or are not. You can put them back in when you are done. See these pics as a reference
Just lay them on the bumper where they came out so we can see the location in relation to the camper.
2. At the front wall, at the bottom piece of the siding, there are many hex head screws along the bottom siding that hold the siding on. Do the same thing as you did on the back wall. Take pics of the heads before you remove anything, then take each out and look at them. Then you can put them back in. See here; rusted heads mean the whole screw is rusted; no need to remove, good looking heads need to be removed as they may have pristine silver threads of a level of rusted heads.
All the bottom siding screws, front, and rear, tell a story of what has happened inside the walls. |
OK, tomorrow is supposed to be sunny so we should be able to get a start on this...
Quote:
Originally Posted by JohnB
Since you are working on a tarp, the roof, back wall, and down the full length of both side walls need to be covered for the winter. If the front wall has rusted screws at the bottom, that front wall and roof seam will need tarping also.
More on your roof pics later; just wanted to get you this info so we can talk to you as you create a plan on what to do come spring before the tarps go on.
Hope this helps
John
|
This is tremendously helpful. We couldn't wait before putting the tarp on as the storm started this am but we can at least get a start on looking at the bottom screws in the front and the back. Thanks again.
__________________
|
|
|
|
|
01-13-2024, 06:03 PM
|
#4
|
|
Moderator
Join Date: Nov 2006
Location: Ohio
Posts: 12,656
SUN #89
|
HI Leslie,
No worries about needing to put the cover on. You did really well getting the tarp on what you did before the storm. What you have will help stop more water from getting from the roof, at least. Your right rear corner has an active seeper leak at the moment. And it would split more open with a snow/water freeze and thaw situation.
Quote:
Originally Posted by Leslief761
Unfortunately we had to cover the top of the camper yesterday.
There are more roof photos in the other album but they're not close up. a few might be helpful...
Snip,
|
This pic is helpful; I already honed in on the failed roof coating that was done by a prior owner. I'll go into that more once you can get the bottom siding screw data for the front and back wall.
Quote:
Originally Posted by Leslief761
snip...
OK, tomorrow is supposed to be sunny so we should be able to get a start on this...
Snip...
This is tremendously helpful. We couldn't wait before putting the tarp on as the storm started this am but we can at least get a start on looking at the bottom screws in the front and the back. Thanks again.
|
Understood, I'll wait for the screw data before I give you "what's going on" from your pics.
The weather has gone into a deep winter freeze overnight here, and it may be heading your way. The high wind and the below-freezing temps all last night and today give you the "arctic feeling". We are in for single digits tonight. Do what you can, and if it is too cold and the weather too miserable, don't feel you have to get this info. There is no rush on our end. We will take it when you can get to it.
Stay warm
John
__________________
Current Sunlines: 2004 T310SR, 2004 T1950, 2004 T2475, 2007 T2499, 2004 T317SR
Prior Sunlines: 2004 T2499 - Fern Blue
2005 Ford F350 Lariat, 6.8L V10 W/ 4.10 rear axle, CC, Short Bed, SRW. Reese HP trunnion bar hitch W/ HP DC
Google Custom Search For Sunline Owners Club
|
|
|
|
|
01-14-2024, 07:24 AM
|
#5
|
|
Member
Join Date: Dec 2023
Location: Maine
Posts: 32
SUN #13951
|
The deep freeze hasn’t quite hit us yet. It’s sunny and will be in the mid thirties today so we’ll take this window of opportunity to get the screw data and get pics of the slide mechanism. Then we can make a plan for restoration in the spring and get a jump on ordering some of the materials we’ll need. Hopefully it won’t be too bad!
__________________
|
|
|
|
|
01-14-2024, 06:07 PM
|
#7
|
|
Moderator
Join Date: Nov 2006
Location: Ohio
Posts: 12,656
SUN #89
|
Hi Leslie, check your PM
__________________
Current Sunlines: 2004 T310SR, 2004 T1950, 2004 T2475, 2007 T2499, 2004 T317SR
Prior Sunlines: 2004 T2499 - Fern Blue
2005 Ford F350 Lariat, 6.8L V10 W/ 4.10 rear axle, CC, Short Bed, SRW. Reese HP trunnion bar hitch W/ HP DC
Google Custom Search For Sunline Owners Club
|
|
|
|
|
01-17-2024, 09:55 AM
|
#8
|
|
Moderator
Join Date: Nov 2006
Location: Ohio
Posts: 12,656
SUN #89
|
Hi Leslie,
Your pics help tell a story. I will comment on all the areas you provided pics for, but it will take a little time, and I will do each in separate replies.
You have 3 areas I will comment on;
1. Rear wall water damage
2. Front wall water damage
3. The main roof condition
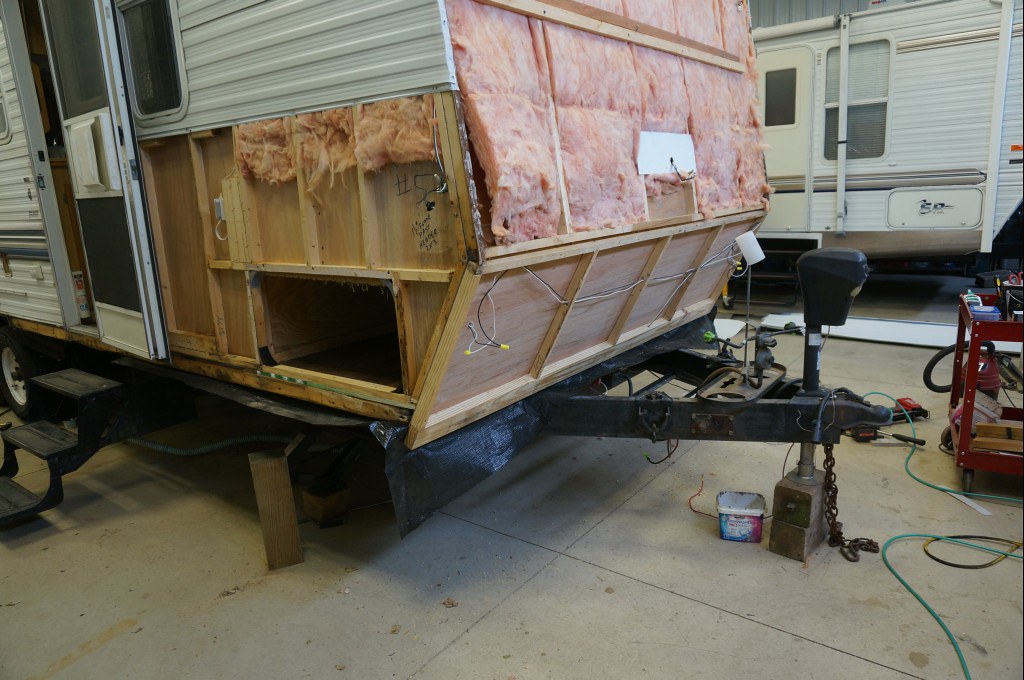
If one has access to a barn or shop where the camper can stay inside apart for a good length of time, then you can work all three areas simultaneously in a repair/restore type of project. The camper would be opened up, and you work on all three areas simultaneously. The advantage of this is less work on sealing back up the roof seams to the front and rear walls. You repair those front and rear seams once, and then it's done.
That said, only some have access to a closed building for a long time, so you can take your time to repair it. There are ways to do this in stages and even at separate times. Separate times may mean even a year or more apart from each other, depending on the severity of the damage. Since you said you cannot access an inside workspace, I will create the responses using the staged approach, and the repairs will be done outside when the weather cooperates.
This repair in the staged approach would start with stopping more water from getting into the camper. Since it's winter, tarping the camper is the fastest way to stop the leaks, and you have a good start on that. The exposed areas below your shorter tarp will be talked to when we get to those areas. The slide is in your other post, and it's necessary to cover up the exposed part of it with another tarp or get the slide to seal tight to the camper's outside wall.
Once the weather cooperates, the roof tarp can come off, and the outside temps warm up enough; you can then work on stopping the active leaks in the areas you cannot get to repair soon.
I will talk about the front and rear wall sealing first to stop siding leaks. At this point, you do not know which siding seams are leaking, so you assume all of them are leaking. You will clean and treat all siding penetrations on the front and rear walls. This includes any window flange to siding seams, DOT marker lights, and roof seams to the wall siding, especially the corner moldings on both the end wall side and the left and right sides of those moldings if there are any other items mounted on those walls like hitch lights, water heaters, outside showers, etc., or any item that has a hole in the siding.
I will recommend Dicor non-leveling lap sealant for this. The reason being, it will work well in this application, and it can be easier to remove with a heat gun, plastic scraper, and mineral sports. You may see that I now also use Proflex RV sealant instead of the Dicor on siding seams; the Proflex is a very good long-term sealant, but it is much harder to get off than the Dicor. Since you will be removing all this caulk to do the long-term repair, use the Dicor now, and later, when the repair is complete, use the Proflex RV.
See this post for tips on how to apply the Dicor. This process also works for Proflex. https://www.sunlineclub.com/forums/f...tml#post137746
Whatever you use, do not use silicone-based caulks. They are very hard to get off, and the bond does not last long to the siding. If someone has already used silicone, you must remove all traces of it, as the Dicor or Proflex will not stick to it. If you need help getting it all off, including and faint traces of it, just ask.
For the roof seams, you may use a combination of the Dicor loop sealant, self-leveling, or non-leveling, and a product called Eternabond Roof Seal tape. I will expand more on the roof in the rear wall repair reply that will come soon.
Åll for now, be back later
John
__________________
Current Sunlines: 2004 T310SR, 2004 T1950, 2004 T2475, 2007 T2499, 2004 T317SR
Prior Sunlines: 2004 T2499 - Fern Blue
2005 Ford F350 Lariat, 6.8L V10 W/ 4.10 rear axle, CC, Short Bed, SRW. Reese HP trunnion bar hitch W/ HP DC
Google Custom Search For Sunline Owners Club
|
|
|
|
|
01-17-2024, 10:25 AM
|
#9
|
|
Moderator
Join Date: Nov 2006
Location: Ohio
Posts: 12,656
SUN #89
|
Here is another repair topic post that can help. For your front and rear wall repairs, it is best to do those repairs starting from outside the camper and working your way in.
The post explains why and how we do this.
https://www.sunlineclub.com/forums/f...tml#post155103
__________________
Current Sunlines: 2004 T310SR, 2004 T1950, 2004 T2475, 2007 T2499, 2004 T317SR
Prior Sunlines: 2004 T2499 - Fern Blue
2005 Ford F350 Lariat, 6.8L V10 W/ 4.10 rear axle, CC, Short Bed, SRW. Reese HP trunnion bar hitch W/ HP DC
Google Custom Search For Sunline Owners Club
|
|
|
|
|
01-17-2024, 02:57 PM
|
#10
|
|
Member
Join Date: Dec 2023
Location: Maine
Posts: 32
SUN #13951
|
Thanks John! Super helpful! I will keep track of this posts and the Dicor applying post for guidance when it warms up enough to start work on the trailer.
__________________
|
|
|
|
|
01-17-2024, 02:59 PM
|
#11
|
|
Member
Join Date: Dec 2023
Location: Maine
Posts: 32
SUN #13951
|
Quote:
Originally Posted by JohnB
Here is another repair topic post that can help. For your front and rear wall repairs, it is best to do those repairs starting from outside the camper and working your way in.
The post explains why and how we do this.
https://www.sunlineclub.com/forums/f...tml#post155103 |
I've read this thread a few times.It's a bit mind boggling still but as we work on stopping the leak I'm hoping it will feel more approachable. 
Thanks again,
Leslie
__________________
|
|
|
|
|
01-17-2024, 07:01 PM
|
#12
|
|
Moderator
Join Date: Nov 2006
Location: Ohio
Posts: 12,656
SUN #89
|
Hi Leslie,
Quote:
Originally Posted by JohnB View Post
Here is another repair topic post that can help. For your front and rear wall repairs, it is best to do those repairs starting from outside the camper and working your way in.
The post explains why and how we do this.
https://www.sunlineclub.com/forums/f...tml#post155103
|
Quote:
Originally Posted by Leslief761
I've read this thread a few times.It's a bit mind boggling still but as we work on stopping the leak I'm hoping it will feel more approachable.
Thanks again,
Leslie |
I'm hoping to help with the "mind-boggling," aspect of all this. There will also be the "ugly" pics that are about to come in my next reply, as I will start on your back wall pictures and what I see from them.
When a very wet camper comes apart, it does look really bad. Almost unimaginable, it can look that bad as it really does not look that bad before you start taking it apart. But there is hope.  Amazingly, once it starts to dry out, the dried-out deteriorated wood starts to look a "little" better and not so ugly.  . From the dried-out part forward, it only gets better.
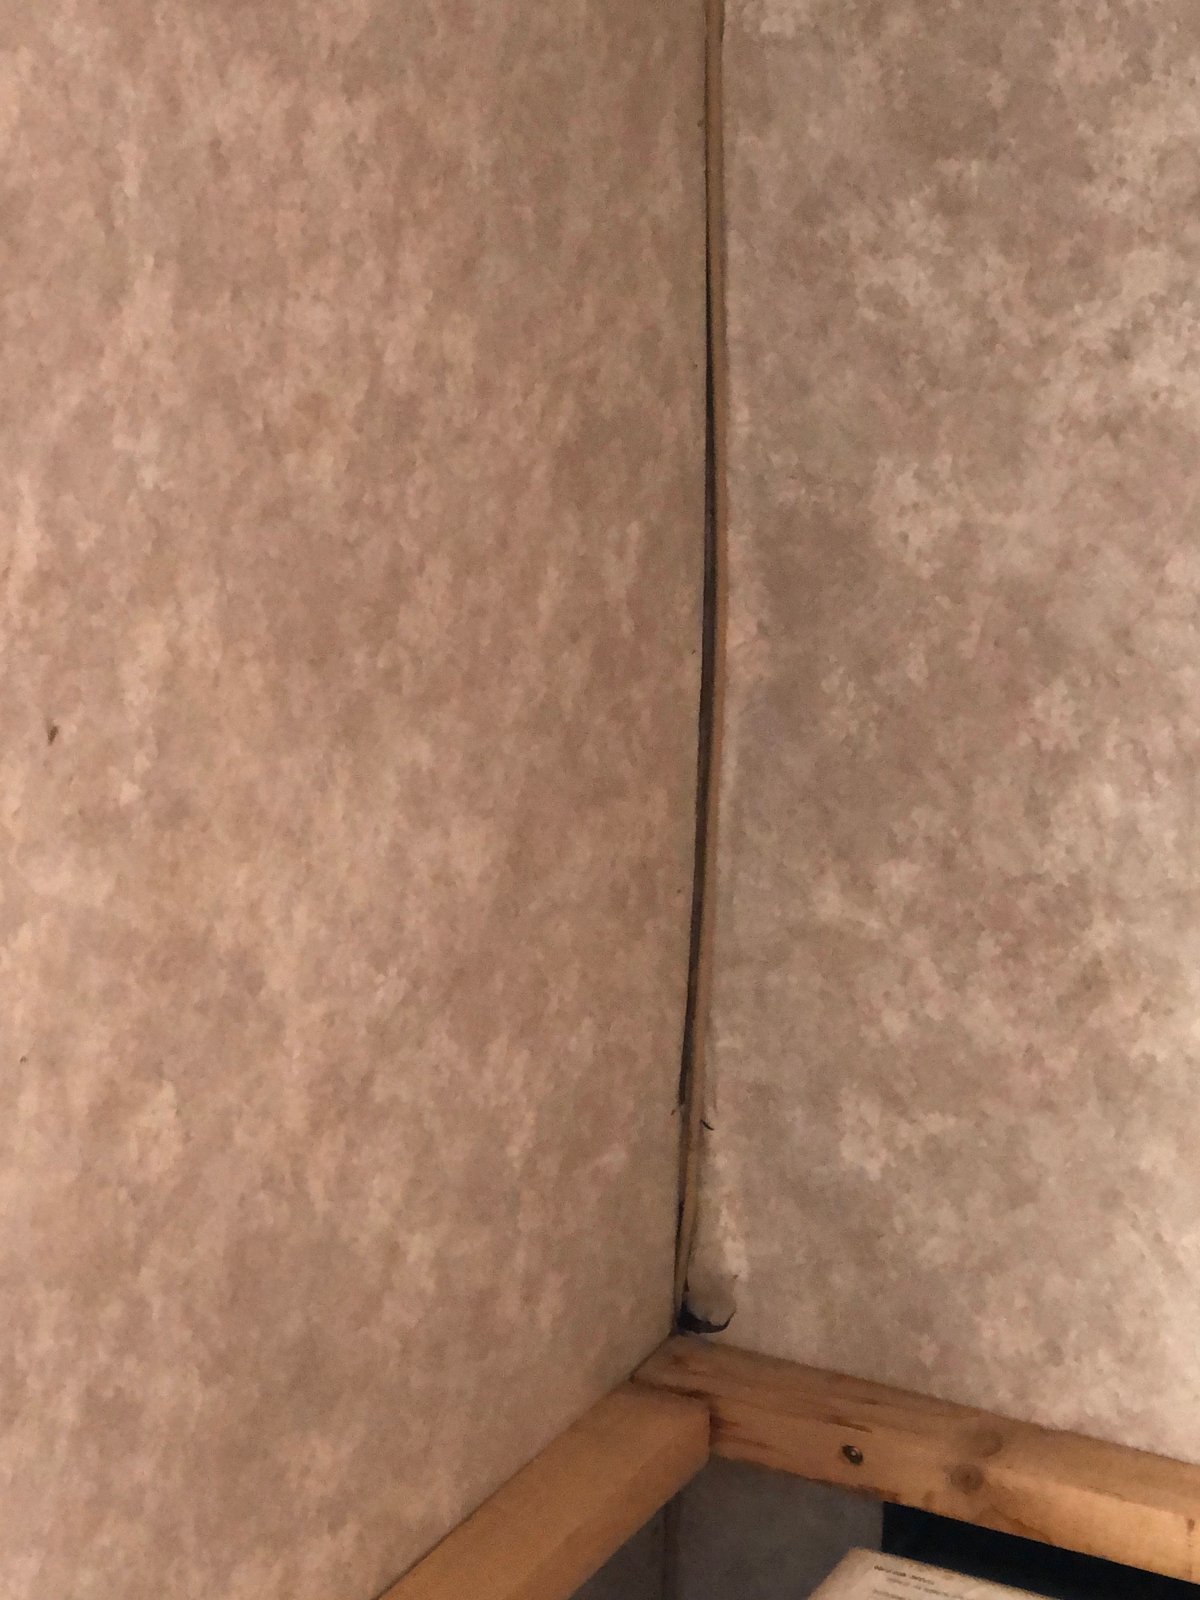
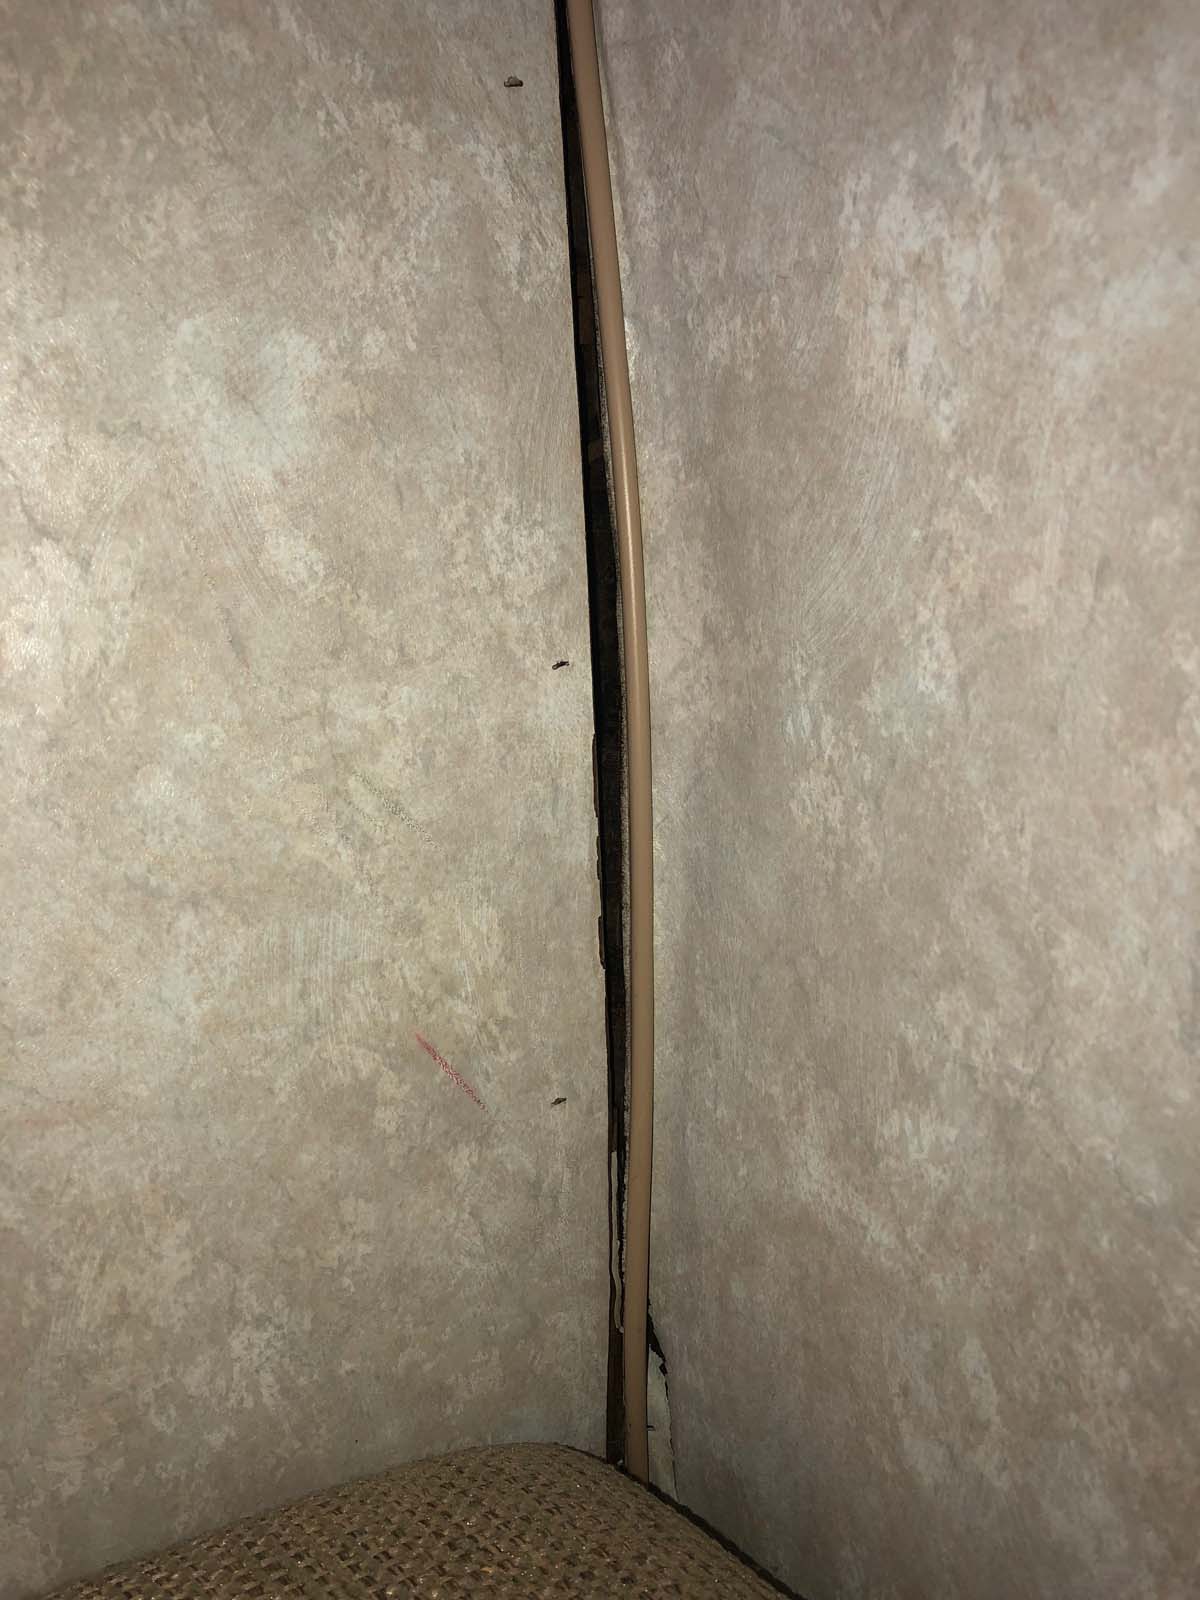
I'll explain what I see from these pics of yours.
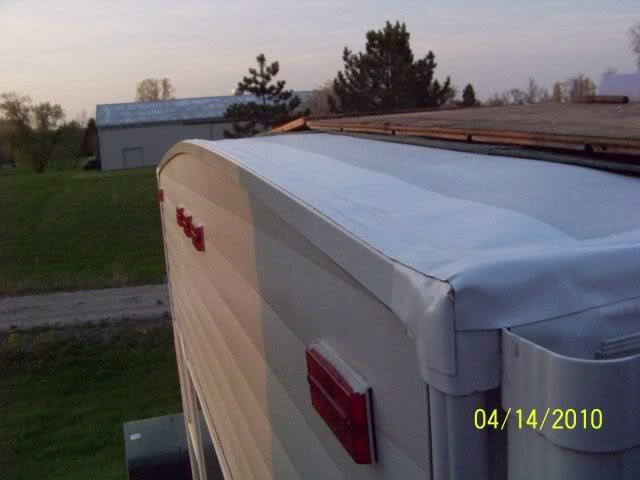
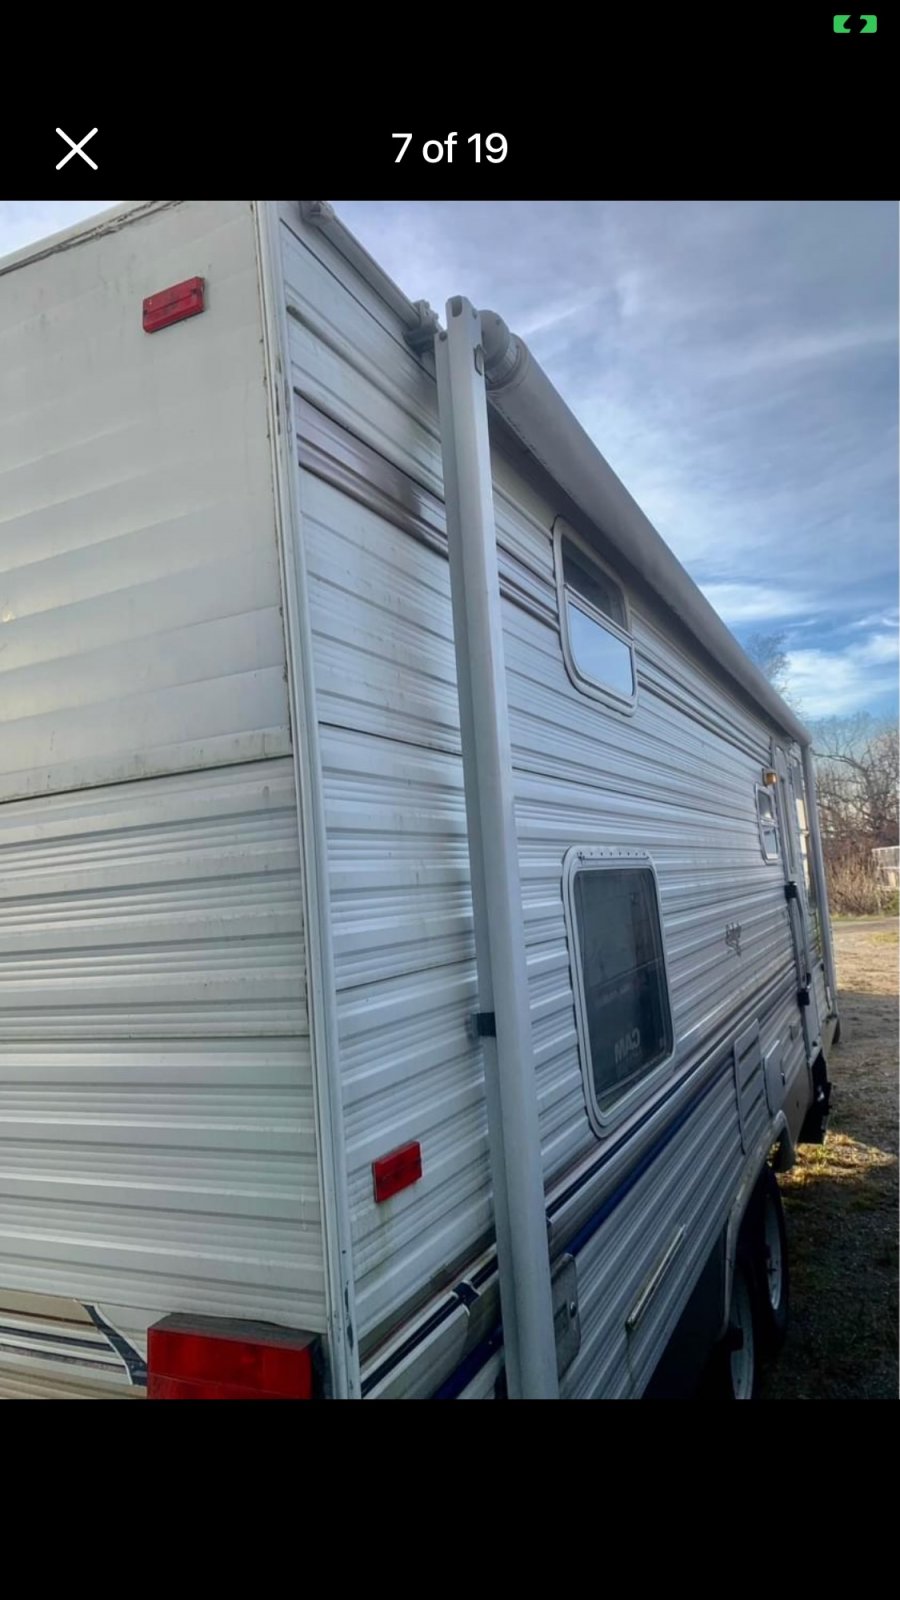
These two pics show a leak from the roof into the right rear corner that has been ongoing for many years. I estimate this damage is from 4 to 6 years' worth of wetness left unchecked and the leak has not stopped. The prior owners may not have known they had to do roof maintenance.
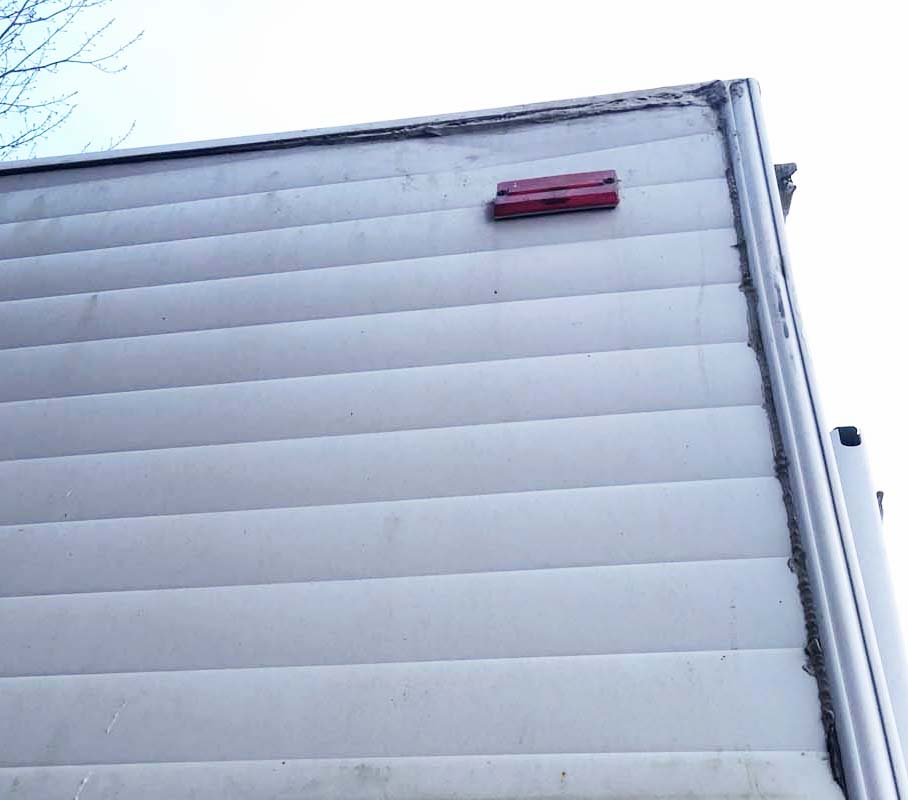
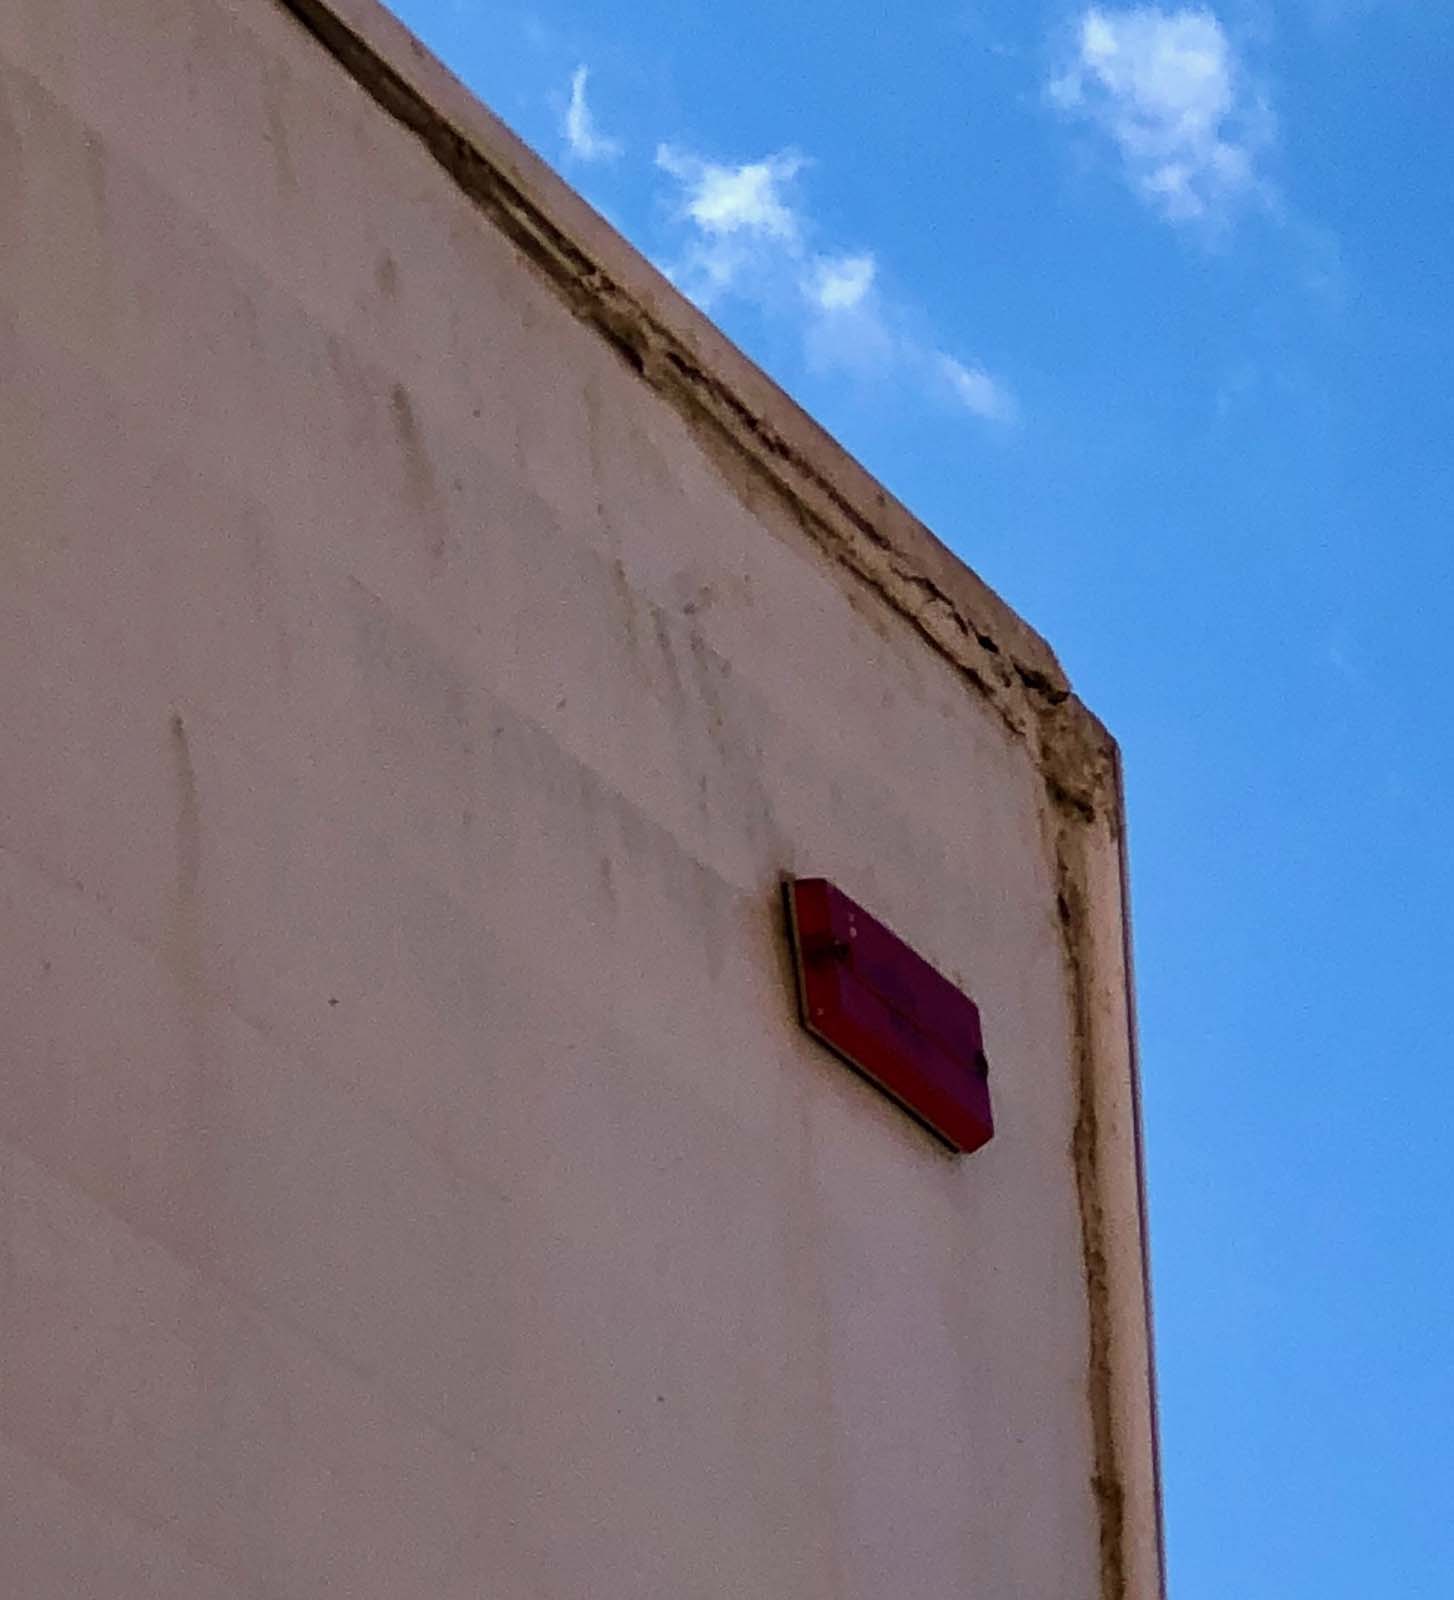
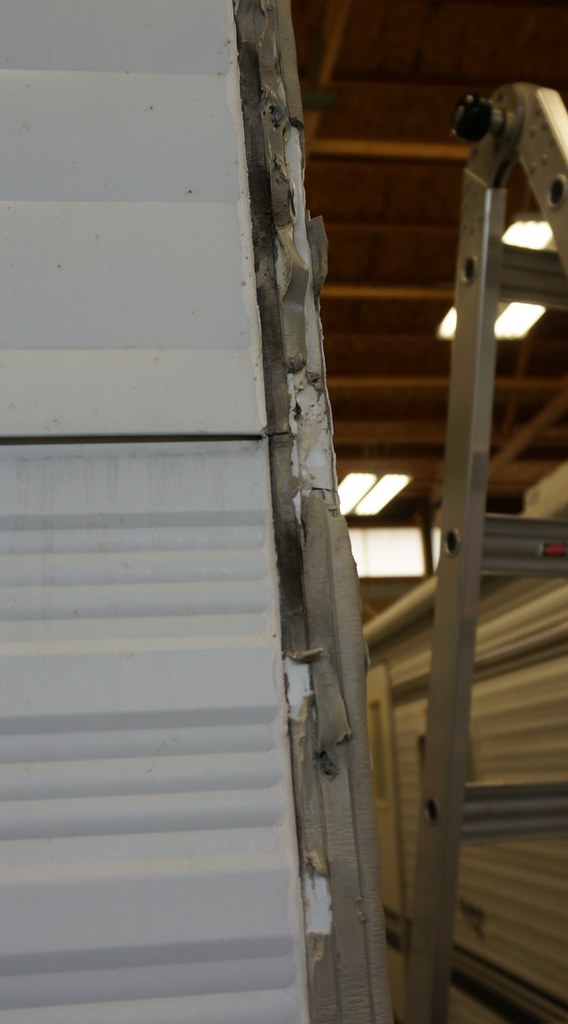
What stands out is that the rear roof molding has lifted up off the rear wall rafter. It may be hard to see in your pics, but the same issue is with another camper I was repairing. In this case, this is one of my project campers, a 2004 T2475. Here, you can see that the rear molding has lifted up, and the old gray putty tape is exposed and stuck to the rear wall siding.

Here, I am pushing the molding back down.

A side view showing an opening at the end of the rear wall molding.

Here is another camper with the same issue, a 2004 T-1950 (another one of my project campers). This sat stored on a dealer's lot for about 6 years with seeping leaks in the top corner of the roof before I acquired it. In this case, it was caulked when the leak was first found, but the caulking was not done correctly.

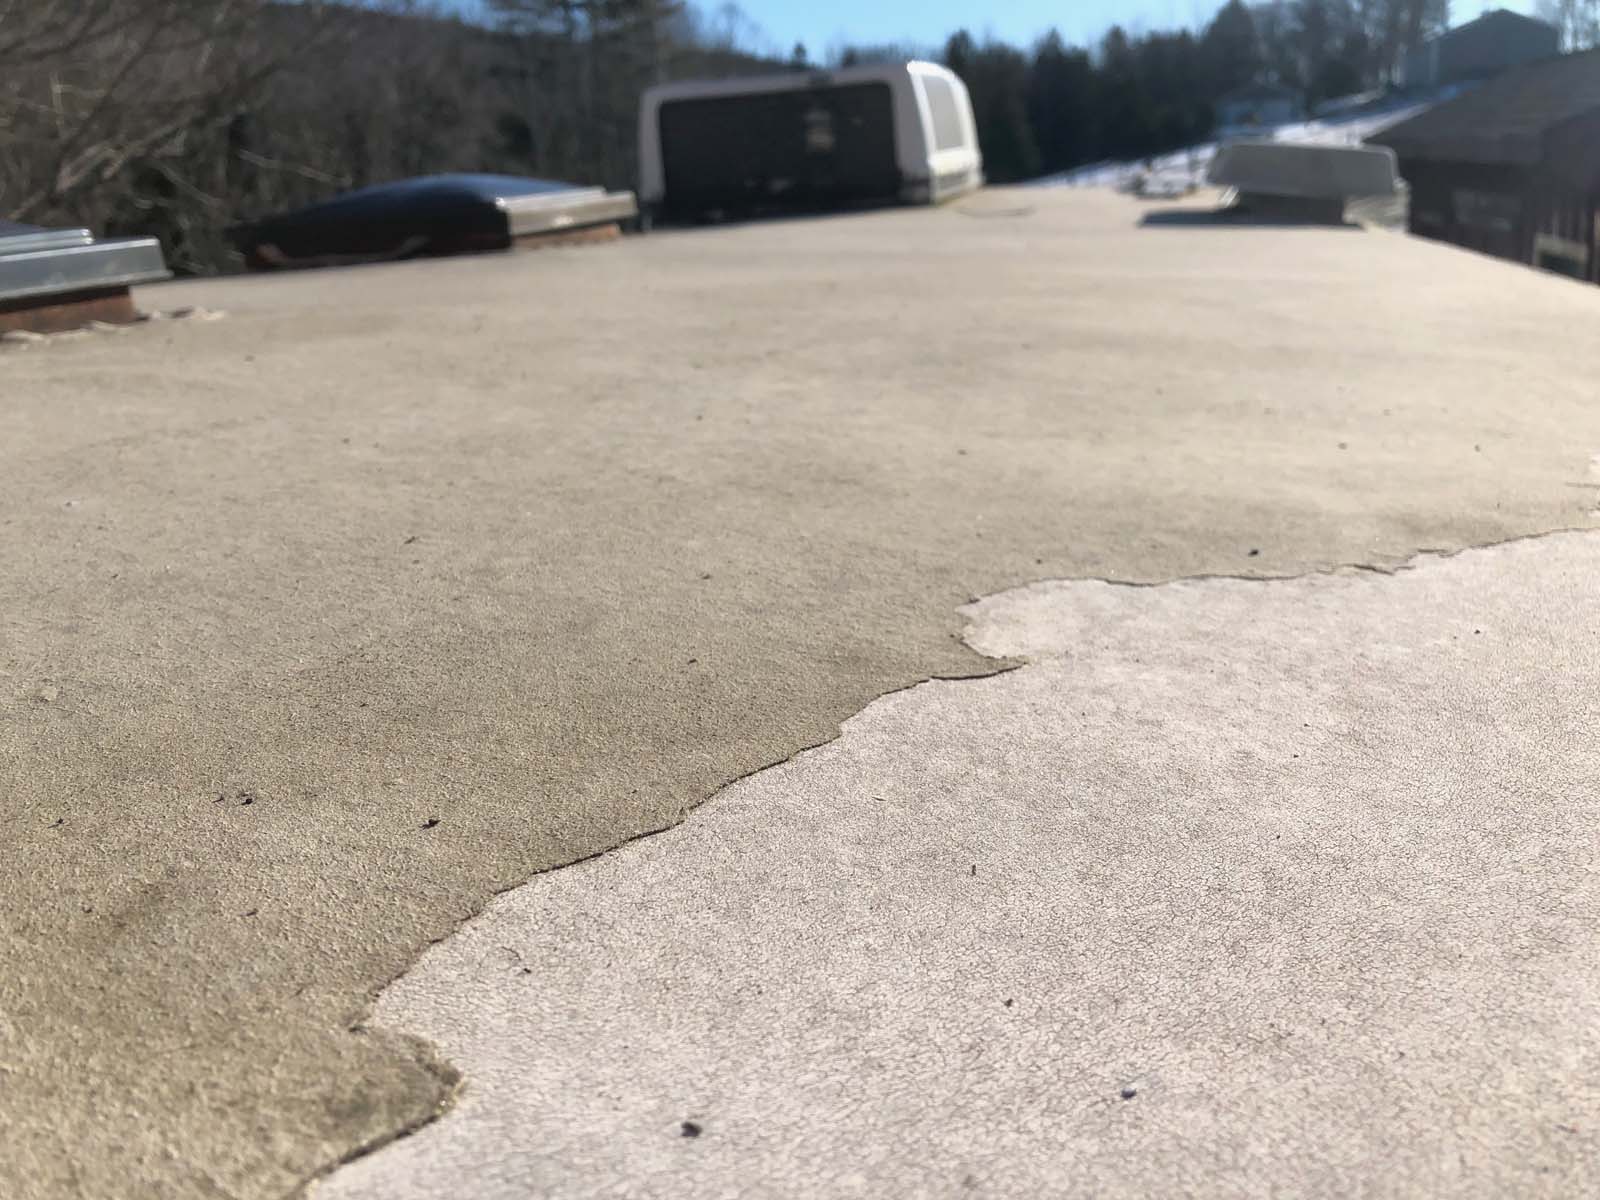
In your case, the roof caulking had failed and was most likely not found long ago. Then, someone attempted a repair that was not done properly and still opened up a leak again. In your case, they also tried to do a roof coat in this area, which also failed.
The pictures show a rotted rear wall rafter that allows the rear molding to flex up to expose the rear wall putty tape. There is no strength left in the wood rafter to hold the screws down. The rear metal molding starts straight when new, and the screws hold it down on the curve of the back wall. As the water damage progresses and rot continues, the metal molding wants to lift and become straight in its natural position. Thus, the lifting action. I have seen this many times. It is a classic effect of a roof with very little maintenance on the roof sealants.
Next is, OK, the rear wall rafter is rotted; where did all the water go? Gravity takes over, and water will travel down as far as the volume of it allows until it reaches the bottom of the wall. Then, the black plastic on the bottom traps the water inside, and it sits and festers. In your case, the water wants to take the easiest path down, which is the right rear corner of the camper. This is all behind the siding and the corner molding in the wall. Your pic shows that heavy water accumulated, which started the wallboard deterioration in the right rear bunk corner.

It took a good amount of time for that wallboard to shrink and separate like that. Years worth of time.
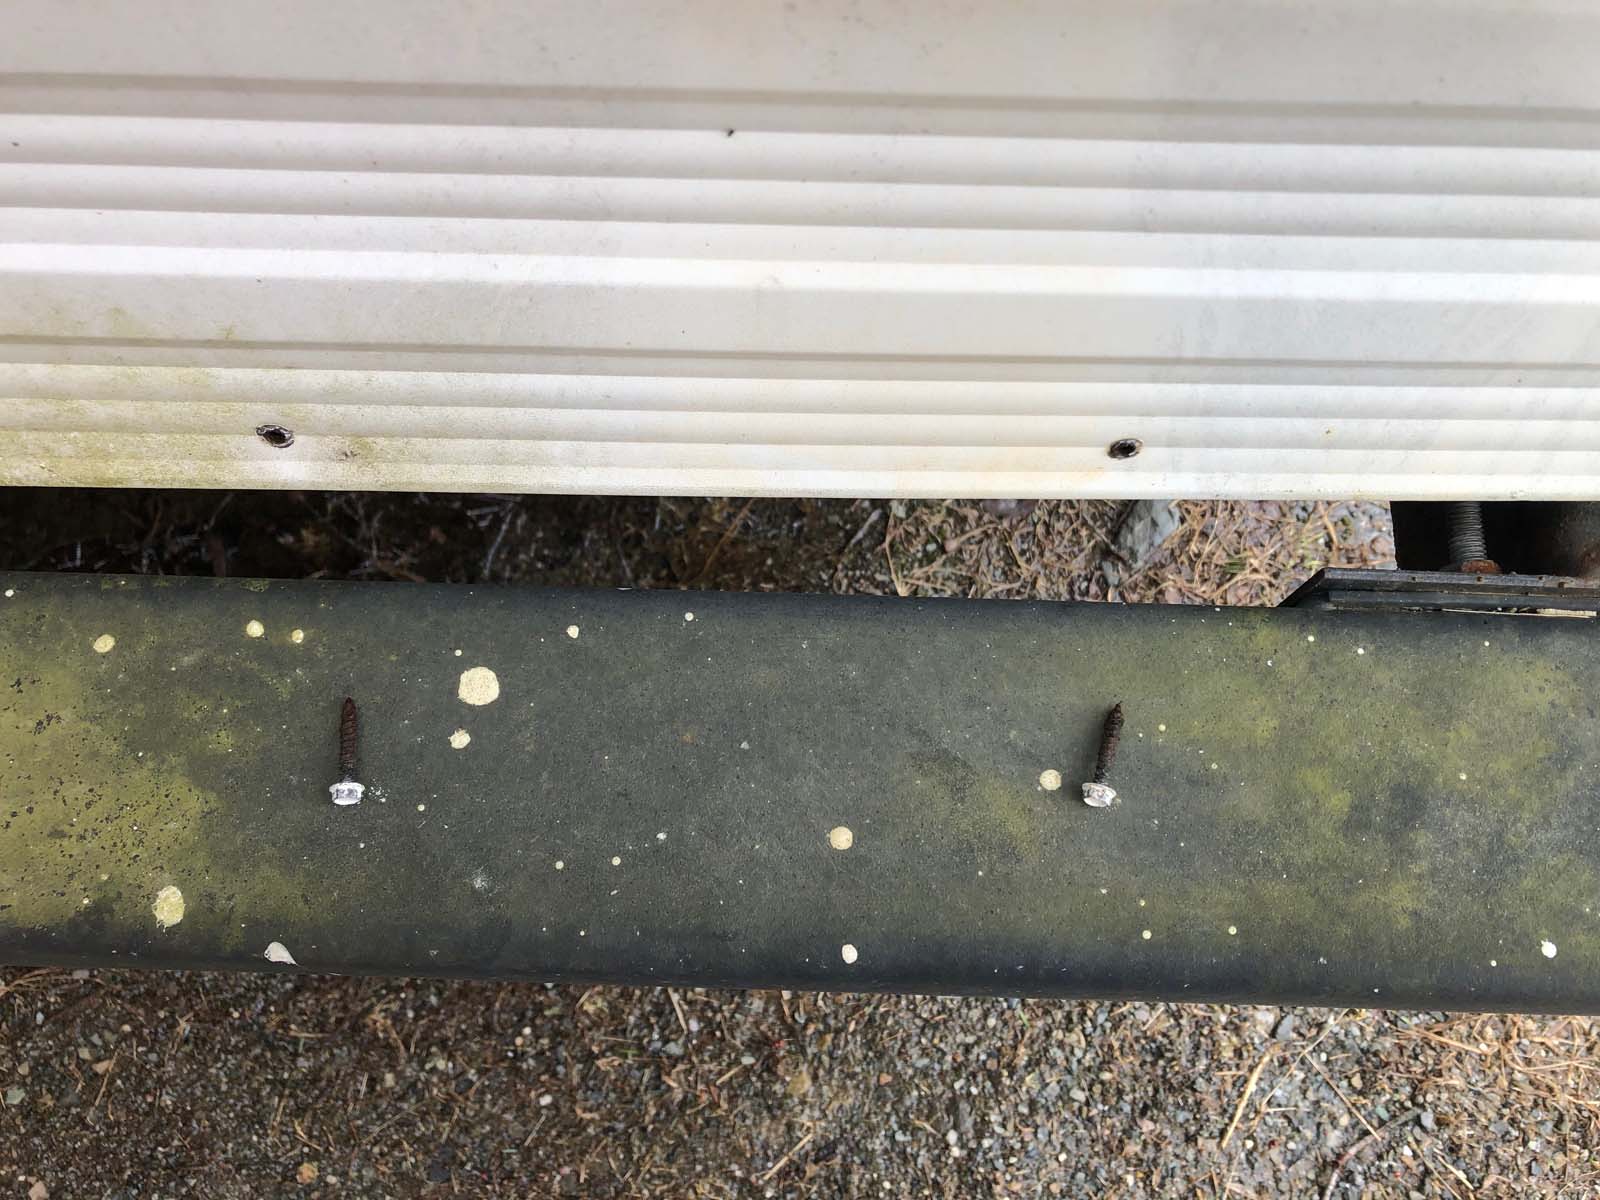
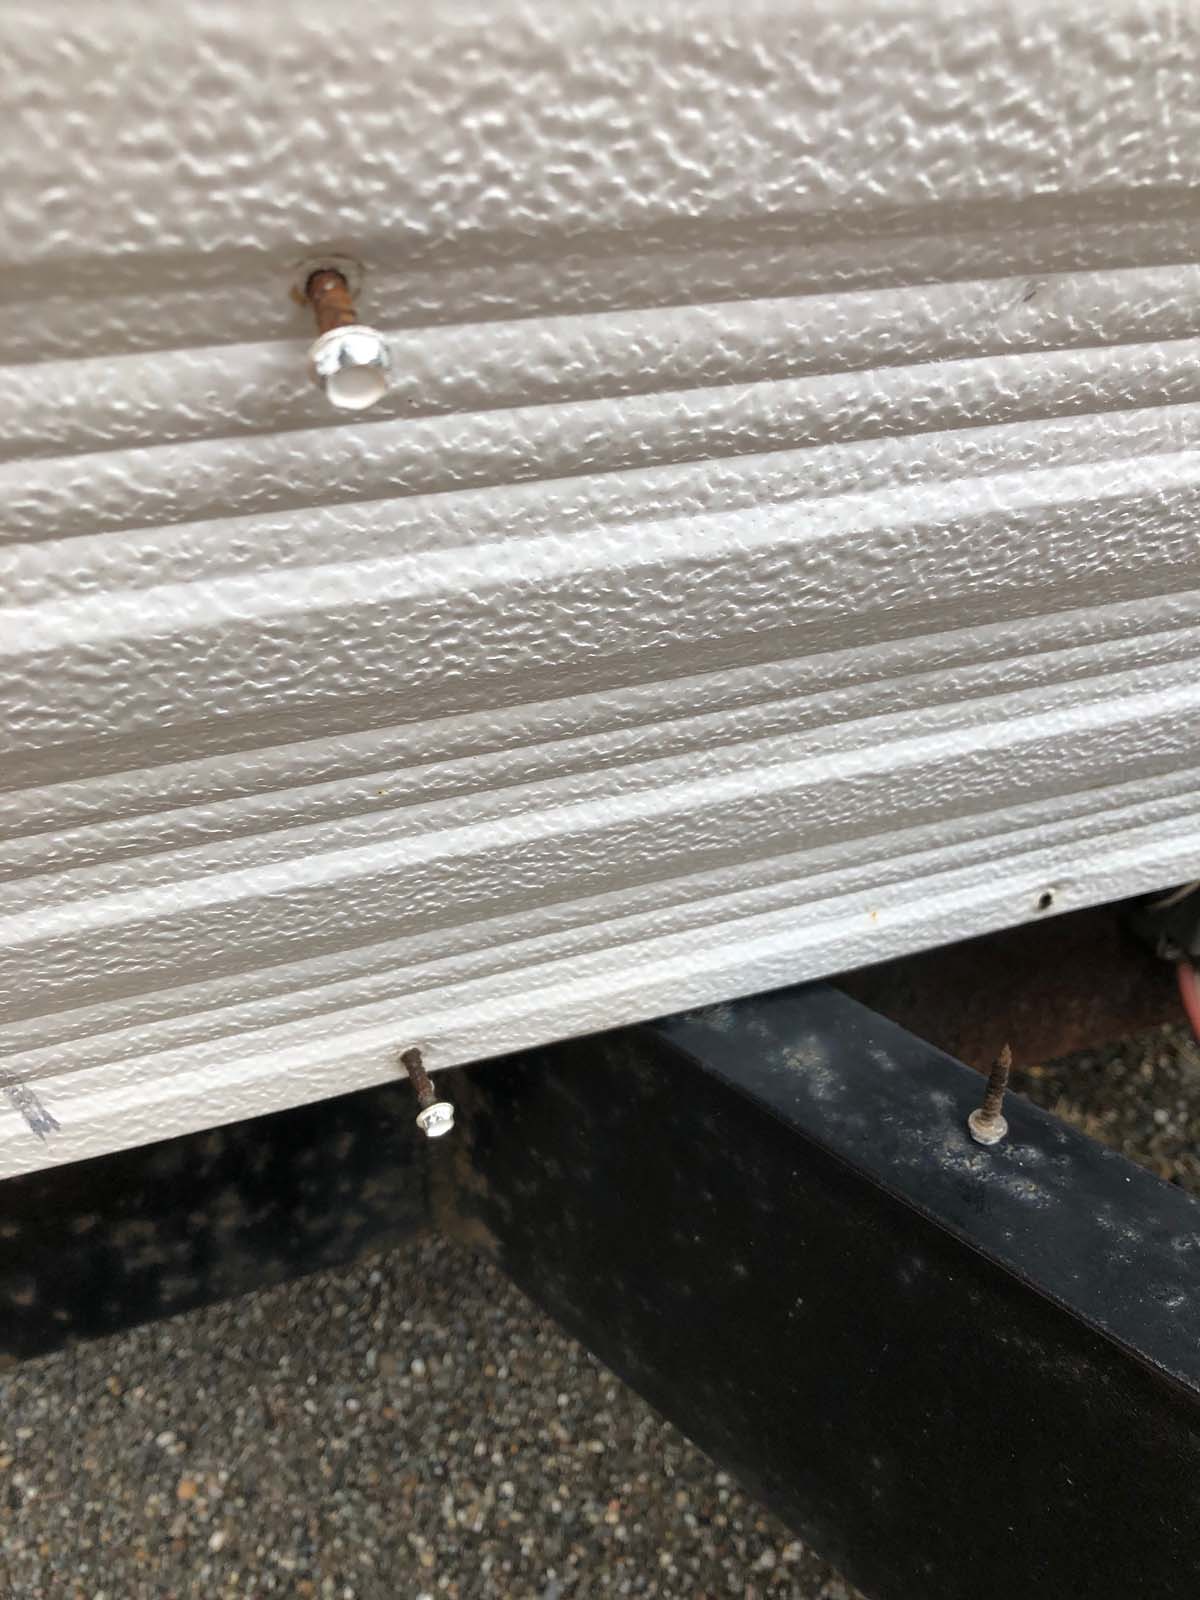
Next is the bottom of the rear wall; the rusted screw checks you did confirm my suspicion.
Quote:
Hi John,
Every single one of the screws is rusty. 
|
There are other potential (most likely) leaks that you have not yet found, which can add more seeping water to create the bottom rusted screws. The left and right rear corner moldings may have leaked from the dried-up and cracked putty tape seal from the molding to the siding. You don't need a roof leak to create the rusted screws. That long molding from the roof to the bottom of the rear wall can leak in many locations into the same corner space and end up down at the bottom of the wall, where the water cannot get out.
If you repair the back wall, when you remove the corner moldings, always look for how it may have leaked. Siding leaks happen when the old putty tape dries up, shrinks, cracks, and separates from the siding or the molding. Water and dirt start to seep in, only a little bit once it starts. As time progresses and towing increases, flexing the camper, the cracks keep growing, and more dirt and water seep in. A freeze and thaw cycle expansion cycle also adds to this. After enough time, the crack reaches the inside of the camper wall cavity. Now, water seeps into the corner and spreads. A little at a time, as years go by, the amount of water adds up, gravity takes over, and it spreads down.
See this corner molding; the black stains are dirt, a cracked space that allowed the dirt to get in there.

The wall side looks like this: the black spots in the putty tape are where water and dirt seeped in. In this pic, the damage stopped before the water made it into the corner as Dicor caulk was used to seal the molding to the siding over the top of the exposed putty tape. The pure white-looking caulk on the left of the putty tape stopped any water intrusion. The caulk was applied about 10 years prior. This is how effective the caulking can be as a stop-gap measure to buy you time before you take the wall apart.
The above shows what I feel has happened to your camper. In the next replay, I will show what it could look like behind the siding and how to repair it. More yet to come.
Hope this helps.
JOhn
__________________
Current Sunlines: 2004 T310SR, 2004 T1950, 2004 T2475, 2007 T2499, 2004 T317SR
Prior Sunlines: 2004 T2499 - Fern Blue
2005 Ford F350 Lariat, 6.8L V10 W/ 4.10 rear axle, CC, Short Bed, SRW. Reese HP trunnion bar hitch W/ HP DC
Google Custom Search For Sunline Owners Club
|
|
|
|
|
01-17-2024, 07:47 PM
|
#13
|
|
Member
Join Date: Dec 2023
Location: Maine
Posts: 32
SUN #13951
|
Hi John, It helps immensely! I noticed that the corner was lifted… now I have a rough picture in my head of why. I’m guessing there’s no quick fix for this area and the roof has to be opened? …or is it possible to do a temporary patch here? I’m guessing opening the roof here will lead to the need of opening the whole back wall?
__________________
|
|
|
|
|
01-17-2024, 07:48 PM
|
#14
|
|
Member
Join Date: Dec 2023
Location: Maine
Posts: 32
SUN #13951
|
Oh and thanks again… we appreciate it so much!
__________________
|
|
|
|
|
01-18-2024, 08:26 PM
|
#15
|
|
Moderator
Join Date: Nov 2006
Location: Ohio
Posts: 12,656
SUN #89
|
Hi Leslie,
Quote:
Originally Posted by Leslief761
Hi John, It helps immensely! I noticed that the corner was lifted
now I have a rough picture in my head of why. Im guessing theres no quick fix for this area and the roof has to be opened?
or is it possible to do a temporary patch here?
|
There are options depending on your situation or wants/needs. They are not exactly "quick," but different options initially give different results, requiring less effort. These options I will present require you to undo this patch the day the long-term rear wall is started. The undoing of your patch will create a low level of cleaning up before the rear wall repair is completed.
Before I get into the options, so you can better understand them, I want to do a quick picture explanation of how your rear wall, the rear ceiling, the rear rafters, and the side walls are all made and joined. These pics are from one of my total restorations on a 2004 Sunline, so all the wood looks new; it is, and you can see how they are made.
The side walls rest on top of the floor. The rear wall screws to the band board/side of the floor. In the older Sunlines, the walls are screwed to the side of the floor instead of on top of it.

The ceiling board and rafters are made as a subassembly before being placed on top of the walls. The ceiling board, rafters, and outside ceiling band board are a total of 8 ft wide, spanning from outside wall to outside wall.

The ceiling assembly is then placed on top of the walls.


Now we are going to hone in on the rear wall rafter that is deteriorated on your camper.

Here is a zoomed-in view with wood thicknesses
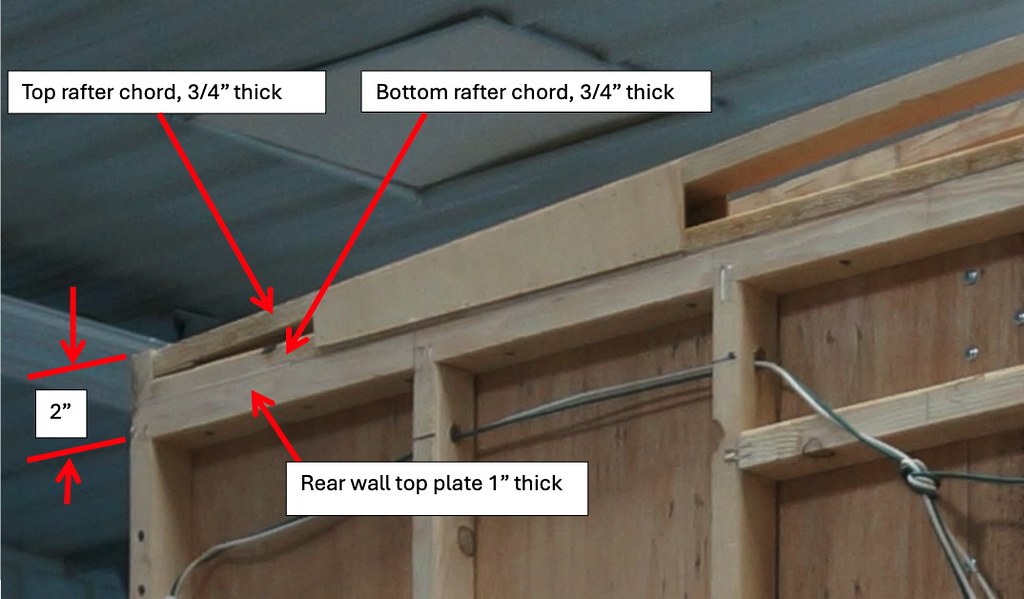
When the rear molding lifts up like yours is, the top rafter chord is very rotted. There is very little to no strength left to hold a screw. Sunline used 1" lg screws on the rear molding, which would screw into the top 3/4" thick chord.
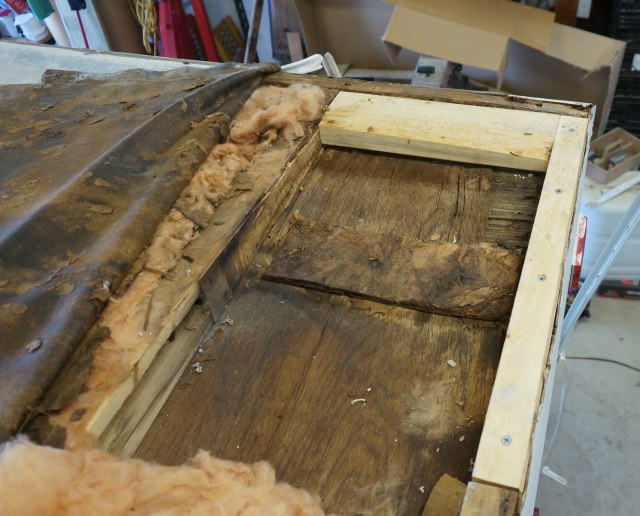
Ugly picture alert!. This is what the top rotted rafter cord looks like when you remove the roof to rear wall molding and lift up the roof membrane assembly. The top chord is just, not good; it has totally deteriorated one to two feet from the side wall.
This is the left side with the membrane lifted.

This is the right side with the insulation removed and exposing the top chord or what is left of it.

Now that you have a picture of what is under the roof, here are some options.
1. If you want to "only stop" the roof leak, not have to take the rear wall or roof apart, stop using the tarp, and be able to tow down the road, there is a method to accomplish this. I will describe a "patch" on how to stop water from getting in from the rear roof seam. You must still caulk all the siding penetrations and corner moldings to prevent the rear wall water from worsening.
These are the big-picture steps. If you're interested in this, I will give you more instructions. This option buys you time not to have any more water get in from the roof. This patch will last a good long while, one to two years, maybe more, but the wet inside attic and walls are still there. It will start to dry out some, and dry rot may also come in the one to two-year period. This option is really only to buy you time.
A. Before we get too far into doing this option, you need to test if longer screws will hold down the rear modeling. You dig out the caulk on the top of the right rear end wall molding (heat gun and all dulled up metal scraper) and remove 2 to 3 of the screws, or what is left of them, starting from the wall and working up towards the center of the roof. Install 2" long screws in place of the 1" screws. The hope is the top wall plate is not totally rotted, and the 2" screw will bite into that better wood of the top wall plate. You can tell real quick as the screw will start tightening up and pull the molding down tight. If that works (I'll call it good odds it will), then this patch can work. If there is no sound wood to hold a 2" long screw, then this option will not work, and you have to take the roof apart sooner then later.
Assuming it works,
B Clean the rear area of the rooftop, the full left to right 8 ft width about 1 to 2 ft down the roof length towards the front. This includes the rear roof cap molding.
B. Using a slightly sharp edge scraper, try to get under and peel up the coating the prior owner put on. The scraper must be close to flat (parallel) on the roof so as not to dig into the roof. This may be easy since the coating blew apart on the right rear corner. We need to remove any loose coating as we need to bond repair tape to the main old roof if possible. If the coating is firmly bonded down, try a little heat from a heat gun and see if it will lift. If it still does not lift, then you can just leave it. We will bond to the coating.
C. Using a heat gun and scrapper, remove all the old bad caulk from the rear, molding the entire width across the camper and about 1 ft down the left and right gutter rail. If the caulk is still sound when you dig down into it, then leave that good caulk in place. Scrap off the bad and leave the good. We want to bond to the metal molding or good caulk and roof, not old, bad caulk. We will seal all 8 feet wide of the rear molding to the roof.
D. On the rear wall cap molding that is lifting, dig all the caulk out of the screws in the area the remaining molding is lifted beyond your initial test. This might be half the width of the camper. Remove the old screws that will not tighten up and install a 2" lg screw, and screw down the molding.
D. Re-clean as needed; if there is black mold, we must remove the mold with a de-molding bleach process. You want the area to be very clean.
E. Apply Eternaclean primer over the surface that will have Etnerabond Roof Seal repair tape applied to it.
F. Apply Eternabond Roof Seal tape over the entire rear molding and 4 to 6" down the length of the roof. See this post for doing the camper seams., https://www.sunlineclub.com/forums/f...ics-11610.html
It will look like this when you are done.
The above option will take one to two days to do. You will be learning, so it will take longer. I can get into the materials if you're interested.
I'll answer this in the next reply.
Quote:
Originally Posted by Leslief761
Im guessing opening the roof here will lead to the need of opening the whole back wall?
|
__________________
Current Sunlines: 2004 T310SR, 2004 T1950, 2004 T2475, 2007 T2499, 2004 T317SR
Prior Sunlines: 2004 T2499 - Fern Blue
2005 Ford F350 Lariat, 6.8L V10 W/ 4.10 rear axle, CC, Short Bed, SRW. Reese HP trunnion bar hitch W/ HP DC
Google Custom Search For Sunline Owners Club
|
|
|
|
|
01-18-2024, 09:03 PM
|
#16
|
|
Moderator
Join Date: Nov 2006
Location: Ohio
Posts: 12,656
SUN #89
|
To this question,
Quote:
Originally Posted by Leslief761
Im guessing opening the roof here will lead to the need of opening the whole back wall?
|
The answer to that is it depends.
Option 2: There is another option that does open up the rear part of the roof and lets it dry out. Reach down and pull wet insulation out of the rear wall as far as possible with a 3 ft or so hook. You also do some repairs to the rotted rear rafter. Once dried out and the wood treated if wanted, then we close the roof back up and seal it.
This option only takes part of the back wall apartabout 2 ft down the wall from the roof. The siding does not come off. We only loosen up the top siding of the wall, reach in, get the wet insulation out as much as we can, and dry out the top of the wall and the attic. This option slows down ceiling board deterioration and can stop it if your resin treat it.
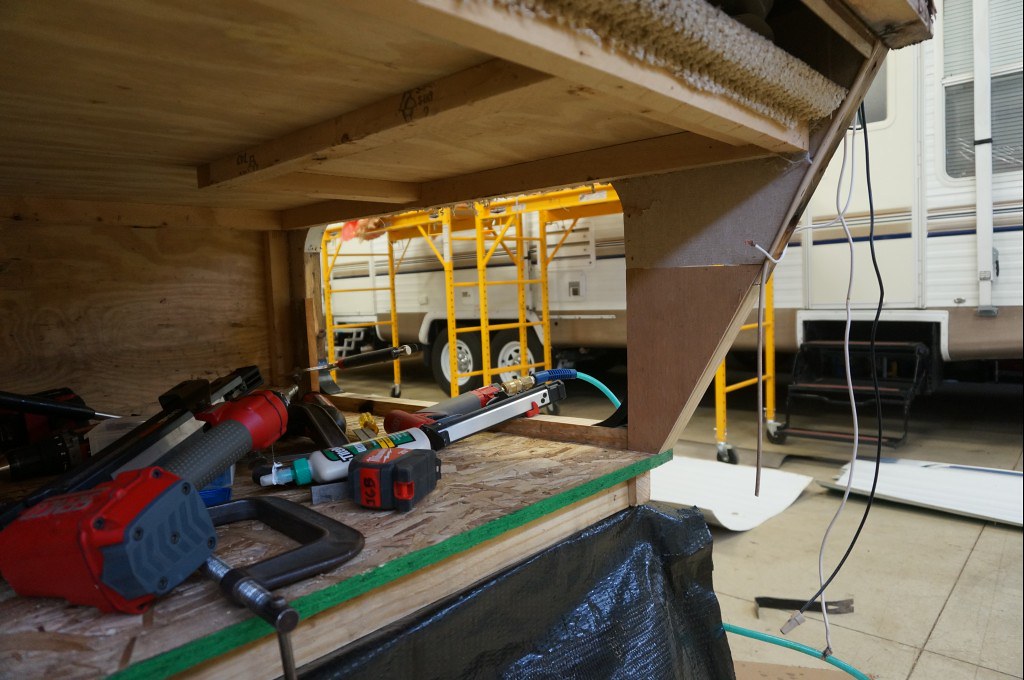
I have done the above to buy time before I take the entire back of the camper apart and do a total re-roof in a restoration effort. I never did a post of this, but I did upload the pictures. See this photo album on my Flickr photo hosting site. https://flic.kr/s/aHskBWidPa
Here are a few pics of the process; there are 92 of them on the Flickr link.
The problem with rear lifting molding.
Open up the back part of the wall until the wetness stops running down the roof.

Repair bad wood so screws will hold

Insert a new sheet of 1/8" luan plywood to prevent the membrane from sinking between the rafters. Cut to fit

Insert under the bud-board roof.

Eternabond Roof Seal was applied to the membrane and the siding.

Install moldings with new butyl tape over the top of the Ebond tape, and Dicor caulk all joints.


This was a temporary repair, and the camper lives inside undercover when not camping. In my case, it saved the back of the camper until I can get to it, and we needed to use the camper. If I did not have to use it, I would have left it apart, drying it out for the number of years unit I can restore it.
That effort took me four days, and I had perfect drying conditions. A fan was running all night when it was 80F; come morning, it had dried out. I was shocked it dried out that quickly. This option for you may take double that work time. Again, this option buys you time until the total repair effort comes.
Tomorrow, I'll give you the full real wall and back of roof repair.
Hope this helps,
John
__________________
Current Sunlines: 2004 T310SR, 2004 T1950, 2004 T2475, 2007 T2499, 2004 T317SR
Prior Sunlines: 2004 T2499 - Fern Blue
2005 Ford F350 Lariat, 6.8L V10 W/ 4.10 rear axle, CC, Short Bed, SRW. Reese HP trunnion bar hitch W/ HP DC
Google Custom Search For Sunline Owners Club
|
|
|
|
|
01-19-2024, 04:20 PM
|
#17
|
|
Member
Join Date: Dec 2023
Location: Maine
Posts: 32
SUN #13951
|
Thanks John! You really do such a good job at explaining everything in great detail which makes it much easier to understand! The first picture of the wooden frame makes it so much more approachable. Given this choice I think we would choose option 2. I'm not sure how the roof rafters are made so the curve may be a challenge to us but I'd like to open it and get the bad insulation out as soon as possible.
In my head the siding also seems like a challenge... like getting it back on and straight would be difficult? It's done perfectly in your project photos but that's with you doing it, not us.  Definitely a learning curve I'm sure!
Leslie
__________________
|
|
|
|
|
01-19-2024, 05:39 PM
|
#18
|
|
Member
Join Date: Dec 2023
Location: Maine
Posts: 32
SUN #13951
|
Also John you should write a book on this just with posts you've already answered for everyone. Is there a way to say any of this offline besides copying and pasting? It would be such a tragedy if it was lost!
__________________
|
|
|
|
|
01-20-2024, 07:26 PM
|
#19
|
|
Moderator
Join Date: Nov 2006
Location: Ohio
Posts: 12,656
SUN #89
|
Hi Leslie,
You are very welcome. Thank you for the kind words. Since you are leaning towards Option 2 (a good choice, BTW), maybe we can help you get to Option 3 and do the whole rear wall simultaneously; you would not tackle the whole roof just yet, only the rear section in Option 2.
Quote:
Originally Posted by Leslief761
Thanks John! You really do such a good job at explaining everything in great detail which makes it much easier to understand! The first picture of the wooden frame makes it so much more approachable. Given this choice I think we would choose option 2. I'm not sure how the roof rafters are made so the curve may be a challenge to us but I'd like to open it and get the bad insulation out as soon as possible.
In my head the siding also seems like a challenge... like getting it back on and straight would be difficult? It's done perfectly in your project photos but that's with you doing it, not us. Definitely a learning curve I'm sure!
Leslie |
Option 3 is to repair the entire rear wall and the rear section of the roof.
The siding, taking it off or putting it back on, has been a hurdle for many before. The unknown is the biggest challenge to overcome. We can help with the unknown. There are many tips and tricks we can pass on to make it simpler and non-challenging. So far, I have done 10 Sunline rear wall repairs, 3 on non-slide campers, and 7 on slide campers. For each one, I keep perfecting the process to the next level to make it easier, quicker, and better for the next time.
I am not sure if you found this post yet. This is my sons 2006 T264SR. https://www.sunlineclub.com/forums/f...avy-16834.html
It was the first time we had a slide camper rear wall taken apart. We learned as we went and used standard woodworking skills to rebuild it. I already had siding skills from my 2004 T310SR slide repair. Have a look if you have yet to see it. For now, we are only talking about the rear wall to be done separately from the roof and front wall if you choose to do it that way. I am presenting this in stages; you do not have to do it all at once, but you can if you want to. That post talks about an entirely new walk-on roof and a front and rear wall repair simultaneously.
Since that first rear wall repair and the other nine campers, I learned many tips and tricks on removing siding, installing siding, and doing the wood repair. Im willing to share if you want to consider this option. Feel free to ask for them.
Here is some good news in all this. You have a slide camper in which the rear wall is made differently than the non-slide campers. The difference is how the back wall connects and terminates with the camper floor. The way leaking water collects on the bottom of the slide camper setup generally causes less overall damage than on the non-slide campers.
Let's look at a non-slide camper to see the issue. The bottom of the rear wall is the bottom of the floor joists resting on the metal camper frame. The entire bottom of the camper is wrapped in the black plastic Darco. When water comes down to the bottom of the rear wall, water stops at the bottom of the floor joists, hits the Darco, and as time goes on and more water comes., it starts spreading under the floor system and anywhere else it can run. Please take a look here at this 2005 T2363, which is a nonslide camper. The blue arrows are the points the water entered, and the red arrows are where it went and did damage. This was one of my total restoration projects.


Here are some more pics of that damage as FYI on my Flickr account https://www.flickr.com/photos/camper...7715819879711/
Now, let's look at a slide camper built like yours. This is a 2005 T264SR camper (the 2nd rear wall camper I did) with a right rear roof corner leak and both sides rear wall corner molding leaks. The heavy damage happened below the main camper floor line. The red dotted line shows the top of the floor and bottom of the floor joists sitting on the steel camper frame. Your camper will look like this and possibly worse.


The back wall where you took the rusted screws out has a false wall, so to speak, below the main camper floor by about 6 that is used to attach the bottom piece of siding. That lower 6 of wall studs is wrapped with the black Darco plastic, and it creates a water dam when a leak occurs. The water pools in the dam and rots out the lower wood and some 2 x 3 wall parts at the floor line. But the damage normally stops there. See, the wallboard is exposed with the 2 x 3 removed.

The red dotted lines were added for the top of the floor and bottom of the floor joist.

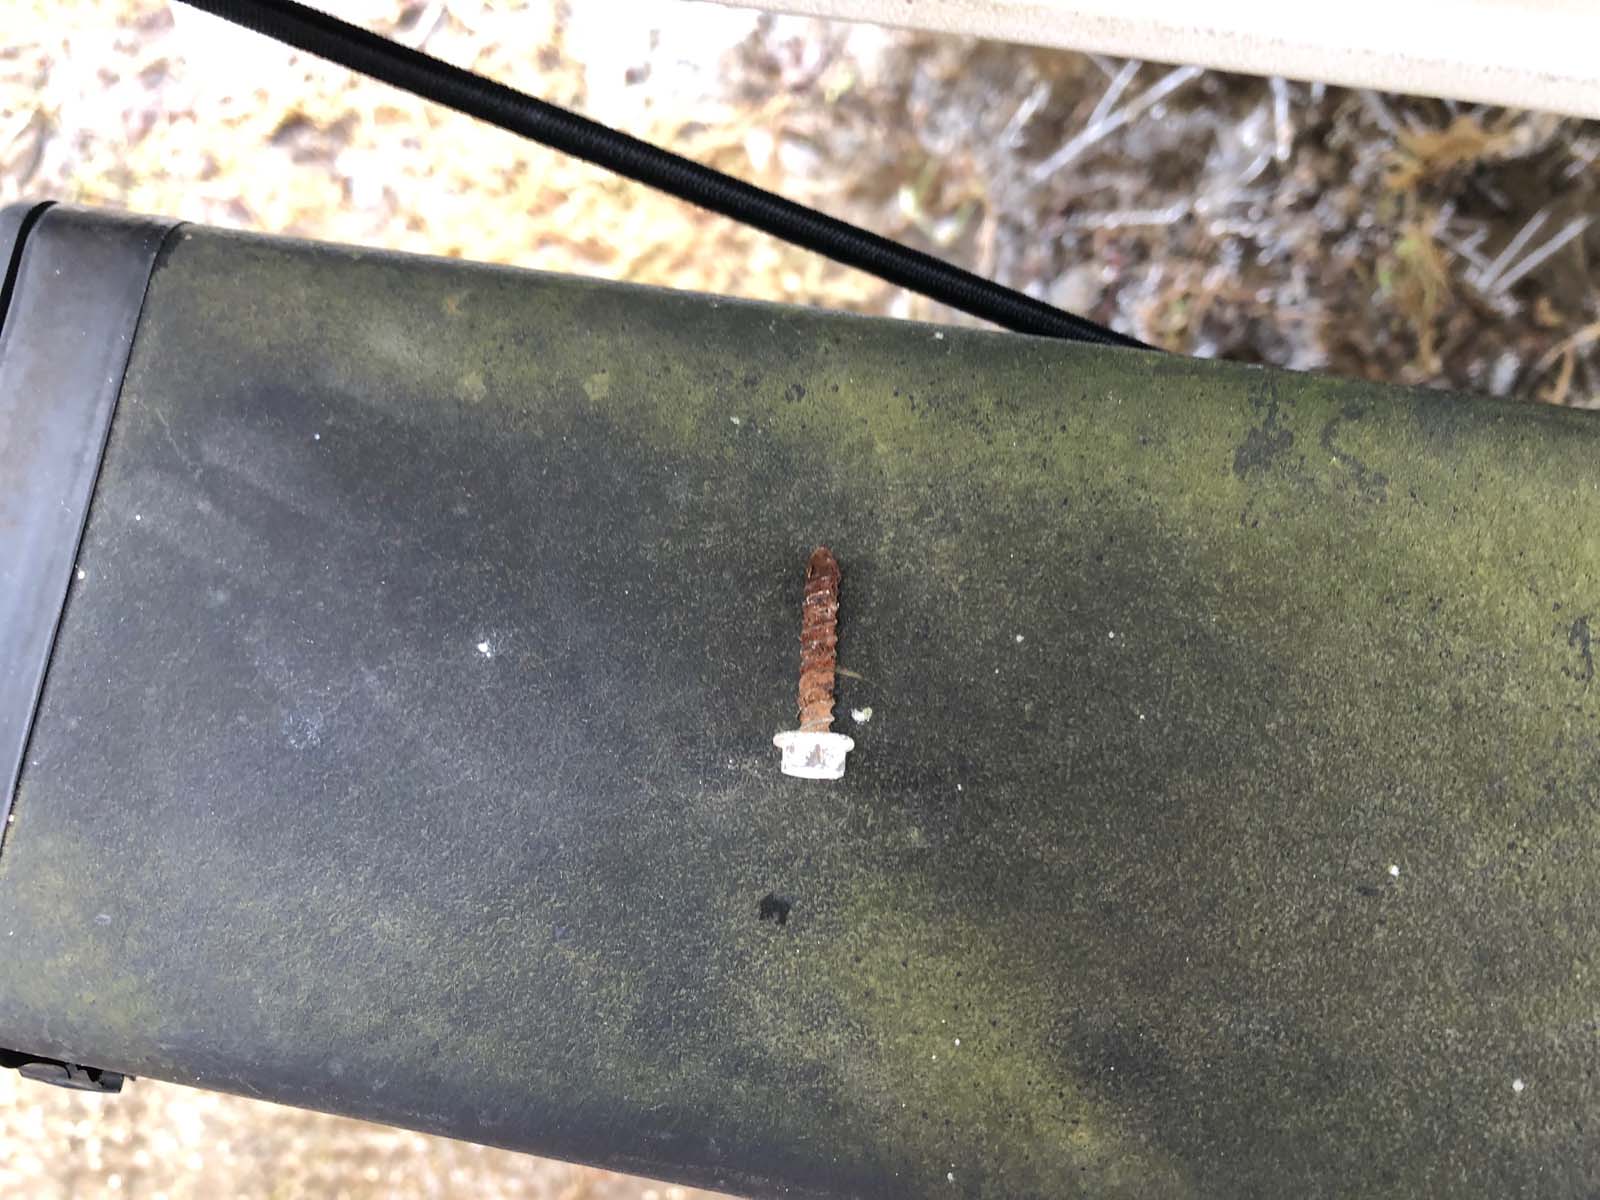
The water may seep out of the dam over time in the small holes in the Darco, but it has a place to collect, and is not running down the main floor heading towards the front of the camper, creating a lot more damage. The wallboard by the floor is most often stained and has some level of rot; the resin treatment can restore it to usable condition. When the weather warms up enough above freezing, the wood of the false wall may be mush if you squeeze behind that lower piece of siding. The bottom siding screws rusted from being screwed into wet wood for so long. The rust starts on the threads and, over time, spreads to the screw head, where it will be rusted all over the headthe screws rust from the inside out.
See here with your screws.
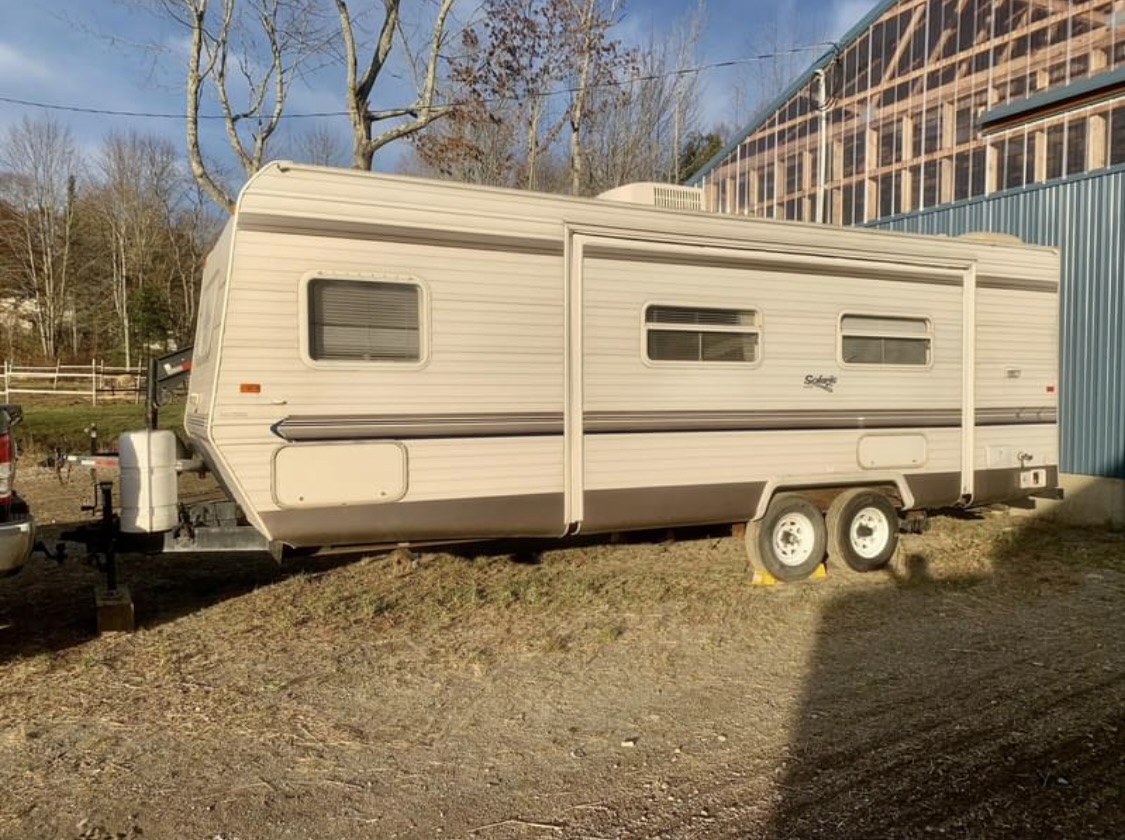
The left side of your camper may be only partially damaged from a corner leak. We have never had a pic yet on the left side rear roof seam because of the weather and tarp, so it is hard to tell if a roof leak is on the left side. The 2005 T264 SR had this same issue, requiring some of the siding on the left and right rear walls to come loose or be removed. Your campers left slide side has short siding from the rear wall forward to the slide opening. Only the needed pieces must be loosened, pending if the water damage went around the left side.
Your left side from your album
Here is the 2005 T264SR; during the repair, I had to open up some of the left rear siding to deal with the corner. You can see the new corner wood. These short siding pieces to the cargo door and slide molding makes removing the siding easier if needed.

On your right rear side, the odds are high there is some level of water damage on the right rear section. The wallboard is damaged inside the bunk area corner, which suggests this. The right rear wall corner wall stud is damaged, maybe the entire length from the floor to the roof on the right side, as the roof leak was in that corner. That rear wall stud is easy to get to with the rear siding off. The 05 T-264SR had an all-new rear wall stud; also, you can see the new wood in the corner.
The right rear wall stud was removed,

The stud replaced

If your damage goes around to the right-side wall, in the best case, you only have to un-staple the right rear corner end of the siding, and it can bow out to see and maybe do the repair. If the damage goes down the right side to the wall stud towards the bunk windows, then more right-hand siding must come off. This is the only pic I could find of the right side of your camper.
It is unknown at this point if more of the right wall siding has to come off until the weather warms up to allow a moisture meter check in the bunk area. Or to confirm it when you open the back wall of the camper with the rear wall siding off and take a peak in that right rear corner. Don't let this bum you out if you find it; you must take "some" of the right side siding off. It is not that bad, and that process will benefit you. in resetting the old putty tape at the windows and other areas with fresh new butyl.
I'll leave you with the above for tonighta lot to absorb for the first time through this. If you want tips and tricks on siding and other rear wall repair techniques, ask, and I'll hunt them up.
I hope this helps with what to expect and how to get through it.
John.
__________________
Current Sunlines: 2004 T310SR, 2004 T1950, 2004 T2475, 2007 T2499, 2004 T317SR
Prior Sunlines: 2004 T2499 - Fern Blue
2005 Ford F350 Lariat, 6.8L V10 W/ 4.10 rear axle, CC, Short Bed, SRW. Reese HP trunnion bar hitch W/ HP DC
Google Custom Search For Sunline Owners Club
|
|
|
|
|
01-21-2024, 04:20 PM
|
#20
|
|
Moderator
Join Date: Nov 2006
Location: Ohio
Posts: 12,656
SUN #89
|
Hi Leslie,
Here are my thoughts on your front wall from the rusty screw check you did. You get an A+ on doing and reporting on the test. Great job!
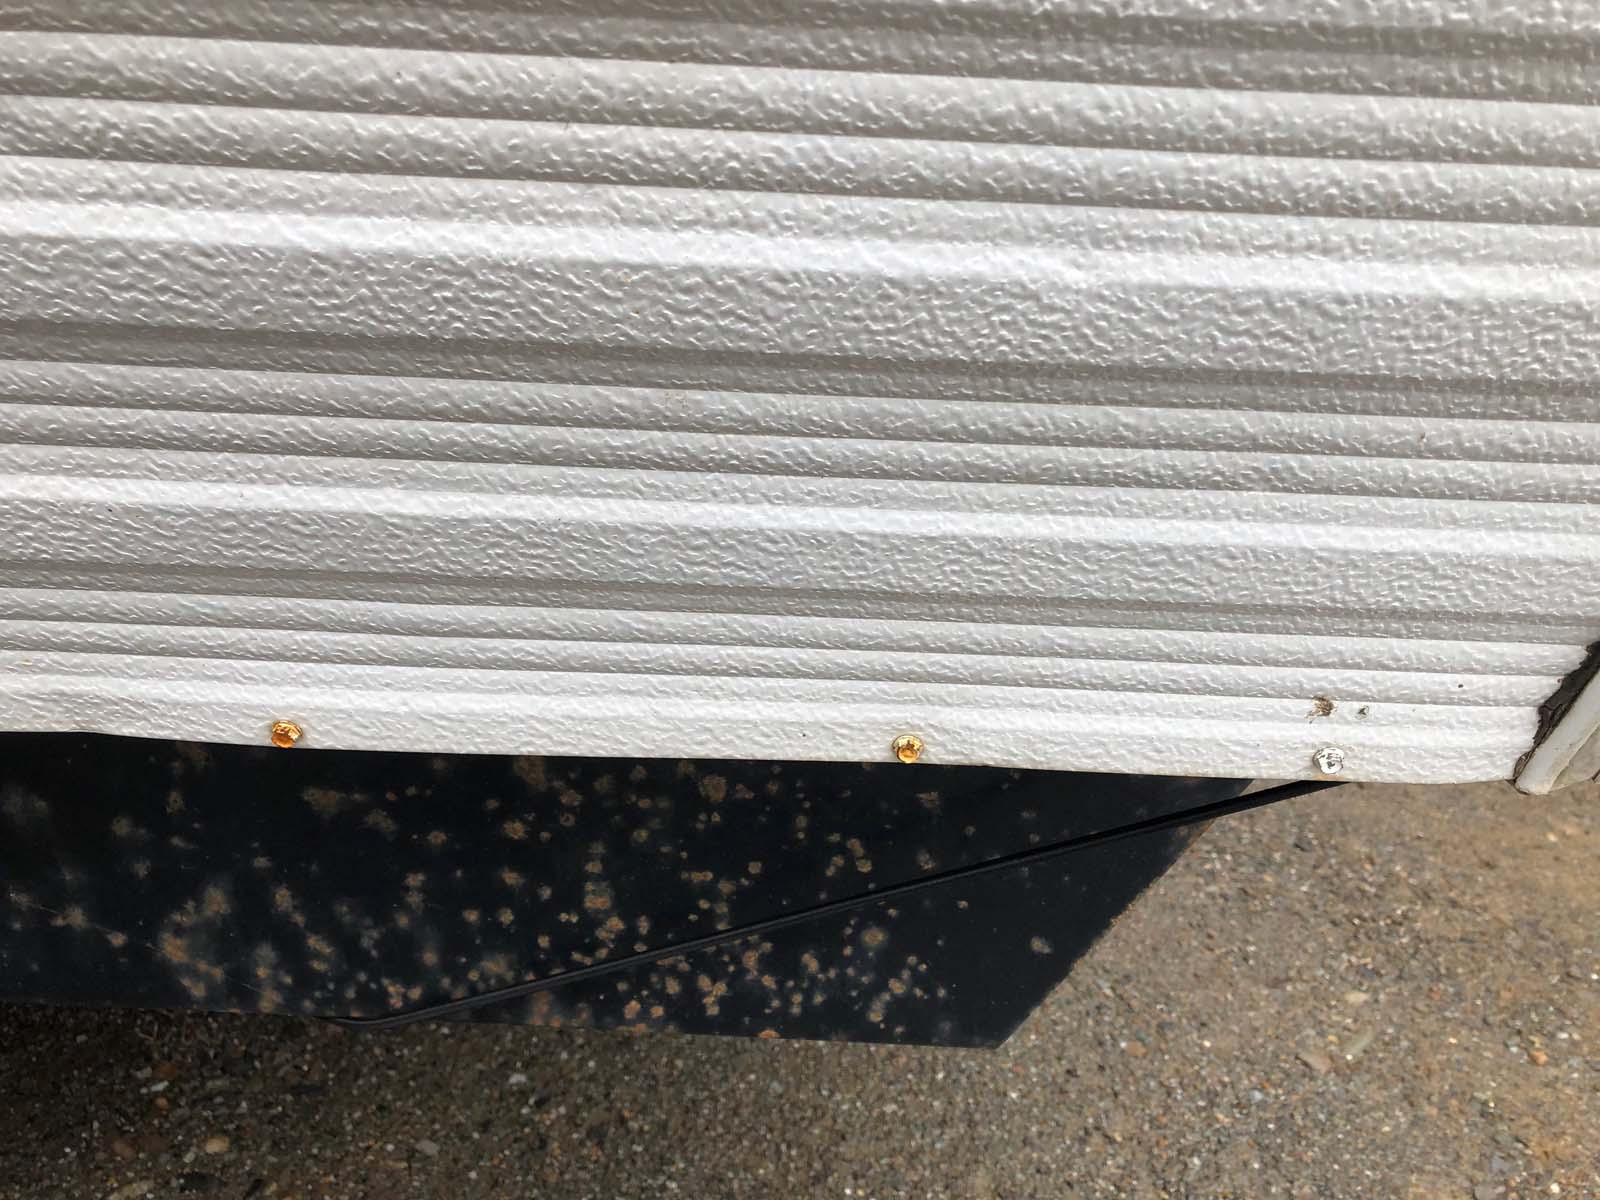
Oh boy, so what does this mean? It indicates there is or was an ongoing leak or leaks into the front wall cavity, which drains down into the front bottom area of the front wall. Again, any water entering the wall cavity coming from above ends up in the bottom of the front wall. Like on the back wall, all the water from above ended up in the false wall dam at the bottom. The front wall water has the same effect; it ends up at the bottom, where it is very hard to get out.
I’m not trying to discourage you; this is a common issue as the years go by, and the siding seams are not sealed up when the camper lives outside all the time. This is all fixable and can be done in stages at different times. You do not have to take the entire camper apart at once if you do not want to.
By the looks of the screws, this is years’ worth of water seepage, maybe 5 to 8 years or more, and there most likely are a few locations seeping in the water, not just one big one. When the weather warms up and the walls are no longer frozen, your moisture meter can help guide you to the possible extent of where the water made it. You can scan:
- Under the camper on the black Darco, scanning up.
- Inside the large front, pass through cargo bay by scanning the entire front wall in the cargo bay and the side walls by the cargo bay doors, and then scan the floor down.
- Scan the entire front wall inside the camper above the bedframe, with extra interest at the front wall to side wall corners, from the ceiling down to the top of the cargo compartment/bed frame. Scan up at the ceiling along the front and side wall areas. Scan all around the front window with extra attention to scanning the full width of the camper wall under the full window. Since your front wall higher-up (halfway up the lower section) screws are rusted, this points to a window frame leak due to a putty tape failure to seal to the siding.
When the roof tarp can be removed, pictures of the roof caulking at the front wall to the roof seam also help tell a story. You can scan down on the rubber roof also; do this from a ladder on the side as far as you can safely reach inwards. If the insulation or roof bud-board is wet, the meter will find it. If, by chance, the entire roof reads high numbers, 75% and up, then there may be mold on the roof, and you are reading the mold, tricking you of a problem inside the roof. I have only had the mold issue once, and it did not look like mold, but it was. But the meter will find wetness through the membrane up to ¾” below the surface.
Given your floor plan, I have seen all the areas I list below create rusted screws in the front. This does not mean you have all these, as any one of them or a combo of them can create the rusted screws in the front. Again, all the front wall water, from wherever it came from, ends at the bottom.
- Roof to front wall front seam leaks from bad lap sealant/caulking, especially at the left and right corners, which flex more than other locations. This is a big offender.
- The front left and right corner moldings from putty tape failures sealing the siding. This is a big offender.
- The front white hitch light. A cracked lens or the caulk on the light is bad.
- The front top yellow marker lights or the side wall front yellow clearance lights. A cracked lens or the caulk on the light is bad.
- The front window frame putty tape seal to the siding is bad. This is a big offender.
- A cargo door gasket seal was bad, and rainwater leaked into the cargo area. This is a big offender.
- A cargo door flange putty tape seal to the siding is bad. This is a big offender.
And you may find a new one. We all learn from each other.
As you can see the trend, any place with an opening or hole in the siding, that hole/opening being sealed, has a leak potential.
This post helps show how to take the front wall apart. It is a non-slide camper, but in this case, a slide camper and a non-slide camper both have water damage the same way, and they are built similarly. https://www.sunlineclub.com/forums/f...tml#post144338
Since you have a slide camper, I have repaired several slide campers where the front floor had to be replaced in the large pass-through cargo area due to leaks at the cargo door area. Water wicks in a failed putty tape seal of the cargo door frame to the siding, or water leaks through a bad door gasket. This cargo door area is right under the front gutter spouts and gets a lot of water running down the side of the camper. A front corner leak can also create a floor issue if it goes on long enough. We do not know if you have a front cargo area floor issue yet. I am just bringing it up if you do; you know what to expect.
Here are pictures of one of those slide campers where the floor had to be replaced. These pics are from a 2006 T-276SR. It is a bunkhouse like yours, a little longer, and the bed is rotated to be a walk-around bedroom. These links are to my Flickr photo site.
The damage folder: https://www.flickr.com/photos/camper...7720300143510/
Some of the rebuild: https://www.flickr.com/photos/camper...th/52178804225
Some more of the rebuild:
https://www.flickr.com/photos/camper...7719707452736/
The damage on the left side was mainly from the left-side cargo door area leak. The corner molding leaked, the putty tape failure from the door frame flange to the siding leaked, and there was the possibility of a door gasket issue, or the door catches not being adjusted correctly to hold the door tight to the door seal. All those areas may have been going on. A lot of water went inside that compartment to rot the floor the way it did.
The right-hand side was the more traditional corner molding leak.
Here are a few of the pics; there are lots more on the Flickr site. I never made a post of these yet to link in. Caution: Ugly pics warning

The lower wall comes off as a unit:


Cut the floor out.


And some of the rebuild. Nice pics!

Rebuilt the lower front wall section

New floor and side wall studding
New floor vinyl in

Rebuilt lower front wall back on
The siding is almost all back on

Ideally, you do not have a floor problem, but the lower front wall needs to be rebuilt. That entire lower wall panel can come off in one piece and rebuilt on the bench. Address the other damaged areas, and then screw it back on. I have more pics of how to do all this if needed.
Also, I'd like to point out that we cut the carpet out and disposed of it. My friend who owns the camper wanted dark flooring, so this front piece was a leftover from the new inside floor vinyl. It makes it easier to install with the lower front wall off, but I have done it with the wall on ours. Having carpet in that cargo hole, I’m unsure what Sunline was thinking. The vinyl is so much easier to clean, etc.
As I said earlier, this front area can be done in a variety of ways. Once the back wall project is done, seal the roof back up and start the front when the timing works. Then, when time allows, do the front wall and seal it back up. There may be a long time between those two events. Then, do the roof, which we need more info on before that can be done. But you will have opened the roof on both ends, and they will be dried out, resin-treated, and done.
Hope this helps,
John
__________________
Current Sunlines: 2004 T310SR, 2004 T1950, 2004 T2475, 2007 T2499, 2004 T317SR
Prior Sunlines: 2004 T2499 - Fern Blue
2005 Ford F350 Lariat, 6.8L V10 W/ 4.10 rear axle, CC, Short Bed, SRW. Reese HP trunnion bar hitch W/ HP DC
Google Custom Search For Sunline Owners Club
|
|
|
|
|
|
|
Currently Active Users Viewing This Thread: 1 (0 members and 1 guests)
|
|
|
 Posting Rules
|
You may not post new threads
You may not post replies
You may not post attachments
You may not edit your posts
HTML code is Off
|
|
|
|
 » Recent Sunline Discussions
 |
|
|
|
|
|
|
|
|
|
|
|
|
|
|
|
|
|
|
|
|
|
|
|
|
|
|
|
|
|


 Linear Mode

