 |
 06-19-2017, 05:46 PM
|
#1
|
|
Senior Member
Join Date: Apr 2016
Location: Maryland
Posts: 488
SUN #8237
|
Dicor Questions
I had my first experience with Dicor non-sagging sealant and not sure if I got a bad tube or not. It was continually pouring out the spout with no pressure on the caulk gun and it was annoying.
Website doesn't even have a TDS (technical data sheet) which is common practice.
Says to clean up with soap and water but that doesn't work at all.
Anybody had any luck tooling Dicor? If so, how?
__________________
__________________
John
2000 T2370
|

|

|
|
06-19-2017, 08:56 PM
|
#2
|
|
Moderator
Join Date: Nov 2006
Location: Ohio
Posts: 12,651
SUN #89
|
Hi John,
I have used the Dicor non sagging (non leveling ) a good amount and it took me a while to figure it out which works best, (for me anyway) but I now have a good process. It took me a lot of tweaking of the process to come up with what I have now and this spring I finally found it. Yeh!!! I was going to create a post on this, and since you are in need of some help, this is a perfect time.
To help clarify, Dicor makes both leveling for horizontal surfaces like roofs (part no, 501LSW for white) and non sagging (non leveling) for vertical surfaces that will not run when applied. The non sagging caulk is part number 551LSW for the white color. They do offer it in other colors. See here https://dicorproducts.com/product/ep...ealants/#specs
What I have tried and now gave up on.- Masking tape off the area to not have the Dicor spread over. Sorta works, very time consuming. Results where average.
- Tried a wet finger to wipe smooth, once I broke into the skin of the Dicor this became a wet puddle of goo. The wet finger at least helped keep my finger cleaner but was not a reproducible method.
- Tried a wet soapy finger. Same as above, once I broke through the outer skin of the Dicor, it turned to soup and was all over.
- Tried to put it on "perfect" with the caulk gun. When it worked it was good but not very reproducible. very hard to create a perfect caulk gun job.
- Tried using disposable nitrile gloves. Ah nope, It makes a big mess, not tight enough to your finger.
Now to what works and is reproducible. 
First question, the ooz'ing. I have noticed this more this year then in year past. Maybe the formulation changed some or I just realized it more. I have been using this for at least 5 years, maybe 8, I lost track.
The oozing is like the pressure is built up in the tube and keeps slightly pushing out even though the caulk gun plunger is fully retracted. I do not know why it does it, but it does. I have managed to minimize the problem. Since I know the ooze is coming, I back off the gun pressure before I stop using it. This helps on the big ooze when you stop but there is still a little drizzle. For the drizzle, I keep a paper towel under the tip as I tool the Dicro into it's final setting.
For tooling Dicor non leveling this is what I found works best so far. I saw my son doing part of this technique this spring and I took it to the next level. He was doing a Dicor coating over all the new butyl caulk he put on last year and it came out really good.
First a realization of the product and how it reacts to air temperature. As soon as the caulk comes out of the gun, air reaches it and a very thin skin forms on the outside quickly. The hotter it is, the faster it forms. Putting caulk on at 50F is very different then 80F, at 80F it almost forms a skim within seconds.
That skin is very thin and if you swipe it with a finger or anything with very much pressure, it will break through the skin and your into molten Dicor that is running and stringing all over. Basically a mess then.
Now we know some of how this product reacts and here is how to use that fast forming skin to your advantage.
First, start by thoroughly cleaning the molding, underlying butyl or putty sealing tape and siding or roof to be totally clean. The final cleaning needs a high flash cleaner to not leave any residue. Mineral Sprits work well as a cleaner with rag, but after your done with the spirits you wipe it dry then use a high flash cleaner to get all the oils/dirt off. Laquer thinner, rubbing alcohol, denatured alcohol, Naphtha, EternaClean, PPG DX 330 etc. all work and do not affect the paint from what I have found. Do not use acetone as it will dissolve the paint.
NOTE (1-17-24 update): If you use Mineral Spirits or other petroleum-based high-flash cleaners, those cleaners will soak into the old putty tape. You should then wait 3 to 5 days for any of the cleaners to be absorbed into the evaporates out, then start the Dicor caulking process. If you do not wait, it is possible the old putty tape will start to gas off and create bubbles in the Dicor, trying to have the gases escape.
An alternative to petroleum-based cleaners, you can clean them with soap and water and scrub the old putty tape to try and get the dirt off. This then needs to be followed up with a bleach and water treatment to get the mold off. The bleach and water treatment needs to soak for about 10 minutes, then scrub and rinse well. Repeat as needed. Do not let the bleach dry; keep it wet. A mixture of 3 parts water to 1 part household bleach will work. You may only need a quart of solution to do a large amount of putty tape seams. You are only treating the seams, the siding will be clean from the soap and water. Once all is rinsed and dry, you can start calling as soon as you want to. Do not do this on very hot sunny afternoons' everything dries up too fast.
Next is to create a soapy solution, I use about 6 to 8oz. of softwater if you have it, or regular tap water. Warm water if you can get it. Then I add several drops of Dawn dish soap to the water. It makes a light blue liquid. I'm assuming any liquid dish soap will work.

Next is the caulking tube. Cut the end of the tip as small as possible. This takes a little practice but just nip the end until it opens a hole in the tip. This will be about 1/16" hole. They do not make the tube tip any smaller than this. If it ends up bigger, it will still work but will be more difficult to control. Using a wire or something poke in the gun tip to break into the caulk seal at the end of the tube. This will allow the caulk to come out of the tube. I break a large hole here. Just not at the tube tip.
Then start very slow with gun pressure and caulking tight to the joint and apply a small bead of caulk. Sometimes I have the gun 90 degrees to the work, sometimes at about 45 deg angle running in the direction of caulk applying. The better you apply the caulk, the easier to smooth out, but you do not have to be a perfect gunner, just try not to over apply.
This is a horizontal seam on top of my slide. Here I am more 90 degrees to the side of the camper

The caulk as soon as you put it down starts the skin forming process. I put down about 3 to 4 feet at a time of caulk and then start smoothing. Sometimes I will also do 7 feet, top to bottom of the camper too. So this is more up to you. But I would not go much over 8 to 10 feet before smooth as the skin may be too thick.
Now get the soapy water and dip your bare spreading finger to be totally wet. Here is the technique that does not show up in my pics well but I have several to show this stage 2, “tap” the caulk.
Very gently tap the caulk bead, do not compress the bead much, just a light tap. Keep working down the line on the bead, move about 3/8 to 1/2" per tap. You will figure out the move distance in time what works.

By taping it at 90 degrees to the bead, you are not pulling the skin, you are compressing it. If you pull the skin, you will be right through into the goo real fast. This is a key understanding, tap it to form it, do not pull it.
Here is the 3 step process on a corner.
Stage 1, Caulk gun apply. It is a little wiggly but we can fix that. This process allows some wiggle as you can work it out.
 Stage 2, tap the bead to where you want it.
 This also means fill in voids and move caulk over that you wiggled too far on the gun apply. Keep a very wet finger all the time. About 8 to 12” wipe and re-dip the finger. If your finger gets dry it will break through the skin and your into goo.
If some caulk slipped over the molding, you can move it back into the main bead. Just keep tapping it over, do not push it over.

More tapping.
Once you have tapped it to where you want it, you move to stage 3.
Stage 3, smooth out. Again start with a very wet finger. Slowly draw your very light pressure very wet finger over the tapped ridges and smooth them out. Do multiple sweeps over the same area to not drag to hard and break the skin. Keep it wet and it will smooth right out.

And here you are done. No finger mess, no camper mess and nice and smooth. You can see the soapy water shine on the caulk.
Here are some other areas.
A door frame seal. Clean up the butyl caulk and siding
 Stage 1, Gun apply
 Stage 2, tap the bead
 Stage 3, smooth and your done

A rear corner molding
Stage 2, tap the bead
 Stage 2, smooth and your done
 A front corner molding, stage 3 smoothed and your done
 A front window rock guard cover, stage 3 smoothed and your don
e

The more you do, the faster this goes and stage 2 tap, can be reduced and you go to stage 3 smooth faster. I can reproduce this method on any seam horizontal or vertical and when I get all done, there is no caulk on my finger to clean up. If there is any that dripped etc, mineral spirits or your high flash cleaner on a rag will cut in instantly. Just wash your hands well with soap and water after. And soap and water with rubbing will get it off too. Or grit hand cleaner for greasy hands.
Hope this helps and let us know how it goes.
John
__________________
Current Sunlines: 2004 T310SR, 2004 T1950, 2004 T2475, 2007 T2499, 2004 T317SR
Prior Sunlines: 2004 T2499 - Fern Blue
2005 Ford F350 Lariat, 6.8L V10 W/ 4.10 rear axle, CC, Short Bed, SRW. Reese HP trunnion bar hitch W/ HP DC
 Google Custom Search For Sunline Owners Club
|
|
|
|
|
06-20-2017, 04:28 PM
|
#3
|
|
Senior Member
Join Date: Apr 2016
Location: Maryland
Posts: 488
SUN #8237
|
Thanks John for the great info. I would have never thought to tap the bead, then smooth with a soapy wet finger.
Hope I didn't make a mistake (time will tell) but I bought a tube of this sealant and did a few areas.......

Five something a tube at the local roofing center.
It dries like rubber but noticed it stays tacky for quite a while. It will pick up dirt but it's easily cleaned with alcohol or thinner. I made the mistake of doing a joint when the pollen was bad and that joint seems a little yellowish even after cleaning.
I like the fact that it cleans up with alcohol instead of thinner. Lay a bead down, dip your finger in alcohol, and tool it.
Here's a couple areas I did.
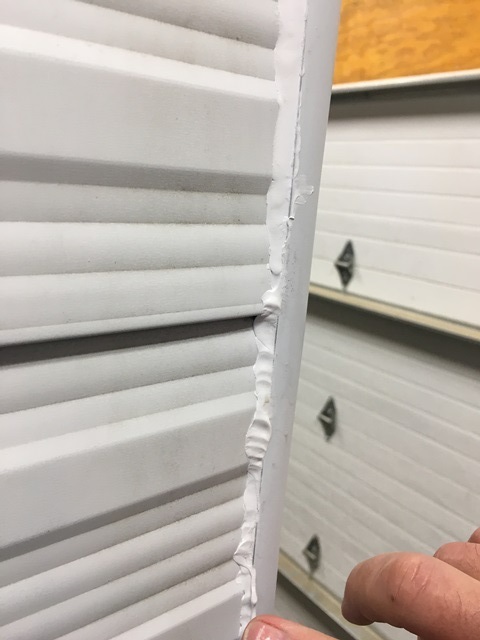
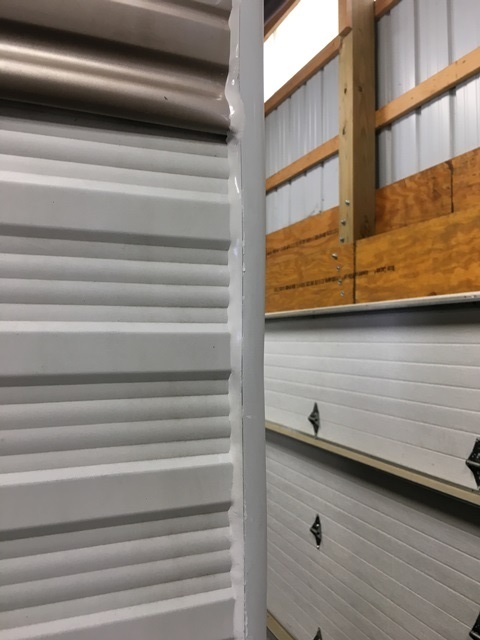
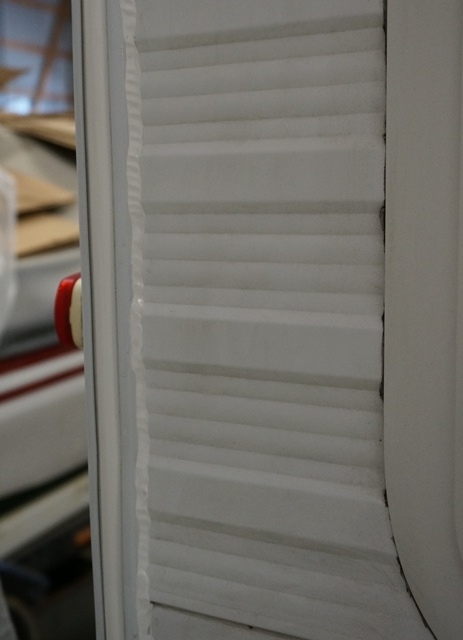
The rear storage door......

One of the rear outside corners.....

It seems to be performing well. Not sure what it would be like to remove. That's my main concern.
I have a friend who's a professional caulker and he's amazing. He's showed me his technique but I can't seem to replicate it. He can lay down a bead and never hardly touch it except once in a while with spit on a paper towel. Two things are paramount: You must push the gun and a dripless caulk gun is a no no. Like I said, I've tried and tried, and can't always get that perfect bead.
__________________
John
2000 T2370
|
|
|
|
|
06-20-2017, 09:34 PM
|
#4
|
|
Moderator
Join Date: Nov 2006
Location: Ohio
Posts: 12,651
SUN #89
|
Hi John,
I have not heard of that product, time will tell. Dicor is not the best thing under the sun, but I know it and is fits the application. And I can get it off when I need to.
Let us know how it goes. It looks like it went on well.
Thanks
John
PS, yes the guys who caulk for a living.... they are masters at a caulk gun... Same as dry wall mud guys....
__________________
Current Sunlines: 2004 T310SR, 2004 T1950, 2004 T2475, 2007 T2499, 2004 T317SR
Prior Sunlines: 2004 T2499 - Fern Blue
2005 Ford F350 Lariat, 6.8L V10 W/ 4.10 rear axle, CC, Short Bed, SRW. Reese HP trunnion bar hitch W/ HP DC
Google Custom Search For Sunline Owners Club
|
|
|
|
|
09-29-2017, 06:00 PM
|
#5
|
|
Member
Join Date: Aug 2017
Location: Washington, D.C.
Posts: 76
SUN #9721
|
Quote:
Originally Posted by JohnB

Hi John,
I have not heard of that product, time will tell. Dicor is not the best thing under the sun, but I know it and is fits the application. And I can get it off when I need to.
Let us know how it goes. It looks like it went on well.
Thanks
John
PS, yes the guys who caulk for a living.... they are masters at a caulk gun... Same as dry wall mud guys....
|
Good Evening John...
This post helped me a lot. The one question I have is, do you remove the old putty first. I have been cutting out the old putty ..so far I have done the front window, exterior lights and the front rubber moulding. The sealant was pretty broken and dirty, and I even found moisture behind the putty in one tiny location on the front.
As I I trimmed some, it just fell off as if it wasn't sticking to the body of my TT anyway. Is that the right thing or should I not touch the putty that looks ok and only remove the broken parts?
Thank you!
Karen
__________________
|
|
|
|
|
09-30-2017, 07:19 AM
|
#6
|
|
Moderator
Join Date: Nov 2006
Location: Ohio
Posts: 12,651
SUN #89
|
Quote:
Originally Posted by CapsFan
Good Evening John...
This post helped me a lot. The one question I have is, do you remove the old putty first. I have been cutting out the old putty ..so far I have done the front window, exterior lights and the front rubber moulding. The sealant was pretty broken and dirty, and I even found moisture behind the putty in one tiny location on the front.
As I I trimmed some, it just fell off as if it wasn't sticking to the body of my TT anyway. Is that the right thing or should I not touch the putty that looks ok and only remove the broken parts?
Thank you!
Karen
|
Hi Karen,
Yes, trim off the old putty tape. It is no longer any good when exposed like it is outside the molding flanges. Even under the flanges get dried out, shrinks, releases from the siding and molding and will over time, create an opening to the inside that can become a leak.
You can use a plastic scraper to not scratch the siding and trim off all the old putty sealant. And if you cut into under the molding a little, that is OK. When you come behind and apply the non leveling Dicor, then it will create the new seal.
One important step to do if you are not already is, to clean the old putty tape and dirt off before applying the new Dicor. I use mineral sprints on a rag and rub. It seems an old terry wash cloth works the best so far. This will in a little time dissolve the old putty and clean it away from the siding and molding as you rub. In tough cases, I wet the old putty area and let is soak a few minutes before rubbing. Scrub as needed to get all the black yuk off as that film of yuk will not create a good bond with the new Dicor. Once you have cleaned up with the mineral spirits, then you need to go back with a high flash cleaner like naphtha, denatured alcohol, isopropyl alcohol or lacquer thinner. This will clean off the residue film left by the mineral spirits but not affect the paint. Just do not use acetone as that will take off the paint.
Hope this helps
John
__________________
Current Sunlines: 2004 T310SR, 2004 T1950, 2004 T2475, 2007 T2499, 2004 T317SR
Prior Sunlines: 2004 T2499 - Fern Blue
2005 Ford F350 Lariat, 6.8L V10 W/ 4.10 rear axle, CC, Short Bed, SRW. Reese HP trunnion bar hitch W/ HP DC
Google Custom Search For Sunline Owners Club
|
|
|
|
|
09-30-2017, 11:03 AM
|
#7
|
|
Member
Join Date: Aug 2017
Location: Washington, D.C.
Posts: 76
SUN #9721
|
Quote:
Originally Posted by JohnB
Hi Karen,
Yes, trim off the old putty tape. It is no longer any good when exposed like it is outside the molding flanges. Even under the flanges get dried out, shrinks, releases from the siding and molding and will over time, create an opening to the inside that can become a leak.
You can use a plastic scraper to not scratch the siding and trim off all the old putty sealant. And if you cut into under the molding a little, that is OK. When you come behind and apply the non leveling Dicor, then it will create the new seal.
One important step to do if you are not already is, to clean the old putty tape and dirt off before applying the new Dicor. I use mineral sprints on a rag and rub. It seems an old terry wash cloth works the best so far. This will in a little time dissolve the old putty and clean it away from the siding and molding as you rub. In tough cases, I wet the old putty area and let is soak a few minutes before rubbing. Scrub as needed to get all the black yuk off as that film of yuk will not create a good bond with the new Dicor. Once you have cleaned up with the mineral spirits, then you need to go back with a high flash cleaner like naphtha, denatured alcohol, isopropyl alcohol or lacquer thinner. This will clean off the residue film left by the mineral spirits but not affect the paint. Just do not use acetone as that will take off the paint.
Hope this helps
John
|
Fyi.....everything you tell me more than helps Will do....Thanks.
(I was hoping to see your response) 
__________________
|
|
|
|
|
09-30-2017, 05:21 PM
|
#8
|
|
Member
Join Date: Aug 2017
Location: Washington, D.C.
Posts: 76
SUN #9721
|
Quote:
Originally Posted by JohnB
Hi Karen,
Yes, trim off the old putty tape. It is no longer any good when exposed like it is outside the molding flanges. Even under the flanges get dried out, shrinks, releases from the siding and molding and will over time, create an opening to the inside that can become a leak.
You can use a plastic scraper to not scratch the siding and trim off all the old putty sealant. And if you cut into under the molding a little, that is OK. When you come behind and apply the non leveling Dicor, then it will create the new seal.
One important step to do if you are not already is, to clean the old putty tape and dirt off before applying the new Dicor. I use mineral sprints on a rag and rub. It seems an old terry wash cloth works the best so far. This will in a little time dissolve the old putty and clean it away from the siding and molding as you rub. In tough cases, I wet the old putty area and let is soak a few minutes before rubbing. Scrub as needed to get all the black yuk off as that film of yuk will not create a good bond with the new Dicor. Once you have cleaned up with the mineral spirits, then you need to go back with a high flash cleaner like naphtha, denatured alcohol, isopropyl alcohol or lacquer thinner. This will clean off the residue film left by the mineral spirits but not affect the paint. Just do not use acetone as that will take off the paint.
Hope this helps
John
|
Hi John...
I didn't think to ask until now, but, how long should one wait, after all of the caulking is done, to take to the road? I do not want my newly caulked seams to come apart with the road stress. I am willing to wait it out rather than do that. I have other options if need be. (a tent is fine too.. )
Thanks you and Goodnight..
Karen
__________________
|
|
|
|
|
09-30-2017, 10:18 PM
|
#9
|
|
Moderator
Join Date: Nov 2006
Location: Ohio
Posts: 12,651
SUN #89
|
Quote:
Originally Posted by CapsFan
Hi John...
I didn't think to ask until now, but, how long should one wait, after all of the caulking is done, to take to the road? I do not want my newly caulked seams to come apart with the road stress. I am willing to wait it out rather than do that. I have other options if need be. (a tent is fine too.. )
Thanks you and Goodnight..
Karen |
Here is the curing time from Dicor. https://dicorproducts.com/product/ep.../#installation
Quote:
Approximate Lap Sealant Cure Times: (approximate times for 50-70° F weather)
5 Minutes – Skins over
4 Hours – Waterproof
48 Hours – Cure 80%
30 Days – 100% Cure
|
That said, I have towed the camper after 24 hours on short distances (10 to 20 miles) with no ill effects in the summer.
If you have to tow the camper, 24 hours would be my minimum cure time at temps above 50 F. 48 hours allows a very high margin.
I would not do any hard washing/scrubbing of the camper until it is fully cured. But a light camper wash a week or so after applying in the summer would be OK. In the cold weather months, when below 40 F, it takes a long time for Dicor to setup. Temperature is needed to help cure it.
A heads up if anyone is applying Eternabond over fresh Dicor. Dicor gasses off as it cures and will cause air bubbles under the Eternabond. As you can see from the chart above, 48 hours there is still a large amount of gassing off on going. Best is to wait a week or more under 50F or above conditions.
Hope this helps
John
__________________
Current Sunlines: 2004 T310SR, 2004 T1950, 2004 T2475, 2007 T2499, 2004 T317SR
Prior Sunlines: 2004 T2499 - Fern Blue
2005 Ford F350 Lariat, 6.8L V10 W/ 4.10 rear axle, CC, Short Bed, SRW. Reese HP trunnion bar hitch W/ HP DC
Google Custom Search For Sunline Owners Club
|
|
|
|
|
10-02-2017, 06:54 PM
|
#10
|
|
Member
Join Date: Aug 2017
Location: Washington, D.C.
Posts: 76
SUN #9721
|
Thank you...yes this helped me to make the best decision for my plans. I think I will just go with the tent for next week. I plan to continue working on the seams and it will take me through the weekend. I am sooo slow but it is looking pretty good. The anticipation keeps me going. It will be a great feeling knowing I did the best I could, for now, when I am done. (the care will be on-going )
I truly appreciate all of the generous attention you have given to my questions!
Have a great week!
Karen
__________________
|
|
|
|
|
06-11-2018, 08:40 AM
|
#11
|
|
Junior Member
Join Date: Jun 2018
Location: Indiana
Posts: 23
SUN #10575
|
Very good information. Since I had to basically rebuild mine wall on the door side in the front, there are large gaps that have to be filled. I was planning on using the roof rubber coating called White Elastometric roof coating which basically adheres to anything, starts kind of runny and then drys to a nice rubber bond. Then could use the dicor to clean up the cosmetics of the seal.
What is your thoughts....
__________________
|
|
|
|
|
06-11-2018, 10:56 AM
|
#12
|
|
Senior Member
Join Date: Sep 2016
Location: Virginia
Posts: 814
SUN #8893
|
Hi Mcqaife. When I was done rebuilding the front, I filled in the gaps with butyl tape. I packed the gaps tight until I couldn't get anymore butyl tape in. I then trimmed it and used dicor over it. It worked well.
Tommie
__________________
|
|
|
|
|
06-11-2018, 07:18 PM
|
#13
|
|
Senior Member
Join Date: Sep 2016
Location: Virginia
Posts: 814
SUN #8893
|
Quote:
Originally Posted by johnnybgood
I had my first experience with Dicor non-sagging sealant and not sure if I got a bad tube or not. It was continually pouring out the spout with no pressure on the caulk gun and it was annoying.
|
I had the same issue and I went through about 2 1/2 tubes during the sealing process so I don't think they were defective. I had to do what JohnB suggested and kept either a old rag or paper towel underneath the tip to catch any caulk that oozed out. I also sometimes took the tube out of the caulk gun and tapped the bottom of the tube on a flat surface. This seemed to help as well. If you tap too hard though, this could damage the bottom of the tube but the tube was still usable.
__________________
|
|
|
|
|
06-11-2018, 09:51 PM
|
#14
|
|
Moderator
Join Date: Nov 2006
Location: Ohio
Posts: 12,651
SUN #89
|
Quote:
Originally Posted by Mquaife
Very good information. Since I had to basically rebuild mine wall on the door side in the front, there are large gaps that have to be filled. I was planning on using the roof rubber coating called White Elastometric roof coating which basically adheres to anything, starts kind of runny and then drys to a nice rubber bond. Then could use the dicor to clean up the cosmetics of the seal.
What is your thoughts....
|
What size of gaps do you have, 1/8", 1/4" or larger?
Dicor can fill a semi large gap. 1/8" is not a problem. If you try and do 1/4" it will be very thick and as it dries it seems to shrink. This then needs another coat or 2 or more to build it up. I do not think cracks larger them 1/4" will work well with Dicor alone. Need to fill the gap with something and then Dicor over it.
I have no experience with the Heng's roof coatings if that is what you are using. So I cannot tell how this would work or last. Again the size of the opening plays a part in this.
Do you have a pic of the gaped areas? There are a few tricks for gap filling. Tommie's suggestion of stuffing butyl tape in, trimming and then Dicor'ing over is one of them for corner molding, window flange, carg hole door flange etc. cracks.
Eternabond tape is another trick that fits in some siding hole/gap situations.
Hope this helps
John
__________________
__________________
Current Sunlines: 2004 T310SR, 2004 T1950, 2004 T2475, 2007 T2499, 2004 T317SR
Prior Sunlines: 2004 T2499 - Fern Blue
2005 Ford F350 Lariat, 6.8L V10 W/ 4.10 rear axle, CC, Short Bed, SRW. Reese HP trunnion bar hitch W/ HP DC
Google Custom Search For Sunline Owners Club
|
|
|
|
|
|
Currently Active Users Viewing This Thread: 1 (0 members and 1 guests)
|
|
|
 Posting Rules
|
You may not post new threads
You may not post replies
You may not post attachments
You may not edit your posts
HTML code is Off
|
|
|
|
 » Recent Sunline Discussions
 |
|
|
|
|
|
|
|
|
|
|
|
|
|
|
|
|
|
|
|
|
|
|
|
|
|


 Linear Mode

