 |
 06-28-2023, 08:26 AM
|
#1
|
|
Junior Member
Join Date: Jun 2023
Location: Maine
Posts: 5
SUN #13727
|
telerip1
Hi, My name is Mark and I am new to this site. I own a 2003 T-1950. I am looking for advice on the best way to repair a rotting floor. I noticed the bumper is a bit loose on the left side. Upon further inspection I can feel the softness of the wood flooring it is attached to. The shower encloser is located above the area that is soft. Do I start from the inside or do I need to remove exterior panels. Any info would be appreciated. Thanks .
Mark
__________________
__________________
|

|

|
|
06-28-2023, 10:48 AM
|
#2
|
|
Moderator
Join Date: Nov 2006
Location: Ohio
Posts: 12,656
SUN #89
|
Hi Mark, Welcome!
This post may help you or scare you... on doing your 2003 T1950. https://www.sunlineclub.com/forums/f...avy-17684.html
The post covers a full camper restoration on a 2004 T1950; yours may only be a local area repair pending on how far you want to go. It talks about the bumper weakness also. I did finish the camper but have not yet completed the post... but what is done will surely get you through the back wall and floor.
And yes, take the camper apart from the outside first; you may be able to save all the wallboard, pending how bad the water infection is. The water damage continued for years before I got it, and I had to replace the whole back wall and ceiling. This post may help with how to save the wallboard. https://www.sunlineclub.com/forums/f...tml#post155357
I hope this helps and ask away any questions
John
__________________
Current Sunlines: 2004 T310SR, 2004 T1950, 2004 T2475, 2007 T2499, 2004 T317SR
Prior Sunlines: 2004 T2499 - Fern Blue
2005 Ford F350 Lariat, 6.8L V10 W/ 4.10 rear axle, CC, Short Bed, SRW. Reese HP trunnion bar hitch W/ HP DC
 Google Custom Search For Sunline Owners Club
|
|
|
|
|
06-28-2023, 12:46 PM
|
#3
|
|
Junior Member
Join Date: Jun 2023
Location: Maine
Posts: 5
SUN #13727
|
Hello John, Thanks so much for getting right back to me. Holy cow, what a big project! Hopefully I'll have a lot less damage. The info & pics are very helpful. Are there any tricks to getting started? I assume I need to remove the bottom panel in the rear 1st.?
I very much appreciate your time & knowledge.
Thanks, Mark
__________________
|
|
|
|
|
06-28-2023, 07:35 PM
|
#4
|
|
Moderator
Join Date: Nov 2006
Location: Ohio
Posts: 12,656
SUN #89
|
Hi Mark,
My T1950 was a big project; I have done many more. And glad to share any of it to help a fellow Sunliner fix up their camper.
On the rear wall, and yes, you start at the bottom siding panel and work up the wall. Suggest this.
1. Remove the rear left and right corner molding first. This must be done as staples are under the molding holding the siding on. Using a plastic scraper, peel off the old putty tape on the siding that was under the molding. You will need to find the siding staples buried under the putty tape. ** see note below
2. Remove the rear under-bed cargo door. ** see note below
3. Remove the water heater. ** see note below
4. Odds are, your damage will be into the area where the rear decal is, so remove the two back wall stop/turn lights. ** see note below
Now to the bottom siding piece.
5. Remove the hex screws on the bottom siding panel of the rear wall, and dig under the area where the left and right molding was to find the few staples holding the ends of the siding on. The siding comes off starting at the bottom and goes up from there. ** see note below
6. Here is a tip, "before" removing the 2nd sheet, and any other sheet above, use a pencil or pen and scribe a line on each wall stud and the corner studs where the bottom of the sheet you are removing is. Again, do this on every sheet. This comes in really handy the day you put the siding back on. Since every window and other cutouts in the siding, the siding has to go back on in the same exact place it came off. Using the scribed lines allows you to reset each siding sheet to align as needed and not get accumulated errors against you by installing too high or too high from the sheet above it.
7. Remove the second sheet up from the bottom, scribe lines on the sheet bottom.
8. Keep track of how many 1/8" shims are at each wall stud location where they stapled the siding. write the number on the stud. Some may need to be replaced, buy you know the number to start with.
9. By the time you are two siding sheets up, you will see the black Darco bottom plastic. Be very careful lifting the staples not to tear the Darco. You have to repair the staples holes when you put it back together, but minimize the repair.
10. In general, try not to rip the siding at the studs where they staple it. Get a 1/4" wide thin screwdriver you can tap the head on, dig under the head, lift a little, then grab and pull the staple. There are pics of the process in the restore post. You will have some siding tears where the staples blew through from the factory installation. Try not to tear the siding; it is easier not to have to deal with the repair.
11. You will need a heat gun; it will come to be your best friend for softening up and releasing old putty tape. Any 1 or 2-speed heat gun will work.
** NOTE: Here is the learning process. Look at the old putty tape seal for every item you pull off the camper "before" you scrape the putty off. You can see the trail of where the sealants failed and let water in. When the putty tape shrinks and splits, it separates from the siding or the molding; water and dirt then sneak in that separation. Over time the separation gets longer and leaves a black dirt trail where the separation was. Once the separation reaches the inside of the camper, a seeping leak into the camper starts. Any hole in the siding is a leak potential. Every screw hole, cargo door, body light, window, etc. The four corner moldings are often the most problematic least spots. Point: Learn from this how campers leak. Don't just tear into it quickly; learn where "all" the leaks are so you can seal them up better than factory installed. More on this when the time comes to put it back together, on how to seal it up better.
You may have to go up higher up the back wall to deal with corner leaks; I suggest you keep siding sheets off going up the back wall until you know there is no more water staining from above.
** Screws, look at every screw you take out. Rusted threads mean the wood was wet at one point, how did it get wet? Heavily rusted threads mean a lot of water/wet wood, a little rust means not much water; no rust, it was dry.
Once the siding is off the back wall and you peel back the Dacro sheet, you can see the floor and then determine the next steps. The odds are high that you might have to open some of the side wall siding; if you get lucky, you only have to undo the very end of the siding and not the whole wall length. More on this when the time comes.
NOTE: Do not just tear into wet wood thinking everything has to come out; create a repair plan before you tear out wet wood. We can help by giving you options on how to do the repair, many of which may mean you do not have to remove the entire wall stud/floor joist, only the badly rotted part.
The above and the restore post will get you going. Take pics and ask any questions along the way.
You are also going to see me using a moisture meter during the rebuild process to see where the water is or is not. See this post for more. Suggest you get one and start scanning the inside of the back of the camper (ceiling, walls, floor, shower etc) before you take it apart. https://www.sunlineclub.com/forums/f...per-17613.html
Knowing before you start taking the camper apart can help guide you on how much you must take apart. And let you know how big a job this might be. Sadly, the meter has never failed me; if it says it's wet, it is. But it can trick you, so you need to learn what it can see and can't, plus where it gives false high readings (metal in the viewing path).
Good luck, and I hope this helps.
John
__________________
Current Sunlines: 2004 T310SR, 2004 T1950, 2004 T2475, 2007 T2499, 2004 T317SR
Prior Sunlines: 2004 T2499 - Fern Blue
2005 Ford F350 Lariat, 6.8L V10 W/ 4.10 rear axle, CC, Short Bed, SRW. Reese HP trunnion bar hitch W/ HP DC
Google Custom Search For Sunline Owners Club
|
|
|
|
|
06-29-2023, 05:53 AM
|
#5
|
|
Junior Member
Join Date: Jun 2023
Location: Maine
Posts: 5
SUN #13727
|
Hi John, Thanks again for the very concise info. I will pick up a water meter prior to any repair attempt. Needless to say, this is a very involved repair. We love our Sunny and want to get as much use as possible. I was 1st thinking & hoping for a quick solution/repair. As most thing go, if you want it done right you have to do it right. Thanks so much for your continued support. I'll let you know my findings.
Mark
__________________
|
|
|
|
|
07-01-2023, 12:46 PM
|
#6
|
|
Moderator
Join Date: Nov 2006
Location: Ohio
Posts: 12,656
SUN #89
|
Good hunting Mark with your moisture meter, make sure to use it on "wall mode".
Not sure if you found this link, but in our files section is a PDF with more on the use of the meter and what the percent numbers from 0 to 100% can mean when scanning a camper.
https://www.sunlineclub.com/forums/d...o=file&id=5638
As to loving your sunny, yes we do too. Our big T310SR will be 20 years old this November. We acquired it in 2007 when it was close to 4 years old. The repairs and upkeep we have done to it are, well, mega and major in some cases. But, it is still in great shape and better made and built than many new ones. I do not think we will ever part with it.
The 2004 T1950 was a restoration project camper. It is now fully restored, in excellent condition, certified leak-free, and sealed to keep it that way. I went into it a month ago to show it to a visiting friend, and it still beats out what is for sale now. The amount of storage, cargo capacity, and quality is more than you will normally find in a small camper. I have 3 more of my own to go on the restoration efforts. Enough projects to keep me busy for a good long time to come. And I seem to end up helping other friends along the way with their camper too.
We will be here when you need us.
John
The Sunlines are all very fixable and will last once you get them all sealed up, roof and siding.
__________________
Current Sunlines: 2004 T310SR, 2004 T1950, 2004 T2475, 2007 T2499, 2004 T317SR
Prior Sunlines: 2004 T2499 - Fern Blue
2005 Ford F350 Lariat, 6.8L V10 W/ 4.10 rear axle, CC, Short Bed, SRW. Reese HP trunnion bar hitch W/ HP DC
Google Custom Search For Sunline Owners Club
|
|
|
|
|
11-07-2023, 05:31 PM
|
#7
|
|
Junior Member
Join Date: Jun 2023
Location: Maine
Posts: 5
SUN #13727
|
Hello John, I have finally started taking the camper apart to deal with the leak. i removed 4 rear panels to expose the rear post & flooring. Pretty much the whole rear floor area is soft. i have removed the bed, & freshwater tank. damage goes to about a foot from the wheel well. All looks pretty straight forward so on that side. What I can't figure out is how to ger the shower pan as the floor is bad under it and possibly to the toilet. i thought i could drop it down but the piping is in the way and the step in is sitting on a support. Will i need to remove the upper shower assembly? i have it completely free from the foot pan. Any advise is appreciated. We had a wonderful spring & summer camping! Now its time to repair.
Thank you
Mark
__________________
|
|
|
|
|
11-07-2023, 06:55 PM
|
#8
|
|
Moderator
Join Date: Nov 2006
Location: Ohio
Posts: 12,656
SUN #89
|
Hi Mark,
I see you are "into it".
Quote:
Originally Posted by telerip1

Snip...
What I can't figure out is how to ger the shower pan as the floor is bad under it and possibly to the toilet. i thought i could drop it down but the piping is in the way and the step in is sitting on a support. Will i need to remove the upper shower assembly? i have it completely free from the foot pan. Any advise is appreciated. We had a wonderful spring & summer camping! Now its time to repair.
Thank you
Mark
|
The water damage you are describing is close to the same as on my 2004 T1950.
See here for the new floor I had to rebuild. In my case, the entire rear wall was gone, and the last 4 ft of the ceiling were gone, so I had to lift off the ceiling and rear wall, and I removed the shower due to the extreme yellowing. I was doing a total restoration, so the new shower came.


In your case, the shower walls are all in place, and I assume they are not damaged enough to have to remove the left rear wall and the shower wall between the shower and the bedroom. Is this correct?
Assuming so, or even if you have to repair some lower wall studs, etc, here is an option on how to do the floor with the shower surround still in place but the shower basin removed. I think this is what you are after, yes/no? Review this and see if your 2003 will come apart this way BEFORE you start into this.
I'll try to explain this with the pictures I have to work with. Consider posting some of yours if this does not get the message across, and I can explain with yours.
The toilet needs to be removed; it will unbolt from the floor flange and walk it out of the camper. Stuff a rag in the floor flange tank pipe to stop construction mess from falling in the tank and stop any smells from coming up.
Behind the toilet is a boxed section that covers the shower grey water pipe. Remove that cover.
You can see the two covers I'm referring to here, the white fresh water hose on one of them, and the other behind the toilet area.

With those covers off, it will expose the grey water drain pipe. Like this
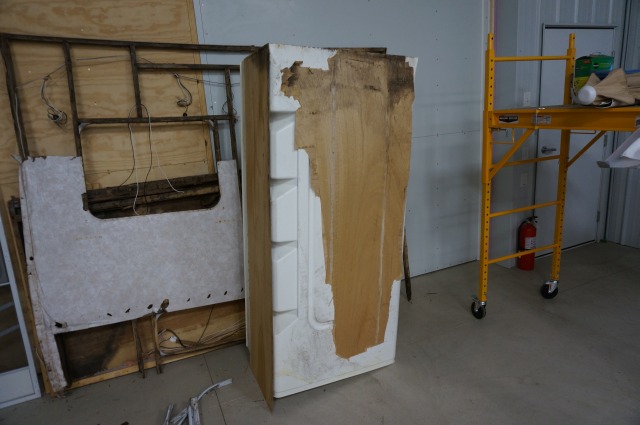
The intent is that you are going to leave the shower walls in place. Trust me, they are not coming out short of destroying the wallboard. They totally glued every square inch of shower surround that touches a wall. All 3 sides that touch walls do not come out without a fight, and you most likely will damage the surround in the process. Here see the wall board I gave up on trying to crack the glue free.
You are correct; the basin has to come out. The goal is to remove the bottom basin support from the back wall. The basin has a three-sided lip that fits up behind the surround. The basin side by the toilet area is flat with no lip pointing up, but it has a lip pointing down we have to deal with. Remove any shower curtain rail on top of the basin. The 2004 and newer had a Shub Shower Screen with a rail on the bottom. I'm assuming your 2003 had a curtain or an according style door. You tell me what you have and if you can understand how to get the bottom rail off.
At the back wall, you will need to cut out the luan and wall studs up to the top of the shower basin lip. Be careful not to cut the shower surround or the DOT light wires in that area. Use a vibrating tool with a plunge-cut wood blade on the end if you have one, and hang on to it to not cut into the surround.
See here, I cut below the basin to take a peak inside, you can start that way to see what is inside. Just when you are done cutting, the wallboard/studs will be much higher by the height of the basin.


When you cut out the studs and luan, it will expose this basin to the top and the surround inside the basin. I do not have a pic with the surround still in place with the basin in place, but this is the basin as you will see it.
Reach in and unhook the plumbing from the shower basin fitting. Take the drain trap out, which will disconnect the basin from the grey water piping. Remove the basin drain fitting also, it may help get the OSB board out under the basin.
You will have to remove the 2 x 3 supports under the basin OSB support board from underneath. They are angle screwed to the floor as I recall. You may end up damaging them to get them out, but you can replace them when you put them back together. The basin OSB board is screwed into the 2 x 3 supports.

Here is the basin floor lifted to show the 2 x 3 supports

The odds are high; the wood wall below the shower entry will have to be cut out as the shower basin goes over this mini lower wall. See this wall in this pic

You can see the back side of the mini wall in this pic. Odds are, you will have to build a new mini wall unless you can surgically cut loose the mini wall. If you can cut loose the screws into the floor or from the other walls, the mini wall can come out intact with the basin. Try not to mess up the floor tile if you want to save it.
When the 2 x 3 supports are removed, the OSB basin floor will drop down and come out. When you remove the mini wall at the entry of the shower, you should be able to pull the basin out of the back wall and then out of the camper. The shower surround is still in place. Then, rebuild the floor and put the basin back in the way it came out. The mini wall will have to be built and go in with the basin.
These last two pics may help to see the basin out in the open and the mini wall


Hope this helps
John
__________________
Current Sunlines: 2004 T310SR, 2004 T1950, 2004 T2475, 2007 T2499, 2004 T317SR
Prior Sunlines: 2004 T2499 - Fern Blue
2005 Ford F350 Lariat, 6.8L V10 W/ 4.10 rear axle, CC, Short Bed, SRW. Reese HP trunnion bar hitch W/ HP DC
Google Custom Search For Sunline Owners Club
|
|
|
|
|
11-09-2023, 06:36 AM
|
#9
|
|
Junior Member
Join Date: Jun 2023
Location: Maine
Posts: 5
SUN #13727
|
Hi John, Just as I suspected. I’m hoping to be able to leave the wall between the bath & bedroom in place. The damage seems to stop half way up the left side rear wall. The insulation was actually wet in that area. What I failed to do was take close looks at the caulking for water penetration. But looking up into the cavities towards the roof it looks clean & dry. So I’m thinking all is good from the rear window up. I’ll pull the toilet tomorrow, cut out the small hip wall that the basin sits on so I can remove it from the rear. Would love to install a new shower as its also yellowing but more than I really want to get into. If I was to install a new shower, I assume the interior wall will need to be removed? Is there a company you recommend to purchase parts? For instance, new shower, the rear window molding is shrinking in the corners. Looking for new rubber molding around the rear cargo door. Then old girl is in great shape otherwise & Fits our needs just fine. Looking forward to getting it in shape for our next adventures. Thanks so much for taking the time & sharing your knowledge. I really appreciate it. I will send some pics as soon as I figure out how. They are very similar to yours with the exception of the amount of damage higher on the wall.
Thanks
Mark
__________________
|
|
|
|
|
11-09-2023, 09:53 PM
|
#10
|
|
Moderator
Join Date: Nov 2006
Location: Ohio
Posts: 12,656
SUN #89
|
Hi Mark,
Quote:
Originally Posted by telerip1
Snip...
Would love to install a new shower as its also yellowing but more than I really want to get into. If I was to install a new shower, I assume the interior wall will need to be removed? Is there a company you recommend to purchase parts? For instance, new shower,
|
Odds are you will damage the wallboard on the 3 sides as the shower surround is glued to when you remove the shower. But only the wallboard. You can leave the entire wall where the shower head is intact; only replace the shower side of the wallboard. The ceiling may be a little tricky as the vinyl insert (called welt bead) is stapled to the top of the wall studs, and then the ceiling is put on. You must be very careful when removing the wallboard so as not to damage that welt bead. Maybe cut the wallboard and old shower about 1/2" away from the welt bead, then remove the shower surround and wallboard, then go back and take the 1/2" strip left out so you can be more surgical in removing it and gentle and not deal with an entire wall at one time.
Most new RV shower surrounds are shorter than the full wall; they stop about 4", maybe 6" from the ceiling. I was lucky; I could buy a longer one that was above the wall, and I trimmed it to the ceiling line to create the same full wall surround as Sunline did. Since you will have the ceiling on, you may use the shorter, more common nowadays, surrounds.
This link will take you to where I cut and installed the new shower https://www.sunlineclub.com/forums/f...tml#post151304
Here is where I bought my shower surround and the new basin. I'm sure the cost has increased since I bought mine in 2019 before Covid. https://www.specrec.com/bath-products
DuoForm, who made the Sunline ones, is still in business. https://www.duoformplastics.com/prod...und-406662721/. I called them, and at that time in 2019, they did not sell directly; they sold to retailers or RV manufacturers. It seems they might sell directly now.
There are others now selling RV showers; Lippert has their version, and there are others who sell the DuoForm showers.
Quote:
Originally Posted by telerip1
the rear window molding is shrinking in the corners.
|
Yes, this is a common issue. Both the Hehr and Kinro windows Sunline used have this issue. That glazing bead vinyl is not a water seal; the glass is bonded directly to the metal window frame for the water seal; the vinyl glazing bead is there to keep dirt and crud out of the channels and make it look nicer. Both Hehr & Kinro were bought up by Lippert, who now sells those windows and parts if you call Lippert customer service. However, you may be out of luck if you have the white Kinro windows. I bought a roll of it for my campers; it was some of the last they had in stock. They discontinued making white. You can buy it in black as black is the wave of all the new camper windows.
Quote:
Originally Posted by telerip1
Looking for new rubber molding around the rear cargo door.
|
You say, "rubber molding" Do you mean the white vinyl screw cover or the black foam gasket material that is in the water seal when the cargo door closes? Let me know which you are after; I have found both for sale.
Quote:
Originally Posted by telerip1
Then old girl is in great shape otherwise & Fits our needs just fine. Looking forward to getting it in shape for our next adventures. Thanks so much for taking the time & sharing your knowledge. I really appreciate it. I will send some pics as soon as I figure out how.
|
You are very welcome; I am glad to help. As to how to post pics, see here:
There are 3 ways to add pics.
1. Upload pics to a specific post, attaching them at the end of the post.
2. Link them in from a publicly viewable web photo hosting service you have.
See here for 1 and 2 https://www.sunlineclub.com/forums/f...html#post86041
3. You can upload pics to the forum in your own personal photo album. Then, link them to anywhere in the text of a post. See here for how to create an album. https://www.sunlineclub.com/forums/f...html#post87945
If you still get stuck, let us know. Pic's go a long way in helping show things you are working on, and we like seeing Sunline pics!
Hope this helps
John
__________________
Current Sunlines: 2004 T310SR, 2004 T1950, 2004 T2475, 2007 T2499, 2004 T317SR
Prior Sunlines: 2004 T2499 - Fern Blue
2005 Ford F350 Lariat, 6.8L V10 W/ 4.10 rear axle, CC, Short Bed, SRW. Reese HP trunnion bar hitch W/ HP DC
Google Custom Search For Sunline Owners Club
|
|
|
|
|
|
Currently Active Users Viewing This Thread: 1 (0 members and 1 guests)
|
|
|
 Posting Rules
|
You may not post new threads
You may not post replies
You may not post attachments
You may not edit your posts
HTML code is Off
|
|
|
|
 » Recent Sunline Discussions
 |
|
|
|
|
|
|
|
|
|
|
|
|
|
|
|
|
|
|
|
|
|
|
|
|
|
|
|
|
|


 Linear Mode

