 |
 01-10-2024, 06:20 PM
|
#1
|
|
Member
Join Date: Dec 2023
Location: Maine
Posts: 32
SUN #13951
|
2004 T-267 SR with slide problems. Yikes
Hi,We just bought a new to us Sunline and part of me is thrilled and part of me thinks I may have made a terrible mistake. There was some visible damage from leaking to the slide room but the seller told us the previous owner had fixed the subfloor and it was no longer leaking. It tested dry with a moisture meter. When we got it home to inspect it closer we saw that the right side of the slide look a little crooked from the outside. I'll show the pics now but I should say that we are planning on taking out the couch and dinette and renovating the camper with new flooring, etc.
First I will post pics of the slide all the way in, then add to the thread with inside pictures, the outside with slide out. The It will get worse in each post. 
These first 4 just show how we can see the rubber seal on the left and towards the bottom it bulges out more. On the right we can't see it and everything looks flush.
__________________
|

|

|
|
01-10-2024, 06:25 PM
|
#2
|
|
Member
Join Date: Dec 2023
Location: Maine
Posts: 32
SUN #13951
|
Here is the worst of it from the inside showing the damage to the trim and dinette area on the right and the slide trim on the left. There was wood flooring put down under the dinette table and when the slide is out there is cheap vinyl flooring in the slide area.The same flooring was put down around the bed. I don't know id there was any previous damage there. I will be pulling out the couch and dinette.
__________________
__________________
|
|
|
|
|
01-10-2024, 06:27 PM
|
#3
|
|
Member
Join Date: Dec 2023
Location: Maine
Posts: 32
SUN #13951
|
Now comes the outside slide pics. There obviously has been some work done but it doesn't look like it was done correctly.
__________________
|
|
|
|
|
01-10-2024, 06:30 PM
|
#4
|
|
Member
Join Date: Dec 2023
Location: Maine
Posts: 32
SUN #13951
|
More outside pics. I've read all of JohnB's slide repair posts and fear we're in over our head... specifically if we need to take the outside of the camper apart. The rusty pipes on the underside also worry me. Any advice will be greatly appreciated!
__________________
|
|
|
|
|
01-12-2024, 09:58 AM
|
#5
|
|
Moderator
Join Date: Nov 2006
Location: Ohio
Posts: 12,656
SUN #89
|
Hi Leslie,
You have several things going on with your slide. I will address each area, but it will take some time to dig in and explain. But I will; I need more time to get to it later. This slide system will take time and effort on your end to get us all the needed info. In the process, you learn how this system works and what to look for in the future once it gets corrected.
Everything I see in your pictures is repairable; we can help provide what may be the issue; you then look further, report back, and we will confirm it and offer a few ways to fix it. You can then decide how the best approach is for you to repair. It. This is doable if you or your husband has the basic woodworking and general mechanic tools/knowledge. So that I can help explain more on what to do, tell us what level of woodworking or mechanic skills you have access to..
I'll start with this: consider it a big-picture first look. As I said, there are several things going on with your slide; they are all fixable, just different topics. We will dig into each, but doing this will take a little time.
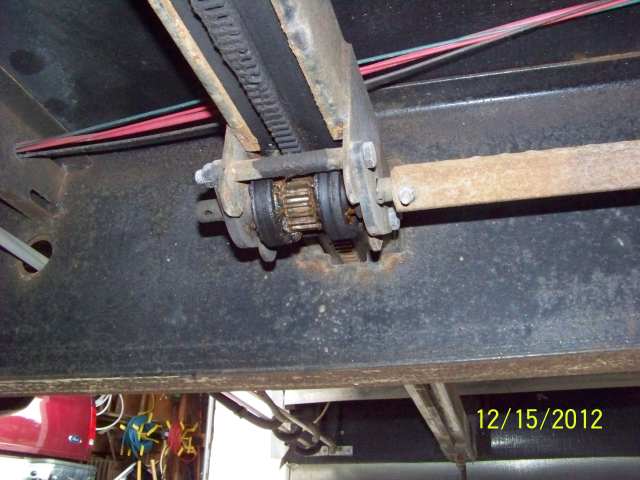
I will start with this issue first. This picture shows the slide drive system is out of alignment.

This pic shows that the slide drive and/or aluminum angle are out of adjustment. This allows water to get in while towing in wet conditions


There is a procedure to adjust the slide drive system, but before any adjustment is made, there needs to be an inspection on the entire slide drive to ensure the gear pinion bushings are not worn or something else needs to be in order. Then, you learn first what each adjustment does, and only then start in on the adjusting process. Slide drives can be worked on with basic mechanic skills, but the biggest issue is knowing what normal is supposed to look like and what each adjustment does. The adjustments are not always intuitive, but they make sense once understood. Many folks are not aware of all these needs, start adjusting something, and create another problem.
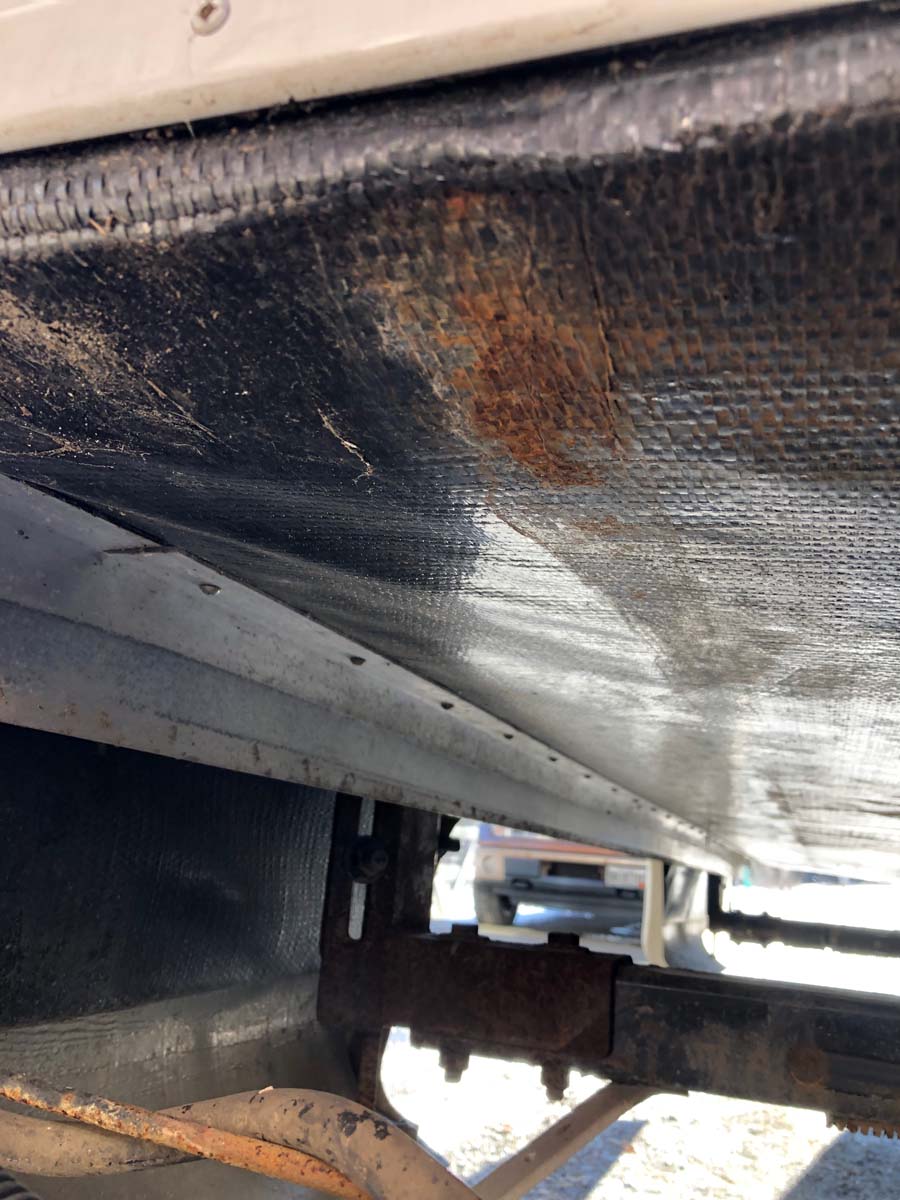
Like this pic 
We will dig into this, but this water damage can come from a few places; the first is the slide is out of adjustment, not creating a tight seal to the camper, and the next is a vapor barrier leak from the 2004 slide system design.
This out-of-adjustment front end of the slide will allow rainwater to get in and show up at the location in your pic. The water can come off the roof when the camper is stored or towed in the rain. This pic shows where the slide seal is not compressed correctly.
I'll leave you for now with this; we will start seeing what your slide drive looks like. If the weather allows, if the slide is open/out, it is better as we can see more, but you can take these pics with the slide closed.
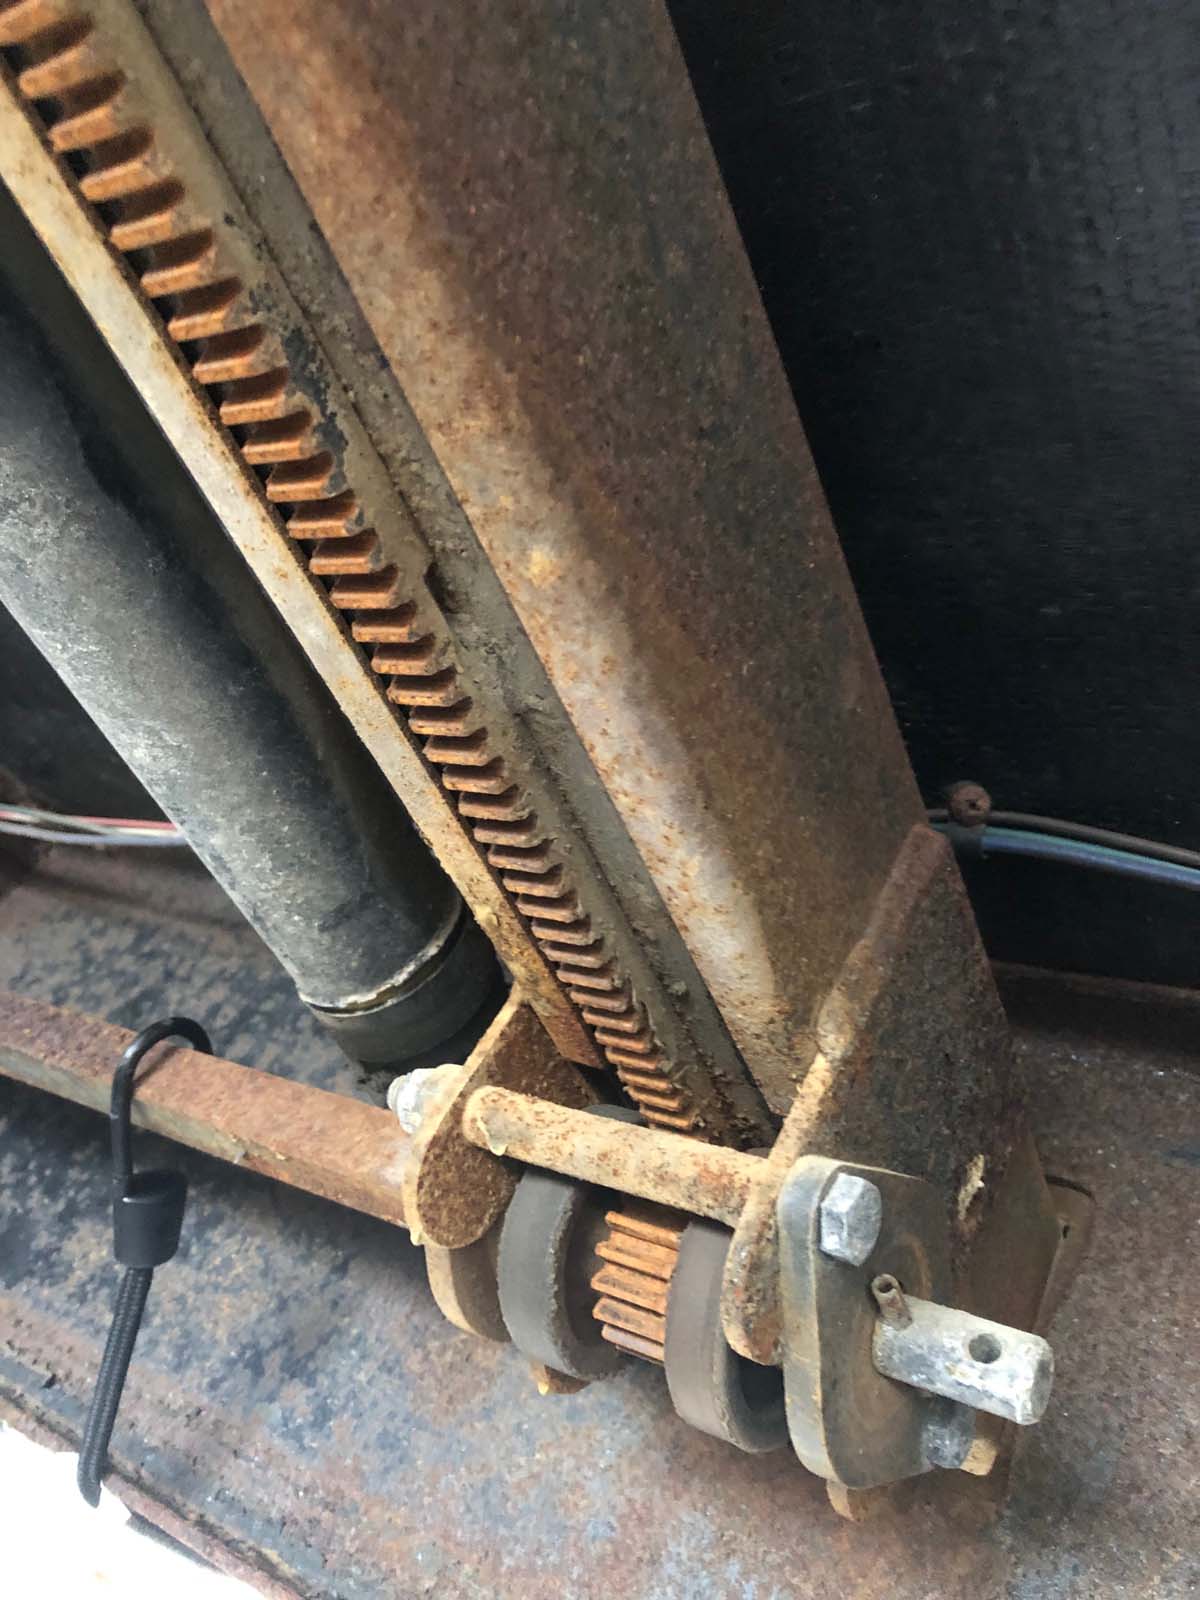
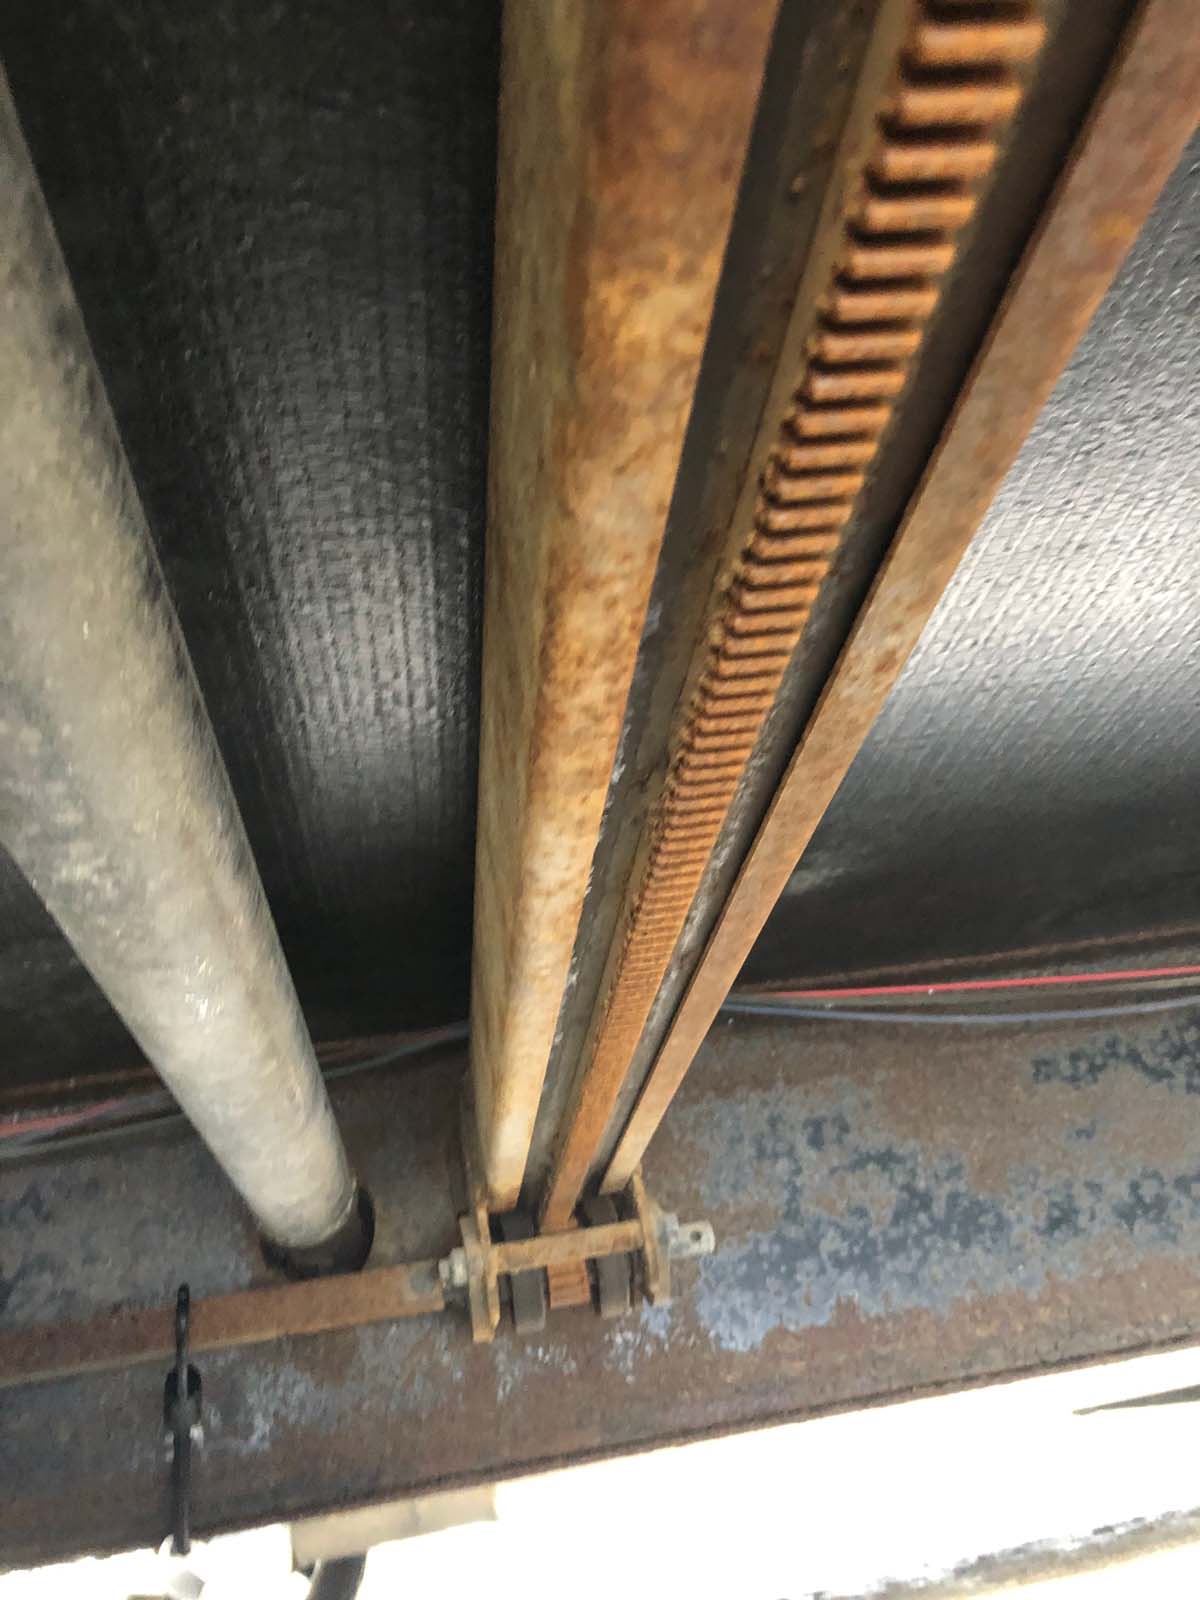
Under the camper/side, there are 2 large slide arms that hold up the slide and have a rack and pinion drive system to push and pull the slide in and out.
There are 2 slide arms; one is the master slide arm, which has the motor drive system on it. The other slide arm is the secondary slide arm; it is driven in and out by a square shaft of the master slide arm.
We will need pics of these areas to get started.
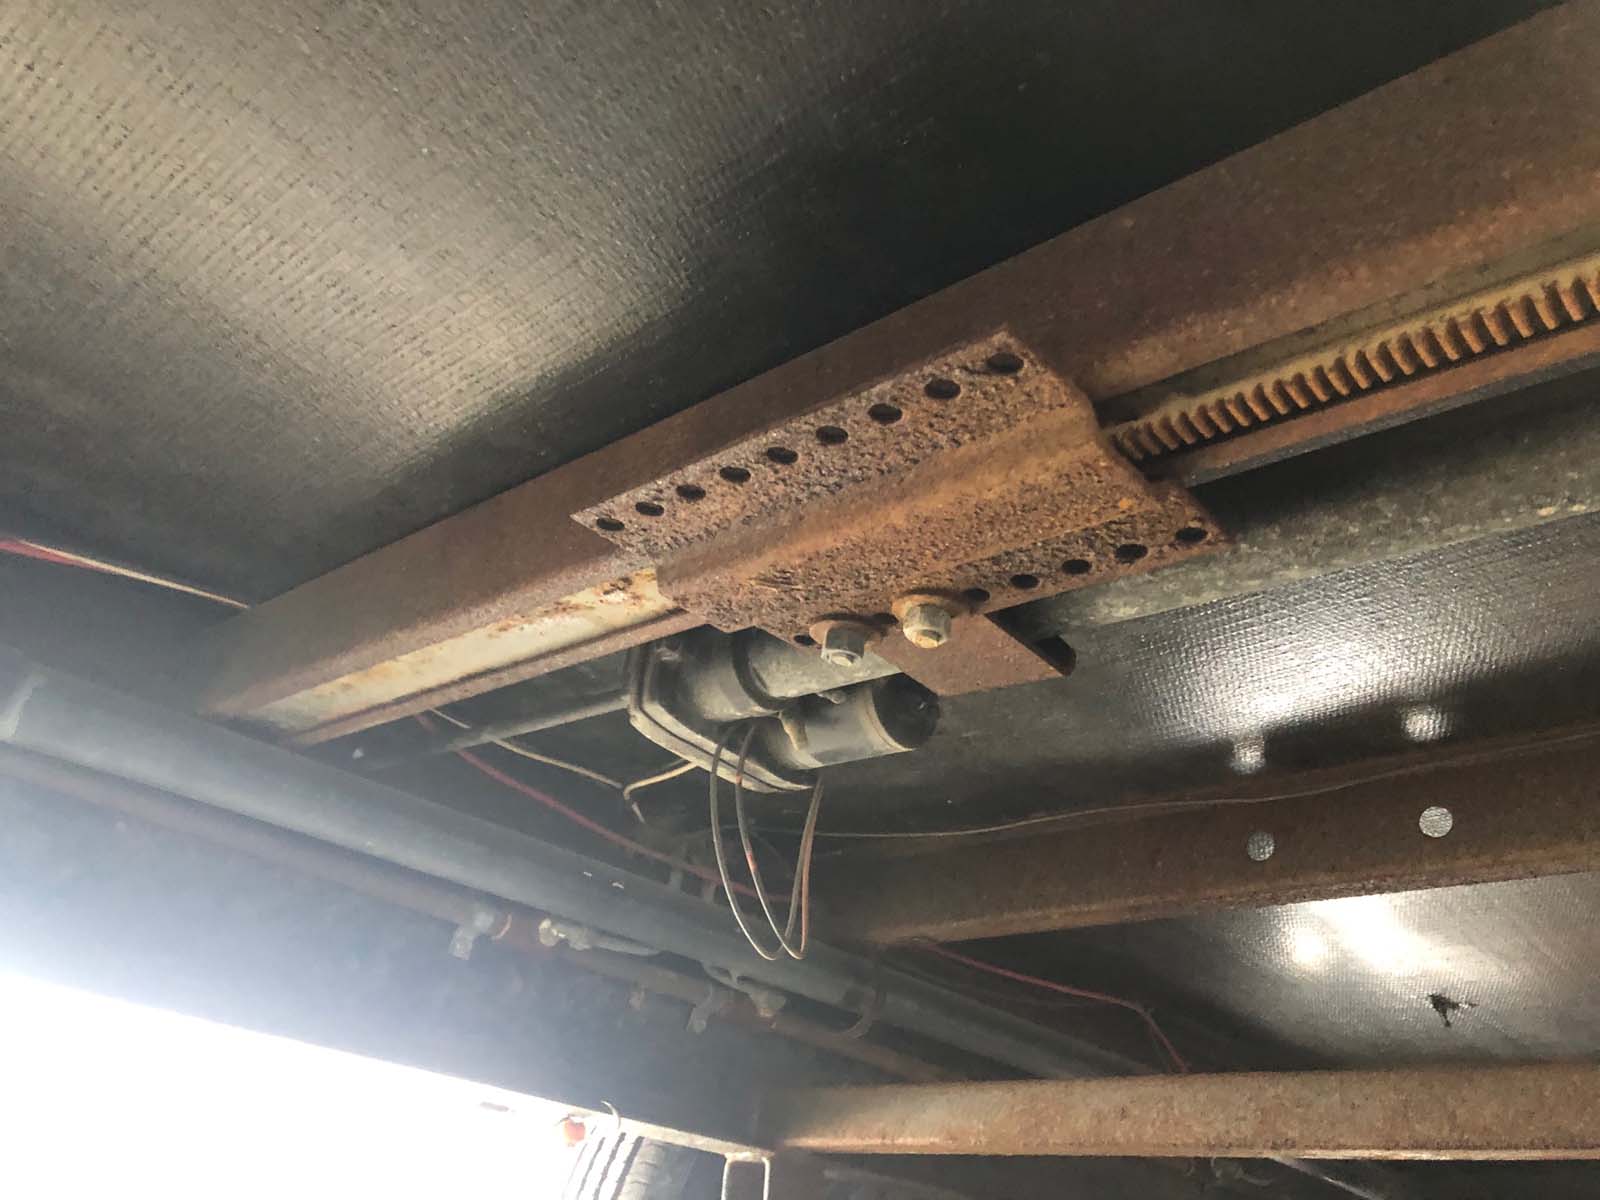
1. Pics of the master slide arm pinion gearing on the inside of the camper main frame rails. Need pic on the inside of the frame and outside.
Inside the frame. Need the pinion gears and the motor drive, Take many pics in different directions.
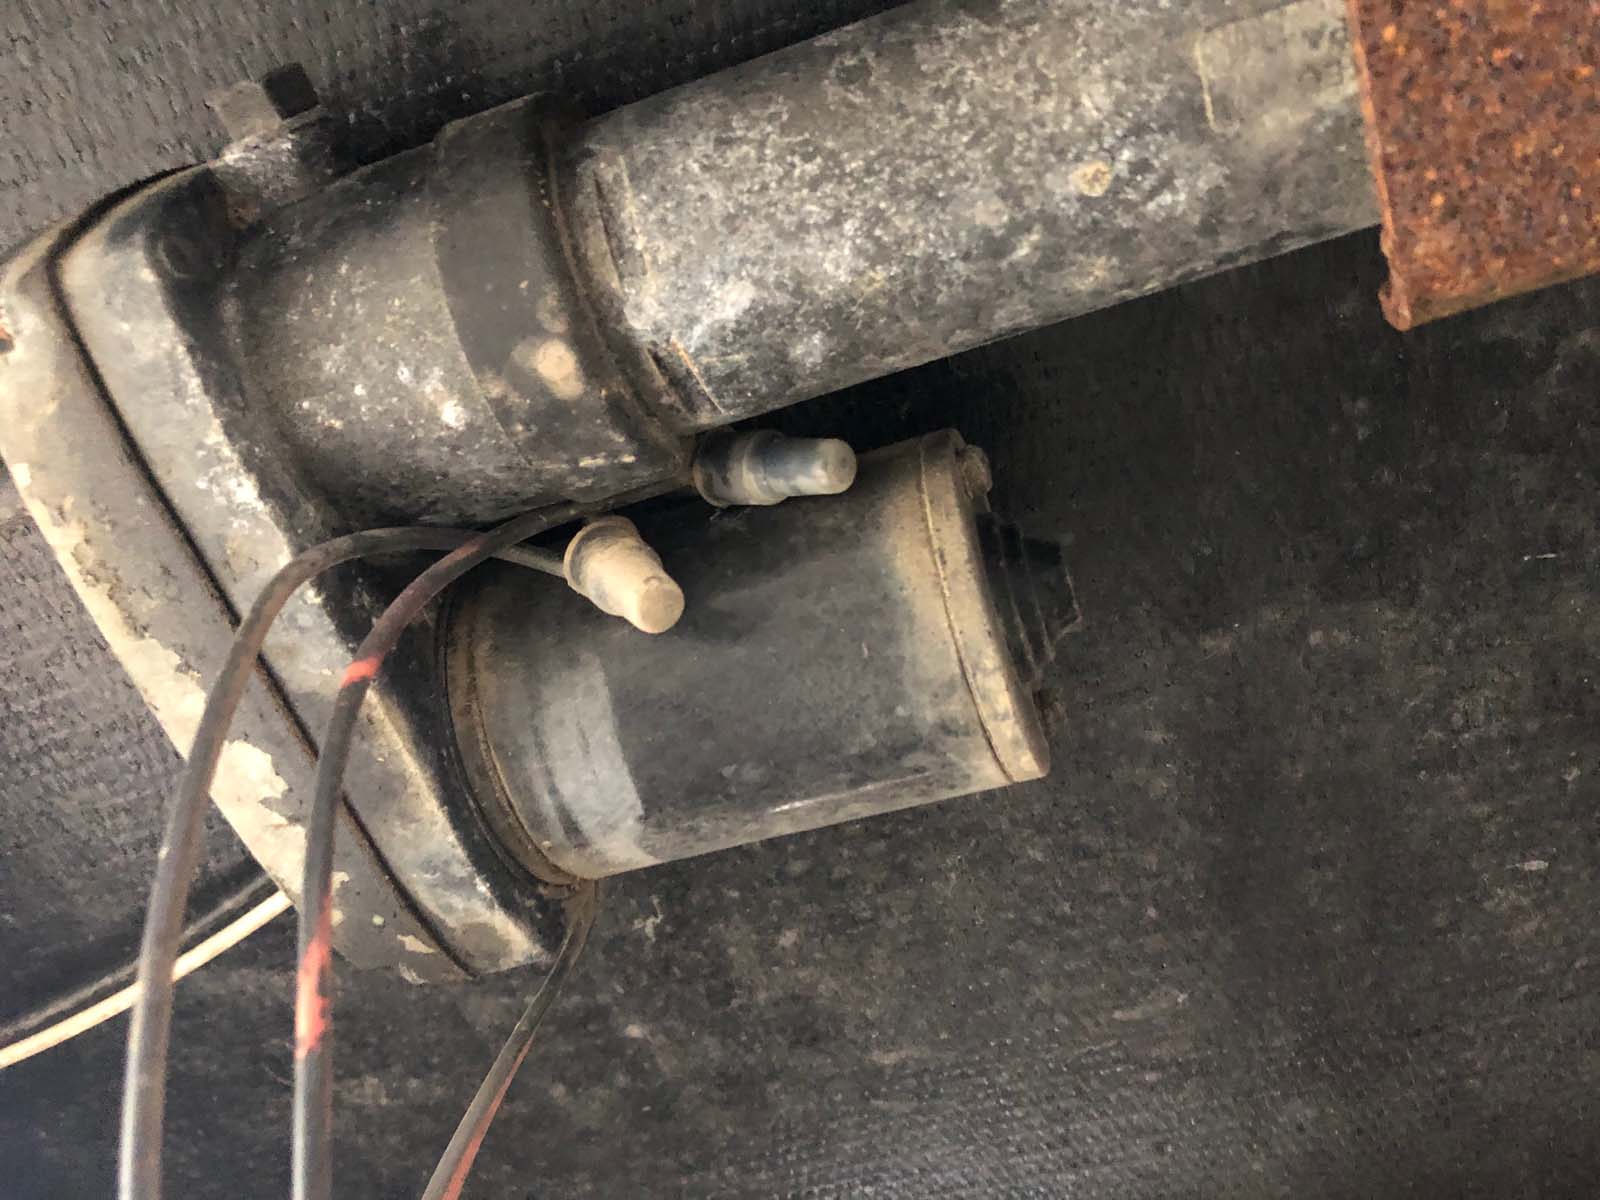
The motor end of the slide drive

The gearbox end of the motor drive

The pinion gearing ideally shows pinion shaft bushings in the building housings.
The square shaft is not on in this pic, but this is the pinion gearing.

Try to get the ends of the pinion shaft showing the bushings. This is a worn bushing. You can see a big gap between the shaft and the bushing.

Outside the frame on the master rack arm. Looks like this when slide is open

Looks like this being closed up


A pic in this direction shows the slide room supports. This is not a Sunline but shows the pic we need

2. The secondary slide arm area. It has similar gears
An end pics of the pinion shaft bushings

3. With the slide closed, look up at the long aluminum angle that runs the length of the slide floor under the slide. This angle in your pic.

When the slide is closed, that silver angle iron is supposed to compress a foam gasket mounted on the camper slide trough. Could you look and see if there is a foam gasket and if it is compressed when the slide is closed? Take pics looking up at the gap between the silver angle and the gasket on the camper. I can tell by your pic that it is not compressing the gasket, if there is even a gasket left in it.
Many pictures help; take them from all directions.
That will get us started. Will need more after this, after we see what you have.
Hope this helps
John
__________________
Current Sunlines: 2004 T310SR, 2004 T1950, 2004 T2475, 2007 T2499, 2004 T317SR
Prior Sunlines: 2004 T2499 - Fern Blue
2005 Ford F350 Lariat, 6.8L V10 W/ 4.10 rear axle, CC, Short Bed, SRW. Reese HP trunnion bar hitch W/ HP DC
 Google Custom Search For Sunline Owners Club
|
|
|
|
|
01-12-2024, 02:49 PM
|
#6
|
|
Member
Join Date: Dec 2023
Location: Maine
Posts: 32
SUN #13951
|
Hi John, Thanks again for your detailed replies. We spent the day warming up the camper and putting the slide out to take pictures, but we hadn't seen your post yet to get the ones you're requesting. Tonight so we closed up the slide and covered the top of the camper with a tarp because we found water damage in the bunk corner and an issue with the roof above that area (but probably the whole roof), and we wanted to protect it from the storm. We have one more warm day on Sunday before it goes back down to the 20s and stays there for a while so we probably won't take the tarp off to open the slide again. I'll come back around to that momentarily.
To answer your question I have woodworking skills from being involved in the building of our house/barn and previous years of old house rehab. We have most of the tools anyone would need and would buy more if needed. Neither of us has much for mechanic skills however. We do have a couple local guys that do mobile RV repair... I'm not sure how costly it would be to have them help.
I'm worried about the subfloor in the slide. You can see the screws coming out of the aluminum angle. There's nothing to screw them back in to. My husband took another one out and it looked like the one in your slide repair posts where you said if you see this you have rot. I planned on tearing out the couch and dinette anyway. Supposedly there were already repairs done other there but from what I can see I wouldn't qualify it as 'fixed'. Is there a way to determine which should be tacked first... the floor or the mechanism?
I will post about the roof leak wall damage in a separate post or maybe just rename this post to "Tony and Leslie's big mistake"?
I'll upload some of the pics I took today in case they help and will get more Sunday, but with the slide in. I made albums on this site for easier retrieval of pictures. I won't include any specific photos in this post as I'm not sure which ones will be helpful but here is a link to the album. They do show the foam gasket held up on one side with duct tape. 
Here's the album... https://www.sunlineclub.com/forums/m...albums903.html
More soon...
__________________
|
|
|
|
|
01-13-2024, 08:15 AM
|
#7
|
|
Moderator
Join Date: Nov 2006
Location: Ohio
Posts: 12,656
SUN #89
|
Quote:
Originally Posted by Leslief761

Snip...
Tonight so we closed up the slide and covered the top of the camper with a tarp because we found water damage in the bunk corner and an issue with the roof above that area (but probably the whole roof), and we wanted to protect it from the storm.
I'm worried about the subfloor in the slide. You can see the screws coming out of the aluminum angle. There's nothing to screw them back in to. My husband took another one out and it looked like the one in your slide repair posts where you said if you see this you have rot. I planned on tearing out the couch and dinette anyway. Supposedly there were already repairs done other there but from what I can see I wouldn't qualify it as 'fixed'. Is there a way to determine which should be tacked first... the floor or the mechanism?
Here's the album... https://www.sunlineclub.com/forums/m...albums903.html |
Hi Leslie,
You have done well with the pics and albums. Great, this really helps. The more pic, the better in these cases, as we can see things we didn't ask for and you didn't know to look for. But they all tell part of the story of what went on.
Good for you for covering the camper so as not to get any worse. I'll get to the roof in your other post, but the slide has leak issues and is out of adjustment even when the slide is closed. The big tarp will buy you time to deal with all this.
You asked, which should you address first, the slide drive system or the floor issues? They are both a problem and depending on what is found with the floor, the slide drive system must also be re-adjusted after the floor repairs. With the weather conditions turning ugly, the right thing to do for now is to tarp it.
While you have a roof leak, we will get to that shortly in your other post; the slide can get water-infected over the winter by water seeping into the main camper's opening area that is not properly sealed up. And the roof leak in the back ties into this. The entire roof and back wall also need to be covered. The camper will leak in the siding joints as badly as a roof leak.
To buy you time to sort all this out and create a plan, I suggest tarping the entire slide area or getting the entire camper inside undercover to buy you time and not allow the water damage to get any worse. This will also tie right into tarping the entire back of the camper. I don't know if Harbor Freight, Northern Tool, or even Tractor Supply has a store near you, but they have large, heavy silver tarps that can go over the entire roof and both sides. Then you get many assorted sizes of Bungie cords (1 ft long to 3-4ft long) and tighten the tarp to the frame on the bottom. Home Depot has a good assortment of long bungees.
You want a tarp wide enough to go from floor to roof, both sides of the camper, and over the top of the roof. And down the entire back wall. You can measure it, but the floor to the roof is about 7 feet, and the roof is 8 feet wide. So, 7ft up one side, 8 ft over the roof, and 7 ft back down the other side. As to how long down the camper and the back wall are being covered, you'll have to measure for that.
Here are some choices from Harbor Freight. I know these cost money, but I figure you will be spending approximately $100 between tarps and bungee cords. I know that is a lot, but short of getting the camper inside or under a roof cover, tarping is an effective way.
The HF selection
https://www.harborfreight.com/search?q=heavy%20tarps
A few options that may be big enough after you measure
https://www.harborfreight.com/19-ft-...lin-47678.html
https://www.harborfreight.com/20-ft-...arp-57030.html
https://www.harborfreight.com/24-ft-...arp-57898.html
One other solution to the problem is a complete camper cover. The camper cover is about $400 for your size camper, and there are many brands, but these can be used when you store the camper over the winter. The covers last about three years, maybe more. Wind damage from loose flapping on sharp objects starts to rip and grows over time. But three years and the camper is covered over the winter is a low cost to save a camper. However, when you start repairing, the tarp work is better than the cover. The tarp is easier to get on and off, and you may end up with two tarps to cover the camper, pending more investigation. This way, when the repair time starts, you will only be under the tarp in the area where you are working. Both the cover and the tarp area options.
Here is an example of a tarped repair. This is a 2006 T276SR Sunline I restored for a friend two years ago. This floor plan is very close to yours; only the front bedroom differs. The entire back wall, roof, and sides were covered, dealing with a right and left rear roof and siding corner molding leaks. The big tarp came off in the morning and went back in for the nighttime. You get good at it after a while.

And just so you know, here is the same camper after being restored with a Classic Car camper cover for winter storage. The camper now lives in a seasonal campground. As you can see, the camper is protected, but doing the cover for a repair would be a lot more work every day to put it on and off. But it would work to hold the entire camper until spring, then convert to the tarp and give you options. I have more on this camper cover topic if wanted.


I hope this helps with the tarping.
John
__________________
Current Sunlines: 2004 T310SR, 2004 T1950, 2004 T2475, 2007 T2499, 2004 T317SR
Prior Sunlines: 2004 T2499 - Fern Blue
2005 Ford F350 Lariat, 6.8L V10 W/ 4.10 rear axle, CC, Short Bed, SRW. Reese HP trunnion bar hitch W/ HP DC
Google Custom Search For Sunline Owners Club
|
|
|
|
|
01-13-2024, 08:34 AM
|
#8
|
|
Moderator
Join Date: Nov 2006
Location: Ohio
Posts: 12,656
SUN #89
|
I saw the pics in your album dealing with the slide. These are great pictures; they help tell a story. I will be back later to comment on them. Out of time right now. I want to think through what I was seeing before responding.
Also, a heads-up: you said you were using a moisture meter. Excellent! You get an A+ for that, as it will help you work through your camper repairs. Which meter are you using? The meter I use will not work on frozen wood. The point is that if the wood is frozen, you can't trust the zero readings. See here for more on the frozen. wood thing
https://www.sunlineclub.com/forums/f...tml#post154912
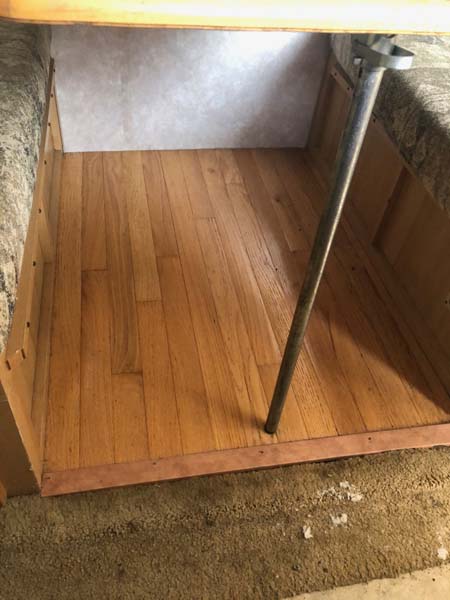
Here is one quick thing to look for. On this pic of the floor, feel the floor, even tap on it, from the bottom up. Is it solid and hard as a rock, or is it soft? You may be unable to do this with the slide closed; if so, it can wait. I just wanted to add this.
This is the rear slide end. Push-up can feel; it should be as solid as a rock. Feel the entire width of the slide floor pushing up. Width means the direction left to right while looking at the end of the slide room. It's about 3 ft in width, not the 13 ft length-wise. Feel from the edge to about 12" or so down the slide length. While you check, check the front floor in the same end spot.
Be back later
John
__________________
Current Sunlines: 2004 T310SR, 2004 T1950, 2004 T2475, 2007 T2499, 2004 T317SR
Prior Sunlines: 2004 T2499 - Fern Blue
2005 Ford F350 Lariat, 6.8L V10 W/ 4.10 rear axle, CC, Short Bed, SRW. Reese HP trunnion bar hitch W/ HP DC
Google Custom Search For Sunline Owners Club
|
|
|
|
|
01-13-2024, 11:46 AM
|
#9
|
|
Member
Join Date: Dec 2023
Location: Maine
Posts: 32
SUN #13951
|
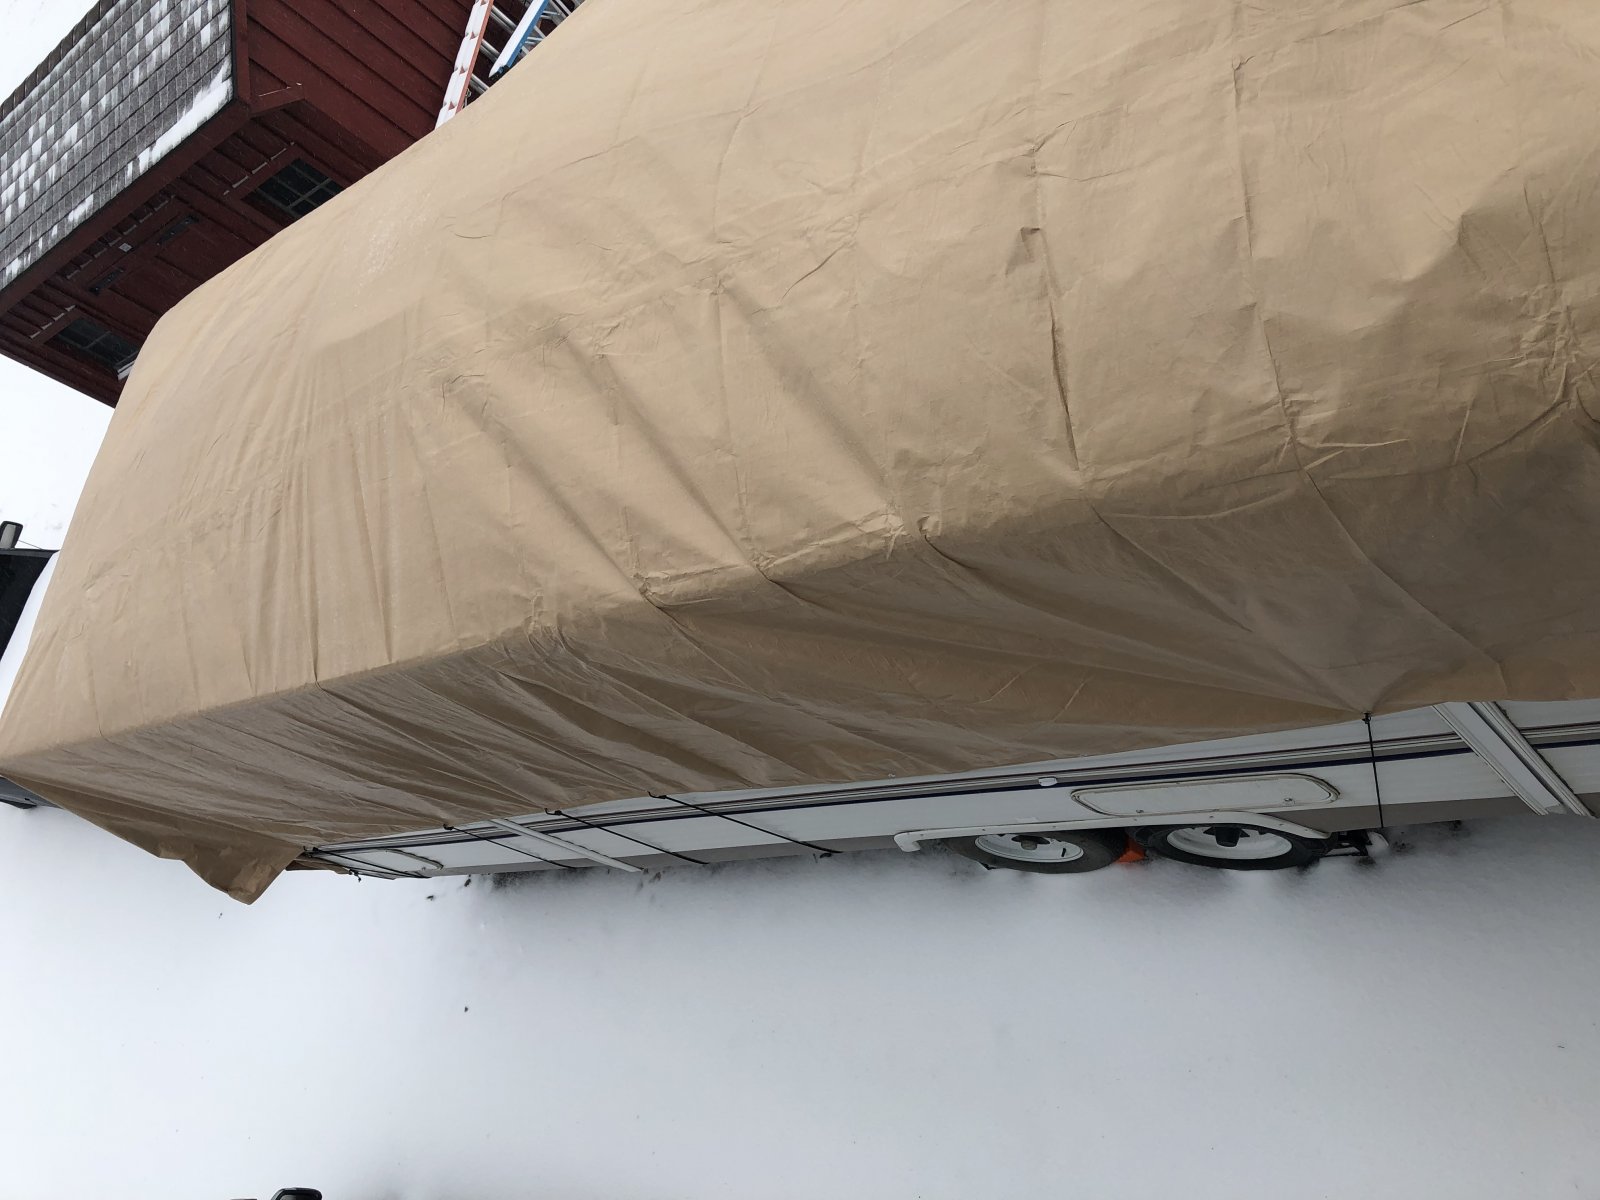
Hi John, Real quick message here to say we covered the camper yesterday because today it's storming. Unfortunately it only covers about half way down. We will rethink this... -
Taken from our upper deck looking down.

__________________
|
|
|
|
|
01-13-2024, 12:05 PM
|
#10
|
|
Member
Join Date: Dec 2023
Location: Maine
Posts: 32
SUN #13951
|
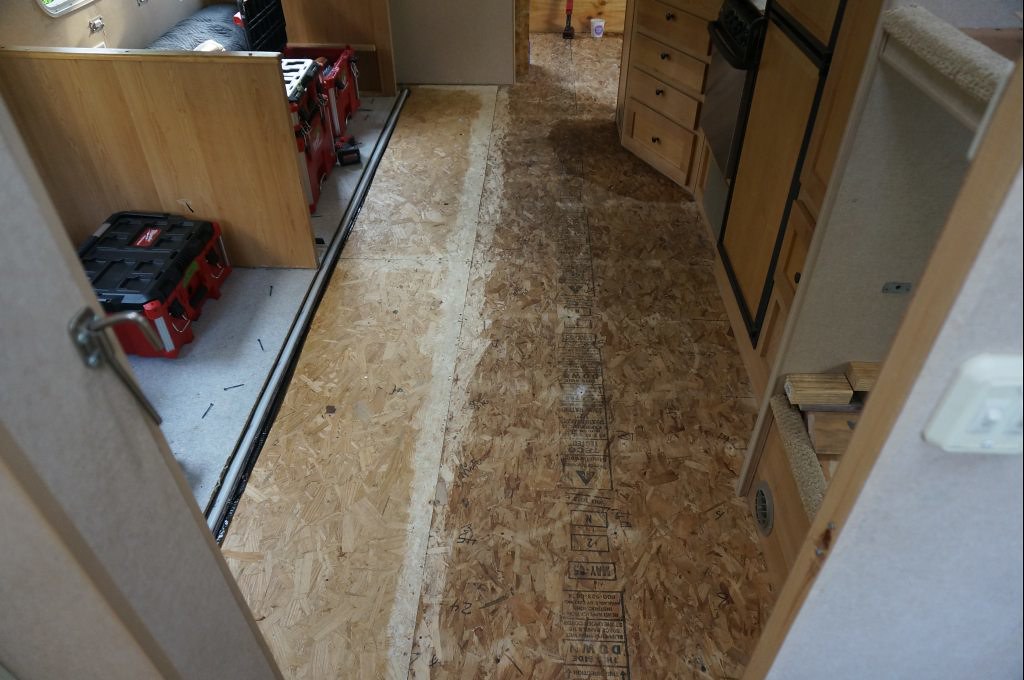
I have 2 moisture meters...Both are General Tools. Locally all I could find was the MM9 pin and pinless combo. It's the one I took with me to look at the camper. Yes it was cold so I was probably getting incorrect readings as for the most part it tested dry. Then I ordered the MMD7NP like you have.
The other day I warmed up the camper to 55 degrees for a few hours and took both moisture meters in. It was still mostly dry except for that back corner. This showed a higher reading in the corner that faded about a foot out. I didn't do the whole camper again but I was comparing the readings. I have to calibrate them better because the MMD7NP was beeping on the table top which was dry. It seemed to be much more sensitive. I'll check again when things warm up.
I didn't feel around under the whole slide but there were areas in the front that seemed lumpy. It almost looks like the darco was removed and put back because it's not smooth on that side. It also has the flashing tape on that side. I will do a more thorough job next time the slide is out. I figured we would really see what's up when we remove the couch, dinette and carpeting. I think it's off that a wood floor was put under the table and the floor was redone with a wood look linoleum type thing on the other side of the slide.
I tried to get more info from the woman I bought it from who had it for 2 years but she just said it was like that when she bought it and the previous owner had done some work on it. She said she didn't have the previous owner's contract information any more. Hmmm.
__________________
|
|
|
|
|
01-13-2024, 07:15 PM
|
#11
|
|
Moderator
Join Date: Nov 2006
Location: Ohio
Posts: 12,656
SUN #89
|
Hi Leslie,
Thanks for the info on the moisture meters.
Quote:
Originally Posted by Leslief761
snip..
I didn't feel around under the whole slide but there were areas in the front that seemed lumpy. It almost looks like the darco was removed and put back because it's not smooth on that side. It also has the flashing tape on that side. I will do a more thorough job next time the slide is out. I figured we would really see what's up when we remove the couch, dinette and carpeting. I think it's off that a wood floor was put under the table and the floor was redone with a wood look linoleum type thing on the other side of the slide.
I tried to get more info from the woman I bought it from who had it for 2 years but she just said it was like that when she bought it and the previous owner had done some work on it. She said she didn't have the previous owner's contract information any more. Hmmm. |
No worries about not being able to open the slide; do more inspection when you can.
I'll comment on the blue highlight above. In case you did not know, here's a friendly heads up: The slide room should not be stepped on or sat on when the slide room is fully retracted in, unless precautions have been taken to add extra support under the slide room floor system. I'll explain, as this is good info to know and understand about your camper.
Your slide is made to have what is called a "flush floor" design when the slide is fully extended out. The slide goes downhill on the way out and uphill on the way in. The steel slide support arms under the slide room have a track/housing that is mounted on an angle to the main floor of the camper, which creates a long ramp the slide support arms ride on. When the slide room is fully out, it drops down into a metal slide trough mounted on the main camper floor at the last few inches of travel. When the slide stops moving out, the slide floor is almost even with the main camper floor. The carpet flap covers over the metal slide trough and blends in the transition.
When the slide retracts in, the metal slide trough acts like a cam and pushes the entire slide room up off the floor. The way the slide is made is intended to lift up the innermost end of the slide room off the floor a few full inches, not scrape the floor, and is part of the flush floor design concept.
Here are some pics of my 2004 T310SR that had a slide floor leak the day I bought it in 2007. I inherited this problem, not realizing this was ongoing. These pics are just like how your slide is made and the slide trough.
The shiny metal is the slide trough. It is formed on an angle with lower and higher sides. The slide floor is sitting on the low side in this pic, making the slide room floor flusher with the main camper floor.


All that said, how far up off the main camper floor your slide room floor is now is part of the slide drive adjustment process that we have not made it to yet. This distance off the floor can be adjusted, but one can mess up some of the other adjustments when it is too far or too close to the main camper floor. Here is my slide up off the carpet when it is fully retracted. This is normal, as it should be. See the large gap.

With that large gap, the innermost end of the slide floor is unsupported. If someone steps on it, there is no support, and the slide floor can bend down. If left unchecked and the practice of stepping on the floor continues, the slide floor can break loose from the end walls and or pull the center mini wall of the dinette out of the outer wall. I have had to repair both of these issues on friends campers.
Now that you see the problem, what can be done? With our floor plan, I created a rug board to slide/jam under the center of the slide when it is fully retracted, where we have to step on it. We can walk down the center of our camper on the main floor until we hit a sink counter that protrudes out next to the slide. It is too easy to accidentally step on the center of the slide floor every time we load the camper with food, etc. The rug board supports the slide floor in the middle and prevents the slide floor from bowing down. See here.
Here is the problem area: check the point area with the kitchen counter.

Here is the rug board. In my case, it is a piece of 3/4" thick plywood surrounded by carpet to slide on the floor and not dig up the main floor or the bottom of the slide room. This thickness works for mine; yours may be different.

Here, it is installed. It is wedged in there, and with the carpet on it, it will slide out of the way to the slide, which goes out. We pick it up and store it until the slide comes back in.

We have a free-standing table and chairs, so not a dinette and our table is down when the slide is in, so it does not fly all over during towing.
If you want to sit at the dinette or the couch in your camper with the slide in, you need to create a support spacer for each area, like the rug board I have. When you remove the dinette and couch, if the slide is in, you need to add the support. If the slide room is extended out, then there is no problem.
The next topic is this pic of your slide trough being all rusted. I'll get into this more tomorrow.
I'll be back with more.
John
__________________
Current Sunlines: 2004 T310SR, 2004 T1950, 2004 T2475, 2007 T2499, 2004 T317SR
Prior Sunlines: 2004 T2499 - Fern Blue
2005 Ford F350 Lariat, 6.8L V10 W/ 4.10 rear axle, CC, Short Bed, SRW. Reese HP trunnion bar hitch W/ HP DC
Google Custom Search For Sunline Owners Club
|
|
|
|
|
01-13-2024, 07:21 PM
|
#12
|
|
Moderator
Join Date: Nov 2006
Location: Ohio
Posts: 12,656
SUN #89
|
I am unsure if you found this older post about my slide floor rot repair. It can help show how your slide floor is made. This repair has been very successful. I have not had to change anything with it since the repair was made in 2009. That said, I have repaired other friends' slide floors also since this first one.
https://www.sunlineclub.com/forums/f...age-10695.html
__________________
Current Sunlines: 2004 T310SR, 2004 T1950, 2004 T2475, 2007 T2499, 2004 T317SR
Prior Sunlines: 2004 T2499 - Fern Blue
2005 Ford F350 Lariat, 6.8L V10 W/ 4.10 rear axle, CC, Short Bed, SRW. Reese HP trunnion bar hitch W/ HP DC
Google Custom Search For Sunline Owners Club
|
|
|
|
|
01-14-2024, 07:18 AM
|
#13
|
|
Member
Join Date: Dec 2023
Location: Maine
Posts: 32
SUN #13951
|
Thank you for this explanation of how the slide works. We had been wondering about it not being level when it was all the way in. Luckily I had seen your post about the support board earlier and we have been careful not to step on the slide area although we havent made support boards for it yet. Its quite cramped in there with the slide in as you know so I think it will have to be fully out for me to have room to get the sofa and dinette out. Not having a garage to work it that will probably have to wait until spring. In the meantime we should be able to find enough scrap material to make supports for all the way across.🙂
__________________
|
|
|
|
|
01-14-2024, 12:29 PM
|
#14
|
|
Member
Join Date: Dec 2023
Location: Maine
Posts: 32
SUN #13951
|
__________________
|
|
|
|
|
01-24-2024, 10:09 PM
|
#15
|
|
Moderator
Join Date: Nov 2006
Location: Ohio
Posts: 12,656
SUN #89
|
Hi Leslie,
The extra pics of inside the camper frame help. Once the weather cooperates, we will still need pictures of the slide drive system with the slide open and closed outside the camper frame. I talked to them in my reply above, but I understand the weather didnt cooperate with getting them. No worries, it is OK; we can still talk about what we have, which is a good amount. The extra pics of the outside frame of the slide drive would help confirm if the misadjusted slide added to the water leaking issues.
From your pics, here is the quick version of what I see happened. I've included the detailed version below.
1. Your slide drive needs to be set up correctly; there are more issues than just not closing correctly at the front. It will need all adjustments checked and readjusted when you are done working on it.
2. The bottom slide seal is different from the correct one. The aluminum angle that presses against the seal will need to be reset to be in the proper location after all slide repairs are completed, a new bottom slide seal is installed, and the entire slide is adjusted correctly. We always set that angle last in the final location.
3. The slide room mold on both ends of the carpet and the rusted slide trough indicate that the slide room was left open for a long period during several rains. Either all at one time or many shorter times. While the rain did the damage, the slide could be out of adjustment when the slide room is in the out direction, along with the camper not being set up level, allowing the slide roof to pitch water towards the camper. When heavy rains come, they can overload the end wall seals when the slide is out and out of level. While the slide drive system can be corrected to sealing problem, the camper users need to understand how the slide is made to work and the importance of having a level camper setup to create the proper slide roof pitch to direct water away from the camper.
4. The rusted slide trough can be from two problems: water leaking in from item 3 above and water being blasted against the bottom slide seal needing to be corrected when towing due to the problem in item 1 above.
Here is a more detailed explanation:
There is a pattern of water intrusion on both ends of the slide. There may be more than one thing wrong to create this water damage. See pics below.
The front slide wall and inside portion of the slide are leaking.
The rear slide wall and inside portion of the slide are leaking.

The slide trough has a good amount of surface rust on the top surface and water damage to the carpet.
The slide trough rusting water damage could be from one of two sources or both with leaks, depending on conditions.
- Slide trough condition 1: The slide was fully retracted in, but the slide seals were not being compressed correctly due to the system being out of adjustment. See here. I can also see the putty tape is heavily cracked behind the main camper wall siding and the slide flange. Those large cracks and gap will allow water into the wall. And I can see the lower part of the flange may be bent.

With the front of the slide out that far, the front outside vertical flange seal is not sealed tight, allowing water into the camper given the right wind and rain-blowing conditions with the camper standing still or traveling down the road. There is also the possibility the bottom seal is not tight either, which, if that is not tight and towing in wet conditions, water can work its way over the sliding trough, and onto the camper floor. We need the pics showing the bottom seal when the slide is in to confirm this, but this bottom slide seal has issues. The slide is, for sure, out of adjustment. Both the front vertical and bottom slide seals are supposed to be sealed tight simultaneously.
The front area of the slide on the bottom had some repairs; the black Darco is not tight, and there is splice tape on the bottom. There is also the condition of the bottom seal aluminum angle that has missing, and the screws are not tight.
The duct tape on the seal is an issue. The adhesive on the back of the seal is damaged. And that bottom seal is not the original one Sunline used.
As you can see here when the camper is towed under wet conditions, the water that flies off the wheels blasts that bottom seal with water. This bottom seal must be right, and if it is not, water can fly up into the camper onto the top of the slide trough and into the camper floor just inside the camper.

The slide trough rust and possibly water-infected floor in the center area of the slide can be explained by towing the camper in wet conditions when the slide is closed. However, the towing water issue does not fit with the inboard ends of the slide carpet, being all wet and moldy. You may have two issues going on.
To create the water damage on the inboard side of the slide at the ends, the molding carpet, like this pic.
This damage at the ends normally comes from when the slide is fully extended out. There are a few reasons for this.
- Slide trough rusting condition 2, and the carpet ends up moldy.
A. If the slide is not adjusted correctly for being extended out, the inside slide seals do not seal up tight, allowing rainwater to enter at the ends of the slide and then flow wherever gravity will take it, which can be down the slide ends walls inside the camper top of the slide trough and floor. The carpet and the foam pad under it act as a sponge, keeping it wet long enough for mold to form and rust. And it happens often, every time it rains when they slide it out.
B. The next area is how the camper is set up and, when the slide is fully extended out, how the slide roof water is supposed to drain off the slide towards the outside wall. Im going to start this by explaining how your Sunline slide is made, how it works, and how when the camper is set wrong, water can flood the seal areas, allowing excess water volume and pressure against the inboard slide seal to leak water inside. I will use my 2004 camper to show how it is supposed to work. This 2004 is made slide drive-wise like yours, and I had all the right pics to show you.
When the slide is fully extended out and adjusted correctly, all three inside slide seals, the front and rear vertical and long top slide seals, are compressed correctly to the inside flanges of the camper. You can see the black rubber seal in these pics; the slide is not yet fully out, but it is on the way out.
See the heavy black seal at the wall of the slide opening

Here, the slide is just about fully out. You can see daylight as the slide seal must still be fully compressed.

When the slide reaches fully out, you can run your fingers inside the edges of the top, front, and rear seal and feel if the wood trim gap is even and very close to the wall in all three areas.
Now to the outside. The slide is not made as a true square box on purpose. The bottom of the slide room is wider than the top. This difference in top and bottom is part of the flush floor design as when the slide is fully in and flush with the outside of the main camper wall, the slide floor is up off the carpet.

T is less than B in width by about 2 2 ½.

While you cannot see it in the pics, the camper should be leveled in two directions when it is set up for camping. The camper frame/siding is to be level from left to right and front to back. Then, when the slide room is fully extended out and adjusted correctly, the slide roof is pitched down facing the front of the slide to allow rainwater to flow away from the camper towards the outside wall of the slide room. And the water will flow more even across the roof as the camper is level front to back. Both ends of the slide room seals see approximately the same volume of water or lack of water during a rainstorm. This is the way it is supposed to be.
If the camper is set up nose high in the front, more rainwater flows to the rear end of the slide, and if the camper is nose down, more water flows to the front. The next bigger issue is the left-to-right level of the camper. If the door side of the camper is lower and the slide side is higher from left to right, the slide room roof follows the camper wall and loses its roof pitch to allow rainwater to flow away from the camper. In this case, the slide roof may be level or, worse, pitched towards the camper, which is a bad thing to do.
If someone is camping for a few weeks, moving camps, or months in the same location, with the slide out all the time, being off-level in the wrong direction can allow rainwater to flood the slide room inside seals, which cannot handle that much water and not leak. Rug mold damage and rusted slide troughs can happen when this off-level condition exists.
The above is where I feel your water damage came from. We can confirm more of this when you get a chance to get some pics of the slide drive system outside the frame when the camper is closed up.
Tomorrow, I have some pics to post of other campers to show a slide floor seal leak issue from the bottom seal being wrong and the slide room damage when the camper is out of level the wrong way. This can help show what I am talking about. I will also show these areas repaired if your camper has those issues. Once you remove the slide dinette and sofa, we can look deeper into the damage under the slide carpet and the new replaced tile in front of the slide.
More to come.
Hope this helps,
John
__________________
Current Sunlines: 2004 T310SR, 2004 T1950, 2004 T2475, 2007 T2499, 2004 T317SR
Prior Sunlines: 2004 T2499 - Fern Blue
2005 Ford F350 Lariat, 6.8L V10 W/ 4.10 rear axle, CC, Short Bed, SRW. Reese HP trunnion bar hitch W/ HP DC
Google Custom Search For Sunline Owners Club
|
|
|
|
|
01-25-2024, 10:10 PM
|
#16
|
|
Moderator
Join Date: Nov 2006
Location: Ohio
Posts: 12,656
SUN #89
|
Hi Leslie,
When the time comes, and you remove the items from the slide, lift the carpet, and you can see if there is any damage under it. I will also add some comments in a separate reply on how to remove the sofa and the dinette and what to expect. Below are some pics of areas to look for when dealing with an off-level slide roof and the wrong bottom slide seal.
Slide water damage from an off-level camper and slide roof. These pics are of a 2007 T289SR I restored for a friend 2 years ago. Their Sunline rests full-time on a seasonal site. The camper is covered over the winter, and when it comes spring, the cover comes off, and they use it during weekdays. They come home on the weekend.
This camper was in pristine condition inside. It was like it just came from the factory. Sadly water damage to several areas started to show up, and the front and rear wall lower screw tests showed as yours did; they were all rusty. The moisture meter also found the rear slide wall wet, which is what I will concentrate on now.
Since the camper lives on a seasonal site, it is never moved from place to place. Over time, the campground's soft sandy area allowed the camper's door side to sink by the tire area. I'm not sure how level it was when set up; it was on 2 x 8s that covered the 2 tires, but it was not level when I picked it up side to side. There was also some nose-high condition from both sides sinking a little. This camper had no slide topper.
Upon close inspection at my shop, the rear slide seal had witness marks of a lot of dirt trail created by flowing water. As we started to take the siding off the back wall to deal with that damage, it was clear, water was entering the rear slide seal into the slide wall.
There are 50 pics of this slide damage and repair on my Flickr photo site. See here: https://www.flickr.com/photos/camper...77720314347238
I'll give some highlights here. If you find damage like this, then we can talk more, and I can add more to the repair process.
Inside the camper, there is a jack-knife sofa like yours at the rear of the slide. This is also where the water came in as the slide was tipped toward the back, and water flowed towards the camper.
The carpet with the slide flange removed

With the sofa removed, looking down at the carpet staining

The carpet lifted and the water damage on the floor

Actually, the damage inside the camper in this case was not a lot, the major damage was in the rear camper wall. The slide was adjusted correctly, so the slide seals were tight. Tight still will not keep large amounts of water flowing into the camper slide seal from getting into something, in this case, the slide's rear wall. The pics will now get ugly.


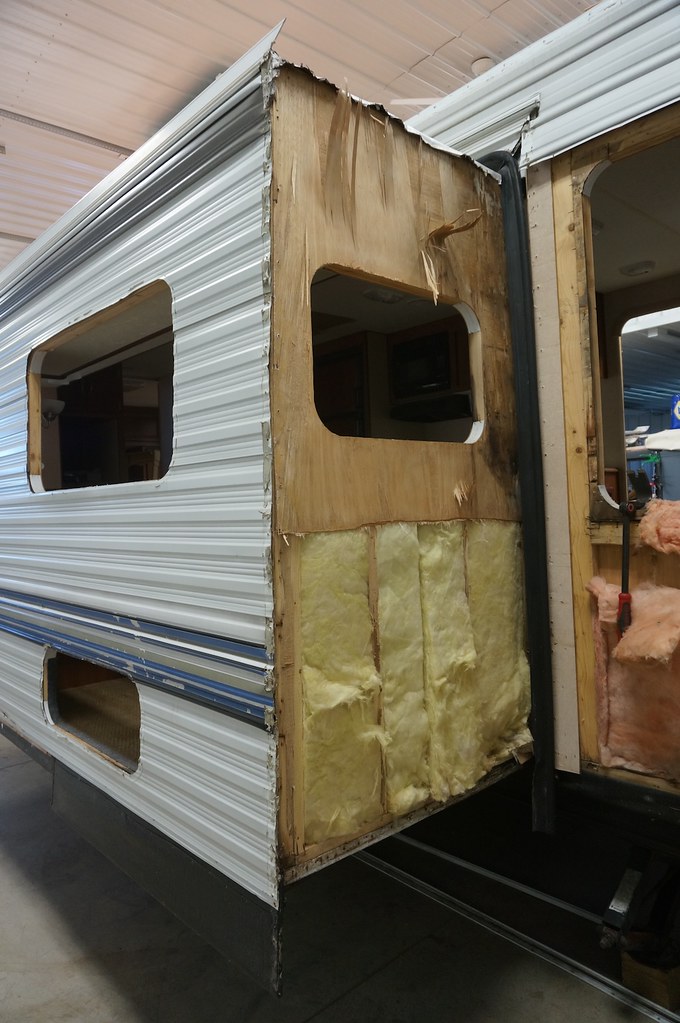


The left rear roof corner where a good portion of the water went in and then down. Again, the slide roof has to pitch away from the camper when heavy rains come.

Here is another problem that made everything get worse as time went on. Over time, water kept seeping in with every storm. Soon, the floor tongue was weakened, and the back of the slide sunk down at least 1/2", making the water even more head for that rear slide seal at the camper. In this pic, the slide tongue is supported by the slide trough. The slide room is sunk down just after the slide tongue stops supporting the slide room.

You can see it better here. The slide tongue looks to be going uphill, but it is more than the slide room sunk down.

After showing this to my friends, they agreed with me, when you are camping in the camper, put the slide out. When you go home or away from the camper for days/weeks on end, push the button and bring in the slide. Every camper in that seasonal campground has the slide on all summer, yet many of the folks only come for a short period of time. 25% of the time, folks are camping, and 75% are not at the camper. The odds are not good that something can happen when you are not there. Bring the slide in when you leave, it takes less than 5 minutes. A lot of this damage could have been minimized if a slide topper had been on the camper with the slide open all the time.
We did repair all of it, including the sunken floor. Here are two pics after all the repairs were done. Also, note that the slide floor and trough on this camper are different than yours; 2005 was a redesign year for the slide floors.


__________________
Current Sunlines: 2004 T310SR, 2004 T1950, 2004 T2475, 2007 T2499, 2004 T317SR
Prior Sunlines: 2004 T2499 - Fern Blue
2005 Ford F350 Lariat, 6.8L V10 W/ 4.10 rear axle, CC, Short Bed, SRW. Reese HP trunnion bar hitch W/ HP DC
Google Custom Search For Sunline Owners Club
|
|
|
|
|
01-25-2024, 10:52 PM
|
#17
|
|
Moderator
Join Date: Nov 2006
Location: Ohio
Posts: 12,656
SUN #89
|
Here is the damage from towing in wet conditions when the bottom slide seal lets water into the camper.
This camper is a 2006 T276SR. It is the same big-picture layout as yours, just a little longer, and the bedroom has the bed turned 90 degrees from yours. This was also a fully restored camper about 2 1/2 years ago. I'll talk to the bottom slide seal now.
The slide drive system was not adjusted correctly. It also would only close unless you started it in with the hand crank about 90% of the time. When the slide closed, the aluminum angle, like yours, was so high that it missed the entire slide seal. The physical rubber seal was below the bottom of the angle. The entire 13 feet of the bottom of the slide had no sealing action when it was closed. The prior owner told my friend they towed the camper all over Canada and the US and had a great time with it. We have no idea how long the water was allowed to leak in, but from the damage, it was years, 5 to 8 years at least. This slide seal is different than yours; it is small in height, so if the side was 3/4" high, it missed the entire seal. The point is that water will create havoc when towed in the rain if the bottom slide seal does not work. However it is made, it has to seal tight.
Here are the pics, and they are ugly. My friend wanted to replace the floor tile, and the moisture meter confirmed that something was happening under the floor; we did not know what until we lifted the floor.
More pics are here on my Flickr site: https://www.flickr.com/photos/camper...7719815377250/
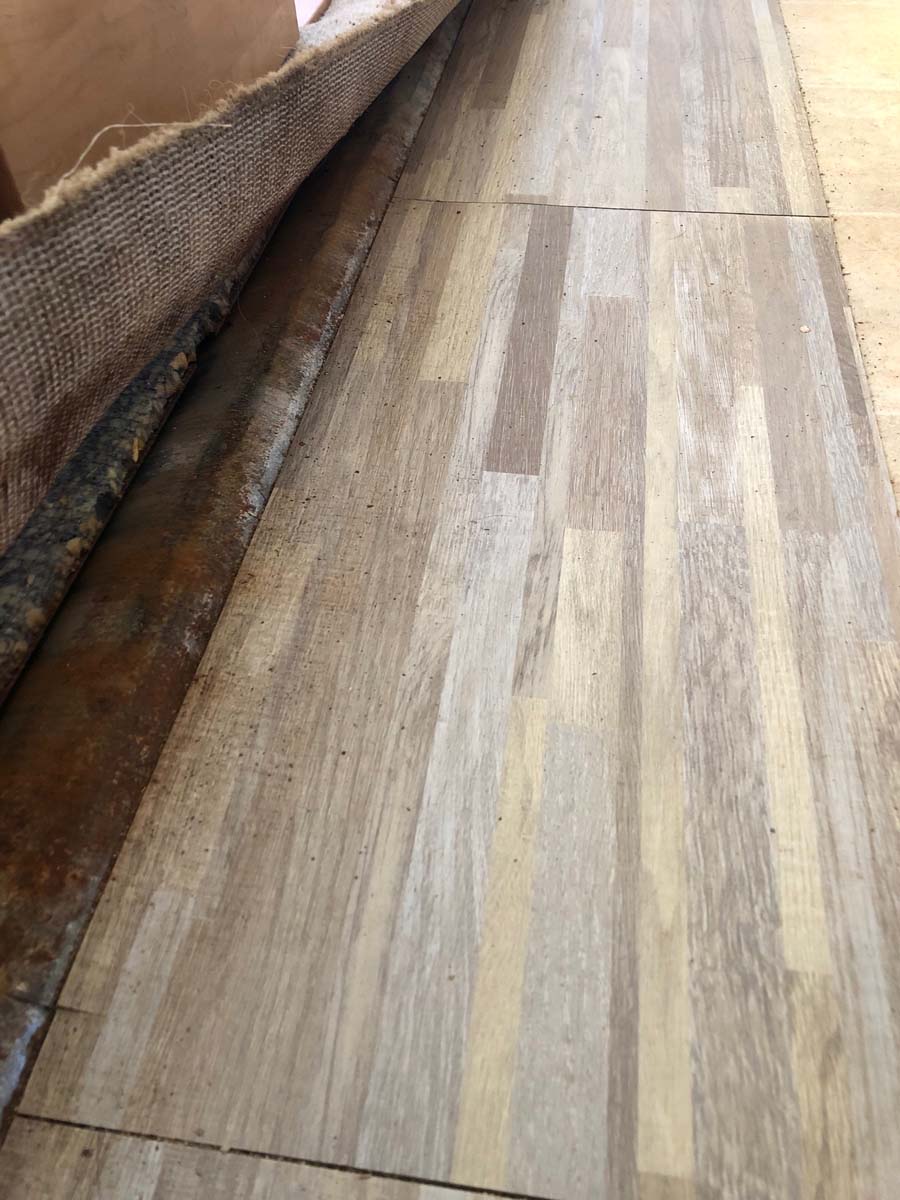
Here is the floor tile lifted. The water flowed between the floor and the tile, also under the floor decking. The whiteish haze is left over from the water flowing.

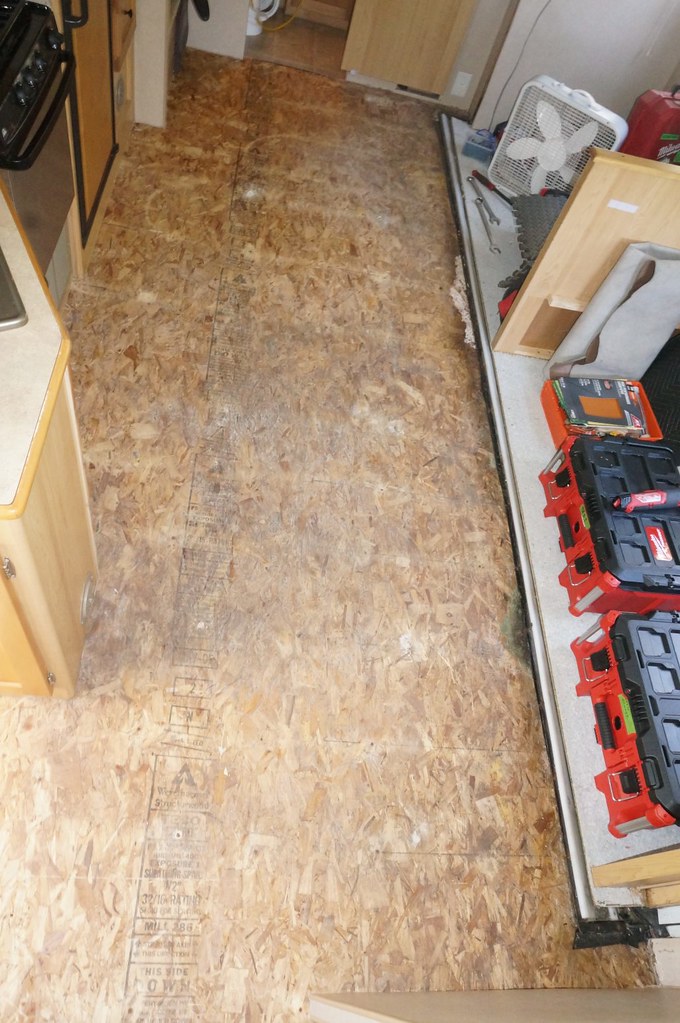
The floor was cut out in one large piece and then smaller ones under the slide trough.


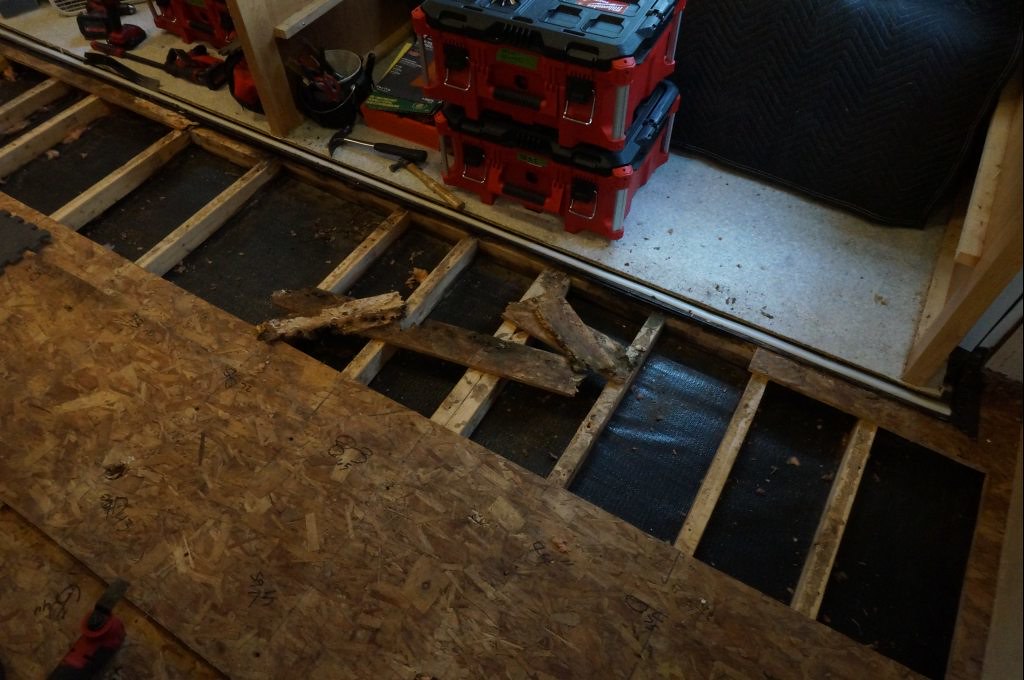
The wood by the tires was gone/rotted. It took direct hits of water seeping in that area.

All sound wood that was water stained was S1 resin treated, and any bad wood was cut out. New wood floor joist splices were installed, new decking was added in the area, the floor was smoothed over with a prep compound, and new vinyl was installed along with new carpet in the slide.


The slide drive needed an entire overhaul, including a new ball screw and clutch system, plus being adjusted correctly.
I am not saying yours is this bad; I am just showing it so you know where to look and use your moisture meter on the floor.
More to come in the next few days. I hope all this helps.
John
__________________
Current Sunlines: 2004 T310SR, 2004 T1950, 2004 T2475, 2007 T2499, 2004 T317SR
Prior Sunlines: 2004 T2499 - Fern Blue
2005 Ford F350 Lariat, 6.8L V10 W/ 4.10 rear axle, CC, Short Bed, SRW. Reese HP trunnion bar hitch W/ HP DC
Google Custom Search For Sunline Owners Club
|
|
|
|
|
01-26-2024, 02:18 PM
|
#18
|
|
Member
Join Date: Dec 2023
Location: Maine
Posts: 32
SUN #13951
|
Hi John, Thanks for the in-depth explanation on everything. If these things happened in trailers that were taken care of I can just imagine what we will find in ours. The repairs outlined in the first example of the last post would be too much for us. That's the scary part... tearing in to it will be a real commitment, one which we weren't planning for. We have some real thinking to do. It's a bit overwhelming to say the least. Maybe we should cut our losses before we get in too deep. Ugh
__________________
|
|
|
|
|
01-28-2024, 02:38 PM
|
#19
|
|
Moderator
Join Date: Nov 2006
Location: Ohio
Posts: 12,656
SUN #89
|
Hi Leslie,
I understand your concerns. When the weather cooperates, and things thaw out, inspecting the right locations with the moisture can help confirm if you have the issues shown above or not. Once you have the known info, you can better determine what to do. For both campers above, the owners found the concerns with their meter once I helped them where to go looking.
I know a lot to think about.
We are here to help as we can whenever you will get into this.
Thanks
John
__________________
Current Sunlines: 2004 T310SR, 2004 T1950, 2004 T2475, 2007 T2499, 2004 T317SR
Prior Sunlines: 2004 T2499 - Fern Blue
2005 Ford F350 Lariat, 6.8L V10 W/ 4.10 rear axle, CC, Short Bed, SRW. Reese HP trunnion bar hitch W/ HP DC
Google Custom Search For Sunline Owners Club
|
|
|
|
|
01-28-2024, 02:57 PM
|
#20
|
|
Member
Join Date: Dec 2023
Location: Maine
Posts: 32
SUN #13951
|
Very much appreciated!
__________________
__________________
|
|
|
|
|
|
Currently Active Users Viewing This Thread: 1 (0 members and 1 guests)
|
|
|
 Posting Rules
|
You may not post new threads
You may not post replies
You may not post attachments
You may not edit your posts
HTML code is Off
|
|
|
|
 » Recent Sunline Discussions
 |
|
|
|
|
|
|
|
|
|
|
|
|
|
|
|
|
|
|
|
|
|
|
|
|
|
|
|


 Linear Mode

