 |
|
 07-05-2022, 08:12 AM
|
#41
|
|
Moderator
Join Date: Nov 2006
Location: Ohio
Posts: 12,656
SUN #89
|
Hi Jim,
Wow, you found the clip on the 4th of July, you scored! Curious, did they have a brand/part number? I never bought one of those clips, it might be good to have a few on hand.
Another wheel with a questionable bearing, yup, it happens and not you know you have all sound wheels.
On the shackles, when you get time to rebuild the suspension, let talk about options for the rebuild. There are better, heavier duty parts that are available that last a lot longer.
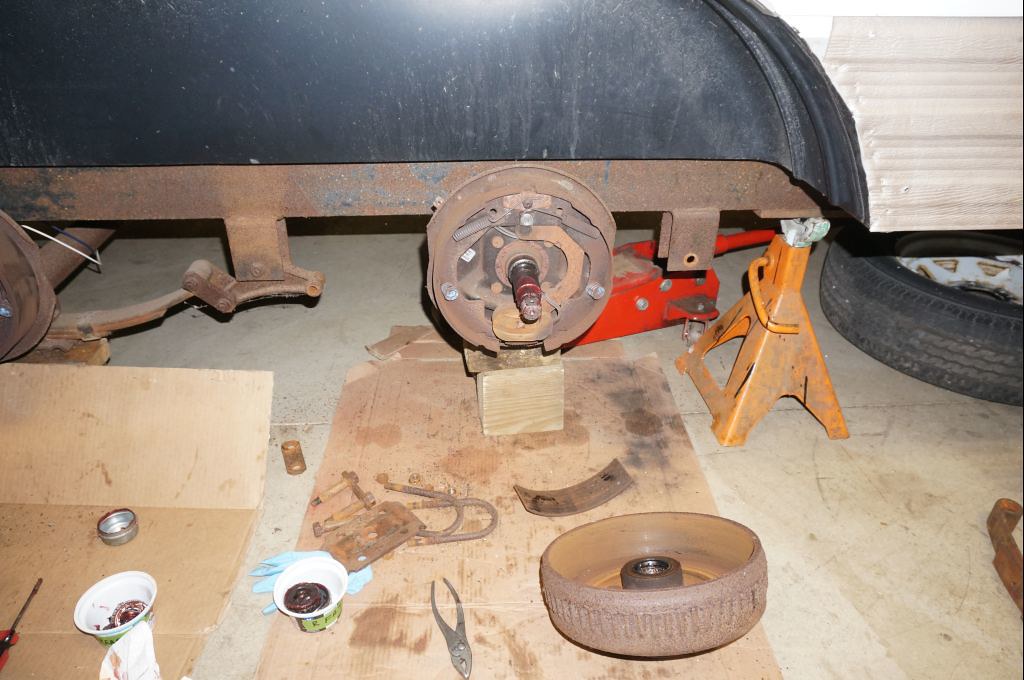
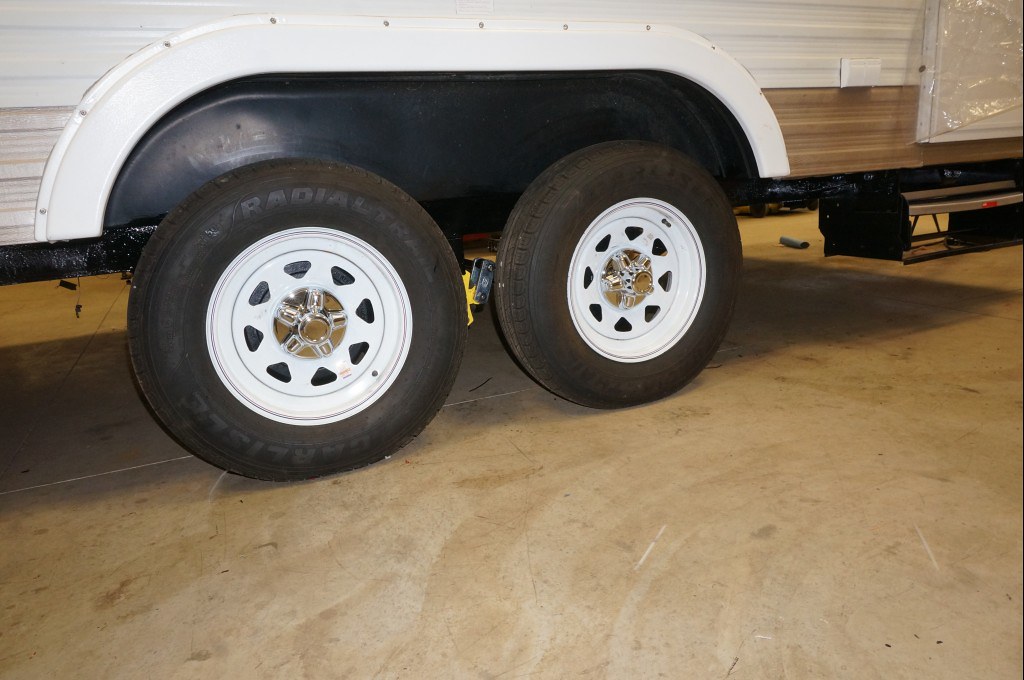
Until the rebuild time comes, here is a few quick pics that can help you now, on what to look for on worn shackle plates, and the equalizer to help at least see before they break. This is a big picture visual look and with all the wheels off, an ideal time to have a look.
The more "normal" "first parts" to fail in the suspension is the equalizer and the shackle plates. You can still tow with some wear, but there there is mega/heavy excess wear that can break while towing and you can see this if you know where to look.
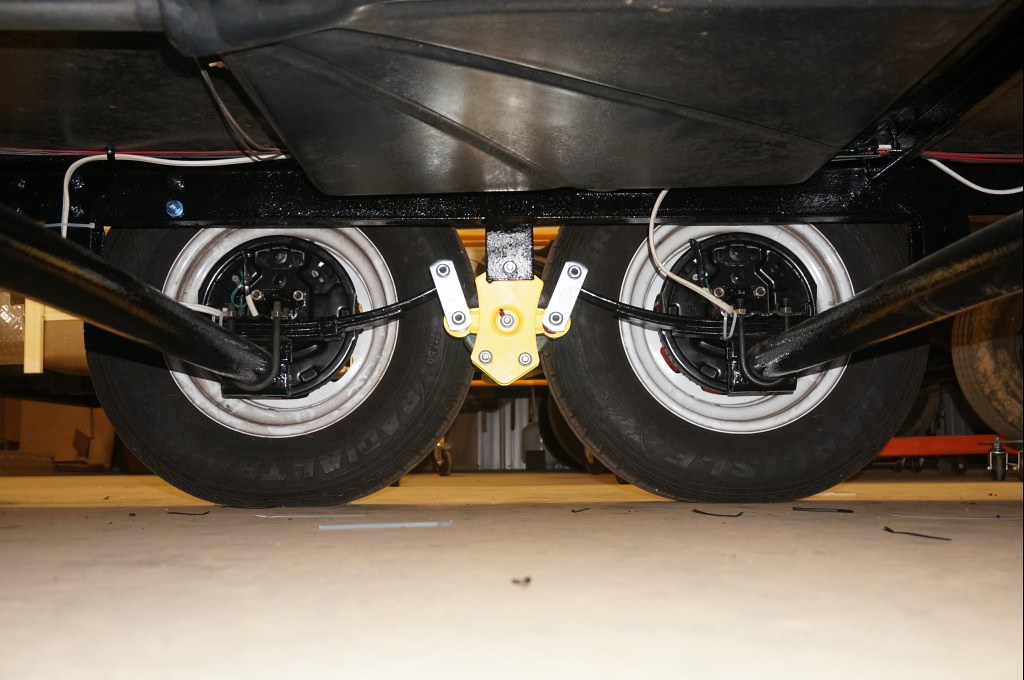
Here is the standard tandem setup. The center spring hanger holds the triangle shaped part called the equalizer. The equalizer has small plates (shackle plates) that span from the ends of the equalizer and connects to the eyes of the front and rear axle leaf springs. There are spring pins in each location.

The equalizer center pin and it's bushing, the one in the hanger, wears many times faster then the other pivot joints. The reason being, the equalizer makes most times 2 pivot motions for every 1 pivot motion of the shackle eyes or the spring eyes. More motion equals faster wear.
You can see the bottom of the white nylon bushing is gone and the pin is wearing into the equalizer casting. The bottom takes the weight of the camper pushing down on it.

The wear on this equalizer with it wearing into the casting has oblonged the hole by about 0.015 to 0.020" at the bottom. Any new bushing you put in this worn area will fail prematurely as the hole is no longer round. During a suspension rebuild, this equalizer will need to be replaced. But the equalizer at this point will not yet leave you stranded on the side of the road. There are times that wear is so bad, it creates a long slot in the casting, the slot can be 1/16" to 1/4" and when it gets that bad, it will break underway sooner rather then later. You really cannot see the 0.020" wear until you pull the suspension apart, but heavy wear in the 1/8" range, if you use a flashlight and look up and into the hanger, you can see the center bolt is slotting out the equalize badly and then it is time to deal with it before it breaks while towing.
The center bolt also wears when things get bad enough and it can slot out the hanger hole, there are knurls in the head of the spring pin/bolt to stop the rotation. Look for signs of the spring bolt hex spinning, it would leave witness lines all scratched up on the face of the hanger. Once the spring bolt starts to spin, the wear on the equalizer is going to happen a lot faster and be a lot worse. The spinning equalizer center bolt is a visual sign, the system needs a rebuild in the near future.
I have found, that once the equalizer starts to wear, the triangular shape starts to wiggle/rotate in and out of the camper due to all the wear on the center pin/equalizer hole. The center spring bolt can no longer hold the shackle plates true straight ahead with all the play in the system. And then the shackle plates start wearing even faster from all the movement. The shackle plates take a lot of side stress when the camper goes through a turn.
This is medium to heavy wear in the shackle plates, you can see all the spring pins where spinning and the holes are getting elongated.

Here is the issue in a closer view, see the excess play and the shackle plate hole being elongated.

That pic above, has medium to bad wear, it needs to be replaced for sure, but most times will not fail just yet. And with the system all assembled, you can barely see that amount of wear as the hex head of the nut or the pin head covers it all up.
When the shackle pate wear starts to double that amount, the oblong holes starts turning into a slot. If you look real close and or wiggle the suspension up and down assembly with a pry bar, with the weight off the wheels, you can find that heavy wear by all the play in the system. And you may see witness lines of the hex head of the pin scratching on the side of the shackle plate. When you find this much wear, total failure is in the near future. Left unchecked the wear will progress and break off the end of the shackle plate and the leaf spring goes flying up hitting the frame and the tire into the wheel well.
So, have a close look and also look at equalizer and shackle area, and the spring pins in the front and rear hangers for spinning pins.
Dexter recommends that the suspension be checked every 6,000 miles. But they do not state what all is involved to check it, you have to take it apart to see the wear. I have found that between 8,000 to 10,000 miles the thin nylon bushes area already worn to the point the spring pins are grinding steel on steel with the leaf springs or the equalizer started to create the beginning of the problems you see above. The camper suspension is a many times a forgotten system, along with the brakes and hub bearings. On a 30 year old camper, unless it sat for 20 years, there is some level of worn too far bushings in the suspension.
Hope this helps
John
__________________
Current Sunlines: 2004 T310SR, 2004 T1950, 2004 T2475, 2007 T2499, 2004 T317SR
Prior Sunlines: 2004 T2499 - Fern Blue
2005 Ford F350 Lariat, 6.8L V10 W/ 4.10 rear axle, CC, Short Bed, SRW. Reese HP trunnion bar hitch W/ HP DC
 Google Custom Search For Sunline Owners Club
|

|

|
|
07-05-2022, 08:16 AM
|
#42
|
|
Moderator
Join Date: Nov 2006
Location: Ohio
Posts: 12,656
SUN #89
|
Quote:
Originally Posted by JimS

Couple unrelated to topic pics for your amusement. This bridge is on our road. Our road is an old rail road bed thru the mountains. This bridge is the only way in or out.

Believe it or not, it is a state maintained rd. For the past year now they are repairing it. They are pulling up the Timbers and replacing steel beams under them. They close it during the day and we are not permitted to cross. You can drive thru the river below, if you dare. They have this walkway on site in case there is a medical emergency. They pull it across the open span. |
Holy cow... how wide is that bridge? 10 ft, 12 feet? Does it have a weight rating? Being an old rail bridge, it must of been a heavy build umpteen years ago as long is it is still maintained.
That must be an issue come winter, ice/snow?
Thanks for sharing
John
__________________
__________________
Current Sunlines: 2004 T310SR, 2004 T1950, 2004 T2475, 2007 T2499, 2004 T317SR
Prior Sunlines: 2004 T2499 - Fern Blue
2005 Ford F350 Lariat, 6.8L V10 W/ 4.10 rear axle, CC, Short Bed, SRW. Reese HP trunnion bar hitch W/ HP DC
Google Custom Search For Sunline Owners Club
|
|
|
|
|
07-05-2022, 09:08 AM
|
#43
|
|
Senior Member
Join Date: May 2022
Location: Virginia
Posts: 119
SUN #13221
|
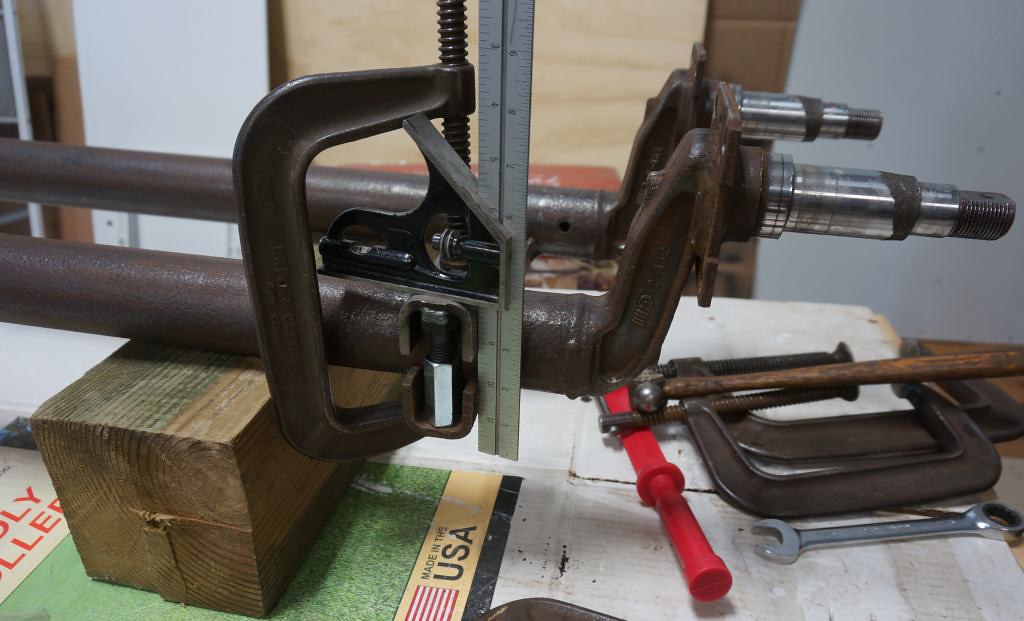
Best photos I could get of this center support bolt. I cant see in there with my eyes. The rest of the spring hardware keeps me from viewing any wear on the hole. Slid the phone in and took a few shots. From what I can tell, the bolts look close to center. Guessing its not yet close to breaking thru, hopefully safe to go aprox 5,000 miles.
F8DCBECA-E3F4-48D6-B2FC-EBC18A41A482.jpg
410E9797-C810-4239-81C9-17C6DF469727.jpg
Photos below taken sideways and looking up. This is the bolt and bushing at the very front leaf spring. Looks like the bushing is squeezing out? Two pieces sticking out with a space between that may have flaked off. Bolt looks to be centered.
E1F783E3-8E0E-4E12-B0F8-CC649095AA31.jpg
C2CA68DE-82A7-4394-847C-8CBC72FE5973.jpg
There seems to be no marred rings around the nuts/bolt heads. I think I will paint a red dot on the nuts to frame. Perhaps that will let me see if they are turning?
-Jim
__________________
|

|
|
|
07-05-2022, 12:30 PM
|
#44
|
|
Moderator
Join Date: Nov 2006
Location: Ohio
Posts: 12,656
SUN #89
|
Jim,
This is a perfect picture of the cast boss on the side of the equalizer. You get an A+ on this one! 

The nylon bushing is most likely worn through or will be after the extra 5,000 miles, but the wear has not yet made it very far into the cast boss of the equalizer.
The spring eyes at the front and rear hanger, this one

Again the nylon bushing most likely is worn through but the pin does not look very bad, yet. While the spring eye may have some wear inside from metal to metal grinding, I have not "yet" seen a spring eye yet fail from wearing through. The equalizer and shackles will wears out first. ")
Since your phone camera can see good detail that close, you can do the shackle area the same way. This is a good tool for seeing. I'll have to remember this. Thanks! 
Here is the reality of what you "most likely have" based on what I have seen. Your nylon bushings will have excess wear and be worn through most likely. There will be leaf spring pin to spring eye wear and at the equalizer on going. Basically metal to metal grinding wear. I do not see an impending failure as the wear in the normal failure areas it not in the gross stage, yet. That said, this does not mean you will not have a problem, but now you know where to look, check it each often.
Check the equalizer area at the shackles and the shackle plates.
And yes, a mark on the spring bolts to the hanger, shackle plates to see if they are spinning is a good thing to do. It gives you some more info.
This I will say, do not think you can take this apart quickly and maybe stuff some grease or something in to buy you some time. The day you take the suspension apart, have all new parts on hand that day. Odds are high out of the 14 spring pins you have, several may gall all up taking them apart making them not usable, oe they are worn enough they need replacing anyway. The equalizer will be worn and the shackles most likely needing replacing. And after adding 5,000 more miles, you will need all new bushings and new pins, the metal to metal grinding will wear them.
The one bad part, the leaf spring eyes are going to take some additional wear during this travel period with the metal to metal grinding. That wear is not reversible short of adding shim stock to hold you over until the day new springs come. And this is really no different then many of the campers on the road today once they reach 10K miles. It is a common problem and goes un-noticed.
We have one member, Todd Osier trying to build up the spring eyes with epoxy and or sleeves, I'm not sure the tests are over yet if they are successful. He goes cross country sometimes in the summer and is a good test case.
As to spraying in some lube oil in the joints, this is a debated topic. One side says , the lube will attract dirt in the joints, the other side will say, it has dirt now, if the lube slows down any wear, it has to be some level better then no lube. You pick which side of the debate you want to be on based on the dust etc. you travel in. I myself have done the squirt lube for a year or so, I have no data to prove what wear it slowed down, in my area I did not see any worse dirt accumulation. It made me feel better and stopped a squeak. I have no good idea if it did any better then not doing it.
Hope this helps
John
__________________
Current Sunlines: 2004 T310SR, 2004 T1950, 2004 T2475, 2007 T2499, 2004 T317SR
Prior Sunlines: 2004 T2499 - Fern Blue
2005 Ford F350 Lariat, 6.8L V10 W/ 4.10 rear axle, CC, Short Bed, SRW. Reese HP trunnion bar hitch W/ HP DC
Google Custom Search For Sunline Owners Club
|
|
|
|
|
07-05-2022, 02:43 PM
|
#45
|
|
Senior Member
Join Date: May 2022
Location: Virginia
Posts: 119
SUN #13221
|
Oh boy
next issue!! 😟
My wife asks do I have you on sped dial? !!! 😀
I need to back up and go over some things before I get into whats wrong now.
So, ever since you said that I might have #3500 axles, and that seems to be the case with bearings and brake drums, this idea has been going thru my head. Then you mention about the suspension being reworked. I knew before hand that it would be a large job. Probably a lot of parts to be replaced. ( the way you mention its not a quick repair. I think your afraid I might just tear into it , especially the way Ive been going at it lately!!!!! Dont worry!!!! 😉 .
One reason I got the camper was for work (outdoor shows).. My idea was to load up my van with my product and gear, and I wanted the trailer to accommodate some back up product and a place to bunk while at the shows. Wanted double axles for carrying more weight, but as short as possible for ease of parking in the city environment. Not easy to find short double axle campers! Not like the toy haulers they make now. I had been looking for a number of years, and it seemed like the scenario was steering me towards a gutted camper that somebody was selling or building one from scratch. Then this one came along, just a little bit more money, but low and behold everything was inside, and it all works. Some minor issues but it was all there. Too nice to gut, the wife likes it as is, so its a win.
So whats the question? I am wondering if it is possible to put #3500 springs/suspension on this?
I do understand that there is a lot to this, and I was going to wait and figure this out over the next several months.
So whats the problem? In repacking the bearings, looking at the suspension, adjusting brakes,
.has me looking at areas I have not yet looked at. Thats a good thing 😉 . I discovered the wheel well has a spot wore thru. Good grief!!!! But it makes sense, I should have been checking on this sooner. The prior owner had put 15 tires and rims on it. Apparently he got a deal somewhere, all brand new. They fit, via close, but never rubbed that I could see or hear. But yes they did, at the the very top. See picture in next post.
So, need to fix this.
And Im wondering do I need to go to the smaller tires, mainly because I could never upgrade to a heavier suspension. Im guessing it would cost $100+/- for each tire, times five(a spare). Instead of spending that on smaller tires, just put it towards new suspension.
Where to go from here
?
- Jim
__________________
|
|
|
|
|
07-05-2022, 02:53 PM
|
#46
|
|
Senior Member
Join Date: May 2022
Location: Virginia
Posts: 119
SUN #13221
|
Pic is from outside looking up into wheel well.
9CE370B8-4060-494B-AD94-BF4F7E1F94E2.jpg
Pic is wheel well access from inside.
DBDDB887-B10B-45EA-B518-122C4621BD7C.jpg
I am thinking about a patch on this to seal up the hole. Possibly a bit of thin metal sheeting, then covered up with the roofing tape to make waterproof. Not sure if I could also put something on the exterior/underside. It would have to be pretty durable to occasional rubbing.
__________________
|
|
|
|
|
07-05-2022, 06:23 PM
|
#47
|
|
Senior Member
Join Date: May 2022
Location: Virginia
Posts: 119
SUN #13221
|
My research so far shows that by upgrading to #3500 springs only lifts the wheel 1/16. Thats not going to help in this scenario.
Putting the axle under the spring give me about 3+/- but thats to intense of a project to tackle on a short time frame.
Buying 14 tires with rims look like the only choice, unless somebody can come up with a unique idea
- Jim
__________________
|
|
|
|
|
07-05-2022, 10:02 PM
|
#48
|
|
Moderator
Join Date: Nov 2006
Location: Ohio
Posts: 12,656
SUN #89
|
Hi Jim,
A few thoughts to pass along. To start with, from our files section, the 93 brochure specs for a 1993 T1740 lists the camper has a GVWR of 5,000# and the empty weight with no LP gas in the tank, no battery, no cargo and no added options shows the camper has a dry weight of approx. 2,475#. Which could mean that there is 2,525# of cargo capacity. BUT, that is brochure weights, not actual weights. The only real way to know, take the camper to a scale and weigh it.
Before going to the scales, put your "must have" things in the camper, the must have is what you have to have to sleep, and eat/live in the camper. And this includes camping gear, blocks to level out the camper (the fridge needs to be level to run) fresh water hose, dump hose etc. you name it. Then weigh it and what is left, you can add extra work gear to the camper before reaching the 5,000# max rating.
We need to do some measuring of the leaf springs. While Sunline put a 5,000# GVWR max rating on the camper, they may have installed 3,500# per axle springs from day one. They have done this before. The de-rated value may be some other weak link in the system, like the main frame rails, or the A frame at the front and not the springs.
Lets get back to increasing the springs later, but in the mean time let see if we can back into what you have now. Using your caliper, measure the spring leaf thickness (the main leaf is OK) and tell me how many leaf's. Take a pic of the total spring pack too.
Next it the 15" tires, what is the actual tire that is on the camper now? ST205/75R15 load range C? Tell me all the number, letters, load range and the brand.
Using the Carlise high speed HD radial tire chart, this one., https://www.carlislebrandtires.com/o...dial-trail-hd/
The 14" tires have an OD of 26.14"
The 15" tires have an OD of 27.15" in the 205 section width. Not the 225's they are a very different 15" tire
Basically, the 15" 205 width tire is 1" larger in OD then the 14". This is 1/2" difference at the fender well.
This pic of your, I agree this is a recent fresh hole.

And I can see 2 different rub marks, the hole and then the scuff on the rib more towards the camper.
The pic does not show where that rub hole is located in relation to the center of the tire. Can you post a pic of the rub marks in relation to the center of the tire or axle?
That rub mark does not look like a tire burn through rub. But if it lines up dead center of the axle straight up, then maybe.
Next topic, fender wheel well clearance. Do you by chance have a dimension from the OD of the 15" tire at the wheel center up to the inside bottom of the wheel well? (With the camper on the ground and the trailer weight on it) A side pic showing the wheel well clearance also would help.
Changing from 14" tires to 15" tires did change the wheel well bump clearance by 1/2" that is a fact.
Need a little more info to make sure the tire actually created that rub through.
Also, what tire location is it? Left side = driver side, right side = passenger. Front wheel is the one closest to the front of the camper, rear wheel is the one closest to the rear/back of the camper.
Was the camper towed level, nose high or nose low?
Sunline created a lot of low riding campers with lower then standard industry wheel well clearances, but towing low or high nose attitude can change the fender clearance that one set of wheels can be closer to the fender. Exp, towing nose high, the rear tires "may" closer to the fender wheel then when level.
Hope this helps
John
__________________
Current Sunlines: 2004 T310SR, 2004 T1950, 2004 T2475, 2007 T2499, 2004 T317SR
Prior Sunlines: 2004 T2499 - Fern Blue
2005 Ford F350 Lariat, 6.8L V10 W/ 4.10 rear axle, CC, Short Bed, SRW. Reese HP trunnion bar hitch W/ HP DC
Google Custom Search For Sunline Owners Club
|
|
|
|
|
07-06-2022, 05:31 AM
|
#49
|
|
Senior Member
Join Date: May 2022
Location: Virginia
Posts: 119
SUN #13221
|
Hello John,
The rub thru spot is on the left front tire. When I was laying on the ground adjusting the brakes, looking up, I noticed rub spots on the right side wheel well. That caught my attention, so checked the left side and found the break thru. Seems all four wheels have at least some rubbing, some worse than others. I will get back to you on the amounts and where when I get back to it.
Ironically, the last time I went to a show(work) with the camper, I had it weighed. It came in at #3620. I was shocked that it was that low. I forgot about that until now when I went to get the paper work to give you the numbers. Perhaps that’s why I started to forget about the need to beef up capacity. Granted, I would like to add more weight into camper, but at the time wasn’t wanting to overload it. So, I will probably go thru the load and weigh cycle a few more times to get a real good idea of the maximum weight numbers. I do know that the van is very heavy loaded, and would like to distribute a little bit from that into the camper. Overall, I don’t see the total combined weight of van and camper going up much, because I do get that feeling from the engine working that I don’t want to make it work harder than it is now.
The springs are 23.25” from center hole to hole. 3 leafs. Thickness is .341, probably on the high side because of paint and rust.
I’m going to hook up the camper today to test the brakes. I will try to get a precise angle of the towing level. I’ve noticed this does change a bit from from use to the other. Whether the van is loaded and low for work, or uphigher when we are just camping.
As far as patching the wheel well: from the top/inside I plan to use the Eternabond tape unless I’m told that’s not good. I am not going to use the Eternaprime because the wheel well may be a type of PVC, and the primer warns of not using it on PVC . The underside I’m a bit of a loss. Perhaps a layer of the Eternaprime tape? Cover that with a underbody spray? I don’t want to build out from there and create less clearance.
The other pics and answers to questions I’ll get back to you thru the day. Just found out the rain is keeping the bridge open today, so I can go out for parts if needed.
- Jim
__________________
|
|
|
|
|
07-06-2022, 07:27 AM
|
#50
|
|
Senior Member
Join Date: May 2022
Location: Virginia
Posts: 119
SUN #13221
|
__________________
|
|
|
|
|
07-06-2022, 07:41 AM
|
#51
|
|
Senior Member
Join Date: May 2022
Location: Virginia
Posts: 119
SUN #13221
|
Yellow tags are placed where rubbing is happening. Left side wheel well. The tag is marked where the rub is at each tire: inside or outside refers to the area its rubbing on in the wheel well.
Left side front wheel. Averages of the two look to me just behind center. This one is where its broke thru the plastic wheel well, on the outside rib area.
77F91E03-71A4-4ACA-9217-59C0855C0245.jpg
Left side rear wheel. Averages of the two appear to be directly over center. Very light rub mark on this wheel.
EFC88372-6553-42D2-91F9-CEF83AEA480B.jpg
The right side wheels Ill get to next time wheels are off.
__________________
|
|
|
|
|
07-06-2022, 08:04 AM
|
#52
|
|
Senior Member
Join Date: May 2022
Location: Virginia
Posts: 119
SUN #13221
|
This is how close the side of the tires are to the drop down lip to wheel well. This is a normal space. Depending on weight in camper, road angles, and torquing of wheels in turns, they get closer/further.
AD6F8A29-61B3-4420-AE4A-594AEAEE4533.jpg
Space of area above the where the wheel broke thru wheel well.
AE6DDE53-2FD6-4236-B467-1B06B40AA08D.jpg
Same space as above with block fit into it for measuring.
380CC642-4DA0-446A-BB18-3DE20AAB679B.jpg
This one is the left rear wheel. More space above it, less rubbing.
1E262F45-A392-4A57-9709-2156DB406202.jpg
The right side wheel well is exactly opposite. The block fits snug on the right rear wheel, and with extra room on the right front tire.
The camper is set down with weight on all four tires Camper is leveled from front to back with jack stand. Could the variations be due to unlevel ground its sitting on(gravel driveway with a twist?). It would be interesting to setup on perfectly level ground with camper leveled out and see if its the same.
__________________
|
|
|
|
|
07-06-2022, 08:51 AM
|
#53
|
|
Moderator
Join Date: Nov 2006
Location: Ohio
Posts: 12,656
SUN #89
|
Quote:
Originally Posted by JimS
snip..
As far as patching the wheel well: from the top/inside I plan to use the Eternabond tape unless I’m told that’s not good. I am not going to use the Eternaprime because the wheel well may be a type of PVC, and the primer warns of not using it on PVC . The underside I’m a bit of a loss. Perhaps a layer of the Eternaprime tape? Cover that with a underbody spray? I don’t want to build out from there and create less clearance.
|
Hi Jim,
Well, with your good investigation work, and the yellow markers for rub spot, it for sure looks like your have wheel rub on the fenders.
I have to dig up some info on the springs to see if I can back into a rating. I'll do that later but wanted to get this to you now.
On the fender repair, the wheel well is ABS plastic. And, I have used Eternabond before to patch small holes, about the size of yours.
Clean the inside well, do a final wipe with Naphtha or denatured alcohol to get any cleaning film off. You can use the Eternaprime, I have not when I was able to get the plastic very clean, but it's your call as you can see what you have.
I did use the Eternabond on both the inside and outside. The Eternabond will seal off the leak potential, there is very little mechanical strength in the patch area, but again the plastic is not that abusive proof either. If you want to add a small level of more outside abuse proofing, if you have aluminum foil HVAC tape, (the good foil tape, not the Whimpey tape) you can put some of that on only the white outside top layer of the Eternabond. It's not going to add a lot of strength, but will a little.
See here on a fender repair during a camper restoration. A 2005 T2363 Sunline. In this case, Sunline did the fender damage the day the camper was made, when they routed out the siding cut out, the cutter clipped the fender well.


And the fenders on the camper and frame.

This camper, has ST205/75R15 tires on it with the 3,500# axles and is rated at 5,000# GVWR.
BUT, this 2005 has a 6" I beam frame, that is different then yours.
Now lets look at my 2004 T1950 project camper, it has 3,500# axles, and in may case, 3,500# springs, with ST205/75R15 tires on it from Sunline, but it has a 4" tall channel iron frame.
This was a low rider from day 1. Here is the camper before I started to restore it
Fenders off

Not a lot of bump clearance. But this never had any hit marks in the wheel wells. More on this in a moment.

The frame setup during restoration.


Leaf spring set

I did the axle over/under conversion. They nick name this, axle flip, you really do not flip the axle, move it from under the spring to over the spring with a kit from Dexter. You add a new axle seat.
For more on the flip, see here https://www.sunlineclub.com/forums/f...tml#post155090
I did finish that camper, just never made it to finishing the post.
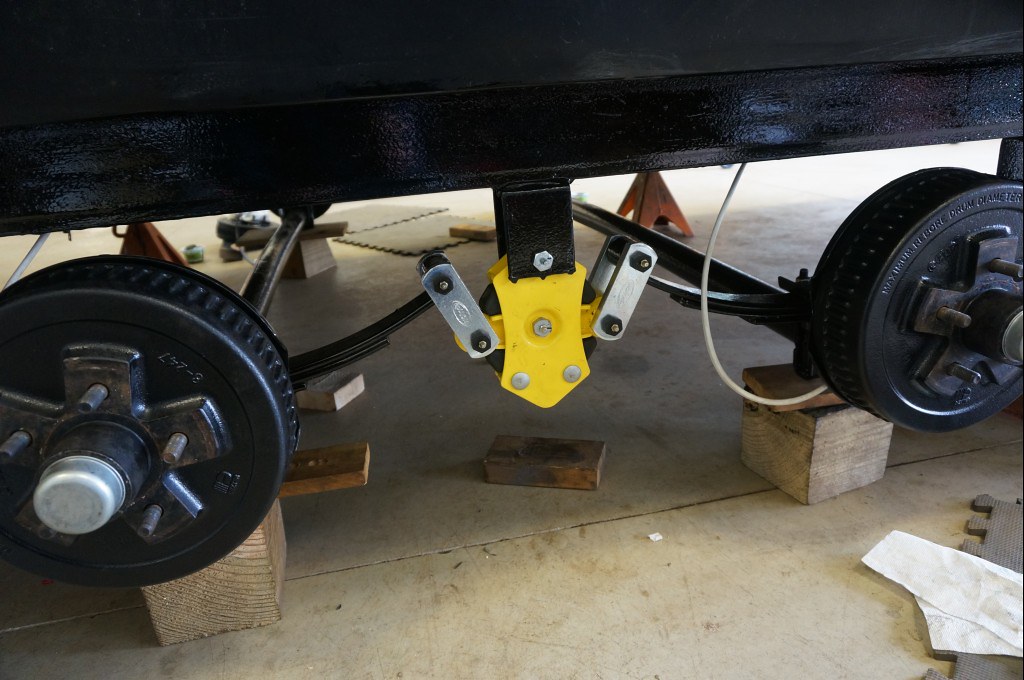
Here is the lift installed, rebuilt with greaseable bronze spring bushings, heavy duty shackles, road armor equalizer and new wheels.

I noticed your frame is made different. Same 5,000# GVWR rating. You have an added reinforcement welded onto the bottom of the frame, then the hangers welded to the reinforcement. This method was used years ago, in your case not sure if it was a part of more tire clearance or not.

Is your main frame 4" channel iron? Or 3"
Also, what is the dimension of the plastic fender well where it touches the frame up to the top inside, I wonder if they increased the fender well on mine.
More in the next note.
__________________
Current Sunlines: 2004 T310SR, 2004 T1950, 2004 T2475, 2007 T2499, 2004 T317SR
Prior Sunlines: 2004 T2499 - Fern Blue
2005 Ford F350 Lariat, 6.8L V10 W/ 4.10 rear axle, CC, Short Bed, SRW. Reese HP trunnion bar hitch W/ HP DC
Google Custom Search For Sunline Owners Club
|
|
|
|
|
07-06-2022, 09:10 AM
|
#54
|
|
Moderator
Join Date: Nov 2006
Location: Ohio
Posts: 12,656
SUN #89
|
You were typing when I was typing.
This is a problem...

I measured the clearance I had on mine before I did the lift on my T1950. I have to hunt them up, I know it was less then 2" but it was for sure more then 1".
By the way, the Dexter recommendation for tire rub clearance is 3". Sunline never really adhered to that. And I know less then 3" will work pending the size of the camper and the springs etc.
It would be good to figure out what Sunline changed when they started to go to 15" tires on the 5,000# GVWR class campers. I know 2005 was a frame redesign year to 6", but my 2004 has the 4" frame and they went to 15" tires there.
Something is very different on yours.
I have/had this on 15" tires
You have this on 15" tires
OK, I'm thinking on this what to do, semi quickly, to gain more fender height.
Ideally you being on 15" tires is a good thing. As far as cost, 5 new 14" wheels (including a spare) and then 5 new 14" tires is way more expensive then the over under kit. and dealing with the entry step and hitch setup to level out the camper when towing. Time, though is an issue, maybe.
I do not know how much time you have, doing "only" the over under kit and not dealing with the worn suspension is not that bad, 1 to 2 days after you have the parts you could be lifted pending what you have in tools to break off or grind off the old U bolts. And you have to possibly deal with a new hitch draw bar if you cannot adjust it for the new ride height. That and an entry step.
Are you using a weight distributing hitch or just towing on the ball with a weight carrying draw bar?
I'm thinking, will be back with something. There is an option in the shackles to gain a level of ride height, I'll see how much.
Hope this helps
John
__________________
Current Sunlines: 2004 T310SR, 2004 T1950, 2004 T2475, 2007 T2499, 2004 T317SR
Prior Sunlines: 2004 T2499 - Fern Blue
2005 Ford F350 Lariat, 6.8L V10 W/ 4.10 rear axle, CC, Short Bed, SRW. Reese HP trunnion bar hitch W/ HP DC
Google Custom Search For Sunline Owners Club
|
|
|
|
|
07-06-2022, 10:54 AM
|
#55
|
|
Senior Member
Join Date: May 2022
Location: Virginia
Posts: 119
SUN #13221
|
Frame size pic. The red dots are paint to see if the bolts are turning.
3CFF5B5F-794A-4C06-B310-A29861036AEB.jpg
I ordered tires. Hopefully I get them in time! My backs up against the wall. It isnt going to do much, but it will give a little more space. And if it helps, itll buy me time to do a good job on a proper fix. I leave Tuesday for a week. Back home a week, gone again for three weeks. Home a week. Gone for four weeks. Then back home and back out again on shorter stints till December.
I really like the looks of what you did with the heavy duty lift with greasable fittings. I might just want to go that route. I like doing things a bit better than needs be. We all like things to cost less, but there is a price to being cheap. A phrase I use in my work is good art isnt cheap, and cheap art isnt good.
The only springs I could find with 23 1/8 spacing is at Etrailer.com, and they are rated for #3500. Nothing that size for #2500, so maybe I have #3500 springs. Again, not that I want to haul that heavy, but I dont like skirting on being overloaded. Better safe than sorry.
So its looking more and more like moving the axle may be the better solution. Perhaps youll come up with something else.
Im thinking about painting the areas in the wheel well that are rubbing. That way Ill know if its new wear marks.
Its crossed my mind a few times if I could add a dome of some sort over the wear areas, inside the camper. Seal it off so to speak. Raise the wheel well in a goofy kind of idea. I think theres room inside to do that to all tires. But, to what end. Just so I keep the trailer 4 lower
?
Could the trailer be rocking sideway while traveling? Ive thought about this, cuz the outside rub marks are worse than the inside ones. Could rocking sideways be indicative of some other problem?
I dont use any stabilization bars. I keep a close on this while driving. Ive had a few trailers do this, so I know what its like. The camper has always towed nicely. I am very careful in weight distribution inside too.
__________________
|
|
|
|
|
07-07-2022, 12:57 PM
|
#57
|
|
Senior Member
Join Date: May 2022
Location: Virginia
Posts: 119
SUN #13221
|
Quote:
Originally Posted by JohnB
Hi Jim,
Also, what is the dimension of the plastic fender well where it touches the frame up to the top inside, I wonder if they increased the fender well on mine.
|
Is this the measurement your interested in? If I could find a wheel well that is higher but the same in the other dimensions, that may do it. I think Id have to cut the siding higher if there was such a thing.
E2EDBE36-C50F-4770-AFB8-82E15FF8EEF3.jpg
__________________
|
|
|
|
|
07-07-2022, 06:49 PM
|
#58
|
|
Moderator
Join Date: Nov 2006
Location: Ohio
Posts: 12,656
SUN #89
|
Hi Jim,
You asked several questions earlier and I missed them, so hear are some answers.
Quote:
Originally Posted by JimS
Could the trailer be rocking sideway while traveling? Ive thought about this, cuz the outside rub marks are worse than the inside ones. Could rocking sideways be indicative of some other problem?
I dont use any stabilization bars. I keep a close on this while driving. Ive had a few trailers do this, so I know what its like. The camper has always towed nicely. I am very careful in weight distribution inside too.
|
The trailer rocking sideways comment, yes this does happen, and a lot pending the roughness and angle (tip sideways) of the road. The camper has different weights on the left and right side due to where cargo is stored as there are cabinets there and the way the camper is built. Sunline did a good of trying to even out the left to right weight of the camper and floor plan, but the reality, people load the camper where there is space to put things. And the fact that later comes, not all 4 wheels have equal weights. While not impossible to have close to equal weights on all 4 wheels, it is more common that there is a heavier side and a lighter side of the camper. Depending on how big a difference that is, and how heavy that is compared to the spring ratings, it may rock more one side then the other beyond the always there rocking.
And then there is the standard RV suspension setup. There are no shock absorbers, no rubber cushioned equalizer as standard on many leaf spring suspension campers. I added these upgrades along with others on our big camper (T310SR) that we use all the time. Adding shock absorbers had a significant reduction in camper oscillations both left to right, and fore and aft after going over most any size bump in the road. A small bump going 55 mph over would set off the camper into a up and down fore and aft sinusoidal motion of 6 full up and down cycles before the trailer tamed itself back down. That is 6 large flexing motions of the camper frame, siding everything, for any kind of bump. The amplitude of up and down increased when the bumps where larger. Once I went to adding quality Monroe gas shocks on all 4 wheel locations, that 6 oscillations went down to 1. It was truly, "shocking" to see it that drastically reduced.
The rubber equalizer helps take the heavy "jolt" out into the camper frame etc. when you hit a bump. Both shocks and the rubber equalizer do different things.
Next topic
OK, with your size camper, matched to your size truck (van) you do not use a weight distributing hitch. You watch the weight and balance in the camper. You tow in a weight carrying hitch setup. This pic of your camper and van is a good one.
In this case, this is the van heaver loaded setup.

Your van looks like a 2500 or a 3500 Chevy full size van, not sure what year. Is that correct?
Those kind of vans make very good tow vehicles. They have a long wheel base compared the the rear overhang of the tow ball (rear overhang = distance from the tow ball center to the center of the rear axle. )
Your van setup is good as the the truck is more stable with the short rear overhang verses truck WB against trailer sway naturally. And the trailer length is close to the length of the truck, another good advantage. The heavier truck suspension has the ability to handle the trailer higher tongue weight in a weight carrying mode. Not every truck has to have a weight distribution hitch, and in your case, as long as you do not overload things, your setup can do well without a WD hitch. If ever needed, you can add a friction anti-sway bar to a standard weight carrying hitch.
A few things to check on your part, you will in time need to weigh the camper "loaded" tongue weight. Shoot for the heaviest loaded up front of the camper you do. That tongue weight could approach 600 to 750# tongue weight if you loaded the camper to the full 5,000#. (and get the camper gross weight also)
Look at the sticker ratings on your ball mount(draw bar) you use and make sure it is rated for that max tongue weight you measured. Many of the 2" hollow tube ball mounts stop at 500# max tongue weight. They do sell solid ones that will go higher.
And check on the van, the truck receiver can handle the max loaded camper tongue weight in "weight carrying" mode. It will have 2 ratings if it the GM OEM receiver. One for weight carrying, and one for weight distributing.
You might not be at those hitch limits now, but as you go up in camper weight, you might get closer or over. The only way to know, is weight it.
While we are on the topic weight distribution hitches, if some day you end up with a different tow vehicle and you want to add a weight distribution hitch, lets talk about this first. This pic says a lot about your camper main frame which is 3" channel iron I believe. You can confirm.

If the main frame is 3", odds are higher the A frame rails up front to the ball coupler are 3" also, are they?
Point in all this, having seen enough camper frames bend and fail, if you add too large a weight distributing hitch, you can bend the frame header or the A frame rails of the camper just towing around and turn. By you towing on the ball in a weight carrying setup, there are none of the issues the WD hitch can create on such a light trailer A frame. They do make small WD hitches, but folks sometimes get good deals on used 1,000# or higher WD hitches and just start using them on a too small a camper frame. Let's talk if that day ever comes and you need to use a WD on this camper you have.
OK more in the next replay on different topics.
__________________
Current Sunlines: 2004 T310SR, 2004 T1950, 2004 T2475, 2007 T2499, 2004 T317SR
Prior Sunlines: 2004 T2499 - Fern Blue
2005 Ford F350 Lariat, 6.8L V10 W/ 4.10 rear axle, CC, Short Bed, SRW. Reese HP trunnion bar hitch W/ HP DC
Google Custom Search For Sunline Owners Club
|
|
|
|
|
07-07-2022, 10:26 PM
|
#59
|
|
Moderator
Join Date: Nov 2006
Location: Ohio
Posts: 12,656
SUN #89
|
Hi Jim,
Some more on the what size springs do you have?
You said this:
Quote:
Originally Posted by JimS
Ironically, the last time I went to a show(work) with the camper, I had it weighed. It came in at #3620. I was shocked that it was that low. I forgot about that until now when I went to get the paper work to give you the numbers. Perhaps thats why I started to forget about the need to beef up capacity. Granted, I would like to add more weight into camper, but at the time wasnt wanting to overload it. So, I will probably go thru the load and weigh cycle a few more times to get a real good idea of the maximum weight numbers. I do know that the van is very heavy loaded, and would like to distribute a little bit from that into the camper. Overall, I dont see the total combined weight of van and camper going up much, because I do get that feeling from the engine working that I dont want to make it work harder than it is now.
The springs are 23.25 from center hole to hole. 3 leafs. Thickness is .341, probably on the high side because of paint and rust.
|
And this one:
Quote:
Originally Posted by JimS
Frame size pic. The red dots are paint to see if the bolts are turning.
I ordered tires. Hopefully I get them in time! My backs up against the wall. It isnt going to do much, but it will give a little more space. And if it helps, itll buy me time to do a good job on a proper fix. I leave Tuesday for a week. Back home a week, gone again for three weeks. Home a week. Gone for four weeks. Then back home and back out again on shorter stints till December.
I really like the looks of what you did with the heavy duty lift with greasable fittings. I might just want to go that route. I like doing things a bit better than needs be. We all like things to cost less, but there is a price to being cheap. A phrase I use in my work is good art isnt cheap, and cheap art isnt good.
The only springs I could find with 23 1/8 spacing is at Etrailer.com, and they are rated for #3500. Nothing that size for #2500, so maybe I have #3500 springs. Again, not that I want to haul that heavy, but I dont like skirting on being overloaded. Better safe than sorry.
So its looking more and more like moving the axle may be the better solution. Perhaps youll come up with something else.
|
And then these 2 very good pics of yours:

I added a file tonight to our FILES section under Axles and Running Gear. This is spring chart from Dexter Axle which shows certain data on some the spring packs they offer. See here when logged in. https://www.sunlineclub.com/forums/d...o=file&id=5643
In my case, I have three Sunline project campers which use the same tire size, ST205/75R15 load range C on Dexter 3,500# axles with Dexter springs.
The three campers are:
2007 T2499 with a GVWR of 7,000#
2004 T1950 with a GWR of 5,500#
2004 T2475 with a GVWR of 5,500#
I found the axle tag on the 2004 T1950 and called Dexter if they can tell me the ratings and the "unloaded" arch height and spring eye to eye length to tell if these springs I had, were getting weak and flattened.
The chart I linked above lists the Dexter part numbers, the leaf pack total thickness, the fully loaded arch height, and the fully loaded eye to eye dimension. This was during Covid and everyone was working remotely so they could not transfer me to engineering as they had in the past when everyone was in the office, but they sent me that sheet and confirmed I had 1,750# spring packs.
My number on the tag was, 7209 that aligns with spring pack PN 072-009-00. It lists the total stack of 3 springs is 1.08" thick, (0.360" each spring) with a fully loaded arch height of 2.5" and a fully loaded eye to eye distance of 24".
Sunline installed heavier then needed, tires, axles and springs in both of the 5,500# GVWR campers. I measured the springs on all three is my campers and they come out as 0.360 - 0.365" thick per leaf
I still do not know what a new "unloaded" main leaf spring eye to eye is or the arch height. Sadly that info is helpful to someone trying to figure out if their springs are fatigued and need to be replaced as they are flatten out beyond spec.
When you went looking at E trailer for 23 1/8" springs, was that an unloaded eye to eye distance, or a partly loaded distance? Spring length can affect the load characteristics, I do not think they rate the load capacity by length, it is by thickness, arch height and eye to eye distance.
My springs are refereed to as 24" springs, it seems they use the fully loaded distance as the nominal eye to eye size.
Unloaded:
23 1/8" eye to eye
3.114" arch height
0.354" single leaf thickness (main leaf)
1.077" all three leaves combined.
The blue text is the corrected values for my 2004 T1950 springs. 7-8-2022 edit
The red, is not correct and was posted in error.
They measured 23 11/6" in the unloaded out on the bench length with a 3 3/16" unloaded arch height.
Your springs "might' be these based on the leaf thickness of 0.341" you measured x 3 leaves = 1.023" stack height.
Spring PN 072-023-00 which has a stack height of 1.04". 1.04/3 = 0.347" thick leaves. With tolerances, you measured 0.341 per leaf. That is only 0.006" off the nominal, it could be that spring.
This would mean yours "might" be 1,500# rated springs, but it would then mean you have a 26" eye to eye distance at full capacity with an arch height of 1.75". While the 1,500# seems to be OK, the 26" fully loaded length seems long when you where getting 23 1/8".
It may be that back in 1993, Dexter had different spring rates and sizes compared to the chart I linked. At this point, I'm not sure what you have. If you call Dexter direct, and tell them the leaf thickness, the arch height and the eye to eye at least unloaded, and the date of the camper, they may be able to confirm what you have. If you do, please let us know. If by any chance there is a tag on the springs, tell them that info.
At this point, seeing your 3" channel iron frame, if Sunline declared the GVWR at 5,000#, the axles and springs are not the limiting factor, I feel the frame is. You should be able to load the camper up to the 5,000# GVWR (total weight of the camper including tongue weight) but suggest not to go over. That frame may not be happy with more weight then the rated value. The 14" tires you have ordered, if they are load range C, is 1,740# per tire or 7,040# for the whole camper. They are well sized with extra capacity.
And in case you did not know, air up the tires to max cold side wall inflation when towing, which is 50psi of LR C. Trailer tires need all the capacity they can to hold up in the tandem axle setup to help ward off interply shear. And use the recommendation of changing ST trailer tires ever 5 years regardless of thread.
I'll do the fender wheel topic on the next reply.
John
__________________
Current Sunlines: 2004 T310SR, 2004 T1950, 2004 T2475, 2007 T2499, 2004 T317SR
Prior Sunlines: 2004 T2499 - Fern Blue
2005 Ford F350 Lariat, 6.8L V10 W/ 4.10 rear axle, CC, Short Bed, SRW. Reese HP trunnion bar hitch W/ HP DC
Google Custom Search For Sunline Owners Club
|
|
|
|
|
07-08-2022, 06:33 AM
|
#60
|
|
Senior Member
Join Date: May 2022
Location: Virginia
Posts: 119
SUN #13221
|
Quote:
Originally Posted by JohnB
Your van looks like a 2500 or a 3500 Chevy full size van, not sure what year. Is that correct? )
|
Yes = 2500 Chevy van. Year 2019 .
Quote:
Originally Posted by JohnB
If the main frame is 3", odds are higher the A frame rails up front to the ball coupler are 3" also, are they?
|
2EA094B6-1FDE-40CB-B222-2EC7C46600FE.jpg
The A frame goes to 4 C channel.
My ball hitch is 2 dia.
Quote:
Originally Posted by JohnB
Look at the sticker ratings on your ball mount(draw bar) you use and make sure it is rated for that max tongue weight you measured. Many of the 2" hollow tube ball mounts stop at 500# max tongue weight. They do sell solid ones that will go higher.
|
2126E7E1-A7B4-4399-B269-4C4D56C37012.jpg
This one is hollow. No more sticker or markings on it, as it being old and repainted. I do have other bars that are solid as you speak of. I tow heavier trailers at times.
Quote:
Originally Posted by JohnB
And check on the van, the truck receiver can handle the max loaded camper tongue weight in "weight carrying" mode. It will have 2 ratings if it the GM OEM receiver. One for weight carrying, and one for weight distributing.
|
DD5A8423-CE01-4A78-B03F-E9A6957571BA.jpg
Bought the van used. I told the hitch shop I want to occasional haul up to 10,000#. Electric brake control should be balanced with that.
- Jim
__________________
__________________
|
|
|
|
|
|
|
Currently Active Users Viewing This Thread: 1 (0 members and 1 guests)
|
|
|
 Posting Rules
|
You may not post new threads
You may not post replies
You may not post attachments
You may not edit your posts
HTML code is Off
|
|
|
|
 » Recent Sunline Discussions
 |
|
|
|
|
|
|
|
|
|
|
|
|
|
|
|
|
|
|
|
|
|
|
|
|
|
|
|


 Linear Mode

