 |
|
 07-01-2022, 04:52 PM
|
#21
|
|
Senior Member
Join Date: May 2022
Location: Virginia
Posts: 119
SUN #13221
|
The shaft area for the outer race bearing,
Then the outer race bearing;
90DA03DE-1A25-40CF-BB3A-ED45DB9AE2DD.jpg
DA837117-EC03-4636-B431-686D5A6E6E63.jpg
Yes, the ID outer race measures smaller than the shaft. Thats cant be, and Id guess the ID measurement is wrong rather than the OD of shaft. Just hard to get inside for a comfortable reading.
If anybody spots wrong descriptions, or errors of some sort, be sure to say so. I dont want anybody to learn wrong stuff.
- Jim
__________________
__________________
|

|

|
|
07-01-2022, 05:02 PM
|
#22
|
|
Senior Member
Join Date: May 2022
Location: Virginia
Posts: 119
SUN #13221
|
No pictures and measurements of the cups for the bearings. I did not want to damage them in removal, and need to get this back together ASAP. Hopefully the seal isnt damaged, and can last till I get the proper parts and time to go at it again. Ill keep a close eye on it till then. All numbers on each of the bearings have been recorded. Time to order some parts.
__________________
__________________
|
|
|
|
|
07-01-2022, 07:22 PM
|
#23
|
|
Moderator
Join Date: Nov 2006
Location: Ohio
Posts: 12,654
SUN #89
|
Hi Jim,
Good pics, I can see a few mix up's to help explain what you are seeing.
The good news, I think you are close enough to know what sizes you have.
The grease seal, by your pics, you picked the wrong diameter for the grease seal. The grease seal is the nest larger diameter towards the camper. See this markup to show which diameter is which on a 3,500# axle spindle

This is no big deal, I'm just trying to help and point it out. You can go back and check.
Quote:
Jim said: Where grease seal goes on Shaft then Grease seal;

|
That diameter is not where the grease seal rides, that surface is where the inboard bearing rides on.
Bearing fits are very precise and there can be error in the measuring and the tool. I'll try to keep this big picture to not burry you too deep in the details, I'll explain it though so you can see why this is not adding up.
And in this pic you have the bearing center bore.

By your pic numbers above on the shaft OD, the shaft OD for the inboard bearing is: 1.3795"
And the bearing bore pic is:1.3655"
There is some error in those numbers, as the bearing would have a 0.014" press fit trying to get on, and we know, the bearing "just" slides on. So where is the error? It looks like a tool/measuring error.
I can tell by the 4th digit on the calipers, it looks like that tool rounds the 4th digit. It is a good tool, just it not super accurate in 4 place decimal . Shaft fits and bearing fits are true 4 place decimal as there may only be 0.0005" or less clearance to get the bearing on the trailer axle. There needs to be enough clearance to allow the bearing to slide on, but not enough clearance to allow the bearing race to spin on the shaft.
I always go the "good book" when it comes to tapered bearing fits. The good book is published by Timken. I used to have a hand book at work to look these up, It was so much easier. But now a days everything is online, and it can be harder to dig to find it then flipping through pages quick if you do not use their site a lot to learn where they put everything. I guess I'm old school and like the hard book 
Here is where I am getting all this from. We are in the TS tapered bearing section. I wish I had my old handbooks. https://www.timken.com/products/timk...apered-roller/
Go here, to the bottom for Product Catalog and download 760 pages
https://www.timken.com/products/timk...red-roller/ts/
Timken is so large now, it is hard to navigate their site for the simple cut sheets on a bearing. I have been away from this now for 6 years since retiring, so bear with me.
The error appears to be in the bearing bore measurement. It is hard to tell if caliper ID jaws are truly zero'ed out. Unless you have a known gauge diameter to test the calipers on, it is hard to know if 0.000 is actual or not. Your friends may be a few thousand's off.
Here is what Timken says the inner bearing cup and cone has for nominal dimensions. The bearing bore on a L68149 bearing is 1.3775" nominal.

There is a tolerance on that nominal bore size, the standard low precision class we are in, they state from their tapered roller bearing catalog, the tolerance is 0.0000/+0.0005". (page 20 on the catalog) The bearing bore is then with the tolerance to be 1.3775/1.3780"
And you showed 1.3655 in your pic. It appears you are 0.012" off, which is a lot. I would question the calipers on the ID measurement, or the thing moved before the pic. Go try it again if you can get closer to what Timken states as 1.3775/1.3780".
By the Timken catalog, the shaft OD for a trailer wheel setup to fit with that L68149 bearing, should use this tolerance smaller then the bearing nominal bore by, -0.0010/-0.0016" under. (page 42 in the catalog) OR in this case, 1.3765/1.3759"
Your pic showed the shaft at 1.3795" which is 0.003" too large. The bearing would not slide on the shaft if it was that big.
It could be there is some dirt on the caliper jaws, wipe the jaws clean, close them all the way, hold them up to the light to see any daylight between the jaws, if there is, clean again. Once the daylight is gone, zero out the caliper and try the shaft again. Wipe the shaft good too, dirt adds up!
I know this gets deep into machine shop tolerancing, I have done that for the last 40 years, so I'm exposed to it. You really do not have to go that deep, just make sure what parts you get are "close" so you know they are the correct from the choices we have.
You are going a great job, keep up the good work.  You will get this and do it right, I know it. Go for it.
Hope this helps
John
__________________
Current Sunlines: 2004 T310SR, 2004 T1950, 2004 T2475, 2007 T2499, 2004 T317SR
Prior Sunlines: 2004 T2499 - Fern Blue
2005 Ford F350 Lariat, 6.8L V10 W/ 4.10 rear axle, CC, Short Bed, SRW. Reese HP trunnion bar hitch W/ HP DC
 Google Custom Search For Sunline Owners Club
|
|
|
|
|
07-01-2022, 07:27 PM
|
#24
|
|
Moderator
Join Date: Nov 2006
Location: Ohio
Posts: 12,654
SUN #89
|
Hi Jim,
On the outer bearing, by your pic you have 1.051"

On the outer bearing, here is what Timken says that bearing nominal is: 1.0625" plus the tolerance. It looks like your calipers may be off in the ID zero point of the jaws. They are measuring this bearing way off as well.

The bearing is off by 0.0115" by your calipers, that is a lot, just like the inner bearing was off. I suspect the caliper is not accurate on ID measuring at this point.
On the outer bearing shaft, you have 1.0605"

Timken says the shaft should be -0.0008/-0.0013 from nominal. OR 1.0625 nominal less the tolerance is: 1.0617/1.0612" for the shaft OD
Your shaft measurement, is not far off only 0.0012. And they may not have machined it exact. You are good on that shaft diameter.
Since the shaft is good by your measurement 1.0605" and the bearing comes up at 1.051, the bearing would have to press fit on by 0.0095" and that is not going to slide on by any chance. The caliper ID numbers are not accurate.
BUT, the bearing numbers on our old bearings are accurate. Do they match the numbers in the Dexter manual for a 3,500# axle?
Hope this helps
John
__________________
Current Sunlines: 2004 T310SR, 2004 T1950, 2004 T2475, 2007 T2499, 2004 T317SR
Prior Sunlines: 2004 T2499 - Fern Blue
2005 Ford F350 Lariat, 6.8L V10 W/ 4.10 rear axle, CC, Short Bed, SRW. Reese HP trunnion bar hitch W/ HP DC
Google Custom Search For Sunline Owners Club
|
|
|
|
|
07-02-2022, 05:19 AM
|
#25
|
|
Senior Member
Join Date: May 2022
Location: Virginia
Posts: 119
SUN #13221
|
Well Jeez, Im sorry to have created more work for you John, and confusion to others. I want to go back to that one post and put a flag/correction in it, but I cant figure out how to edit an older post.
Its good that these things were pointed out because Ill try to look into some of this before I got it back together.
I know those measurements are not accurate. Some are physically impossible. It seemed as if each time an area was measured it would vary. I will go by what the old bearings are, more than trusting my measurements. But by measuring I am trying to confirm and double check what they are. Im in amazement to the folks I see using calipers and get proper measurements accurately. Definitely a skill. Im used to working with wood, where I can see a scale, and get to a 1/64, but a lot of that is by feel and looks, not so much by exacting standards.
__________________
|
|
|
|
|
07-02-2022, 06:32 AM
|
#26
|
|
Moderator
Join Date: Nov 2006
Location: Ohio
Posts: 12,654
SUN #89
|
Hi Jim,
No worries. Helping others is not work for me, more enjoyment.
Having to go back to the Timken site is a need that was good to figure out what changed from the last time I went. Not that every RV'er needs to go figure out bearing tolerances, they should be out in a campground having smore's around the fire. But, I like using my hands and head and don't want to get rusty at either of them, so it's all good.
On the post editing, our site software allows a short period of time after the post was made for the user to go back and edit it. This is a security feature in case you account gets hacked, the hackers do not go nuts making changes to posts. If any post you made needs an edit, PM message one of the moderators what you want to do, and they all can edit it for you.
On the calipers, yes there is a "feel" to it. And then there is the tool itself. I learned on the older mechanical gear driven dial calipers, and there is for sure a learning curve. Like these measuring a roof membrane.

These dial calipers are the older ones before the forerunners to the newer sliding electronic ones. The feel is different between the two tools, both can be learning/mastered, just on mine the batteries never die  And there is the really older sliding Vernier scale ones, they also have a different feel to them, still very accurate if used correctly.
The feel part also deals with how much squeeze to give, too much and you are springing the tool, not enough and the reading is too wide. It does take time and ideally someone helping teach you. As there a lot more that goes into be accurate then just using the tool, it's knowing how to use it and when it is a bad setup to use it on.
This much I can leave you with, in order to get a known good reading, repeat the setup at least three times, if the numbers repeat, then you have higher odds the readings are accurate. If the setup does not repeat, then there is error somewhere in the setup, the feel or the tool. Or the part is that made/worn that way to have readings that are all over, within a tolerance.
And yes, your wood working skills shinned through on your roof post. You learned that skill well. We all have our talents, all are different and that A OK. The learning never stops.
John
__________________
Current Sunlines: 2004 T310SR, 2004 T1950, 2004 T2475, 2007 T2499, 2004 T317SR
Prior Sunlines: 2004 T2499 - Fern Blue
2005 Ford F350 Lariat, 6.8L V10 W/ 4.10 rear axle, CC, Short Bed, SRW. Reese HP trunnion bar hitch W/ HP DC
Google Custom Search For Sunline Owners Club
|
|
|
|
|
07-02-2022, 07:52 AM
|
#27
|
|
Senior Member
Join Date: May 2022
Location: Virginia
Posts: 119
SUN #13221
|
I love learning/figuring new stuff out, hands on. Not so much book learned. Its really becomes a fault of mine, cuz I want to know why instead of just trusting what someone tells me. Kind of comes off as being hard headed at times.
So here is more defined info. Been spending time measuring again and trying to get a feel for it. Seems I have to hold it tighter against the surface than I would have guessed.
Hope this info is typed in an understandable way. My measurements when using ID on the calipers seem to be off by .004. If you add this to my ID numbers looks like it is spot on.
Brake is 10 x 2.25. That leads to #84 axle spindle. Which should make it simple but Im wanting to double verify.
My grease seal #171255 V8
2.563 OD
Seems to make sense since it needs to be a snug fit.
Since its tougher to measure the rubber ID, I set the calipers to 1.719 ID and put it in the seal it is touch the rubber seal a lot. If set to 1.715 it touches it lightly.
If a #84 spindle, grease seal is #171255
Seems end variations added to that # are many.
1.719 ID
2.56O OD
My Inner bearing says Kl.GH149
Hungary MGM Radax
No info can be found on this one.
1.374 ID
If a #84 axle,
Inner Bearing L68149
1.378 ID
-
My outer bearing
L44
Cant read those last three numbers
1.059 ID
If a #84 axle
Outer Bearing L44649
1.063 ID
Thats it for now, 😁
- Jim
__________________
|
|
|
|
|
07-02-2022, 02:59 PM
|
#28
|
|
Senior Member
Join Date: May 2022
Location: Virginia
Posts: 119
SUN #13221
|
Question on this seal.
Napa seal 17144
Same OD and ID as the one I removed.
Thickness is less, at .315
Original is .5
32E3418F-F64B-409C-9EA4-22E078F8044E.jpg
41D33372-B783-4F48-9554-1F362790C13F.jpg
1) is it ok to be using this seal?
2) should it be installed flush as in the picture, or further down in till it seats on lip in the hub?
3) if installed flush, I assume fill the cavity between the bearing and the seal with grease?
4) wondering if there is a cavity left, does the bearing stay in the cup bearing because its against a shoulder on the axle?
Thank you.
__________________
|
|
|
|
|
07-02-2022, 06:22 PM
|
#29
|
|
Senior Member
Join Date: Apr 2011
Location: Maine
Posts: 3,357
SUN #2097
|
Make your life easier bearings are metric measure when you go looking.
__________________
|
|
|
|
|
07-02-2022, 07:49 PM
|
#30
|
|
Moderator
Join Date: Nov 2006
Location: Ohio
Posts: 12,654
SUN #89
|
Hi Jim,
I'll explain a few seal things from your prior reply and what is in your last post. I see you have better measurements now. Good.
The seal. I gave some interchange brands for the seal if the Dexter is not available. There were
Dexter: 010-019-00
NOK: AD2548E0
Chicago Rawhide: CR 17144 (FYI: SKF bought out Chicago Rawhide a number of years ago)
National: 473336
Redline Trailer Parts: RG06-050 (10-19 seal)
I know the seal listings may be confusing on how to measure it. You stated
Quote:
Originally Posted by JimS

————————
My grease seal #171255 V8
2.563 OD
Seems to make sense since it needs to be a snug fit.
Since it’s tougher to measure the rubber ID, I set the calipers to 1.719 ID and put it in the seal it is touch the rubber seal a lot. If set to 1.715 it touches it lightly.
If a #84 spindle, grease seal is #171255
Seems end variations added to that # are many.
1.719 ID
2.56O OD
|
I have seen some web sites call out the ID as 1.719 on this type of seal. They are calling out the seal wrong, I knew when I saw them say the ID was 1.719" that something was off. There is no good way to measure a rubber seal ID and seals are not normally called out by the seal ID. They are "normally" listed as to the "shaft" size they work on. So I looked up the National and the SKF, both of those brands are very good industrial brands.
Here see the National: (Timken bought National Seal)
https://www.applied.com/c-brands/c-q...-8/p/100754577
The callout the seal "bore" it works on", the seal width and the "shaft" size the seal works on. In this case, Bore: 2.561, Shaft, 1.719 and width 1/2".
See this link to Motion Industries, they are a large supply house, they call out the Timken/National seal different, but it is still accurate, you have to read the words they use. The callout the seal OD and not the housing. https://www.motionindustries.com/products/sku/01317904
Now lets look as SKF, they bought out Chicago Rawhide, This is the seal you got at NAPA. https://www.skf.com/us/products/indu...roductid-17144
They list the housing the seal works on: 2.561"
The shaft the seal works on: 1.719"
The seal width: 0.315
Point, not all places callout seals the same, have to read what the number is for. And some site just plan goof the seal ID
If you measured
Quote:
My grease seal #171255 V8
2.563 OD
|
That sounds correct for the seal OD as it will press fit into a housing bore 2.561" with a 0.002 press fit.
Just mentioning this so you do not have to measure the rubber on the seal, measure the shaft it rides on.
Quote:
Originally Posted by JimS
Question on this seal
Napa seal 17144
Same OD and ID as the one I removed.
Thickness is less, at .315”
Original is .5”
1) is it ok to be using this seal?
|
YES, it is common the seal width can change between brands. Using the 0.315 width will work OK when the old one was 1/2" . There is no change in sealing ability, the OD land is just larger on the old one.
Quote:
Originally Posted by JimS
Question on this seal
2) should it be installed flush as in the picture, or further down in till it seats on lip in the hub?
 |
You have that installed correct. You do not want press it down any further. Right now, the seal is nice and square to the shaft bore as it is dead flush with the end of the housing that is machined square.
Quote:
Originally Posted by JimS
Question on this seal
3) if installed flush, I assume fill the cavity between the bearing and the seal with grease?
|
No, you do not have to pack the air space between the seal and the bearing solid with grease on purpose. Not on a hand pack situation. You can have some excess on the outside of the bearing and it will end up between the seal and the bearing and that is OK. You just do not have to pack it solid after you install the seal. Same goes for the cavity between the two bearings, on a hand pack, you do not have to fill the entire cavity packed with grease.
This pic shows the grease on the bearing hanging out towards the bearing, "before" the seal is pressed in. This is OK, it will end of being what it is, you just do not have to pack it solid after the fact.

Quote:
Originally Posted by JimS
Question on this seal
4) wondering if there is a cavity left, does the bearing stay in the cup bearing because it’s against a shoulder on the axle?
|
See this pic, this is out of the Dexter manual page 54. They are talking about the drilled spindle EZ lube setup with the grease flow arrows, but it was the only Dexter cross section I could find to show how the bearings, races, hub and shaft shoulder shows how the hub is locked in place.

The inner bearing cone stops at a shaft shoulder.
The inner bearing race is installed in the brake drum. The drum cannot move towards the camper as the race is touching the bearing that is held with a shaft shoulder.
The outer bearing race is pressed into the outer end of the brake drum.
The outer bearing, the shaft nut holds the thrust of the outer bearing outwards away from the camper. The brake drum cannot move away from the camper as the outboard bearing is holding the outer race of the bearing.
The cavity is an air space, it is not part of holding any thrust of the brake drum.
This make sense now?
Also, just checking, do you know the tightening sequence on the nut to set the bearings running clearance? The sequence is on page 56 of the Dexter Manual.
https://www.dexteraxle.com/user_area...ice_manual.pdf
Hope this helps
John
__________________
Current Sunlines: 2004 T310SR, 2004 T1950, 2004 T2475, 2007 T2499, 2004 T317SR
Prior Sunlines: 2004 T2499 - Fern Blue
2005 Ford F350 Lariat, 6.8L V10 W/ 4.10 rear axle, CC, Short Bed, SRW. Reese HP trunnion bar hitch W/ HP DC
Google Custom Search For Sunline Owners Club
|
|
|
|
|
07-03-2022, 05:22 AM
|
#31
|
|
Senior Member
Join Date: May 2022
Location: Virginia
Posts: 119
SUN #13221
|
Quote:
Originally Posted by mainah
Make your life easier bearings are metric measure when you go looking.
|
Ill check that out when searching for them. But it still means I have to measure them right  .
__________________
|
|
|
|
|
07-03-2022, 05:27 AM
|
#32
|
|
Senior Member
Join Date: May 2022
Location: Virginia
Posts: 119
SUN #13221
|
Thanks again John, yes it helps!!!!! That should complete all the missing little stuff I couldnt find in other threads/areas.
And yes, Ive read in several places the way to fasten the bearings in. All of those seem to be in agreement on how its done. Thanks.
Happy 4th to you and all others.
__________________
|
|
|
|
|
07-03-2022, 11:23 AM
|
#33
|
|
Senior Member
Join Date: May 2022
Location: Virginia
Posts: 119
SUN #13221
|
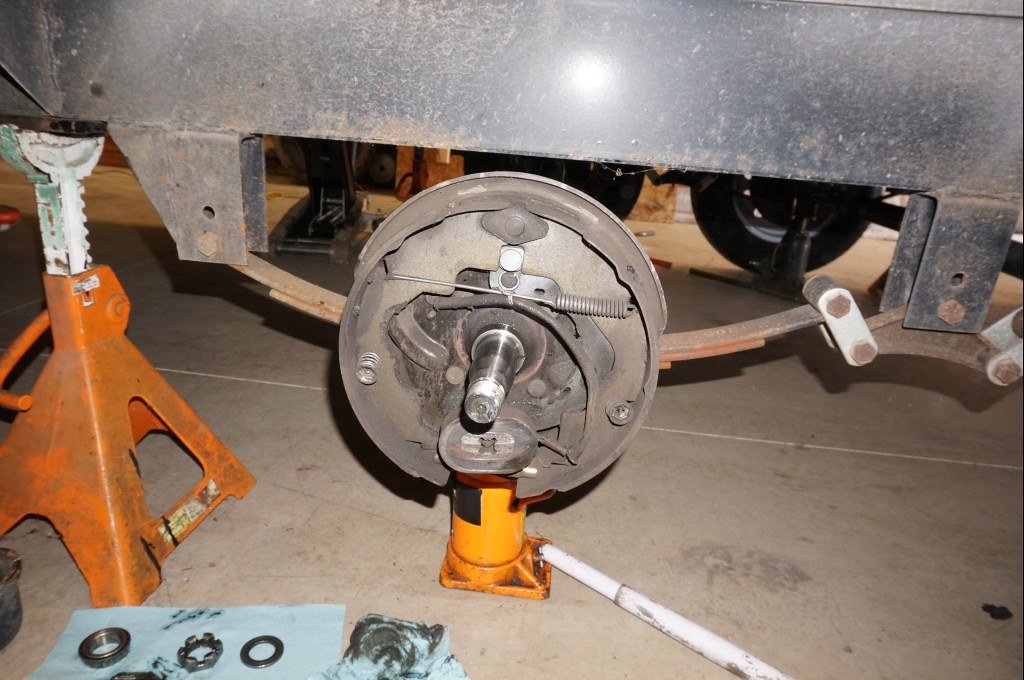
Ahh Ha!, look what I found when opening the second wheel. Can you spot it in the photo? I saw some discolor on the ID of the bearing, and then the rollers seemed a bit burned color too. So I was looking over this one more cautiously. Almost was to the point of giving up not finding anything wrong.
EFA74773-BAF1-4533-A0F0-05CAA4B750A7.jpg
John, the kit you recommended here:
NAPA Part #: BK 7304458
Line: Balkamp
https://www.napaonline.com/en/p/BK_7...pressionRank=1
It comes with the two seals in the pic below. The black one is the same ID as the one I removed. The other has a very slight smaller ID, all of which is listed on the package. The black one is all plastic. Do you use this one out of the kit ? Or do you pitch it and go get a metal one?
5C74CC5A-5545-481D-9822-E490D0C4E765.jpg
__________________
|
|
|
|
|
07-03-2022, 11:57 AM
|
#34
|
|
Moderator
Join Date: Nov 2006
Location: Ohio
Posts: 12,654
SUN #89
|
Hi Jim,
You had a great find, finding that bad bearing, that would of lead to a lot of issues if left in service. And you stuck on the side of the road...
The Napa seal kit and two seals, h'mm, I never bought that kit, I buy the bearings and seal from different places as I buy them in advance. I have extra seals for just servicing.
A "guess" is, they have two seals that fit different spindles and they give you both and you pick the one you want. As the kit is setup for one wheel only.
I have seen both types, the metal carrier and the black plastic looking covering over a metal carrier. Look on the inside, one may have the garter spring (a double seal) and one may not have the spring, (a single seal). In this case, use the double seal.
If they are both double seal, and if the all black one is truly all plastic and not a coating over metal, I would use the metal one.
I have not run into this before and not having them in hand to see, it is hard from here to make the judgment call. The ID may be slightly smaller/different on one of them due to flex of the seal rubber, I can see that happening. If it is a few thousands, I would not worry that can be just the way the rubber relaxes. If it gets to be 0.030" and smaller in diameter, that does not sound right
Hope this helps
John
__________________
Current Sunlines: 2004 T310SR, 2004 T1950, 2004 T2475, 2007 T2499, 2004 T317SR
Prior Sunlines: 2004 T2499 - Fern Blue
2005 Ford F350 Lariat, 6.8L V10 W/ 4.10 rear axle, CC, Short Bed, SRW. Reese HP trunnion bar hitch W/ HP DC
Google Custom Search For Sunline Owners Club
|
|
|
|
|
07-03-2022, 06:08 PM
|
#35
|
|
Senior Member
Join Date: May 2022
Location: Virginia
Posts: 119
SUN #13221
|
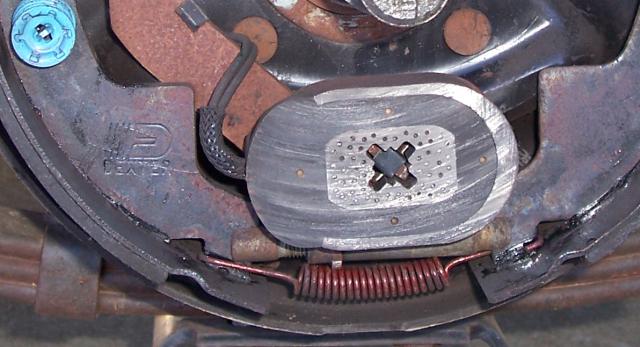
New discovery. Upon cleaning the interior brake area, the magnetic shoe was falling out. Looking inside the hole, I found this little fastener. Comparing it to the other brake I realize it is broke.
96FEF856-B7BD-4882-B841-528DEA497B57.jpg
6BFF734E-0BA0-4A5B-8098-4C6B2DB558CC.jpg
Im thinking of robbing one from this area, as they look to be the same. Its probably more important to have one holding the the magnetic block on, eh? Maybe I could put a small wire around the electric line to replace the one I remove. Or is this little piece a common hardware store item that goes by a certain name? Any ideas in general on this?
D06DDD3F-2D22-4655-9E46-7A06429BAFB5.jpg
Edit: I found that the auto stores do sell them. Ill give them a call tomorrow. Just hate making another trip!!!!
Ill get back to you on the info on the seals from the kit later.
- Jim
__________________
|
|
|
|
|
07-04-2022, 05:53 AM
|
#36
|
|
Moderator
Join Date: Nov 2006
Location: Ohio
Posts: 12,654
SUN #89
|
Hi Jim,
The little clip in the magnet, yeh, it's job is to hold the magnet from falling off until you get the brake drum on. The the drum traps it once the drum is on from falling off with the spring pushing it flat to the drum.
Not the best pic of the clip, but a straight on shot.
I have not compared the wire holding clips to the magnet spring clips. They might be the same. Both are clamping on the same arm thickness, just a different area, so the clip might be the same. I'm not sure. I do have some spare brake sets in the barn if you want me to confirm, let me know.
I agree, you need the magnet clip, the wire clip needs to make sure the wire does not get caught up in the arm and is important but maybe there is a way to work with what you have.
Here is a cleaned up pic of the same size brake. Dexter only put two clips on the wire in 2003 when these brake sets were made.

Your older set has 3 wire clips. Rather then the wire wrapped around, maybe only use 2 clips and space them out like the pic above. The wire wrap you mentioned would work, my only pre-conceived notion is, will road vibration start chaffing the insulation over time and wear through to ground out the wire as the wire is so thin and not wide. If you already put the brake back together, the wire wrapped will work, and if a year or so you are going to pull them apart again, change out the little wire for a clip. The vibration concern is more like after 5 plus years of vibration, not instantly.
I thought about a nylon tie wrap for the wire, but not sure about the brake heat affecting the plastic and it cracking off over time. The wire insulation is plastic, but made for the heat. Again the plastic tie wrap will work too, just may not last.
Short of a new clip, I would say go with re-arranging the 3 clips to 2 clips is if the clip is the same and use the extra clip on the magnet. But, there are more ways to do this too. So go with what you feel will work.
By the way, the amount of dirt in this pic of yours, wow.

I have seen heavy rust, heavy grease, dirt and grease, but that wheel looks like is was dunked in a mud puddle... Good for you going all through this before you start doing a lot of towing. It confirms my belief, when you get a new used camper, go through it and check, then you know what you got to work with and can address issue before they happen.
Hope this helps.
John
__________________
Current Sunlines: 2004 T310SR, 2004 T1950, 2004 T2475, 2007 T2499, 2004 T317SR
Prior Sunlines: 2004 T2499 - Fern Blue
2005 Ford F350 Lariat, 6.8L V10 W/ 4.10 rear axle, CC, Short Bed, SRW. Reese HP trunnion bar hitch W/ HP DC
Google Custom Search For Sunline Owners Club
|
|
|
|
|
07-04-2022, 06:31 AM
|
#37
|
|
Senior Member
Join Date: May 2022
Location: Virginia
Posts: 119
SUN #13221
|
I’ve now tried swapping the clip. I was hesitant because of the possible age of the metal and breaking the clip off the armature while removing it. It did come off. However, as Murphys law kicks in, it is just a bit wider/thicker than the ones that go in the magnets. Apparently that armature is a bit thicker than the bar that supports the magnet. I’m afraid of smashing it thinner as it probably would crack. I might possibly get the magnet to hang without the clip on while setting the drum back in place, but that gives me an uneasy feeling.
Brakes are dirty, huh? I wouldn’t know what normal is. The brake shoes look good to me. Possibly on the new side? Again, not ever seeing new it’s hard to know. We live on a gravel/limestone road. Very dusty. But the dirt inside doesn’t really have the limestone appearance.
I can’t do it now, but maybe this winter. I want to check those bushings/bolts/shackles that I’ve seen you talk about in another thread. The things that hold the suspension on. I’m thinking about squirting a bunch of oil over them, but that may be bad too?
__________________
|
|
|
|
|
07-04-2022, 10:42 AM
|
#38
|
|
Senior Member
Join Date: May 2022
Location: Virginia
Posts: 119
SUN #13221
|
Couple unrelated to topic pics for your amusement. This bridge is on our road. Our road is an old rail road bed thru the mountains. This bridge is the only way in or out.
BEA1E517-E518-48B2-9CAB-F347A56587D6.jpg
497BE797-BF63-4994-AB67-9A06F10E6C6B.jpg
Believe it or not, it is a state maintained rd. For the past year now they are repairing it. They are pulling up the Timbers and replacing steel beams under them. They close it during the day and we are not permitted to cross. You can drive thru the river below, if you dare. They have this walkway on site in case there is a medical emergency. They pull it across the open span.
803CF2D4-6579-4E53-B470-84F4C3C1262B.jpg
__________________
|
|
|
|
|
07-04-2022, 11:05 AM
|
#39
|
|
Moderator
Join Date: Nov 2006
Location: Ohio
Posts: 12,654
SUN #89
|
Hi Jim,
If you were closer, I have a few sets of old brake plates I keep to rob parts off of in times of need, like this time. You could come over and get a used clip free. But, the drive and the cost of gas right now, probably not a great option... ")
What does a normal brake service look like? Good question and it sort of depends on what the owner has done with them, and this affects the shoe wear as well. I'm sure different parts of the country have different "normal" things for their area too. At this point, nothing surprises me. The normal is, expect anything to happen.
Here are a few of the brake jobs I have pics on to show. The others I have done are similar in nature. This will give a feel for what you can expect, some being normal and some being just what happens.
This is a 2013 Gulfstream brand camper of my neighbors. These are Lippert brand brakes, 3,500# axle. 10" x 2" wide. Their older brakes which were made in the USA which I felt were actually made good. Since then, they must of cost too much to make here and what has replaced them with off shore made parts, and they are not so great, everything is thinner and cheaper. In this case the magnet worn badly on the pivot arm and the whole thing was rattling inside not doing much braking.


Next up, 2004 T1950 Sunline with Dexter 3,500# axles. This trailer went across the US a few times before sitting in storage for 6 years doing nothing until I bought it. These are Dexter 10 x 2 1/4" brakes, a lot of rust is shown as they where not used for so long to even wear it off the drums. The pads let go on one wheel.
Rear Axle - right side

Front axle - left side

Front axle, right side, pad fell off the shoe, rattling around inside.
2004 T2475 Sunline with Dexter 3,500# axles. This is one of my project camper when I got it. It was used by the prior owner the year before. Pads fell off one wheel.


Sunline T310SR with an Alko brand 5,200# brake axle 12" x 2" brakes. Alko was bought out by Dexter and the new Dexter combines designs from both Alko and Dexter to sell as complete new Dexter brake plates. This is our big camper after we bought it. The camper came from PA and PA is a trailer inspection state. They are required to pull a wheel and I think they nicked the seal during an inspection and grease is all over. Again, you get a used camper, go all through it. In this case, it took me 2 years to get to it, the other 3 wheels worked OK, this grease soaked on, not so much...


A 2006 T264SR camper with 12 x 2" Alko brakes, 5.200# axles. This is a common looking grease and dirt looking setup during a suspension and brake rebuild. This is what I would call is normal looking.


These are from a Sunline 2007 T286SR with Alko 5,200# 12" x 2" Brakes. In this case, my friend bought this camper new and went cross country a few times with it and all over the east coast. The brake shoes have very little wear for 12 years of use and a lot of miles.


There is a reason for very little brake pad wear. I asked my friend, did you ever have these brakes adjusted for wear? He said, "never". He did not know they where supposed to be adjusted every 3,000 miles, so he never had them done. He has a big 3/4 ton truck and it did a lot of the stopping. I was actually shocked when I measured the pads, they had very little to no wear. And they for sure towed it. The shackles actually had broke on them while on a trip and left them stranded on the side of the road to get fixed before they could get home. It takes "miles" to wear them to failing while underway.
Point being, very little brake pad wear is common if the owner never tracks mileage and does not re-adjust the brakes every approx. 3,000 miles. While the brakes do work, they just do not work very well when out of adjustment and keep get less effective all the time when they continue to wear out of adjustment. The tow vehicle ends up doing more of the work.
I'll add some more later on what to look for on the shackles now, so you can know you have good odds you can make until winter to take the suspension apart and and deal with that part.
Hope this helps
John
__________________
Current Sunlines: 2004 T310SR, 2004 T1950, 2004 T2475, 2007 T2499, 2004 T317SR
Prior Sunlines: 2004 T2499 - Fern Blue
2005 Ford F350 Lariat, 6.8L V10 W/ 4.10 rear axle, CC, Short Bed, SRW. Reese HP trunnion bar hitch W/ HP DC
Google Custom Search For Sunline Owners Club
|
|
|
|
|
07-05-2022, 05:39 AM
|
#40
|
|
Senior Member
Join Date: May 2022
Location: Virginia
Posts: 119
SUN #13221
|
Very impressive John. So many different ones. It shows a lot of different scenarios there.
I’m almost done. I got the magnet clips. It was surprising that some auto stores were open on July 4th. Found another wheel that had questionable areas on the bearings. Nothing as bad as the other, but just enough to cause some doubt. Changed them to ease the mind.
__________________
__________________
|
|
|
|
|
|
|
Currently Active Users Viewing This Thread: 1 (0 members and 1 guests)
|
|
|
 Posting Rules
|
You may not post new threads
You may not post replies
You may not post attachments
You may not edit your posts
HTML code is Off
|
|
|
|
 » Recent Sunline Discussions
 |
|
|
|
|
|
|
|
|
|
|
|
|
|
|
|
|
|
|
|
|
|
|
|
|
|
|
|


 Linear Mode

