 |
|
 07-08-2022, 07:41 AM
|
#61
|
|
Moderator
Join Date: Nov 2006
Location: Ohio
Posts: 12,649
SUN #89
|
Hi Jim,
I'll add to the wheel well comments
Quote:
Originally Posted by JimS

snipp..
The only springs I could find with 23 1/8 spacing is at Etrailer.com, and they are rated for #3500. Nothing that size for #2500, so maybe I have #3500 springs. Again, not that I want to haul that heavy, but I dont like skirting on being overloaded. Better safe than sorry.
So its looking more and more like moving the axle may be the better solution. Perhaps youll come up with something else.
Im thinking about painting the areas in the wheel well that are rubbing. That way Ill know if its new wear marks.
Its crossed my mind a few times if I could add a dome of some sort over the wear areas, inside the camper. Seal it off so to speak. Raise the wheel well in a goofy kind of idea. I think theres room inside to do that to all tires. But, to what end. Just so I keep the trailer 4 lower
?
|
Quote:
Originally Posted by JimS
Is this the measurement your interested in? If I could find a wheel well that is higher but the same in the other dimensions, that may do it. I think Id have to cut the siding higher if there was such a thing.
|
I'll start with "some" of the issues to work through raising up the wheel well inside so you can think through this before deciding to go that route.
From this pic of yours, it appears Sunline has not changed the plastic wheel well height between 1993 and all the way until the 2007 models.
Here is yours 1993 T1740 on 14" tires, 11" frame to top inside of wheel well.

Here is mine on a 2004 T1950, on 15" tires, 11" frame to top inside of wheel well. (more on where is all the extra clearance for the 15" tires later in this reply)

Cutting out the center of your wheel well and adding something back in may be an undertaking, and then how to seal it up so road splash towing in the rain is now a concern. Short of the tire rub holes, your wheel wells are fully intact. I have not yet found who makes these to buy new ones if ever needed. We have a another member have a tire blow out and it blew his wheel well totally apart. We have not heard back how he repaired it.
The wheel well is ABS plastic, it can be solvent welded and you can weld pieces to it if yours ever blew up. BUT making all the curves and ribs, that will be more of a challenge.
You talked about cutting the siding. The siding cuts easy with a router, a carbide bit with a roller on the end, to trim with. I have done this many times. However... the siding is not going to be your biggest issue, the wood behind it will be.
This is a 2005 Sunline so it may be made a little different then your 1993 in this wood method.
I was chasing wood rot damage on restoring this camper and the water wicked all into the wheel well frame, outer band board and the floor joists from a rear corner molding leak. Yes, that rear corner leak took out floor wood at least 8 ft forward as the water wicked over time down the length of the camper .
See how heavy the wood build up is. The black is the bad wood that was all removed, these pics are with just the wheel well removed.


Here is the wheel well fit in place over the wood framing before I removed it.

There is an about 1 1/2" to 2" outer flange to the plastic wheel well that seals and hold the wheel well in place to the wood behind it.
You can see the flange on the outer perimeter here

If you plan on cutting out the siding to raise the wheel well, you will have to deal with all this wood and then how to seal the newly created wheel well top to the camper and the siding to the new wheel well. This wheel well raising is doable providing inside the camper there is room on both the left and right side wheel wells. Sometimes one side is doable and the other side has something inside sitting on top of the wheel well. Check what your has on both side. With your wood working talents you can rebuild all this, it will take a good amount of time and effort, but doable.
The over/under axle conversion will solve any wheel well clearance issues but comes with different things that may be good or not so good pending your situation. Measure your axle tube to be sure, but this is the Dexter over/under kit for the 2 3/8" axle. They only seem to offer the 2 3/8" and 3" axle kits. The 3" kits are for the larger trailers.
https://www.dexteraxle.com/product/2...conversion-kit
I buy a lot of my Dexter parts from either Eastern Marine, Etrialer or a few other trailer parts dealers. Eastern Marine beats Etrailer on price sometimes but charges freight. Etrialer has free freight over $99. Shop both, both are good suppliers from my experience.
Eastern Marine
https://www.easternmarine.com/dexter...kit-k71-384-00
Etrialer
https://www.etrailer.com/Accessories...71-384-00.html
You will need 2 kits, as the kit only does one axle.
There are other benefits to the camper lift. The camper does not drag the back of the frame going over dips in the road, like high up gas stations or driveways. The longer the camper, the worse this drag issue on low riding campers.
The dump pipe is higher to allow the black and grey water tanks to drain down hill better when dumping. In some cases members have to drive up on blocks to get the height to dump. Or do the slinky lift draining the hose.
The down sides, you need to deal with the higher ball height on the truck hitch, this is a one time thing.
You need to deal with some kind of step arrangement to get in and out of the camper. Some have made a separate wood step, some bought a premade step, others changed the step on the camper.
We have had many members do the axle flip/lift. There are many posts on this, I do not recall any of the members complaining wishing they never did it. Those that needed the extra camper height, not for wheel well reasons, are praising the lift.
If you decide to gain more tire clearance, think through which will be better long term and what it will take top get to that end. Cut up the fenders or the axle flip. If you are asking what I would do, I would do the axle flip "if" I found I actually had a wheel well issue.
Since you will soon be on 14" tires as Sunline had it, travel this year and see how it goes. Your paint rub test you mentioned would be a good thing to see if you ever hit. And how much frame dragging you have done from the lower riding camper. Yours is shorter and my not be such a big issue.
Hope this helps
John
__________________
Current Sunlines: 2004 T310SR, 2004 T1950, 2004 T2475, 2007 T2499, 2004 T317SR
Prior Sunlines: 2004 T2499 - Fern Blue
2005 Ford F350 Lariat, 6.8L V10 W/ 4.10 rear axle, CC, Short Bed, SRW. Reese HP trunnion bar hitch W/ HP DC
 Google Custom Search For Sunline Owners Club
|

|

|
|
07-08-2022, 07:54 AM
|
#62
|
|
Moderator
Join Date: Nov 2006
Location: Ohio
Posts: 12,649
SUN #89
|
Hi Jim, this is all good info.
Quote:
Originally Posted by JimS
Yes = 2500 Chevy van. Year 2019 .
The A frame goes to 4 C channel.
My ball hitch is 2 dia.
|

Thanks for this pic, I have never seen that like that. I'm more familiar with the new Sunlines. In your case, the A frame at 4" is a real good thing. But, the caution still remains about the WD hitch if you ever need to go to one. We have had the 4" A frame twist too if the loads get heavy enough with a WD hitch.
The 2" ball, just mentioning this, some of the older campers were set up on 2" ball couplers, as time went on they all converted to 2 5/16". I do no know what model year this all changed. Just check your camper ball coupler to make sure it is a 2" coupler, or upgrade the tow ball to the 2 5/16". A 2" ball will fit inside a 2 5/16" coupler but not lock in right. I have had a few friends make this mistake on cargo trailers. Thankfully none of them ever had a decoupling, but it could of happened.
Quote:
Originally Posted by JimS
This one is hollow. No more sticker or markings on it, as it being old and repainted. I do have other bars that are solid as you speak of. I tow heavier trailers at times.
|
OK, if your loaded camper tongue weight ever gets over 500# maybe look into a new ball mount with a sticker.
Quote:
Originally Posted by JimS
Bought the van used. I told the hitch shop I want to occasional haul up to 10,000#. Electric brake control should be balanced with that.
|
That Curt receiver is a good one. You will have plenty of receiver rating for your camper towing in weight carrying mode.
__________________
Current Sunlines: 2004 T310SR, 2004 T1950, 2004 T2475, 2007 T2499, 2004 T317SR
Prior Sunlines: 2004 T2499 - Fern Blue
2005 Ford F350 Lariat, 6.8L V10 W/ 4.10 rear axle, CC, Short Bed, SRW. Reese HP trunnion bar hitch W/ HP DC
Google Custom Search For Sunline Owners Club
|
|
|
|
|
07-08-2022, 08:02 AM
|
#63
|
|
Moderator
Join Date: Nov 2006
Location: Ohio
Posts: 12,649
SUN #89
|
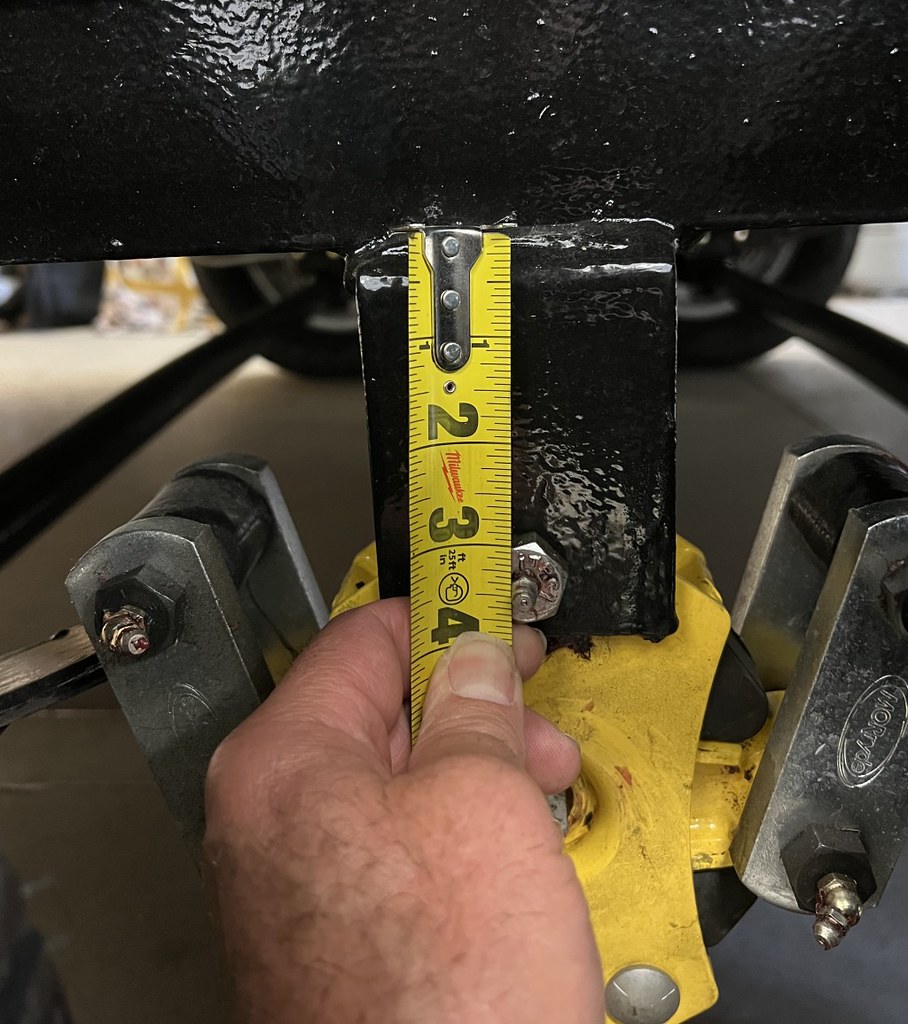
Jim,
There is still an unsolved mystery. The Sunline change from 14" to 15" tires and wheel well clearance, what changed?
Since your wheel well is 11", and my wheel well is 11", you have a 3" frame with a 1" reinforcing strip on the bottom increasing the frame height to 4", and I have a 4" frame to start with, there is only one last place Sunline could of changed to create more wheel well clearance when changing from 14" tires to 15" tires. Well, one last area to check anyway. Spring rates may enter into this too, but lets confirm the easier things to check.
The spring hanger height, mine is 3 1/2" bottom of frame to center of spring or equalizer bolt. By chance what is yours?
Thanks
John
__________________
Current Sunlines: 2004 T310SR, 2004 T1950, 2004 T2475, 2007 T2499, 2004 T317SR
Prior Sunlines: 2004 T2499 - Fern Blue
2005 Ford F350 Lariat, 6.8L V10 W/ 4.10 rear axle, CC, Short Bed, SRW. Reese HP trunnion bar hitch W/ HP DC
Google Custom Search For Sunline Owners Club
|
|
|
|
|
07-08-2022, 08:51 AM
|
#64
|
|
Moderator
Join Date: Nov 2006
Location: Ohio
Posts: 12,649
SUN #89
|
Quote:
Originally Posted by JimS
snip..
So its looking more and more like moving the axle may be the better solution. Perhaps youll come up with something else.
Im thinking about painting the areas in the wheel well that are rubbing. That way Ill know if its new wear marks.
|
Jim,
Me coming up with "something else" to gain you some fender height, I did look into this from two other options beyond the axle flip.
1. An equalizer change. This one did not pan out with out more investigation.
I have run into wheel well issues before, but they where on the 10,000# camper frames where the camper is much higher up off the ground. And I had different things with that added height to work with. Not so on your smaller camper.
You can change the equalizer to one with a longer distance from the center pin to the place the shackle plates bolt onto. By increasing this distance, it lowers the leaf spring which in turn lifts the camper up. This is a way to gain some small extra clearance short of changing the hanger length or doing an axle flip.
This method does work but it comes with issues that may or may not work. In your case, Dexter only makes one size of longer equalizer and I feel that is a jump to far.
This is the more standard size EQ-104 equalizer you have. This is a different brand but it shows the 2" vertical distance from center hole to shackle plate pins.
This is the next size up. The EQ-310 4" rise vertical distance.
https://www.etrailer.com/Trailer-Lea...e/TREQ310.html
Changing that will lift the camper axle about 3/4" to maybe 7/8". BUT the equalizer will hang down further to the ground by 2" more then you have now. This is a crash concern going over a bump. And then this 2" drastic of a change will change the springs to be down hill so to speak all the time as you only changed the center hanger point.
There is also other checks that need to be done to check for shackle binding at the extreme suspension travel areas.
At this point, there are too many unknowns to ring out to make this option viable without more investigation.
2. Adding the Correct Track system. This will work but needs some review to make sure it fits in your hangers.
There is another method which bolts onto the hangers and raises the camper about 1 1/4" to 2" called Correct Track. This is a viable option. It seems they have a 3rd generation now and Lippert may have sold off the rights to this or is discontinuing the original system. You add in adjustable spring eye mounts that allow you to adjust the axle locations. And the bolt on brackets also lift the camper. You do this at each hanger, which is all 6 hangers.
see here on E trailer.
https://www.etrailer.com/Accessories...ol/RR23QX.html
Here is the cut sheet on it,
https://rvridecontrol.us/wp-content/...ackMan1945.pdf
The axle flip is more straight forward, but the correct track is an option.
Hope this helps
John
__________________
Current Sunlines: 2004 T310SR, 2004 T1950, 2004 T2475, 2007 T2499, 2004 T317SR
Prior Sunlines: 2004 T2499 - Fern Blue
2005 Ford F350 Lariat, 6.8L V10 W/ 4.10 rear axle, CC, Short Bed, SRW. Reese HP trunnion bar hitch W/ HP DC
Google Custom Search For Sunline Owners Club
|
|
|
|
|
07-08-2022, 10:41 AM
|
#65
|
|
Senior Member
Join Date: May 2022
Location: Virginia
Posts: 119
SUN #13221
|
Hey John, I will look over and research those options next week during the evenings while on the road. Gives me something to. That’s a good thing!
I am also placing a lot of info here so I have it recorded in a safe place. And someone had said when I first joined that not many ‘93 -T1740 have been listed on this forum. So I figure all the pics are a good thing for future references. Hope that makes sense.
——————————
Quote:
Originally Posted by JohnB
My springs are refereed to as 24" springs, it seems they use the fully loaded distance as the nominal eye to eye size. They measured 23 11/6" in the unloaded out on the bench length with a 3 3/16" unloaded arch height.
John
|
I think this might be a typo on the measurement. What was the unloaded length? I am curious to know what is the unloaded and loaded length to compare with what I might expect.
Quote:
Originally Posted by JohnB
When you went looking at E trailer for 23 1/8" springs, was that an unloaded eye to eye distance, or a partly loaded distance? Spring length can affect the load characteristics, I do not think they rate the load capacity by length, it is by thickness, arch height and eye to eye distance.
My springs are refereed to as 24" springs, it seems they use the fully loaded distance as the nominal eye to eye size. They measured 23 11/6" in the unloaded out on the bench length with a 3 3/16" unloaded arch height.
Your springs "might' be these based on the leaf thickness of 0.341" you measured x 3 leaves = 1.023" stack height.
Spring PN 072-023-00 which has a stack height of 1.04". 1.04/3 = 0.347" thick leaves. With tolerances, you measured 0.341 per leaf. That is only 0.006" off the nominal, it could be that spring.
This would mean yours "might" be 1,500# rated springs, but it would then mean you have a 26" eye to eye distance at full capacity with an arch height of 1.75". While the 1,500# seems to be OK, the 26" fully loaded length seems long when you where getting 23 1/8".
John
|
My 3 leafs measured in at an “average” of .941”.
Distance I measured was 23 1/4”.
My height seems to be 3 1/4”.
What Etrailer has is 23 1/8”.
Their height is 3 3/16”
They have measurements listed, but I don’t see it stating loaded/unloaded.
Here is the link to the one I found:
http://https://www.etrailer.com/Trailer-Leaf-Spring-Suspension/etrailer/e59SR.html?feed=npn&utm_source=google&utm_medium=c pc&utm_campaign=Google%20%7C%20Shop%20-%20Trailer%20Leaf%20Spring%20Suspension&adgroupid= 86687955755&campaignid=1687494923&creative=4038989 25720&device=m&devicemodel=&feeditemid=&keyword=&l oc_interest_ms=&loc_physical_ms=9008712&matchtype= &network=g&placement=&position=&gclid=CjwKCAjwq 5-WBhB7EiwAl-HEkmkARo2nfg2f7qZMvGPP8Kn9PXSHVcpb2jtCsGyCzSSTOi0G FhHL7BoCH9IQAvD_BwE
This was how I got the height for mine. Camper frame is supported. Weight of axles are on top of springs. I did not have enough tools to get the axles lifted too. I took a straight stick and laid it on the ends, got 4”. Then measured to the center of spring eyes, got 3/4”. That gives me a balance of 3.25” spring height.
E38E7F9F-6541-4EBE-B639-3EE0C7AC25DD.jpg
176896BB-1D5E-4A31-A31B-9E27574CFEE8.jpg
__________________
|
|
|
|
|
07-08-2022, 06:41 PM
|
#66
|
|
Moderator
Join Date: Nov 2006
Location: Ohio
Posts: 12,649
SUN #89
|
Hi Jim,
Lets compare notes.
Quote:
Originally Posted by JimS
Hey John, I will look over and research those options next week during the evenings while on the road. Gives me something to. Thats a good thing!
I am also placing a lot of info here so I have it recorded in a safe place. And someone had said when I first joined that not many 93 -T1740 have been listed on this forum. So I figure all the pics are a good thing for future references. Hope that makes sense.
|
Yes, this is all good, we are all learning from it.
Quote:
Originally Posted by JimS
Quote:
Originally Posted by JohnB View Post
My springs are refereed to as 24" springs, it seems they use the fully loaded distance as the nominal eye to eye size. They measured 23 11/6" in the unloaded out on the bench length with a 3 3/16" unloaded arch height.
John
|
I think this might be a typo on the measurement. What was the unloaded length? I am curious to know what is the unloaded and loaded length to compare with what I might expect.
|
Yes, I did mix up the numbers, in blue, they are not correct. Actually 23 11/16" is the OD to OD of the eyes, not the centerline. And the arch height is mixed up too. I typed the wrong numbers from my hand sketch notes from last year. Thankyou for pointing this out. I will go back and fix my post for future reference.
Here is what and how I measured my springs. Springs where out of the camper, out in the bench when measuring.
Unloaded:
23 1/8" eye to eye
3.114" arch height
0.354" single leaf thickness (main leaf)
1.077" all three leaves combined.
Quote:
Originally Posted by JimS
My 3 leafs measured in at an average of .941.
Distance I measured was 23 1/4.
My height seems to be 3 1/4.
|
And this from your prior post.
Quote:
Originally Posted by JimS
The springs are 23.25 from center hole to hole. 3 leafs. Thickness is .341, probably on the high side because of paint and rust.
|
Something on your leaf thickness is not adding up between the 2 notes. Which one is not correct?
Are you more sure the stack of 3 leaves is: 0.941"?
Or is the single leaf thickness 0.341" which would then be 1.023" for all 3?
The total pack of 3 springs is what aligns into 2 different springs on the Dexter chart.
Using 0.941" lines up 1,250# springs, Dexter number 072-006-000 Which has, a "loaded" eye to eye of 24" and a loaded arch height of 2.50". Using these springs, at 1,250# each x 4 = 5,000# which aligns with the GVWR of the camper at the axles, not counting on the truck to hold part of the weight on the tongue.
Using the 0.341" single leaf, this creates 1.023" for all 3 which aligns "close" to Dexter 07-042-00 which is nominal 1.027 for the stack of 3 at 1,750# per spring pack. But the loaded eye to eye at 26" and loaded arch at 1.50" seems all wrong.
Is the 0.341/spring a typo?
Quote:
Originally Posted by JimS
|
Etrailer is not listing a brand for that spring that I can tell and they are not giving a decimal spring thickness or stack height of all 3 in decimal. I "think" they may be buying generic 3,500# rated springs and selling them under their name.
As to are those dimensions are loaded springs or unloaded springs, I can't tell. The Dexter printed cut sheet calls out theirs as loaded dimensions very clearly.
Quote:
Originally Posted by JimS
This was how I got the height for mine. Camper frame is supported. Weight of axles are on top of springs. I did not have enough tools to get the axles lifted too. I took a straight stick and laid it on the ends, got 4. Then measured to the center of spring eyes, got 3/4. That gives me a balance of 3.25 spring height.
|
Your method gets you close, in this case close enough. There is some error in the method as the 3/4" is actually 0.657" if the spring thickness is 0.314" (0.941/3=0.314") The bushing OD is 11/16" (0.688"). Bushing OD/2 = 0.343" + 0.314" spring = 0.657". 0.750 - 0.657 = 0.093" or 3/32" less then 3/4" in error. Again, as this point what you have is close enough for now.
In this case, you are close enough on the unloaded arch height, we know it has some load of the axle on it that causes some deflection which is minor.
If the spring pack is 0.941" you might just have 1,250# springs. It all fits with the GVWR rating as Sunline has sized the running gear to make sure it can carry all the GVWR on the axles which it really does not. It is a safety factor thing.
BUT, if all this is right and you have the Dexter 1,250# springs, if the day ever comes you load the axle close to full load, the full load arch height is 2.5" If you are close to 3.25" unloaded arch height with some error in it, then 3.25" - 2.5" loaded = 0.75" drop in camper height when you fully load the springs.
I will be curious what your fender to tire clearance will be when you put the new 14" tires on. Technically there should be enough clearance that when you are fully loaded and loose arch height, you do not hit on bumps.
Gee, see how much you are learning about trailers and campers you never knew before until you bought a camper. 
Have a good trip next week.
John
__________________
Current Sunlines: 2004 T310SR, 2004 T1950, 2004 T2475, 2007 T2499, 2004 T317SR
Prior Sunlines: 2004 T2499 - Fern Blue
2005 Ford F350 Lariat, 6.8L V10 W/ 4.10 rear axle, CC, Short Bed, SRW. Reese HP trunnion bar hitch W/ HP DC
Google Custom Search For Sunline Owners Club
|
|
|
|
|
07-11-2022, 07:58 AM
|
#67
|
|
Senior Member
Join Date: May 2022
Location: Virginia
Posts: 119
SUN #13221
|
The nuances of ball height, especially when wheel wells are so close to tires.
With 3 drop hitch
2F5A26C2-54CC-47FF-B099-71A655953260.jpg
With 2 drop hitch
828D4423-6F0C-4ADF-A320-693524EA8139.jpg
With level hitch
853234D4-FB6F-4E2E-A2B3-7D3A7010E58B.jpg
My findings:
-With 3 drop, front tires are only 1/2 from wheel well.
-With level hitch back tires are 1/2 from wheel well.
-With 2 drop, front tires are 7/8 from wheel wells, and back tires are a little over an 1.
I wish I had a 1 drop hitch at this point. This is with the old 15 rim tires. Camper and van is loaded, probably at the max it would ever be, but that can always be slightly variable. One issue that is coming up with me and the wheels so close to the wheel wells: as I sell stock, load gets lighter, and I feel the ball height will need to be adjusted (because the wheels are so close to wells). So probably best to bring some different set-ups to accommodate.
Now Ill try to get the tongue weight.
Hope to get it all weighed too.
Smaller tires havent come yet!!!! Grrrrr.
More later, Jim
__________________
|
|
|
|
|
07-11-2022, 08:48 AM
|
#68
|
|
Senior Member
Join Date: May 2022
Location: Virginia
Posts: 119
SUN #13221
|
Tongue weight when loaded is coming in at 306#
Tongue weight before loading was about 340#
I found the link below as to how to get tongue weight. Anybody else try the bathroom scale method? I will try to get to the actual weigh scales to confirm accuracy. Of course unhooking from trailer you lift the trailer up aprox 3. I did tongue weight at this height, then lowered it to towing height and re-measured. It weighed 15# lighter when lower. I assume this occurs because I have tandem axle.
https://www.etrailer.com/faq-how-to-...ue-weight.aspx
- Jim
__________________
|
|
|
|
|
07-12-2022, 06:10 PM
|
#69
|
|
Moderator
Join Date: Nov 2006
Location: Ohio
Posts: 12,649
SUN #89
|
Hi Jim,
A few things,
In the bath scale method, I found on larger tongue weights, about 800 - 1,000# there was too much error in the method to be reliable. If you have a bath scale that will go to 400#, you can put a 2 x 6 etc across your scale and put the tongue jack on it directly. That would be more accurate. I myself bought a Sherline tongue scale, they work much better and up to 2,000# tongue weights. But even those, you repeat the setup 3 times to make sure there is no binding of the scale and you get the same number all 3 times.
The camper tongue weight "can" change being 3" high or low. This is not due to the tandem axle, it is due to the center of gravity of the camper. Not all campers see much change in 3" hi or low while other can see of the lot, and yours if the method was accurate, was a lot. Ideally, measure tongue weight with the camper level.
On the ball mounts, they do sell adjustable ball mounts. Curt has one with a pretty fine height adjustment. They have many models, you only need one big enough for your camper See here https://www.curtmfg.com/towing-acces...nel-adjustable
There are other brands that make them too. Just raise or lower the ball as needed
They also sell hi rise tow balls to help get an in-between distance. Just make sure it is rated for the total GVWR of the trailer, but I cannot find them right now in 2". A lot of them in 2 5/16" like this https://www.etrailer.com/Trailer-Hit...RT/C40086.html
Hope this helps
John
__________________
Current Sunlines: 2004 T310SR, 2004 T1950, 2004 T2475, 2007 T2499, 2004 T317SR
Prior Sunlines: 2004 T2499 - Fern Blue
2005 Ford F350 Lariat, 6.8L V10 W/ 4.10 rear axle, CC, Short Bed, SRW. Reese HP trunnion bar hitch W/ HP DC
Google Custom Search For Sunline Owners Club
|
|
|
|
|
07-15-2022, 10:26 AM
|
#70
|
|
Senior Member
Join Date: May 2022
Location: Virginia
Posts: 119
SUN #13221
|
I did get a chance to officially weigh my set up.
11,850 = total combination, both fully loaded
7,860 = van fully loaded
3,990 = camper fully loaded
320 = tongue weight
__________________
|
|
|
|
|
07-15-2022, 05:52 PM
|
#71
|
|
Moderator
Join Date: Nov 2006
Location: Ohio
Posts: 12,649
SUN #89
|
Quote:
Originally Posted by JimS
I did get a chance to officially weigh my set up.
11,850 = total combination, both fully loaded
7,860 = van fully loaded
3,990 = camper fully loaded
320 = tongue weight
|
Hi Jim,
Good job on weighing your setup.
I did notice one thing to give you a heads up on, your trailer 320# tongue weight is low compared to the 3,990# GVW (Gross Vehicle Weight) of the camper.
The industry standard guideline for your type of trailer is, that a "minimum" of 10% of trailer GVW is on the tongue to create natural low anti-sway towing conditions for the trailer.
You have, 320#/ 3,990# = 0.080 Or 8% tongue weight.
For 10% tongue weight, 3,990# x 0.10 = 399# on the tongue minimum. Or 79# more TW then you have now.
For travel trailers where tongue weights change often due to LP tanks going empty, and other camping gear additions/subtractions, I target 12 to 13% tongue weight (TW) to give you some freedom to move things or add/subtract and not get into the 10% area.
12% TW is: 3,990# x 0.12 = 479# (479 - 320 = 159#)
13% TW is: 3,990# x 0.13 = 519# (519 - 320 = 199#)
Consider moving weight from behind the axles, to in front of the axles to get your TW up higher. Ideally, something off the back wall moved all the way to the front wall will have the largest effect on shifting weight forward.
Hope this helps.
John
PS how did you make out with the 14" tires?
__________________
Current Sunlines: 2004 T310SR, 2004 T1950, 2004 T2475, 2007 T2499, 2004 T317SR
Prior Sunlines: 2004 T2499 - Fern Blue
2005 Ford F350 Lariat, 6.8L V10 W/ 4.10 rear axle, CC, Short Bed, SRW. Reese HP trunnion bar hitch W/ HP DC
Google Custom Search For Sunline Owners Club
|
|
|
|
|
07-15-2022, 07:18 PM
|
#72
|
|
Senior Member
Join Date: May 2022
Location: Virginia
Posts: 119
SUN #13221
|
Ah yes, the tongue weight is lighter than I want. That’s noticeable when towing. BUT, I did it this way to get the most evenly distributed weight over the tires. I wanted, and actually went around to all four tires, and measured the space to get them even. The tire that wore thru the wheel well was still the smallest space at 7/8”. The other tires are at 1”. I will get to the 14” tires in my next post, and what the results are.
__________________
|
|
|
|
|
07-15-2022, 09:04 PM
|
#73
|
|
Senior Member
Join Date: May 2022
Location: Virginia
Posts: 119
SUN #13221
|
The measurements above are with the 14” tires. They gave me 3/8 to 1/2” more space, which I really, really needed. Was it enough…..NO.
I am still rubbing, which you probably had a good guess that I would be. Granted it is now rubbing uniformly on all four tires. I do feel that without it, I’d be in real trouble. I’m frustrated that it’s still touches at times, but it would be a lot worse if it touched 1/2” more! I think it rubs when the camper bounces up/down, not as a constant contact. So now what?
I think the axle drop would be the best solution. I just have to analyze whether to tackle it the one week before my next long trip. If I understand it correctly, there are parts to be welded on the axle? That could be the real issue in getting it done on time.
__________________
|
|
|
|
|
07-18-2022, 05:46 AM
|
#74
|
|
Senior Member
Join Date: May 2022
Location: Virginia
Posts: 119
SUN #13221
|
Im at the campground and I decided to take apart one of the suspension bolts to find the correct size ( mainly diameter).I want to get the parts ordered as soon as possible. I thought my bolts were an odd size, but it turns out they are 9/16 but the threads are a smaller size. Im assuming they did it this way so the nut would tighten down on the shoulder and not bind the leaf spring.
So my question is: do I need to use the exact same design? It looks like the leaf spring bolts Im finding now are straight and regular. Perhaps they have all gone this way?
61853596-3CAA-421D-B431-DC1724C8B99D.jpg
__________________
|
|
|
|
|
07-18-2022, 08:45 AM
|
#75
|
|
Moderator
Join Date: Nov 2006
Location: Ohio
Posts: 12,649
SUN #89
|
Hi Jim,
On the spring bolts, yes there are a few brands of straight solid 9/16" with fine threads on the ends.
Dexter, MORryde, and Lippert offer the stepped-diameter shoulder bolt setup. I personally prefer the stepped bolt. You can torque it and you know it's done. The solid straight length bolt is OK too, but you have to be careful to not over-tighten as it will squeeze the hanger and bind on the spring or the shackle's. Both do work.
If you are considering upgrading from the standard nylon bushings, Lippert and Dexter offer heavy shackle upgrade kits with bronze and greaseable wet bolts. The wet bolt comes with a predrilled hole in the center for the grease fitting.
Morryde offers 2 1/4" shackles and 3 1/8" in bolt center length. Check what you have before buying. https://www.morryde.com/products/hea...y-shackle-kit/
Dexter's kit, they offer a kit with and without the center equalizer. These are the 2 1/4 shackles. just confirm that.
With equalizer https://www.dexteraxle.com/product/2...suspension-kit
Would have to hunt for the kit without the equalizer.
Find the right part numbers, then hunt for the best-delivered deal. You can buy from Dexter direct, and by odds chance, sometimes they are cheaper.
Eastern Marine (Trailer parts Superstore), Etrailer, Amazon, and E bay are competitive. I have used them all and shopped them all as the prices delivered do change.
I personally would stick with the brand name. Dexter and Morryde I have no issues with. Lippert is touch and go, when they make the parts in the US, they are good, when they start getting the products from offshore, quality suffers you wish you stuck with the other two. I have not bought the Lippert HD kit enough to know where they are made now.
Off-label brands are cheap and if you are looking for cheap that will get you to just get by, there are many out there at a lower cost. Then you see where they cut corners. The grease fittings are pressed in, not screwed in. The grease nipple does not even have the ball checked in them so grease starts flowing out the nipple hose as soon as you take the grease gun off. I got burned once, never again. I still have them in the box in the back barn, never used them.
If you are considering the greaseable bronze bushings, consider putting the pins on so the grease zerks are facing outwards. Then change the grease fitting to a 45 or 90-degree fittings.(Check the thread size. Some are metric others 1/4-28 SAE) Yes, you are going to have to pay for new grease fittings you just bought straight ones in the kits, but it will pay off if you plan on keeping the camper. You can grease all the fittings from the outside versus crawling under. You will need to grease them about every 2,500 to 3,000 miles.
They do sell the original nylon bushings. They are cheaper and life is for sure shorter. You may not get much past 8,000 miles, and you will be grinding pins on steel.
They offer a Never Fail brand bushings that are supposed to be guaranteed for life and speak to 100,000 miles, the jury is still out if they actually do last that long. There are mixed reviews without all the data on the springs.
The standard bronze from Dexter or Morryde does outlast the standard nylon but you have to grease it. The issue is more of the springs as the spring is not a precisely machined width or a bored hole. The thin wall bronze can then crack when it is not 100% supported. The bushing can then fail from being cracked before it wears out.
We have a few of us who get into the bushing thing trying to make them the best. If you want to read up on those tests and options, let me know we have a few long posts on those tests.
In short, I go with the bronze which you can buy easily if you want an upgrade beyond the standard nylon. I have no issues using a grease gun. I have data the bronze now into the 40,000 miles range and still working on a 10,000# camper. And some have started to crack, but the cracks have stalled out from not getting worse at the moment. This all comes back to how good the spring holes are.
You did not mention an equalizer upgrade. This can come with time if wanted, but odds are high that the one you have, the pivot bushing hole is worn egg-shaped and that will tear out any new bushing installed in short order. A new solid cast equalizer is pretty cheap, just figure to change it.
Hope this helps.
John
PS I have some more to add the tack welding the new axle seats on the axle flip kit, u bolt torque, lug nuts threads, worn brake wires in the axle tube, and axle alignment checked that at least should be aware of before the weekend on doing the axle flip and suspension rebuild. More on these areas later in the week unless you need this ASAP.
__________________
Current Sunlines: 2004 T310SR, 2004 T1950, 2004 T2475, 2007 T2499, 2004 T317SR
Prior Sunlines: 2004 T2499 - Fern Blue
2005 Ford F350 Lariat, 6.8L V10 W/ 4.10 rear axle, CC, Short Bed, SRW. Reese HP trunnion bar hitch W/ HP DC
Google Custom Search For Sunline Owners Club
|
|
|
|
|
07-18-2022, 11:17 AM
|
#76
|
|
Senior Member
Join Date: Apr 2011
Location: Maine
Posts: 3,357
SUN #2097
|
If it's stepped down like that there probably is is a reason. It most likely is to keep the bolt from binding the bushing.
__________________
|
|
|
|
|
07-18-2022, 12:06 PM
|
#77
|
|
Senior Member
Join Date: May 2022
Location: Virginia
Posts: 119
SUN #13221
|
Quote:
Originally Posted by mainah
If it's stepped down like that there probably is is a reason. It most likely is to keep the bolt from binding the bushing.
|
Thats my thought too. Havent been able to find it yet, so wondering if they discontinued that method.
__________________
|
|
|
|
|
07-18-2022, 12:13 PM
|
#78
|
|
Senior Member
Join Date: May 2022
Location: Virginia
Posts: 119
SUN #13221
|
I want to heed your warning about not doing the whole suspension rebuild right now. It will take to long. So, I’m hoping to put the over/ under axel kit on, just opening the outward spring shackle bolts. Replace the bushings in those four bolts. Then do all of it, even throwing out those newest bolts and sleeves, come winter time. Hope to start it all in about 2 or 3 days.
Am I missing something important that will not make this work?
__________________
|
|
|
|
|
07-18-2022, 01:55 PM
|
#79
|
|
Senior Member
Join Date: May 2022
Location: Virginia
Posts: 119
SUN #13221
|
Ok. Found the bolts.
__________________
|
|
|
|
|
07-19-2022, 08:22 AM
|
#80
|
|
Moderator
Join Date: Nov 2006
Location: Ohio
Posts: 12,649
SUN #89
|
Quote:
Originally Posted by JimS
I want to heed your warning about not doing the whole suspension rebuild right now. It will take to long. So, Im hoping to put the over/ under axel kit on, just opening the outward spring shackle bolts. Replace the bushings in those four bolts. Then do all of it, even throwing out those newest bolts and sleeves, come winter time. Hope to start it all in about 2 or 3 days.
Am I missing something important that will not make this work?
|
Hi Jim,
You can do the running gear repair process in stages, and given your time and fender clearance concerns, understand why you want to do the over under kit now and come back to the rest.
Here are some things to maybe help. I'll list each as I do not know what you have to work with, nor how much you already have sorted out on how you are going to do it. You can ask for more clarification as needed on each point. I'm just trying to help make sure this goes as smooth as it can for you.
1. Have all the new parts you need before taking the camper apart. This is qty 2 of the Dexter over/under kits and any spring pin bolts/bushings.
2. You will need a 1/2" drive torque wrench and deep socket for the U bolt tightening and the wheel lug nuts. Pending the adjustable torque setting, you need to go lower to torque the spring pin nuts on the stepped spring pin bolts. I use a 3/8 torque wrench on the spring pin nuts as my 1/2" drive on will not go low enough.
3. Getting the old U bolts off, there are 8 of these to get off. If you are after the fastest way to get them off, use a 4 1/2" grinder with a cut off wheel and cut them off by the U bolt plate to not nick the axle tube with the cutting wheel. With the heavy rust on those fine threads, they do not come off very cooperative trying to unscrew them. Odds are several may gall all up and you have to snap the U bolt or cut them off anyway.
If my chance you have a nut splitter and no grinder, then start juicing up the threads now and split the nut before trying to unscrew them.
Regardless of how you take the old U bolts off, you should not reuse them on the trailer. They are too far stretched being that old and rusted.
4. Cribbing or jack stands, you will have to get the axle area of the camper on jack stands or wood cribbing. To start with before taking the tires off, make sure you jack up the camper and block it up several inches higher in the lifted condition. The wheel will not go back on in the older lower location after the axle is moved. Figure a good 4"- 4 1/2" higher then you would normally jack up the camper to get the tire off. Level out the camper with the tongue jack during and once you are up to that new height.
5. Start now, and spray penetrating oil/spray on the leaf spring pack center bolt. The nut will be on the very bottom of the leaf stack and you can see it through a hole in the center of the U bolt plate. You need to reuse that center pin and you need to flip the pin over so the pilot head is down into the new axle seat. Thus, you have to save the pin/bolt and reuse it . Or find a new one. Get all 4 of these spring pack center bolts juiced up good "before" the tear apart day. Do it a few times several days beforehand.
6. When the axle is off the spring pack, you will grip the round pilot head of the spring center bolt (think vise grips with a leather glove over the pin head) and slowly work the bolt nut back and forth, spray more penetrating oil on it, until it comes off. Flip the pin over, the round head is now on the bottom of the spring pack, the nut is on top. Tighten it up. I use the standard torque for that size bolt on dry threads. It should be a grade 5 bolt.
7. You said this and I'm just clarifying which area you are going to open up.
Quote:
Originally Posted by JimS
snip... put the over/ under axel kit on, just opening the outward spring shackle bolts.
|
No knowing how you are going to block up the camper, think through this. In my shop I have a concrete floor and more options then doing this outside, and I have all the suspension unhooked so it works easier. See what works best on your situation.
You may find it easier to unhook the leaf spring for the rear axle at the rear hanger. Meaning you pull the rear hanger spring bolt. Leave the center area hooked to the shackle plates. By unhooking at the hanger, there is more room to move the axle out the back and then move it forward under the spring pack and put it in place. Then you do not run into the equalizer area. You mentioned open the "spring shackle bolts" which are at the center shackle area. I mean to open the rear spring hanger bolt, not the shackle. I know you may have just mixed up the spring pin words what they are called, just clarifying it incase you did mean the spring bolts at the shackle area.
For the front axle, just unhook at the front hanger.
BUT, your jack stands and or cribbing will be behind or in front of the hangers. If you are on jack stands, there may be good room to move the axle out out the hanger area. If you have large wood cribbing that hangs inboard, look it over, it may be easier to unhook at the center shackle area to not fight the cribbing with the axle.
8. Not sure if you have a 1/2"-20 fine thread tap, but consider doing this. The lug nuts over time, and many on and off cycles, the cone part of the nut gets swedged tighter on the threads in the cone area. This makes the nut spin on the lug studs very hard, and in some cases gall up the lug stud then needing to pull the brake drum and replace the stud. And the swedged cone area, affects getting the right torque on the lug nuts once up against the wheel. I run a tap through each nut, some nuts it does nothing on other then clean up some dirt. Others, it cuts out a sliver if metal that was swedged. All nuts then spin on very easy and then you torque them up. I put the tap in a cordless drill with a low clutch setting, start the nut on the tap, then put the nut in the vise and use the drill on slow. It goes faster, just make sure you start the nut by hand on the tap or you may cross thread the nut using the drill to start it.,
9. U bolt torque, I use and X torqueing pattern. And I bring them up to final torque in 2 or 3 settings. Start lower, even them all out, then step up the torque, even them out, then go to final torque. Check them after you get a 100 miles or so on the trailer. The Dexter sheet has the torque for the size U bolt and the newer U bolt plate. The plates changed over the years and so did the U bolt torque.
10. Lug nut torque. The 1/2"-20 fine thread studs use 100 Ft lbs. Torque in a star pattern. It is very important to check the torque in miles thereafter pulling a wheel for anything. The recommendation on miles varies across the industry but they all agree on "trailer" wheels that are lug centric, to check them 3 times after install. The first re-check the most important at about 30-50 miles. The second check, at around 100 additional miles. The third an additional 150 miles. The nuts normally stop taking any additional torque at the 3rd check but not always. If the 3rd check comes up with a wheel taking a little more to get back to 100 ft lbs, then go 4 times until they stop moving. Your new wheels with paint in them are more prone to needing the re-checks as the paint is squirting out of the wheel cone shapes.
11. Dexter does recommend tack weld or short stitch weld (~1/2") of the new axle seats to the axle tube. This is to help ward off any movement in a rough handling situation. I do the welding as I'm assembling the axles as for me, it is easier that way. And I tack weld the long nut they give you to go between the axle seats to not loosen up. But, the welding can be done after the camper is all bolted up and torqued etc. You can tow the camper to the welder. This post might help some if you have not seen it, It will drop you into the middle of a long rebuild post. https://www.sunlineclub.com/forums/f...tml#post155084
12. There is an axle alignment procedure that ideally should be done before long term towing starts. This is done before you tighten the U bolts if you are doing it with an axle flip. And you have to round up the tools to do it. The ideal way to do the alignment check and tweak is with all the suspension rebuilt. In your case, you will not have rebuilt the suspension until later on. For the first time through doing an axle check and getting everything setup, this might take you 1/2 to 3/4 of a day if everything comes out right. The 2nd time through this may be a few hours process, it is learning how to do it that takes the time. This is your choice if you want to tackle this now or over the winter, You tell me. We have 3 of us here on the forum who have done this with pics etc. I did the first and they improved the method each time for what they had to work with. If you have not started researching this, it will take time. Let us know and we can start the process.
13. There is a axle tube wiring issue where the wire inside the axle tube gets brittle, the cable bounces on the tube and after enough years and bounces, it wears off the insulation and grounds out the brake wiring when the power is applied. It is a classic trailer issue that comes with towing miles and years. The best fix is to abandon the wire in the tube and rewire the the system including running the ground wire direct to the truck 7 wire cable ground. You can do this later, just noting it so you know. More on this if wanted.
Hope this helps and good luck.
John
__________________
__________________
Current Sunlines: 2004 T310SR, 2004 T1950, 2004 T2475, 2007 T2499, 2004 T317SR
Prior Sunlines: 2004 T2499 - Fern Blue
2005 Ford F350 Lariat, 6.8L V10 W/ 4.10 rear axle, CC, Short Bed, SRW. Reese HP trunnion bar hitch W/ HP DC
Google Custom Search For Sunline Owners Club
|
|
|
|
|
|
|
Currently Active Users Viewing This Thread: 1 (0 members and 1 guests)
|
|
|
| Thread Tools |
Search this Thread |
|
|
|
| Display Modes |
 Linear Mode Linear Mode
|
 Posting Rules
|
You may not post new threads
You may not post replies
You may not post attachments
You may not edit your posts
HTML code is Off
|
|
|
|
 » Recent Sunline Discussions
 |
|
|
|
|
|
|
|
|
|
|
|
|
|
|
|
|
|
|
|
|
|


