 |
|
 02-18-2021, 07:24 PM
|
#121
|
|
Moderator
Join Date: Nov 2006
Location: Ohio
Posts: 12,654
SUN #89
|
After the fridge went in, we kept plugging holes in the side of the camper with cleaned-up parts. Yeh!!!  Fewer holes means we are getting closer to done! 
The entry door finally made it to the top of the list to install the door frame, less the door's glass. I ordered Parr Bond adhesive to set the glass in the door frame, but I ordered it from PPL Motorhomes in TX last week. Well, Texas is in a bit of ice storm and frigid temps. PPL is shut down due to the weather. Not sure when I will get the Parr Bond but it will not be this week for sure.
I installed a new screen door gasket. This door seal was hard to track down, but you are looking for open-cell foam weatherstripping, 1/2" wide x 3/16 to 1/4" thick. I could find 3/8" and 3/4" wide, but not 1/2". You want to get the open-cell foam as it compresses real easy. The screen door will not shut right with a more rigid denser foam seal. So I bought both the 3/8" and the 3/4" wide and cut it down as my big T310SR needs new screen door seals too. I installed the 3/8" in the T1950. It will work.
I used the Frost King brand of open-cell foam.

A close-up picture of the 3/8" wide.

I am installing the seal.

Put GSSI butyl tape on the door frame and siding low spots and installed the door. I have not seen the door on this camper in a while.

This completes one large hole plugged in the side of the camper, now onto the next.
The rear cargo door.
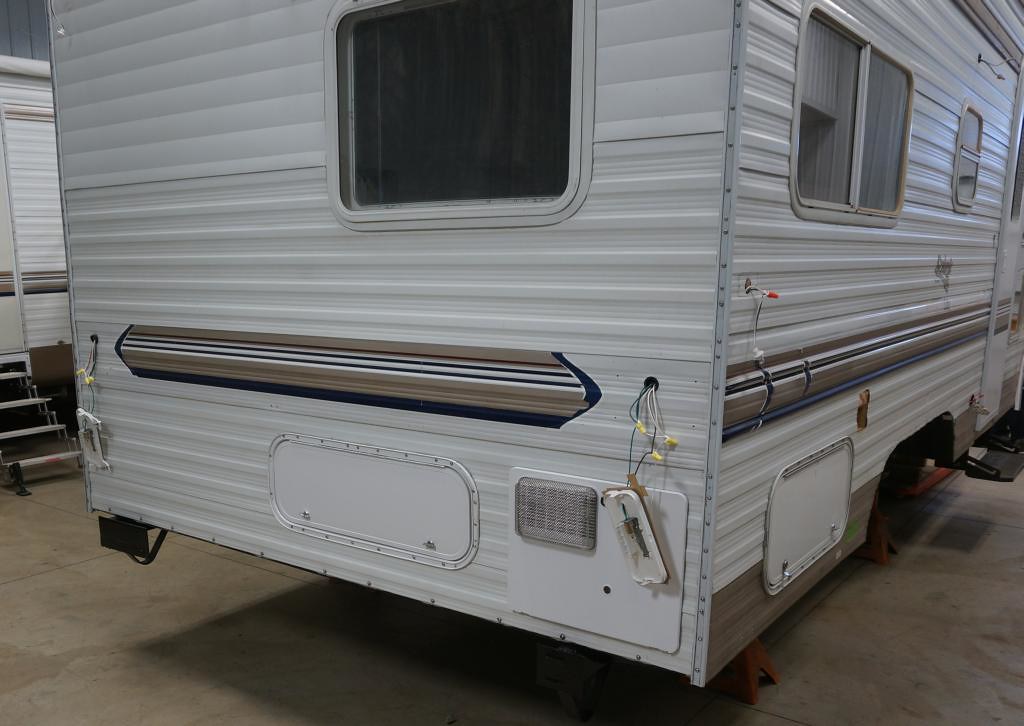
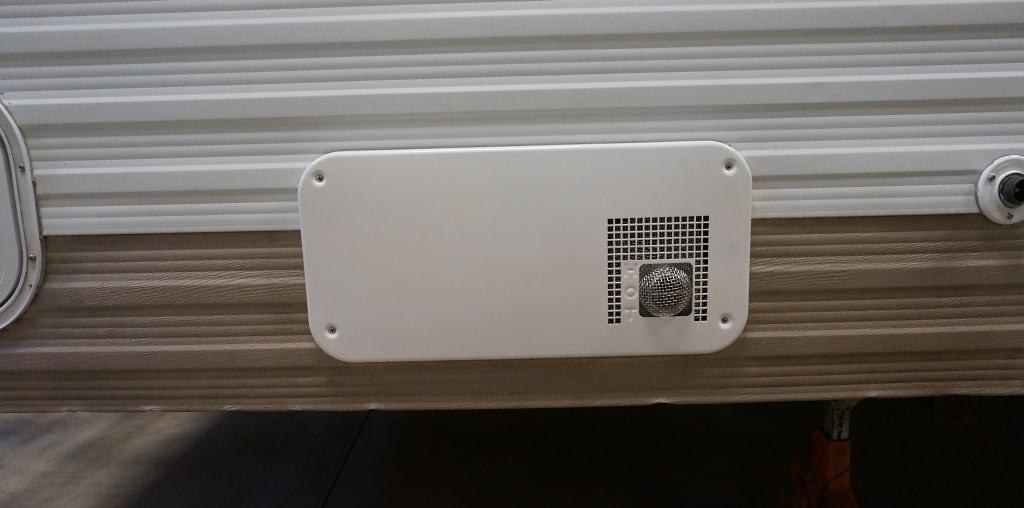
The left side of the camper had the front cargo door, the city water hookup, the outside shower, the fridge cabinet lower vent, the insect screens for the lower fridge vent cover, the power cord door, the cable TV hookup, the left side outside light and all the DOT light sockets installed and the wire nuts silicone treated for waterproofing.

That was a lot of holes plugging.
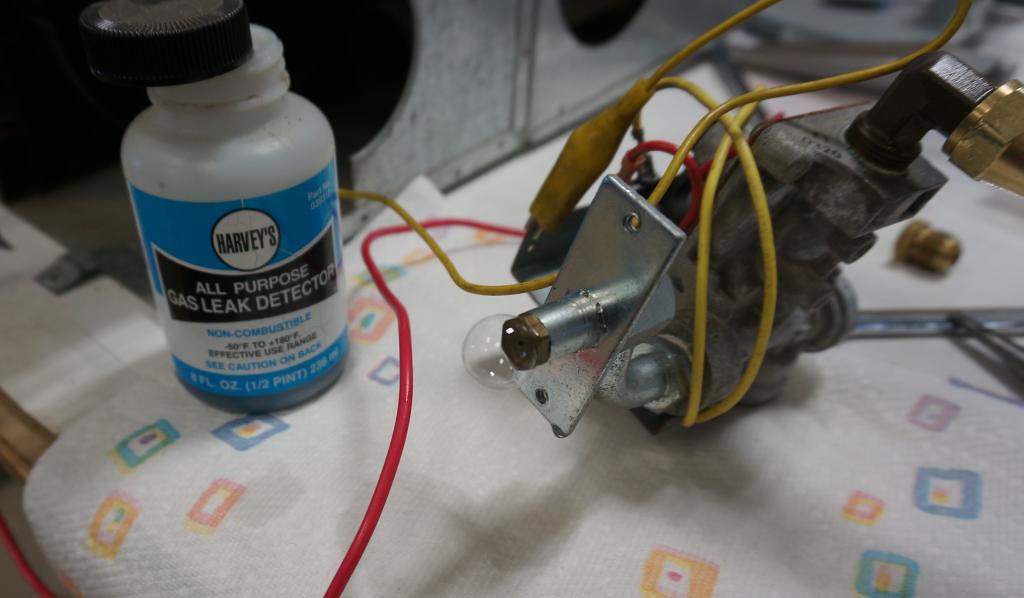
While I am still waiting on some parts, I started servicing the furnace.
Here is what we are starting with, an Atwood 8520-IV Hyrotherm furnace. A bit dirty, but in good shape.
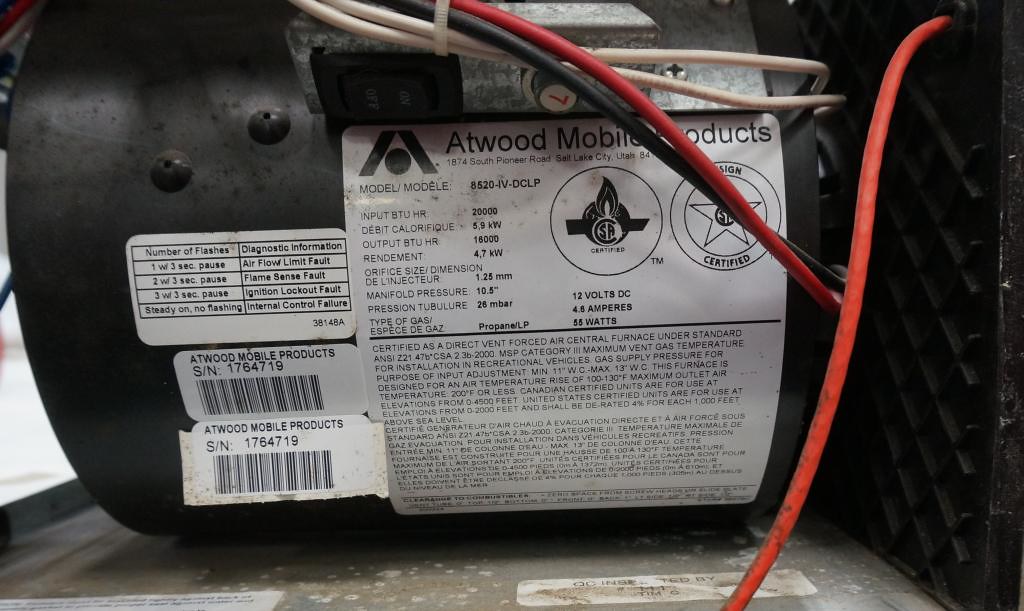

The gas valve looks suspect, I have not had many issues with the furnace valves like the water heater valves, but this valve does look to have some corrosion on the outside. I will test the valve as part of the servicing.

I am taking it apart to clean and inspect. The control board looks good from the outside; that is a good start. The electrical connections are not corroded.


The gas burner. A better look at the gas valve.
The burner screen and electrode are in good shape.

The heat exchanger has some dirt in it but very low rust; it should clean up OK.

Work tasks to clean up the furnace and make it ready for a bench test.
-I wire brushed the limited rust in the heat exchanger exhaust tube, vacuumed out, and blew out the heat exchanger. It is in good shape.
-Scraped off the disintegrated controls/exhaust wall compartment seal. It was an open-cell foam seal like the screen door seal was.
-Vacuumed and blew out the dirt in the controls cabinet.
-Checked the control board connections for corrosion, all good.
-Checked the igniter connection for corrosion and found it rusted, and I cleaned it up.
-Put the furnace back together and hooked up the bench test equipment.
Here is the bench test setup, a battery for the 12 volt DC source, and an LP gas setup with test gauge.

The bench test.
1.Start with the gas off, power up the unit, and test the control board. a. The blower started, timed out to clear the chamber.
b. The trial for ignition started; you can tell by the spark clicking.
c. Let it try to light and see if it will shut down on an ignition lockout fault. i.After an ignition trial period, it stopped the ignition and went into the chamber purge cycle with the blower running.
ii. After a purge timeout, it started a trial for ignition again.
iii. After three attempts to light, it shut down on an ignition lockout
fault.
iv.The blower continued to run as it should until the purge cycle
completed. d.The control board is working correctly so far.
2.Next was a gas leak test. a. With the furnace off, charge the system with 11" WC gas pressure and valve off the supply. The system held pressure. 3.Move to a test-fire of the system. a.With the gas on, start the furnace. i.Within a few seconds, the fan started, and after a chamber purge, the system started a trial for ignition; the burner lit and was up and running.
ii.The sound of the burner was typical of how it should be as the system kept heating up.
iii. I let the furnace run for approximately 3 to 4 minutes, and I unhooked the T stat wires to simulate the T stat was satisfied. The burner shut down, and the blower ran until it timed out for cool down. 4. I tested the gas valve for leaks again after cycling the valve open and closed several times by running the furnace and simulating the T stat on and off. a.Tested the gas valve for leaks with the furnace off and the gas supply valve off. The gas valve now leaks through the gas valve. The leak is not a surprise with the amount of corrosion on the outside of the valve. This same thing happened on the water heater gas valve, tested good then tested bad after opening and closing several times. The valve seat most likely has corrosion on it and it will not seal off.
b. I ordered a new gas valve, and waiting for the new valve to come. The current winter weather conditions here have affected many UPS, Fed Ex, and USPS mail services. After installing the new gas valve, I still need to test the high temp limit switch that it will open at 190F. More when the new valve arrives.
This update now completes all work to date on Monday, 2/15/21. I finally caught up on the progress posting. Now I need to go snowplow again.
Work tally on time and materials to get to this point;
Work completes Day 61 of the repair.
2/8 through 2/15/21;
1 worker totaling 14.7 hr.
2 workers totaling 12.8 hr.
----
26.97 hrs total 2/8 to 2/15/21
542.41hr. - Total work hours accumulated to date: 2/15/21
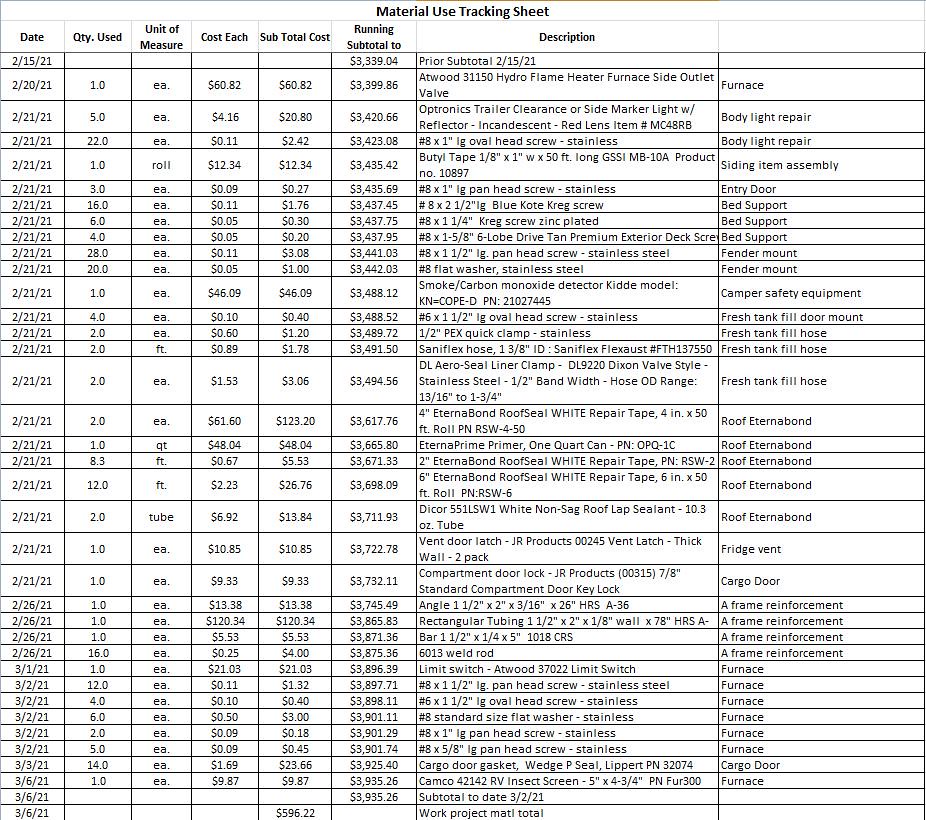
New material use: 2/15/21

$3,238.68 Prior material subtotal 2/7/21
$100.36 Work week subtotal. 2/7/21 to 2/15/21
----------
$3,332.10
Materials Subtotal to date 2/15/21
Thanks for looking.
John
To see more of my photos on this entire 2004 T1950 restoration project, go here to my Flickr photo album
https://www.flickr.com/photos/camper...7667376730349/
__________________
Current Sunlines: 2004 T310SR, 2004 T1950, 2004 T2475, 2007 T2499, 2004 T317SR
Prior Sunlines: 2004 T2499 - Fern Blue
2005 Ford F350 Lariat, 6.8L V10 W/ 4.10 rear axle, CC, Short Bed, SRW. Reese HP trunnion bar hitch W/ HP DC
 Google Custom Search For Sunline Owners Club
|

|

|
|
03-08-2021, 09:03 AM
|
#122
|
|
Moderator
Join Date: Nov 2006
Location: Ohio
Posts: 12,654
SUN #89
|
This update spans from 2/20/21 to 3/6/21 and will be in multiple parts (Part 1 – 5) to keep the pictures per area in task sequence over the 14 days. The total work hours for this period were 56.58 hours. Materials lists and costs will be captured at the end of part 5. If anyone needs a breakdown of time and cost per task, let me know.
Part 1 of 5, Complete the furnace repair and install.
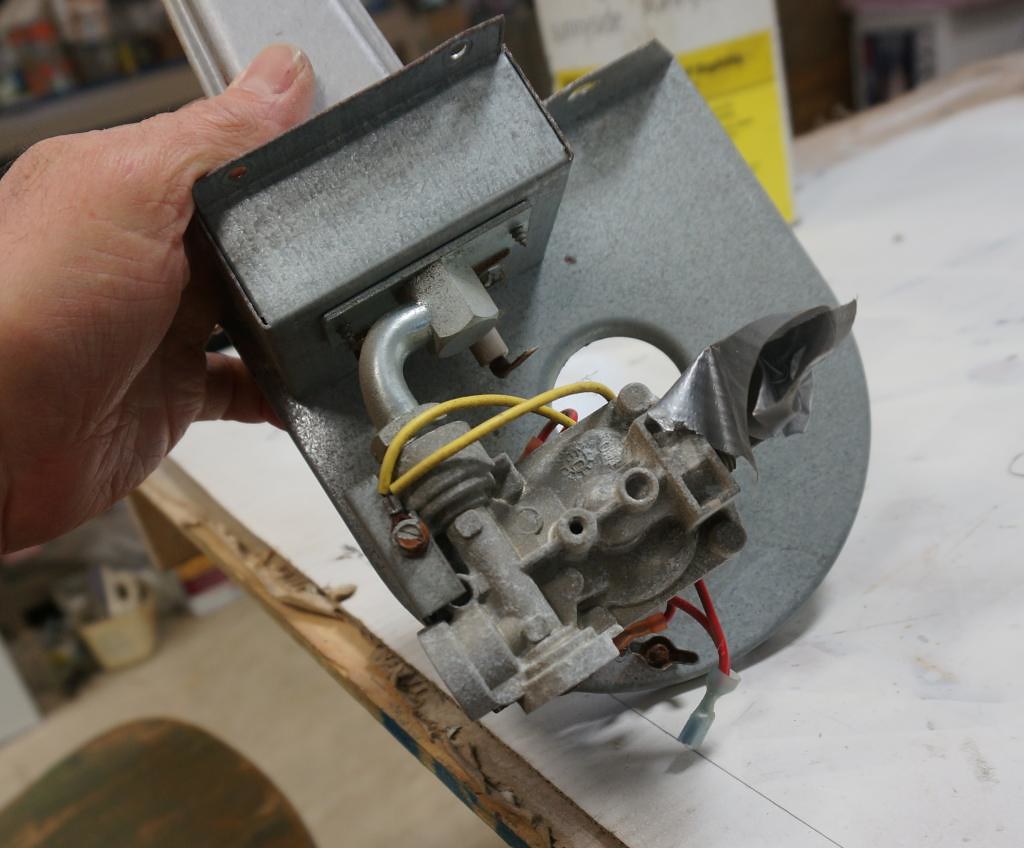
I pulled the gas valve out and checked the valve for leak-through. It leaks, and I ordered a new one as these are non-serviceable.
The part number has been updated as the original valve was discontinued. This is the latest version. 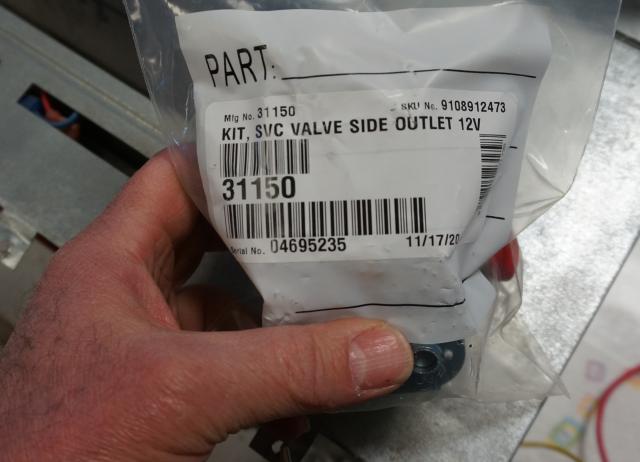

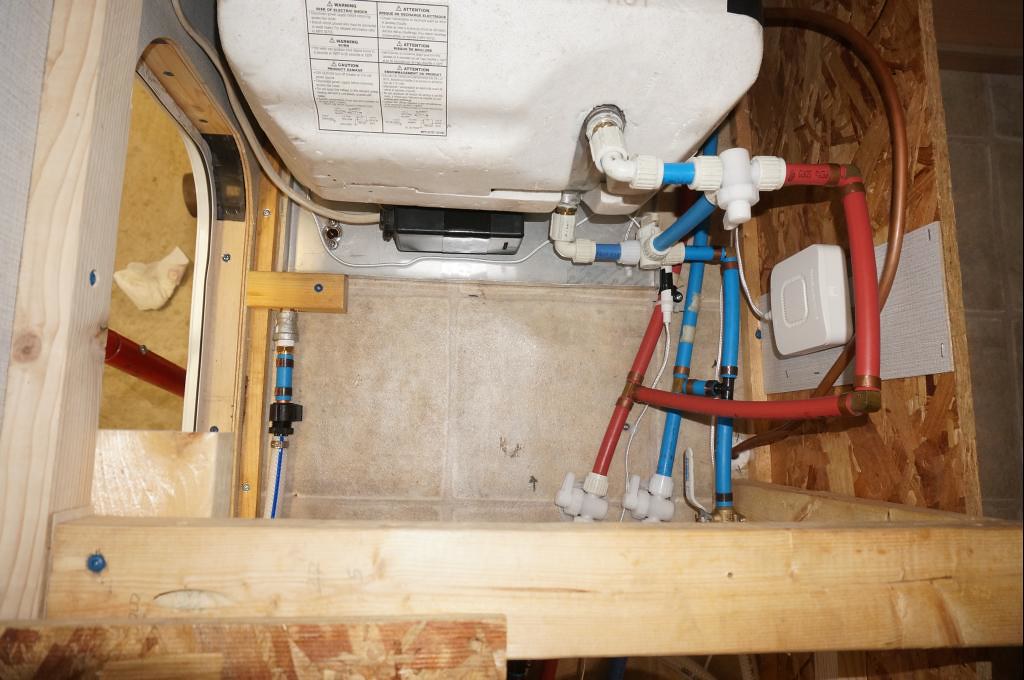
A check to confirm the new valve and gas fittings install does not leak before installing.
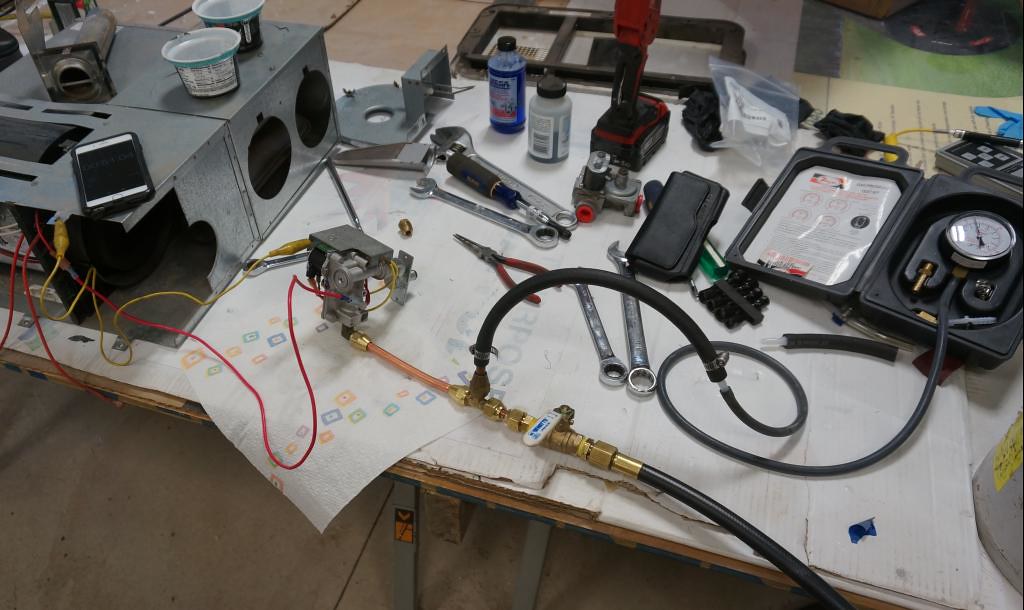
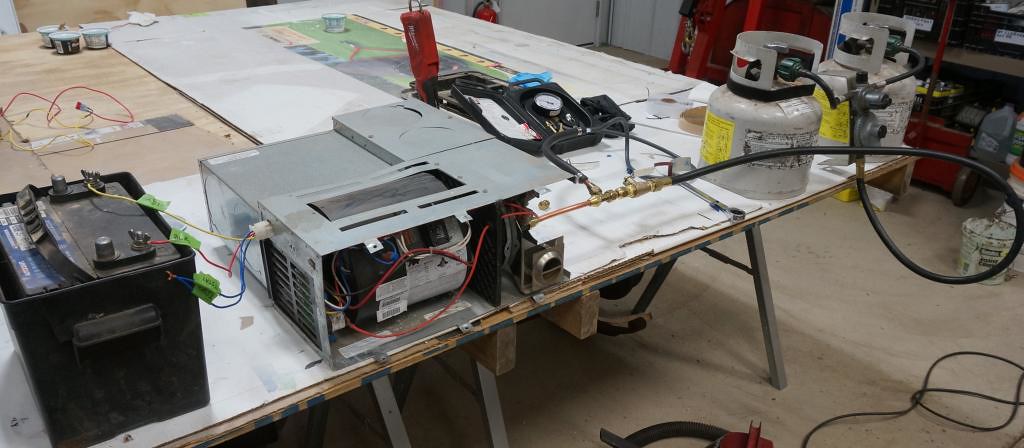
Once the furnace was back together, I did two main test fire checks. The first check was 40 minutes long to establish the normal operating temperatures of the furnace. The second test challenged the hi-temp limit switch.
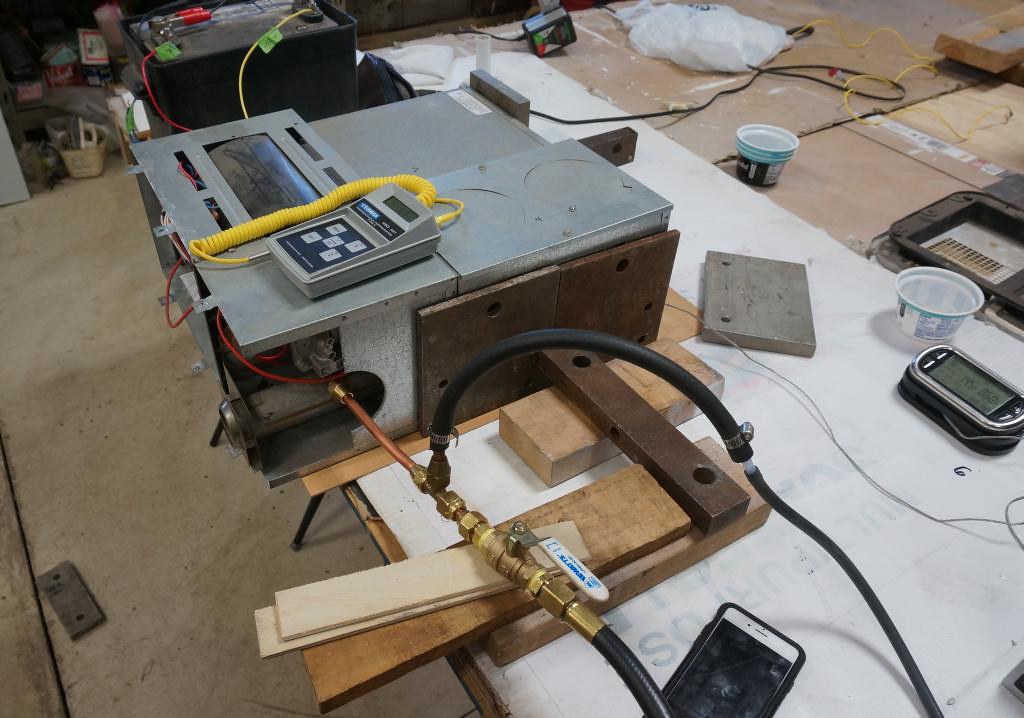
Here is the basic setup of the bench test.

There were six main text points in the first 40-minute temperature check.

Test point 6, was the air temperature next to the hi-limit switch. The pic shows the stem of the remote thermometer next to the hit limit switch inside the furnace.

1= Exhaust port, outside surface temp.
2= Heat exchanger surface temp at discharge.
3= Heat exchanger surface temp at end of gas burner.
4= Outside cabinet temp, above gas burner.
5= Furnace exit duct temp.
6= Hi-limit switch sensor area air temp.
Here is the data from the first 40-minute normal run test. Due to the length of the picture, see the data here on my Flickr photo site
https://www.flickr.com/photos/camper...posted-public/
During the normal bench test, the hi-limit switch would not activate to allow the switch to trip and shut off the gas burner. This 8500 series furnace has a 190F setpoint, -20F reset hi-limit switch. The sensor is seeing air temp and us not contacting the heat exchange metal, so the trip point will be a little higher the 190F setpoint.
I blocked the ports by approximately 70% of airflow with steel plates to force the system into hi-limit. I could not get the sensor to trip on the first hi-limit test. The cabinet temperature ran a little hotter but not hot enough to trip the sensor. I did some more research into this, and it appears on other brands of campers; it is common for the hi-limit switch to trip and shut down the gas valve during so-called, normal operation. The hi-limit switch tripping indicates not enough air moving through the inside furnace cabinet, most times by blocked or miss routed/pinched ductwork. The hi-limit switch is a hi-limit safety, not a cabinet thermostat control that is supposed to cycle the gas valve due to a limited airflow through the furnace cabinet. The research turned up that the hi-limit switch fails open when the switch fatigues from the excess cycles. Since this switch is buried deep inside the furnace, I spent $20 for a new switch, installed it, and re-ran the test. When the camper repair is complete, I will test the furnace in the camper and listen if the gas valve cycles during operation, and if it does, I will look for duct issues. I'll report back on this when the time comes.
Here is the furnace apart again to get to the hi-limit switch. I had to pull the gas burner to hold the fan wheel. The inside blower chamber had to come apart to get to the switch.

The switch itself.

The old switch is now discontinued. No. 4 screws with no. 0 square bit drive heads hold the switch in place. I had to use mini vise grips to get the screws out and order some size 0 square bits.

The current replacement hi limit switch. Dometic PN 37022

The terminals are rotated and a little smaller. It would be best to squeeze the wire connector to work tight on the new switch or replace the wire end.

With the new hi-limit switch installed, I repeated the blocked ports test; I blocked the discharge ports more this time. I would estimate the airports are now 95% blocked.

The test outcome for this 20,000 BTU furnace. Time zero was when the gas burner opened the first time. I used the same remote thermometer to measure the inside cabinet air temperature at the hi-limit switch area. The old switch had ratings stamped on it, setpoint 190F, with a -20F differential.
Start
Time" 0'0" Gas burner on
Hi limit area temp: 57F
Time: 3' 59" Gas burner off
Hi limit area temp: 204F
Time: 5' 41" Gas burner on
Hi limit area temp: 154F
Time: 8' 20" Gas burner off
Hi limit area temp: 206F
Time: 10' 10" Gas burner on
Hi limit area temp: 154F
Time: 13' 20" Gas burner off
Hi limit area temp: 204F
Test over.
By blocking the ports more completely, the system will cycle the burner on and off as it should. The furnace is now ready to install back in the camper.
The next issue deals with the furnace bezel. The plastic bezel had curved corners, and the steel outer cover only screws into the plastic bezel. Due to age or that, whoever installed the cover over tightened the screws. This cracking issue seems to be a common problem for 10 plus-year-old campers. Many times you have to replace the bezel for it being so cracked. On this one, I attempted an ABS solvent weld repair. So far, it is holding.


Here is the now discontinued old part number of the bezel, Dometic PN 37117.

The current replacement bezel is Dometic PN 32611. It is a little different, but it does work. I had to use this on another Sunline.

The furnace mounted in the camper.


The outside cover was painted, and an insect screen installed.
This work completes the furnace serving, Part 1 of 5.
For more pictures on the furnace serving, see my Flickr photo album here. https://www.flickr.com/photos/camper...7718343108663/
__________________
Current Sunlines: 2004 T310SR, 2004 T1950, 2004 T2475, 2007 T2499, 2004 T317SR
Prior Sunlines: 2004 T2499 - Fern Blue
2005 Ford F350 Lariat, 6.8L V10 W/ 4.10 rear axle, CC, Short Bed, SRW. Reese HP trunnion bar hitch W/ HP DC
Google Custom Search For Sunline Owners Club
|
|
|
|
|
03-08-2021, 09:10 AM
|
#123
|
|
Moderator
Join Date: Nov 2006
Location: Ohio
Posts: 12,654
SUN #89
|
Part 2 of 5, spanning from 2/20/21 to 3/6/21, Complete DOT lights, bed frame, water heater alarm system, fresh tank fill hose, and cargo door gaskets
This section is the sum of several tasks that were started and waiting for completion. The first is the DOT lighting and the outside porch lights being mounted and wired.
We now have DOT lights and porch lights! We did power up the camper and the 7 wire plug to ensure all the wiring was correct and the stop, left, right turn signals, and body lights worked before installing.


Next was installing the water alarm, which uses a rope sensor. If the rope gets wet along any portion of its length, the alarm will be activated.
Here are the alarm and a cable extension.

We routed the rope sensor around all four sides of the water heater base inside the drip pan. We were able to do the routing with the heater still in the camper.


We had enough rope sensor length to go near the water pump area.

We are mounting the battery-operated alarm box using Velcro to take it off and on if needed. The only way to shut the alarm down is to unplug the rope sensor or dry up the rope. We can access this area from outside through the new cargo door we added.

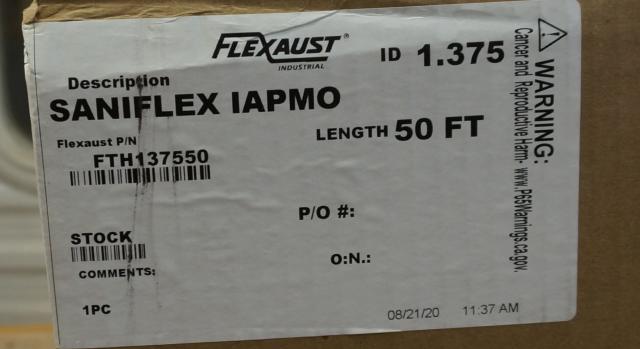
The new freshwater tank fill hose came in. I finally found a better hose than the green and white striped hose Sunline used. The Sunline hose was tough to seal, and it cracked in the thin sections. There also have been Sunline members where the hose disintegrated. I have this issue with one of my other project campers, the 2007 T2499. I found the new hose brand used on my neighbors Keystone fifth wheel. The brand is Flexaust; the type is called Saniflex, and it carries a food-grade application approval. https://www.flexaust.com/product/potable-water-hose/
I bought the hose and clamps from an Ohio industrial hose supplier. Murdock Industrial out of Akron, Ohio. They have several websites and counter sales. Hose Warehouse is the website I ordered it from after calling them and confirming use and availability. We need the 1 3/8" ID for the newer Sunlines. https://hosewarehouse.com/collection...duct-hose-50ft
In my case, I bought a box 50 ft long, and they may sell it by the foot; I did not ask. I needed to do at least two campers, and trying to find short lengths on eBay or other outlets, was very costly if you needed to do more than one camper. Doing two trailers worth paid for the box of 50 ft and I have more left for others.
The difference is, the Saniflex is more smoothbore. The plastic is more rubbery, very flexible, yet the hose is thicker in the thin sections than the prior Sunline hose that would crack in the thin areas. The hose fit the fitting perfectly, and no food-grade silicone was required to seal the hose. I have had a heck of a time needing to use food-grade silicone as Sunline did to seal the hose to the polyethylene tank. T Polyethylene plastic has hard to have anything stick to it. Here is the Saniflex.
Compared to the green and white striped hose.


It fits the water fill door fitting perfectly.

It fits the tank perfectly.


Then there are the clamps. Spiral hose traditionally used a wire spiral clamp. The size of 1 3/8" ID hose is not the most common in this type of clamp. I bought a spiral clamp close to that size 1 1/2", at $8.50 a clamp, but it was too large to fit the hose and too large to fit in the space we had to work within. Murdock being an industrial hose supplier, has lots of other options in clamps. I found these different stainless worm drive clamps, and they work well and are cost-effective on the Saniflex. The clamp is called a liner clamp type.


The difference is, there is a liner inside where the worm drive slots are, and this liner changes the way the clamp works. The band will not roll on its side as a traditional worm drive clamp will on a non-even surface.

The clamp will fit over two flutes of the ribbed hose, and it will not roll to the side as a standard worm drive clamp does due to the liner.

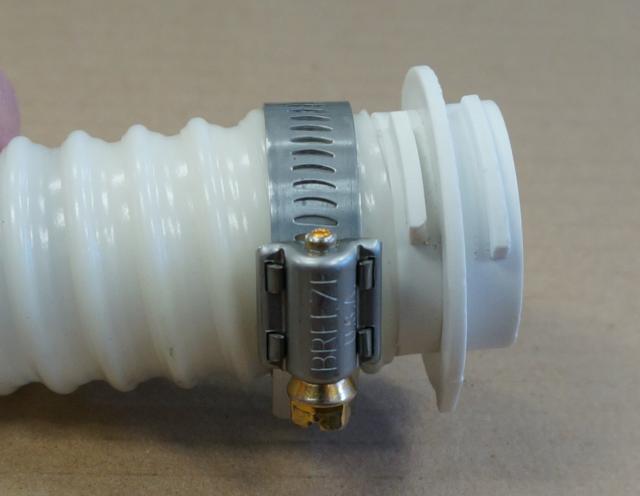

The Aero Seal brand by Breeze, was boxed inside a Dixon box when sold through Murdock
Industrial. Dixon is a significant industrial clamp supplier.

The hose and the liner clamps worked great. Glad I found this lead.
The next task was to finish assembling the bed frame. We found the OSB bed board warped and flexing when being on it. We added reinforcement under the OSB in the bed frame and on the hinged door, which stiffened the bed support very well.
Here is what the bed frame looked like from Sunline.

The added support frame. See the added 2 x 4 reinforcement.

The pivoting bed board lid was also warped in the center. We added a 2 x 4 across the middle, located to miss the added support. It was installed with Kreg screws (pocket hole screws) between the 2 x 3's and the OSB, then screwed to the new reinforcement.


Last was to install new cargo door seal material. All the old cargo door seals were beaten up and disintegrating. In the past, finding the "right" seal has been a challenge. The size needed is 1/2" wide by 3/16" thick wih the right durometer (sponginess). This seal size is not a standard size you can find in the local lumberyards. In our area, I've tried, and that size does not show up, or the foam is too stiff and will not compress enough allowing the door to close. Going thicker to 1/4" and less rigid has had limited success. The extra thickness makes it hard to squeeze and get the door closed and locked on both ends, not to warp the door.
A year and a half ago, I bought a new cargo door for a friend with a Sunline camper from Lippert (LCI). That cargo door came with a very different door seal than I have seen before. This new seal is different from any of Sunline's original seals, and it looked much better. After buying and returning the local lumber yard foam tapes for houses and ordering new seals on Amazon that do not fit, I tried the LCI direct route. I called them up, gave them their part number for the cargo door I ordered, and asked them if I could buy the door seal that they sent with the door. They looked up the bill of material and sent me a drawing of the door seal to make sure it was the right one. Yup, it was. I ordered it. It came in, and I installed them on the cargo doors. It fits very well, it seals great, the adhesive on the back is very good. It does fit a little tight in the hinge area, but so did the new door I bought. I am leaving the doors locked to create the seal's impression to help make it easier to close. Here is the new seal.
It is a P-type bulb seal with grooves. It allows the seal to compress and not create excess bulk, yet create a tight seal. Here is the seal being installed.

A close up.

Fitting around the corners.


The seal is LCI part number 320742, "Wedge P seal ribbed" is the part name.
This work completes part 2 of 5.
More yet to come shortly for this time period,
Part 3, A-Frame reinforcement
Part 4, Roof Eternabond
Part 5, Frame and axle rust removal.
For more pictures on the restoration, see my Flickr photo album here.
https://www.flickr.com/photos/camper...7667376730349/
__________________
Current Sunlines: 2004 T310SR, 2004 T1950, 2004 T2475, 2007 T2499, 2004 T317SR
Prior Sunlines: 2004 T2499 - Fern Blue
2005 Ford F350 Lariat, 6.8L V10 W/ 4.10 rear axle, CC, Short Bed, SRW. Reese HP trunnion bar hitch W/ HP DC
Google Custom Search For Sunline Owners Club
|
|
|
|
|
03-08-2021, 04:00 PM
|
#124
|
|
Moderator
Join Date: Nov 2006
Location: Ohio
Posts: 12,654
SUN #89
|
Part 3 of 5, spanning from 2/20/21 to 3/6/21, Reinforce the A Frame and header.
While this camper does not have any issues now, I am proactively reinforcing this 2004 T1950 A-frame and frame header. I have seen this same frame setup bend before, and I have repaired one of my other project campers that had failed with the same frame size. This size frame's issues come from using a weight distributing (WD) hitch combined with heavily loaded tongue weights or too heavy of a WD bar on the WD hitch. The A-frame bending topic has been discussed before on the forum, and I am open to discussing more if needed. This update is how I addressed the issues. There are other ways and materials for doing this; this is just the method I used. This method may not be adequate for your camper, pending existing damage you may have or the weights or WD hitch loads on the A frame. Use at your sole discretion for what fits your application. What I am showing may not work on your camper.
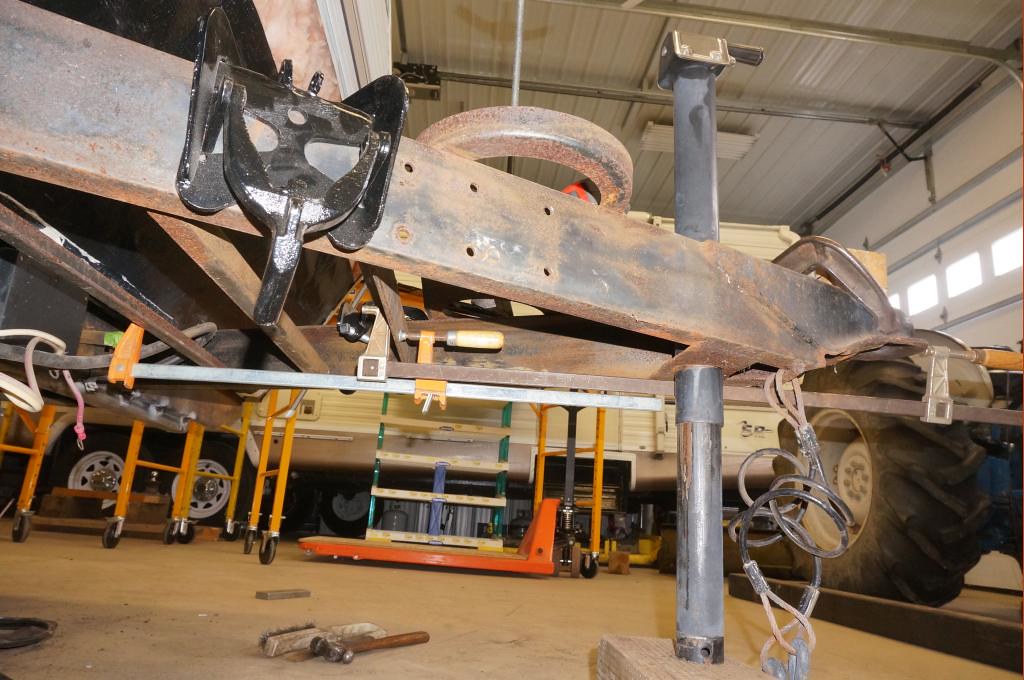
To reinforce the header from bending, I started with 1 1/2" x 2" x 1/8" wall thickness structural tubing. To keep water and debris out of the tube, I cap the tube's ends using 1 1/2" x 1/4" thick flat bar. The tube's length, including the end caps, is the distance from the outside of the left and right main frame rail plus 1" extra overhang on each end.

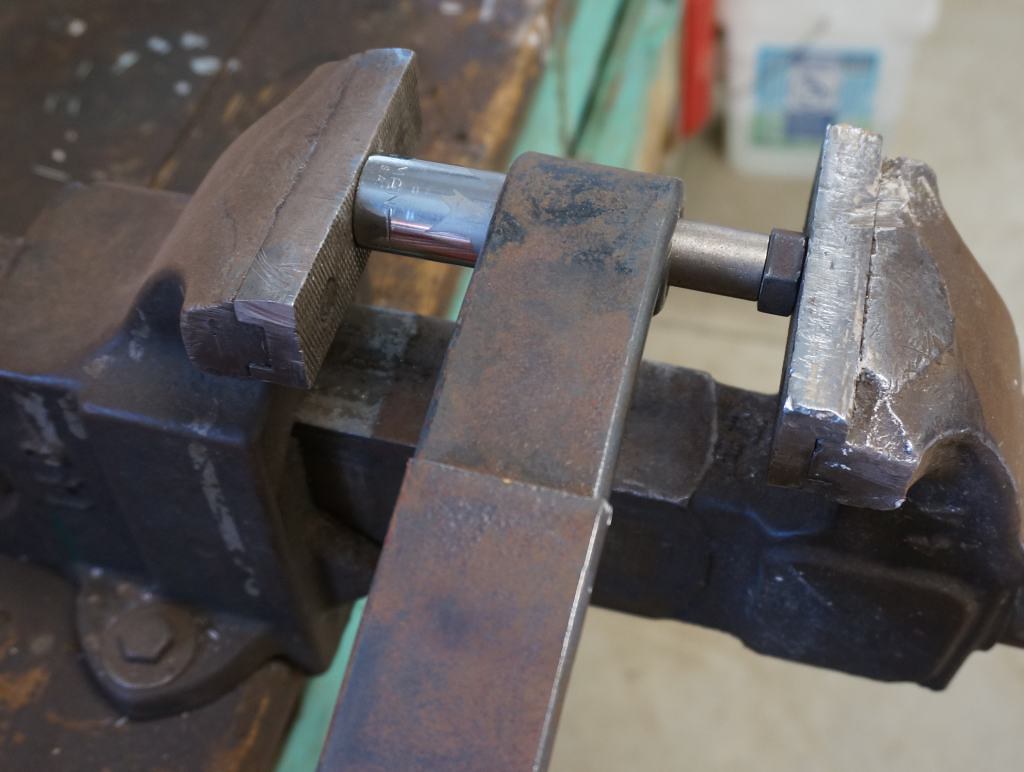
Here are pictures of the capped tube clamped in place before welding. I started with a floor jack to hold the tube in place as I added more C clamps.

The header and reinforcing tube need to be clamped tight in both directions. Tube to header and tube to channel iron rails. The tube is used in this orientation as the header has not yet bent. If the header was bent and needed more strength, I would rotate the tube 90 degrees. 

In my case, the header had a slight bow towards the tow ball. I needed to use four large clamps (all I had) and steel blocks to hold the tube to the header and create no gap, to very little gap, between the header and tube. I welded the center area first, then move a clamp to the outer main frame rail and finish welding the tube to the header. Start with tack welding the tube to the header on the outside by the battery angles area. Again only do the center area until you move the clamps. You will use a series of short stitch welds from the tube to the header.
Before welding the tube to the A-frame or main frame rails, you need to add a heat shield to protect the weld heat from damaging the plastic membrane on the bottom of the floor. I use two sheet metal pieces that I can shove between the channel iron and the plastic membrane.

You can see the heat shield above the left A-frame rail. That weld will be done, then move the shield to the next location. I weld all three sides of the channel iron to the tube. You can see the arc flash where the welds are.


Here is the front side of the tube showing the stitch welds. Use standard weld procols and move around or let the metal cool before adding more weld. You want to minimize excess heat build-up to reduce warping.
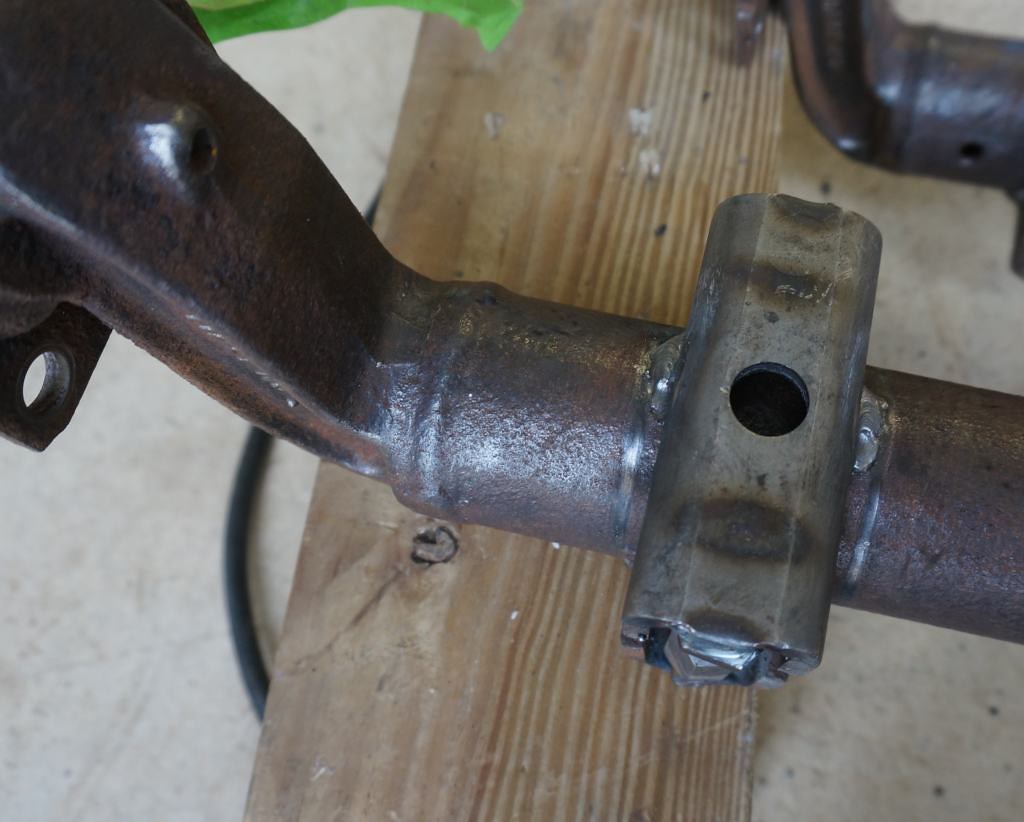
After the header area is welded, I add reinforcement at the WD hitch bracket location on the A-frame rails' sides. You have to know where your snap up or L bracket location will go and leave some excess if you can for slight adjustments. I used 1 1/2" x 2 1/2" x 3/16 leg angle iron mitered to fit inside the frame.
After marking the WD chain brackets, I use a rafter square clamped to the frame aligned parallel to the header. This method allows me to get a dimension to cut the miter and length on the angle iron.

Check three times, cut once.

Test fit the angle for fit and location with the snap-up brackets. Clamp the angle in place for welding.

You can see there is some excess room to tweak the snap up location if needed.

Tack weld the angle in place, then fully weld out the angle on both sides. I welded all around.


The welding slag and smoke cleanup will come when the frame is prepped for painting.
This work completes part 3 of 5.
For more pictures on the frame reinforcing, see my Flickr photo album here. https://www.flickr.com/photos/camper...57718547670797
__________________
Current Sunlines: 2004 T310SR, 2004 T1950, 2004 T2475, 2007 T2499, 2004 T317SR
Prior Sunlines: 2004 T2499 - Fern Blue
2005 Ford F350 Lariat, 6.8L V10 W/ 4.10 rear axle, CC, Short Bed, SRW. Reese HP trunnion bar hitch W/ HP DC
Google Custom Search For Sunline Owners Club
|
|
|
|
|
03-09-2021, 05:59 PM
|
#125
|
|
Moderator
Join Date: Nov 2006
Location: Ohio
Posts: 12,654
SUN #89
|
Part 4 of 5, spanning from 2/20/21 to 3/6/21, Eternabond all roof seams and membrane penetrations.
Here is the product we are using, Eternabond Roof Seal, white from Royal Adhesives. EternaBond RoofSeal
There is a need if you are applying Eternabond (Ebond) over fresh applied Dicor caulk. Three weeks is needed for the Dicor roof caulk to cure and fully gas off. If you do not wait or forget, the gassing off process can create bubbles in the Ebond.
We had adequate time lapse since the new Dicor was applied. Next was to use the Ebond roof sealing tape over all Dicor'ed joints. The purpose of the Ebond treatment is to gain added leak-free protection of the roof system by not having Dicor caulk as the primary seam sealant. When using the caulk as the primary sealant against leaks, it is an uphill battle to stay on top of the cracking caulk as it ages and starts to deteriorate from sun damage. The Ebond treatment is above and beyond what most campers come with from the factory, including Sunline.
The first step in applying Ebond, is to have the roof where the Ebond tape will be used maliciously clean. If you apply the Ebond to an older roof, the roof needs to be washed to remove the dirt and perform a mold kill with a bleach solution if black specs are present. The bleaching step ensures no mold will be under the Ebond tape. We did not have the mold to deal with on a new roof, but we did have talc leftover from the new rubber roof that needed to be removed.
It is hard to see, but you can see the whiter areas along the gutter rail and the other areas where the Ebond will be applied.

The next step I recommend is to use primer, Eternaprime, on the areas you will apply the Ebond. The primer is not a mandate, but I have found it solves any issue with proper bonding. Some areas have lots of bumps and edges to go over, and the added adhesion helps. I have done this successfully with and without the primer, but the primer makes this more guaranteed the tape will not lift. The little added cost to ensure no leaks, it worth it for me. The Eternaprime comes in a spray can or brushable liquid 1 qt can, which will do any size Sunline camper roof. I use the liquid as there is less waste and less mess as it is hard to control the spray pattern on a camper application. I recommend using a respirator during the Eternaprime application, safety glasses, and disposable gloves. It takes 20 to 30 minutes to cure time. I pour some out of the can into a separate container to not have the open quart can gassing off the entire time you are applying.

You can see the shiny primer next to the more dull white roof. Apply enough to cover the area you need, plus a little extra, approx. 1/2". You will clean off any excess when you are all done. 
You can start applying the Ebond on any caulked roof penetration. There is no particular required sequence to which roof penetration comes first unless you have multiple penetrations very close to each other, where the Ebond tape will overlap from adjacent penetrations. In our case, we had a tank vent right next to a shower dome which we taped the vent first, then the shower dome. We did not want excess layers in the one corner where the tapes would intersect. Just think through your roof how you would approach this.

To get more step-by-step instructions installing Ebond, see my first post on this from 2010. https://www.sunlineclub.com/forums/f...ics-11610.html
Here are some pictures of T1950 Ebonding process. If anyone needs help or more understanding on how to use Ebond or why, feel free to ask.
An attic vent being covered using two pieces of 6" wide tape.


The front seam, using 2 strips of 4" wide Ebond. Note: The most forward strip is put on last to have the rear lap joint downwind. It will work both ways, but doing the most forward strip last adds extra protection from wind lifting the tape when towing. Notice, I go down into the gutter rail to the bottom. This practice covers all screws and leak areas. No more vinyl screw cover to trap moisture behind it, rust the screws, and, over time, starts a leak path into the attic.


The rear roof seam, using 4" and 2" Ebond tape. The 2" goes down the back wall the width of the rear molding and folds over onto the top of the 4". Using 2" wide allows the tape to bend and create a nice smooth joint. Using 4" or 6" is too wide and makes a wrinkled application trying to do a 90-degree fold over the top of an arched roof.
The gutter rails, this area is the most problematic area to install the Ebond. However, with training and a few tricks, it is not hard to do. The other post I linked above gives some pointers on the gutter rails; I will highlight the basics here. Ask if you need more; I have lots more pictures of this process.
Getting started,

There is a sequence of how to apply the tape to force the air out in one direction. Start at the very bottom of the gutter to tack the edge of the tape to the bottom of the gutter.

Work the first two feet of length with the release paper pulled back. Make the folds up the gutter rail and force the air up and out the top behind the tape.

The top folded down.

There are several mini-steps in the process above not mentioned. If you want those extra steps, ask away. Pictures of those steps are in the Flickr photo link at the end of this reply.
I learned a new trick this time; you have to have a running 8 feet minimum or more of the tape staged in the bottom of the gutter rail so the tape will apply flat and not start lift as you progress down the gutter rail. I found this time to unroll out the whole length of the camper, or at least 12 feet of tape, and add “holders” in the gutter rail so the tape will not pop up. I use two wood shims back to back to create a parallel low clamp wedge staged every approx. 4ft. You do not want a lot of squeeze, just gentle tension.

Here is the tacking-in-place process where the tape can pop up out of the gutter and be stuck wrong by accident. You gently tug on the tape while you tack the bottom to the gutter rail with the release paper peeled back about 18 to 24” at a time. If the tape were not down in the gutter upstream of the work area, the tape would start climbing up out of the gutter. Hard to explain in words for a real problem you need to master how to overcome. The wedges help make this easier.

It comes out like this in all one piece. You can see the excess primer in this picture as it is shiny next to the edge of the tape on the roof.
I had taught this gutter method to my neighbor when we were doing his camper. He kept forgetting to keep the tape down in the gutter, and it would get stuck up and going uphill. That creates a fold-down mega wrinkle on top. Not to worry, it happens. When it does, stop, do not force it. Just cut the tape before the mess up, cut out the bad part, and start over. Overlap the tape about 1 1/2” and keep ongoing. This tape once stuck on hard, will not peel back off by pulling on it. It is a permanent bond. If you mess up bad enough, again, stop before you make the mess worse. Cut off the strip in a clean location, use a heat gun and a dulled up edge stiff metal putty knife, scrape up the mess, and start over—no need to reply primer. Anyone who has worked with Ebond long enough makes a goof every once in a while. There are ways to fix it, and all is good.
A few pics of the tape applied before the last step, caulking the exposed edge.


Next is to clean the excess primer from the roof beyond the Ebond tape; the Ebond directions state to use lacquer thinner. I have used two different brands of lacquer thinner and have had different results. It appears that there is a dissolving strength difference in brands of lacquer thinner.
The Kleen Strip brand I used worked well in cleaning the excess primer and did not remove the white paint from the siding. Klean Strip | Lacquer Thinner
I ran out of Kleen Strip and bought a can of Jasco Professional Strength lacquer thinner. Jasco | Lacquer Thinner
The Jasco works great for tool cleanup, but it is so strong it will take the white paint off the siding. I stopped using it and used Naphtha to clean off the excess primer that I know would not affect the paint. If you use your lacquer thinner brand, test it on an inconspicuous spot on the camper's siding and see if it will affect the paint.
The last step is to seal the gray exposed edge of the Ebond micro sealant. That gray edge being sticky will attract dirt and, over time, be an issue and look bad. I use a small bead of Dirco non-sag, non-leveling roof sealant on the exposed edge to solve this problem.
Place a very thin bead of caulk next to the exposed edge.

Using a soapy water solution in a cup, I used Dawn and water, wet your finger, and spread the Dicor smooth over the roof and Ebond edge. Do this on all Ebond tape exposed edges, I used 1 1/4 tubes of caulk to do the whole roof.


The pictures of the Maxx-Air fan, fridge vent and, radio antenna used 4" wide tape. The attic vents, tank vents, and Winegurad roof antenna use two 6" wide strips of Ebond tape.
I buy my Eternabond from two sources, both are commercial roof supply companies. I have had positive results from both companies. I will never again buy Eternabond from Amazon. Amazon does not know how to pack the product and I suspect the stock can be old. The 2" roll I bought from them as I needed it a hurry, was smashed on the edges from not being packed tight in the box. This sticky stuff cannot be smooshed in shipping as it will get stuck together on the roll. Commercial roof supply places know how to deal with these types of product. If you have a local place in your area, try them.
Best Materials out of Phoenix AZ. https://www.bestmaterials.com/Eternabond.aspx
Big Rock Supply out of Bensenville, Illinois
https://www.bigrocksupply.com/eterna...-50-white.aspx
Compare price and shipping, both are competitive and prices change from time to time.
This work completes part 4 of 5.
For more pictures on the Ebonding process on the T1950, see my Flickr photo album here.
https://www.flickr.com/photos/camper...h/51008666713/
__________________
Current Sunlines: 2004 T310SR, 2004 T1950, 2004 T2475, 2007 T2499, 2004 T317SR
Prior Sunlines: 2004 T2499 - Fern Blue
2005 Ford F350 Lariat, 6.8L V10 W/ 4.10 rear axle, CC, Short Bed, SRW. Reese HP trunnion bar hitch W/ HP DC
Google Custom Search For Sunline Owners Club
|
|
|
|
|
03-12-2021, 10:51 PM
|
#126
|
|
Moderator
Join Date: Nov 2006
Location: Ohio
Posts: 12,654
SUN #89
|
Part 5 of 5, spanning from 2/20/21 to 3/6/21, Frame and axle rust removal.
Scraping rust is a dirty task that, once done, you are always glad it is over. I must say, with the axles out of the camper; it sure makes this process go a lot easier. Here are some pics of the frame de-rusting work which is the first step in repainting the frame and suspension.
Hand wire brush, scraper, and in a few places, wire brush on a 4 1/2" grinder. The pics do not do justice to the rust and dirt on the shop floor, and everywhere else. ")

A picture with the flash turned on.

Then onto the axle area. Here is one axles at the start.
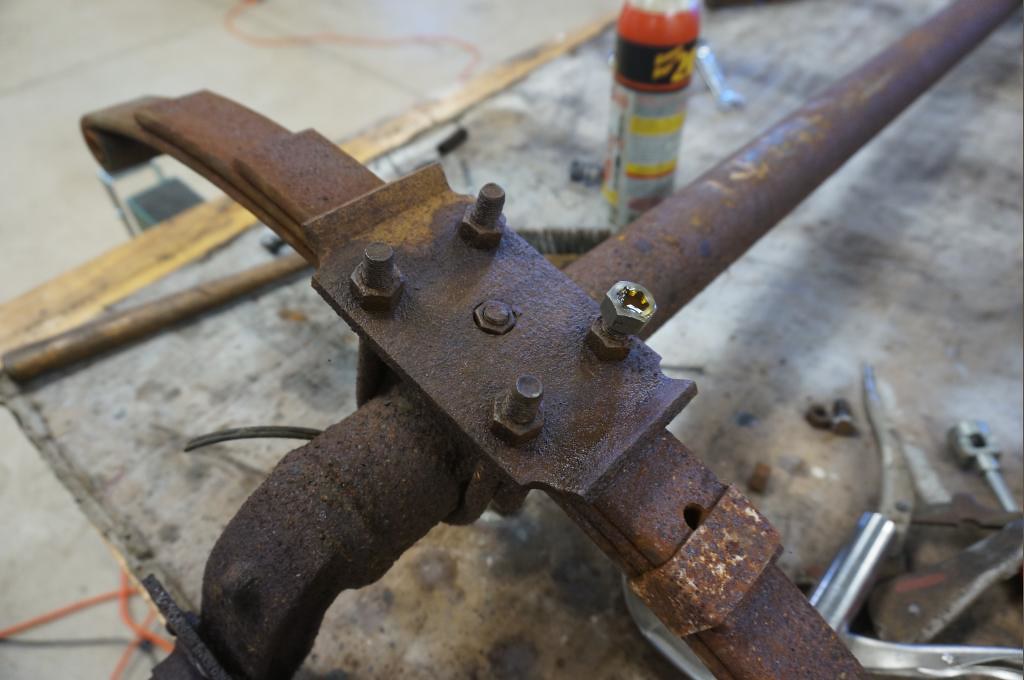
The brake plate bolts heavily rusted. This rust is typical of a camper restoration on a 16-year-old camper that lived outside most of its life. Lots of penetrating oil, work the nuts back and forth and sometimes the nuts come off. Other times, you have to cut them off.

The leaf spring U bolts rusted the same as the brake plate bolts. There are excess threads exposed; running a chaser die over them helps the nut spin-off easier. Again lots of penetration oil, work the nuts back and forth, and with an impact wrench, the nuts come off. When the threads gall all up, use the cut-off wheel on a 4 1/2" grinder and cut the U bolts off.

Waste tank mounting plates to clean up.

The front and rear stabilizers took apart, ready to start the de-rusting process.

The front and rear stabilizers rust scraped/brushed, ready for cleaning.

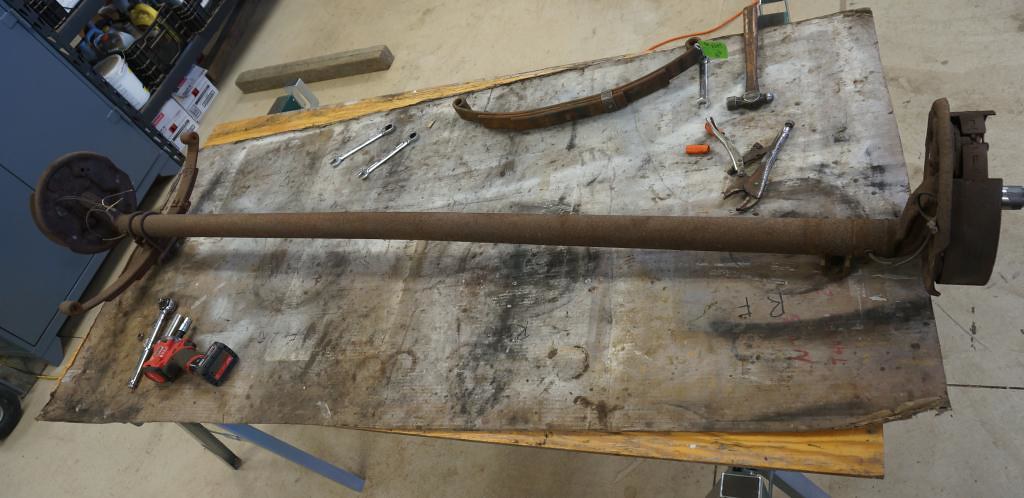
One of the axles and leaf springs rust scraped and ready for cleaning.

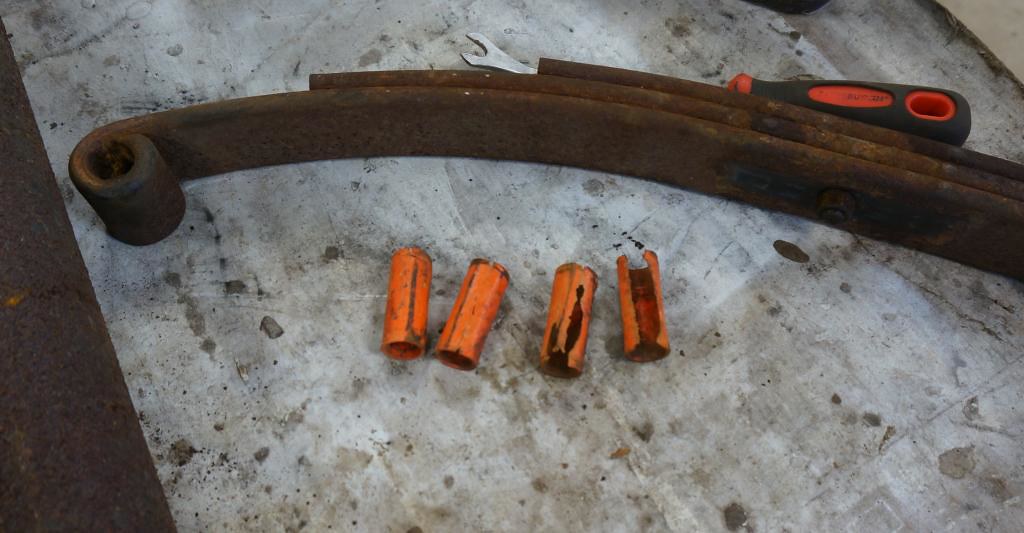
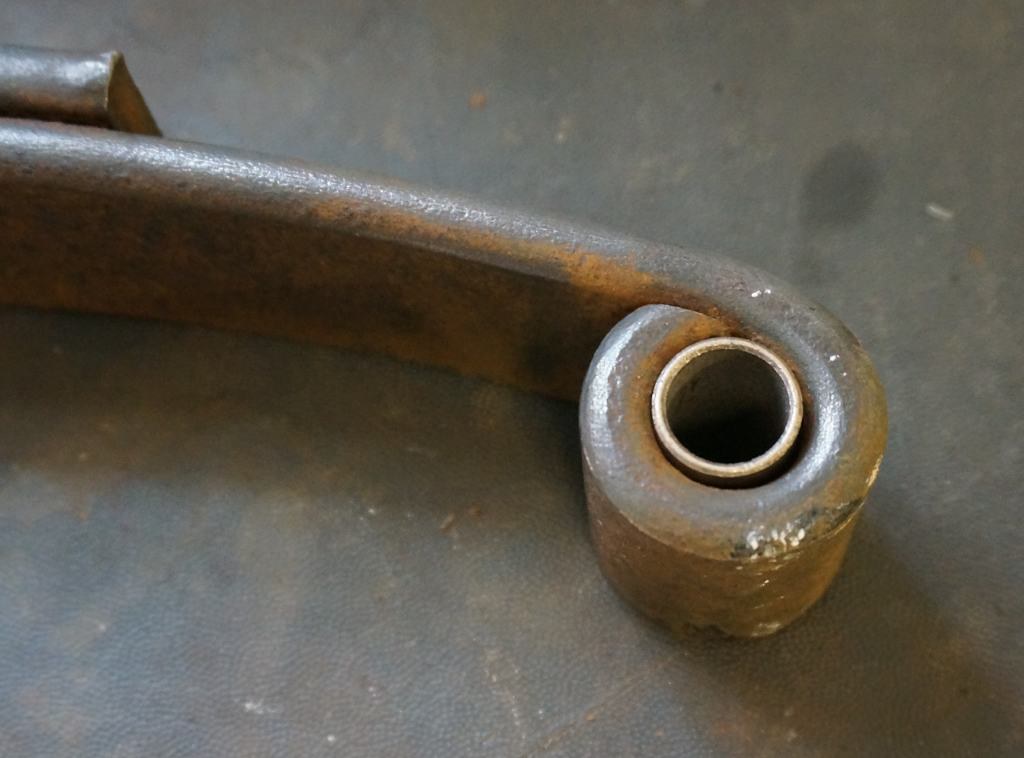
The front axle spring eye bushings are shown here with them worn through. The good news, the mileage was low enough the spring pins rubbing steel on steel did not heavily damage the spring eyes.
The rear axle, showing all of the spring eye bushings worn through. This wear is typical of the standard nylon spring eye bushings. Dexter states every 6,000 miles to check the suspension, including these bushings which means you have to take the spring pins out and inspect for wear. From what I have seen, between 8,000 to 10,000 miles, the wear is close to or already through the bushing. When was the last time you checked your suspension if you are still using the standard nylon bushings?

Here is a classic failure of the brake wire running through the axle tube. As the miles and years go by, the axle tube's brake wire inside the tube, gets brittle and can crack the insulation. The problem is compounded by the wire rubbing on the inside of the axle tube, mainly in the middle. That rubbing wears through the insulation, and let go long enough, will wear the wire's insulation bare to create a short in the electric brakes, not allowing them to work right. A close-up picture of the rub wear. This one is not all the way through yet, but well on the way to getting there. We will replace all the brake wiring.


Last is to clean up the brake drums and check if they spin true enough for self-adjusting brakes, which will add all new.
Start with this.

The clean-up tools.

The magnet surface is in good shape, and the brake lining surface is cleaned up too. The ductile iron drums look bad, but most times clean up well.

Now to check the drum run out to see if they spin within tolerance. The first one checked, it spun within 0.003” T.I.R. I was shocked it was that good. This one passed; now I need to check the rest and confirm they are within tolerance.

This work completes part 5 of 5, and all the rust scrapping. Next is to clean and coat/paint the frame and suspension.
This update now completes all work to date spanning from 2/20/21 to 3/6/21.
Work tally on time and materials to get to this point;
Work completes Day 70 of the repair.
2/20 through 3/6/21;
1 worker totaling 30.92 hr.
2 workers totaling 25.67 hr.
----
56.58 hrs total 2/20 to 3/6/21
598.99hr. - Total work hours accumulated to date: 3/6/21
New material use: 3/6/21
$3,339.04 Prior material subtotal 2/15/21
$596.22 Work period subtotal. 2/20/21 to 3/6/21
----------
$3,935.26
Materials Subtotal to date 3/6/21
Thanks for looking.
John
For more pictures on the axle, frame, and suspension restoration process, see my Flickr photo album here.
https://www.flickr.com/photos/camper...57718542592561
__________________
Current Sunlines: 2004 T310SR, 2004 T1950, 2004 T2475, 2007 T2499, 2004 T317SR
Prior Sunlines: 2004 T2499 - Fern Blue
2005 Ford F350 Lariat, 6.8L V10 W/ 4.10 rear axle, CC, Short Bed, SRW. Reese HP trunnion bar hitch W/ HP DC
Google Custom Search For Sunline Owners Club
|
|
|
|
|
03-16-2021, 09:47 AM
|
#127
|
|
Moderator
Join Date: Nov 2006
Location: Ohio
Posts: 12,654
SUN #89
|
This update spans from 3/7/21 to 3/13/21 and will be in multiple parts (Part 1 3) to keep the pictures per area in task sequence over the seven days. The total work hours for this period were 30.33 hours. I will show the materials lists and costs at the end of part 3. If anyone needs a breakdown of time and cost per task, let me know.
Part 1 of 3, Complete the frame painting
After the parts, axles, and frame were rust scraped, I used a water-based cleaner called Klean from KBS coatings to clean the parts and frame. You spray it on, let it soak, scrub the metal and rinse. The parts were easier, and the weather cooperated, allowing me to do it outside. The camper frame inside was more work. I have motor mixing tubs under the frame to catch the dripping liquids. I did not get pictures of the cleaning process.
The frame coating system used is KBS Rust Seal. https://www.kbs-coatings.com/
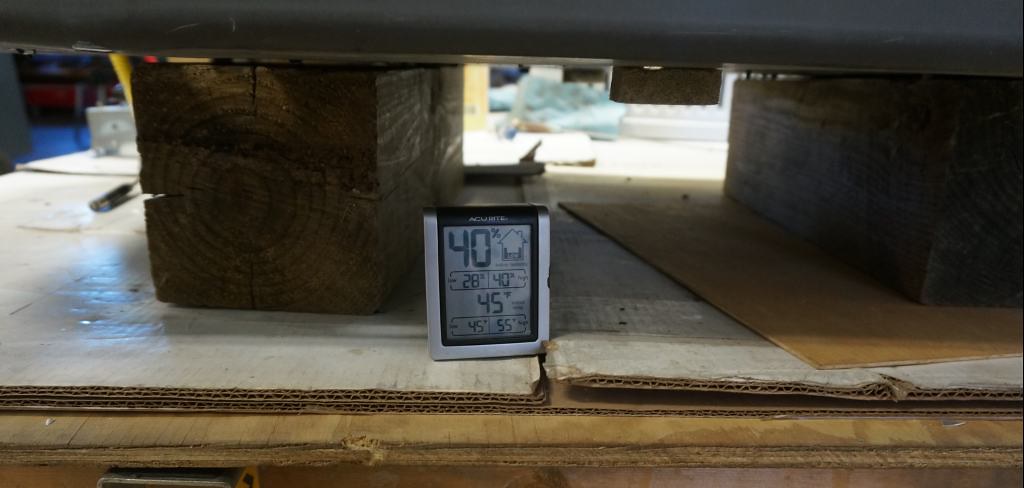
It is a moisture cure coating. The relative humidity in the barn needs to be 50% RH, or it takes a long time to cure, and you need to do two coats. The coating requires drying enough that a fingerprint is not visible before applying a second coat. You do not want to wait over-night as then you have to sand it to ruff it up to allow it to stick. The weather cooperated, and I had 57% RH, and within 3 hours, it was ready to be recoated.
Here are some pics of the coating outcome.
Leaf springs in the process of being coated.


The axles coated.

The camper frame.

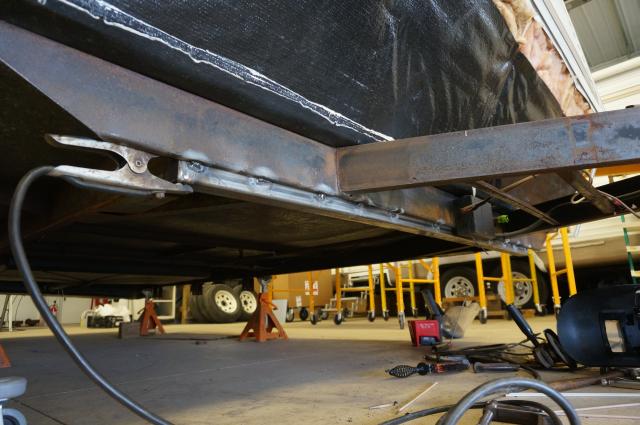
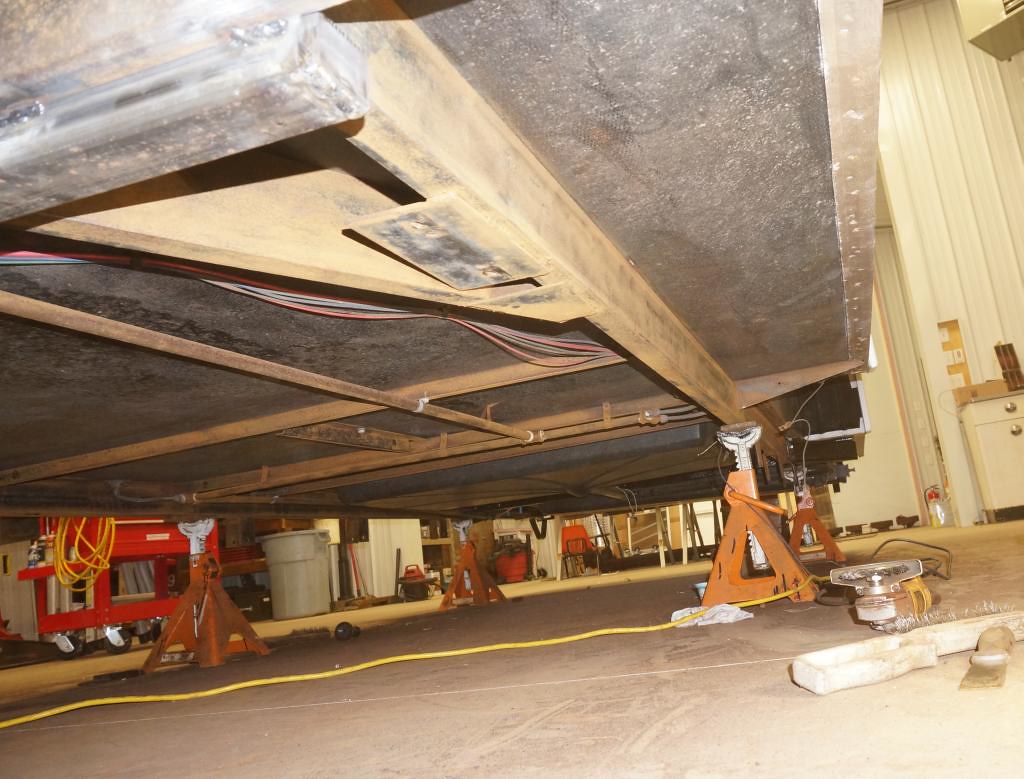
A picture of a bottom view looking at the frame header under the camper.

The A-frame. The KBS product will dull Its color after long-term sun exposure. The color dulling does not affect the rustproofing; it just looks dull. On the frame which is under the camper, it received two coats of the KBS Rust Seal. The A-Frame received one coat of KBS and one coat of Rust-Oleum Professional black gloss enamel, which will keep its surface color/shine.

The stabilizer parts being treated with Rust-Oleum Professional gray metal primer. These same parts will later be painted with Rust-Oleum Professional black gloss enamel.

This work completes the camper frame painting, Part 1 of 3.
For more pictures on the camper frame painting, see my Flickr photo album here.
https://www.flickr.com/photos/camper...57718542592561
__________________
Current Sunlines: 2004 T310SR, 2004 T1950, 2004 T2475, 2007 T2499, 2004 T317SR
Prior Sunlines: 2004 T2499 - Fern Blue
2005 Ford F350 Lariat, 6.8L V10 W/ 4.10 rear axle, CC, Short Bed, SRW. Reese HP trunnion bar hitch W/ HP DC
Google Custom Search For Sunline Owners Club
|
|
|
|
|
03-16-2021, 09:49 AM
|
#128
|
|
Moderator
Join Date: Nov 2006
Location: Ohio
Posts: 12,654
SUN #89
|
Part 2 of 3, spanning from 3/7/21 to 3/13/21, Axle sub assembly/
Next was to start the suspension and axle repair and upgrade to an under over spring conversion. The painting of some parts is out of order in this reply. The axle parts shown are to keep the post in technical sync.
I replaced the worn nylon bushings with Dexter bronze bushings. The leaf spring eyes were not heavily worn, and the bushings pressed in with a good fit. I used a large vise as the press.
Here are the tools of the bushing press. A fixed-up old spring bolt with the serrations ground off is used as a bushing press tool and a socket to back up the spring during pressing.

You start the bushing without the back-up socket. The spring bolt will bottom out once the bushing is started in the spring eye.

Back off the vise clamp, insert socket, keep pressing until the bushing end edge aligns with the spring eye width.

Here is the standard bronze bushing pressed in the spring eye. We have had some good discussions on the lack of 100% support of the bronze bushings, and you can see it here. The spring edge radius and the eye curl end allow a small portion of the bushing to be unsupported. As the miles of towing add up, the bushing can crack from flexing and the lack of support. While this is not great, this method outlasts the nylon many times over. The mileage this camper will see, these will give tolerable service. I may do a different correction on spring bushings on my larger T310SR when the time comes. I expect the T310SR to accumulate a good amount of cross-country travel. Hopefully, by then, RRS2670 (Russ) and Tod Osier will have some info back from their spring eye upgrade.

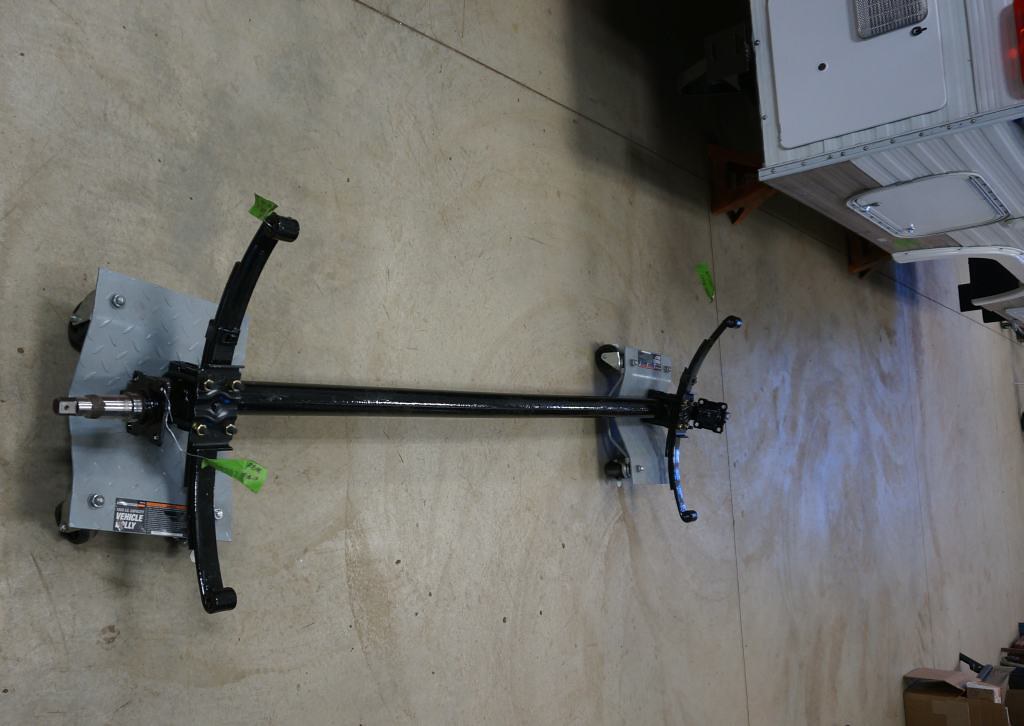
We are also doing a spring under over conversion to gain more clearance under the camper and wheel wells. Here are some pics of the conversion.
The parts. Dexter conversion kit for one axle 2 3/8" OD tube.

I am installing the upper axle seat. It needs to be directly over the lower original axle seat, so the leaf spring center bolt pilots the new axle seat in the same place. I use a combination square to check alignment. Check both sides and adjust as needed.
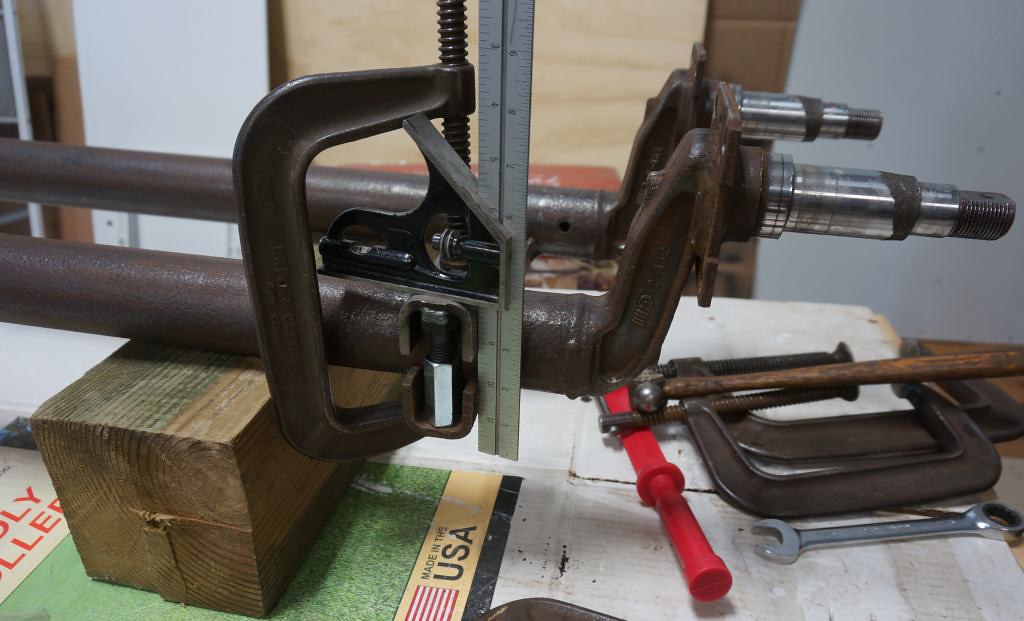
You need to adjust the coupler nuts to touch lightly on the old axle seat and that both sides of the new axle seat are parallel. I used an outside spring caliper to feel both sides are even. Dexter states that both sides need to be within 1/32" in height; with a little extra time, you can do a lot better than that. The large C clamp needs to be tight and the coupling nuts to kiss the lower axle seat. You want the new axle seat tight to the tube and no air space on the coupler nuts.

Dexter did a great job stamping and forming the new axle seats. When the caliper was set to allow both sides to have the same drag feel, that same setting worked on all four-axle seats.

Dexter states to tack weld the new axle seat to the axle tube. I put a short stitch on both sides of the axle seat and tack on the coupler nuts to the old axle seat. We do not want the coupler nuts coming loose.


After coating the leaf springs and the axle tubes, I wire brushed the new axle seat and the spring where they contact each other to remove any coating. I did not want any coating or paint in that joint for two reasons. The U bolts tension could change when the paint deteriorates and flakes out of the joint under extreme pressure. I did not want to change the steel's friction on steel with a coating or paint in the mix. The friction at the axle seat holds side thrust in the springs.

The U bolt nuts are finger-tight at this stage. I have to do an axle alignment during installation, and the springs need to move to line up in the hangers.

Ready to roll in under the camper.
This work completes the axle sub-assembly, Part 2 of 3.
For more pictures on the axle work, see my Flickr photo album here.
https://www.flickr.com/photos/camper...57717387573591
More yet to come soon on the AC unit cleanup and test, and the roof items assembly.
__________________
Current Sunlines: 2004 T310SR, 2004 T1950, 2004 T2475, 2007 T2499, 2004 T317SR
Prior Sunlines: 2004 T2499 - Fern Blue
2005 Ford F350 Lariat, 6.8L V10 W/ 4.10 rear axle, CC, Short Bed, SRW. Reese HP trunnion bar hitch W/ HP DC
Google Custom Search For Sunline Owners Club
|
|
|
|
|
03-16-2021, 01:34 PM
|
#129
|
|
Moderator
Join Date: Nov 2006
Location: Ohio
Posts: 12,654
SUN #89
|
Part 3 of 3, spanning from 3/7/21 to 3/13/21, AC unit clean and test, and roof items assembly.
I never knew if the AC unit on this camper worked. Before we put the roof unit on the camper and a new AC roof gasket, we needed to check the roof unit on the bench. Here is the AC unit clean and check process.
The cover shroud was heavily sun sun-baked brittle as expected and needs replacing. Here are a few pictures of the roof unit when we started. Not that bad, but dirty and in need of cleaning.


The coil areas are a need to check how dirty they are. For sure, they need cleaning.
The inside evaporator coil is dirty, complete with a mud dauber nest.


The outside condenser coil is very dirty.


I checked inside the capacitor box; bees nests like to form in here. This capacitor box was clean from the get-go.

Both coils cleaned up well. There were some creased coil fins that I straightened out. The cleaning was a combination of compressed air, vacuum, and a soft bristle brush. It was too cold outside to do a wet cleaning of the coils. The dry clean came out well.


Put all the sheet metal back in place to get ready for a test run. The good news, the fan motor did not freeze up, which was a good sign. Next is to check the fan and compressor system.
These non-ducted AC systems use a simple control system. A speed selector switch controls the fan, low, med, and hi-speed. Create a temporary AC power line, feed the control box 120 VAC, and the controls are all powered. There is no 12 VDC on this system.
Turn the fan on, and it works. It is drawing 2.94 amps, and the fan blade runninglow, med, and hi-speed all work.

Next is the real test, the compressor system. This non-ducted system uses a capillary tube mechanical thermostat. And I had to work at it to get the T stat to turn on. This mechanical thermostat only works between 65F to 90F ambient. Above or below that range and the compressor will not start. The barn temperature was 57F, which explains why the compressor will not start regardless of where the temperature control knob is set. I helped get the capillary tube warm-up and the side of the control box in that range.
I used a heat gun on low, blowing on the capillary tube. Now we have 6.96 amps and the compressor running, and that is a good start. The system is working, but we do not know yet if it will cool.

The most basic way to tell if the system does not have a gas leak and the compressor is working is to test the hot and cold pipes going in and out of the compressor. After a short period of running, the cold line at the top of the evaporator is getting very colda good sign.

The hot pipe at the top of the compressor is getting very hotanother good sign.
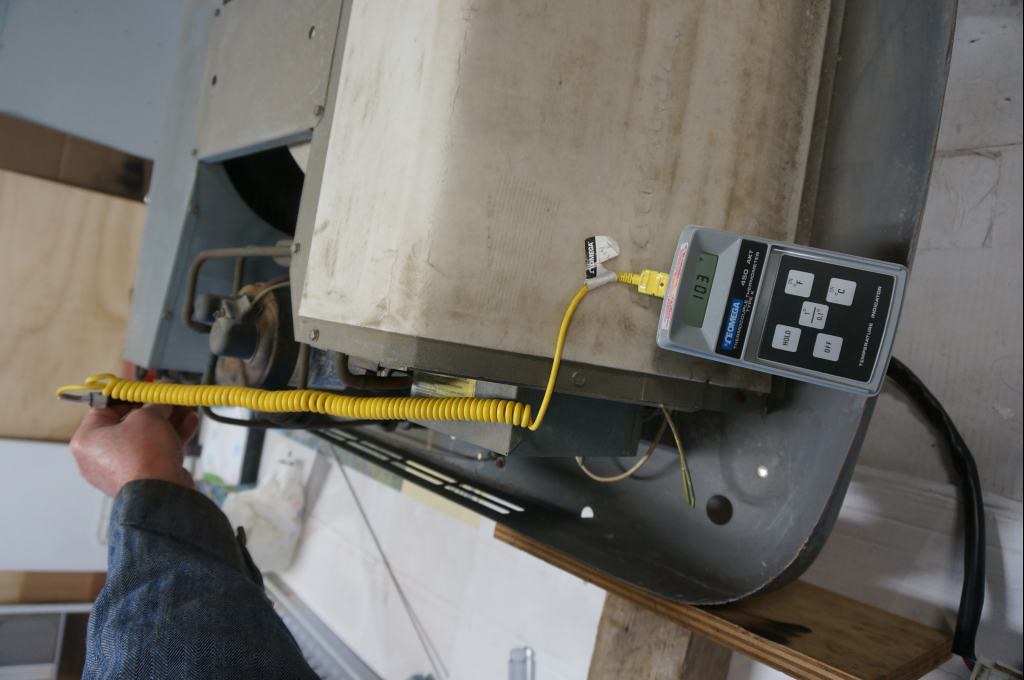
Both of those lines were 57F when the testing started. Next is the air temp check.
57F degrees intake air (the barn temp).

And 45F air coming out of the evaporator discharge. That is a 12-degree drop in air temp for the time length I ran the system. To note: This is only an 11,000 BTU unit.
The system passed enough to change the roof gasket and mount the roof unit on the camper roof. One of the easier ways to get the bulk of the roof gasket off is to use a flat blade attachment on a vibrating tool. It cuts the majority of the gasket off. Then use a heat gun and scraper to get most of the stuck-on gasket off, then chemically cleaned with 3M adhesive remover to the remaining small traces of the gasket off.
The old gasket ready to come off.


The new gasket is 1" thick. I only use the Dometic gaskets as I have heard some of the aftermarket gaskets collapse over time, losing the seal. I have not experimented with other brands as I know the Dometic ones work.
The adhesive released paper side

The other side.

Then to get the AC unit up on the roof. We staged the AC unit on a scaffold on blocks which allowed us to lift that high from the ground. The blocks help not to disturb the new roof gasket. Then climb on the scaffold and lift it onto the roof.


Both of you get up on the roof and lift the AC unit over the roof opening. Do not drag the AC unit as it will damage the roof gasket. Once rough placed, one worker goes inside and lines up the screw holes in the corners while the other work lifts some weight up. You equally space the four 1/4" threaded holes into the four corners of the roof opening.

While I was cleaning up and testing the AC unit, BenB was on the roof, installing the rest of the roof items. The roof is close to completion; the remaining items are the roof antenna head, the radio antenna, and the AC shroud.
Maxx air covers on, all attic vent covers on,

The front Maxx fan and fridge vent cover installed.

This work completes the AC unit clean and test and roof items assembly, Part 3 of 3.
Work tally on time and materials to get to this point; Work spanning from 3/7/21 to 3/13/21.
Work completes Day 74 of the repair.
3/7 through 3/13/21;
1 worker totaling 19.00 hr.
2 workers totaling 11.33 hr.
----
30.33 hrs total 3/7/21 to 3/13/21
629.32 hr. - Total work hours accumulated to date: 3/13/21
New material use: 3/13/21

$3,935.26 Prior material subtotal 3/6/21
$363.54 Work period subtotal. 3/7/21 to 3/13/21
----------
$4,298.80
Materials Subtotal to date 3/13/21
Thanks for looking.
John
For more pictures on the AC unit cleaning and testing, see my Flickr photo album here.
https://www.flickr.com/photos/camper...57718659978538
__________________
Current Sunlines: 2004 T310SR, 2004 T1950, 2004 T2475, 2007 T2499, 2004 T317SR
Prior Sunlines: 2004 T2499 - Fern Blue
2005 Ford F350 Lariat, 6.8L V10 W/ 4.10 rear axle, CC, Short Bed, SRW. Reese HP trunnion bar hitch W/ HP DC
Google Custom Search For Sunline Owners Club
|
|
|
|
|
03-24-2021, 09:32 AM
|
#130
|
|
Senior Member
Join Date: Sep 2010
Location: Michigan
Posts: 854
SUN #1546
|
THAT LOOKS GREAT! I have been thinking about painting my tongue and frame too! Might as well with everything else I ned to get done
__________________
__________________
 Joan & Miss Emme Lu Who
Full Timing in T-1950 2005 Anniversary Model
1997 6.5L Chevy Turbo Diesel Truck
"Pure Michigan"
Facebook: Apackof2 for the Rd
|
|
|
|
|
|
|
Currently Active Users Viewing This Thread: 1 (0 members and 1 guests)
|
|
|
 Posting Rules
|
You may not post new threads
You may not post replies
You may not post attachments
You may not edit your posts
HTML code is Off
|
|
|
|
 » Recent Sunline Discussions
 |
|
|
|
|
|
|
|
|
|
|
|
|
|
|
|
|
|
|
|
|
|
|
|


 Linear Mode

