 |
|
 12-31-2020, 04:12 PM
|
#101
|
|
Moderator
Join Date: Nov 2006
Location: Ohio
Posts: 12,654
SUN #89
|
Quote:
Originally Posted by apackoftwo

It does my heart good to see a 1950 saved and brought back to her (even better than)glory days! The roof looks beautiful! 
However, looking at that roof corner makes me wonder if my corner is that bad 
Also John was looking for the same detailed threads of your 2363 restore but I can't find any? Could you post the link(s)??
Thanks! |
Thanks Joan 
When I acquired this T1950, the very nice Sunline member said just about the same thing. She really wanted the camper to go to someone who would restore it to it's full glory and go camping once again. She had many fond memories in it and was really hard to let it go. Her current and future situation did not allow her to camp any more with all the towing, camp setup etc. We really get attached to our Sunlines. Lots of great memories in them I can attest to this.
The T2363 restore, I never made it to making a post of just that camper, yet anyway. I use pics of it from time to time in other responses helping folks out. This link will take you to my 2005 T2363 collection of pics that are uploaded to my photo server. I have gig's more of them, just not up on the server. There are 3 different 05, T2363 Sunlines in that photo group. Most of the subdirectories are of the restored camper I did, but there are 2 other campers I inspected for a friend or was helping the other friend with their WD hitch setup.
https://www.flickr.com/photos/camper...7691474240364/
To your right rear roof issues comment, if you had an attic vent in the roof behind the bedroom crank up ceiling vent, the attic would have a chance to dry out rather then have wet insulation and wood just fester. It is amazing when air can get to the wet area of camper, just how much can dry out. Sealed up, almost nothing dries, it just festers even if the leak has been sealed shut.
__________________
__________________
Current Sunlines: 2004 T310SR, 2004 T1950, 2004 T2475, 2007 T2499, 2004 T317SR
Prior Sunlines: 2004 T2499 - Fern Blue
2005 Ford F350 Lariat, 6.8L V10 W/ 4.10 rear axle, CC, Short Bed, SRW. Reese HP trunnion bar hitch W/ HP DC
 Google Custom Search For Sunline Owners Club
|

|

|
|
01-01-2021, 07:44 AM
|
#102
|
|
Senior Member
Join Date: Sep 2010
Location: Michigan
Posts: 854
SUN #1546
|
Thanks John and your right about so many fond memories attached to our Sunlines!
Happy New Year!
__________________
 Joan & Miss Emme Lu Who
Full Timing in T-1950 2005 Anniversary Model
1997 6.5L Chevy Turbo Diesel Truck
"Pure Michigan"
Facebook: Apackof2 for the Rd
|
|
|
|
|
01-06-2021, 08:23 PM
|
#103
|
|
Moderator
Join Date: Nov 2006
Location: Ohio
Posts: 12,654
SUN #89
|
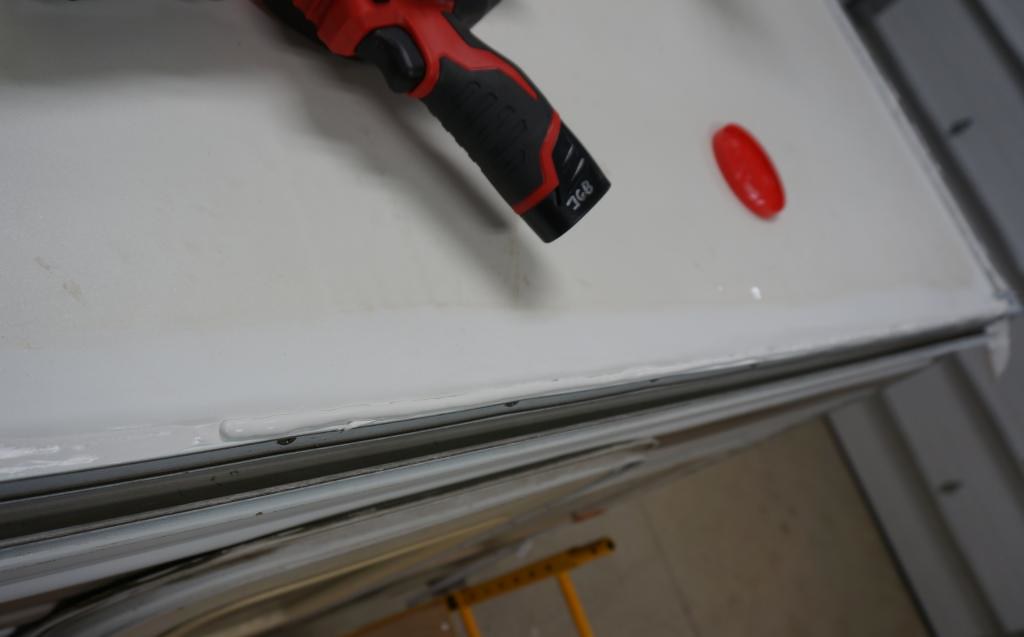
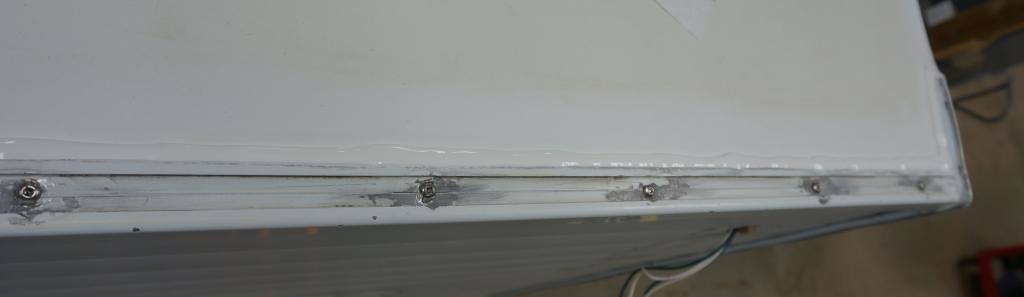
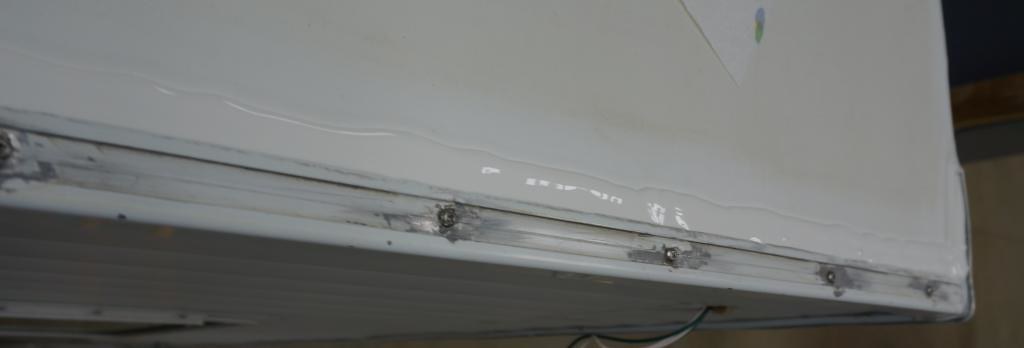
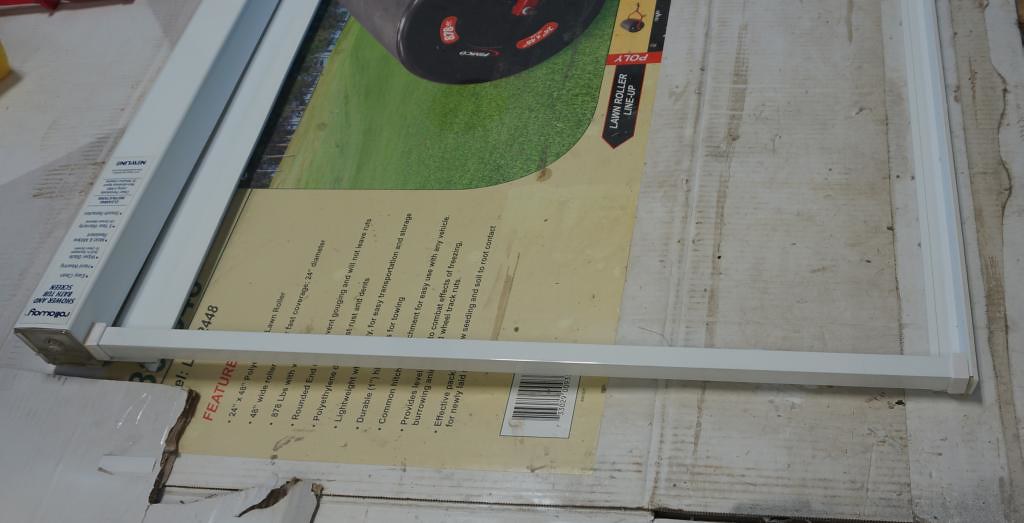
We had another workday to finish the roof items install and apply the roof lap sealant.
I am finishing up the front wall to roof seam. The front and rear roof seams are critical that they get sealed well. These are known leak areas.
Start with cleaning the area to make sure all dirt is removed. A quick Naphtha clean does the trick.

Since there is a height difference between the roof rubber surface and the siding, start with adding a strip of 3/4" wide x 1/8 thick butyl tape to the rubber to take up the difference.


Then comes the top cap flat molding. A tip to pass along, using a sharp drywall knife, trim the excess butyl tape which hangs over the molding before applying the molding. Pre-trimming makes this area clean up more manageable on the rubber membrane.

The entire front seam molding width requires butyl. If the butyl tape width you have does not cover in one strip, multiple strips are needed to cover the width.

Before removing the release paper from the molding, check the overall molding length to fit between the two front corner moldings. Trim the molding length as needed to work. Then remove the release paper and warm the front siding and butyl. I flip the front cap molding over and warm all three areas at once the full length.

Using at least two ice picks or other line-up tools are needed to position the cap molding screw holes to the front siding end edge. The molding screws need to be centered at that siding edge to provide equal molding overlap to the roof membrane and front wall siding. Once the molding is aligned, press the molding to the roof.

Take care when putting the first screws in that the cap molding does not shift position. Warm the molding again, and using a clutch setting on a cordless drill, start putting the screws in. Keep warming approximately every 3 feet of screws in the cap molding. The warm butyl will ooze out. Check each screw for torque by hand. The amount of butyl at this front seam is a lot, and you need to make sure it is tight. It is common to get 1/2 a turn on the screw by hand beyond the drill torque. If you try and do the final torque with the drill in one quick strong motion, you can pop the heads off if too much drill torque is applied.


Next is trimming off the excess butyl. It would be best to have a plastic trim tool with a radiused blade end not to dig the rubber membrane while trimming the butyl.

The siding side trims easily as the stiff siding allows a clean cut. The rubber side is more complicated. The butyl wants to smear and ball up, sticking to the rubber. I find gentle warming helps the trimming. Too much heat makes a mess, too little heat, and you dig into the rubber too quickly, you will get the feel of what is the right heat. Grab the excess trimmed butyl and gently tug it away as you peel the butyl off with the scraper. There is a pressure feel to this with the scraper. Too much pressure with the scraper will dig through the membrane, too little, and you do not cut the butyl, and it is smear stuck to the rubber. Practice and enough time doing this, you can get all 8 feet to come off with little issues.

If you create a tear in the membrane, patch the tear with a small piece of Eternabond. Do not only caulk over a tear. The front seam has too much flex for caulk alone over a tear at the front seam.
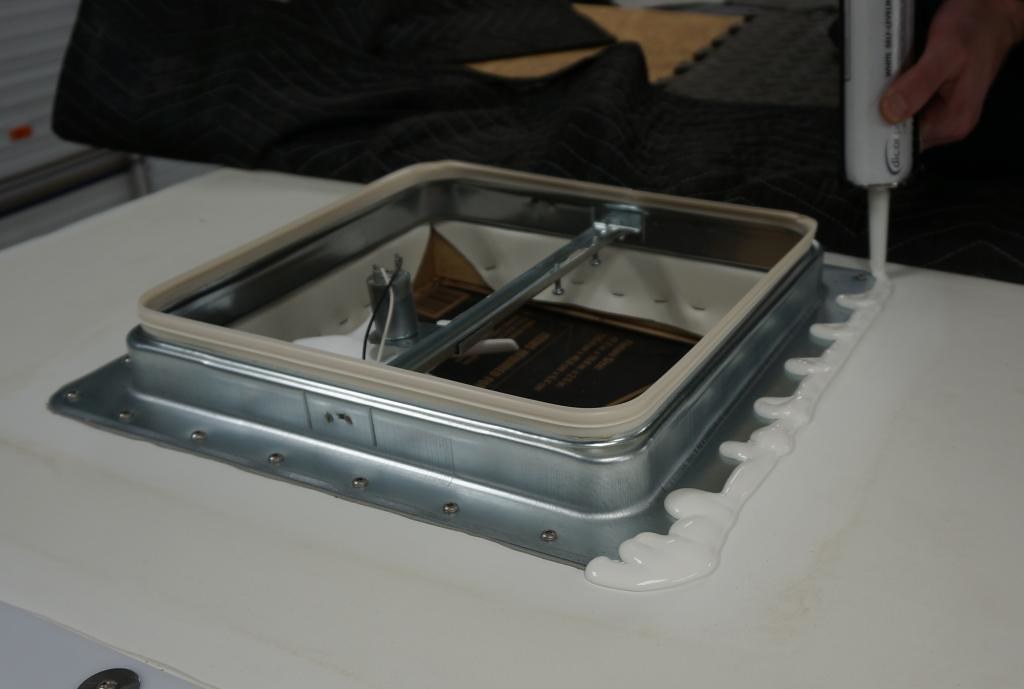
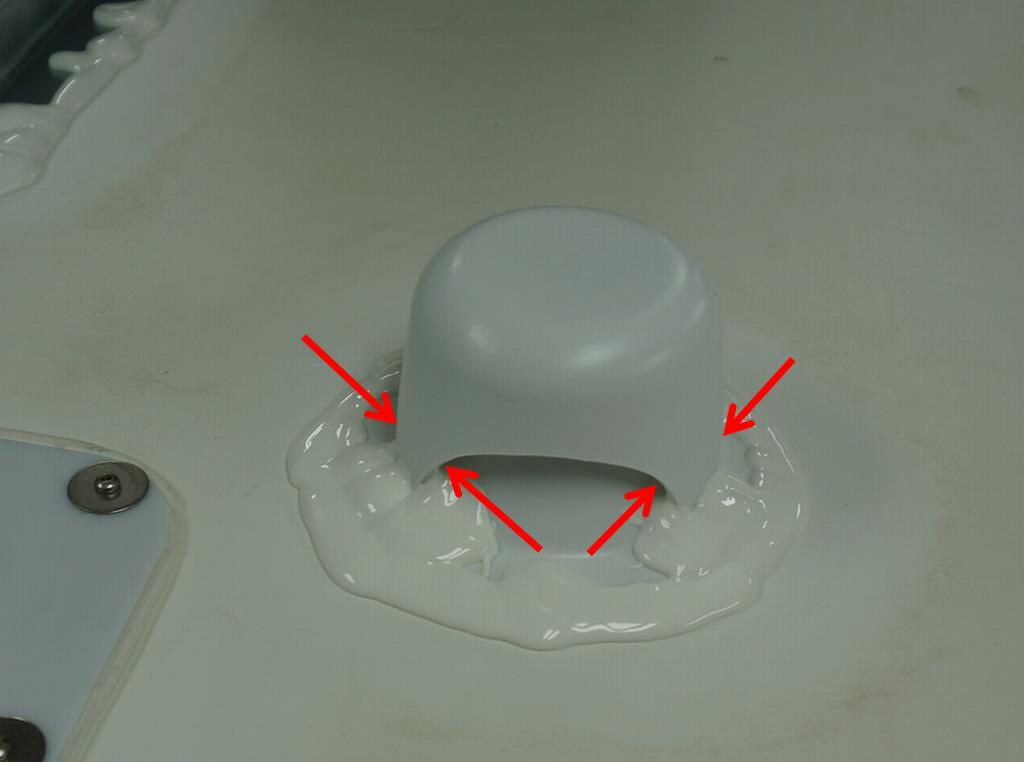
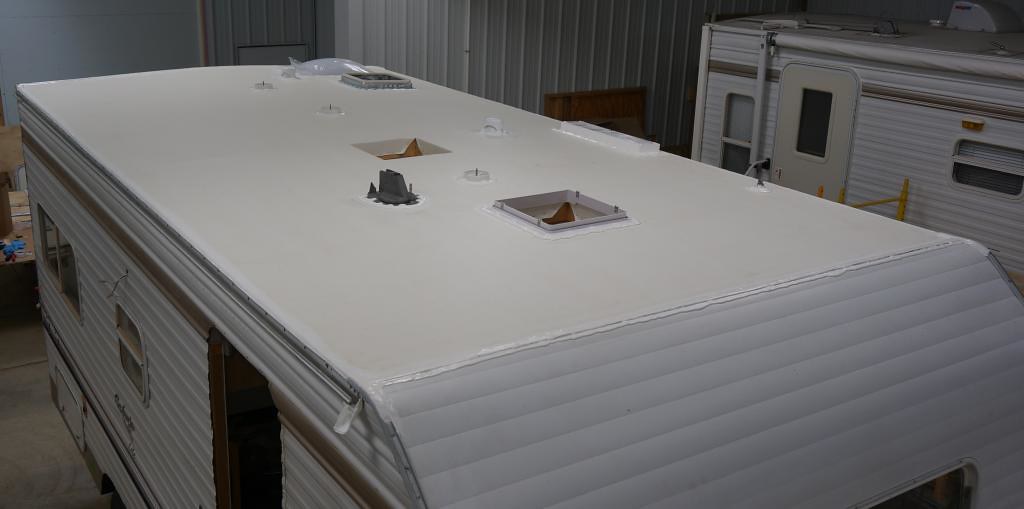
We added a Maxx air fan to the front living area and three attic vents. To prepare for adding the final lap sealant, we cleaned the rubber at all roof areas needing caulking with Naphtha.
I was able to buy a case of Dicor 502LSW. The 502 lap sealant is the commercial version of the 501LSW roof seal, sold as an aftermarket sealant. The only difference is the 502LSW creates a slightly wider bead after it flows out. The 501 is approximately 3/8, where the 502 is about 1/2". We used the self-leveling 502LSW on all the horizontal areas. In the gutter rails area, we used 551LSW non-sag/non-leveling sealant. Due to the added thickness of the roof decking, the caulking is applied more vertical than horizontal.
Here are some pics of the process. Note: The caulk has to touch the molding and close to its top to get maximum adhesion. If a slight gap (leak) exists between the molding and the caulk, when the sealant shrinks, a leak path can form over time.
At the front seam, there are two beads of caulk on the rubber roof side. See in this picture how high up the molding the caulk is. The front seam is a common caulk failure area as the caulk is not large enough, high enough bonded to the molding, or too old and cracked.

Since we are going to Eternabond treat all seams, the front, and rear seams have the screw channel filled with caulk to create a smoother transition for the Eternabond.

The gutter rail area will use non-sag/non leveling Dicor. You start by placing a bead of caulk on top of the gutter rail molding.
Using a soapy wet finger (I use Dawn dish soap in water), you press your finger tight to the molding while dragging your finger down the molding length, which starts folding the caulk bead uphill.

Keeping a wet soapy finger, work the caulk up onto the rooftop and smooth out the bead. As your finger starts to drag/dry, rewet it. The result is a ramp of caulk from the rooftop to the top of the gutter rail top outer edge. 
The roof antenna mount.
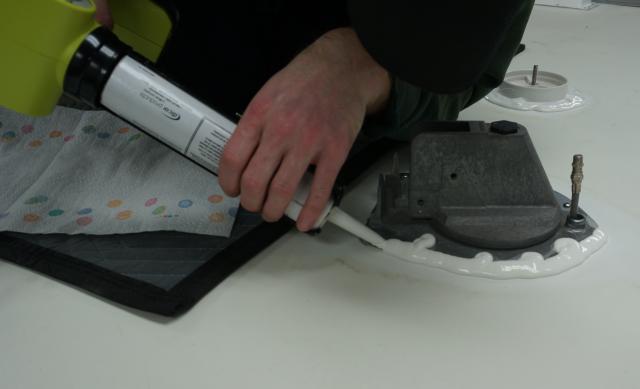
The front living area Maxx air vent fan base.
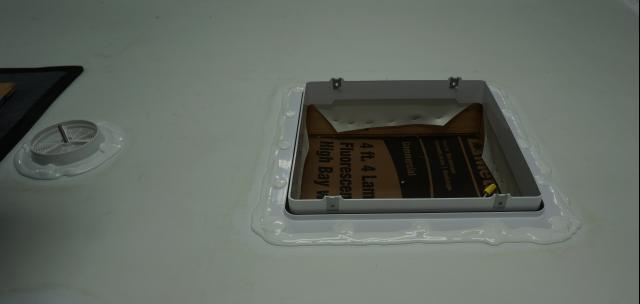
One of the three, attic vent bases.

Bathroom roof vent.
The rear roof seam first bead.
Second bead.
First screw channel bead.

Last rear molding bead.

Black tank vent. More on the red arrows soon in another post.
The completed roof caulking. We need to wait for 3 to 4 weeks for the Dicor to cure and gas off before applying the Eternabond.


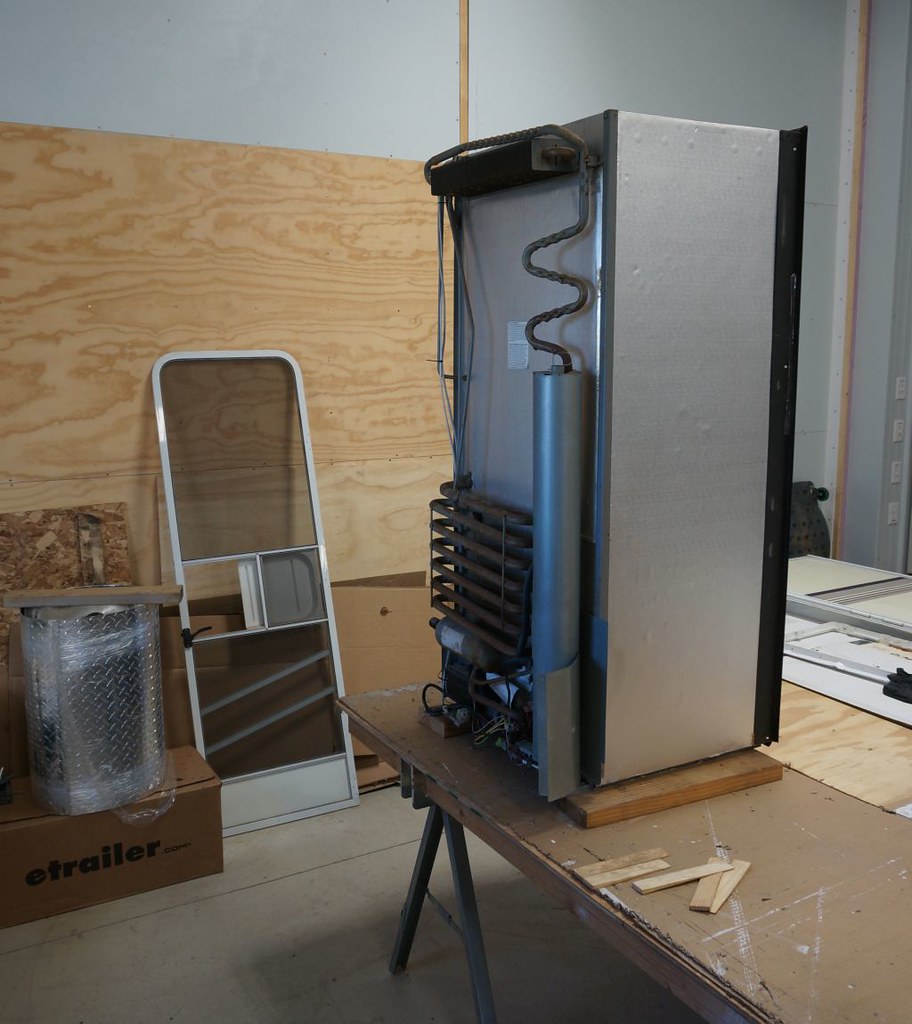
We had powered up the camper to test the fridge. Upon starting the fridge on Auto (electric), we lost all AC power in the trailer. Ah, that is not good. We tripped the GFI in the barn. It seems the AC neutral part of the electric heater element may have rusted itself to the casing (earth ground), and that will cause a GFI trip but not a circuit breaker trip. We proceeded to remove the fridge out of the camper and ordered a new heating element.
We removed the fridge out of the cabinet. It is much easier to remove the heating element and clean up the cooling coil with the fridge out of the cabinet. Fortunately, we had the ceiling AC airbox duct already off, as the front flange of the fridge will hit it when coming out. We also had to unscrew the light fixture to not get hit.
Here is before we took the camper apart. See the AC air duct and the light.

And the fridge out of the cabinet on blocks in the camper.
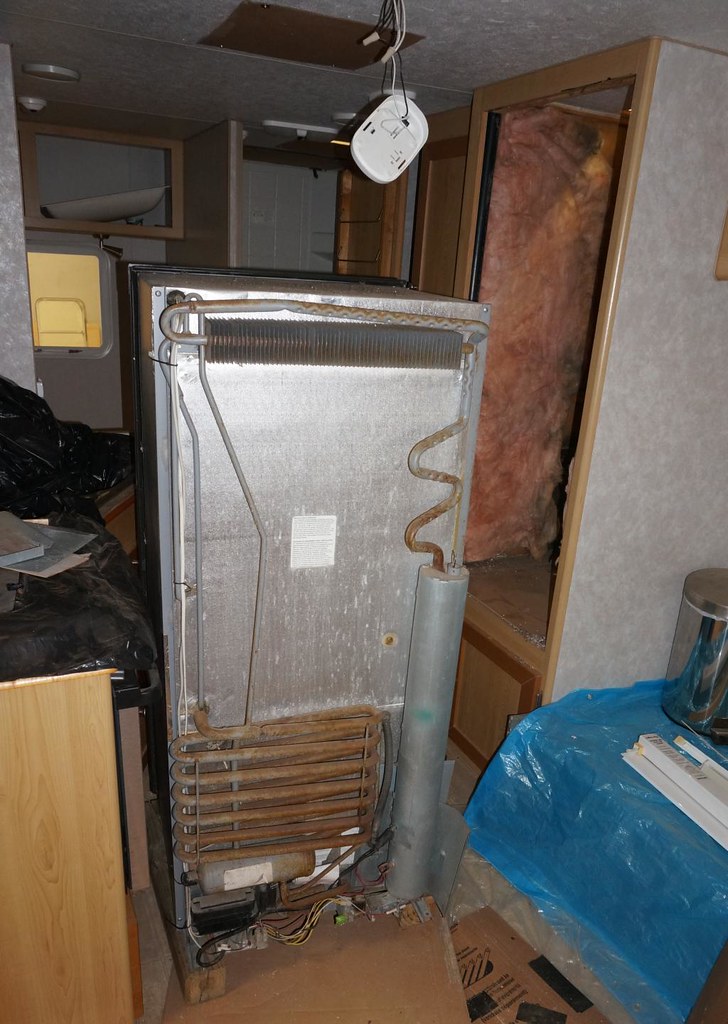
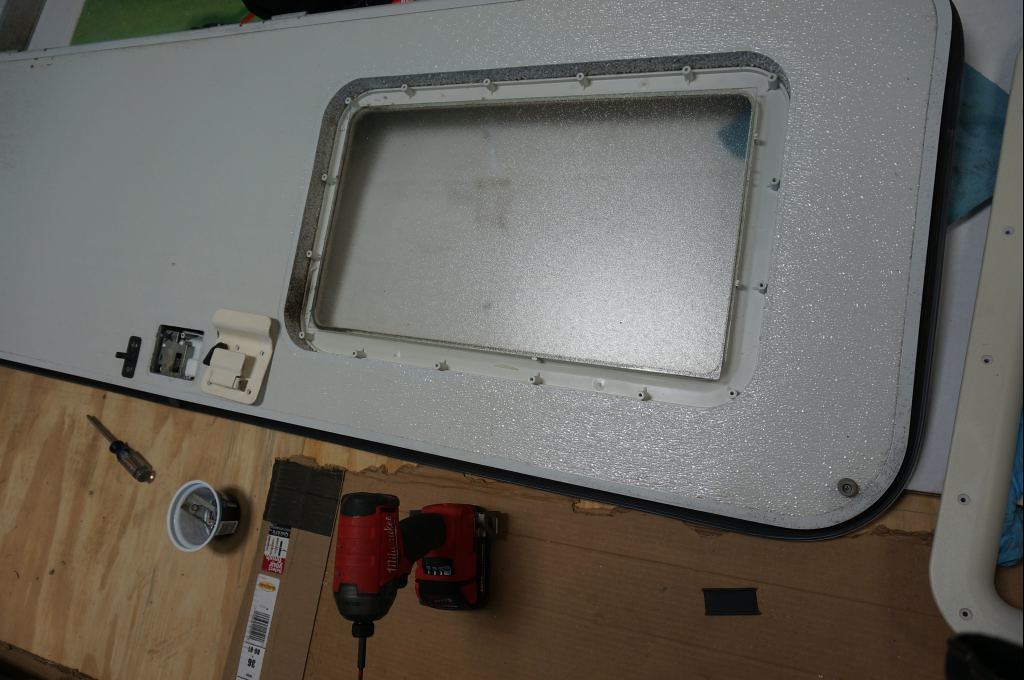
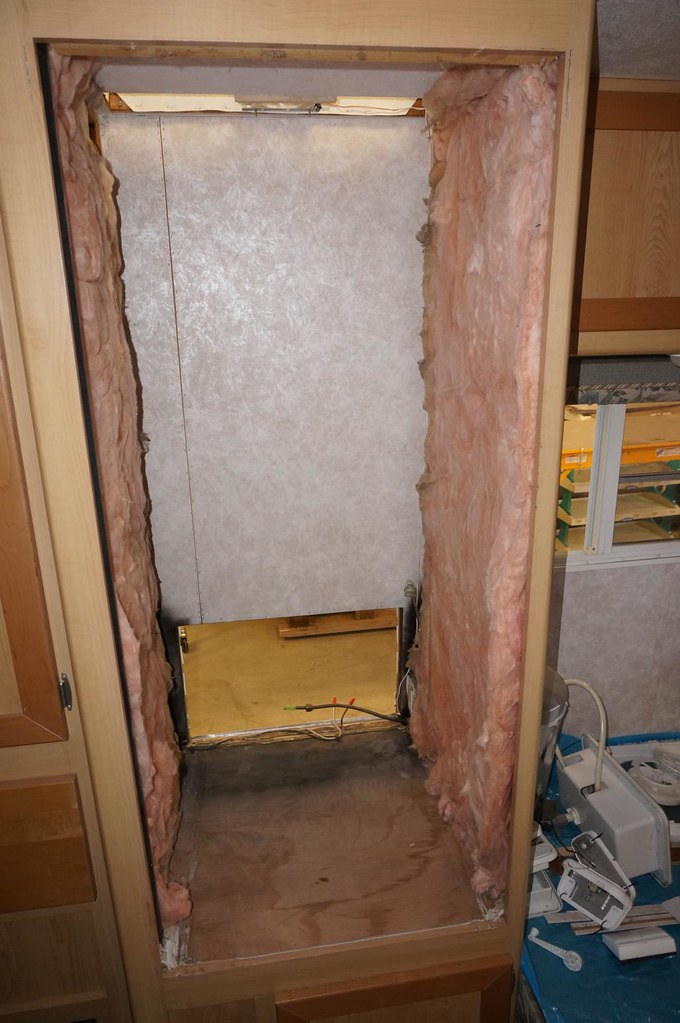
New learnings!! A 2004 T1950 entry door is not wide enough to allow the fridge to pass through the door opening. Or any other window opening in the camper. We had the door unit temporarily set in the rough wood opening to keep dirt/dust out. We removed the door unit and still have an issue. There is a 3/4" press-fit issue. It was late in the day, and we called it quits. More to this next time.
Note to self: When restoring a camper, and the entire rear wall is off, service the fridge before putting the rear wall back on!
That is all for this update.
Work tally on time and materials to get to this point;
Work completes Day 45 of the repair.
1/3/21; 2 workers, combined total, 13.00 hr.
401.69 hr. - Total work hours accumulated to date: 1/3/21
New material use: 1/3/21

$2,193.08 Prior material subtotal 12/27/20
$589.65 work weekend material subtotal. 1/3/21
-------
$2,448.70
Materials Subtotal to date 1/3/21
Thanks for looking.
John
To see more of my stored photos on the roof install, see here on Flickr for my photo album https://www.flickr.com/photos/camper...7717387538671/
__________________
Current Sunlines: 2004 T310SR, 2004 T1950, 2004 T2475, 2007 T2499, 2004 T317SR
Prior Sunlines: 2004 T2499 - Fern Blue
2005 Ford F350 Lariat, 6.8L V10 W/ 4.10 rear axle, CC, Short Bed, SRW. Reese HP trunnion bar hitch W/ HP DC
Google Custom Search For Sunline Owners Club
|
|
|
|
|
01-08-2021, 01:35 PM
|
#104
|
|
Senior Member
Join Date: Sep 2011
Location: Connecticut
Posts: 373
SUN #2943
|
Bummer about the fridge, I was really glad that we were able to get ours out the door. Barely fit, but did. We did tear the spade off the recall thermofuse on the stack and had a bugger of a time finding a new one for a decent price.
I often check in on this tread and enjoyed the roof work in the latest updates. Interesting stuff. You are pretty good laying the dicor down freehand.
__________________
~~~~~~~~~~~~~~~~~~~~~~~~~~~~~~~

2006 Sunline T-1950
2019 Ford F-250
~~~~~~~~~~~~~~~~~~~~~~~~~~~~~~~
|
|
|
|
|
01-08-2021, 07:17 PM
|
#105
|
|
Moderator
Join Date: Nov 2006
Location: Ohio
Posts: 12,654
SUN #89
|
Quote:
Originally Posted by Tod Osier
Bummer about the fridge, I was really glad that we were able to get ours out the door. Barely fit, but did. We did tear the spade off the recall thermofuse on the stack and had a bugger of a time finding a new one for a decent price.
I often check in on this tread and enjoyed the roof work in the latest updates. Interesting stuff. You are pretty good laying the dicor down freehand. |
Hi Tod,
On your fridge, I take it you had a cooling coil failure along the way? Glad to hear Sunline made the door a little bigger. 2004 was a design year and those models were supposed to get larger doors etc. I thought at least. The cargo doors appear larger, it just may be the entry doors did not get wider until 2005's etc.
Thanks for the good words on the caulk, after one pumps over a 100 tubes of the stuff, you get better at it. The reality is, on the self leveling caulk, it fixes a bunch of booboo's with the self leveling features. If you get it semi close to being good, the leveling makes it good.
If all works as planned, there should be weekly updates on this thread or close to that, until we get this finished, baring no more state lock downs due to Covid.
Thanks
John
__________________
Current Sunlines: 2004 T310SR, 2004 T1950, 2004 T2475, 2007 T2499, 2004 T317SR
Prior Sunlines: 2004 T2499 - Fern Blue
2005 Ford F350 Lariat, 6.8L V10 W/ 4.10 rear axle, CC, Short Bed, SRW. Reese HP trunnion bar hitch W/ HP DC
Google Custom Search For Sunline Owners Club
|
|
|
|
|
01-09-2021, 10:12 AM
|
#106
|
|
Senior Member
Join Date: Sep 2010
Location: Michigan
Posts: 854
SUN #1546
|
Do you have to remove the refrigerator out of the camper to fix it or is it just preferred? btw I agree with Todd, stellar job on the caulking, the roof looks beautiful!
Quote:
Originally Posted by JohnB
Hi Tod,
On your fridge, I take it you had a cooling coil failure along the way? Glad to hear Sunline made the door a little bigger. 2004 was a design year and those models were supposed to get larger doors etc. I thought at least. The cargo doors appear larger, it just may be the entry doors did not get wider until 2005's etc.
Thanks for the good words on the caulk, after one pumps over a 100 tubes of the stuff, you get better at it. The reality is, on the self leveling caulk, it fixes a bunch of booboo's with the self leveling features. If you get it semi close to being good, the leveling makes it good.
If all works as planned, there should be weekly updates on this thread or close to that, until we get this finished, baring no more state lock downs due to Covid.
Thanks
John |
__________________
Joan & Miss Emme Lu Who
Full Timing in T-1950 2005 Anniversary Model
1997 6.5L Chevy Turbo Diesel Truck
"Pure Michigan"
Facebook: Apackof2 for the Rd
|
|
|
|
|
01-09-2021, 03:43 PM
|
#107
|
|
Moderator
Join Date: Nov 2006
Location: Ohio
Posts: 12,654
SUN #89
|
Quote:
Originally Posted by apackoftwo
Do you have to remove the refrigerator out of the camper to fix it or is it just preferred? btw I agree with Todd, stellar job on the caulking, the roof looks beautiful!
|
Thanks for the good words on the roof. 
On the fridge removal, my case is different then most. I could replace the electric element which failed in the camper, I only would need to unhook the fridge, push the fridge in about a foot, still leave it in the cabinet and work on it, then push it back out and re-install. It is not an easy thing to work in the fridge cabinet, but it is doable if it had to be.
On older Sunlines when the cooling coil cracked and leaked out all the coolant, members here on SOC have reported they did the entire cooling coil change inside the camper. There is a pic of it somewhere. They just propped the fridge up on the floor and did the coil change as there was no way to get the fridge out of the camper. It could be done in my 1950 if needed.
In my case, I'm doing a restore to this camper. Our goal is, this camper lives a real long time. The cooling coil has a good degree of rust on it. I want to treat the coil to help slow down the rusting leading to a cooling coil failure. That job is messy. I could do it in the camper if I had to, but the mess is big. The camper is in very nice interior condition and we are trying to keep it that way.
Tomorrow if all works out right,... the fridge will be out off the camper, through the door opening, and we can make the mess out on the shop floor rather then in the camper. I will post pics of how to do this in case others have the option on theirs.
John
__________________
Current Sunlines: 2004 T310SR, 2004 T1950, 2004 T2475, 2007 T2499, 2004 T317SR
Prior Sunlines: 2004 T2499 - Fern Blue
2005 Ford F350 Lariat, 6.8L V10 W/ 4.10 rear axle, CC, Short Bed, SRW. Reese HP trunnion bar hitch W/ HP DC
Google Custom Search For Sunline Owners Club
|
|
|
|
|
01-10-2021, 09:43 AM
|
#108
|
|
Senior Member
Join Date: Sep 2011
Location: Connecticut
Posts: 373
SUN #2943
|
Quote:
Originally Posted by JohnB
Hi Tod,
On your fridge, I take it you had a cooling coil failure along the way?
John
|
Last spring, I did a little bit here, but was in a rush to get to back together and on the road.
https://www.sunlineclub.com/forums/f...ity-19677.html
__________________
~~~~~~~~~~~~~~~~~~~~~~~~~~~~~~~
2006 Sunline T-1950
2019 Ford F-250
~~~~~~~~~~~~~~~~~~~~~~~~~~~~~~~
|
|
|
|
|
01-10-2021, 05:55 PM
|
#109
|
|
Moderator
Join Date: Nov 2006
Location: Ohio
Posts: 12,654
SUN #89
|
Quote:
Originally Posted by Tod Osier
|
Thanks.
I had forgot you had that issue. And I even responded in your thread. ")
One too many campers and whose broke what I guess for my memory cells to remember. 
__________________
Current Sunlines: 2004 T310SR, 2004 T1950, 2004 T2475, 2007 T2499, 2004 T317SR
Prior Sunlines: 2004 T2499 - Fern Blue
2005 Ford F350 Lariat, 6.8L V10 W/ 4.10 rear axle, CC, Short Bed, SRW. Reese HP trunnion bar hitch W/ HP DC
Google Custom Search For Sunline Owners Club
|
|
|
|
|
01-15-2021, 05:32 PM
|
#110
|
|
Moderator
Join Date: Nov 2006
Location: Ohio
Posts: 12,654
SUN #89
|
We have reached the restoration process stage, where there are lots of little things to do. Each area is almost a mini project in itself. The workday surrounded getting these mini-projects started.
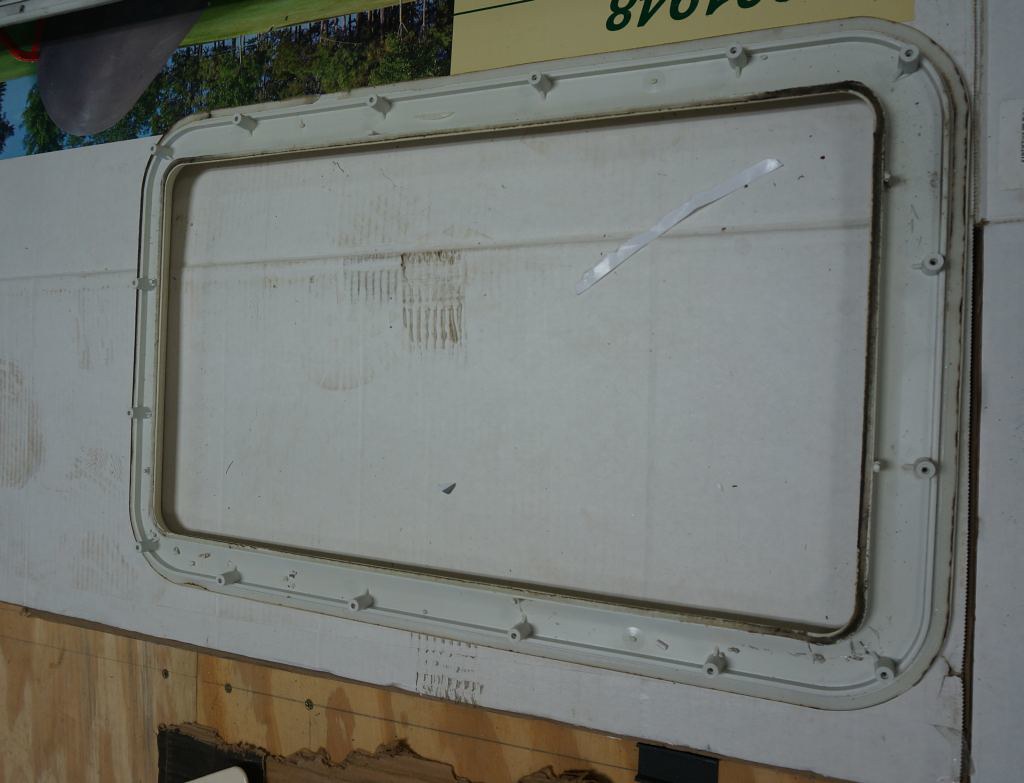
First up was getting the fridge out of the camper. I did not notice it before, but there are shims on the entry door frame's rough opening. By removing the shims and the doors on the fridge, the fridge would fit through the opening.
The front side of the door rough opening with two 1/4" shims.
The rear side of the door rough opening with one 1/4" shim.

The top door cushion is stapled to the wall and was removed.

Left and right side trim (battens) removed. Use a stiff blade putty knife, start at the top, slide down to the first staple, twist the putty knife to pop out the staple, and move to the next, working your way to the bottom. If you are careful, there is no damage to the trim.

Some siding lengths overhang the shimmed area, and some did not. I had to trim the overhanging siding pieces. A carbide cutter with a roller on end in the router does quick work of this trimming.

We took the doors off the fridge and the top plastic control panel to not break it. Then, using two people, lift and move the refrigerator out the doorway, sideways. Also, open the front right window with the screen out. One person inside, and one outside when you get to move the fridge out the door.
Here is JohnB sort of "holding the bag"
while BenB jumps out the window to grab the other side. He fit better out the window than I did.

Fridge out safely and on a pallet dolly with no damage. It went really well.
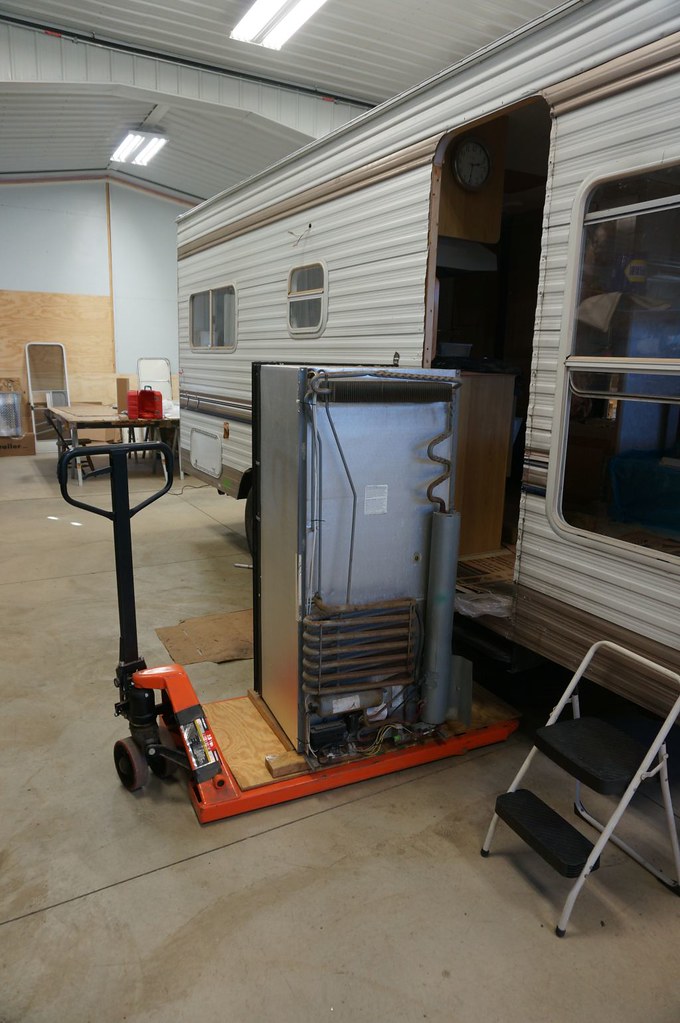
Fridge on workbench ready to be serviced.
Next mini-project, remove the axles to start the rebuild, the over/under spring kit install, and the frame painting.
Removed the brake drums to make the axle lighter and see what condition the brakes were if we needed to order parts.

Front right brake lining separated from the brake shoe. A for sure need to do periodic brake inspection/maintenance as the campers get older. This has happened before.
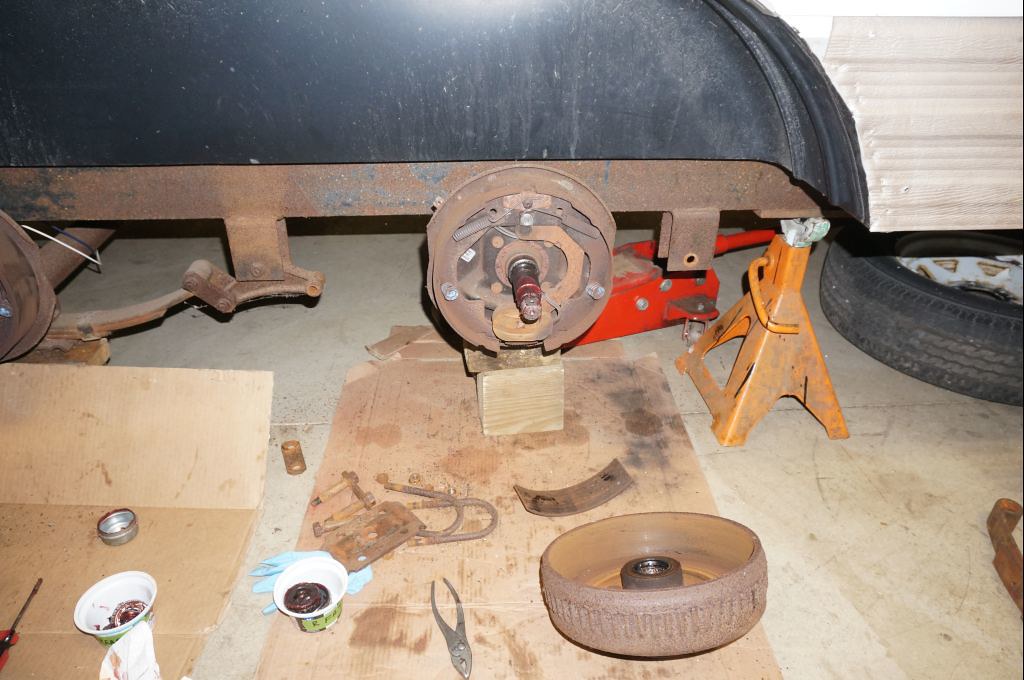
Right rear, intact but rusted heavily. The last time this camper camped was pre-2010.
It sat ever since, other than the trip to our house in 2017.

Left side, intact but heavily rusted.

I suspect the spring, shackle, and equalizer pins are the originals. The spring pins are heavily rusted and froze in the hangers/shackles. I find when they are that rusted in, you need to press them out. I used to use a large C clamp and sockets to help press them out. It worked but was at the limit of a 12" clamp (3/4" thread), and you had to tap the screw with max pressure applied to break them loose. Here is the old setup.
I do not have pictures of the C clamp method pressing the pins out, but here is the old setup to push the pins in. The same clamp, just used differently.

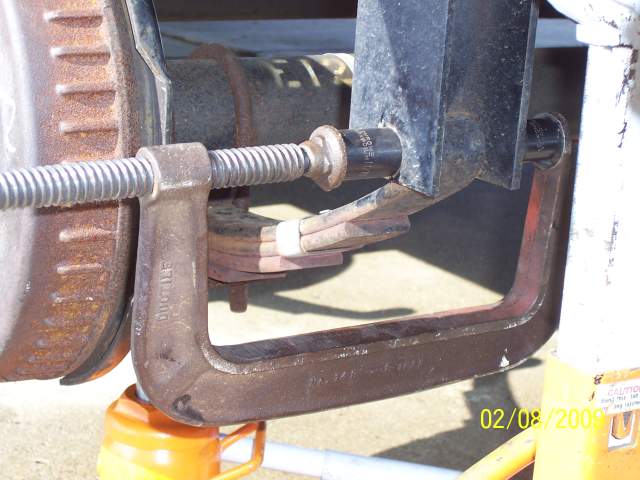


I ended up getting a ball joint tool for working on autos. This tool is two to three times stronger in pressing capacity than the 12" C clamp and works well on pressing out rusted spring pins. The round open ring on the clamp end fits around the spring pins' head, supports the hanger or shackle, and allows the spring pin to come through the clamp's ring center hole. Trying to break free rusted in spring pins with a punch and hammer is close to futile and, you can bend the hanger if it is bad enough, or worse, miss the punch and hit your hand with the hammer. A small impact or 1/2" ratchet wrench works well for turning the screw.


Once the hanger pins are out, the axle rolls out from under the camper easily if you have small dollies to place the axle on.
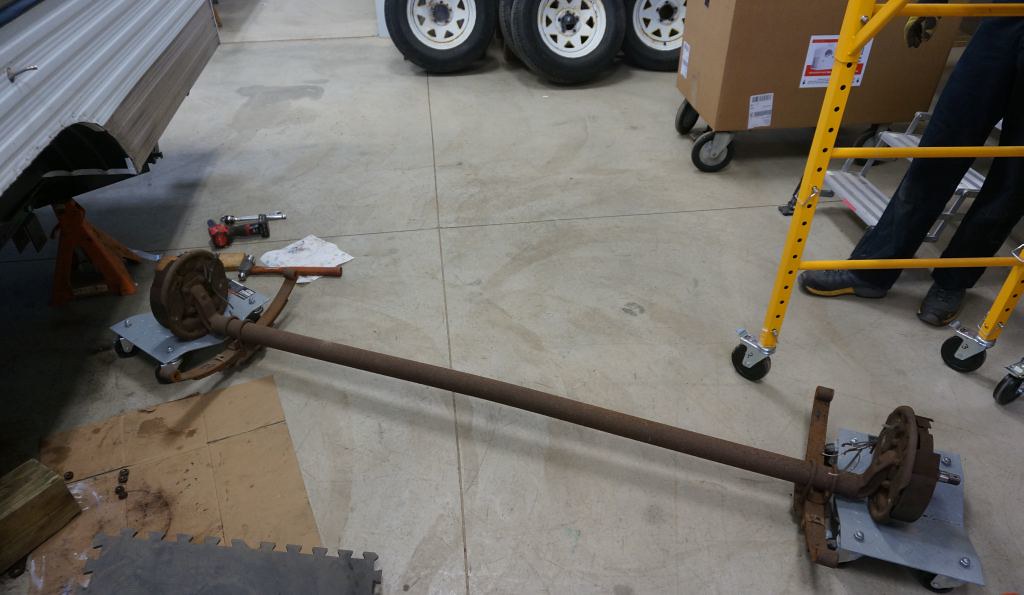
The camper up on jack stands waiting for the rest of the frame rust to be addressed and reinforcing the header and A-frame.


We were able to get the rusted stabilizers apart. Both of these cooperated surprisingly. They need to get de-rusted, cleaned up, and coated like the frame will be.


The next mini-project was to clean up the entry door, front window rock guard, and two cargo hole doors, getting them ready for painting. We are going with the Rust-Oleum Top Side Marine paint that Yellowjacket pointed us to on his camper rebuild.

Found out the entry door had a window seal leak to the inside of the door. You can tell by the black dirt trail.

Rock guard and cargo doors.

That is all for this update.
Work tally on time and materials to get to this point;
Work completes Day 46 of the repair.
1/10/21; 2 workers, combined total, 12.83 hr.
414.52 hr. - Total work hours accumulated to date: 1/10/21
New material use: No new material was used on 1/10/21.
$2,448.70
Materials Subtotal to date 1/10/21
Thanks for looking.
John
To see more of my stored photos on the roof install, see here on Flickr for my photo album https://www.flickr.com/photos/camper...7667376730349/
__________________
Current Sunlines: 2004 T310SR, 2004 T1950, 2004 T2475, 2007 T2499, 2004 T317SR
Prior Sunlines: 2004 T2499 - Fern Blue
2005 Ford F350 Lariat, 6.8L V10 W/ 4.10 rear axle, CC, Short Bed, SRW. Reese HP trunnion bar hitch W/ HP DC
Google Custom Search For Sunline Owners Club
|
|
|
|
|
02-06-2021, 10:21 AM
|
#111
|
|
Moderator
Join Date: Nov 2006
Location: Ohio
Posts: 12,654
SUN #89
|
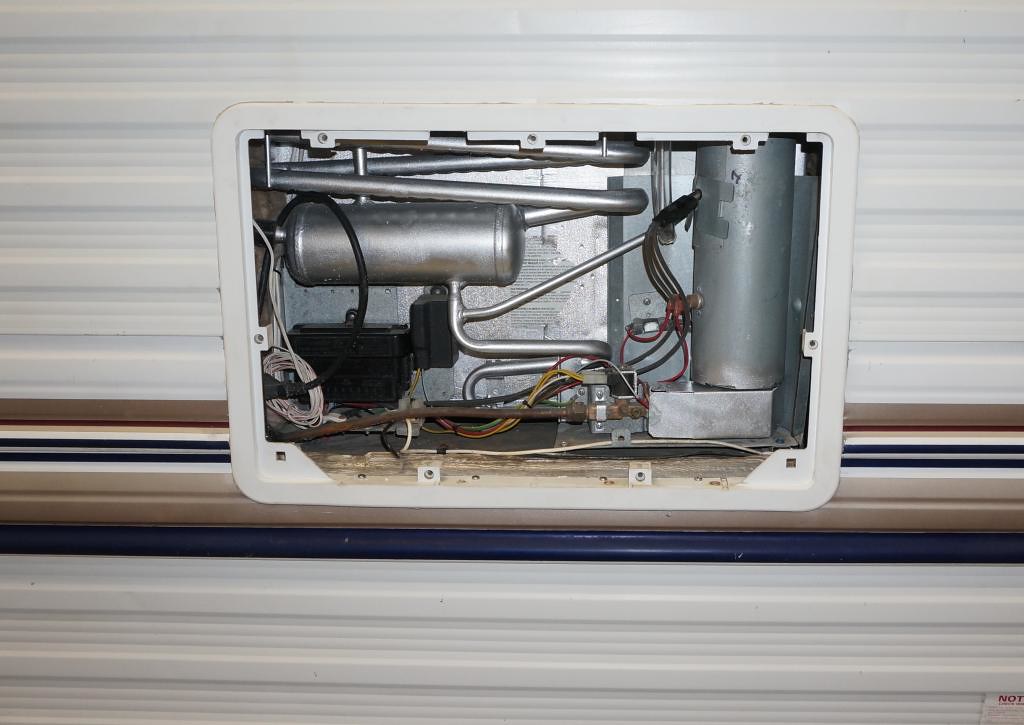
Next up, go through the water heater, checking if it is usable and restoring it to dependable service. The water heater work tasks were spread over a long period due to waiting for parts and doing other work tasks. I have combined them all to make this follow along better.
When restoring an old camper, the water heater is one appliance that can salvageable or not. The water tank condition is the turning point to, is this heater worth fixing or buying a new water heater? A new heater can range from $650 wholesale to $1,235 depending where you but it. And if you can get this Atwood version. Dometic is now pushing their latest redesigned water heater. Not sure yet if that is a good thing or not.
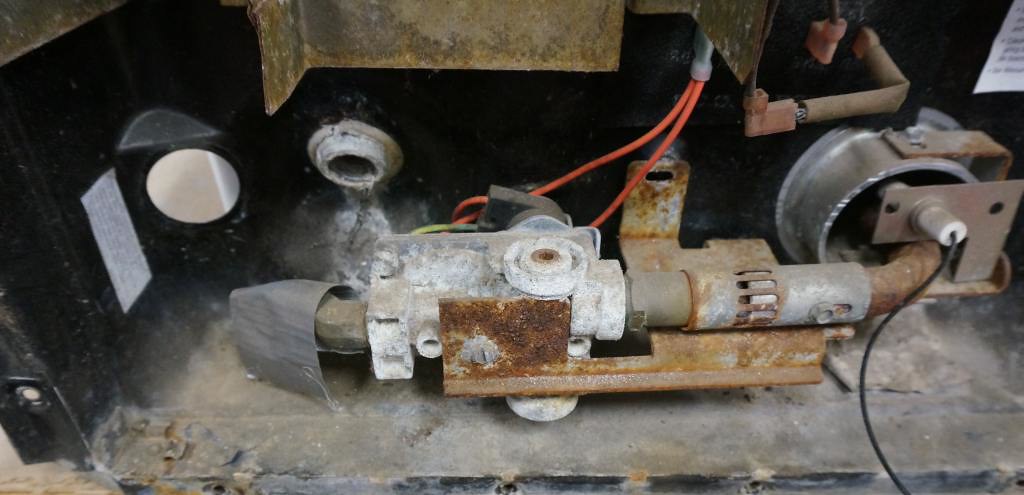
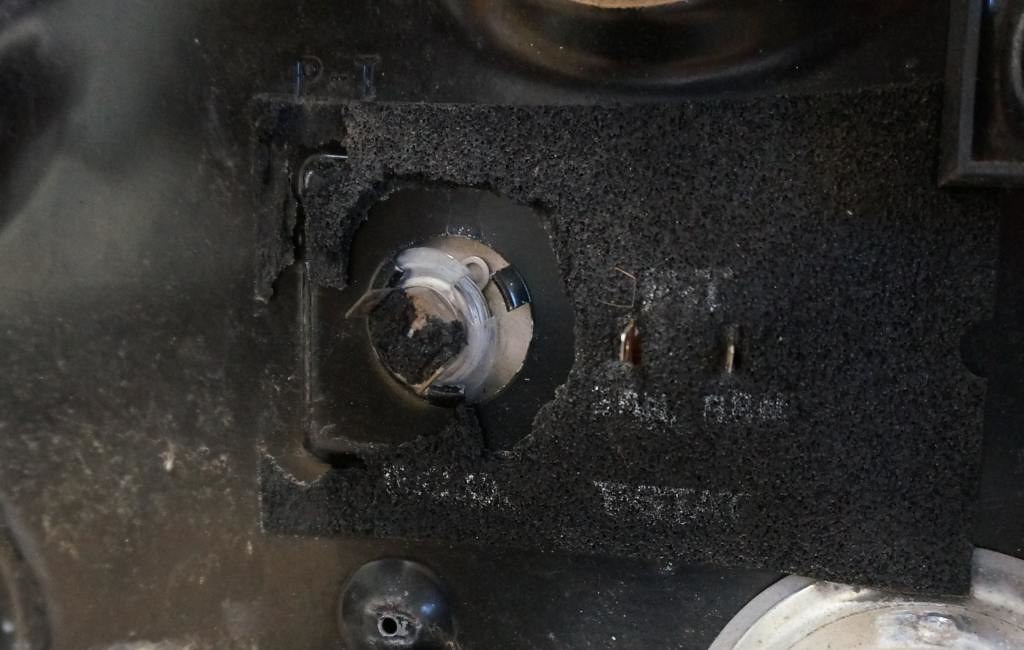
See here what the outside looks like as I found it. It appears a quantity of water made its way into this outside area and started some heavy corrosion. The gas valve and the gas burner look rough.

I started taking the heater apart so I can do a better inside tank inspection with my borescope.

Getting the electric element out was a challenge. The steel element can get frozen in the aluminum tank, and it was. Using a standard 1/2" socket and large breaker bar did nothing but slip on the short hex of the element. Luckily, using a 1/2" impact wrench jarred it loose, and the threads in the tank were not damaged when it came out. Trying to do this element removal with the heater in the camper would be a super challenge.


This gray plastic PEX pipe nipple for the bottom cold water inlet fitting can be a leak area. I am not sure what model year this practice started. Sunline used a straight running thread, plastic pipe nipple in a tapered pipe thread tank. They used silicone caulk on the fitting threads. The plastic never bottoms out, and you run out of threads on the plastic fitting before it is tight. One of the campers I restored a year ago had this fitting leak. Every camper I now restore, this fitting gets changed.


Now to a look inside the tank. With the electric element out, it is easier to go in that larger hole with a borescope. The pics my scope can take are not as sharp and clear as what appears on the screen. Here are a few.
The wire stuffed in the cold inlet port is so I can see inside the tank where that internal pipe comes out.

Here are some of the minerals that build up in the bottom of your water heater. Once a year, the water heater needs to be flushed to prevent this buildup from getting too big.


After you scrape the buildup with a wire brush and have it fall out, this is only some of the buildup.

The mineral buildup in the tank was not a lot compared to some of the 12 to 16-year-old water heaters I have seen. And I did not see any significant corrosion of pit holes in the tank visually. That was a real good thing, which means, keep on going to retore this heater.
Also, the 2010 time frame was the last time this heater had water in it. The camper was stored at an RV dealer starting in 2010 until I acquired it in March of 2017. The trailer only had six years of use for camping,
Next up, clean up the parts as the tank has hope! Yeh.
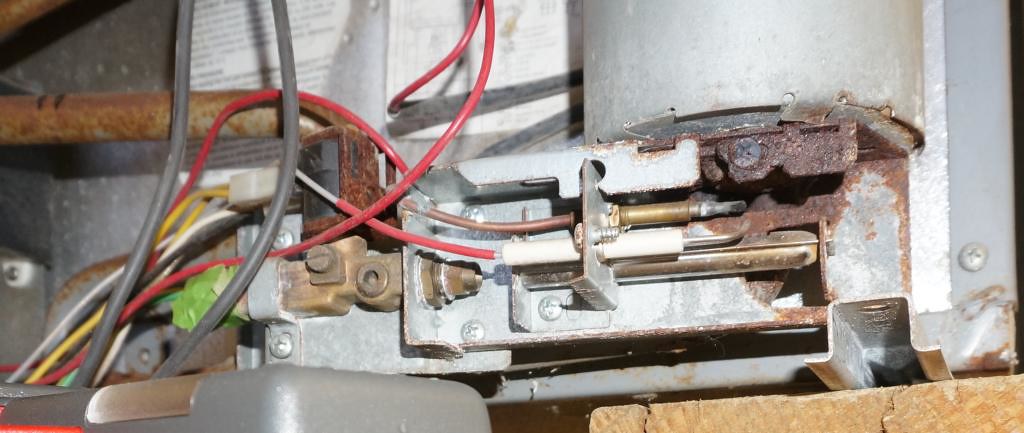
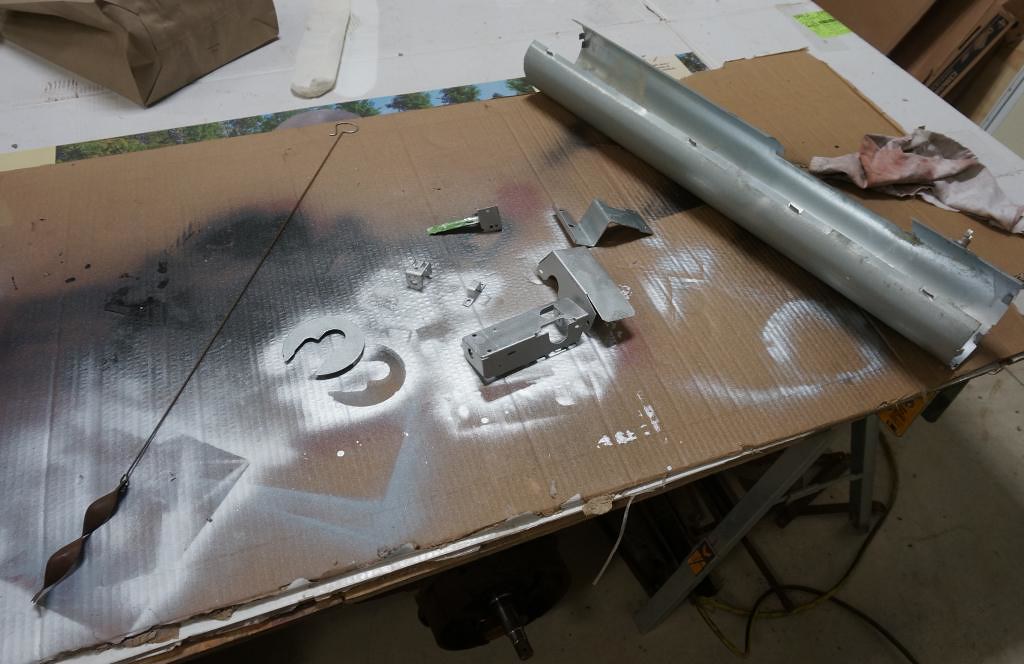
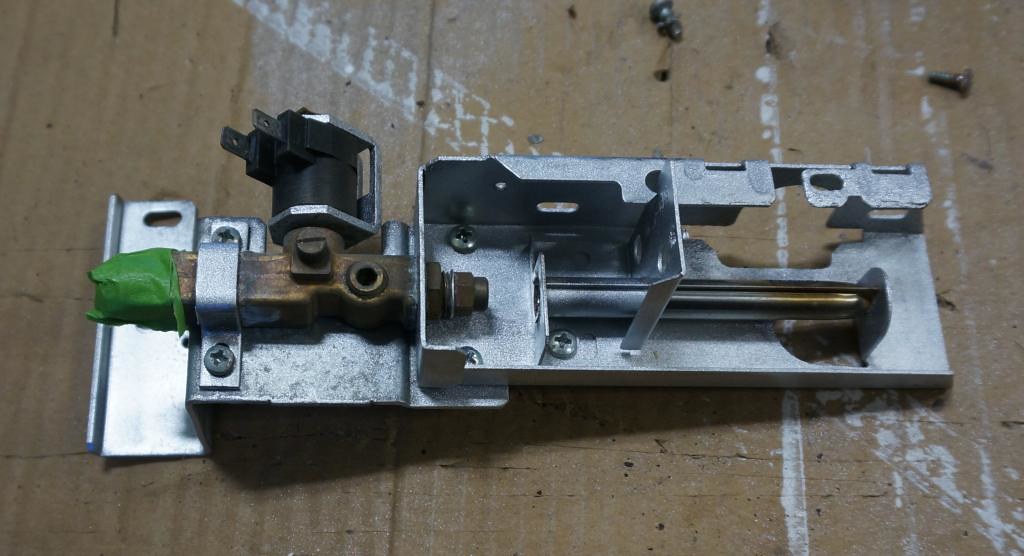
The gas burner is too far gone for me, and the safety relief valve, lift lever works very hard. I will replace both.

The gas valve corrosion is terrible. I will clean up the outside and paint the valve outside when I paint other parts, but until I do an LP gas leak test on the valve, I will not know if the valve is any good.

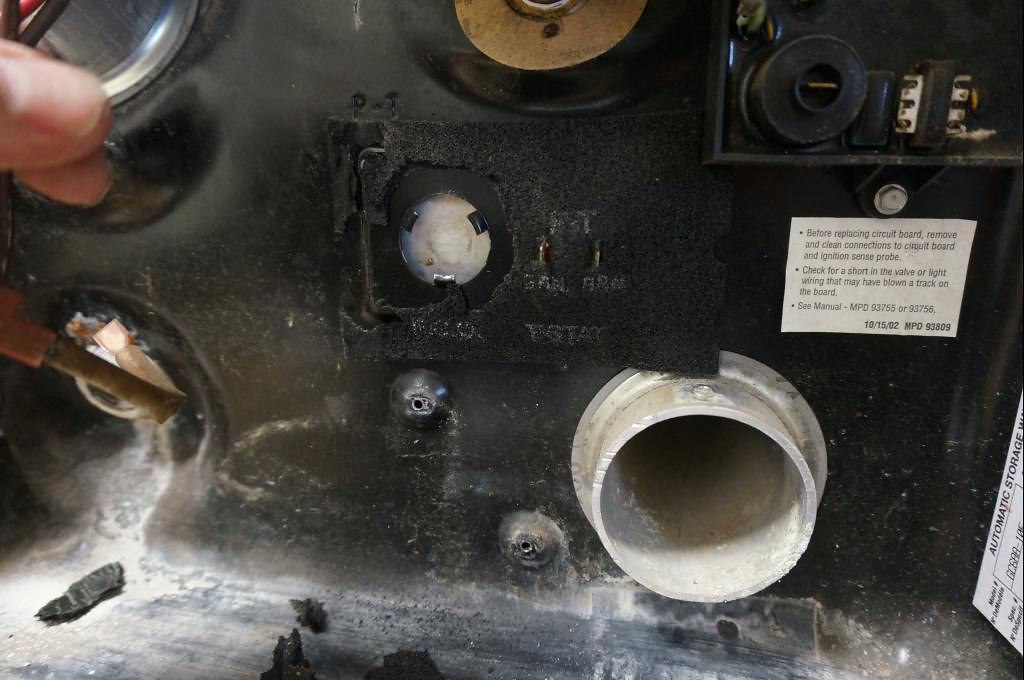
Something to show, the T stat and the ECO for the gas valve insert into the tank front and area held spring held in place. Getting the wires off these sensors after they have corrosion on them can be a challenge. The only way to get the wire fitting off is to use needle nose pliers on the wire terminal, hold the sensor in place with a screwdriver, and then pull on the pliers. If not, you can able destroy the sensor trying to get the wire off. Here is what the sensors look like behind the foam covering. The ECO for the gas valve was a bugger to get the wires off, and the sensor giggled out of location in the process.

The sensor out looks like this

The tank with the sensor out looks like thisthree slots for the sensor tabs to lock-in.
To install the sensor, you align the tabs slots on the sensor to the tank and push it on and off to one side.
Then move and rotate the sensor so the wire terminal tabs are correct and the sensor is in the center of the opening.

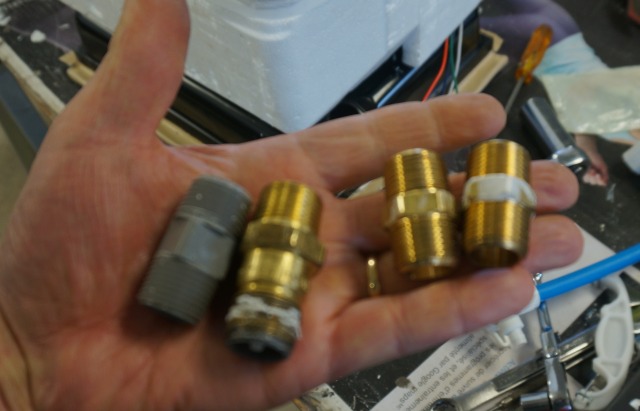
I converted the heater bypass from a one, 3-way valve and check valve to a two, 3-way valve bypass. I have seen too many check vavles get stuck when the spring keeper falls off and makes the valve not work or the valve stem sticks and will not seal closed. The two 3-way valve bypass setup costs a little more but is very reliable.
I also upgrade to using brass, hex close nipple fittings machined on the inside to replace the straight thread plastic fittings and check valve Sunline used. Note: They do sell lead-free brass hex close nipples that are not machined inside. They are roughcast. I do not use them as the PEX swivel cone washers will not seal well on the roughcast fitting.


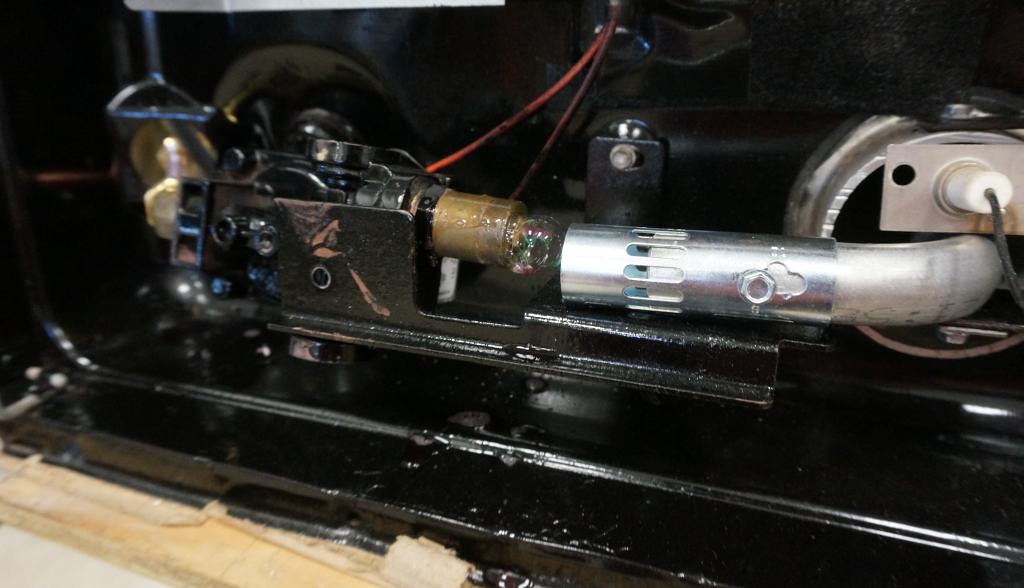
Here are the parts cleaned up and paintedthe tank front compartment.


The front compartment parts painted.

I used high heat (2,000F rated) paint on the heater exchanger exhaust ventthe silver parts.

Put the heater back together and start testing it.
With a 12 volt battery and an ohmmeter, you can power up the control board to run on "electric" and test that the control board, the electric element, and the element control relay all work.


With an LP gas test setup, you can test the "gas" side of the control board, the gas igniter, the gas solenoid valve for leaks, and if the main burner runs on gas.
Start by hot wiring, jump 12 VDC to the "LP Gas" wire feeding the control board. The LP gas is off for this first test. Within a few seconds of powering up the control board on gas, you should hear a clunk of the gas valve opening, followed by, click, click-click of the igniter that you can listen to and see the spark jumping the electrode. If that passes, keep the power on and let it try and start on gas, and it will fault out after three trials for ignition.
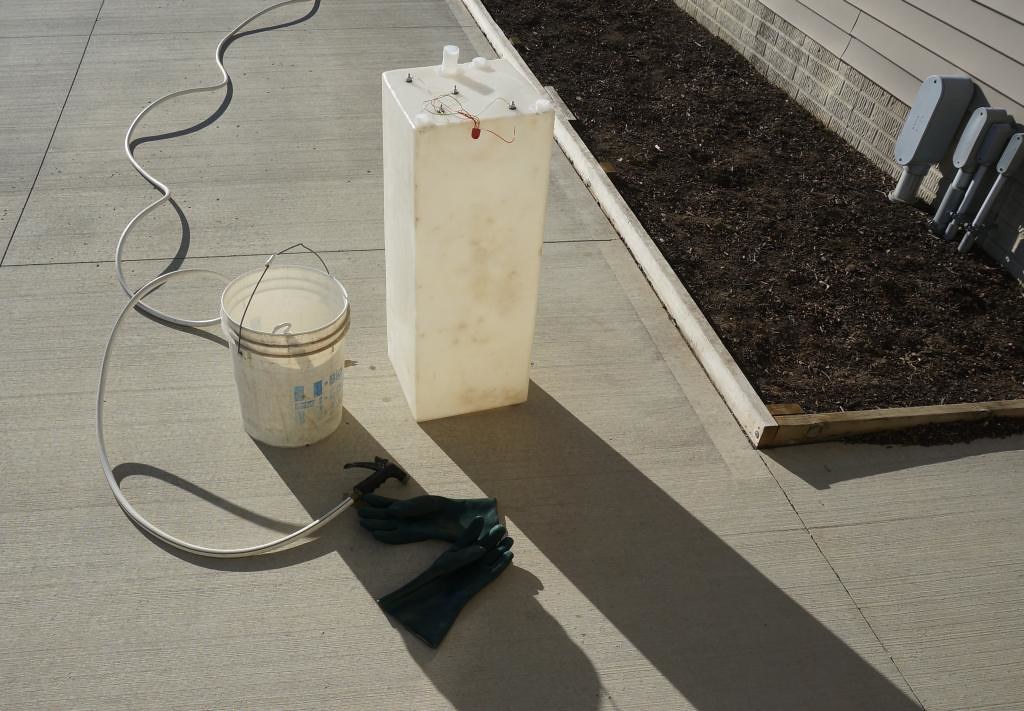
Here is my made up LP bench test setup. I use the primary tank regulator from the camper on two 5 lb LP tanks, a low-pressure gas vapor hose, a positive gas shut off valve, a Dwyer LP test gauge, and temporary copper fittings to connect to the appliance.


After testing the bench test fittings for a leak, you pressurize the water heater gas valve, let the pressure stabilize, close off the LP tanks with the gas ball valve on the bench test, and time the pressure drop. At first, the gas valve sealed perfectly. The first test passed.
Next, under LP pressure, open and close the heater gas valve a few times to bleed and shut off the gas. Let the system pressurize and looks for leaks. Now the gas valve is leaking badly. It is failing the leak test in less than 30 seconds. The gas valve will not seal off. A bubble test confirms the valve will not seal off.
I suspect the heavy corrosion on the outside carried over to the valve seat inside the valve. These gas valves are non-serviceable; all you can do is replace them. A new gas valve install and the test repeated.


Check the new valve for leaks. When it passes, try a test fire on the main burner. The heater works on gas! Thankfully the control board works; they are more costly. The gas valve was bad enough.

While waiting for the new gas valve to arrive, I did the tank leak test. Install a pressure test gauge in the heater drain piping and an air pressure fill and drain valve. Slowly charge the tank with air pressure. Five psi is all that is needed. Seal off the supply and watch the gauge. It appears the 3-way bypass valves are not 100% bubble tight shut off valves. I created hard plugs on the downstream PEX and repeated the test. Glad to report no leaks at low pressure. Then, bring the pressure up in stages, and test for leaks.
Once up to 55 psi, let the heater stay charged overnight and read the next day. I'm pleased to report; the system lost no pressure after 16 hours of testing. Yeh!

The water heater has completed testing, been restored, and ready to install in the camper. A drain pan was fabricated and installed under the water heater. See this post for details on the drain pan. https://www.sunlineclub.com/forums/f...tml#post154792
Here is the heater installed in the camper with the drain pan in place.

I am a bit behind in my updates, and I wanted to keep the post topic on one task as there is a lot of jumping around now between camper tasks. The water heater restoration and installation was this topic. Here are the hours and costs to go with the water heater.
Work tally on time and materials to get to this point;
Work completes Day 48 of the repair.
1/11 through 1/24; 1 worker, combined total, 15.42 hr. for water heater restore task.
429.94 hr. - Total work hours accumulated to date: 1/24/21
New material use: 1/24/21 (for water heater)

$2448.70 Prior material subtotal 1/3/21
$317.77 Water heater subtotal. 1/24/21
-------
$2,829.63
Materials Subtotal to date 1/24/21
John
To see more of my stored photos on the water heater restoration, see here on Flickr for my photo album https://www.flickr.com/photos/camper...57718076754068
__________________
Current Sunlines: 2004 T310SR, 2004 T1950, 2004 T2475, 2007 T2499, 2004 T317SR
Prior Sunlines: 2004 T2499 - Fern Blue
2005 Ford F350 Lariat, 6.8L V10 W/ 4.10 rear axle, CC, Short Bed, SRW. Reese HP trunnion bar hitch W/ HP DC
Google Custom Search For Sunline Owners Club
|
|
|
|
|
02-06-2021, 07:43 PM
|
#112
|
|
Senior Member
Join Date: Jun 2016
Location: Pennsylvania
Posts: 186
SUN #8473
|
Hi John!
Camper is looking great!
Roger
__________________
Roger
2001 T320SR
2021 Ram 2500 Big Horn SLT
|
|
|
|
|
02-08-2021, 09:22 AM
|
#113
|
|
Moderator
Join Date: Nov 2006
Location: Ohio
Posts: 12,654
SUN #89
|
Thanks Roger thanks for having a look. More yet to come, we are gaining, but more to go. I'm behind in posting progress but will add more soon.
Thanks
John
__________________
Current Sunlines: 2004 T310SR, 2004 T1950, 2004 T2475, 2007 T2499, 2004 T317SR
Prior Sunlines: 2004 T2499 - Fern Blue
2005 Ford F350 Lariat, 6.8L V10 W/ 4.10 rear axle, CC, Short Bed, SRW. Reese HP trunnion bar hitch W/ HP DC
Google Custom Search For Sunline Owners Club
|
|
|
|
|
02-12-2021, 10:13 AM
|
#114
|
|
Moderator
Join Date: Nov 2006
Location: Ohio
Posts: 12,654
SUN #89
|
Next up, hookup of the freshwater system.
The fresh tank needed a good cleaning inside as there was a brown "something" in spots on the tank's bottom area. I removed all the fittings from the tank so that I can see all areas inside the tank.
Started the cleaning process by removing the fine mesh plastic strainers in the pump suction port and another in the fresh tank drain line. Odd why Sunline left a strainer in the drain line. I suspect the tank came with the two strainers, and they never took the drain port strainer out. I will leave the drain strainer out when we put the system back together to help the tank drain faster.
Here is the brown "something" on the strainers. I am washing the strainers in our house laundry room tub.

Cleaned

I started with a bucket of hot water, some Dawn dish soap and tried to slosh clean the tank. The slosh cleaning removed approximately 5% of the brown stuff, and that was about it.
I tried a water blast from my water heater rinse wand and a long handle flower watering stick to water pressure scrub some of the brown stuff off after the Dawn had soaked a while. This method removed about 30% of the brown stuff. The scrub brush cleaned up the outside great!
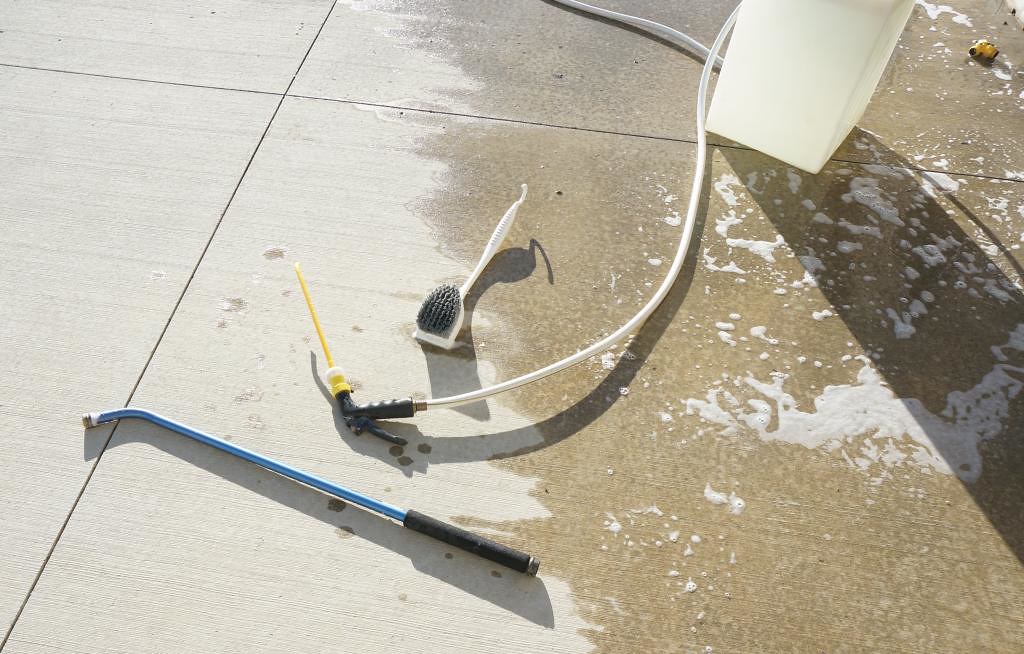
Access to the inside is limited. After some thinking, I went with the "Tim the tool man Taylor" "more power" approach and brought out the pressure washer. The pressure washer worked well where I could direct the water spray. After the pressure blast, about 10% of the brown stuff remained.

I did some more thinking and came up with a new clean brass bristle brush on the end of a rod that will fit inside a 1/2" NPT tank port.


The brass brush on the rod worked well where I could manipulate it too. I could see what I was doing through other tank port holes, but I could not get the brush to all the areas I needed. About 5% of the brown stuff remained. I was not about to leave that "stuff" in the tank. I then sanitized the tank with a bleach and water solution and let it sit and soak for 30 minutes. That did the trick. The bleach solution took off the rest of it. YEH!!!
Triple rinsed the tank, and it was ready to install in the camper. This cleaning task took two and a half hours to complete. A lot more than I had expected.
We re-plumbed the water pump set up to include some upgrades to the system, which are:
1. Install flexible hose on the pump suction and discharge lines to create a vibration dissipation loop.
2. Added an external cleanable pump suction strainer.
3. Upgrade the size of the freshwater tank drain line and valve to 1/2".
4. Added an onboard compressed air valve set up to allow easy and quick draining of the freshwater system.
5. Added a small storage shelf above the water pump.
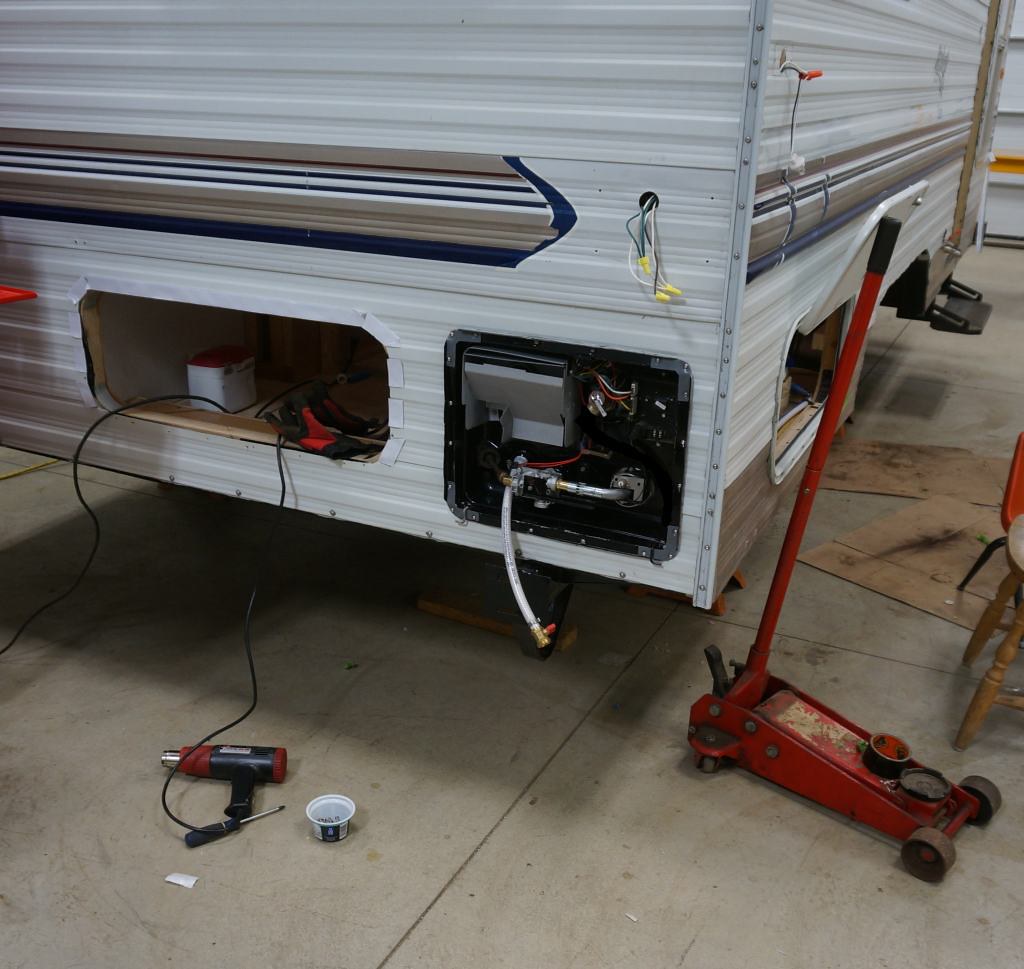
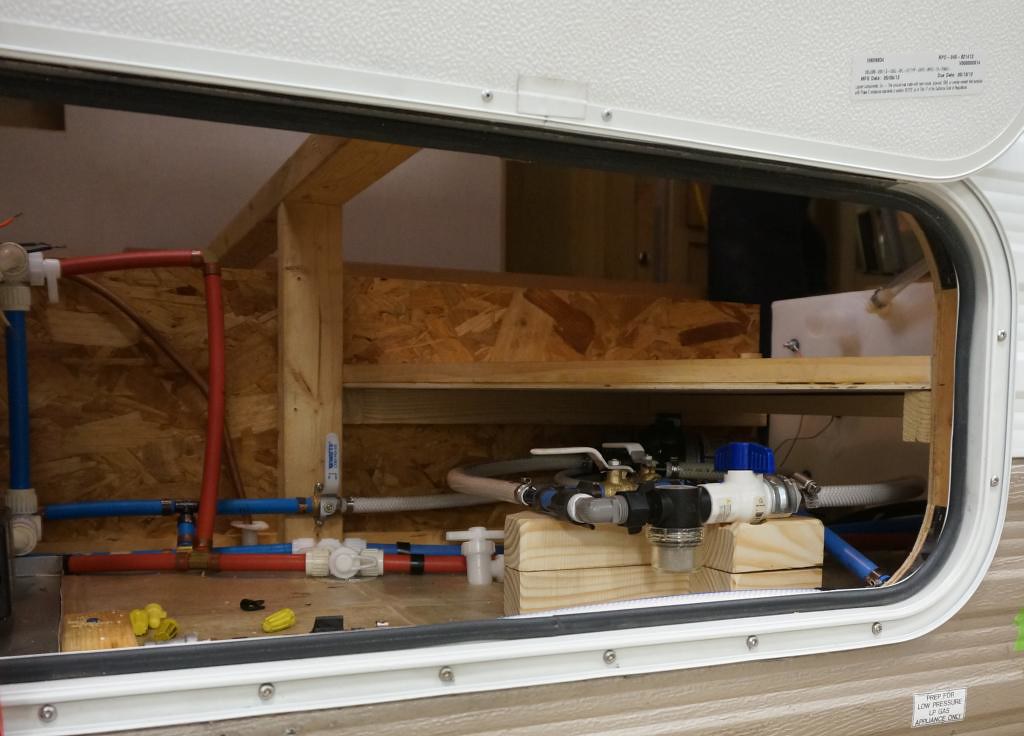
Below is a picture of the original pump setup, which shows stiff hose connections at the water pump suction and discharge lines. The rest of the piping is relatively standard for Sunlines of this era. The original access to this location was under the bed. We added an external cargo door to allow easy access to the water heater and the freshwater pump.
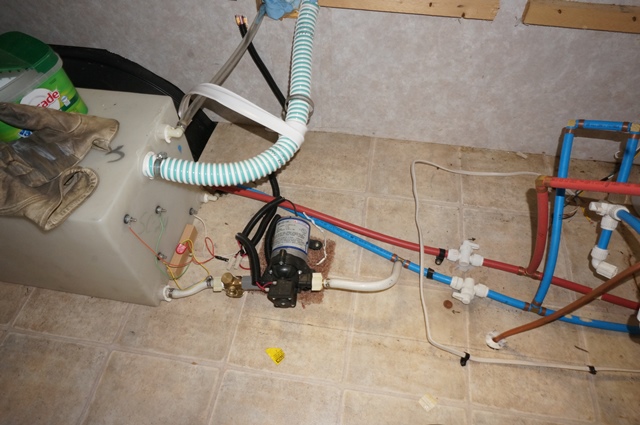
Here is the new piping set up. At first look, this may look like, holy cow, what is John B up to? We spent a fair amount of time mocking up piping configurations before settling on the layout to cover all the needs. Taking the time to sort this out in advance makes using it quick and easy.
A view looking in through the new cargo door
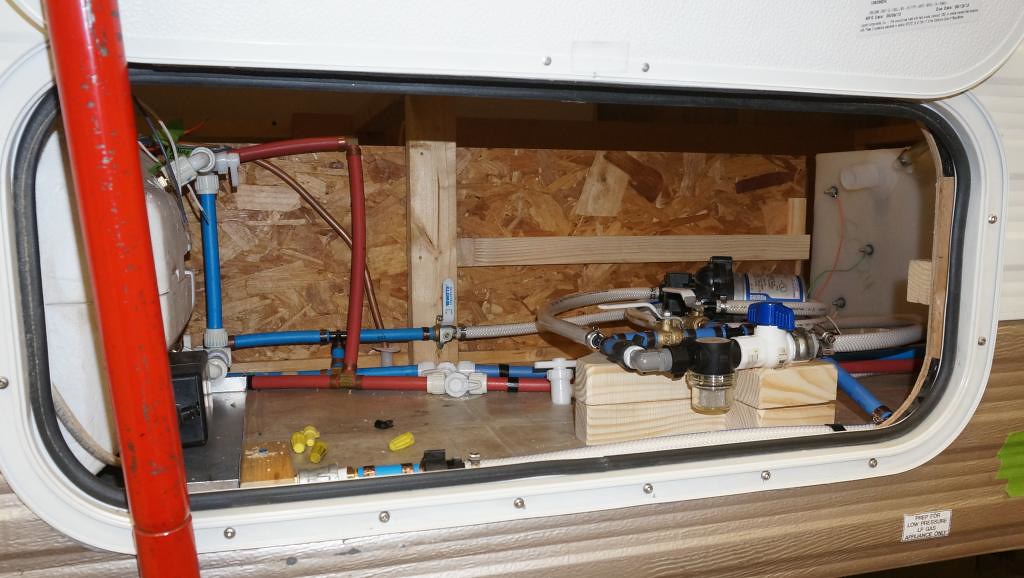
A view from the top


This install is the fourth, Sunline with the compressed air valve system to allow quick and easy draining of the freshwater system. Each camper had different floor plans and water pump mounting areas. The T1950 setup is not as elegant as the other three, but the function is the same. After each campout, I gravity drain the freshwater system and blow out the lines. The compressed air valve setup allows a quick and easy method to blow out the water lines, which takes approximately 5 to 8 minutes. I do this for sanitary reasons for the freshwater system.
The blow out concept has three basic configurations of the valves—each for a specific setup for blowing out all the water lines.
Setup 1 is the first to be used, which blows out the main hot and cold water lines starting at the pump discharge piping. The red X's are valves closed. The red arrows are the path of compressed air makes. The water pump suction and discharge lines are sealed off, and the air is pumped directly to the main water lines rather than blowing through the water pump, which is a restricted flow. You select the appropriate valves to allow this.
You connect a 45 – 50 psi compressed air hose to the air input line. This air fitting setup also allows RV antifreeze for winterization if wanted or to draw in vinegar for doing a water heater de-scaling (boil out). You would change the air chuck fitting to a suction tube to suck liquid into the system. With all faucests and drain valves closed, the air is connected and turned on, the total freshwater pressure side charges with compressed air. Then you open and close each faucet, toilet, low point drain, and water heater drain valve to purge the water out of the lines.


Setup 2 is done after step one to blow air through the water pump, the pump suction line and discharge lines. The water blows out into the piping system or the cold water low point drain. Once this sequence over, you switch back to setup 1 and blow out the remaining water in the piping.
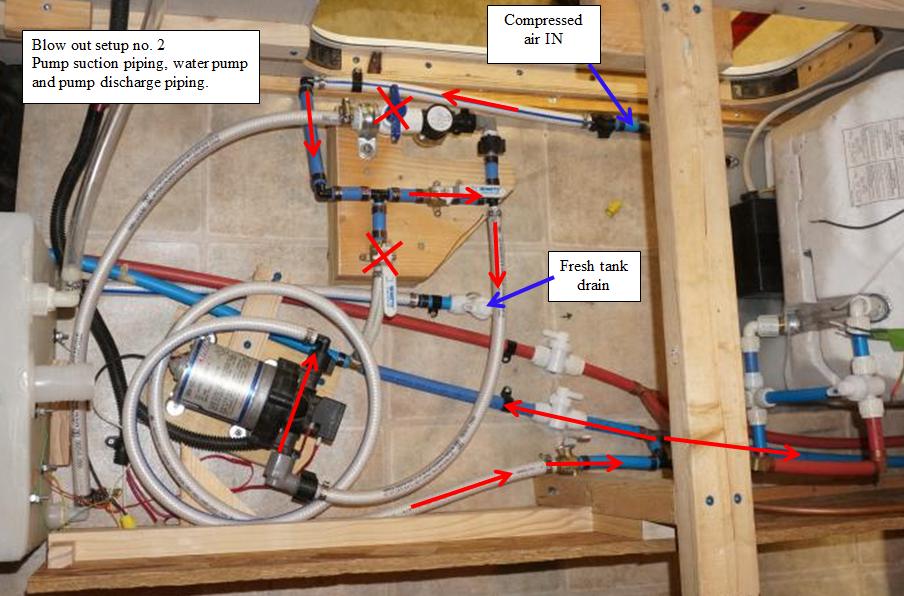
Setup 3 will blow out the pump suction line strainer and the pump suction hose back to the fresh tank. Any removed water will flow out the fresh tank gravity drain. You can do setup 3 before or after setup 2.

When all draining is complete, you return all valves to the normal operating position and store the air input hose in its woodblock holder. All pump suction and pressure hoses are gravity pitched down to flow to the low point drain or the fresh tank.
We added an easily removable shelf to store light items over the top of the water pump. The shelf is made in two pieces and blocked in place from moving. No screws are needed to hold them in place. There is a 3/4" high edge on the shelf, so items do not slide off the shelf. This shelf stays in place unless the water pump needs servicing. All piping blown down can happen with the shelf installed.
The small shelf piece was installed.

The second piece. This shelf installed allows the needed air space behind the water heater.

A view looking in the cargo door
Something to pass along, there are three Flair-It valves Sunline used in the newer campers. These are the valves and their part numbers. Some of the valves are for sale on Amazon. I also use Elkhart Supply for what Amazon does not have or for a lower cost.

Here is Elkhart Supply's web site. https://www.escousa.net/plumbing/all-fittings/valves/
This completes the freshwater piping short of the new fresh tank fill hose. The new hose has not yet come in from the hose distributor I ordered it from 3 weeks ago. Covid may have affected the shipment.
Work tally on time and materials to get to this point;
Work completes Day 50 of the repair.
1/11 through 1/24; 2 workers totaling, 14.58 hr. for freshwater cleaning and install tasks.
444.52 hr. - Total work hours accumulated to date: 1/24/21
New material use: 1/24/21 (for fresh water system)

$2,829.63 Prior material subtotal 1/24/21
$70.99 Fresh Water system subtotal. 1/24/21
-------
$2,962.67
Materials Subtotal to date 1/24/21
Thanks for looking.
John
To see more of my stored photos on the freshwater system, see here on Flickr for my photo album https://www.flickr.com/photos/camper...57718258202202
__________________
Current Sunlines: 2004 T310SR, 2004 T1950, 2004 T2475, 2007 T2499, 2004 T317SR
Prior Sunlines: 2004 T2499 - Fern Blue
2005 Ford F350 Lariat, 6.8L V10 W/ 4.10 rear axle, CC, Short Bed, SRW. Reese HP trunnion bar hitch W/ HP DC
Google Custom Search For Sunline Owners Club
|
|
|
|
|
02-13-2021, 09:11 AM
|
#115
|
|
Moderator
Join Date: Nov 2006
Location: Ohio
Posts: 12,654
SUN #89
|
Next is to checkout and restore the fridge. The hope when getting a used camper, the fridge cooling coil is still good. Checking that the cooling coil still works was the first order of business. If the coil has failed, restoration work will start differently.
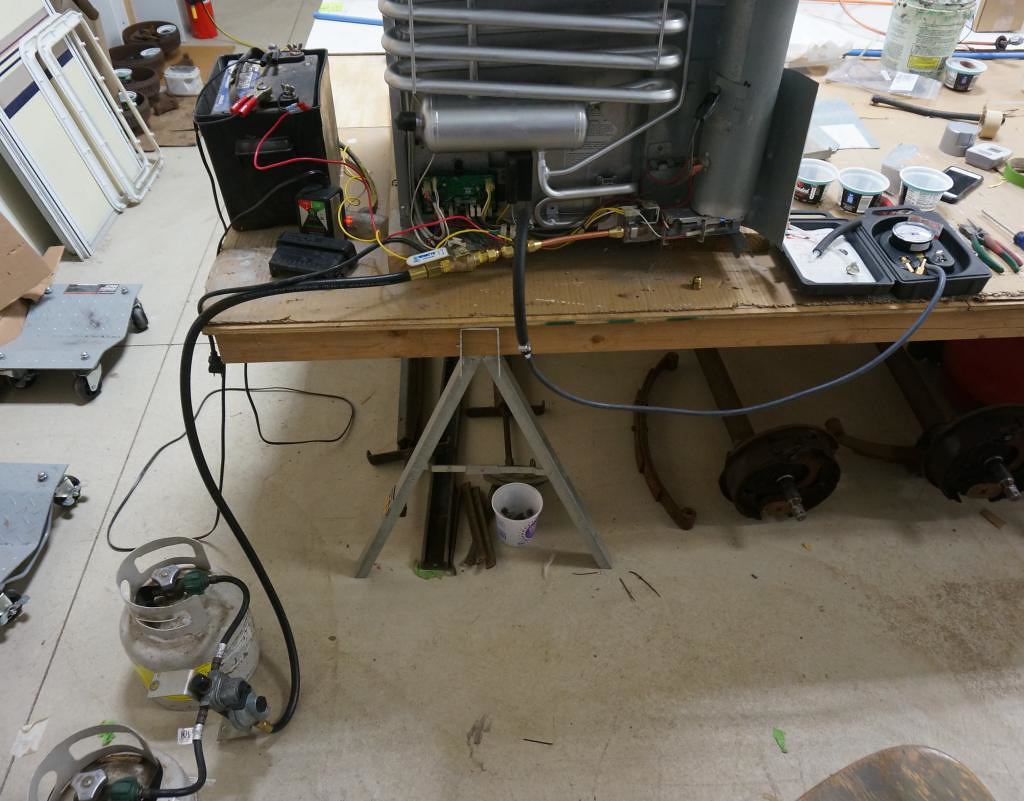
We knew from our initial power converter tests that something in the fridge would trip the shop wall GFIC outlet. I suspected the electric element had shorted the neutral to case ground. I did an ohm test between both leads and the case ground, and they came up OK when the fridge was cold. I set out to create a 12 volt DC and 120 VAC test setup to test run the refrigerator. Here is the setup.
You cannot see in the picture; the 120 VAC fridge cord is plugged into an extension cord for power.

The fridge was powered up and turned on to run on Auto. Within a few seconds, I heard the control board relay click to power up the electric element. About 5 seconds later, I heard a pop in the barn. Ah, yup, the GFIC just tripped. I tried it twice, and sure enough, the GFIC would trip again. Something inside the element creates a path to ground on the neutral wire as the heating element starts expanding.
I ordered a new element and started the tests over—the new next to the old.

I created a 12 point temperature test to check the cooling coil during operation. These are the temperature test points.
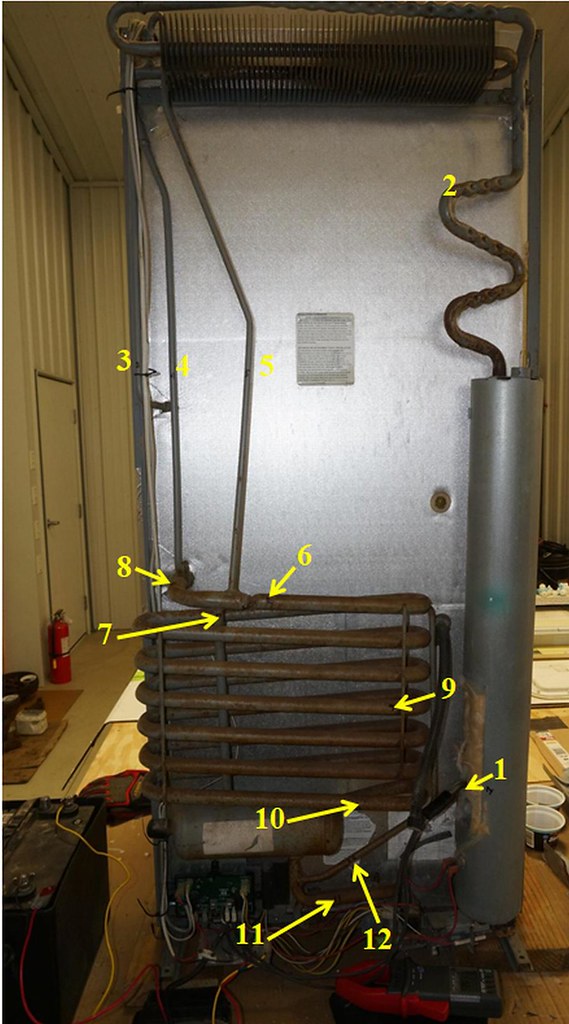
Here is test point 1, the top of the electric element sleeve.

I used a contact thermometer to check the cooling coil test points.
Inside the fridge was a remote sender to a wireless thermometer I could read the inside temperature, outside. I placed a small yogurt tub of water in the freezer to confirm I can freeze water. I used an amp probe to establish the electric element was still active when I took the temperature readings.

The test data was interesting. I never realized the spread and range in temperature across the cooling coil. Here is the first set of data. The fridge was running for a little over two hours, and the fridge's internal temperature started to drop quickly.

I ran out of time the first day, so I started the test again the next day after lunch. This time I created a better spreadsheet to track the information. Here is the start of the second test recording temperature at 1:32 pm with checks approximately every 20 to 25 minutes until the system started to cycle the heat on and off. As a point of reference, the barn temperature was at 50F overnight. Before the tests started, I raise the barn temp to 55F, warming the barn up in the afternoon. The fridge internally began at 53, close the 51F the day before.

On the second test, I noticed the same pattern at approximately 2 hours. The fridge compartment temperature had dropped close to 39F, and the control board started cycling the electric element on and off. At 4:06 pm, I went into the house for dinner and left the fridge running. The refrigerator was at 37F inside, and the element was again cycling on and off.

I checked the fridge twice in the evening. At 7:13 pm, the fridge compartment was at 36F, and I had ice in the freezer. See yogurt tub. I rechecked the temp at 11:27 pm, and the fridge compartment was at 35F and cycling the element on and off. I let the fridge run the whole night.

The next morning the fridge was at 50F. OK, what is up with this? I felt inside the refrigerator, and it felt cold. I checked the yogurt tub in the freezer, and it was frozen. These results do not fit a 50F compartment temperature. I found the remote wireless thermometer has issues and stopped working correctly altogether. I went in our big camper, took the old mercury fridge thermometer out and another remote wireless thermometer. Sure enough, the fridge was working right.
I added a gallon of water to the fridge so it has something to cool down and let the refrigerator run for two more days nonstop. Everything checks out on electricity. The cooling coil is good. Yeh!
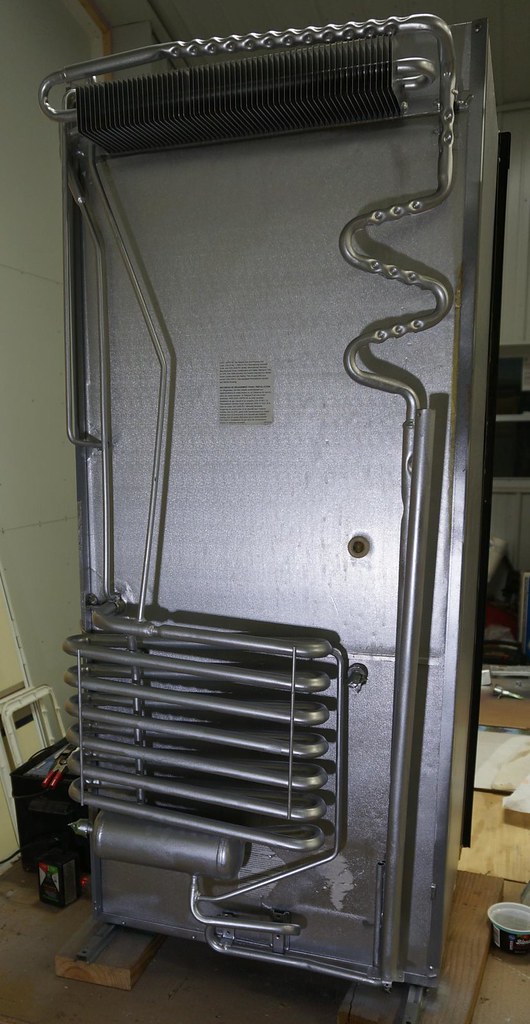
Then to deal with the rust on the cooling coil to make the coil last as long as possible. Now is the time to deal with it since it is on the bench. I took the gas burner off, the control system on the back of the fridge, the boiler tube insulation off, the flue baffle out, wire brushed the cooling coil and cleaned the rust dust off, and prepped for painting.
The gas burner before removing it
The control system off

The gas burner up close

Loose parts cleaned up

The boiler area, which is where many of the coolant leak failures have occurred on other failed coils.
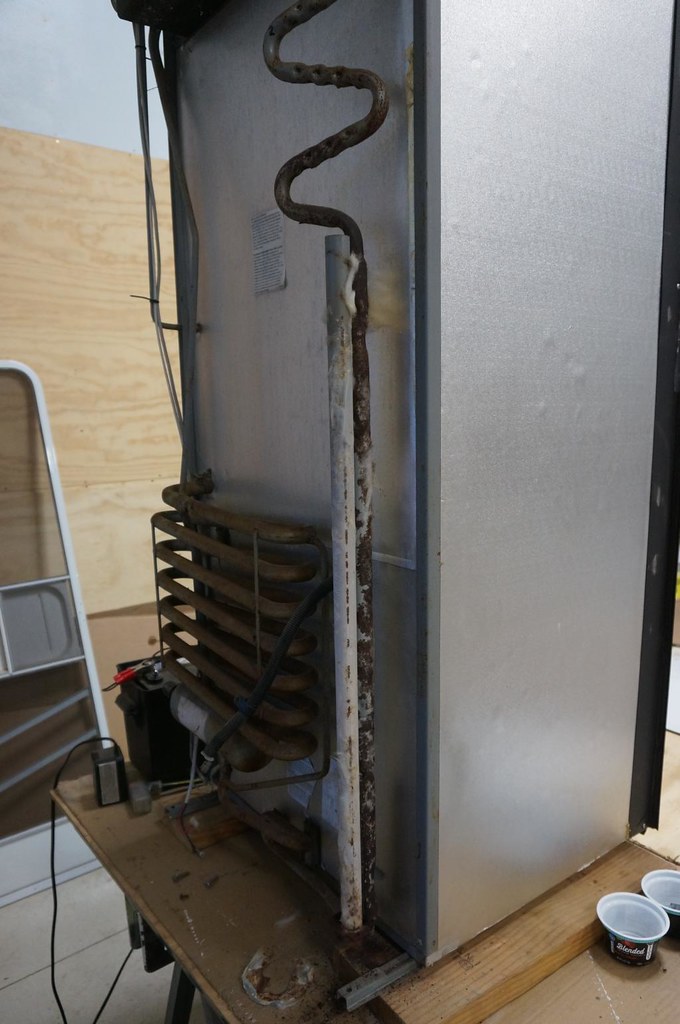
The electric element sleeves of the boiler area

The cooling coil wire brushed, degreased and ready to paint

The paint I used, rated to 1,200F.

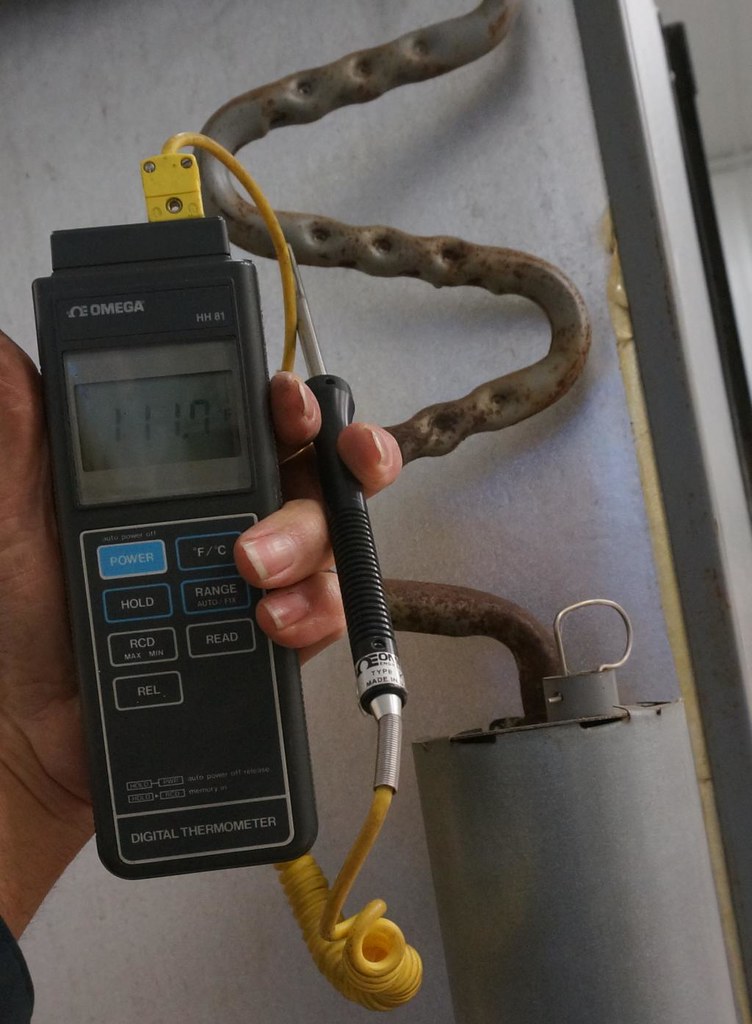
This paint works differently than most oil based paints. They do not recommend a primer, and the overspray dries very quickly into tiny beads of silver, almost like silver dust particles.

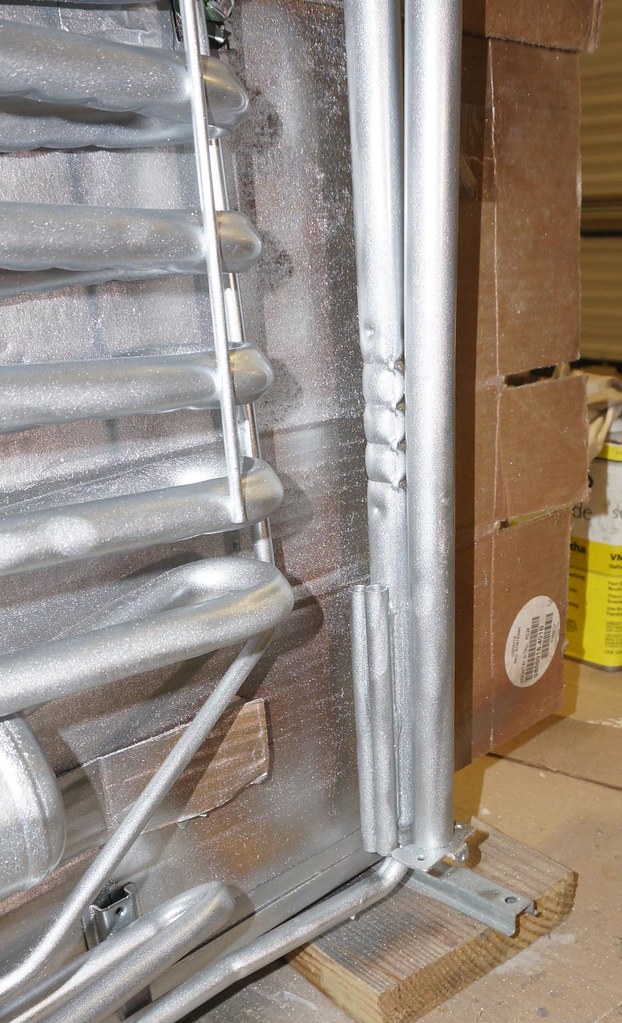
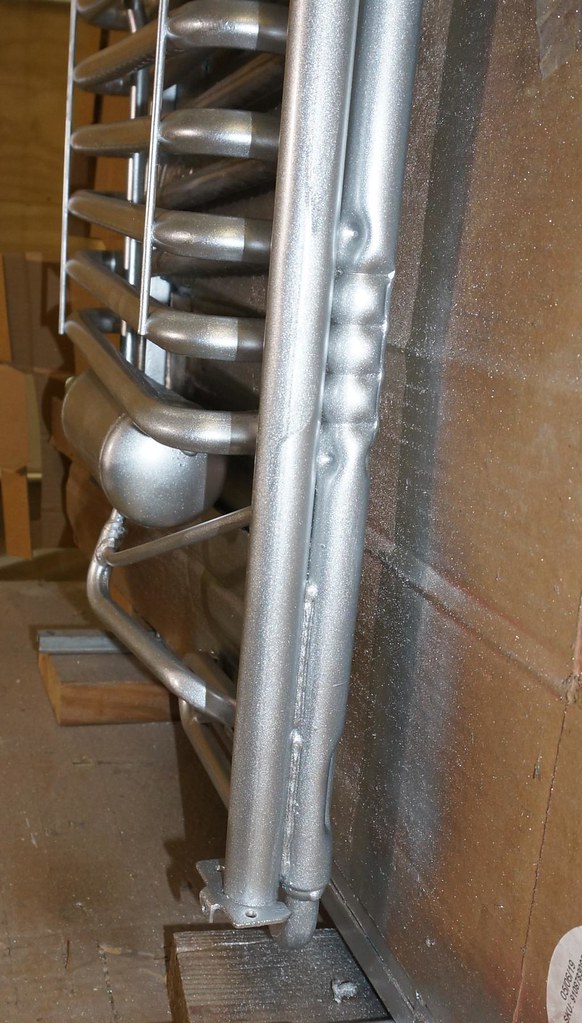
You have to have good lighting and keep looking at the backside of the coil close to the fridge and keep touching up all the missed spots from the first pass. It is hard to paint the backside but it is doable.
The loose parts. I intentionally did not paint the flue baffle or spray any paint up or down the boiler tube. The instructions state not to be use in areas of direct flame.
The masking cardboard was removed.
I noticed that in location no. 2 on the top of the boiler area when the system is running/heating, the paint is soft if touched with a screwdriver on site 2, and at the bottom of the boiler area. Location 3 to 12 has lower temperatures, and the paint surface is still hard. When site 2 cools, the surface is hard as expected. I called Rust-Oleum and asked about the rating and my use of it and the soft paint at approximately 150F. The coil temperatures are half the 1,200F rating at site 1 and well within the paint rating. Typically there is no abrasion of the coil when it is hot, and in use, so the softness concern is not something that will affect the use. I confirmed there is no fire hazard with the paint under its rating. He stated if the paint is subjected to heat above the rated temperature, it will flake off. I tested this on a test piece of scrape painted metal using a propane torch heating the metal from the backside, and it does flake, not melt when the excess temperature comes.
I assembled the system and started testing the system on LP gas mode.
The boiler insulation metal cover can be a bugger to get on with one person. I found using tie wraps helps hold the tube while you fasten the metal tabs helps. The sheet metal wants to spring open until the metal tabs are in place.


The gas burner assembled, ready to install.

The gas valve was tested for leaks and passed with flying colors. I also tested the flame fault control by shutting down the LP, looking for the control system to go into, trial for ignition, and trying three times to light and go then into a fault. The control board is working as it should.
The system fired right up on gas within three igniter clicks the first time. All is good on the gas control. Each re-ignition only takes one click, and the burner is up and running.

I ran the fridge on gas for two days straight, the system froze ice in the freezer, and the fridge compartment stays at 32 to 35F regulation without opening the door. I only had two gallons of water in the fridge as a heat load.
This work completes getting the fridge checked and working. I still have the fridge door to fix, the condensate drain, and the cabinet insulation seal to address.
Work tally on time and materials to get to this point;
Work completes Day 54 of the repair.
1/11 through 1/24; 1 worker totaling, 23.41 hr. for fridge repair and testing.
467.94 hr. - Total work hours accumulated to date: 1/24/21
New material use: 1/24/21 (for fridge repair)

$2,962.27 Prior material subtotal 1/24/21
$66.72 Fridge repair subtotal. 1/24/21
-------
$3,029.69
Materials Subtotal to date 1/24/21
This completes the work tasks from the three areas spanning 1/11/21 to 1/24/21.
Thanks for looking.
John
To see more of my stored photos on the fridge repair, see here on Flickr for my photo album https://www.flickr.com/photos/camper...57717878335011
__________________
Current Sunlines: 2004 T310SR, 2004 T1950, 2004 T2475, 2007 T2499, 2004 T317SR
Prior Sunlines: 2004 T2499 - Fern Blue
2005 Ford F350 Lariat, 6.8L V10 W/ 4.10 rear axle, CC, Short Bed, SRW. Reese HP trunnion bar hitch W/ HP DC
Google Custom Search For Sunline Owners Club
|
|
|
|
|
02-16-2021, 02:35 PM
|
#116
|
|
Moderator
Join Date: Nov 2006
Location: Ohio
Posts: 12,654
SUN #89
|
The next task was, clean, prep, and paint five doors. The main entry door, cargo doors and rock guard were pre-cleaned before, but they needed prep for painting. There is a host of yellowed camper parts to clean and paint as well. The time to do these tasks is always longer than it seems.
Most of the doors needed new door gasket seals, and removing the seals was a task. Changing door seals is a straightforward four-step process, but it is time-consuming to do three doors. Here is the method I did.
Scrape dry what you can to get the old gasket off. The dry scraping removes the loose seal material, and you end up with chunks of gasket still stuck on.

Using just the right amount of gentle heat would soften the adhesive, and you could scrape up most of the adhesive and remaining gasket.

The last remnants of adhesive came off with a combo of mineral spirits for the first wave of cleaning, followed by 3M adhesive remover. For dirt on the front/back of the door, LA’s Awesome cleaner and a Mr. Clean magic eraser worked well.
The last step is to sand the outside fiberglass door panels lightly using 150 grit paper.

The rock guard

The entry door needed fiberglass filler to cover over an old aftermarket door holder. After the filler has cured, repeat the same four-step prep process as the cargo doors. The screen door bug seal had desegregated into dust.

I had to remove the old rubbery glass seal compound from the glass frames.

Dug it out and cleaned all the sealant grooves. A thin scraper and 3M adhesive remover did the trick, just tedious.

Here are some pics of entry door unit with the screen gasket removed and cleaned.

The paint I used was the Rust-Oleum Top Side Marine paint. I had to order it from an ACE hardware store. It took about four days to get it.

Here is the brush I used to get a fine finish.

All door parts cleaned, final Naphtha cleaned and ready to paint.

The primer applied. The primer flowed out once on nice and smooth.

A small amount of topcoat on a primed door. You can tell the slight color difference.

I painted the door frame that was exposed to the outside. This was to have the frame match the door as the white shade is slightly different from the Sunline white.

I have now completed the painting on all doors. The only downside I see with this paint so far is the topcoat; I should have thinned the paint slightly. I found using paint direct from the can; the topcoat did not level as well as the primer. I can see a low level of brush strokes and feel the slightly thinner paint would level out better. Others seemed to have used it straight out of the can, like the directions state. I did not find it to worked as well as I wanted, not thinning. Maybe my can was older, not sure, but the doors look 100% better.

This work completes the door painting tasks.
Work tally on time and materials to get to this point;
Work completes Day 55 of the repair.
1/25 through 1/27/21; 1 worker totaling 8.67 hr. for door cleaning and paint.
489.44 hr. - Total work hours accumulated to date: 1/27/21
New material use: 1/27/21 (for door paint)

$3,029.69 Prior material subtotal 1/24/21
$83.09 Door paint subtotal. 1/27/21
----------
$3,112.78
Materials Subtotal to date 1/27/21
Thanks for looking.
John
To see more of my stored photos on the door paint, see here on Flickr for my photo album https://www.flickr.com/photos/camper...57717880899923
__________________
Current Sunlines: 2004 T310SR, 2004 T1950, 2004 T2475, 2007 T2499, 2004 T317SR
Prior Sunlines: 2004 T2499 - Fern Blue
2005 Ford F350 Lariat, 6.8L V10 W/ 4.10 rear axle, CC, Short Bed, SRW. Reese HP trunnion bar hitch W/ HP DC
Google Custom Search For Sunline Owners Club
|
|
|
|
|
02-16-2021, 04:16 PM
|
#117
|
|
Senior Member
Join Date: Nov 2018
Location: Pennsylvania
Posts: 328
SUN #10986
|
Nice, John. I really need to tackle that on my 1950.
Kind of surprised me that with your normal overachievement syndrome, you didn't spray the paint. 
__________________
|
|
|
|
|
02-17-2021, 08:28 AM
|
#118
|
|
Moderator
Join Date: Nov 2006
Location: Ohio
Posts: 12,654
SUN #89
|
Quote:
Originally Posted by Tinstaafl
Nice, John. I really need to tackle that on my 1950.
Kind of surprised me that with your normal overachievement syndrome, you didn't spray the paint. |
Thanks for the good words, Tin.
The thought of spray painting did cross my mind. My Bliss spray gun from years ago is an air type gun. The overspray is very abundant and I do not have an exhaust type paint booth to deal with the fumes etc. If the weather outside was more conducive to painting, I may have sprayed them. It was -6F at the house this morning. and about 12" of snow on the ground.
I have not tried the modern day airless sprayers to know if they have significantly less overspray. Or how the finish comes out. I need to research that more for the future.
We really need a good method on how to help old yellowing large camper parts. I have many campers yet to fix the yellowing doors on. Small parts, the aerosol spray can works, but these big parts need something more and then the kind of paint. I spent the money on the better brush, I just need to thin the paint a little to get it to even out better. If I had done that, then the brush work would of been prefect. Brushing the paint on uses a lot less paint and less mess inside a building too. I only used 1/4 of the quart of primer and top coat. I can get 2 maybe 3 more campers worth out of the paint I have.
I probably should get a paint viscosity cup so I can experiment with using the paint straight from the can, or how much to thin it, then I know what works and what does not. I used to have a older all stainless no. 2 cup, but cannot find it now. Been too many years and barns ago. I see they have plastic ones now less then $10 bucks and that would help. I never thought of this until your note, thanks!!
The small parts painting coming up next.
__________________
Current Sunlines: 2004 T310SR, 2004 T1950, 2004 T2475, 2007 T2499, 2004 T317SR
Prior Sunlines: 2004 T2499 - Fern Blue
2005 Ford F350 Lariat, 6.8L V10 W/ 4.10 rear axle, CC, Short Bed, SRW. Reese HP trunnion bar hitch W/ HP DC
Google Custom Search For Sunline Owners Club
|
|
|
|
|
02-17-2021, 08:49 AM
|
#119
|
|
Moderator
Join Date: Nov 2006
Location: Ohio
Posts: 12,654
SUN #89
|
There are still several small tasks to complete, both inside and out of the camper. BenB and I split up to divide and conquered them.
Inside, BenB started putting the bathroom and window treatments back together, and I began to clean parts, lots of parts.
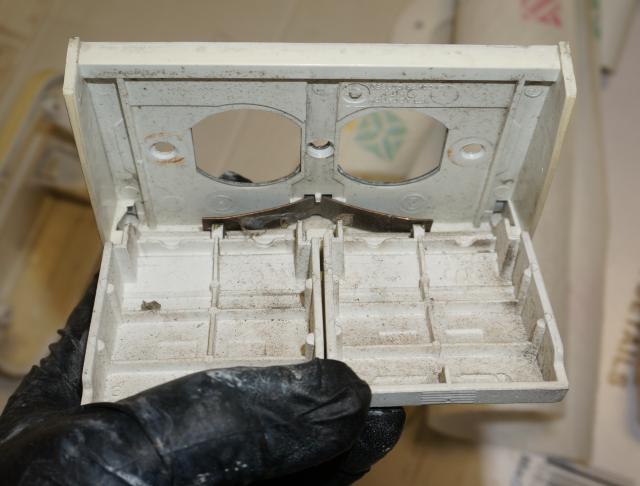
We installed a new Atwood 36719 LP detector and rerouted the power wiring to it. For those following along, the Atwood LP detectors in your camper have limited life. This new one has a life of 84 months after the retail sale. Any Sunline that has not had an LP detector changed is very overdue for a change out. This kit came with an outer mounting plate. It seems Atwood (Dometic) may have stopped sending the outer mounting plate to fit over the existing Sunline hole as the new ones I am getting do not have the large outer adapter plate.

The LP detector's power wiring used to come up through the floor by the fresh tank on the right in the picture below. The old wiring hole was under the silver aluminum plate cover. That location created a risk of cargo items running into the wiring and possibly damaging it. Since we had all the wiring apart, we moved the wire location to the left side and ran the existing wire through a 1/2" polyethylene hose. It is now out of the way and protected.

Ben installed the shower steam dome.

Since we installed a new shower surround, we needed to remount the showerhead and hot/cold faucet valve. We had to sort out where to drill the holes, remount the faucet and determine where to mount the showerhead that a backer board existed behind the wall. We upgraded to the Oxygenic's RV shower head. As FYI, Lowes is now selling the Oxygenic's RV shower head cheaper than any online place I could find. https://www.lowes.com/pd/Oxygenics-B...use/1003280276
The showerhead is a new stock item for Lowes in 2021, and three stores in our area had them in the building but not on the shelf yet. It took a good deal of time to find the right person to go into the storeroom and bring one out to buy. If you want one of these showerheads, the Lowes RV section is in the middle of plumbing and not on the shelf back by the home showerheads.
The Shub shower screen needed a cleaned up and some parts painted as they were severely yellowed. Some of our club members may have never seen one of these Shub shower doors apart, so adding some extra pics to help explain them. Since we added a new shower surround, we had to cut the top and bottom track bar to fit the new surround.
The shower door unit is universal as far as left or right side-mounted. You flip it over 180 degrees, and it converts it to the opposite hand. There are drain holes on the bottom of the door unit. You need to make sure they do not caulk over them. See the holes here in the transparent base plate.

You mount the door and the opposite door latch rail with double-sided foam tape. The tape is white, hard to see in these pics, but there are two 1" wide strips on the door and one 1" wide strip on the door latch rail.

The screen guide rails on the top and bottom have plastic clips on the track's ends that slip on the track and then clip in place to nylon pins sticking out.

Here is the clip installed over the nylon pin. The top of the bottom rail fits into that clip square.

The entire door.

Before taking the release paper off the double-sided tape, we did a dry test fit in the shower to ensure all the cut pieces fit correctly and marked where it goes on the surround with a pencil. Then we stuck the door unit side first; then, the door latch rail, and then inserted the top and bottom track bars.
The shower door is now in place, and we are ready to start installing the toilet.

I cleaned up the toilet, inside and out, and passed it off to BenB. The toilet is still in good shape.

Here is a pic of the toilet floor flange fitting. We use the soft set Teflon pipe dope on the tank threads.


Sunline only put one screw per side of the toilet T bolt slot; four screws total per flange. I have found the plastic flange flared up on the side that is not screwed down, so we added the other four screws making eight total. We also used stainless screws in place of nickel-plated as every toilet I have taken up has rusted screws. Just condensation sweat can start the screw deteriorating over time.

A new floor flange gasket. You have to use the correct rubber floor flange gasket for the proper toilet. No wax rings, and I do not use the aftermarket RV gaskets. I use the actual Dometic seal. There are a top and bottom to the seal; the seal has marked which side is up.

We also put new Flair It Santoprene cone washers in all the swivel fittings. Being 16 years old, the old ones are hard and crusty. The toilet water supply hose has one of those swivels.
The bath is almost all together. We have to hold off installing the bath roof vent inside parts until the Eternabond on the roof is done.

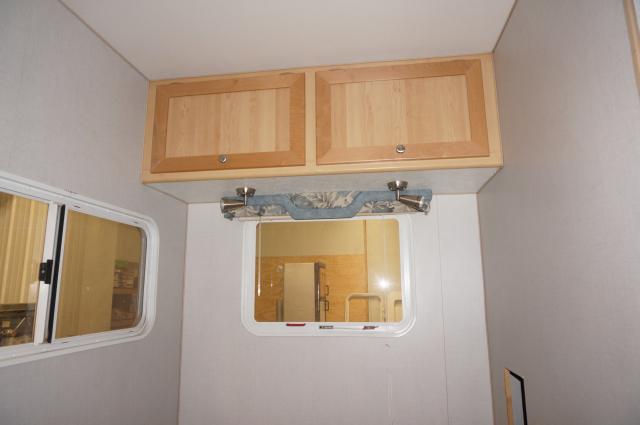
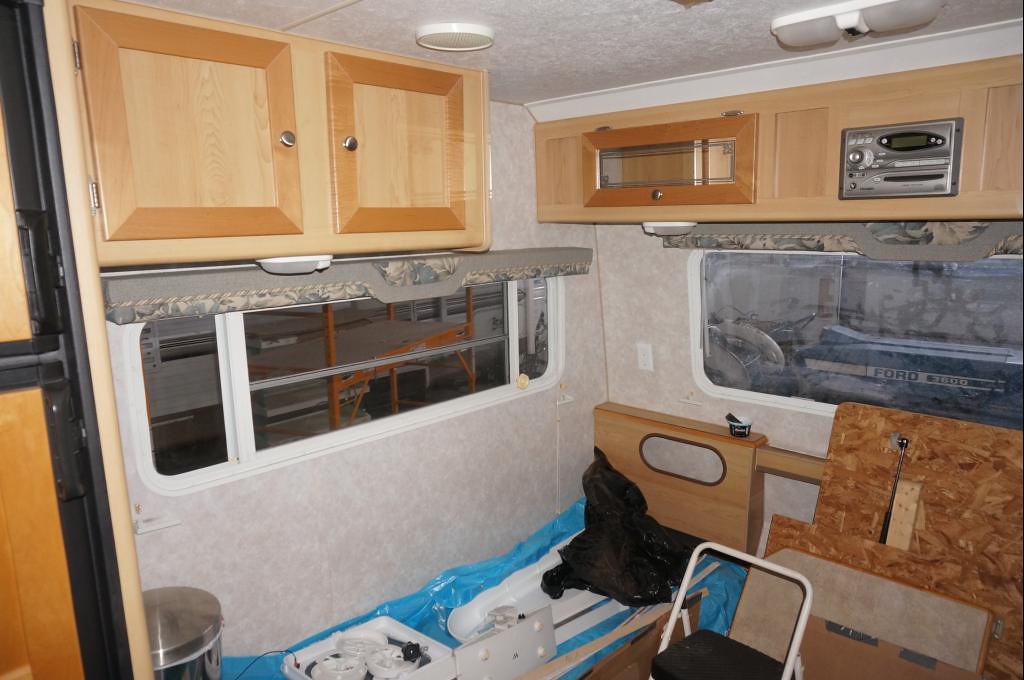
Ben also put up all the valances and blinds. We took these down when we had significant construction ongoing and stored them in the house basement.
The bath window before the shower door went in.

The bedroom back wall window. I missed a pic of the right side window; it, too, now has a valance/blind on it.
The front right side windows. We are still waiting for the new fresh tank hose to come in before putting the bed OSB boards back in place, shown in this picture.

Front left side.
Here is the pile of parts to be cleaned and painted.
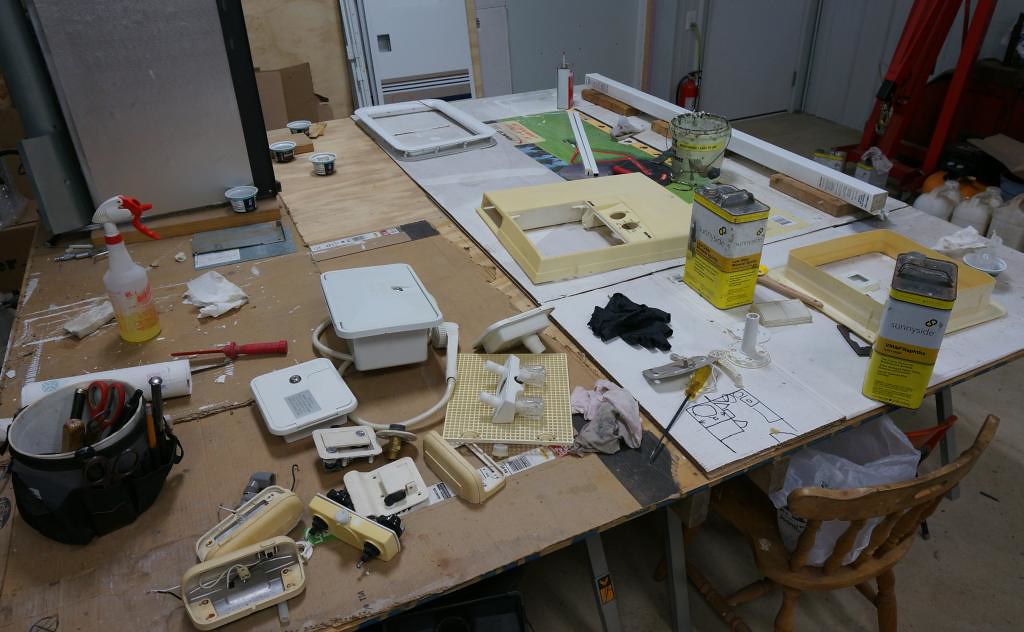
Some were very dirty, like this outdoor outlet cover.
All cleaned and ready to spray paint

Now all new looking parts. Yeh! The painting method of plastic continues to evolve. These came out the best of prior attempts. They came out perfect. Sort of a for sure different method, but I did 3 super thin coats of Krylon Fusion gloss white paint. Wait a few minutes between coats, enough to tack up, it is vey thin paint. Once done with the Krylon, wait about 5 to 10 minutes pending temps, I used a top coat of Rust-Oluem standard stops rust gloss white oil based paint. Do not use the Pro line of Rust-Oluem on plastic as it dries too fast and will wrinkle. Learned that the hard way. The top coat creates a better smoother looking finish. Certain types of plastics have different surface energy and low energy makes it hard for paint to stick. The super thin coats of Fusion paint bond and change the surface energy. You can use the Fusion paint by itself too, just super thin coats or it will run.


I took apart the two switched outdoor light fixtures to clean and paint. The plastic switch slide broke off both tabs that move the electrical switch. The plastic is sun-baked brittle. Bargmen discontinued making this style several years ago. I'm not too fond of the last few new ones they offer, plus the cost of around $15 each. So I fixed the broken switch slide tabs. While not a fast thing to do, it came out well. I work cheap.
Here is one of them; the small silver aluminum fork screwed on is where the old molded tabs were.
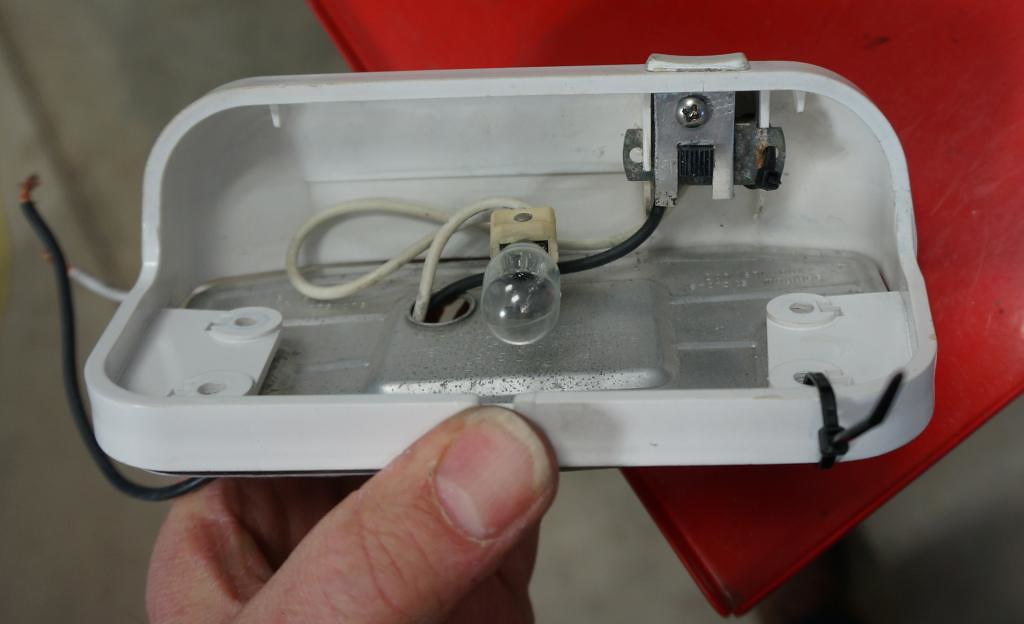
The other one

The black mini tie wraps hold the switch in as those holding tabs snapped off too.
The above work completes progress up to Feb. 7th. More yet to come.
Work tally on time and materials to get to this point;
Work completes Day 58 of the repair.
1/28 through 2/7/21; 1 worker totaling 4.5 hr.
2 workers totaling 21.5 hr.
----
26.0 hrs total 1/28 to 2/7/21
515.44 hr. - Total work hours accumulated to date: 2/7/21
New material use: 2/7/21

$3,112.78 Prior material subtotal 1/27/21
$125.90 Inside assemble & parts paint subtotal. 2/7/21
----------
$3,238.68
Materials Subtotal to date 2/7/21
Thanks for looking.
John
To see more of my stored photos on the camper inside work, and parts painting, see here on Flickr for my photo album
Parts painting
https://www.flickr.com/photos/camper...57717880899923
Interior assembly
https://www.flickr.com/photos/camper...57718318942333
__________________
Current Sunlines: 2004 T310SR, 2004 T1950, 2004 T2475, 2007 T2499, 2004 T317SR
Prior Sunlines: 2004 T2499 - Fern Blue
2005 Ford F350 Lariat, 6.8L V10 W/ 4.10 rear axle, CC, Short Bed, SRW. Reese HP trunnion bar hitch W/ HP DC
Google Custom Search For Sunline Owners Club
|
|
|
|
|
02-18-2021, 07:05 PM
|
#120
|
|
Moderator
Join Date: Nov 2006
Location: Ohio
Posts: 12,654
SUN #89
|
I think we are finally getting closer to the end of the little mini projects that take a good deal of time but do not look like you did much. Here is the latest work.
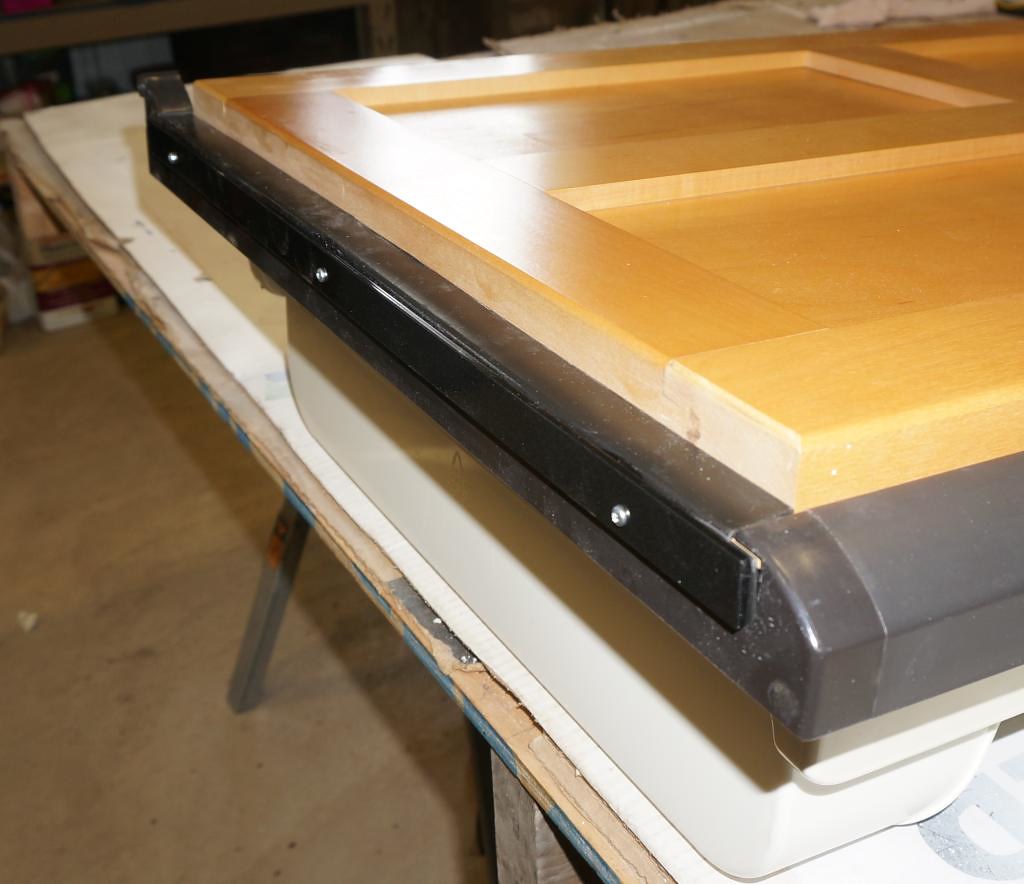
The camper had an amount of cracked ABS plastic in need of repair. Both wheel-well fender skirts had cracks, and the fridge door panel molding cracked.
Here is a quick recap on the fender skirts repair. It started out looking like this. One fender cracked into two pieces, and many cracks abundant at the mounting screw holes.

All ABS repair in progress.

All fixed and painted ready to install.

I will capture the labor time and materials here in this post. For details on how to do the ABS repair, including the fenders above, see this post with more detail. https://www.sunlineclub.com/forums/f...zel-18665.html
Learned something new with this project camper, how the fridge door panels molding holding them on, fails. I never noticed this before until taking the door off the fridge. The wood door panel weight and bouncing down the road appears to have cracked the bottom molding holding the panel in location.
See here.


The molding cracked at all three mounting screws.

The door panel itself weighs a fair amount. I never weigh it yet, but there is a quantity of 3/4" thick solid maple in it.

The backside has what looks like a Masonite product attached to the maple wood, creating a slide to hold the door panel to the fridge door.

There are three, no 4 x 3/8" long tiny screws that hold this lower molding on. I'm sort of shocked the small screws did not pull out. Guess the weak link to fail first is the molding.


To repair the molding, I first heated it and flattened out the puckered-out cracked plastic to be flat and the bend angle to be 90 degrees.

Then I did ABS plastic repair on the molding. See the link above on the fenders for the ABS repair to the fridge molding.
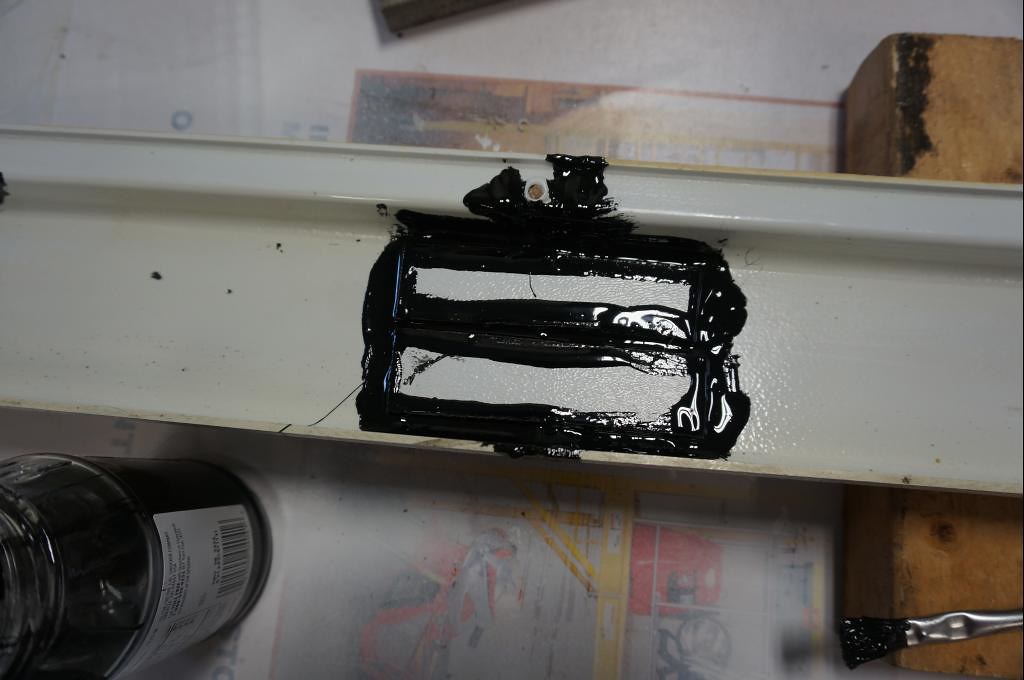
To help strengthen the plastic molding, I added a piece of 3/4" wide x 1/8" thick aluminum strip and drilled three holes in it to match the molding holes.

A test fit the holes all lineup.

After painting the aluminum strip black, I installed the repaired molding with the aluminum strip. I changed the screw length to no. 4 x 5/8" long. The longer screws accounted for the added thickness of the metal and an extra 1/8" of bite into the door plastic for more holding strength. We will see how this holds up. I also need to check the other five Sunlines in the barn to see if they have this issue.
The fridge has an open-cell foam gasket seal between the fridge cabinet and the metal fridge flange. Sixteen years and this seal is gone, disintegrated. If we had left the refrigerator in place, the seal most likely would be OK. Once you pull the fridge out, it is gone. This seal is more of an insect and air draft seal for the fridge compartment.

I bought this foam seal at the local lumberyard, which is a little better quality, and it fits well.


I also did an upgrade to the condensation drip hose. The original Dometic black corrugated hoses are known to crack over time, and this one, while not broken yet, was 16 years old. The fridge is now out in the open, so now is the time to change it. You have to pull the refrigerator back about 8 to 12" in the camper to install this if it fails later on. A cracked drain hose leaks water into the wood fridge compartment and is a bad thing.
Here is the old hose next to the new one, or at least as how the new one started out.

By coiling a 360-degree loop in the fridge drain line, the coil creates a pigtail, as we call it, to make a natural water trap to stop hot air outside from backing up into the refrigerator. I even saw one of these upgrades on a fellow Sunliner's camper. I cannot recall how he exactly did it. I started to create the pigtail loop with the vinyl hose, and it wanted to kink shut when I started to make the loop small enough to fit in the space. After fiddling with it and I had to create a second bend to get the hose out of the air vent on the side of the camper, I gave up on trying to get the vinyl hose to make those hard turns. This is most likely why Dometic used the corrugated hose. It would bend and not kink as easy.
After thinking about this, I came up with a more heavy-duty version for $3.50 more at the hardware store. I started with 1/2" soft copper refrigeration tubing and rolled it into the pigtail, and connected it with the vinyl hose.


Here it is installed on the back of the fridge.


I will jump a little out-of-time order here and show the hose installed in the camper. I had to make a second copper bend to get the hose out of the side air vent. The vinyl hose kept wanting to kink, trying to make this turn.

I want the drain tube to poke out of the cover in place of just inside the cover. This way, I know the water will drip outside. 
NOTE: If you make the pigtail loop in the drain line, you need to winterize the loop when storing the camper below freezing. You can flush the drain line with RV antifreeze or compressed air to blow out the water to winterize.
We were also able to install the fridge during this work period.
The fridge cabinet.
A view of our fridge roof vent upgrade from the inside.

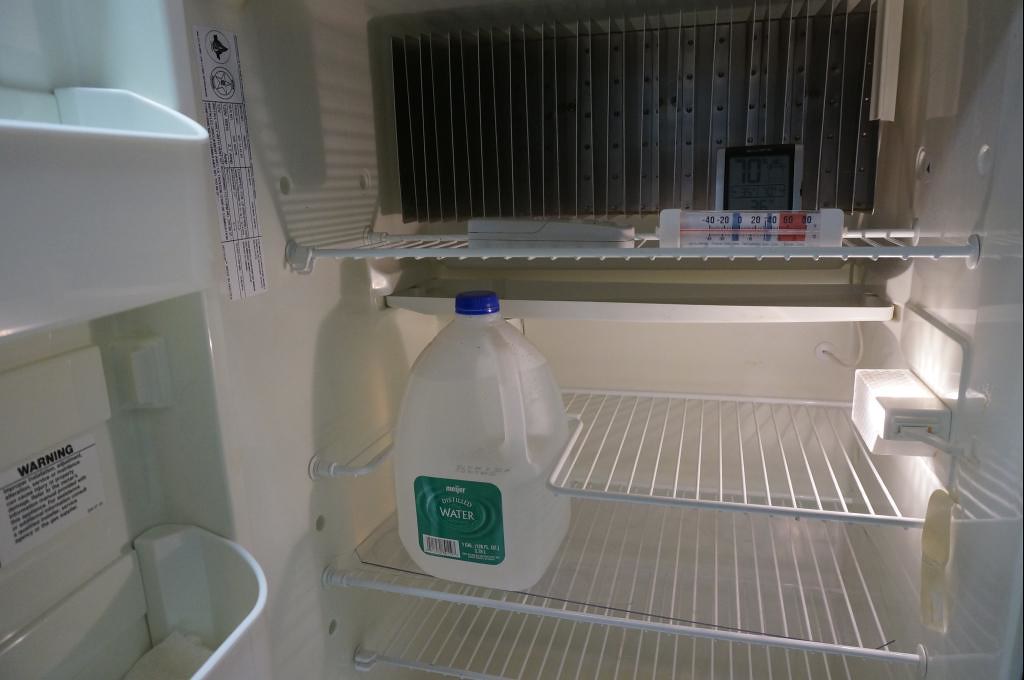
Fridge installed. Yeh!!!

With the heat shield on.

I'll stop here for the moment so the pictures will load faster and restart in the next reply.
__________________
Current Sunlines: 2004 T310SR, 2004 T1950, 2004 T2475, 2007 T2499, 2004 T317SR
Prior Sunlines: 2004 T2499 - Fern Blue
2005 Ford F350 Lariat, 6.8L V10 W/ 4.10 rear axle, CC, Short Bed, SRW. Reese HP trunnion bar hitch W/ HP DC
Google Custom Search For Sunline Owners Club
|
|
|
|
|
|
|
Currently Active Users Viewing This Thread: 1 (0 members and 1 guests)
|
|
|
 Posting Rules
|
You may not post new threads
You may not post replies
You may not post attachments
You may not edit your posts
HTML code is Off
|
|
|
|
 » Recent Sunline Discussions
 |
|
|
|
|
|
|
|
|
|
|
|
|
|
|
|
|
|
|
|
|
|
|
|
|
|


 Linear Mode

