 |
|
 06-23-2021, 08:22 PM
|
#21
|
|
Moderator
Join Date: Nov 2006
Location: Ohio
Posts: 12,654
SUN #89
|
Quote:
Originally Posted by Skywalker14

Man that does seem like a pain with the tight spaces would there be any butyl tape to apply for the slide like under the inside metal flange or is it just screwed down and then eternabond taped over the top.
The slide roof seems solid as could be but I have three low spots where water puddles up and sits.i had put some dicor roof coating on it when I did the roof a year or so ago but when the water sits on there it makes the coating bubble up and separate from the roof to where it just wants to peel
I still have no black looking marks of the epdm it is still white just like my roof the epdm has spider cracks look to it.
A few years ago a misc screw poked through from under the epdm and that was my leak I believe it is right on the seam of the two luan boards under the epdm I ended up taking lap sealant and coated the seam and all of the edges with lap sealant and it has held up great so far no more leaks there but it is something I have to always check before rain comes.
what are the coatings you mentioned I will probably fix the roof first to see how that goes before the slide I will buy extra epdm depending on which route to take.
i did have a question about the butyl tape under the membrane does the butyl go under the membrane where the termination bar will go to sandwich the membrane or would it go where the membrane will be stapled like the front would it go where the membrane is stapled to the front stud or right under the termination bar?
|
Getting back to you, Just got home tonight so I can answer.
I have tested 2 brands of high solids silicone roof coatings. The testing was pretty elaborate to get both to do all what I wanted them to do, which is coat every seam on the roof, the vertical gutter rails and the easy open areas. Basically a no exposed caulk roof, with a lifetime warranty on the product and you can service the roof if a vent, shower dome etc. needs to be changed. Plus the coating can handle ponding water and not flake or peel. The Dirco acrylic coating I "think" you used is a good coating, but the acrylics by nature of most brands have the issue with ponding water.
These are the 2 brands
https://crazyseal.com/crazy-seal/
https://henry.com/retail/white-roof-...e-roof-coating
At the moment, I'm leaning more towards the Henry's Tropi cool. It is formulated in 884 caulk tube, 885 seam repair and 887 roof coating. Crazy Seal (CS) has 3 formulations too, but the viscosity of the Henry's 885 and CS patch is very different and those products are needed on all the seams.
I will most likely be coating one or two campers before the end of the year with the Henry's. I will create a detail post on all this, as there was a learning curve on how to deal with the gutter rails, vertical surfaces and how to get it off to service a roof item.
If you have any interest with either, read up on them and I can answer any questions before the post comes out.
On the butyl tape under the membrane of on top questions, this all depends on where you are sealing.
The very front seam from rubber to front siding is different then the gutter rails and the rear wall.
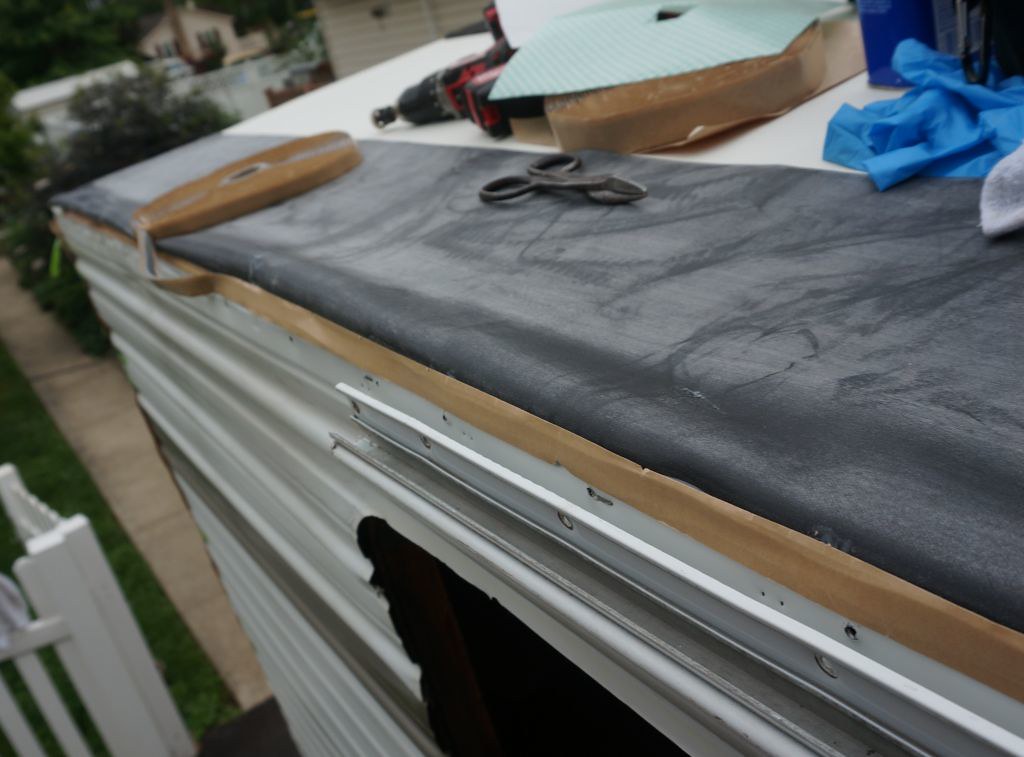
The front seam, the rubber is glued to the roof decking which extends all the way under with the front siding. In this case, butyl is on top of the rubber and seals to the front wall siding on top of the rubber. Then the termination strip is butyl sealed again over the top of the siding and on top of the rubber. There is 2 sets of butyl on the front.
From this post link
https://www.sunlineclub.com/forums/f...tml#post154611
and this one https://www.sunlineclub.com/forums/f...tml#post154679
Rubber glued to deck. Butyl on top, to seal front siding to rubber. Step 1

Then staple down front siding and put the corner moldings on


Then comes the front seam termination molding on top of the siding and the rubber. I myself add an extra stripe of butyl at this location as it is critical to bond the rubber and termination molding. This is a common leak area.
Place butyl on the rubber next to the front siding sheet.


I also line the back side of the termination bar with butyl. Trim excess butyl to edges of termination bar.

Warm butyl if your shop is cold, below 70F

Ice pick align the holes in the molding to the old holes in the siding, which should be on the center of the joint. If the siding holes are not on center, put the molding on center. It needs to seal equal both sides.

Use a drill clutch setting to set the screws, follow with a hand tightening on each screw. Torqueing into goo/butyl is hard to set a torque.

Trim excess, Take care to not cut the rubber when trimming. A little heat can help trimming, too much makes trimming a mess. It all depends on your shop temperature. You rub cut, (drag) at the rubber, do not push hard. Use plastic rounded slightly dull edge.

On the gutter rails, the butyl is on the bottom of the rubber to the siding to seal rubber to siding. Sunline had Budboard to siding and not rubber to siding. A new roof will have rubber to siding as there is no budboard.
Butyl to siding, rubber goes over.

Then rubber over the top of butyl and the gutter rail is also lined with butyl on the back side which goes on top of the rubber
Ice pic old holes to line up the gutter right where it came off

Screw gutter lined with butyl on the back side on top of of rubber. This seals the gutter to the rubber and helps seal the screw holes.

The back wall. This is a little different due to the way Sunline stopped the rubber at the end of the back wall and down the back wall.
This top rear wall siding sheet has butyl at the back wall roof line sealing the wood to the rear wall siding. This is a Sunline thing, as this area can leak badly and they gave it an extra layer of butyl to try and seal the screws from water wicking down the screw. You can see the tan release paper we put over any exposed butyl held on with the green tape
I run new run rubber over the back and down the back wall. This is different then Sunline as they stopped at the end of the roof and did not go down the back wall. I believe they could not get the bud board to wrap down the wall and deal with the arched roof at the same time. It would all bunch up trying to turn like that.
Butyl on the rear siding, rubber over the top and down the back wall. The rubber only can deal with the arched roof and 90 degree turn OK

Then the rear roof molding, lined with butyl on the top and 90 degree down the back wall part of the molding. That gets installed on top of the rubber.
This pic is from a different camper, but shows the rubber hanging down the back wall under the molding.

Hope this helps
John
__________________
__________________
Current Sunlines: 2004 T310SR, 2004 T1950, 2004 T2475, 2007 T2499, 2004 T317SR
Prior Sunlines: 2004 T2499 - Fern Blue
2005 Ford F350 Lariat, 6.8L V10 W/ 4.10 rear axle, CC, Short Bed, SRW. Reese HP trunnion bar hitch W/ HP DC
 Google Custom Search For Sunline Owners Club
|

|

|
|
06-23-2021, 08:31 PM
|
#22
|
|
Moderator
Join Date: Nov 2006
Location: Ohio
Posts: 12,654
SUN #89
|
This may help on the butyl, It die not show the rear wall seam like Sunline made the campers and I explained above, but may help
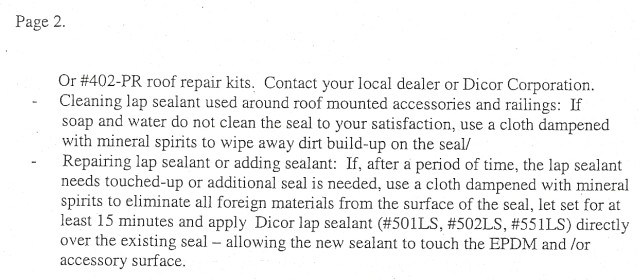
This is off the Dicro website on EPDM install instructions
https://dicorproducts.com/wp-content...-Guide4.19.pdf
Here is where the link started from on the Dicro site
https://dicorproducts.com/product/di...ber-roofing-3/
__________________
Current Sunlines: 2004 T310SR, 2004 T1950, 2004 T2475, 2007 T2499, 2004 T317SR
Prior Sunlines: 2004 T2499 - Fern Blue
2005 Ford F350 Lariat, 6.8L V10 W/ 4.10 rear axle, CC, Short Bed, SRW. Reese HP trunnion bar hitch W/ HP DC
Google Custom Search For Sunline Owners Club
|
|
|
|
|
06-24-2021, 06:20 PM
|
#23
|
|
Junior Member
Join Date: May 2021
Location: Texas
Posts: 18
SUN #12635
|
Quote:
Originally Posted by JohnB
|
Oh I see so does the butyl tape over the siding( gutter sides) and under the rubber help protect the siding from ripping the rubber or does the 1/2 inch wide butyl tape used for that when it fills the gap in. Yeah I was reading the instruction but it was vague and just said apply butyl tape where rubber meets the wood structure or something like that so I figured I ask what you did.so I had been buying the supplies and I got the #6 x1 screws and I was wondering do you ever worry about the heads of the screws popping off over time like when walking on it to me they look really thin.i am still.going to use them but I just wanted to know your theory.i also figured because the heads aren't that big so you have more wood to glue ratio. Also do you just pepper the plywood with screws every inch or so like rivets or spaced pretty far apart.so I will be starting the roof july 6 so we shall see how it goes I am extremely more confident now since getting the know how from you.thanks a million.
__________________
|
|
|
|
|
06-24-2021, 09:46 PM
|
#24
|
|
Moderator
Join Date: Nov 2006
Location: Ohio
Posts: 12,654
SUN #89
|
I answer this one tonight and the rest tomorrow.
Quote:
Originally Posted by Skywalker14
Oh I see so does the butyl tape over the siding( gutter sides) and under the rubber help protect the siding from ripping the rubber or does the 1/2 inch wide butyl tape used for that when it fills the gap in.
|
Will answer this tomorrow. I just did a roof job last week and have pics of the 1/2" butyl filling the gap. Will post comments with the pics tomorrow.
Quote:
Originally Posted by Skywalker14
Yeah I was reading the instruction but it was vague and just said apply butyl tape where rubber meets the wood structure or something like that so I figured I ask what you did.
|
. The Dicor instructions help, but do not address all of it.
Quote:
Originally Posted by Skywalker14
so I had been buying the supplies and I got the #6 x1 screws and I was wondering do you ever worry about the heads of the screws popping off over time like when walking on it to me they look really thin.i am still.going to use them but I just wanted to know your theory.i also figured because the heads aren't that big so you have more wood to glue ratio. Also do you just pepper the plywood with screws every inch or so like rivets or spaced pretty far apart.so I will be starting the roof july 6 so we shall see how it goes I am extremely more confident now since getting the know how from you.thanks a million.
|
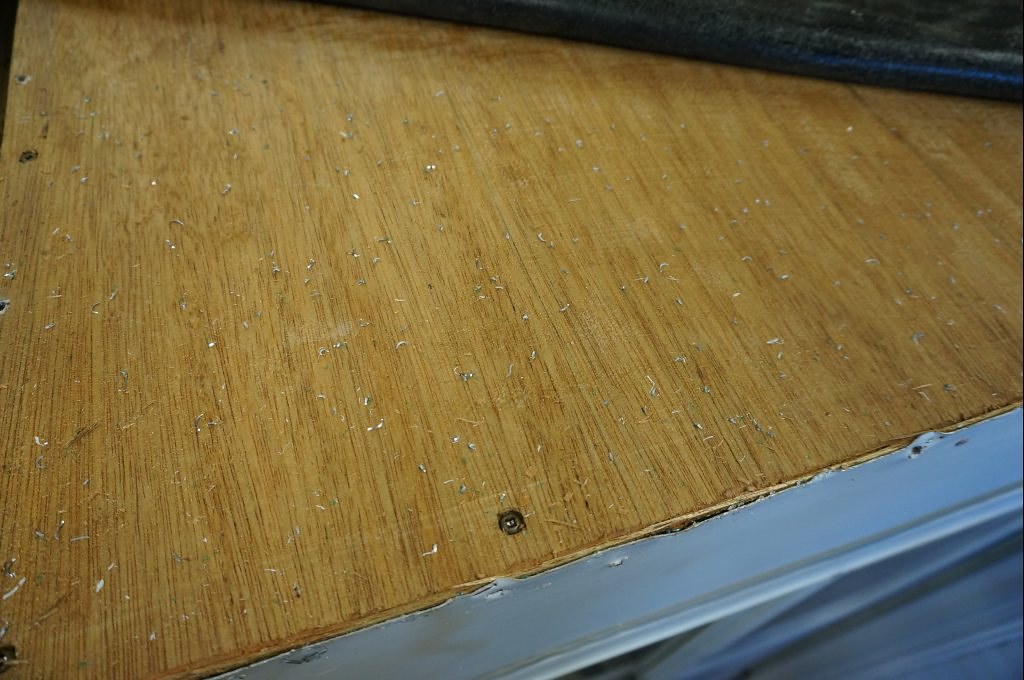
The number of screws and spacing depends on the thickness of the decking. 3/16" (1/4" nominal) needs more screws then 3/8 due to the 3/16" flexing (buckling) between screws. I will get the dimensions on the 3/16" tomorrow,, for 3/8" I use about 8" pitch, and added more if needed due to warped sheet etc. If you pepper the screws literally every inch, at the seam joints the wood will split as there is limited space on a single rafter for 2 sheet edges to meet and create a joint.
Regardless of spacing, I feel you have to pre countersink the wood for the screw head/ sheet clearance hole. Reason being, you want the head to be dead flush to very slight below the deck surface. If you do not countersink, the wood will mushroom up around the hole and that creates a hump in the wood and a high spot on the rubber. I bought a special counter sink with a stop collar that I could set the counter sink depth and the pilot drill depth independent. It has a carbide cutter and that works slick.
See this post where I show using the counter sink on the 3/16" decking. If that countersink interests you, I hunt up where I bought it and the make/model, just let me know. https://www.sunlineclub.com/forums/f...tch-19201.html There is some other info in there that may help you on weight and other things about the budboard to decking conversion.
The concern of the head popping off, the way that can happen on that #6 screw is due to over tightening or going in on an angle rather then straight into the counter sunk hole. If the screw flat head is not true to the counter sink, one end of the flat head will be above the deck. And then trying to overdrive the screw to get the high spot down, can stress/bend the screw head to maybe pop.
With the counter sink and a slight pilot hole only through the decking, and just kiss the rafter, the screw will be thread cutting into the rafter only. This helps to have the sheet flat to the rafter when the screw starts biting into the rafter, the sheet falls flat down tight. You ideally need a drill motor with a good torque clutch that you can set the torque repeatedly. And the drill will take them to 95 to 100% down. If you you go over too much, soon the screw will start to pull apart or pop the head. Sometimes you rip the wood threads if you go too tight and that is no good either.
I use a sharp edged putty knife to go over every screw to feel for a high edge. And a hand screw driver to set any that are in the 95% almost there down to flush. If you start going gang busters and just slamming screws in where ever and real quick, odds are high you will stress and pop heads. I'm not in factory mode or on piece work, I want the best roof I can create, so I take the extra time. The wood rafter is stronger then the screw in most cases.
I have no concerns that the screw will back out over time or when walking on the roof. I for sure have great concerns on stapled roofs about the back out of the staples, I have seen it done by other shops.
Hope this helps
John
__________________
Current Sunlines: 2004 T310SR, 2004 T1950, 2004 T2475, 2007 T2499, 2004 T317SR
Prior Sunlines: 2004 T2499 - Fern Blue
2005 Ford F350 Lariat, 6.8L V10 W/ 4.10 rear axle, CC, Short Bed, SRW. Reese HP trunnion bar hitch W/ HP DC
Google Custom Search For Sunline Owners Club
|
|
|
|
|
06-25-2021, 10:34 PM
|
#25
|
|
Moderator
Join Date: Nov 2006
Location: Ohio
Posts: 12,654
SUN #89
|
Quote:
Originally Posted by Skywalker14
Oh I see so does the butyl tape over the siding( gutter sides) and under the rubber help protect the siding from ripping the rubber or does the 1/2 inch wide butyl tape used for that when it fills the gap in. Yeah I was reading the instruction but it was vague and just said apply butyl tape where rubber meets the wood structure or something like that so I figured I ask what you did.so
|
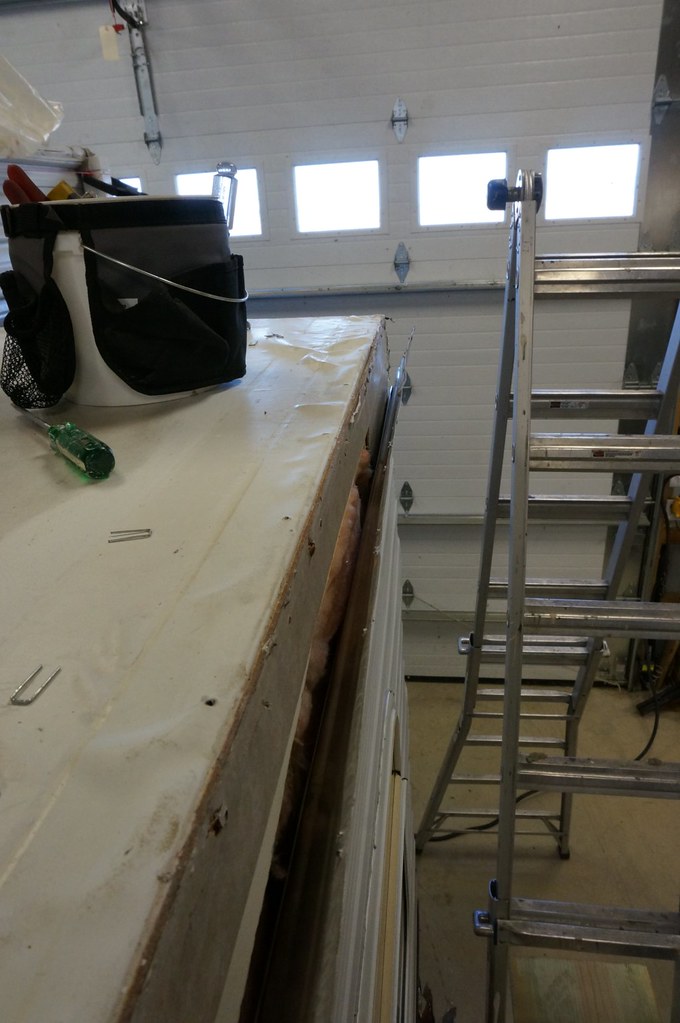
Here are the pics I was talking about. I had a roof project about 2 weeks ago and I took these since you were asking about them.
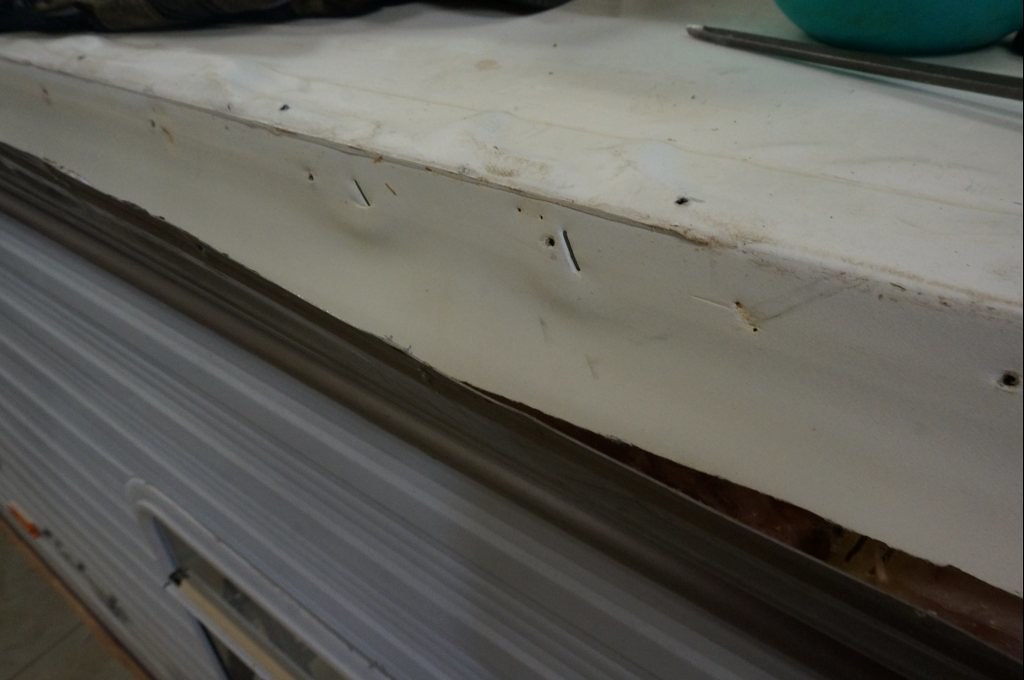
The 96" wide decking falls short when over the arched rafters. The wall to wall cross width in the straight horizontal is right on 96", so the rafter arc is longer. I split the gap as equal as I can between both sides and it leaves this step before the end of the wall. In this case, this was 1/4" nominal decking. 3/8" decking has the same issue, just higher.
Here is the gap.

And one where there is a sheet joint. The gap is a little different at both sheets and it is that wall all the way down the roof.

Here is how I fill the gap with 3/16" thick x 1/2" wide butyl. I clean the talc off the rubber and then insert the butyl. Try and not get the butyl too high up on the rubber. Ideally the butyl is no higher then the top of the rubber roof.


Here is what it looks like behind the release paper.

Then you need to add a 1/8" x 1" wide strip of butyl next to (below) it to seal the siding the rubber.

Looks like this under the release paper

Then fold over the rubber and roll (a hard roller, wood or metal works better then a rubber roller) the sheet gap butyl to a nice smooth radius over the top. This helps keep the roof rubber not stick up due to bunched up butyl under it at the edge corner.


Slight tug on the rubber to take out slack and staple the rubber to camper to hold it until the gutter rail goes on.
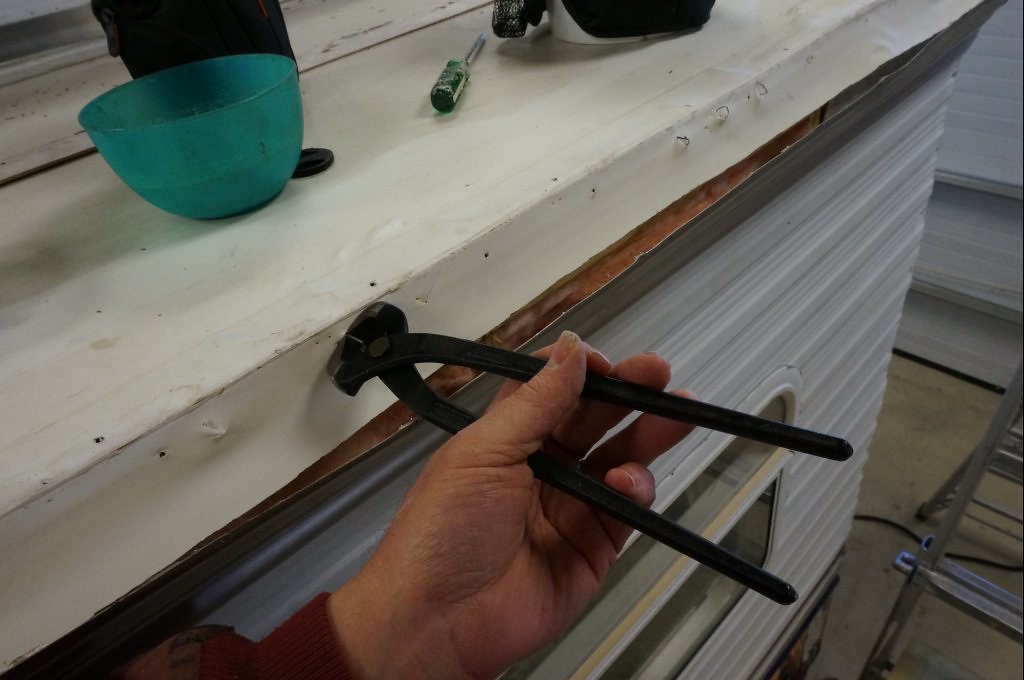
Then the cleaned up gutter rail with butyl lining the complete back side is put in place. I find a existing siding screw hole with an ice pick so I know the gutter is going on in the same place it came off. Hold the gutter back on the shaft of the pick. Once aligned, hold gutter back slide on the pick shaft, take the release paper off and slide the gutter on the shaft to stick the gutter to the camper and put the screws in.

Use a drill motor with a clutch setting, and once all screws are in, come back with a hand screw driver and reset each one. Torqueing out into butyl does not create a very repeatable tension. You can feel the 1/8 to 1/4 turn on the screw driver as you final tighten each one. Plus the butyl will ooze out when the drill sets the tension changing the thickness a little.
Hope this helps show how this all fits now.
John
__________________
Current Sunlines: 2004 T310SR, 2004 T1950, 2004 T2475, 2007 T2499, 2004 T317SR
Prior Sunlines: 2004 T2499 - Fern Blue
2005 Ford F350 Lariat, 6.8L V10 W/ 4.10 rear axle, CC, Short Bed, SRW. Reese HP trunnion bar hitch W/ HP DC
Google Custom Search For Sunline Owners Club
|
|
|
|
|
06-26-2021, 11:47 AM
|
#26
|
|
Junior Member
Join Date: May 2021
Location: Texas
Posts: 18
SUN #12635
|
Quote:
Originally Posted by JohnB
Here are the pics I was talking about. I had a roof project about 2 weeks ago and I took these since you were asking about them.
The 96" wide decking falls short when over the arched rafters. The wall to wall cross width in the straight horizontal is right on 96", so the rafter arc is longer. I split the gap as equal as I can between both sides and it leaves this step before the end of the wall. In this case, this was 1/4" nominal decking. 3/8" decking has the same issue, just higher.
Here is the gap.
And one where there is a sheet joint. The gap is a little different at both sheets and it is that wall all the way down the roof.
Here is how I fill the gap with 3/16" thick x 1/2" wide butyl. I clean the talc off the rubber and then insert the butyl. Try and not get the butyl too high up on the rubber. Ideally the butyl is no higher then the top of the rubber roof.
Here is what it looks like behind the release paper.
Then you need to add a 1/8" x 1" wide strip of butyl next to (below) it to seal the siding the rubber.
Looks like this under the release paper
Then fold over the rubber and roll (a hard roller, wood or metal works better then a rubber roller) the sheet gap butyl to a nice smooth radius over the top. This helps keep the roof rubber not stick up due to bunched up butyl under it at the edge corner.
Slight tug on the rubber to take out slack and staple the rubber to camper to hold it until the gutter rail goes on.
Then the cleaned up gutter rail with butyl lining the complete back side is put in place. I find a existing siding screw hole with an ice pick so I know the gutter is going on in the same place it came off. Hold the gutter back on the shaft of the pick. Once aligned, hold gutter back slide on the pick shaft, take the release paper off and slide the gutter on the shaft to stick the gutter to the camper and put the screws in.
Use a drill motor with a clutch setting, and once all screws are in, come back with a hand screw driver and reset each one. Torqueing out into butyl does not create a very repeatable tension. You can feel the 1/8 to 1/4 turn on the screw driver as you final tighten each one. Plus the butyl will ooze out when the drill sets the tension changing the thickness a little.
Hope this helps show how this all fits now.
John |
I see now man the pictures tell a thousand words.since you lay the butyl tape that wide down the siding it should protect the membrane from tears from the siding. Oh and I did get the countersink I got an amana carbide #6 countersink with depth stop and a 1/8 drill bit i have heard good things about them so i tried one.man I can see why everyone wants you to rebuild there roofs very clean and professional.i hope mine comes out that good I am going to take my time and be thorough with everything.heres hoping it will last another 17+ years
__________________
|
|
|
|
|
06-27-2021, 04:33 AM
|
#27
|
|
Moderator
Join Date: Nov 2006
Location: Ohio
Posts: 12,654
SUN #89
|
Yes, pics are worth a million words!
You will like the Amana countersink. I use it all the time now, a little pricey, but you get what you paid for and it works really well.
You will do a good job, you have the right mindset to start with. That is half the battle. Any help you need, ask away. I have lots of pics for most all things and glad to share.
Good luck and let us know how it goes.
John
__________________
Current Sunlines: 2004 T310SR, 2004 T1950, 2004 T2475, 2007 T2499, 2004 T317SR
Prior Sunlines: 2004 T2499 - Fern Blue
2005 Ford F350 Lariat, 6.8L V10 W/ 4.10 rear axle, CC, Short Bed, SRW. Reese HP trunnion bar hitch W/ HP DC
Google Custom Search For Sunline Owners Club
|
|
|
|
|
06-27-2021, 06:44 AM
|
#28
|
|
Junior Member
Join Date: May 2021
Location: Texas
Posts: 18
SUN #12635
|
Quote:
Originally Posted by JohnB
Yes, pics are worth a million words!
You will like the Amana countersink. I use it all the time now, a little pricey, but you get what you paid for and it works really well.
You will do a good job, you have the right mindset to start with. That is half the battle. Any help you need, ask away. I have lots of pics for most all things and glad to share.
Good luck and let us know how it goes.
John
|
Thanks again.i had another question so I bought some self adhesive fiberglass mesh tape that I was going to put on the seams of the plywood but its doesnt feel to sticky so I was wondering if I should glue those down first and let it dry then glue down the rubber or will the rubber not stick down since there will be glue dried there making it non porous or should I just stick it down with the self adhesiveness the best I can and glue over it to stick the rubber down would the glue work it's way through the tape and have a better adhesive.
__________________
|
|
|
|
|
06-27-2021, 03:30 PM
|
#29
|
|
Moderator
Join Date: Nov 2006
Location: Ohio
Posts: 12,654
SUN #89
|
Quote:
Originally Posted by Skywalker14
Thanks again.i had another question so I bought some self adhesive fiberglass mesh tape that I was going to put on the seams of the plywood but its doesnt feel to sticky so I was wondering if I should glue those down first and let it dry then glue down the rubber or will the rubber not stick down since there will be glue dried there making it non porous or should I just stick it down with the self adhesiveness the best I can and glue over it to stick the rubber down would the glue work it's way through the tape and have a better adhesive.
|
Good thoughts, your thinking about this. Here is my take on the topic.
I use self adhesive dry wall fiberglass mesh tape. Adfors FibaTape This one, https://www.menards.com/main/paint/a...9227465&ipos=5
It has a mesh pattern like this

Here it is on the the joint
I'm not really hung up on the brand, I liked that the openings in the mesh were large and the membrane glue would bind to the wood well through the larger openings. If your fiberglass tape has openings that are larger then a standard window screen, then I feel you are good with that tape. Even a window screen might work, but I feel the larger openings would work better.
The self adhesive on mine is not a super strong tack, but it is enough to hold the tape in place until I get the rubber over it. I can lift the tape, move it, press again and it still sticks enough and keep on going.
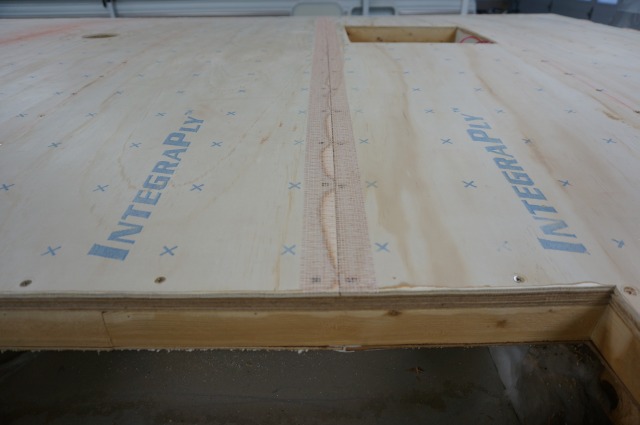
When the Dicro glue goes over the tape, it starts bonding to the wood through the mesh openings. And it bonds to the rubber creating a glued sandwich of the tape in the middle. When the glue dries, that entire mesh is bonded to the wood and rubber and creates the needed strength to jump the gap and support the rubber over it.
I would not want to use extra glue to bond the mesh down, your thoughts are right. The extra glue would affect the Dicro glue bond and not adhere to the decking as the other adhesive glue just sealed up all the porous wood. That tape area would then no longer have the membrane glued to the roof.
As long as your tape's self adhesive is strong enough to not have the tape sort of blow out of position by a slight breeze, I would say it would work well. The dicro glue will do the permeant bond through the openings to the wood and rubber. The roof is horizontal, so gravity is in your favor and the light self adhesive tack is enough to not have the mesh move until the rubber is over it.
Hope this helps.
John
__________________
Current Sunlines: 2004 T310SR, 2004 T1950, 2004 T2475, 2007 T2499, 2004 T317SR
Prior Sunlines: 2004 T2499 - Fern Blue
2005 Ford F350 Lariat, 6.8L V10 W/ 4.10 rear axle, CC, Short Bed, SRW. Reese HP trunnion bar hitch W/ HP DC
Google Custom Search For Sunline Owners Club
|
|
|
|
|
06-27-2021, 04:30 PM
|
#30
|
|
Junior Member
Join Date: May 2021
Location: Texas
Posts: 18
SUN #12635
|
Quote:
Originally Posted by JohnB
Good thoughts, your thinking about this. Here is my take on the topic.
I use self adhesive dry wall fiberglass mesh tape. Adfors FibaTape This one, https://www.menards.com/main/paint/a...9227465&ipos=5
It has a mesh pattern like this
Here it is on the the joint
I'm not really hung up on the brand, I liked that the openings in the mesh were large and the membrane glue would bind to the wood well through the larger openings. If your fiberglass tape has openings that are larger then a standard window screen, then I feel you are good with that tape. Even a window screen might work, but I feel the larger openings would work better.
The self adhesive on mine is not a super strong tack, but it is enough to hold the tape in place until I get the rubber over it. I can lift the tape, move it, press again and it still sticks enough and keep on going.
When the Dicro glue goes over the tape, it starts bonding to the wood through the mesh openings. And it bonds to the rubber creating a glued sandwich of the tape in the middle. When the glue dries, that entire mesh is bonded to the wood and rubber and creates the needed strength to jump the gap and support the rubber over it.
I would not want to use extra glue to bond the mesh down, your thoughts are right. The extra glue would affect the Dicro glue bond and not adhere to the decking as the other adhesive glue just sealed up all the porous wood. That tape area would then no longer have the membrane glued to the roof.
As long as your tape's self adhesive is strong enough to not have the tape sort of blow out of position by a slight breeze, I would say it would work well. The dicro glue will do the permeant bond through the openings to the wood and rubber. The roof is horizontal, so gravity is in your favor and the light self adhesive tack is enough to not have the mesh move until the rubber is over it.
Hope this helps.
John |
Oh I didn't know they make different patterns I just got the ducky brand with the basic screen pattern.i think the holes are somewhat large the glue should.be able to pass through it good. I will use the seam roller to put some pressure on it to get it to stick down till I put the rubber down. Thanks again
__________________
|
|
|
|
|
07-08-2021, 07:17 PM
|
#31
|
|
Junior Member
Join Date: May 2021
Location: Texas
Posts: 18
SUN #12635
|
Quote:
Originally Posted by JohnB
Good thoughts, your thinking about this. Here is my take on the topic.
I use self adhesive dry wall fiberglass mesh tape. Adfors FibaTape This one, https://www.menards.com/main/paint/a...9227465&ipos=5
It has a mesh pattern like this
Here it is on the the joint
I'm not really hung up on the brand, I liked that the openings in the mesh were large and the membrane glue would bind to the wood well through the larger openings. If your fiberglass tape has openings that are larger then a standard window screen, then I feel you are good with that tape. Even a window screen might work, but I feel the larger openings would work better.
The self adhesive on mine is not a super strong tack, but it is enough to hold the tape in place until I get the rubber over it. I can lift the tape, move it, press again and it still sticks enough and keep on going.
When the Dicro glue goes over the tape, it starts bonding to the wood through the mesh openings. And it bonds to the rubber creating a glued sandwich of the tape in the middle. When the glue dries, that entire mesh is bonded to the wood and rubber and creates the needed strength to jump the gap and support the rubber over it.
I would not want to use extra glue to bond the mesh down, your thoughts are right. The extra glue would affect the Dicro glue bond and not adhere to the decking as the other adhesive glue just sealed up all the porous wood. That tape area would then no longer have the membrane glued to the roof.
As long as your tape's self adhesive is strong enough to not have the tape sort of blow out of position by a slight breeze, I would say it would work well. The dicro glue will do the permeant bond through the openings to the wood and rubber. The roof is horizontal, so gravity is in your favor and the light self adhesive tack is enough to not have the mesh move until the rubber is over it.
Hope this helps.
John |
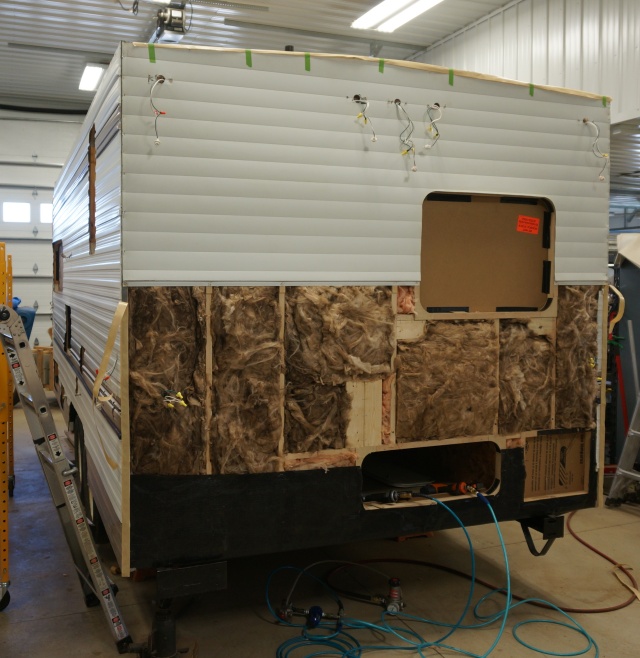
Okay John I am a few days into my roof conversion and I am getting ready to put the plywood on and had a few questions the plywood reinforcement around the ac and roof vents should I remove those or will the new plywood go right over it. Also when you add the rise in the first truss in the front should the slope from front to back be the same as the rest of the roof or will there be a dip from back to front.and when I put the ac back on should the bolts be just snug or really tight I figured just snug since the gasket would sink if too tight. I think that's all the questions I had so far. The roof has been going good so far been dodging some rain the past few days so it's been going a little slower than I like but the rot has been pretty limited from what I have seen. If I had to rate it compared to your rebuild I would give it a 2 out of 10 the luan was pretty rotten which I think took most of the abuse from the moisture.but I had the front corner was rotten on the side so I replaced that one and I had one rotten corner on the back side which I replaced and the last truss on the back was solid still so i epoxy that up and fixed the corners of that truss but I popped the siding off about 20 inches or so and it looked like the rot stopped at the roof framing it was a bone dry and solid still around the rot. I am so glad I am doing the rebuild now before the rot was unbearable to deal with. Also I pulled the side gutters off and they were pretty clean behind it just a little green but the screws were a little.rusted.i was wondering though I had to cut some of the gutter screws so the screw is still.in the hole what do I do when I put the gutter back on should I drill a new hole.in the gutter and just dicor the old hole.
__________________
|
|
|
|
|
07-08-2021, 09:36 PM
|
#32
|
|
Moderator
Join Date: Nov 2006
Location: Ohio
Posts: 12,654
SUN #89
|
Quote:
Originally Posted by Skywalker14
Okay John I am a few days into my roof conversion and I am getting ready to put the plywood on and had a few questions the plywood reinforcement around the ac and roof vents should I remove those or will the new plywood go right over it.
|
I remove all the bud board filler pieces, including the 1/2" OSB at the AC unit. The new decking needs a good flat surface to mount to the rafters and the outer wall plate.
This is from a 2007 slide camper with the budboard rolled off. All that excess filler of luan and OSB comes off. The insulation is cut so it fall below the rafters.


You may find at the fridge roof vent opening, you are going to have to shim some on top of the rafters to get a good transition on the new decking. The way that opening is, while budboard went over it easy, semi rigid decking ends up with air gaps under it or cracked decking and ponding areas. Lay a straight edge from the upstream rafter over the fridge opening and it should touch the down stream end nice and flush. If there is a gap, fill the gap with luan thin stripes or other as needed so the new decking is smooth and no stressed down all around that opening. The straight edge will guide you.
The shower dome area may also need some rafter filler shim. The straight edge across the opening will guide you.
Quote:
Originally Posted by Skywalker14
Also when you add the rise in the first truss in the front should the slope from front to back be the same as the rest of the roof or will there be a dip from back to front.
|
That second rafter behind the laying flat 2 x 3 at the front wall siding transition, needs to be shimmed. The slope on that front roof seam back to the 3rd rafter is different then the rest of the roof. It has to be, as you transition to a flat laying 2 x 3. The rafter shim is thicker at the center and then peels out to nothing at the wall top plate.
In this pic, hard to see, the 3rd rafter towards the back (not including the flat laying 2 x 3) is in line with the rest of the roof line. The 2nd rather is lower, too low for decking, OK for budboard.

The rafter shim on the 2nd rafter towards the back will fill this straight edge gap.

The decking will flex down OK from the flay laying 2 x 3 at the front roof seam to the 1st truss rafter with no shim. But the 2nd rafter has to have a filler shim.
Quote:
Originally Posted by Skywalker14
and when I put the ac back on should the bolts be just snug or really tight I figured just snug since the gasket would sink if too tight. I think that's all the questions I had so far.
|
When you buy a new AC gasket, they are close to 1" thick. Take off the old on the AC unit, clean up the goo and surface, then stick on the AC the new gasket. When you get the AC unit over the 14 x 14 hole in the roof, center it up and tighten the 4, long bolts to compress the gasket half way from new. In this case, the 1" thick new gasket is compressed to approx. 1/2". It may not be exactly even all the way around. Sometimes on corner may be 9/16" uncompressed while the rest is more right on 1/2". The roof itself may not be totally flat. I have some come out perfect and 1 of them, off by 1/16" as the wood was not dead flat to start with.
Quote:
Originally Posted by Skywalker14
The roof has been going good so far been dodging some rain the past few days so it's been going a little slower than I like but the rot has been pretty limited from what I have seen. If I had to rate it compared to your rebuild I would give it a 2 out of 10 the luan was pretty rotten which I think took most of the abuse from the moisture.but I had the front corner was rotten on the side so I replaced that one and I had one rotten corner on the back side which I replaced and the last truss on the back was solid still so i epoxy that up and fixed the corners of that truss but I popped the siding off about 20 inches or so and it looked like the rot stopped at the roof framing it was a bone dry and solid still around the rot. I am so glad I am doing the rebuild now before the rot was unbearable to deal with. Also I pulled the side gutters off and they were pretty clean behind it just a little green but the screws were a little.rusted.
i was wondering though I had to cut some of the gutter screws so the screw is still.in the hole what do I do when I put the gutter back on should I drill a new hole.in the gutter and just dicor the old hole.
|
Yes, rain dodging is all over here lately. And the muggy heat that comes after.
Broken off screws in old holes, either in a corner molding or gutter rail. This comes down to a judgement call and a few tricks. Ideal is, get the old screw out. Sometimes I can dig down the screw enough to grab the screw with vise grips and back it out. Other times It is more damage then it' worth. In this case, yes new butyl tape helps seal over old holes and dicor pumped into a hole is needed. Then drill and new hole in the molding, about 1/4 to 3/8" away and put in a fresh new hole and move on. Tray and pencil mark the siding on known broken off screws so you do not try and put a new screw in that location. And sometimes, like on corner moldings, you just need to add an extra screw or two to pull the molding in tighter. Heat gun the molding and add extra screws helps pull the moldings in place. It all "depends", I can see Sunline did this practice as needed also.
Your doing a great job. Good for you! Post a few pics sometime, we all learn something new on every camper fixed.
John
__________________
Current Sunlines: 2004 T310SR, 2004 T1950, 2004 T2475, 2007 T2499, 2004 T317SR
Prior Sunlines: 2004 T2499 - Fern Blue
2005 Ford F350 Lariat, 6.8L V10 W/ 4.10 rear axle, CC, Short Bed, SRW. Reese HP trunnion bar hitch W/ HP DC
Google Custom Search For Sunline Owners Club
|
|
|
|
|
07-18-2021, 02:58 PM
|
#33
|
|
Junior Member
Join Date: May 2021
Location: Texas
Posts: 18
SUN #12635
|
Quote:
Originally Posted by JohnB
I remove all the bud board filler pieces, including the 1/2" OSB at the AC unit. The new decking needs a good flat surface to mount to the rafters and the outer wall plate.
This is from a 2007 slide camper with the budboard rolled off. All that excess filler of luan and OSB comes off. The insulation is cut so it fall below the rafters.
You may find at the fridge roof vent opening, you are going to have to shim some on top of the rafters to get a good transition on the new decking. The way that opening is, while budboard went over it easy, semi rigid decking ends up with air gaps under it or cracked decking and ponding areas. Lay a straight edge from the upstream rafter over the fridge opening and it should touch the down stream end nice and flush. If there is a gap, fill the gap with luan thin stripes or other as needed so the new decking is smooth and no stressed down all around that opening. The straight edge will guide you.
The shower dome area may also need some rafter filler shim. The straight edge across the opening will guide you.
That second rafter behind the laying flat 2 x 3 at the front wall siding transition, needs to be shimmed. The slope on that front roof seam back to the 3rd rafter is different then the rest of the roof. It has to be, as you transition to a flat laying 2 x 3. The rafter shim is thicker at the center and then peels out to nothing at the wall top plate.
In this pic, hard to see, the 3rd rafter towards the back (not including the flat laying 2 x 3) is in line with the rest of the roof line. The 2nd rather is lower, too low for decking, OK for budboard.
The rafter shim on the 2nd rafter towards the back will fill this straight edge gap.
The decking will flex down OK from the flay laying 2 x 3 at the front roof seam to the 1st truss rafter with no shim. But the 2nd rafter has to have a filler shim.
When you buy a new AC gasket, they are close to 1" thick. Take off the old on the AC unit, clean up the goo and surface, then stick on the AC the new gasket. When you get the AC unit over the 14 x 14 hole in the roof, center it up and tighten the 4, long bolts to compress the gasket half way from new. In this case, the 1" thick new gasket is compressed to approx. 1/2". It may not be exactly even all the way around. Sometimes on corner may be 9/16" uncompressed while the rest is more right on 1/2". The roof itself may not be totally flat. I have some come out perfect and 1 of them, off by 1/16" as the wood was not dead flat to start with.
Yes, rain dodging is all over here lately. And the muggy heat that comes after.
Broken off screws in old holes, either in a corner molding or gutter rail. This comes down to a judgement call and a few tricks. Ideal is, get the old screw out. Sometimes I can dig down the screw enough to grab the screw with vise grips and back it out. Other times It is more damage then it' worth. In this case, yes new butyl tape helps seal over old holes and dicor pumped into a hole is needed. Then drill and new hole in the molding, about 1/4 to 3/8" away and put in a fresh new hole and move on. Tray and pencil mark the siding on known broken off screws so you do not try and put a new screw in that location. And sometimes, like on corner moldings, you just need to add an extra screw or two to pull the molding in tighter. Heat gun the molding and add extra screws helps pull the moldings in place. It all "depends", I can see Sunline did this practice as needed also.
Your doing a great job. Good for you! Post a few pics sometime, we all learn something new on every camper fixed.
John |
20210716_130841.jpg
20210716_130729.jpg
20210716_130627.jpg
20210716_130733.jpg
20210716_130714.jpg
20210716_130723.jpg
Alright the roof is all sealed and ready for the monsoons lol. I think it came out great I couldn't be happier with the end result. I finished sealing it Friday it took me around a week or so to do the whole thing but lost so much time to the rain.i sure did have some hard times dealing with the rain I had one ripple in the membrane torwards the back but the minute I glued it down I worked what I could out for bubbles but I had to tarp it again as it started to rain again. My next goal is changing the roof on the slide out I had bought 40 foot of membrane I have about 15 foot or so left for the slide. So are there any new materials that i will need to replace the membrane on the slide that the roof didn't use I figure I need butyl tape for the trim and termination bars and some eternabond tape for the seams on the long sides plus luan and glue for the membrane can I just use the same 1 inch screws to screw the luan down or should I staple it down. I have never countersink thin wood before does it still bond good or does the wood crack I wanted to check under the back fiber glass panel on the slide and was wondering if that was just screwed down on the edges or if it was glued as well is that just more luan under the fiberglass as well or is it thicker plywood in case I need to replace due to rain getting in. Thanks again for all of the pictures they definitely made me more confident in finishing the roof. Here's to another 17 plus years of a non leaking rv. So what are your tips for washing the roof say quarterly or twice a year and do you apply anything onto the roof since you are removing the chalk everytime it is washed.
__________________
|
|
|
|
|
07-21-2021, 08:14 PM
|
#34
|
|
Moderator
Join Date: Nov 2006
Location: Ohio
Posts: 12,654
SUN #89
|
Great job on the main roof!! It looks great!
Quote:
Originally Posted by Skywalker14
My next goal is changing the roof on the slide out I had bought 40 foot of membrane I have about 15 foot or so left for the slide. So are there any new materials that i will need to replace the membrane on the slide that the roof didn't use I figure I need butyl tape for the trim and termination bars and some eternabond tape for the seams on the long sides plus luan and glue for the membrane can I just use the same 1 inch screws to screw the luan down or should I staple it down.
|
The slide roof is the same as the main roof for the most part as far as materials, except decking. Sunline used 1/8" luan. They most likely glued the luan to the slide room rafters I suspect as there are no staples that I could see in the middle area. They did use Kreg screw type cabinet screws and buried them below the surface on the outer perimeter. I agree, countersinking 1/8" is not a good thing, it will splinter and rip out at the flat head screw. While not the thing one would think of, what Sunline did with the cabinet screws did work.
These pics may help show you what your are up against. You may want to consider leaving the decking in place and just change the rubber. You will have to break the luan from the ceiling rafters if they glued it. It might come easy or not. The issue if you do not change the luan, the sub straight has to be clean back to bare wood for the glue to work. I have done that, on spot repairs, it's tedious to do, but I did get it up. The pics shows this too.
If your decking is not rotted, you do have an option to not change the rubber, but clean it and coat it with Henry's Tropicool or Crazy Seal. More on this if you chose to go that route after you figure out if you are going to change the slide roof decking.
Here are the pics
You have to remove all the slide moldings, including the outer flanges. They folded the rubber over and put it under the wall siding. See here as you have to un-staple it.
Moldings off and siding unstapled to expose the rubber.

Stapled rubber


At the ends of the slide room, the rubber went over the aluminum siding

Here are some pics of the rubber lifted. In my case, Sunline goofed, there was aluminum trim chips under the rubber, I kept feeling these little bumps, and now I know where they came from. They trimmed the siding with a router bit and the stuff went flying and they glued it down. I have no good explanation on why they left those chips in there.
You can see the embedded screws at the perimeter.


Screws down the long wall

The back end wall of the slide, more chips


Another shot showing the screw heads


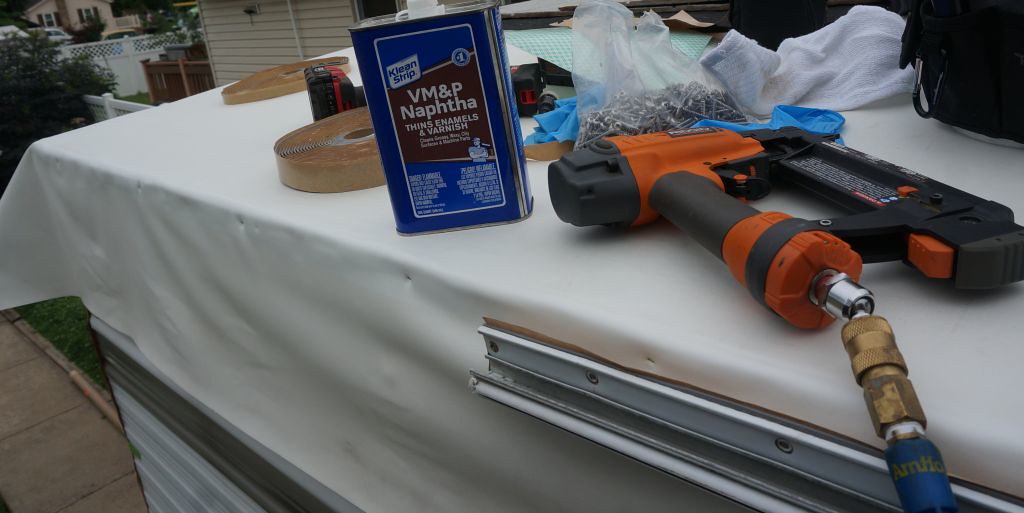
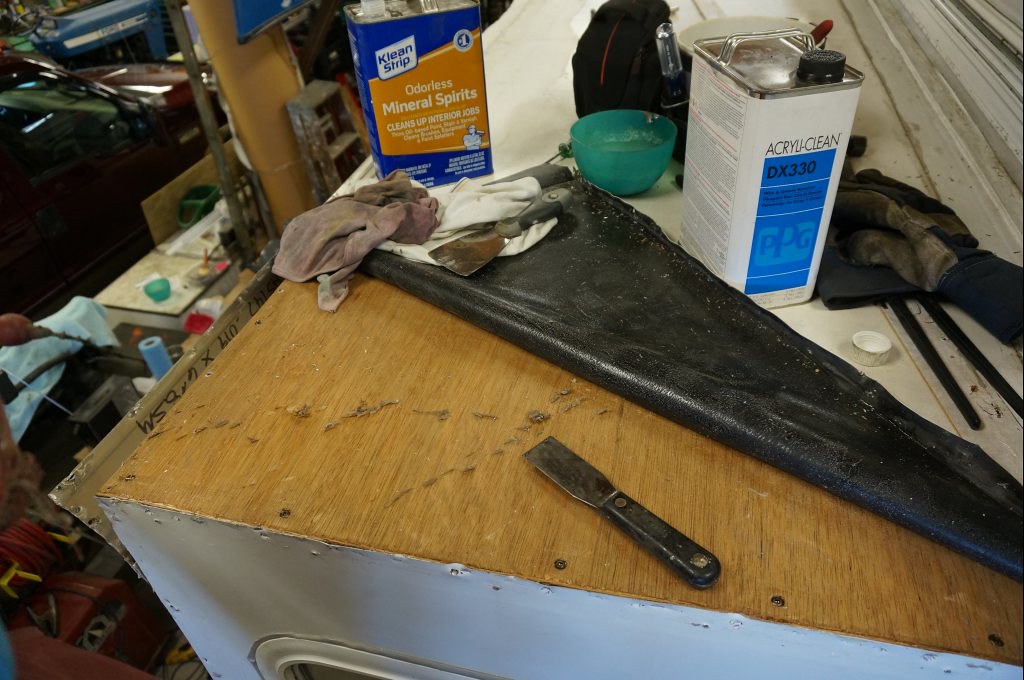
Here I am scrapping up the glue. Mineral sprits followed by Naphtha or Acryli-clean. Trust me, the Naphtha is a lot cheaper then the Acryli-clean. If your painting a car, use the Acryli clean, if you are doing camper work, use the Naphtha.
And in process of getting it off the rubber too. In your case, you have new rubber at least

Quote:
Originally Posted by Skywalker14
I have never countersink thin wood before does it still bond good or does the wood crack
|
My opinion, it will crack it is so thin. I've tried and it did not work well.
Quote:
Originally Posted by Skywalker14
I wanted to check under the back fiber glass panel on the slide and was wondering if that was just screwed down on the edges or if it was glued as well is that just more luan under the fiberglass as well or is it thicker plywood in case I need to replace due to rain getting in.
|
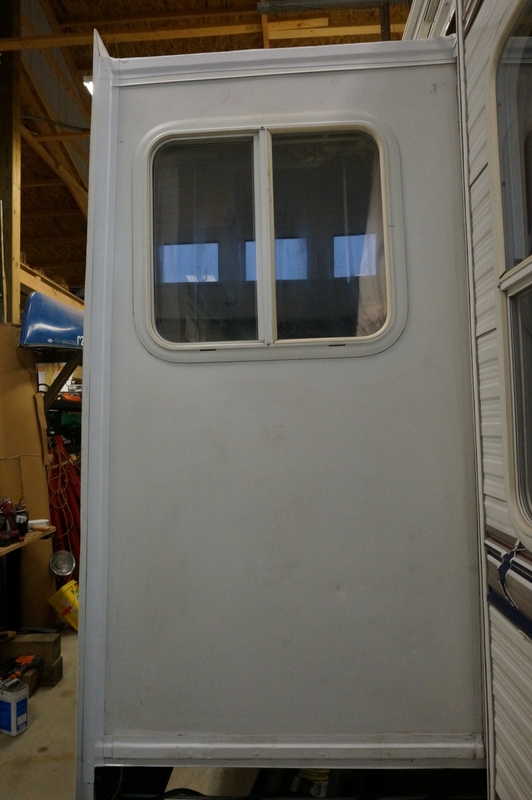
You are talking about a fiberglass panel. H'mm are you sure it is fiberglass and not aluminum? All the Solaris slide campers I have seen use sheet aluminum siding. The Sole, may have been different and yours is fiberglass. Please confirm as I have not had a Sole camper apart before. May learn something new.
The aluminum is glued to 1/8" luan, the window and the perimeter moldings help hold that on. And they may have glued the luan to the wall studs too. They did staple at the top and bottom which get covered under moldings.
More in the next post
__________________
Current Sunlines: 2004 T310SR, 2004 T1950, 2004 T2475, 2007 T2499, 2004 T317SR
Prior Sunlines: 2004 T2499 - Fern Blue
2005 Ford F350 Lariat, 6.8L V10 W/ 4.10 rear axle, CC, Short Bed, SRW. Reese HP trunnion bar hitch W/ HP DC
Google Custom Search For Sunline Owners Club
|
|
|
|
|
07-21-2021, 08:20 PM
|
#35
|
|
Moderator
Join Date: Nov 2006
Location: Ohio
Posts: 12,654
SUN #89
|
Quote:
Originally Posted by Skywalker14
Thanks again for all of the pictures they definitely made me more confident in finishing the roof. Here's to another 17 plus years of a non leaking rv. So what are your tips for washing the roof say quarterly or twice a year and do you apply anything onto the roof since you are removing the chalk everytime it is washed.
|
Your very welcome. Glad the pic's help. I have gigs of pics on any camper I take apart. No one wanted to see a slide roof yet, so the pics above I dug up from 2017 when I did that work and uploaded them for you.
Now to keeping your roof dry and not leak for the next 17 years. What I am going to tell you may be a surprise, as this is not talked about a lot, but I have a 17 year old camper doing this and the roof is still in top shape as far as the rubber. I Ebonded every seam to deal with the Dicor as it has it's issues over time.
Here is what I recommend if you want to stay on the Dicor caulk and rubber maintenance.
If the camper lives outside all the time,
Wash the roof 4 times a year. Use Dawn or laundry soap and a soft bristle brush on a pole. Do not scrub hard, you are only getting the dirt off and not to be confused with black mold specs.
As the years add up and you live in the mid west or north east, mold will start growing on the roof, it will look black and still be there after you wash it with the above. You can as needed, once a year or every 2 to 3 years as needed, do a bleach mold kill. This has to be done on a cloudy day or very early or late in the day if the sun is out. You use house hold non scented fresh bleach and water solution, no soap. Apply it wet, and it needs to stay wet for at least 10 to 15 minutes or more if you have a heavy build up. Do not let it dry on the roof. Do not do this in hot sun, it is a losing battle, it will dry up before it can work. I use a ratio of 1 part bleach to 3 parts water. Make up as much or little as needed. The bleach really needs to be fresh, no greater then 6 months old. Bleach starts breaking down the day it is made and year old weak bleach does not work well.
You must rinse any bleach solution splash over on the siding or decals very soon after it touches. Do not let it dry on the siding. Rinse down the wall starting from the top to not splash water up on the bleach on the roof.
Once the soak time for the bleach is up, and you do not need to redo it again, rinse the roof and the camper well. You have to get to all off.
Once all cleaned and bleached if needed, let it dry. On the same 4 times a year, inspect the Dirco caulking and be extra picky. Make going into winter and coming out of winter 2 of those 4 washing/inspections. They are most important for caulking. Anything that has a hair line tiny crack starting needs to be touched up right then and there. These tiny cracks will start about year 3, maybe sooner. Those tiny cracks are not a problem in that stage and can be caulked over. But if they are left and not corrected, the crack will split and grow into a leak with time. If you really want to get to 10 years or longer I recommend this next step.
Apply 303 Aerospace protectant to everything up there that is rubber, plastic, vinyl and the Dirco caulk. Do this the same 4 times a year after washing. Yes, this makes a major difference in the Dirco caulk drying up and the rubber white layer not start to crack. I have my 2004 T310SR with the rubber still in very good shape and only 50% of the white layer is shed. I also have several 2004 or 2007 Sunline project campers that did not have the above maintenance done and the roofs are shot.
If the camper is stored under cover during the off season months, the you adjust the 4 times a year down to 3 times or 2 pending your situation. My big camper lives in the barn now, and even that one, I wash and treat 2 times a year. The sun UV kills the roof and anything up there that is plastic, rubber or vinyl.
If you plan on keeping the camper past 3 to 5 years, there are upgrades that can be done to treat the Dirco caulking to make sure it does not split open in the winter outside or between your caulk inspections. Leaks between caulking inspection periods has happened to many a good camper owner trying to keep up on his roof maintenance. They get tied up and can't get to it, the reasons just keep growing. If you want more on this upgrade, let me know.
Hope this helps and please post some pics of the slide roof how ever you come up with to do it. We do not have hardly any posts on slide roof repair.
John
__________________
Current Sunlines: 2004 T310SR, 2004 T1950, 2004 T2475, 2007 T2499, 2004 T317SR
Prior Sunlines: 2004 T2499 - Fern Blue
2005 Ford F350 Lariat, 6.8L V10 W/ 4.10 rear axle, CC, Short Bed, SRW. Reese HP trunnion bar hitch W/ HP DC
Google Custom Search For Sunline Owners Club
|
|
|
|
|
07-21-2021, 08:27 PM
|
#36
|
|
Moderator
Join Date: Nov 2006
Location: Ohio
Posts: 12,654
SUN #89
|
Here is what came in my 2004 Sunline manual from Dicro on maintaining the roof. Back then, they never talked about UV protection, but Dicor now even sells their own branded UV protection.

__________________
Current Sunlines: 2004 T310SR, 2004 T1950, 2004 T2475, 2007 T2499, 2004 T317SR
Prior Sunlines: 2004 T2499 - Fern Blue
2005 Ford F350 Lariat, 6.8L V10 W/ 4.10 rear axle, CC, Short Bed, SRW. Reese HP trunnion bar hitch W/ HP DC
Google Custom Search For Sunline Owners Club
|
|
|
|
|
07-23-2021, 06:51 PM
|
#37
|
|
Junior Member
Join Date: May 2021
Location: Texas
Posts: 18
SUN #12635
|
Quote:
Originally Posted by JohnB
Here is what came in my 2004 Sunline manual from Dicro on maintaining the roof. Back then, they never talked about UV protection, but Dicor now even sells their own branded UV protection.
|
20210723_174001.jpg
20210723_174017.jpg
Here are the slides sides I dont believe there aluminum they seem soft and flexible like a form of fiberglass or something. They dont feel glued down either to me just looking at the outside they seemed just screwed down from every side with the moldings. About the eternabond tape the seams would that leave a hump around the edge of the roof where the water will not roll off like it should and then puddle or will it be flat enough still.would you use the 2 inch wide or the 4 inch wide eternabond. I like the thought of never having to worry about a leaking seam again.sadly my rv is in the weather 24/7 i will definitely look into that 303 protectant it looks like great stuff.i will be working on the slide roof this weekend I will try to take some pics of it tore apart. The roof I couldn't take any pics because I was fighting the rain so much I just had to focus on putting it back together between rain storms.
__________________
|
|
|
|
|
07-23-2021, 10:19 PM
|
#38
|
|
Moderator
Join Date: Nov 2006
Location: Ohio
Posts: 12,654
SUN #89
|
Quote:
Originally Posted by Skywalker14
Here are the slides sides I dont believe there aluminum they seem soft and flexible like a form of fiberglass or something. They dont feel glued down either to me just looking at the outside they seemed just screwed down from every side with the moldings.
About the eternabond tape the seams would that leave a hump around the edge of the roof where the water will not roll off like it should and then puddle or will it be flat enough still.would you use the 2 inch wide or the 4 inch wide eternabond.
I like the thought of never having to worry about a leaking seam again.sadly my rv is in the weather 24/7 i will definitely look into that 303 protectant it looks like great stuff.i will be working on the slide roof this weekend I will try to take some pics of it tore apart. The roof I couldn't take any pics because I was fighting the rain so much I just had to focus on putting it back together between rain storms.
|
I agree, by the texture, those slide end walls look like a fiberglass panel. You will know when you take up the moldings on top as you can see it. Sunline did change some of the materials between the Sole campers and the Solaris campers. It now looks like the slide end wall material was a change.
On the eternabond, I used 4" wide on the long roof to slide flange seams due reusing the old rubber to cover more rubber that was affected from the repair. On the ends walls, I used 2" wide. If you have new rubber, and you will, you can use 2" on the long roof to slide flange if wanted. The 4" was only to cover rubber damage.
I also used flat head screws and countersunk the aluminum slide flanges to make a smooth top to not cut the eternabond. Sunline used the hex head screws, and they have sharp hex tops that would cut into the slide tape they used. It takes more time to countersink every one of those holes to make a flush countersunk screw, but it came out well. If you do not want to deal with the countersink, then at least use pan head screws with a rounded head and not the sharp hex heads.
Here is the 4" but like I said, on new rubber, 2" will work OK

Here is some pics of the 2" on the end walls, both on the roof ends and the slide end walls.

This link will drop you into a long bent frame repair post, but it should show the slide Ebond how I did it. You can read the whole post if wanted and you have the time. A lot of work there to save the camper. But all is good now.
https://www.sunlineclub.com/forums/f...tml#post136159
I'm not sure if your slide floor is covered with the black waterproof plastic wrap (Darco) or has the new 2005 slide floor redesign which has a plastic coated slide floor. Both have water issues to the floor, but from different reasons. I think yours will be the Darco bottom. See this post on what to look for on the holes in the slide floor Darco that can rot out the floor and how to correct it. If you have the smooth hard plastic bottom, let me know I'll show what to do with that one.
https://www.sunlineclub.com/forums/f...eck-11086.html
And it will link to this post, dealing with the rotted slide floor and later creating a drip edge at the bottom to stop water from wicking under the slide.
https://www.sunlineclub.com/forums/f...age-10695.html
I'll add one last thing, after you Ebond the roof and the end walls, on the roof, run a fine bead of Dicor non sag, non leveling caulk on the exposed edge of the Ebond to the rubber. You are covering the exposed gray sealant so dirt and slide seals do not stick to the ebond exposed sealant. Use a soapy water solution (I use Dawn dish soap and water) to wet your finger and smooth out the caulk. Keep the finger wet and it will not stick to your finger.
On the end walls, do not use the Dicor, it will get goofed up with the slide seals rubbing it. I know, I tried that and had to remove it. It is too soft for the side walls. But, use Proflex RV caulk on the slide end walls and let is cure up good before bringing the slide in. This caulk is not as soft as the Dicor and does not have the problem. You do not want to use the Proflex on the rubber, as it will affect the rubber, but it can be used Ebond to aluminum with out issue. Just no rubber. The soapy water trick works on Proflex too.
I'll post later on how to upgrade to not having to worry about roof seam leaks again, but it will take 2 to 3 weeks for the fresh Dicor to cure before you can treat it with anything. The Dicor gases off in the curing process that long. And the Dicor has no issues in the first year, and even into the 2nd year if it was applied right. It is just year 3 and beyond is when issues can start.
Hope this helps
John
__________________
Current Sunlines: 2004 T310SR, 2004 T1950, 2004 T2475, 2007 T2499, 2004 T317SR
Prior Sunlines: 2004 T2499 - Fern Blue
2005 Ford F350 Lariat, 6.8L V10 W/ 4.10 rear axle, CC, Short Bed, SRW. Reese HP trunnion bar hitch W/ HP DC
Google Custom Search For Sunline Owners Club
|
|
|
|
|
08-08-2021, 01:28 PM
|
#39
|
|
Junior Member
Join Date: May 2021
Location: Texas
Posts: 18
SUN #12635
|

Quote:
Originally Posted by JohnB
I agree, by the texture, those slide end walls look like a fiberglass panel. You will know when you take up the moldings on top as you can see it. Sunline did change some of the materials between the Sole campers and the Solaris campers. It now looks like the slide end wall material was a change.
On the eternabond, I used 4" wide on the long roof to slide flange seams due reusing the old rubber to cover more rubber that was affected from the repair. On the ends walls, I used 2" wide. If you have new rubber, and you will, you can use 2" on the long roof to slide flange if wanted. The 4" was only to cover rubber damage.
I also used flat head screws and countersunk the aluminum slide flanges to make a smooth top to not cut the eternabond. Sunline used the hex head screws, and they have sharp hex tops that would cut into the slide tape they used. It takes more time to countersink every one of those holes to make a flush countersunk screw, but it came out well. If you do not want to deal with the countersink, then at least use pan head screws with a rounded head and not the sharp hex heads.
Here is the 4" but like I said, on new rubber, 2" will work OK
Here is some pics of the 2" on the end walls, both on the roof ends and the slide end walls.
This link will drop you into a long bent frame repair post, but it should show the slide Ebond how I did it. You can read the whole post if wanted and you have the time. A lot of work there to save the camper. But all is good now.
https://www.sunlineclub.com/forums/f...tml#post136159
I'm not sure if your slide floor is covered with the black waterproof plastic wrap (Darco) or has the new 2005 slide floor redesign which has a plastic coated slide floor. Both have water issues to the floor, but from different reasons. I think yours will be the Darco bottom. See this post on what to look for on the holes in the slide floor Darco that can rot out the floor and how to correct it. If you have the smooth hard plastic bottom, let me know I'll show what to do with that one.
https://www.sunlineclub.com/forums/f...eck-11086.html
And it will link to this post, dealing with the rotted slide floor and later creating a drip edge at the bottom to stop water from wicking under the slide.
https://www.sunlineclub.com/forums/f...age-10695.html
I'll add one last thing, after you Ebond the roof and the end walls, on the roof, run a fine bead of Dicor non sag, non leveling caulk on the exposed edge of the Ebond to the rubber. You are covering the exposed gray sealant so dirt and slide seals do not stick to the ebond exposed sealant. Use a soapy water solution (I use Dawn dish soap and water) to wet your finger and smooth out the caulk. Keep the finger wet and it will not stick to your finger.
On the end walls, do not use the Dicor, it will get goofed up with the slide seals rubbing it. I know, I tried that and had to remove it. It is too soft for the side walls. But, use Proflex RV caulk on the slide end walls and let is cure up good before bringing the slide in. This caulk is not as soft as the Dicor and does not have the problem. You do not want to use the Proflex on the rubber, as it will affect the rubber, but it can be used Ebond to aluminum with out issue. Just no rubber. The soapy water trick works on Proflex too.
I'll post later on how to upgrade to not having to worry about roof seam leaks again, but it will take 2 to 3 weeks for the fresh Dicor to cure before you can treat it with anything. The Dicor gases off in the curing process that long. And the Dicor has no issues in the first year, and even into the 2nd year if it was applied right. It is just year 3 and beyond is when issues can start.
Hope this helps
John |
20210724_135305.jpg
20210724_130241.jpg
20210724_135234.jpg
20210724_130231.jpg
Hey john sorry about the hiatus but I came with some pics of the slide.i finished the slide in about three days so it wasn't very difficult.i found out the back panel is aluminum it is very thin with a finish of some kind on the top for texture. The top is comprised of membrane with 1/8 inch luan that is screwed down as well as glued to the framing as well as it had these very small staples throughout I took a pic of them and you hardly even know they are in the wood. The local home depot didn't have luan or 1/8 inch plywood so I used 1/4 inch birch plywood as it was all they had for the size.if you think about it is about only 1/8 or so thicker than the luan.i just took the luan off and copied each half to the new plywood and it came out beautifully and I had zero fitment issues. It feels alot more rigid now over the luan.i couldn't take the back panel off the slide as the screws along the wall I didn't have the space or tool to get them out so I just peeked in from the top and it was dry in the wall so I know now the water it wicking from the bottom of the slide to underneath. On the inside you have the metal L shaped flange the original membrane stopped right under the flange and didn't wrap down the slide framing so on the new I stapled it down to the inside so it is wrapped down. I didn't take any photos of the inside of the slide roof as it had already been tampered with from the leak I had previously.i didn't have any pics of the finished birch wood roof as I had to glue the membrane down before dark as my helper I had had to work the next day so I needed to glue the membrane down that night because that was a two person job.i just need to eternabond tape the screws I had dicor them since I stuck with the hex screws and I am just waiting for it to fully cure. It looks very good I couldn't be more happy with the results.thanks again for the help and all of the pics they were very helpful.
__________________
|
|
|
|
|
09-05-2021, 08:19 PM
|
#40
|
|
Moderator
Join Date: Nov 2006
Location: Ohio
Posts: 12,654
SUN #89
|
Hi Skywalker,
Thanks for reporting back. I saw your post with the good pics and the text, but I had forgotten to respond. Sorry about that.
You did a great job! Good for you.
Those tiny staples, yes Sunline used a boat load of them all over on many things. I finally found that size staple and the air stapler to shot them with.
They call that size staple a "Fine wire" staple. 22 gauge, 3/16" wide crown by 5/8" long. See the Senco air stapler I got. It is red in the pic. This one, https://www.senco.com/tools/details-...d-wire-stapler
It works great, I use it a lot on the 1/8" laun and carpet.

Have a great rest of the season camping.
John
__________________
Current Sunlines: 2004 T310SR, 2004 T1950, 2004 T2475, 2007 T2499, 2004 T317SR
Prior Sunlines: 2004 T2499 - Fern Blue
2005 Ford F350 Lariat, 6.8L V10 W/ 4.10 rear axle, CC, Short Bed, SRW. Reese HP trunnion bar hitch W/ HP DC
Google Custom Search For Sunline Owners Club
|
|
|
|
|
|
|
Currently Active Users Viewing This Thread: 1 (0 members and 1 guests)
|
|
|
 Posting Rules
|
You may not post new threads
You may not post replies
You may not post attachments
You may not edit your posts
HTML code is Off
|
|
|
|
 » Recent Sunline Discussions
 |
|
|
|
|
|
|
|
|
|
|
|
|
|
|
|
|
|
|
|
|
|
|
|
|
|
|
|


 Linear Mode

