 |
|
 08-22-2023, 11:51 AM
|
#1
|
|
Junior Member
Join Date: Oct 2021
Location: New Jersey
Posts: 15
SUN #12992
|
My Sunline T-276 SR roof flipped it's lid... Literally!
Greetings Sunline club folks! I've been haunting the forums here for awhile now. Getting lots of great tips and tricks for repairing and maintaining this trailer that we purchased 3 years ago (wish I had known about the moisture meter then but still glad I purchased it. It's a great trailer!)
I've done a lot of work repairing water damage to the slide floor, back of the slide and the entire back of the trailer. Earlier this year I found a wet spot on the driver side front roof (thanks water meter) and my buddy and I set about to repairing it. Following some of the great tutorials here we peeled back the rubber roof replaced the bud board back to the first vent, fixed a small section of rotted wood (fortunately the inner ceiling was fine) and even removed the front of the trailer to repair some water damage there.
After all that work, I went around and scraped off all the old caulk all the way around the roof, over vent covers etc. Again following the great how to posts I found here. All seemed right with the world.
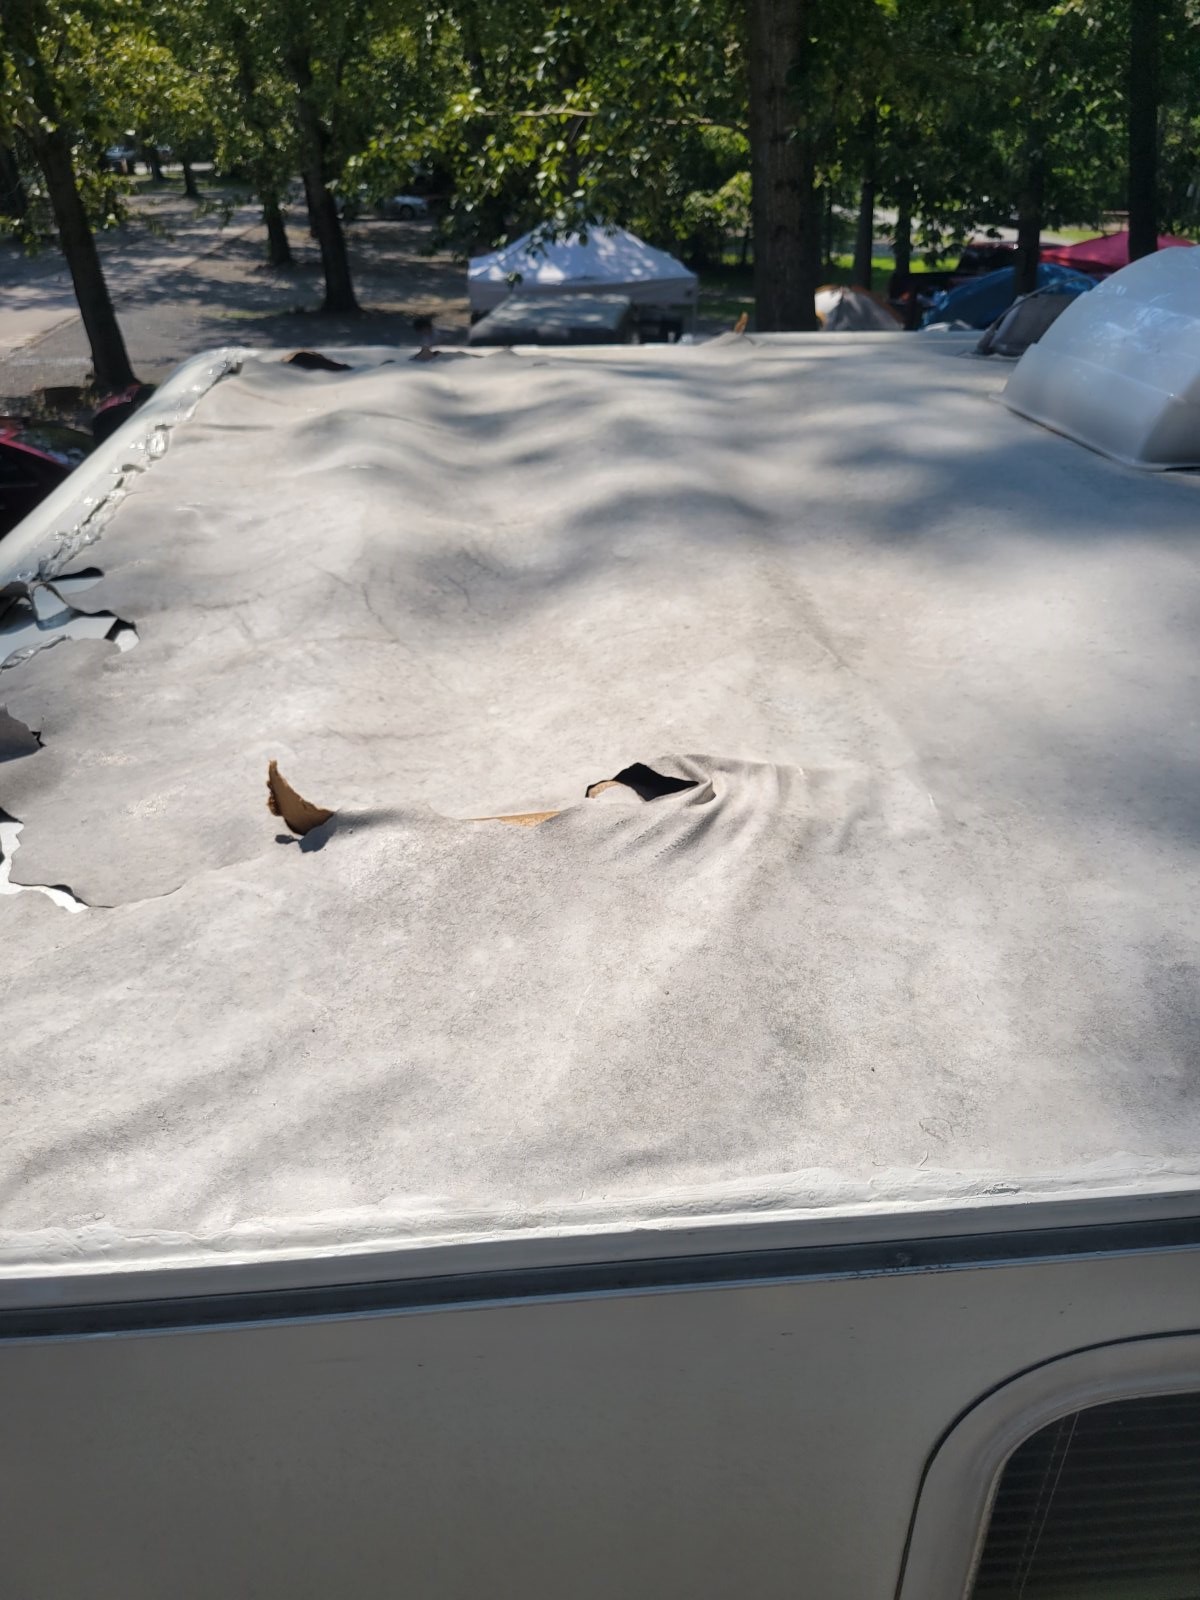
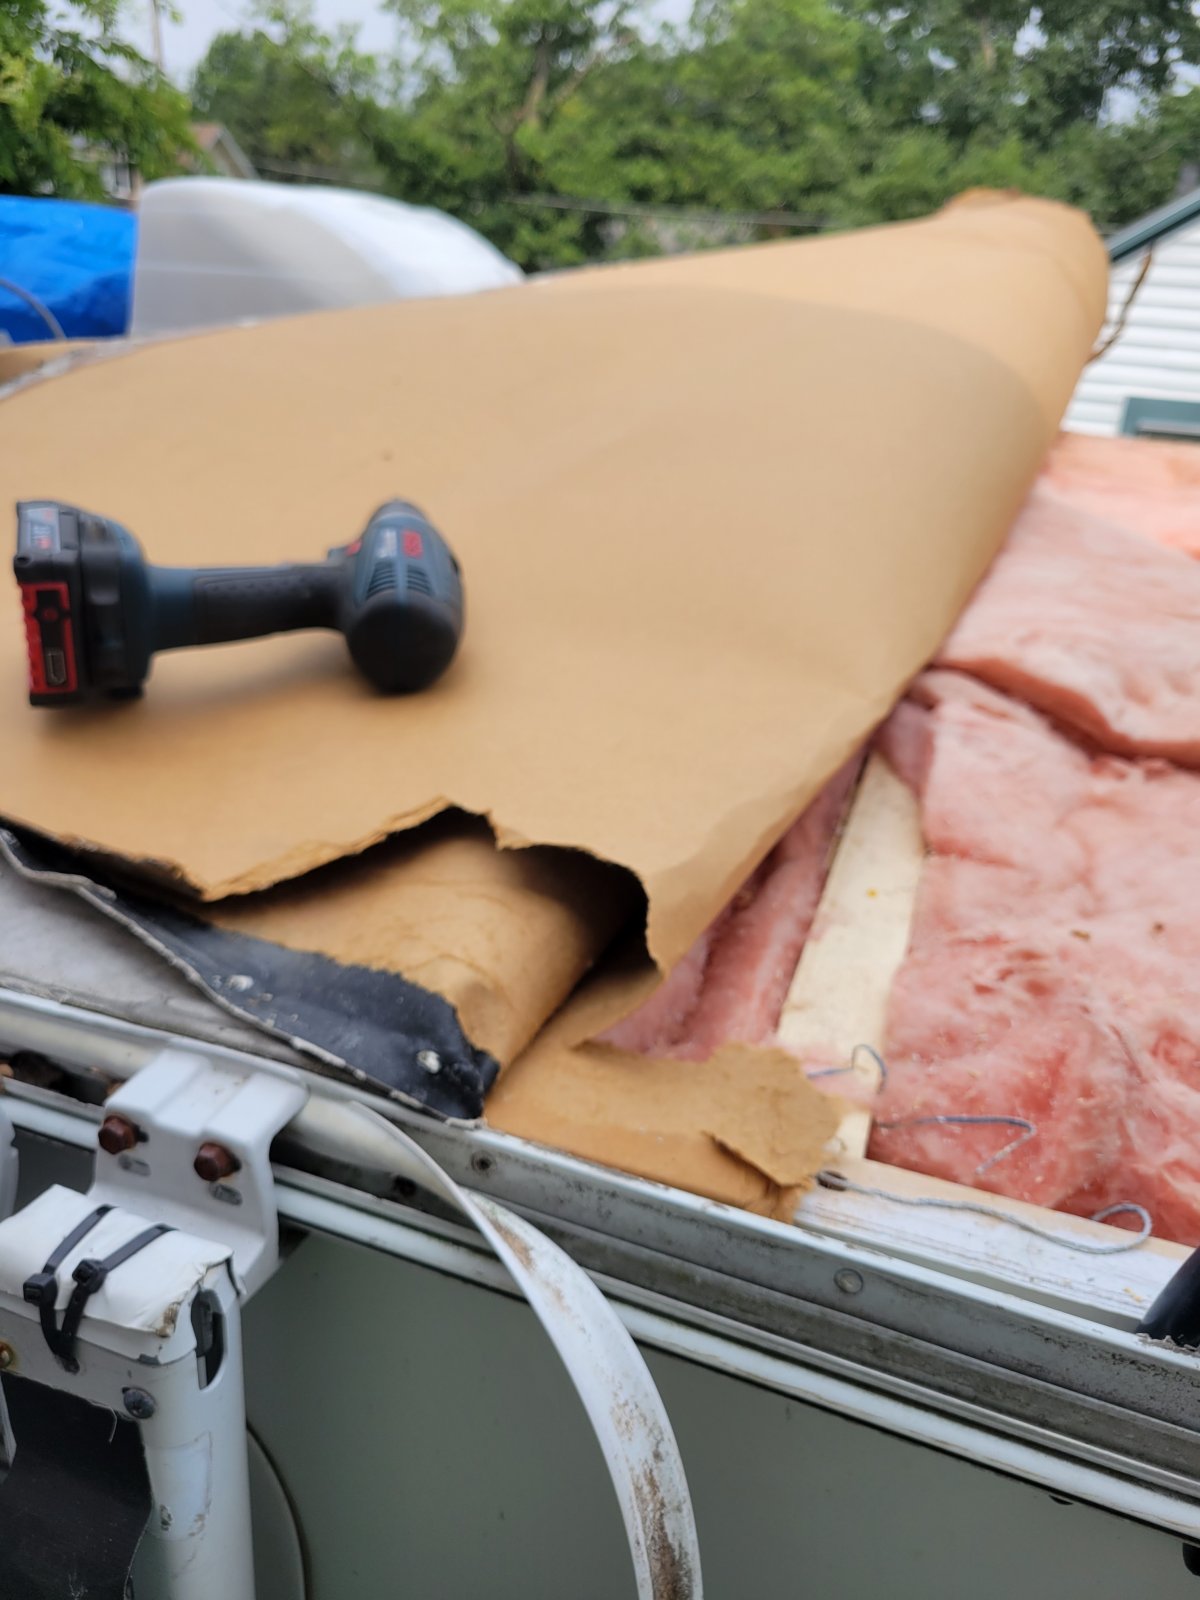
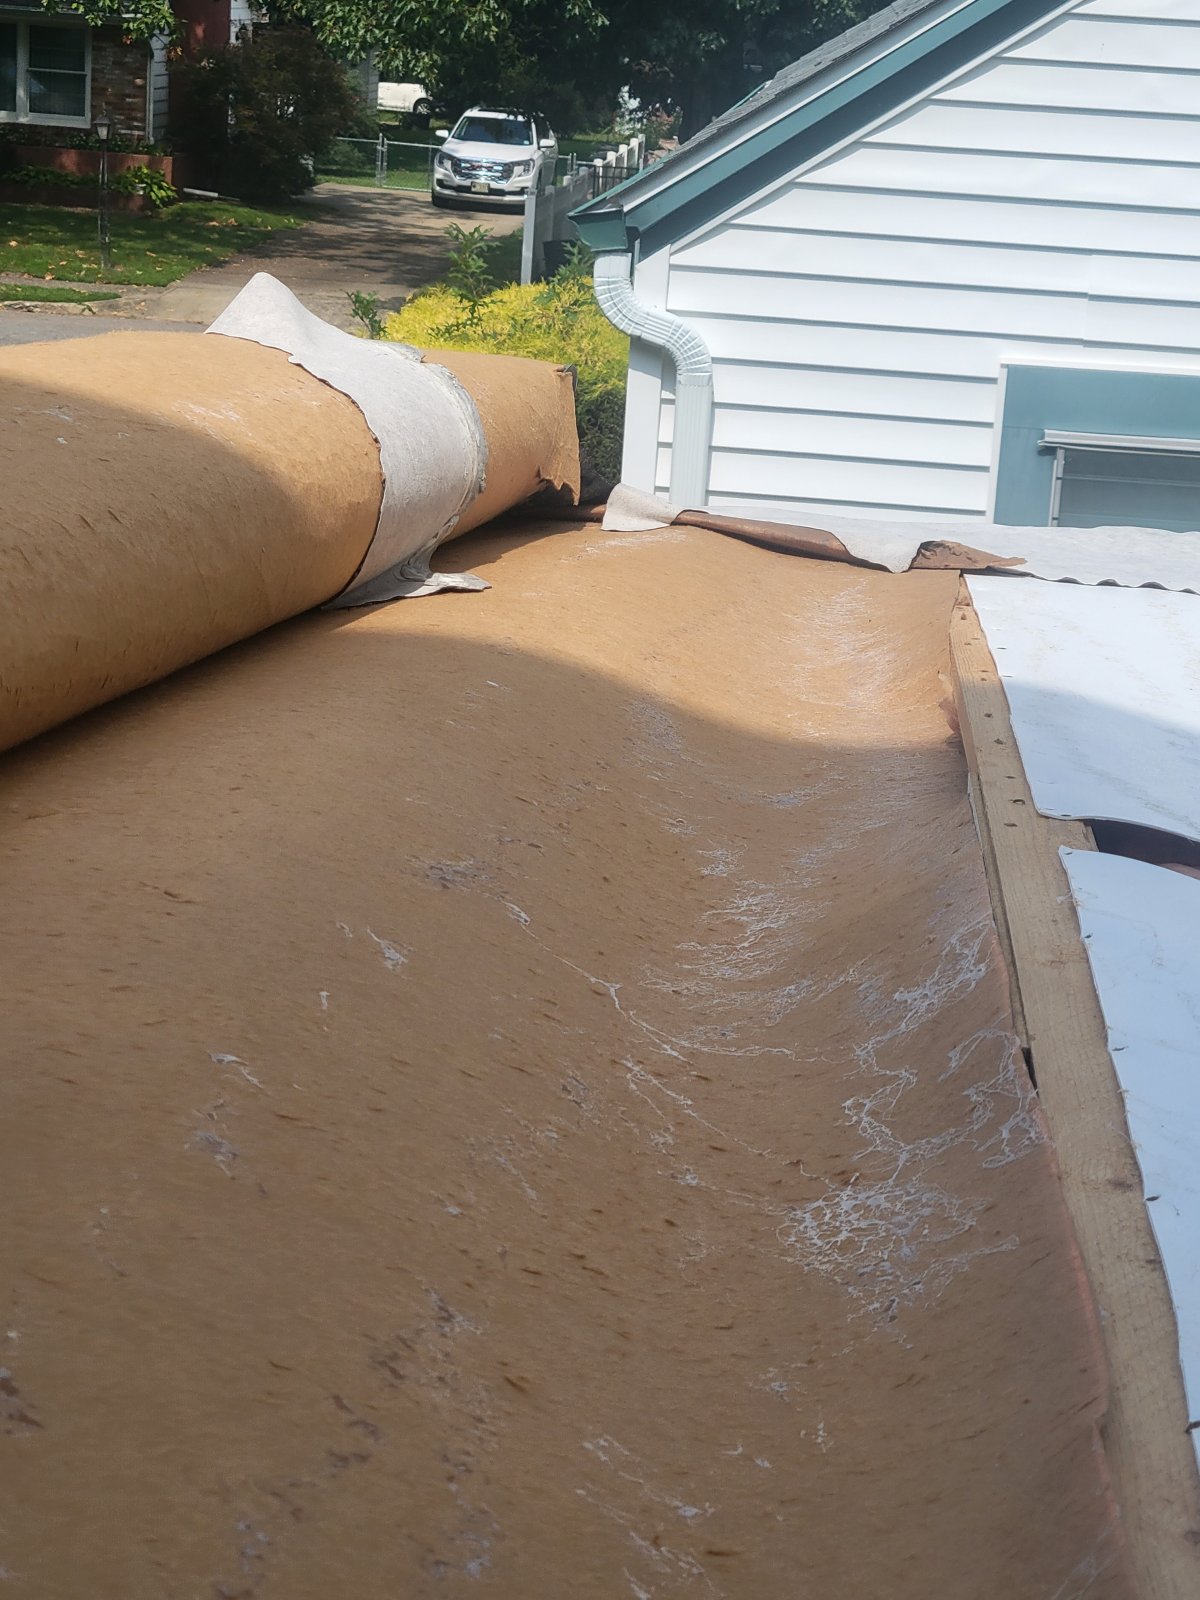
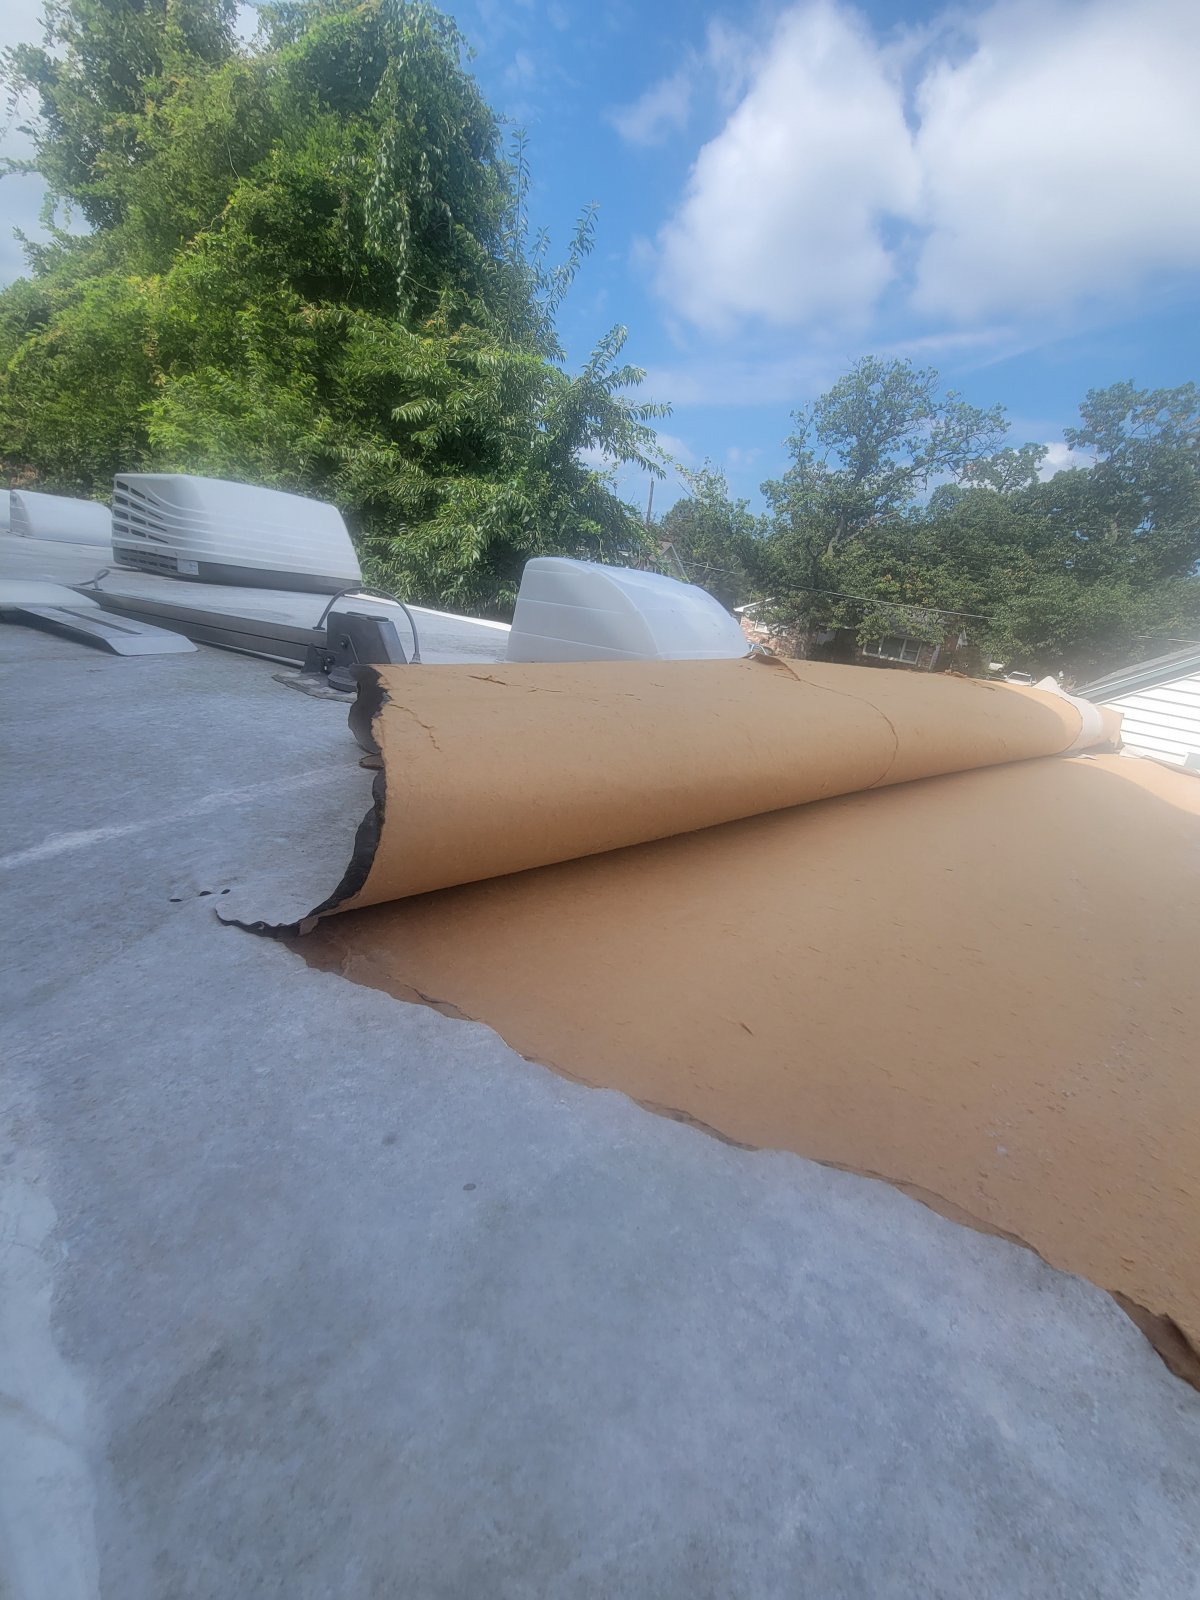
OK sorry for the back story. All of that is to say, we finally got out camping for the first time after the repairs. When we stopped at the first rest stop I happened to look at the top of the trailer and wondered how that cardboard go wrapped around my vent. It didn't take long for me to figure out that what I was seeing wasn't cardboard, but the bottom of the rubber roof folded back on itself.
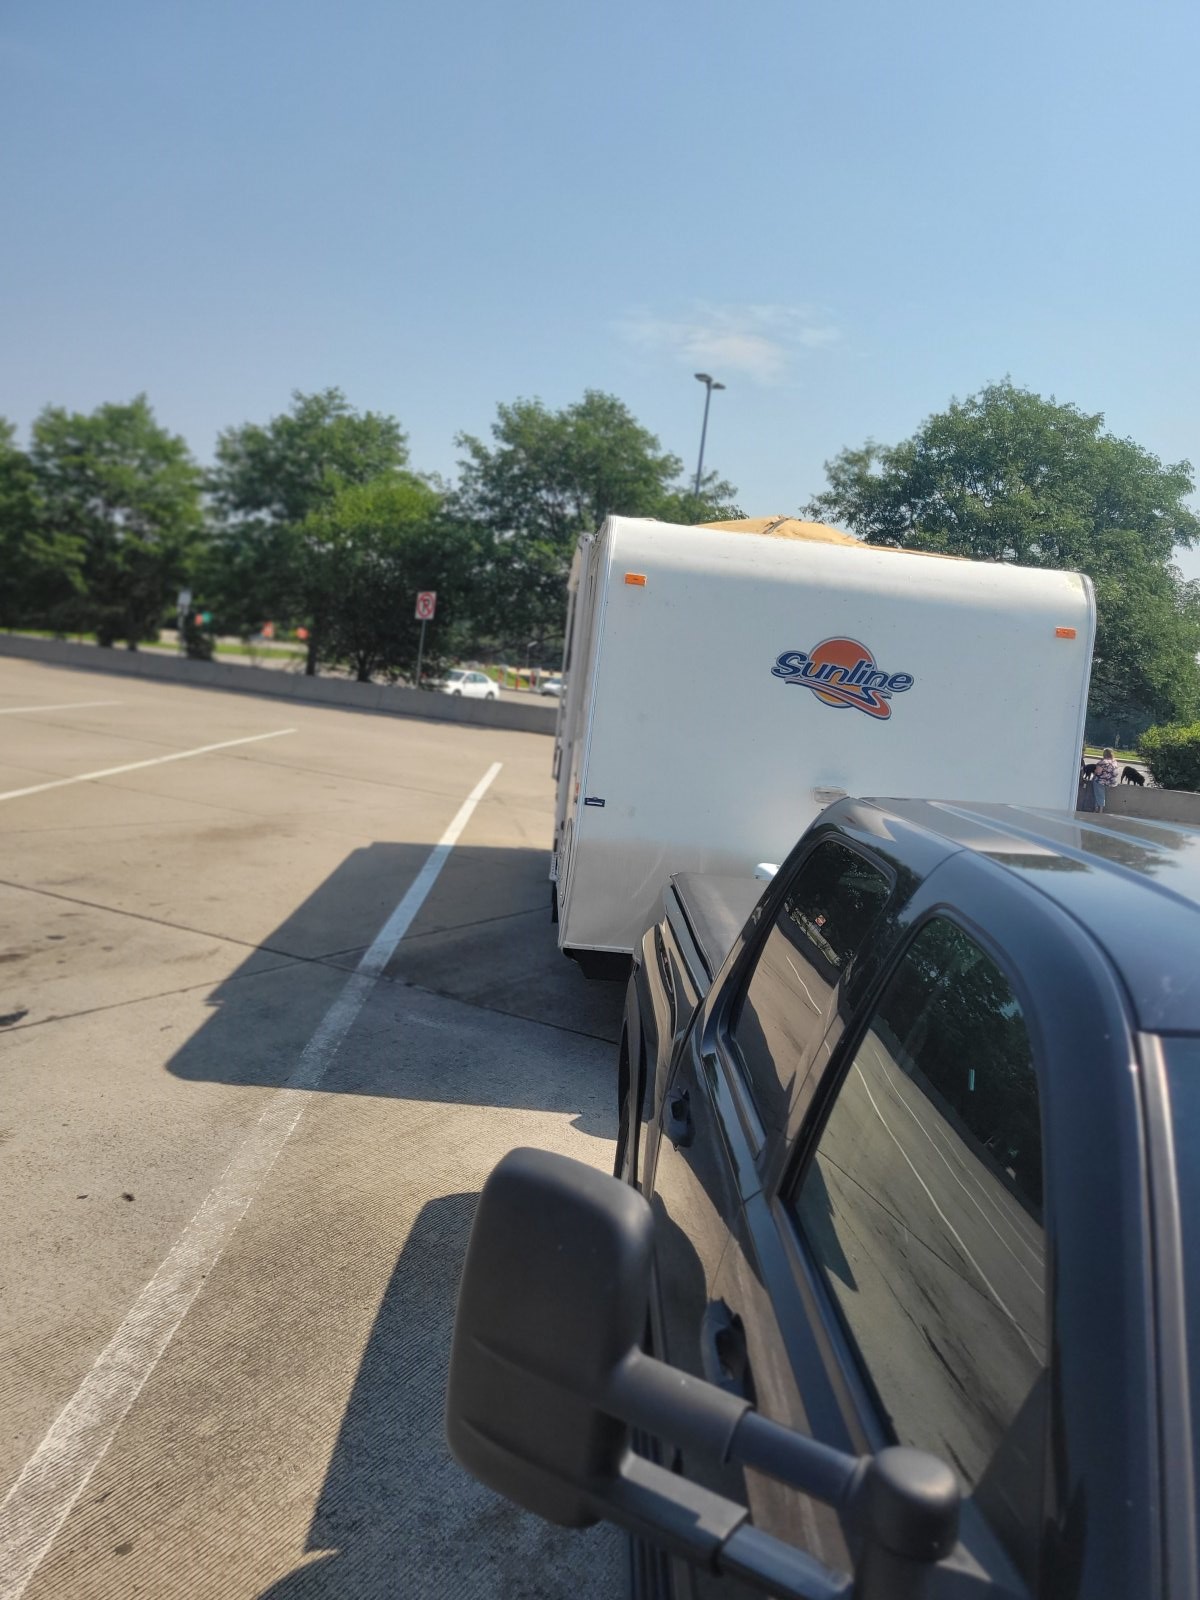
There wasn't much I could do about it in the parking lot without a ladder so we continued on to our destination. Once we got there my friend climbed up on the side of the truck (It must be nice being 7 feet tall) to take a peek.
What we discovered is that somehow, the rubber roof must have worked it's way out from under the front molding trim piece, caught some air and ripped off the roof.
So now I have two basic questions I'm hoping you folks can help me with:
What the heck happened? What did I do wrong with the original repair? I thought we did a really good job fixing this thing to begin with then to have this occur. I want to make sure whatever mistake we made we don't make again.
Is there any possible way I can fix this without having to replace the entire roof? I have very limited work area in my driveway. I had to take down part of my neighbor's fence in order to do the original fix and the caulking. My neighbor's pretty cool but I don't want to push my luck. That and the fact that it's outside is going to make it difficult for me to remove EVERYTHING to replace the whole roof.
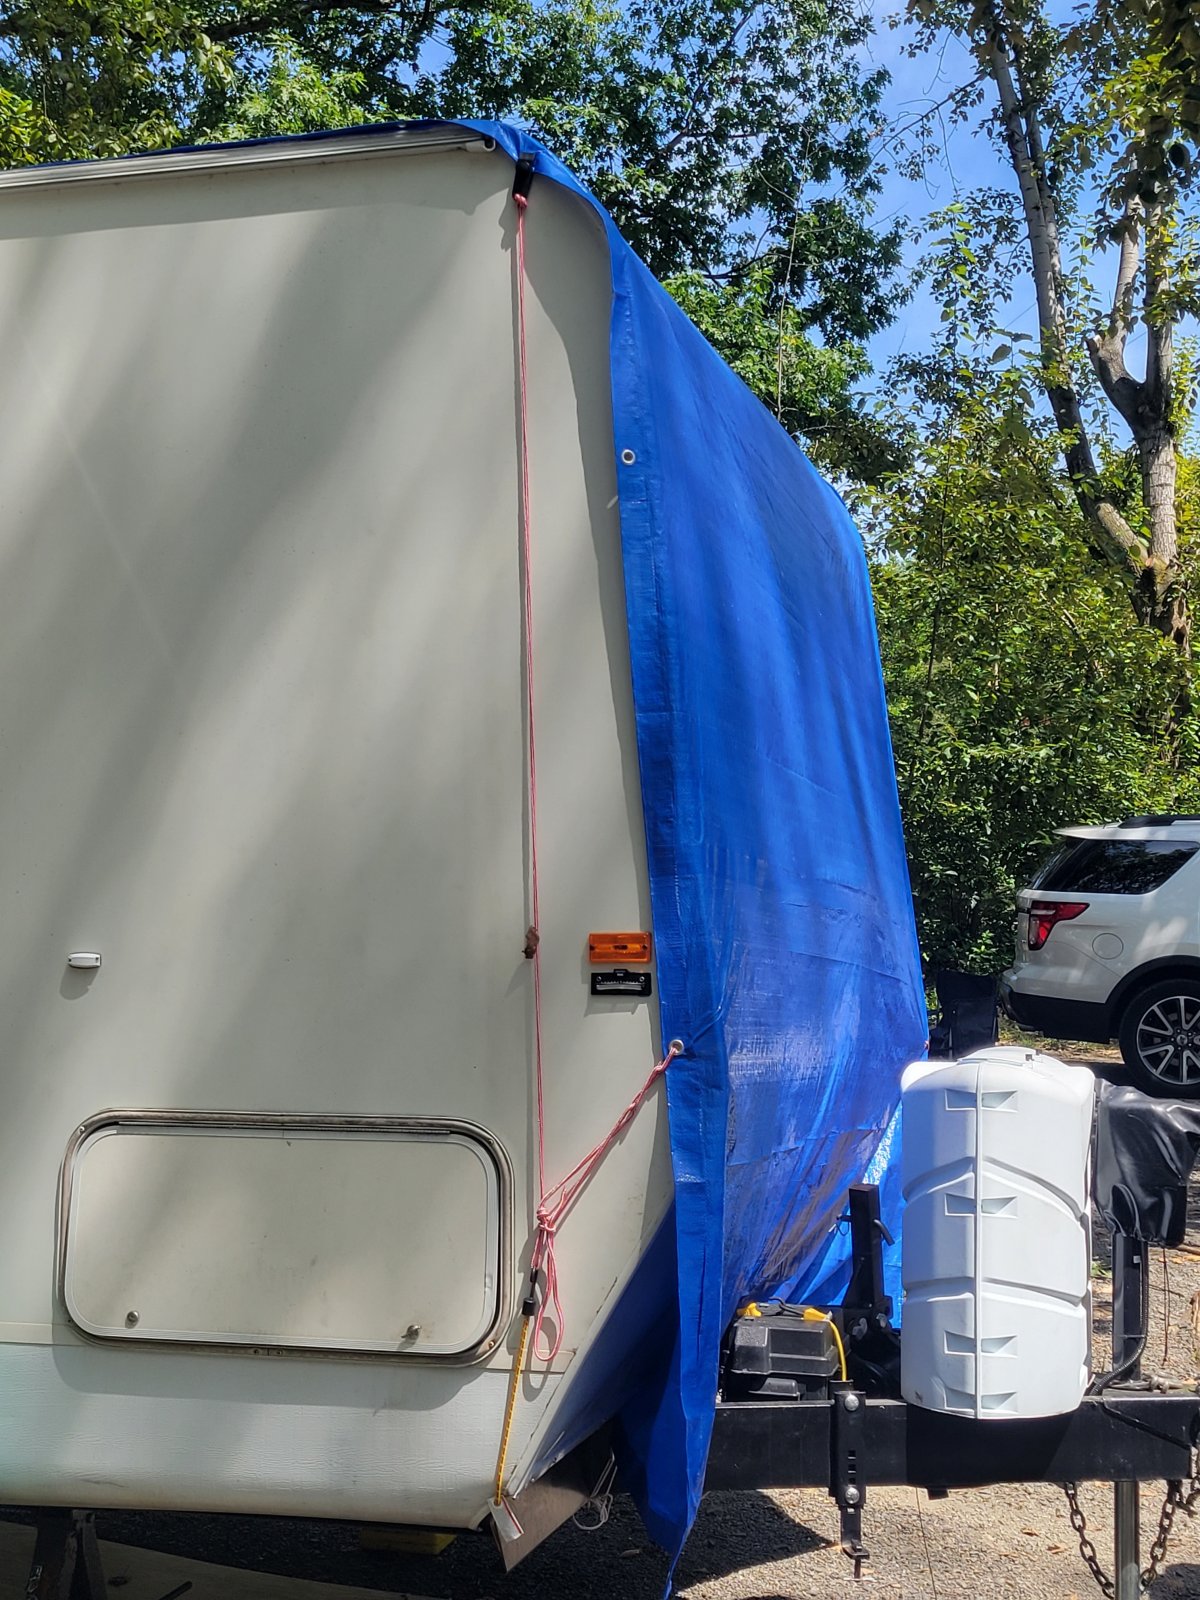
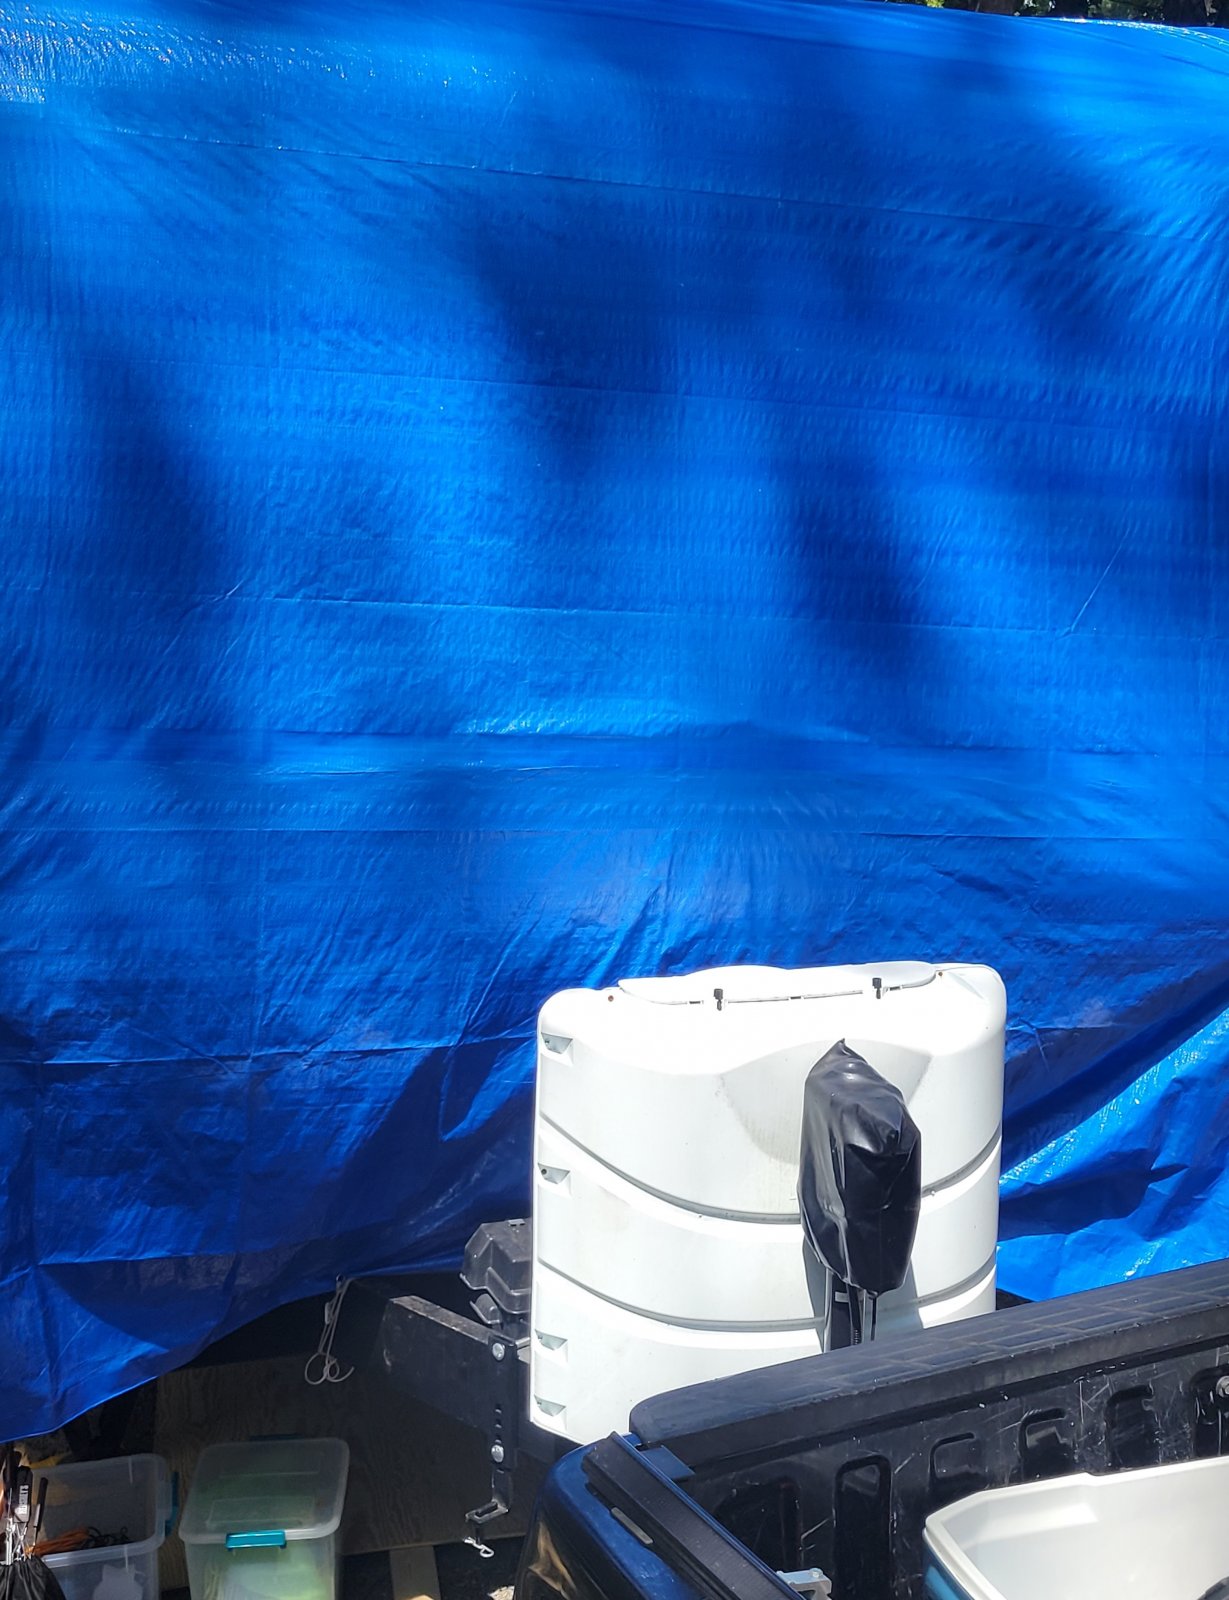
For now, we've folded the roof back down, put a tarp over it (tied down) and will be putting plywood, 2x4 and ratchet straps over it to get us home.
For now, We're enjoying our stay at Knobel's till we head out on Thursday.
__________________
|

|

|
|
08-24-2023, 09:25 PM
|
#2
|
|
Moderator
Join Date: Nov 2006
Location: Ohio
Posts: 12,656
SUN #89
|
Hi Rlanger,
I may be able to help answer your 2 questions, but I am having internet connection issues and I am limited in posting any pics etc until early next week when my connection issue gets resolved.
But, in the mean time, if you can get us some more information on how you did your repair, we can help back into what may have happened and how to repair it going forward.
In the paragraph below, you said you replaced the bud board back to the first vent. If I understood that correctly, please explain how you replaced the bud board. What actual material did you get to replace it with? How did you glue the new bud board to the roof membrane?
Pictures really help in theses cases, by chance do you have any pictures on how you attached the new repair material to the first rafter before putting the front wall siding over the top of the roof membrane. Need to see how the front joint of the roof was put back together to join the front wall siding, the roof membrane and then the front cap molding over everything.
Did you remove the gutter rails during your repair and replace them after the repair was completed?
How did you transition the repaired membrane at the first vent into the main roof?
Did you reuse the original EPDM rubber membrane?
Also any pics you have showing the original damage as you were taking it apart helps too.
Quote:
Originally Posted by Rlanger

I've done a lot of work repairing water damage to the slide floor, back of the slide and the entire back of the trailer. Earlier this year I found a wet spot on the driver side front roof (thanks water meter) and my buddy and I set about to repairing it. Following some of the great tutorials here we peeled back the rubber roof replaced the bud board back to the first vent, fixed a small section of rotted wood (fortunately the inner ceiling was fine) and even removed the front of the trailer to repair some water damage there.
|
I will be back early to mid next week when I can have full connectivity and can post pictures etc
Hope this helps
John
__________________
Current Sunlines: 2004 T310SR, 2004 T1950, 2004 T2475, 2007 T2499, 2004 T317SR
Prior Sunlines: 2004 T2499 - Fern Blue
2005 Ford F350 Lariat, 6.8L V10 W/ 4.10 rear axle, CC, Short Bed, SRW. Reese HP trunnion bar hitch W/ HP DC
 Google Custom Search For Sunline Owners Club
|
|
|
|
|
08-26-2023, 12:25 PM
|
#3
|
|
Junior Member
Join Date: Oct 2021
Location: New Jersey
Posts: 15
SUN #12992
|
Hi John. Thanks for getting back to me despite your internet issues. Technology is great, isn't it? At least when it works.
Now that I am home safe and mostly sound I can better explain the original repairs that I made.
I exaggerated a little bit before. The water damage was in the driver's side front corner back to almost the first rafter. It did not go back to the vent as I originally said. I had to see it again to remember exactly what was fixed. 
I don't have pictures of the repair but do have some of the original damage which I'll post below.
Here's how the original repair went:
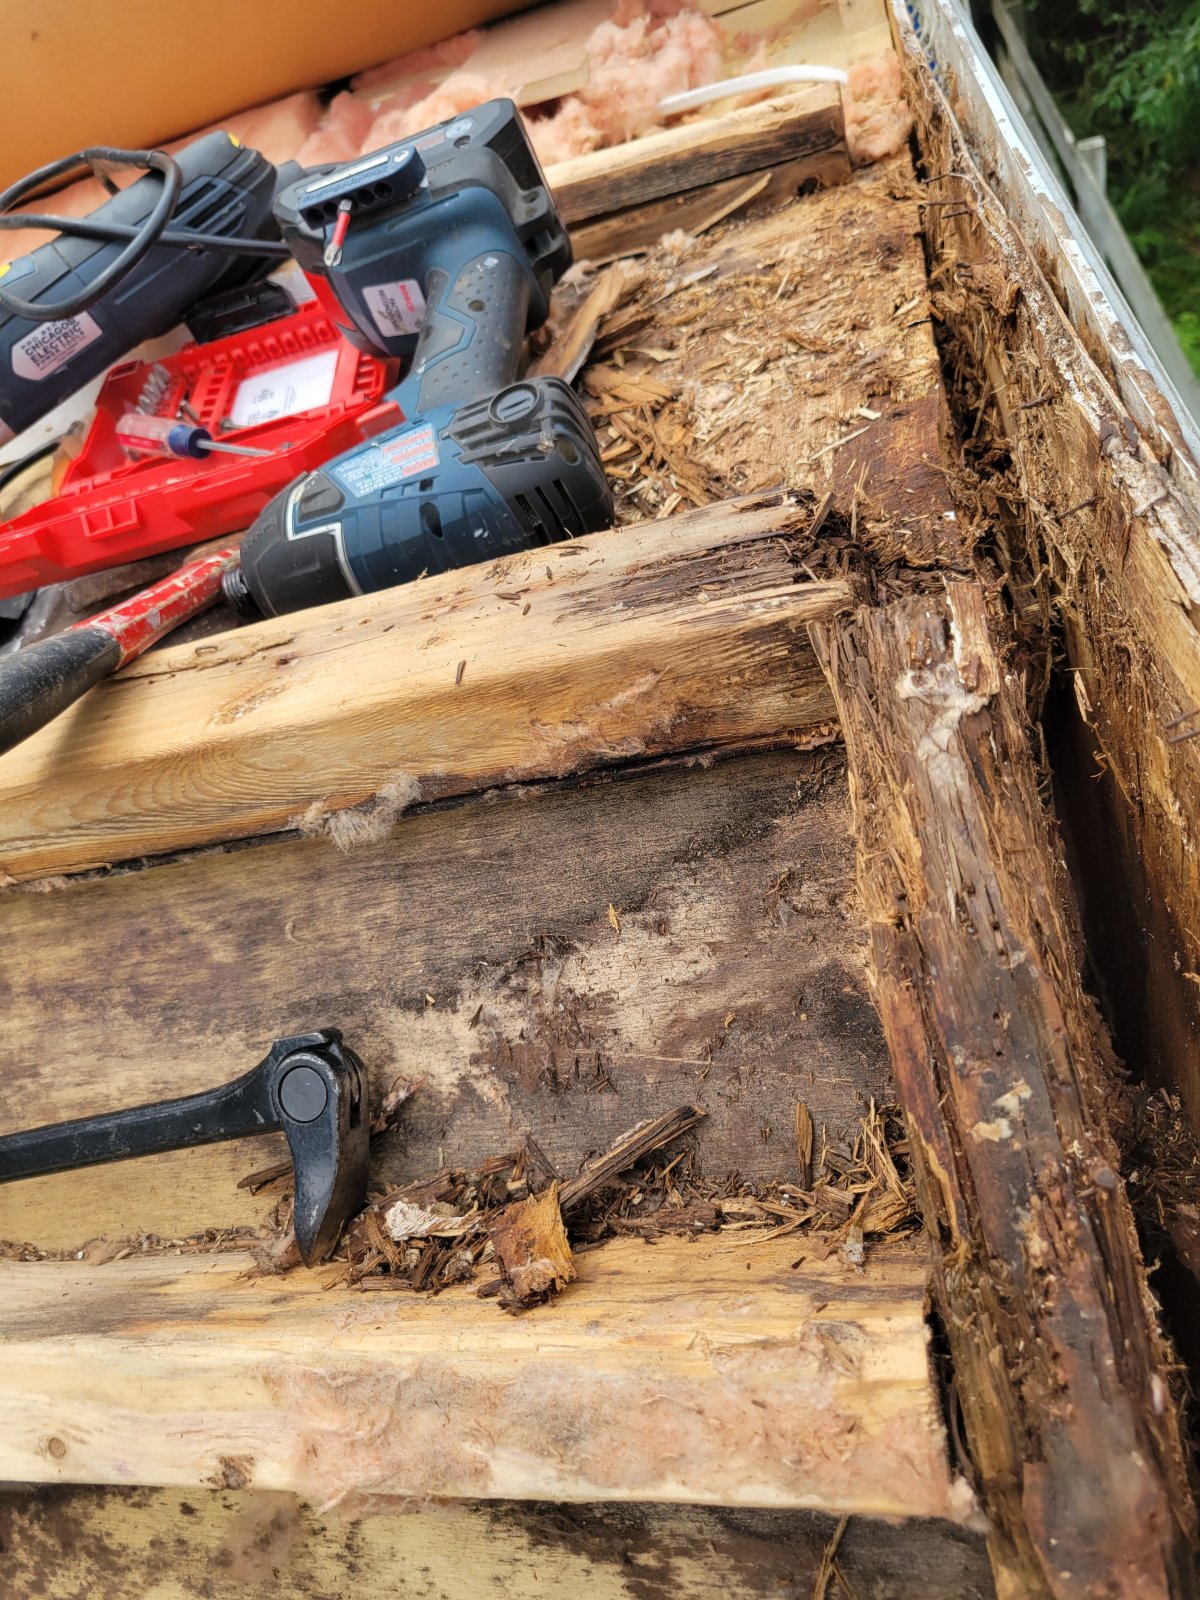
I detached the EDPM from the front of the trailer back to the second rafter and folded it back to the vent to give us plenty of room to work. I did this by removing the front cap molding and the front wall completely (There was water damage down the front as well) and detached the gutters back to the awning. The EDPM was not damaged other than needing a good cleaning and was still partially attached to the bud board except in the place where it rotted
I then cut out the rotted bud board right along the middle of the first rafter from the driver's side to the passenger side. Next, I cleaned and repaired damaged wood along the side and down the front driver's side corner.
I replaced the cutout section of bud board with Polywall plastic panel (see the link below). I thought I was being slick since it is lighter and cheaper than Luan. It stapled easily into the wood and the rafter and looked like it was going to work nicely but I think this was my first mistake.
https://www.lowes.com/pd/Parkland-Pl...-Panel/3436816
I then pulled the EPDM back down. I used spray-on contact cement to glue the roof to the plastic. This was my second mistake. It doesn't look like the EPDM stuck to the plastic (more on that later)
From there I folded the EPDM down over the sides and stapled it working towards and then across the front.
I repaired the water damage on the front then put the front siding, gutters, and front cap molding back on (after cleaning them).
Finally, I dicored everything using leveling and non-leveling caulk.
Unfortunately, I only have some pictures of the original damage and not the repair itself. Hopefully, the pictures I do have help explain what I did for the orginal repair.

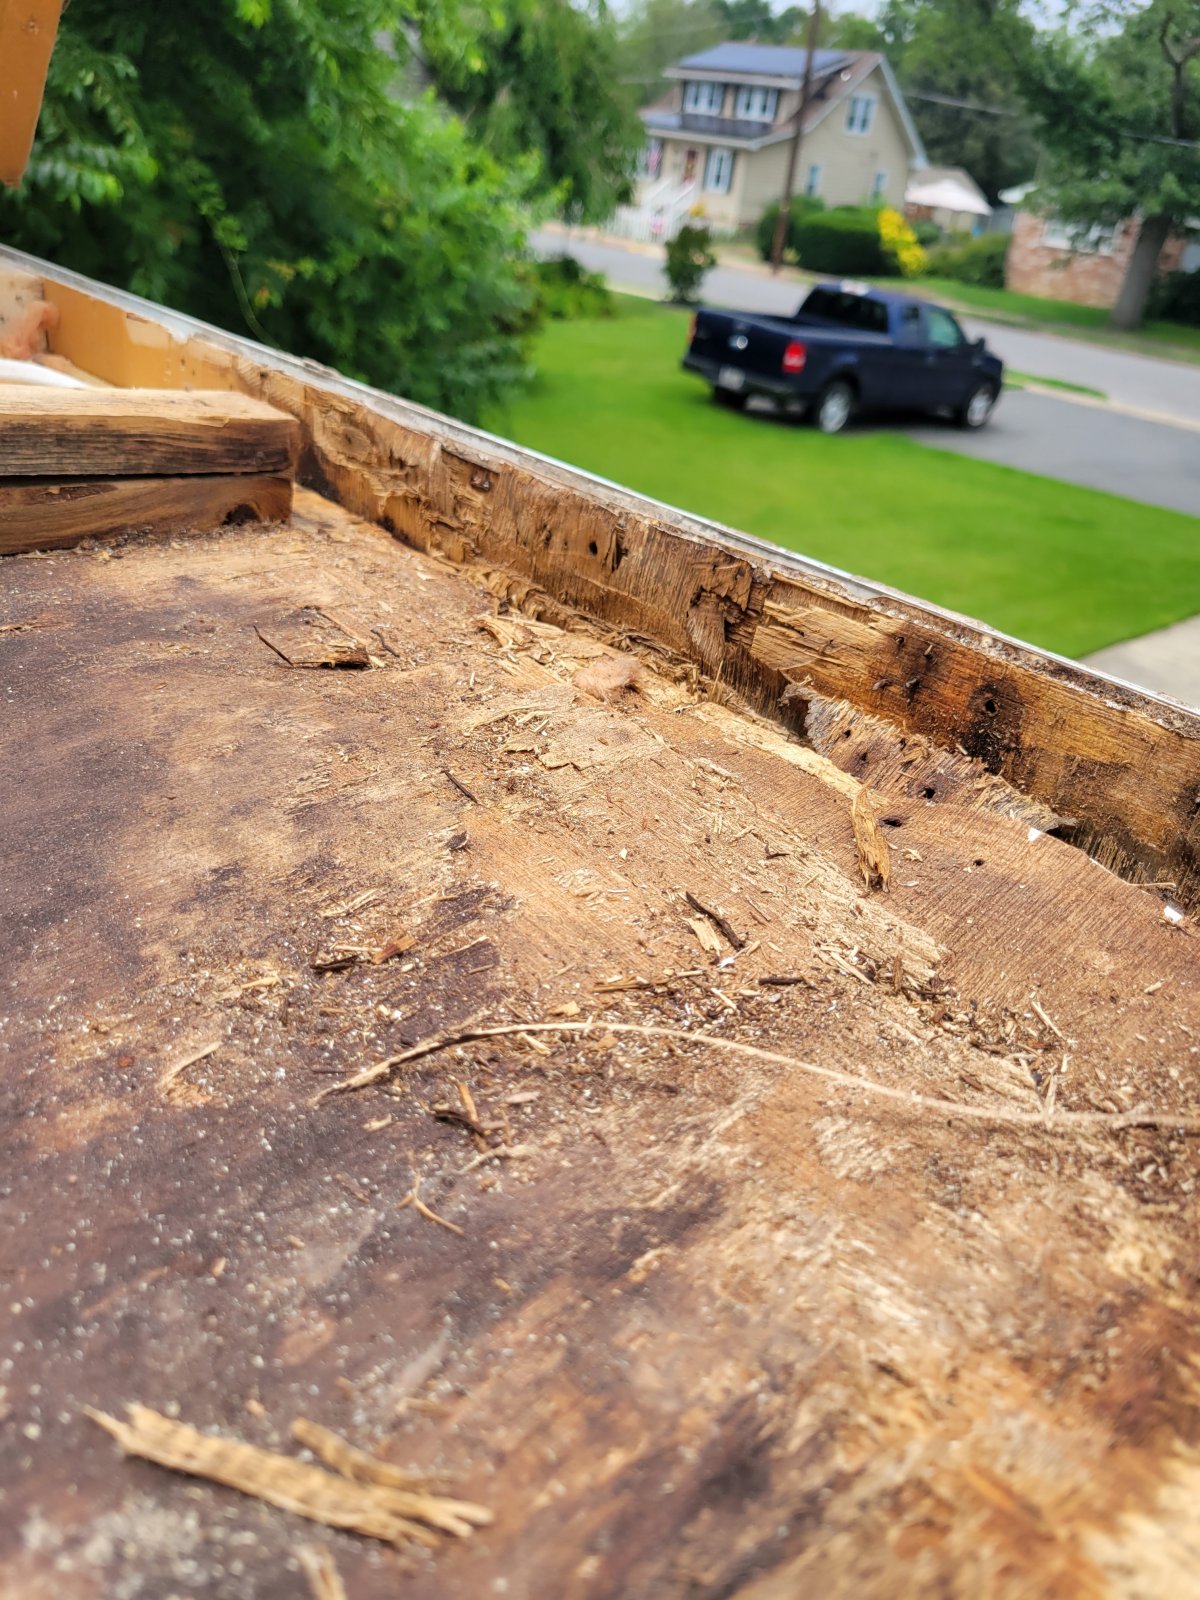


I think now that I've had time to reflect, this answers the first question. I messed up the original repair by not making sure the roof was properly glued down. The Bernoulli effect probably lifted up the EPDM allowing it to eventually pull it out from under the front cap moulding. The Wind shear did the rest. You'll be able to see some of the evidence of this in the pictures below.
So now on to how to fix this mess.
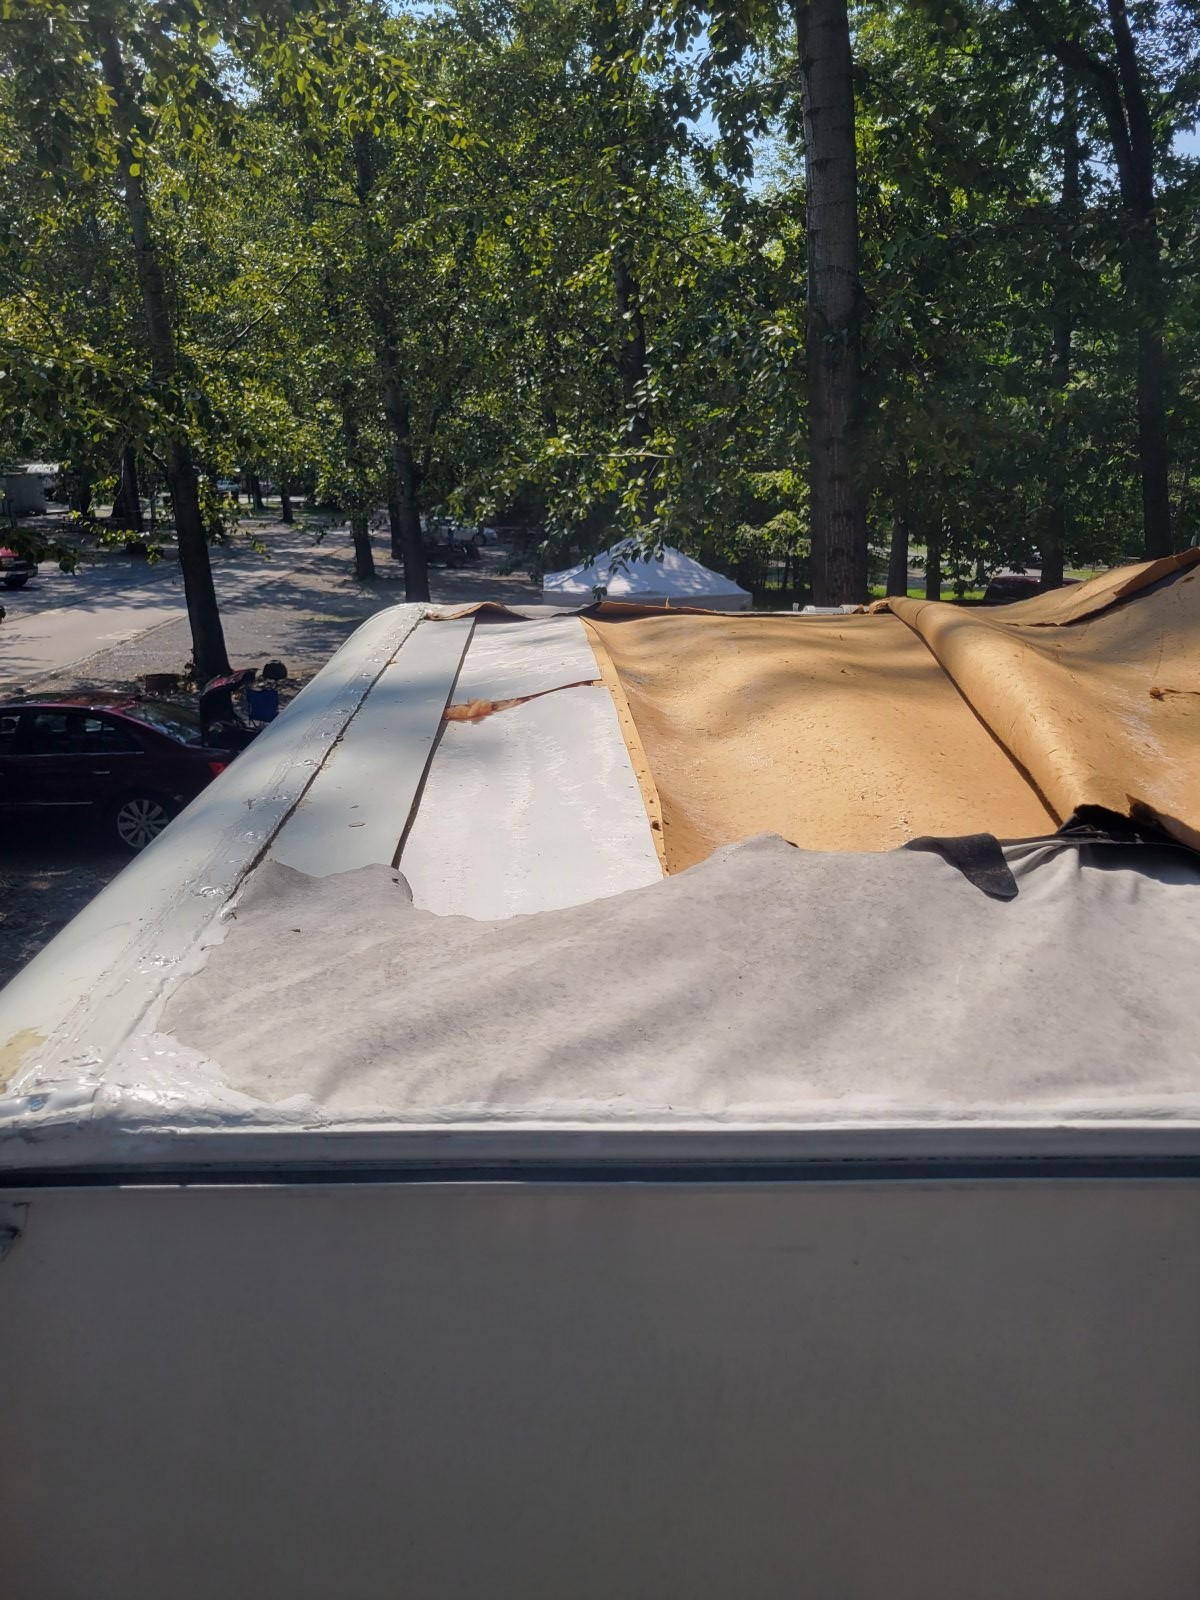
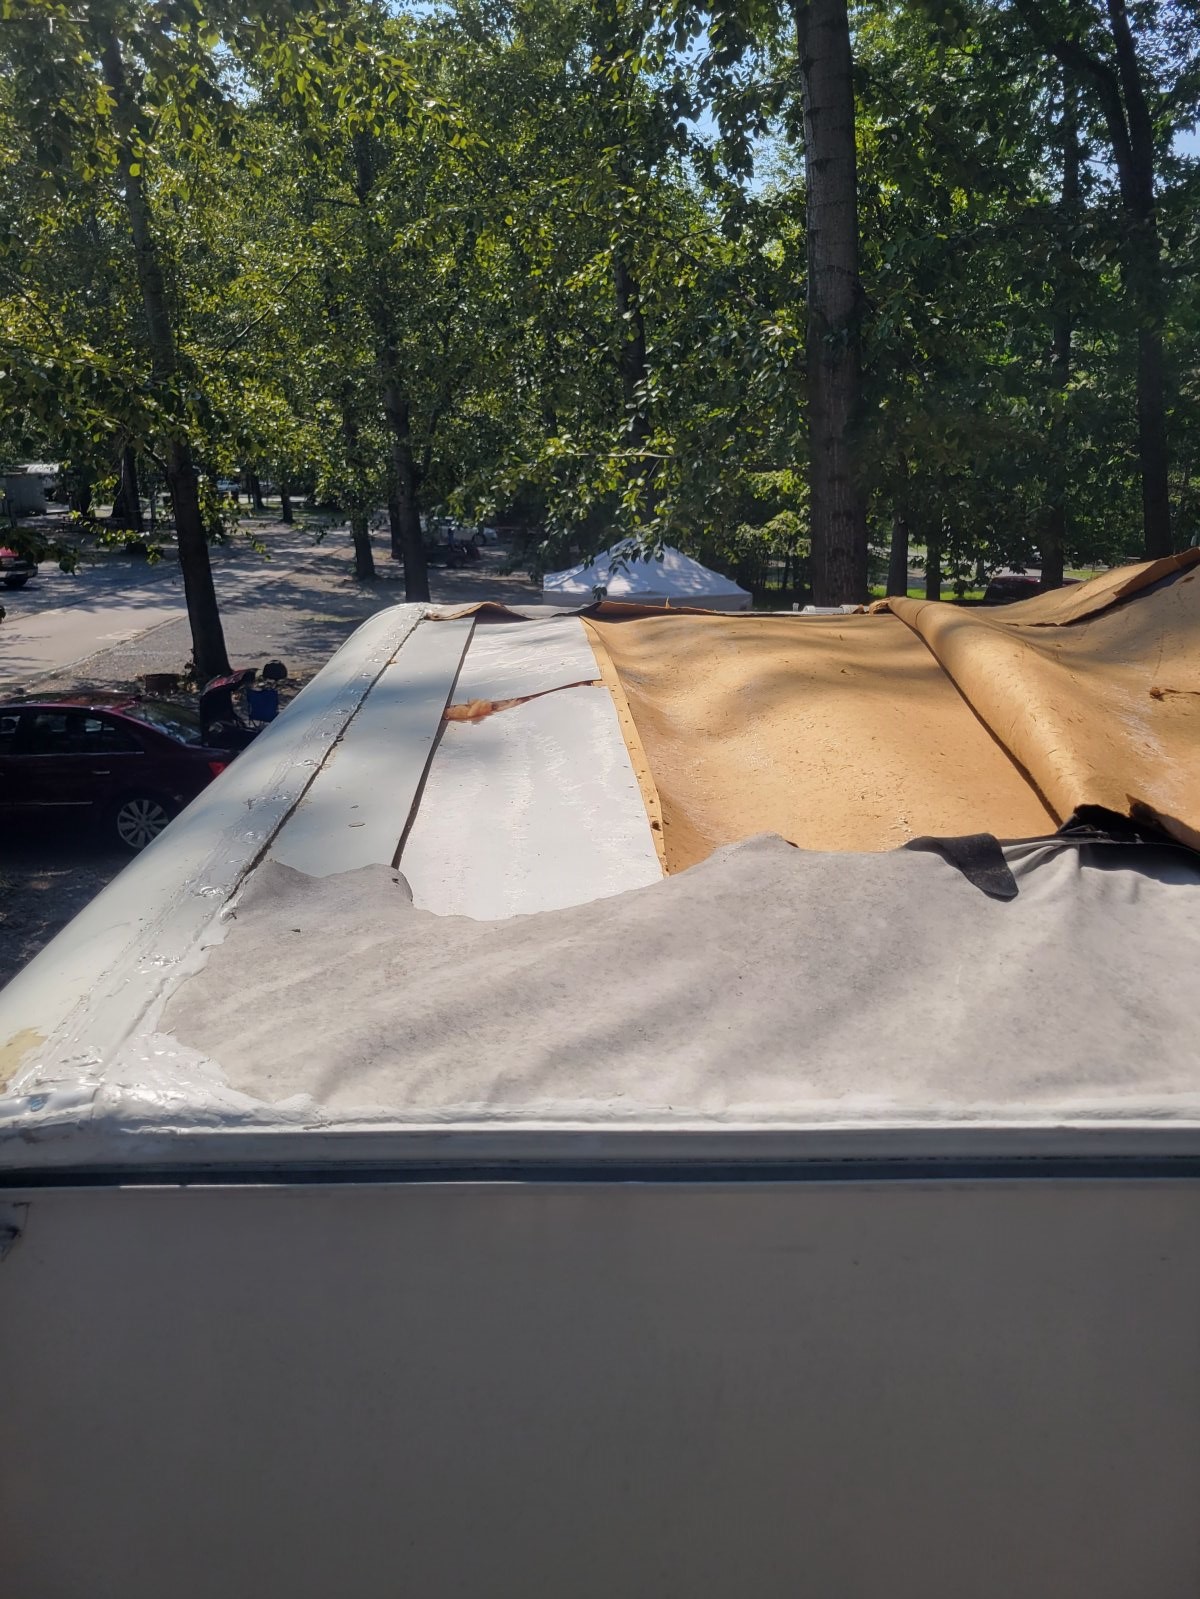
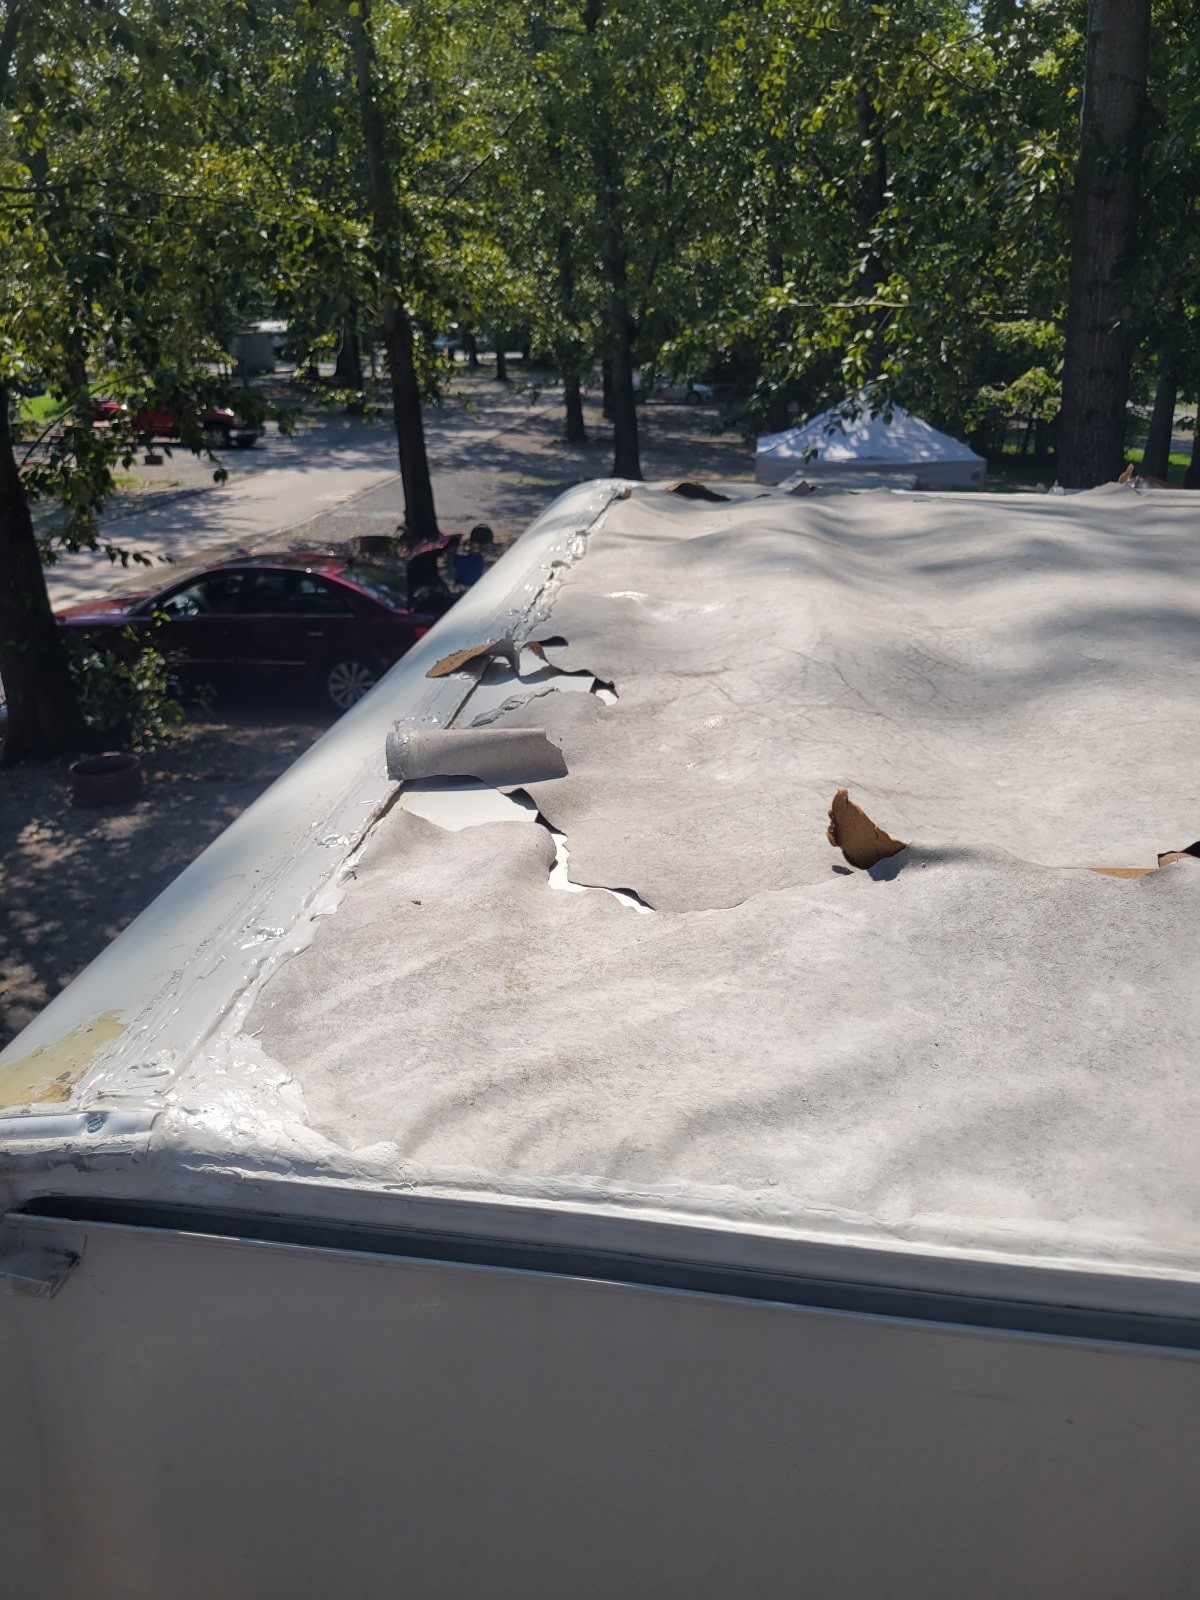
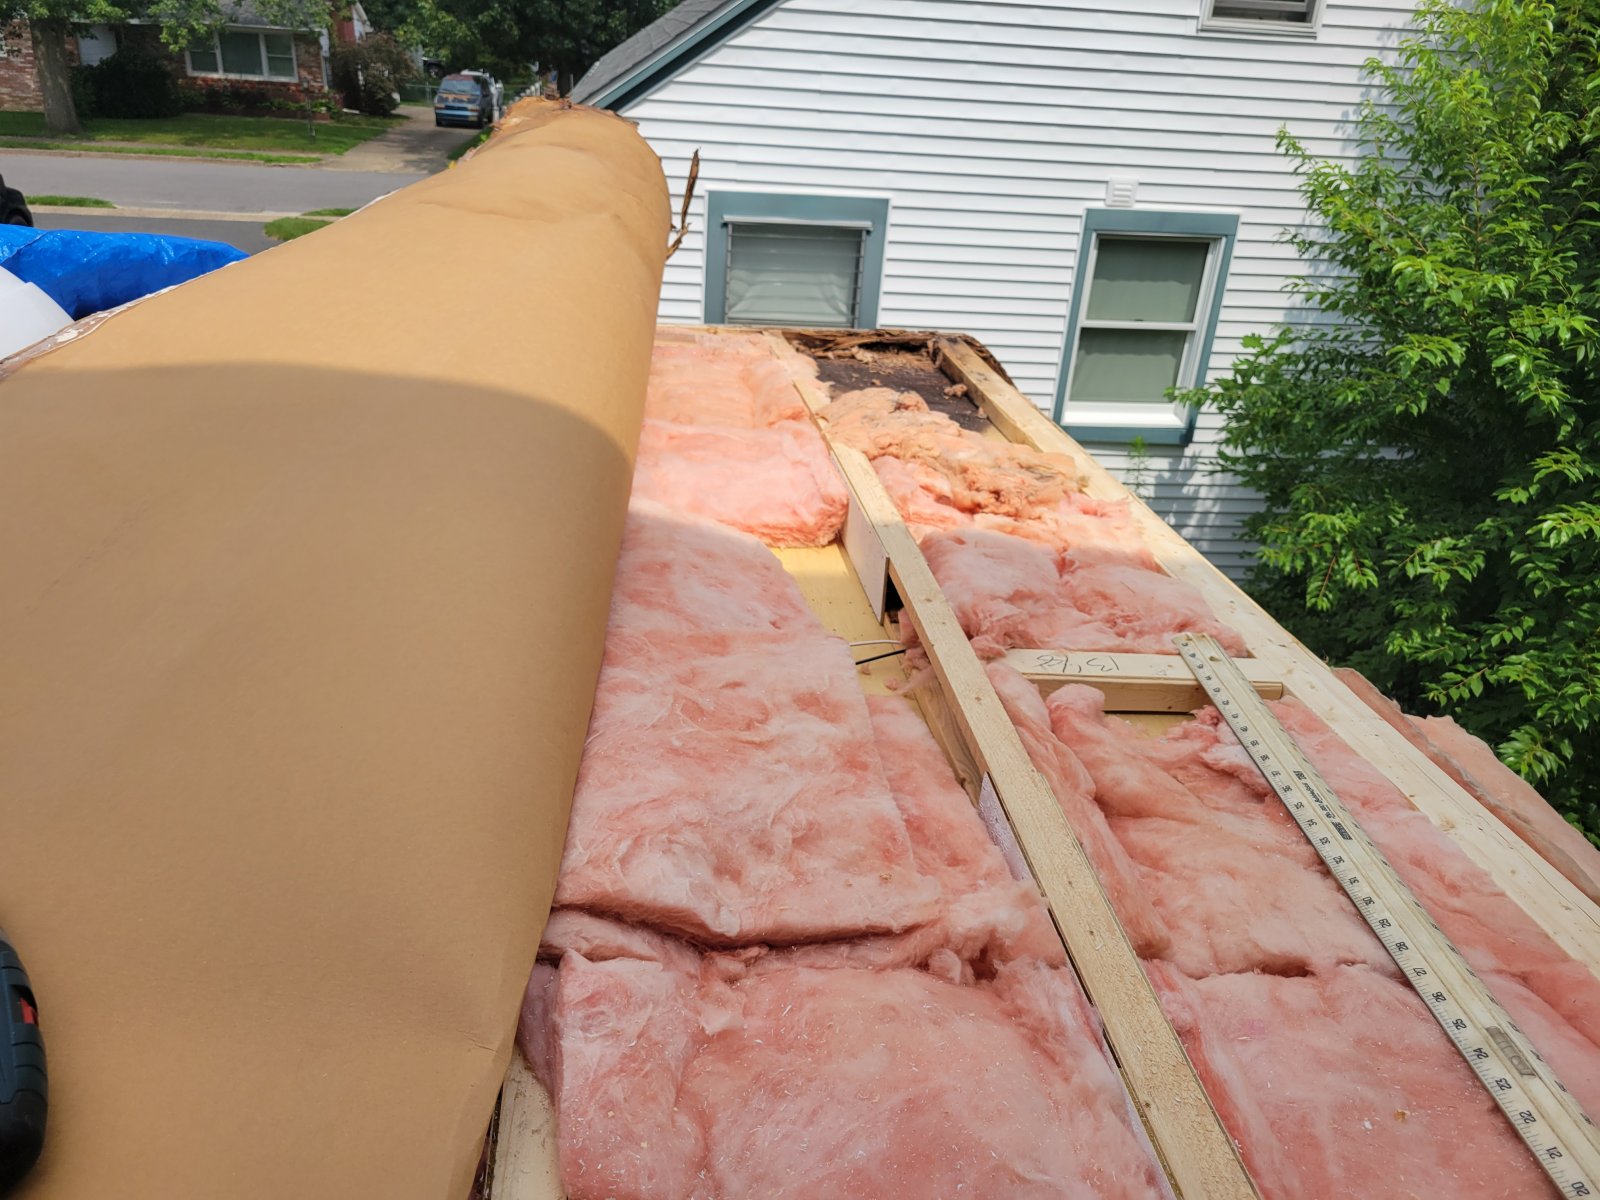
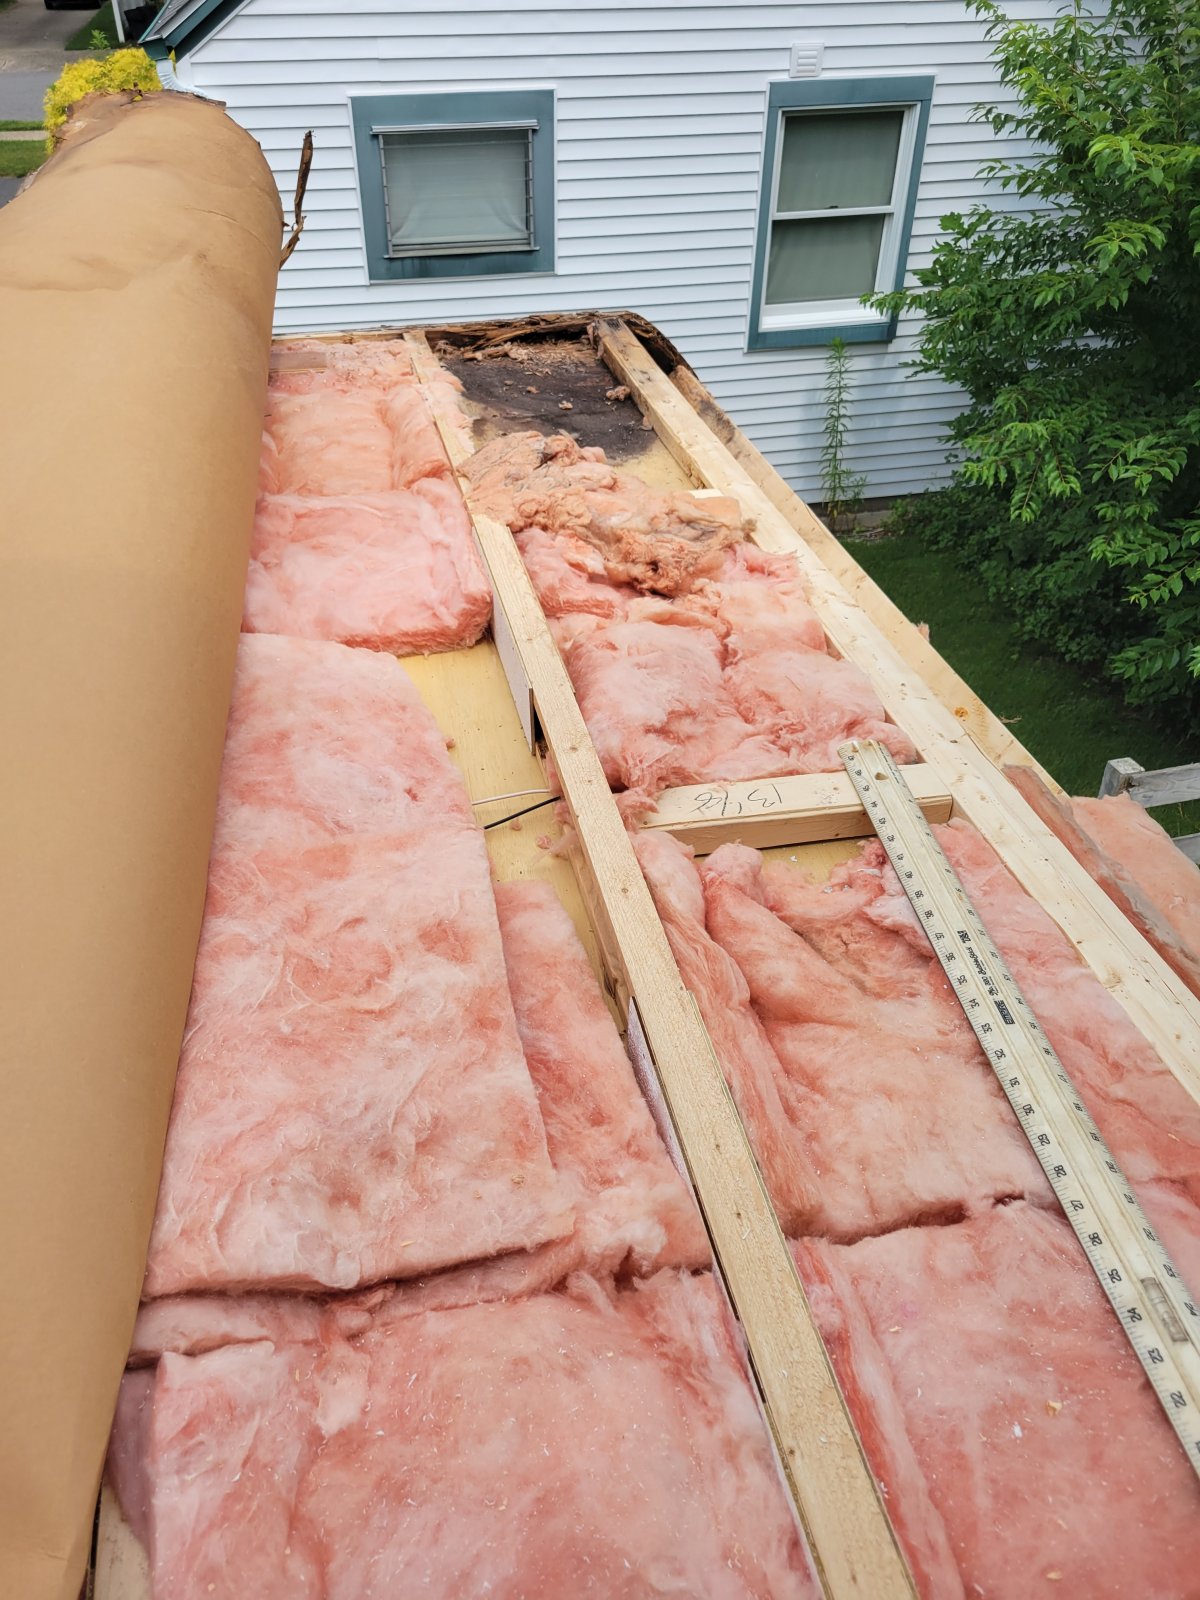
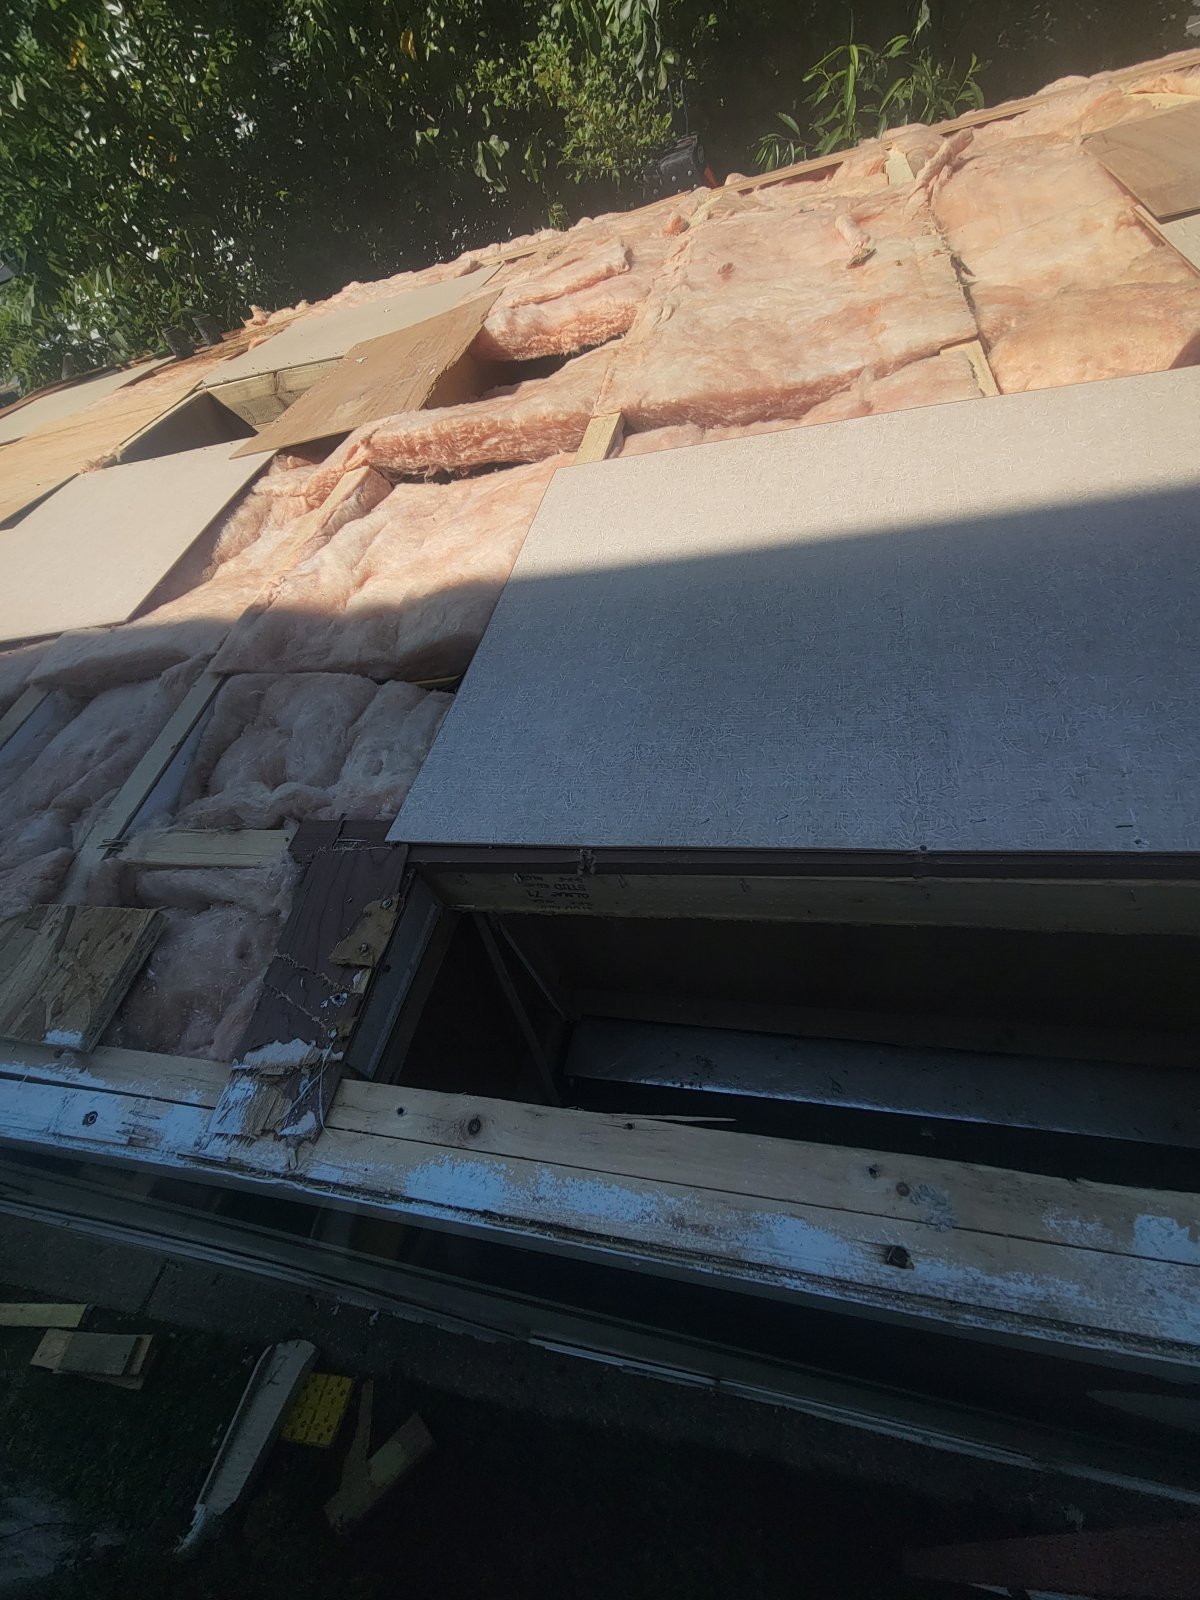
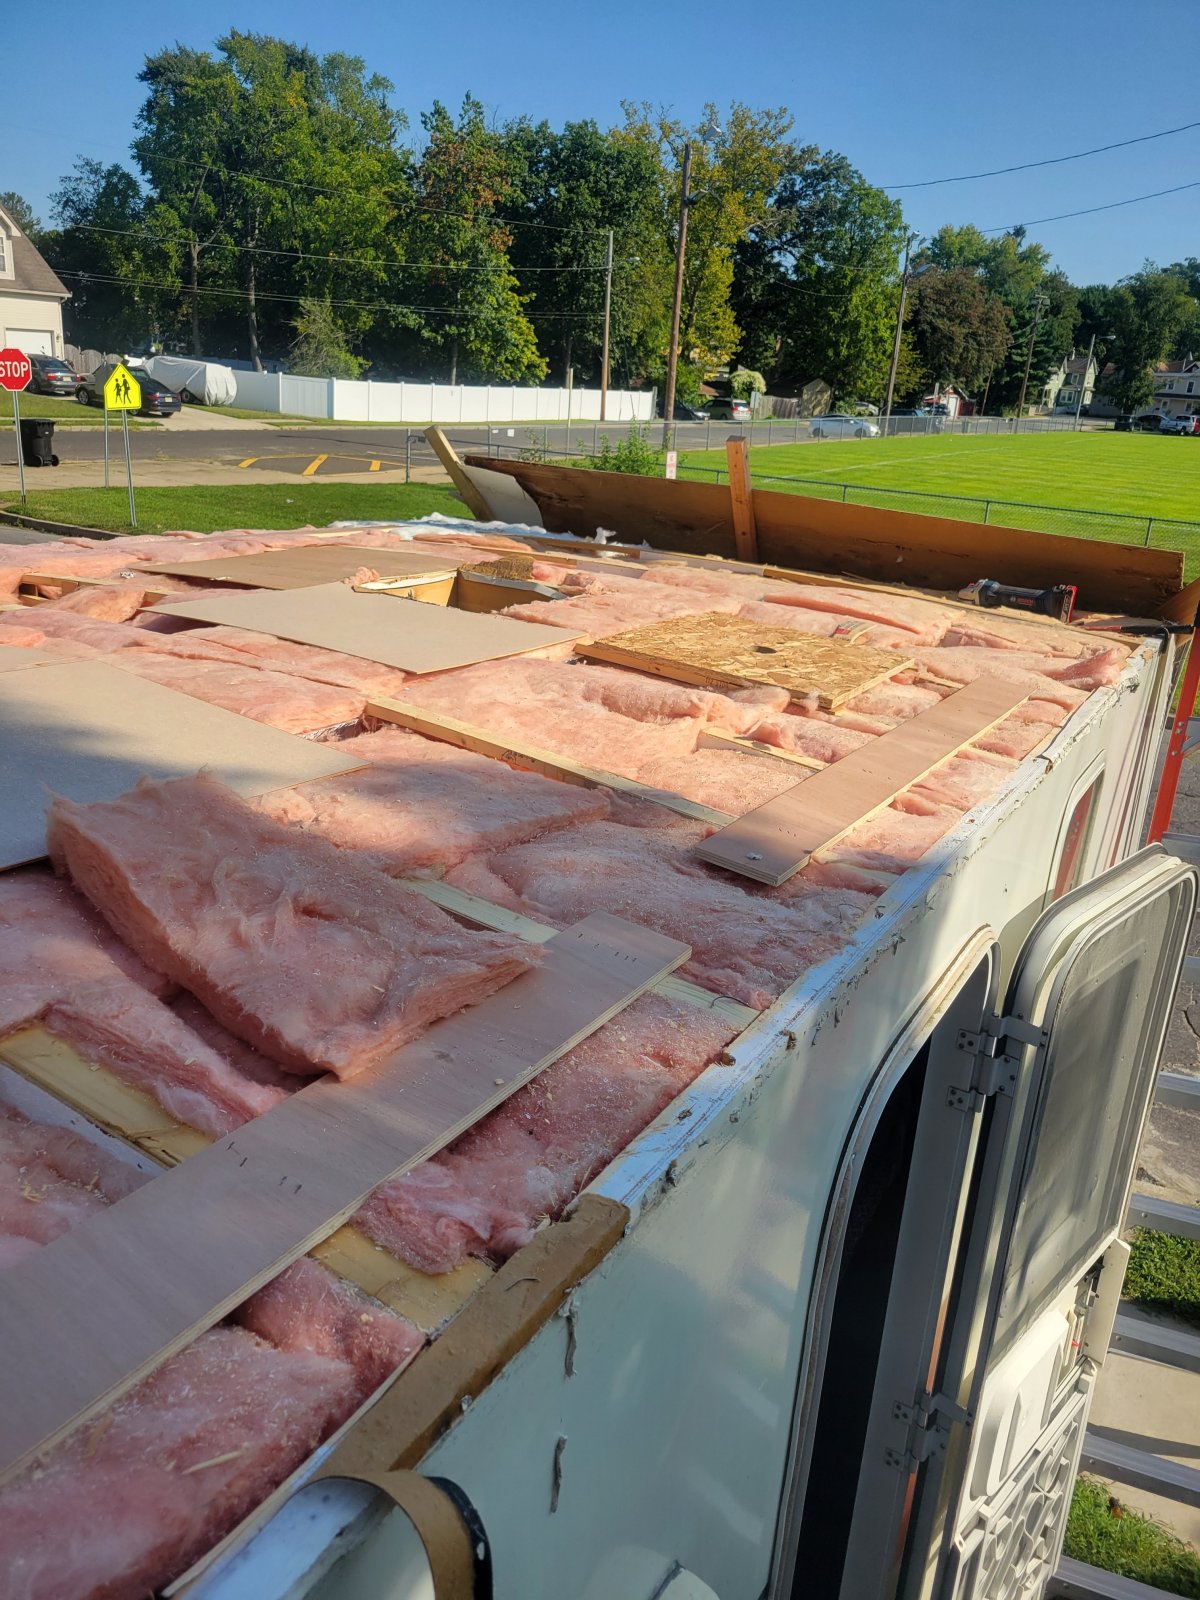
Here's what the roof looks like now. In this picture, I have the EPDM folded back and you can see the plastic I used to replace the bud board. If you look closely you can see the glue residue but there's no trace of bud board or EPDM. This is what makes me think that the glue failed.
This is a close-up look at the plastic. You can see that the EPDM worked its way out from under the Cap molding but ripped about 8-10 inches from the passenger side. The driver's side looks about the same

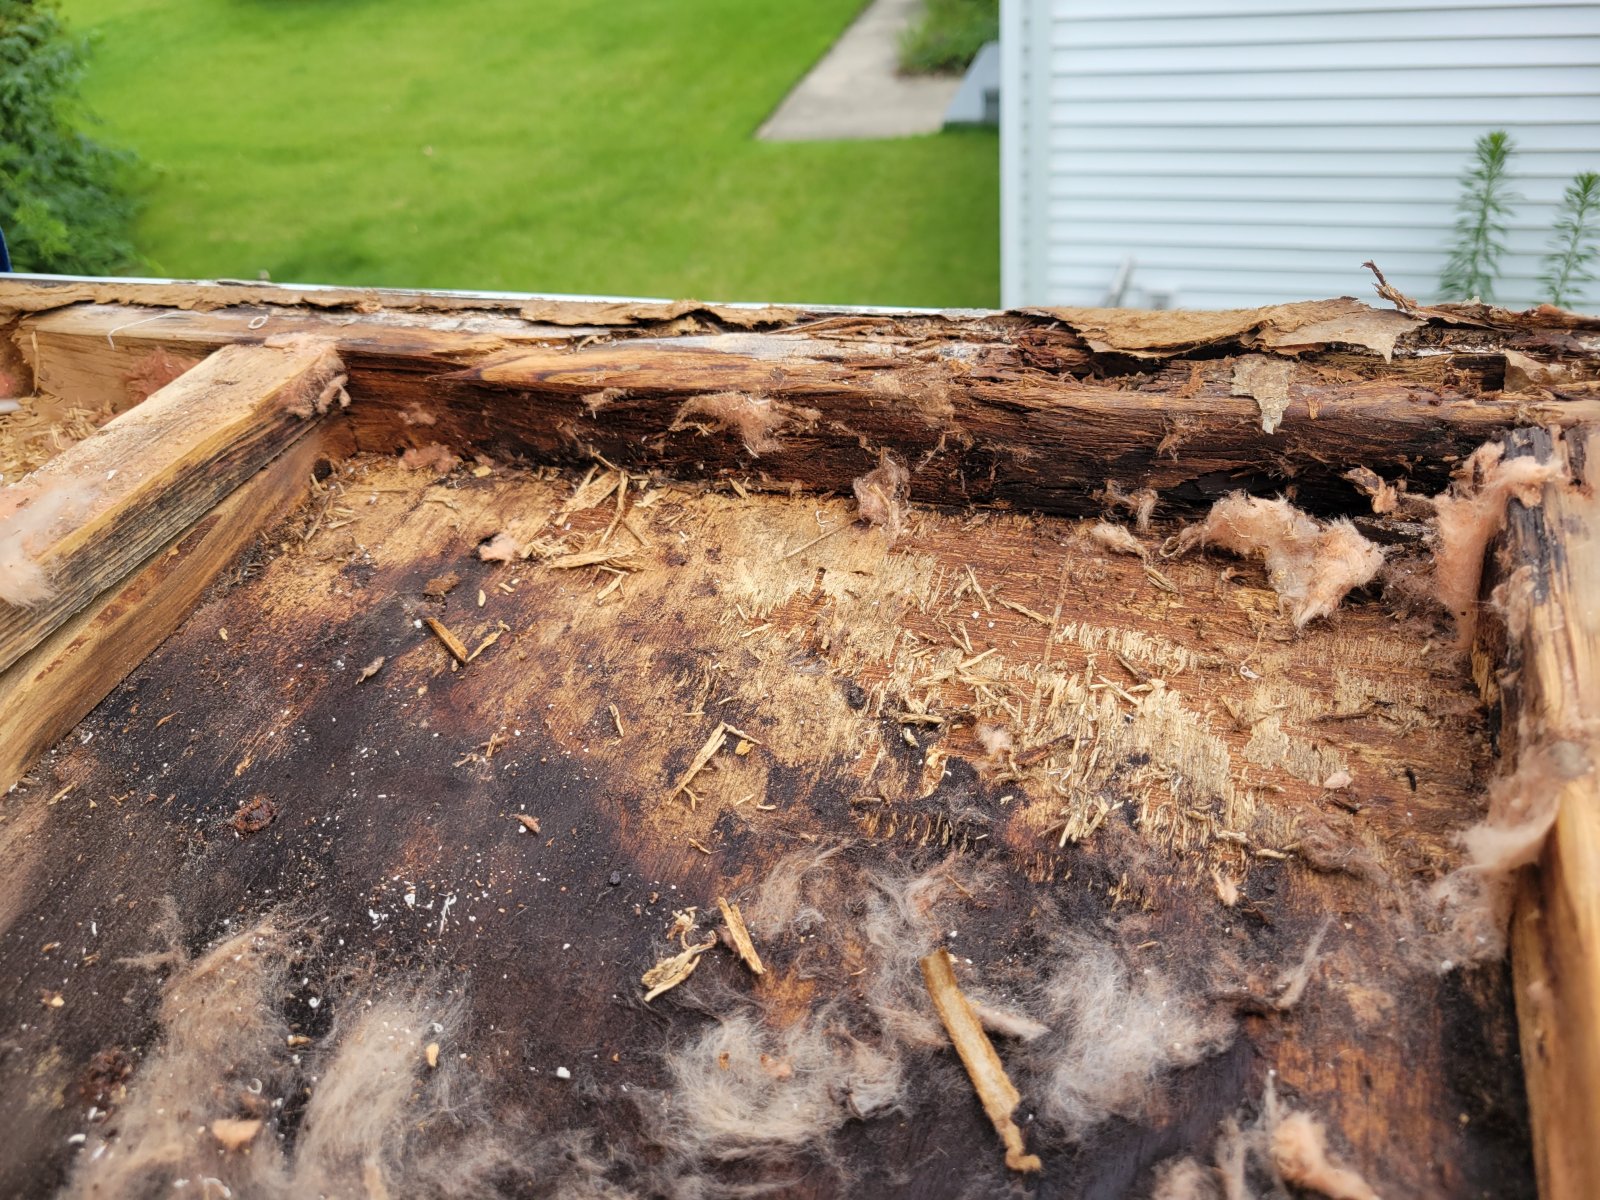
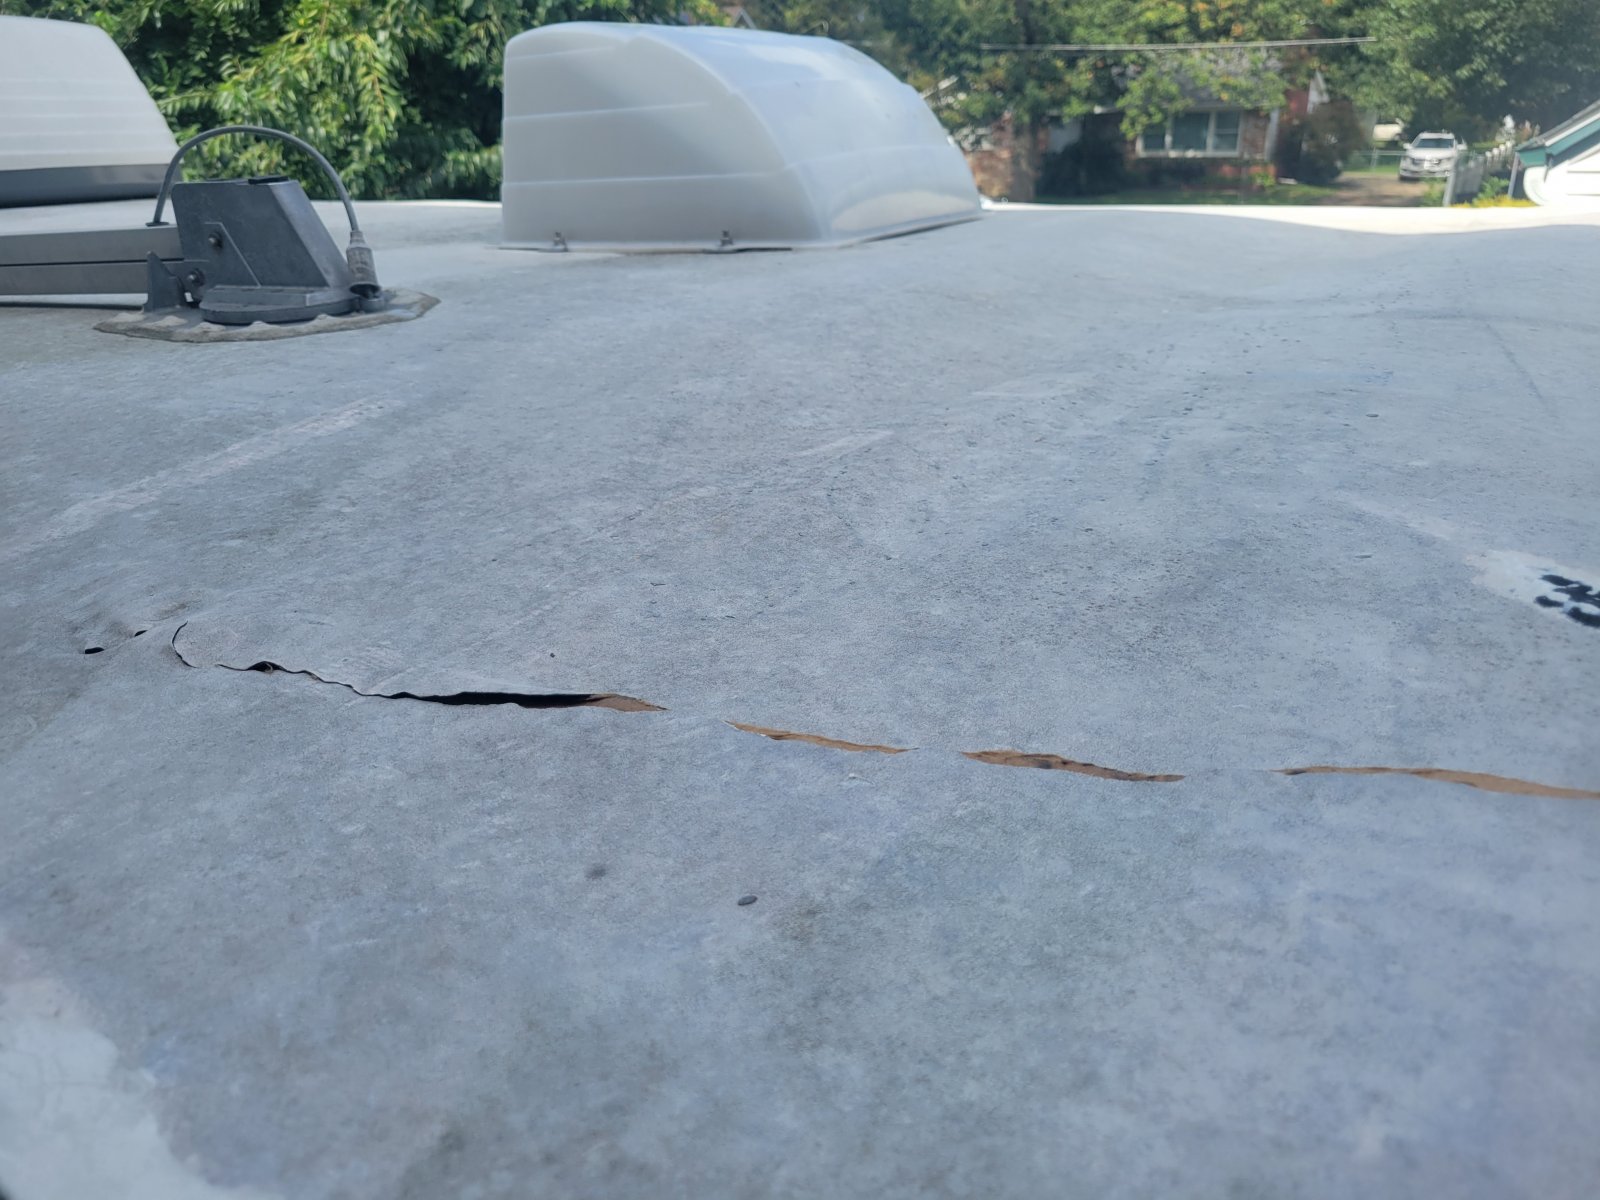
You can see along the first rafter. This is where the bud board and the plastic met after the first repair. In this picture, you can also see the rip about 10-12 inches on the driver's side.
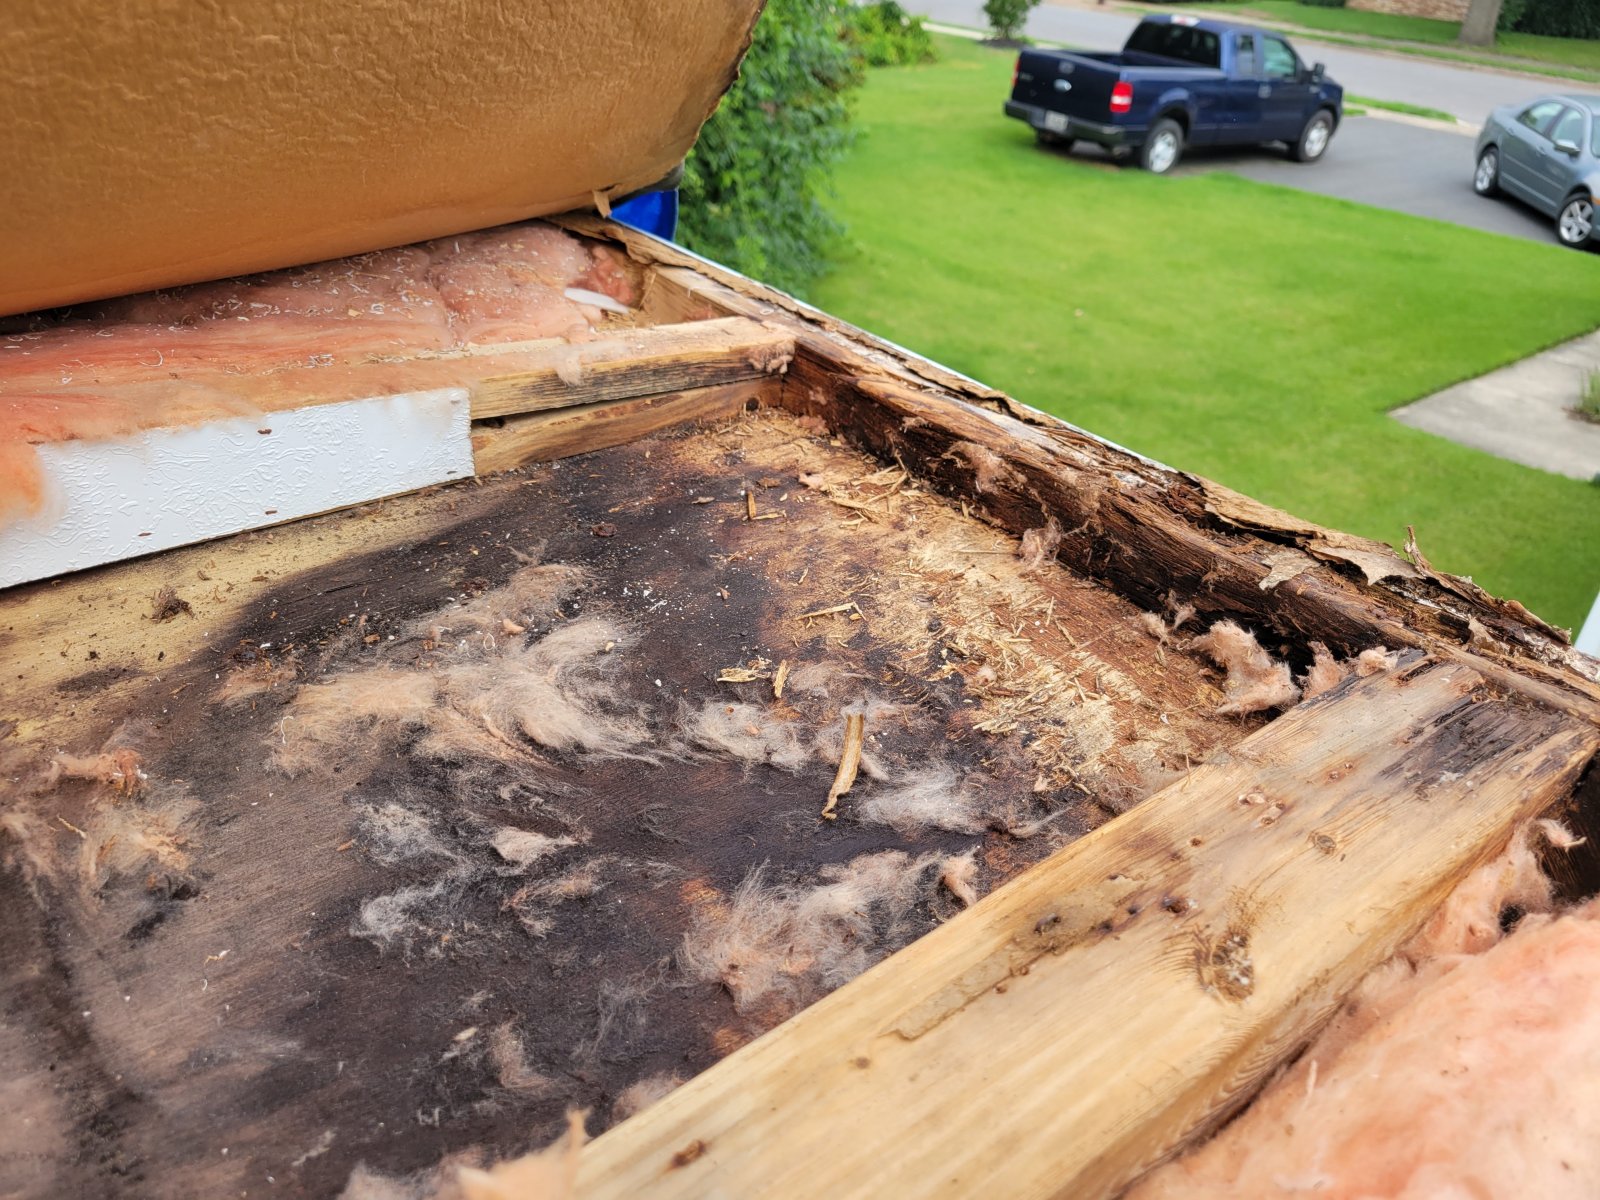
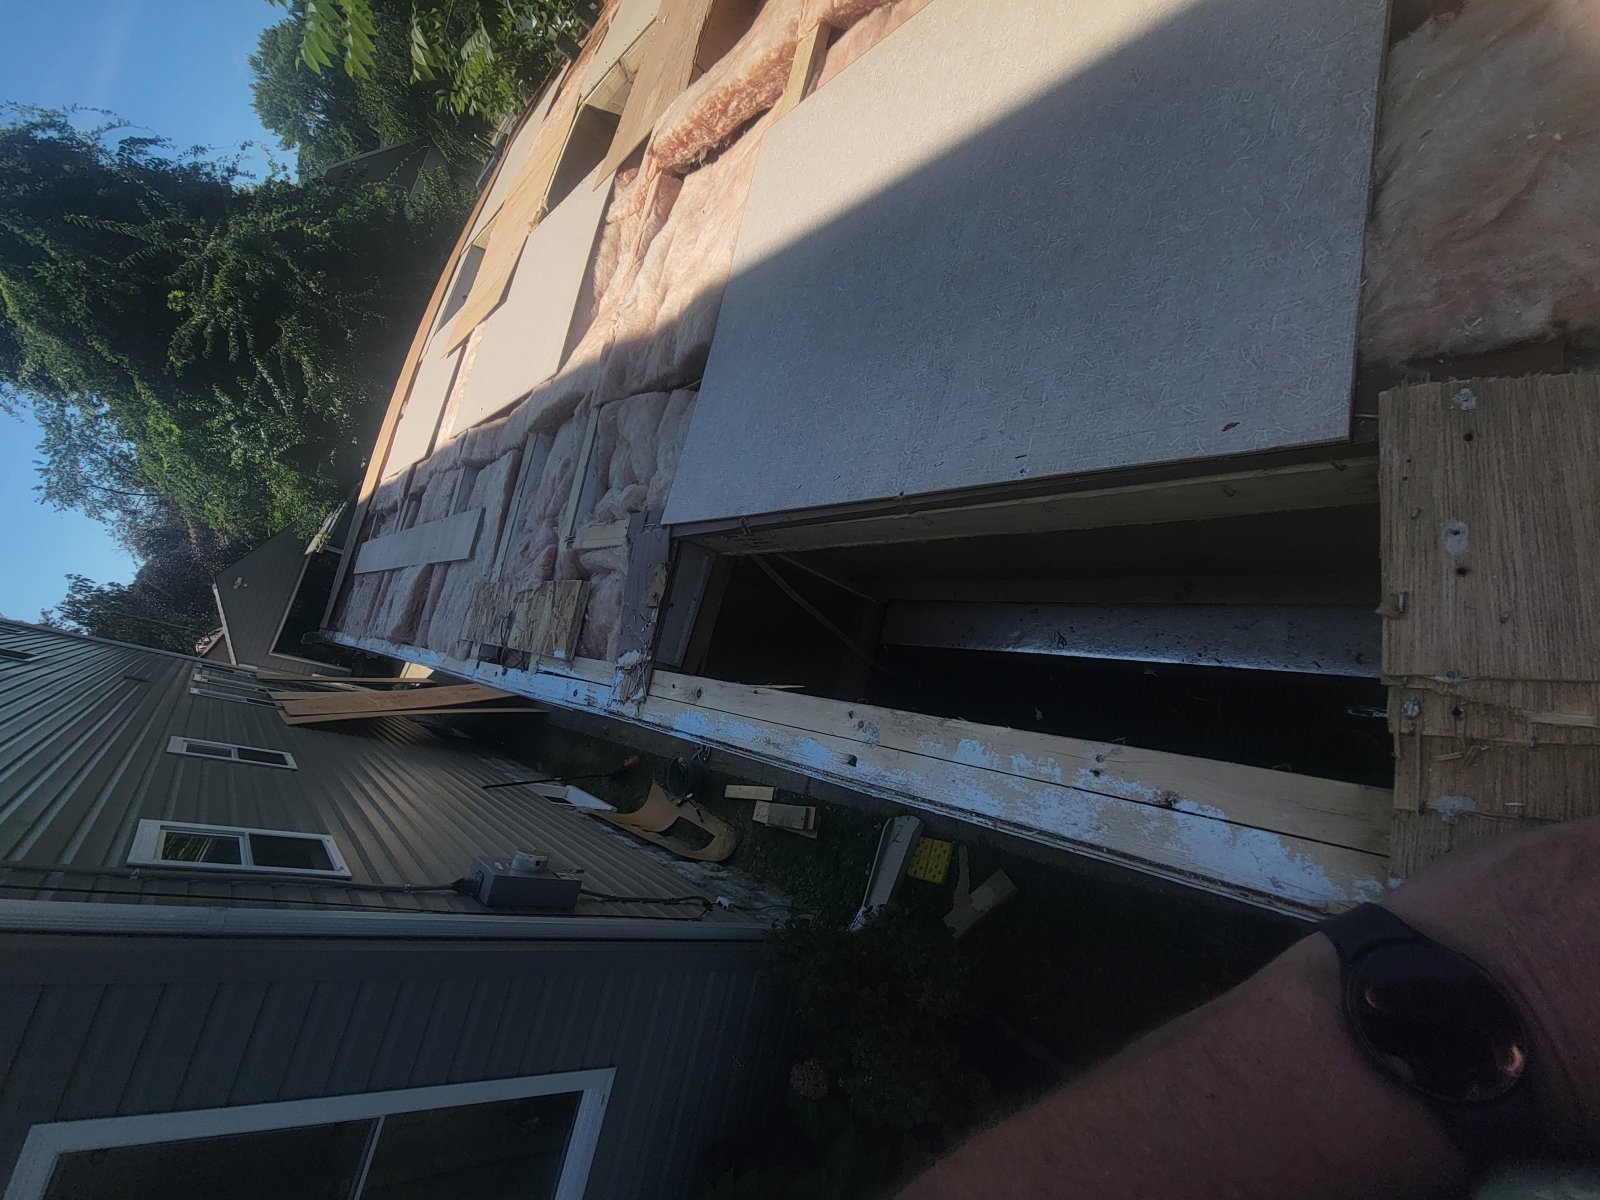
Passenger side corner.
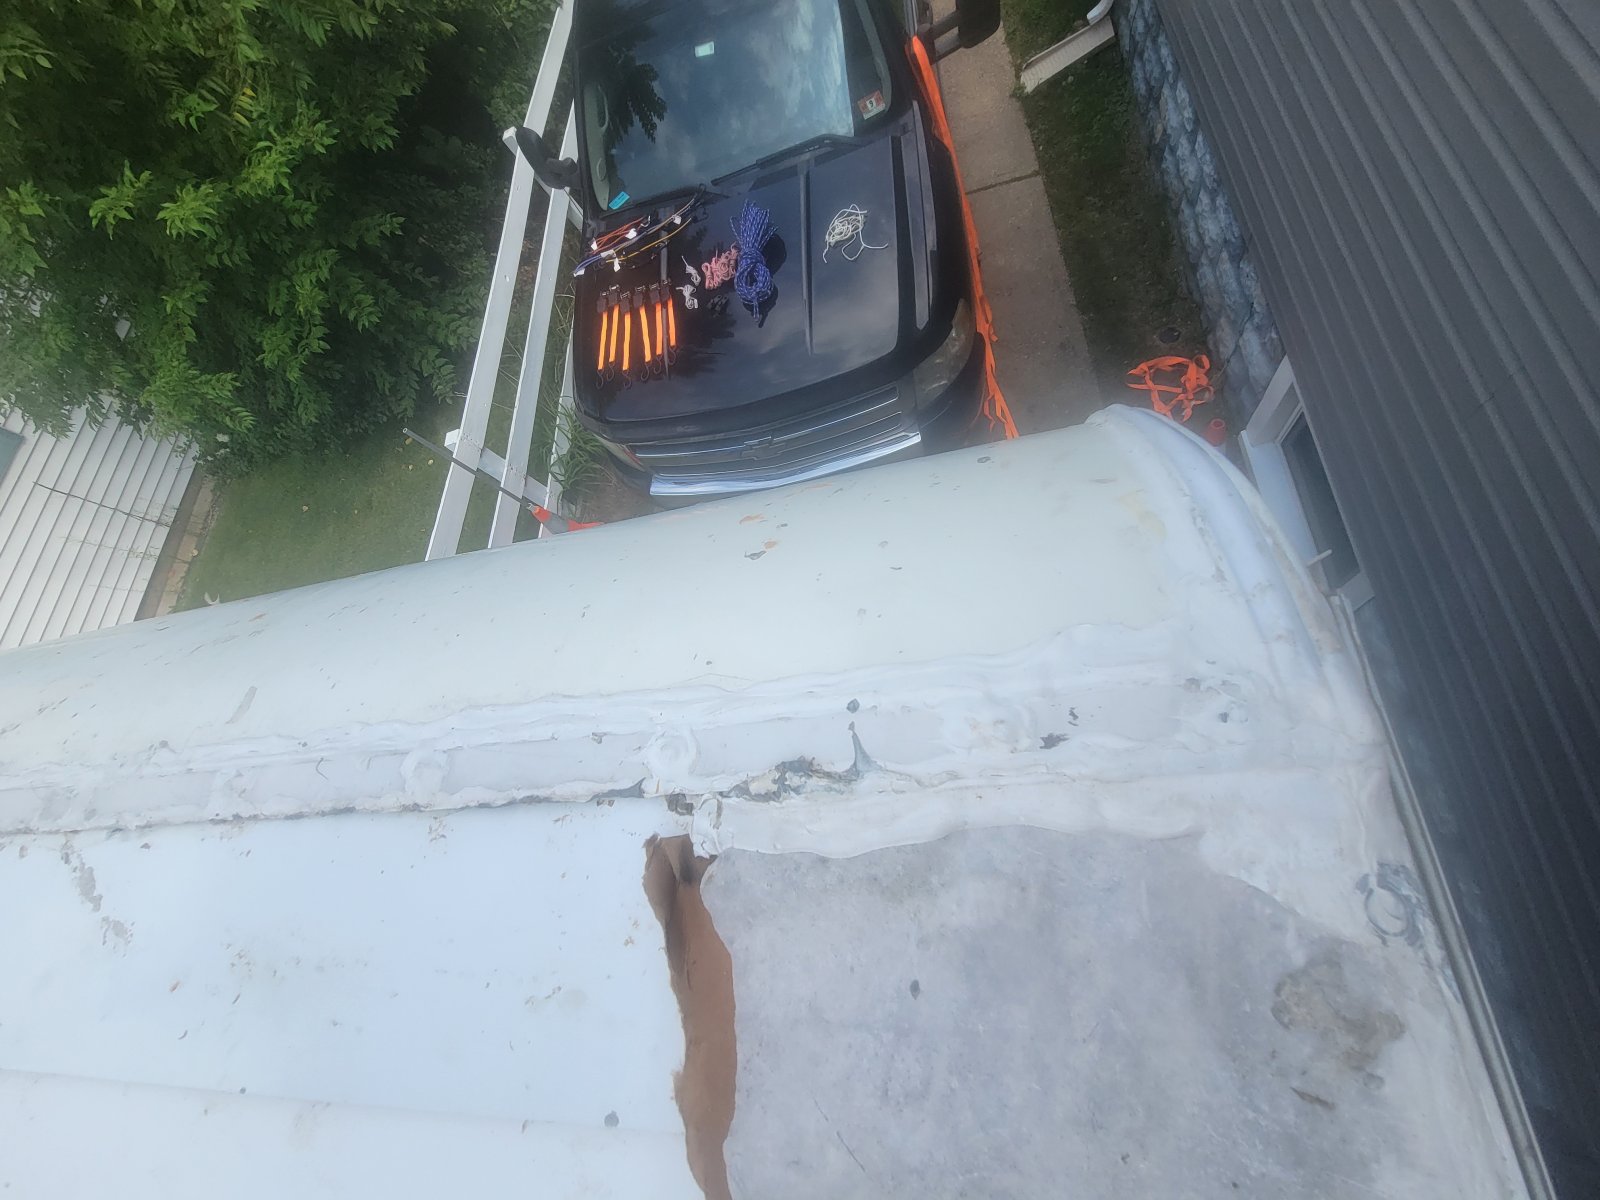
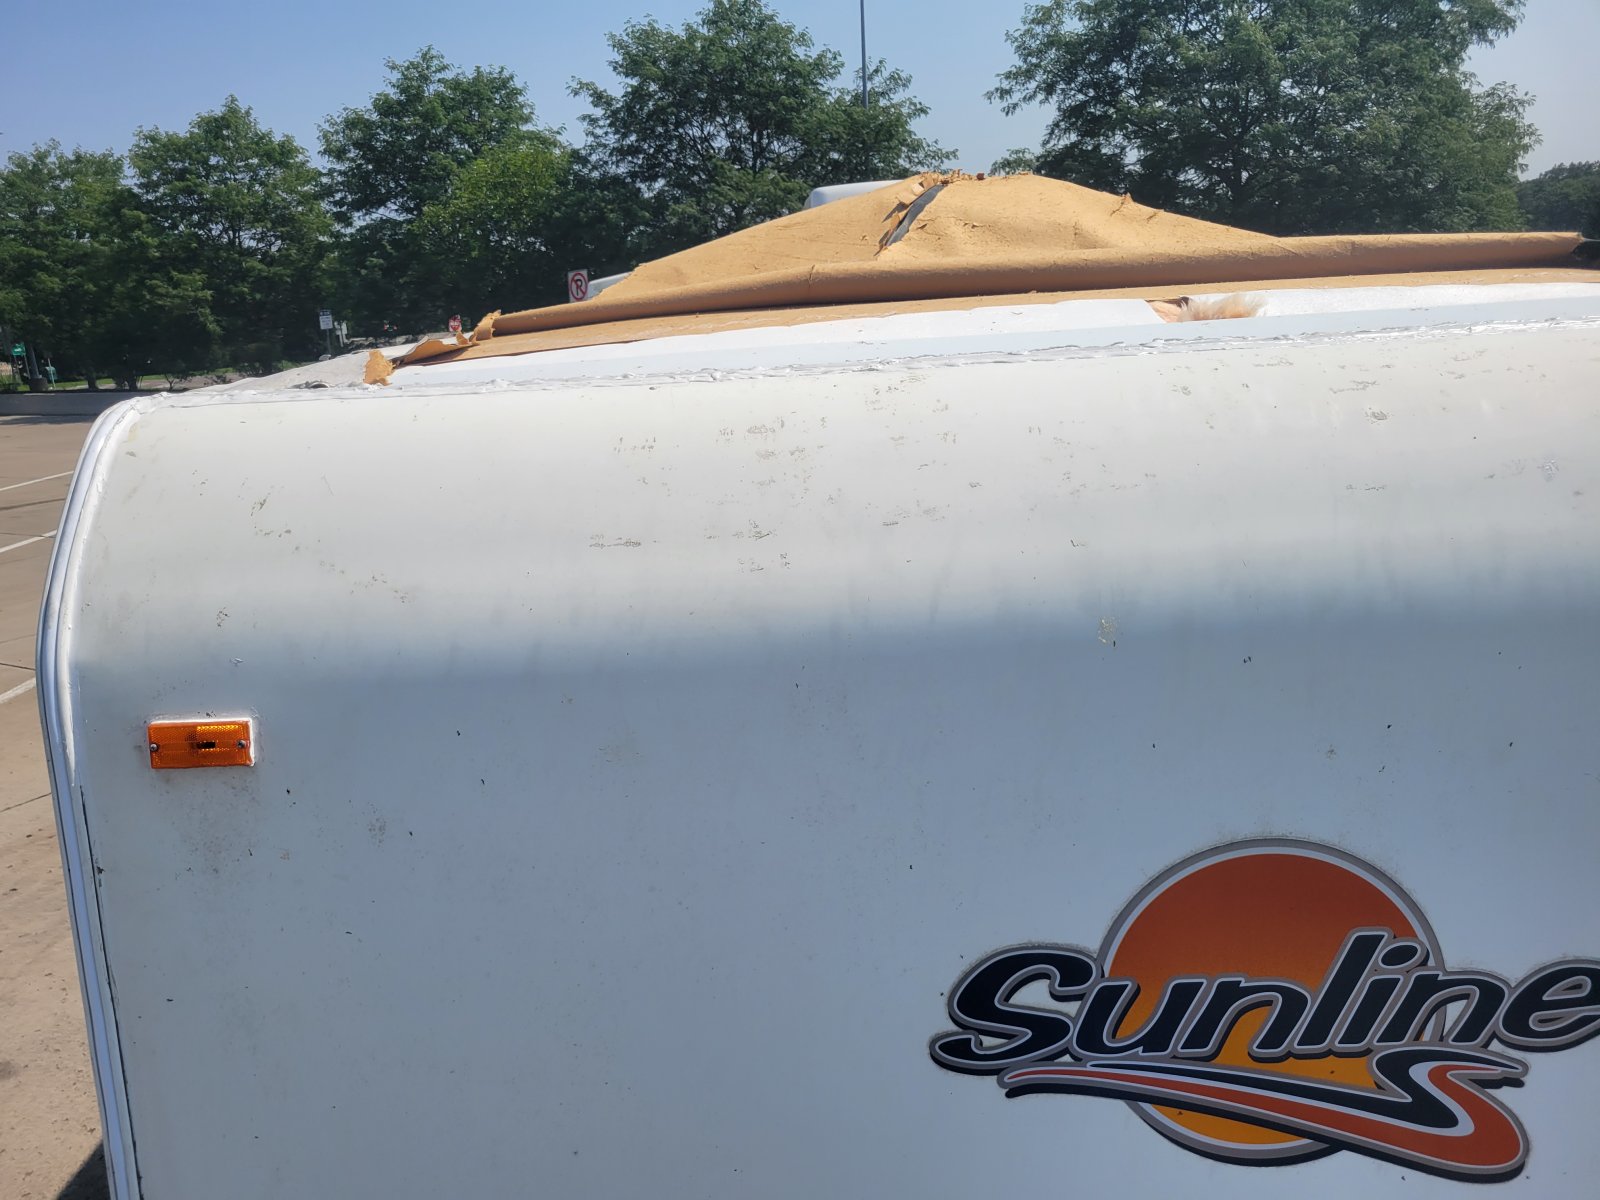
Along the front of the trailer with the cap molding. You can see where the EPDM pulled out from under it
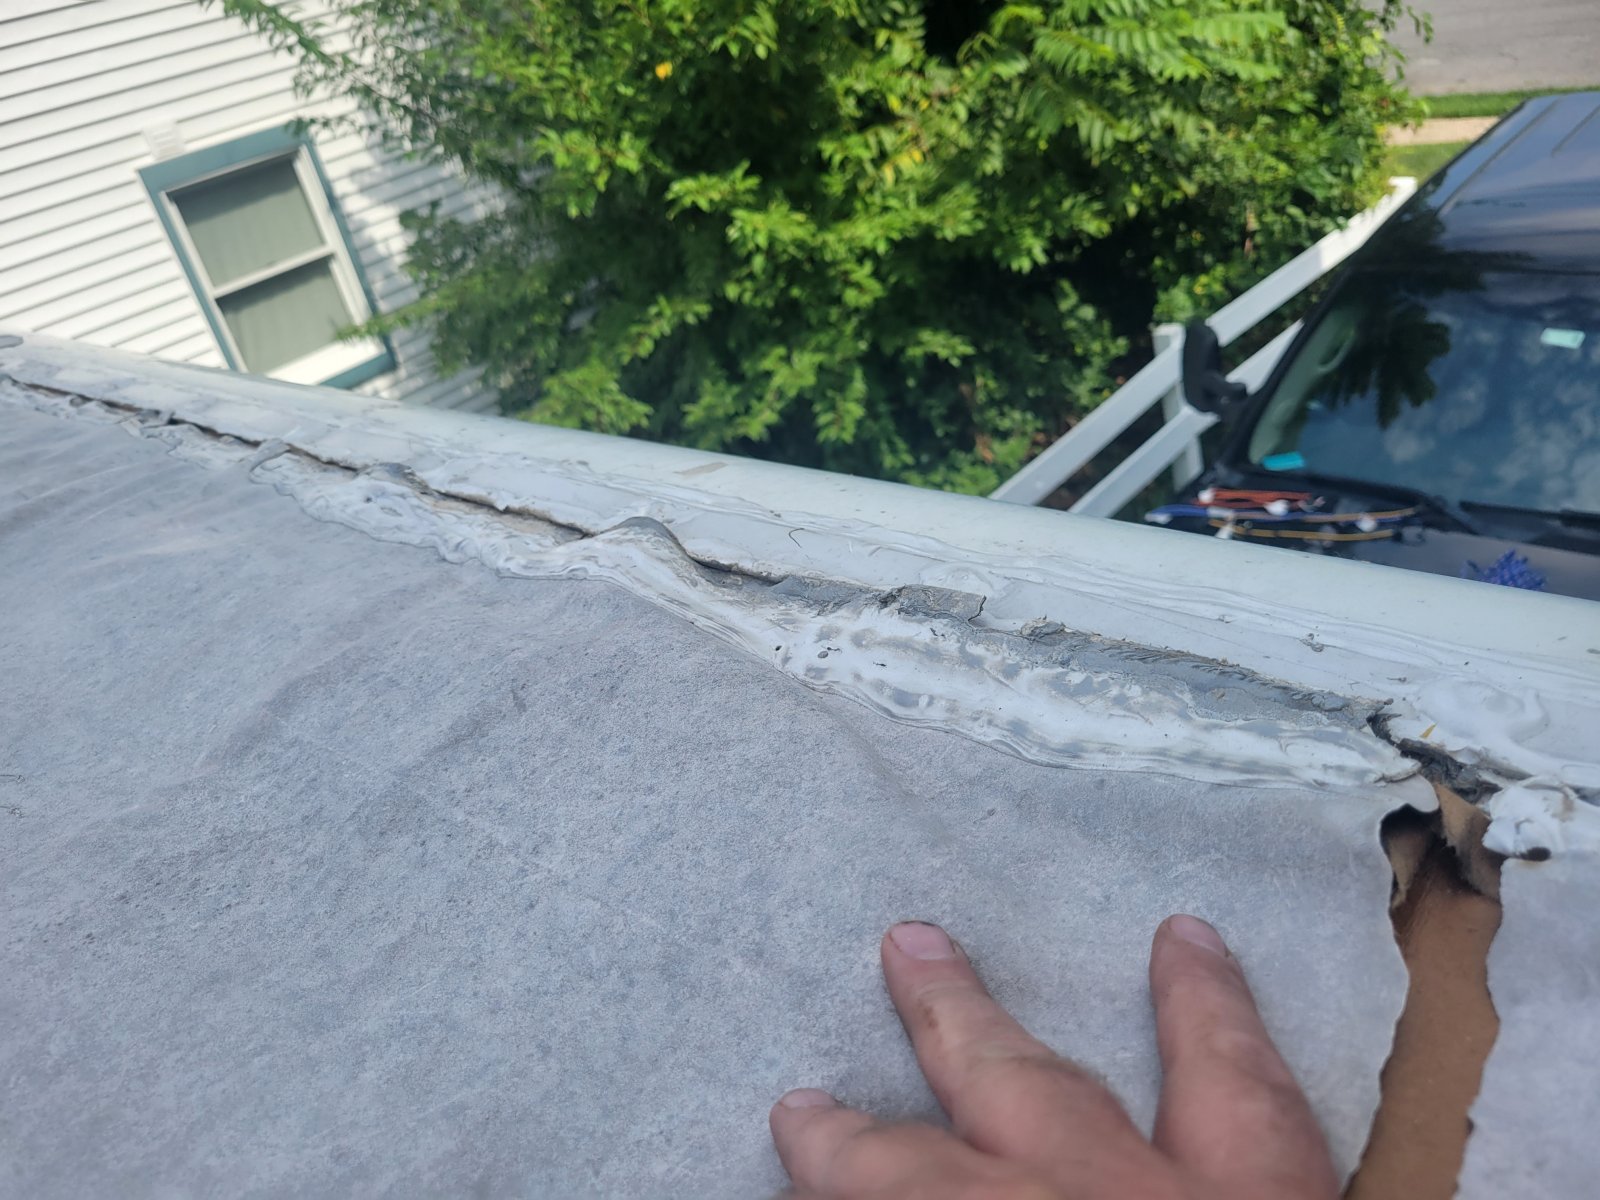
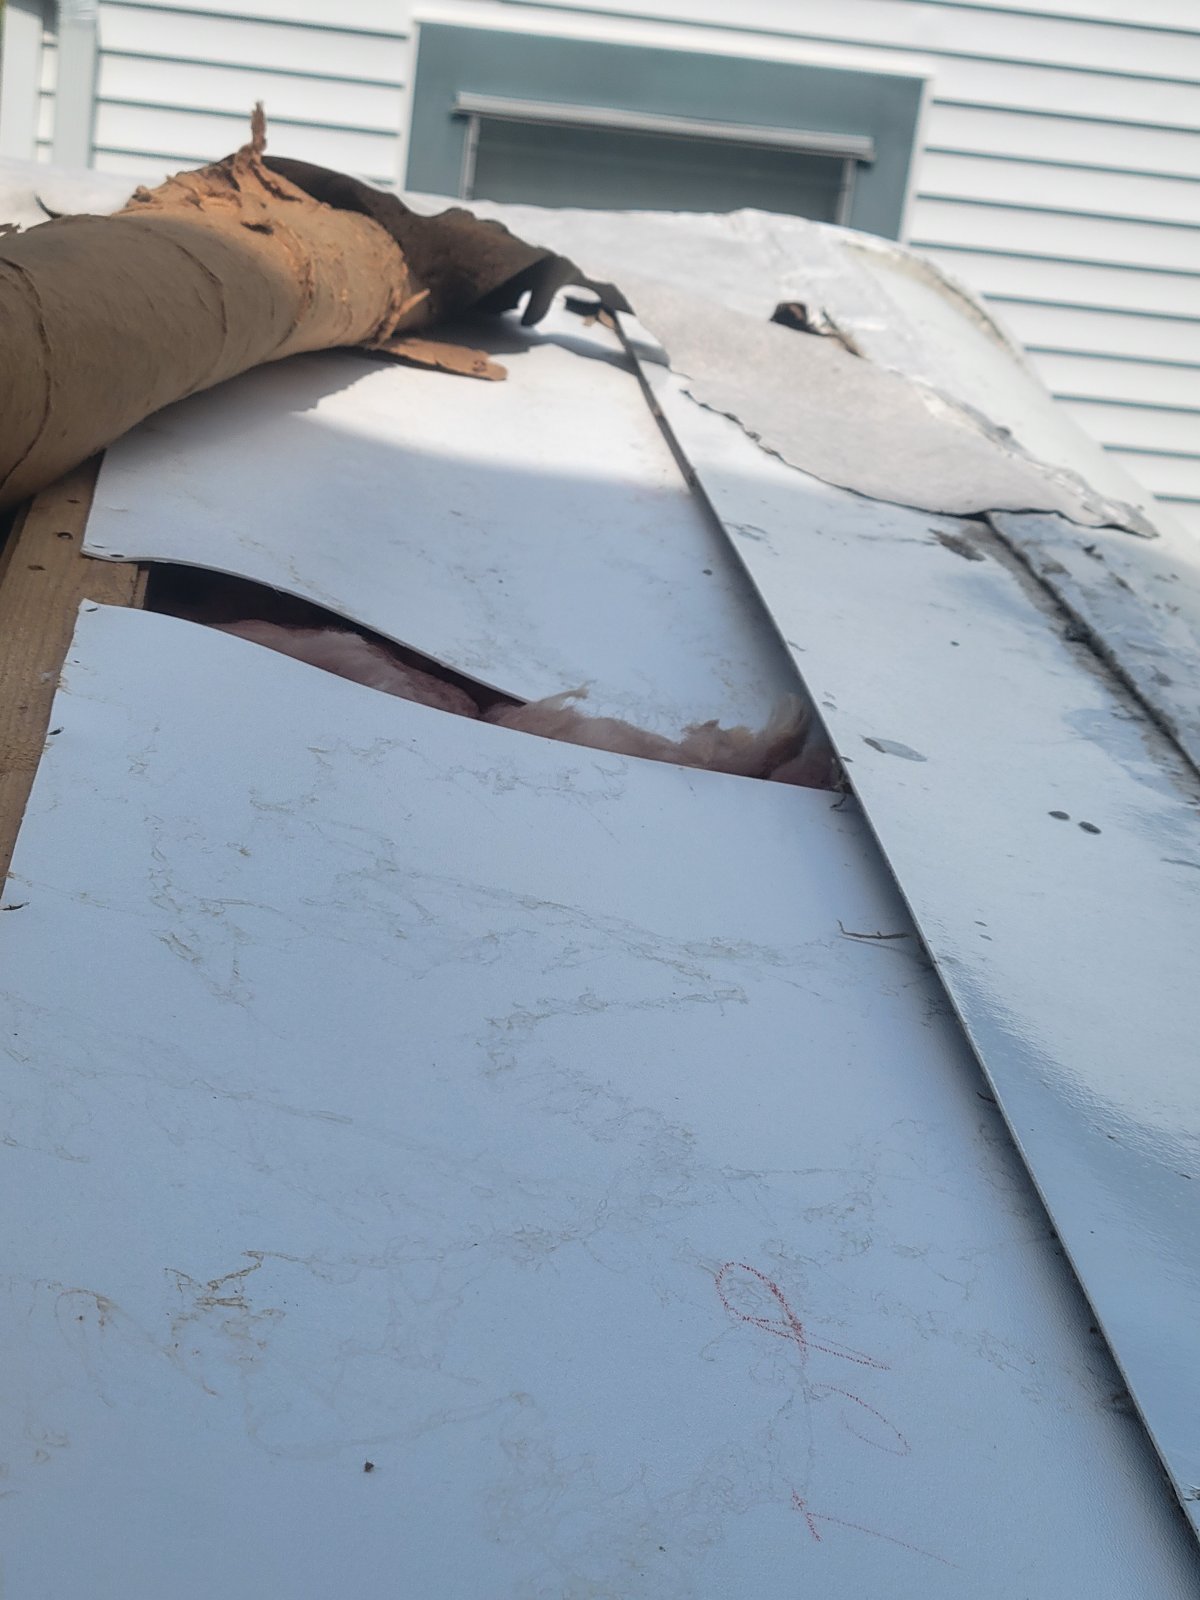
Close up picture of where the EPDM rippled on the passenger side.

You can see here that the roof is ripped just about back to the vent. 8-10 inches from the side.
I think that answers the questions you had (and one of my own). From here I'm hoping we can figure out how to do the repair, properly this time 
Please let me know if I can provide any additional information. Thanks for looking!
Bob L.
__________________
|
|
|
|
|
08-31-2023, 08:49 AM
|
#4
|
|
Moderator
Join Date: Nov 2006
Location: Ohio
Posts: 12,656
SUN #89
|
Hi Bob,
I made it back home, have a good internet connection and I am now in catch up mode. I can see your pics clearly. Good job on the Pics.
Here is what I see that most likley happened. You picked the wrong substrate (plastic), the plastic was not mounted well, and the wrong glue used to create the repair.
The plastic is a problem as certain plastics have what they call a low energy surface and glues will not bond to them unless you treat the surface to raise the surface energy. There is science in this and I had to deal with it at work getting adhesives to bond to polypropylene. The glue also has to work with the rubber, while there may be an adhesives that might have worked with the plastic, there is then the rubber.
The front wall can take a wind beating. The plastic sheets mounted in the way you did allows then to bellow, this is not stiff enough and allows the membrane to flex a lot.
The glue, in this case the glue has to be able to bond to the rubber and the substrate and have ample strength to not crack. They do make adhesives that works with the rubber, TPO or PVC RV roof membranes, I have used two different brands of this membrane glue, both need a porous substrate to bond too. The glue has to absorb into the substrate.
We all make mistakes, myself included, so no worries there. It looks like you have the tools to do this repair and it is repairable. Two summers ago, I helped a friend deal with a similar situation, it was on a 2006 T-276SR with the aluminum siding. Just, this issue was on the back wall and not the front. They had some other friends try and help them, and they not knowing, used a sheet rock knife and made a huge cut and cut the back 5 feet of the roof membrane out thinking a whole new roof was going to be installed which was not in the owners budget. It ended up almost like what you have now, just a different way how it got there.
Now what to do? You sort of have two choices, do a complete re-roof, or do a partial re-roof. You tell me what you want to do. I do not know the condition of the rest of the roof or the attics condition. Doing a total re-roof opens up all areas and you can see and treat any water damage. The new roof, properly maintained, can last the entire life of the camper. I do this when I am restoring an older camper.
The partial repair can be made, but it is more involved then what you did the first time. And sadly you have a TV antenna right in the way of the repair. This is not a show stopper, it will just take more time to work through it. This pic is what I am seeing.
It "appears" the ripped membrane is partly past the rafter at the front of the bedroom vent. The TV antenna looks to be mounted between the two rafters that support the roof vent. I cannot tell for sure as the pic is skewed. I need a pic looking more top down at the whole front of the roof. Post a pic with a view starting at the front seam back to the front of the roof AC unit looking more down on the roof. I can draw on your pic and show you what I have in mind on how to do this repair. The concept is to create a sound joint between the old roof and the new front roof. This will include new plywood with a new EPDM glued on membrane from the front wall seam back to the joint where we tie in the 2 roofs. That joint has to be sound and fully supported across the roof to hold the new roof molding at the joint. It will land on a rafter and we may have to add a sister rafter also.
The front of the roof tapers down to the front seam so there is slope for water run off. I suspect the joint will be at the back (rear side) of the bedroom roof vent. The front rafter at the roof vent has a lot going on there with the slope and trying to hold the plywood down.
I have pics of similar work on how to do this, but before I get into the heavy detail, want to make sure you want to go the repair verses full roof method. The repair method is not conventional and you may never get a RV dealer to even consider it as the time to do it is still a good amount versus a new roof.
I also notice the water damaged wood in your pics from the leak, I'm not sure if you treated that cieling board or the rafter etc. See this post on how I do the resin treatment to stop future dry rot and stiffen up the damaged wood. If you do not have any S1 resin consider getting some.
https://www.sunlineclub.com/forums/f...tml#post155103
Let me know what you want to do and we can get into it.
Hope this helps
John
__________________
Current Sunlines: 2004 T310SR, 2004 T1950, 2004 T2475, 2007 T2499, 2004 T317SR
Prior Sunlines: 2004 T2499 - Fern Blue
2005 Ford F350 Lariat, 6.8L V10 W/ 4.10 rear axle, CC, Short Bed, SRW. Reese HP trunnion bar hitch W/ HP DC
Google Custom Search For Sunline Owners Club
|
|
|
|
|
08-31-2023, 11:40 AM
|
#5
|
|
Junior Member
Join Date: Oct 2021
Location: New Jersey
Posts: 15
SUN #12992
|
Ur awesome JohnB! Thanks for getting back to me.
I didn't go into it, but I did repair the water damage the first time around with a combo of epoxy and Kills. I'm just glad it didn't rot all the way through!
We came to the same conclusion. Right idea, wrong material. I think the correct glue would have done it. The plastic had a glue side which we did put up, but I just didn't use the right stuff. Live and learn!
Originally we didn't want to do a whole roof repair, because of the lack of room to work, but we finally said, "what the heck" and we're doing the entire roof anyway. I think this is the right choice long term as the rest of the roof, although solid, is showing it's age. The previous owner didn't take care of it for sure.
I just picked up the 3/8" plywood and the roof kit, screws and other materials were delivered. Also managed to borrow 2 x 10' ladders. I have a crew of 3 to help out this weekend and think we're in pretty good shape.
I've been studying the "winter project" you did with your son as if it were a how to guide. I think I have a handle on what we need to do at least in theory.
Remove everything on the top and sides
Clean up and repair anything that's bad (hope there's not too much but suspect I'll find something around the skylight)
Put the plywood on
cut out the holes
use the right glue AND the right amount! to glue on the roof
Get rid of the air bubbles!
Cut where the holes are in X formation. Punch the corners
Put everything back.
Caulk caulk and maybe even some caulk
Not quite that simple I know but that Winter project is "how to" gold!
Two questions on the process.
I know I read somewhere how to remove the awning without it becoming unwound but darned if I can find it. Can you remind me on that?
Most of the cut outs (Air vents, ACs, etc) are easy to do as they can be located and marked from the inside. Any tips on accurately doing the water and refrigerator vents? If I don't cut the holes exact, how concerned do I need to be? How forgiving is the rubber roof?
I also recall seeing a post about how to carefully remove the very fragile skylight?
On the front of the trailer, I believe the order is wood, rubber roof, front siding then the front cap molding. Does that sound right?
OK. I can't count and I know that's more than 2. I Really appreciate your help John.
Bob L
__________________
|
|
|
|
|
08-31-2023, 04:13 PM
|
#6
|
|
Moderator
Join Date: Nov 2006
Location: Ohio
Posts: 12,656
SUN #89
|
Hi Bob,
I see you decided to go with the full walk on the roof. That is a good decision.
Before answering your last questions, I'll ask a few of you and then create answers to yours and some you have not yet asked. Now that I know you are going with a full walk-on re-roof, I have extra things I learned after that Winter Project post I'm willing to pass along. With each re-roof I have done, I have learned more things that Sunline did and easier ways to overcome them, and "watch-outs for this" that I am willing to share to help give you options for the weekend's work. But I need your information to know what you have regarding materials.
Please answer these questions:
1. What brand and type of roof membrane did you get? EPDM, TPO, PVC, or other. And if EPDM is it the 40 mil RV EPDM or the 60 mil thick commercial roofing?
2. What brand and type of glue did you get?
3. You mentioned a roof kit. Is there any chance you can link me to the kit? Or tell me the contents or a picture etc? Many of these roof kits do not include everything needed for a total roof job; they supply the materials to put the membrane down and caulk the perimeter. I want to make sure you have all the materials.
4. I'm assuming you are doing the roof gluing process outside, open to the clear blue sky, yes/no? There is a heads up on this for gluing being done outside in the sun versus inside a closed building. And which membrane you use can make it worse.
5. Are you trying to reuse these items, or have you bought them all new:
-The fridge vent
-The crank-up roof vents
-The black and gray tank vents
-The shower dome
Thanks, I'll be back later to type more.
John
__________________
Current Sunlines: 2004 T310SR, 2004 T1950, 2004 T2475, 2007 T2499, 2004 T317SR
Prior Sunlines: 2004 T2499 - Fern Blue
2005 Ford F350 Lariat, 6.8L V10 W/ 4.10 rear axle, CC, Short Bed, SRW. Reese HP trunnion bar hitch W/ HP DC
Google Custom Search For Sunline Owners Club
|
|
|
|
|
08-31-2023, 07:49 PM
|
#7
|
|
Junior Member
Join Date: Oct 2021
Location: New Jersey
Posts: 15
SUN #12992
|
Hey again. Here's the answer to your questions so far
1) After a bunch of research I went with EPDM from ClassACustoms. I was a little leary of the single ply .90mm but the reviews from other sites I've haunted seem to be pretty good.
https://www.classacustoms.com/Class-...Kit_p_511.html
The kit comes with Hengs 4 tubes of caulk 2 rolls of tape, and 2 gallons of ClassACustom's glue. I think I'll be OK with the amount of glue but know I'll need more caulk. I have another role of butal. Another question I just thought of? Can I mix the Heng and Dicor? ( I have a few tubes of Dicor level and non-leveling left over from the original repair). I also plan to do your "gutter hack"
4) Yes outside and partially shaded. Nice maple and the house blocks most of the direct sunline up till about 1PM this time of year. Temps are supposed to be in the low 80's the next 2 days with 70% humidity. Sunday up to 91 and 75% humidity (not that the weather person can ever accurately predict that far ahead  ).
Good to know about the dangers of the glue in the sun. Please tell me more.
5)
-Reuse The fridge vent
-Replaced earlier this year The crank-up roof vents
-Reuse The black and gray tank vents
-Afraid to even look at The shower dome
The items I'm reusing are in good shape and were removed and reattached during the original repair.
Think that's it for now. Look forward to hearing from ya!
Bob L.
__________________
|
|
|
|
|
09-01-2023, 01:58 PM
|
#8
|
|
Moderator
Join Date: Nov 2006
Location: Ohio
Posts: 12,656
SUN #89
|
Quote:
Originally Posted by Rlanger
I just picked up the 3/8" plywood and the roof kit, screws and other materials were delivered. Also managed to borrow 2 x 10' ladders. I have a crew of 3 to help out this weekend and think we're in pretty good shape.
I've been studying the "winter project" you did with your son as if it were a how to guide. I think I have a handle on what we need to do at least in theory.
Remove everything on the top and sides
Clean up and repair anything that's bad (hope there's not too much but suspect I'll find something around the skylight)
Put the plywood on
cut out the holes
use the right glue AND the right amount! to glue on the roof
Get rid of the air bubbles!
Cut where the holes are in X formation. Punch the corners
Put everything back.
Caulk caulk and maybe even some caulk
Not quite that simple I know but that Winter project is "how to" gold!
Two questions on the process.
I know I read somewhere how to remove the awning without it becoming unwound but darned if I can find it. Can you remind me on that?
Most of the cut outs (Air vents, ACs, etc) are easy to do as they can be located and marked from the inside. Any tips on accurately doing the water and refrigerator vents? If I don't cut the holes exact, how concerned do I need to be? How forgiving is the rubber roof?
I also recall seeing a post about how to carefully remove the very fragile skylight?
On the front of the trailer, I believe the order is wood, rubber roof, front siding then the front cap molding. Does that sound right?
OK. I can't count and I know that's more than 2. I Really appreciate your help John.
Bob L
|
Hi Bob,
OK, I'm going to do this in a few responses. I'll start with answers to these questions and then get into your last note and the "heads up" and "new and improved methods."
Let's start with taking the awning off. You will need to remove it to remove the gutter rail to do the roof job.
I am going to link you to another one of my restoration posts. The link will drop you in the middle of the long post dealing with awning. Scroll down a little, and the awning process will show up.
https://www.sunlineclub.com/forums/f...tml#post137475
Here are the basics:
- Find the 2, small (no 4 screws) screws in the gutter rail cord slot that holds the fabric from sliding fore and aft. Remove them. Look on top of the bottom of the gutter rail for these screws. I have found them on either side.
- Determine which direction you can walk off the entire awing with 2 or more people in one big assembly. Look at the gutter rail to see if the cord slot is opened up wider to let the fabric cord come out. Or, take a gutter spout off one end, and it will come out the end.
- Use soapy water and a paintbrush to soap up the entire length of the awning on the top side where the cord slot is. This is to lube up the fabric to come out easier of the cord slot. Get it good and juicy.
- Flip the awning tube latch to allow the awning to open up as you do with camping to open it. Loosen the awning arms' black knob and pop open the center arm snap. Leave the awning bottom still hooked to the camper at the is point. Open the awning about 4 to 6" and stop. This will give you some working room to not fight the awning butt up against the camper.
- One at a time, Hold the awning arm up, unhook the bottom of the awning arm, the big gray snap clip at the bottom, so the bottom of the arm is off the camper. HOLD up onto the awning arm as the awning tube will drop until the 4" to 6" of fabric stops it. While holding the arm, release and let the foot of the arm that was attached to the gray clip drop to the ground; lock in the extended foot so it is holding the weight of the awning tube up. Hang onto it. NOTE: I removed the bottom gray awning arm bracket in the linked pics as I was taking all the siding off. You do not have to remove that lower bracket.
- Have your helper unhook the other end and drop the foot to the ground. The awning roller should be loose to the camper with the slack of the 4 - 6" you deployed.
- Go up the ladder and remove the 2 lag screws on the arm attached to the gutter rail. Snap the loose arm into the main awning arm. Do both ends. Heads up! There is nothing now holding the awning arms to the camper. The fabric is in the gutter cord slot.
- Both helpers need to communicate who is starting to go first. Give the awning arm up high a good yank in the direction you want to walk off the awning. Walk out the awning totally from the camper. HEADS UP: Do not let go of the awning arms until the awning is stored safely on the ground. The spring is still acting on the arms. NOTE: Sometimes the awning fabric flys out of the cord slot, other times it is dirt stuff bad and takes a few yanks to get it to start moving. If you are walking it off and it gets tight, stop and see what is binding so you do not rip the fabric.
- Find a location where you can set the entire awing down on the ground so the arms are laying flat on the ground. See pic HEADS UP; while the roller tube latch end arm is held by the tube latch, the non-latch arm is under spring tension trying to move the arm or the tube. The arm is long enough to hold the spring tension; just keep the arm 90 deg to the awning tube.

To this question:
Quote:
|
Most of the cut outs (Air vents, ACs, etc) are easy to do as they can be located and marked from the inside. Any tips on accurately doing the water and refrigerator vents? If I don't cut the holes exact, how concerned do I need to be? How forgiving is the rubber roof?
|
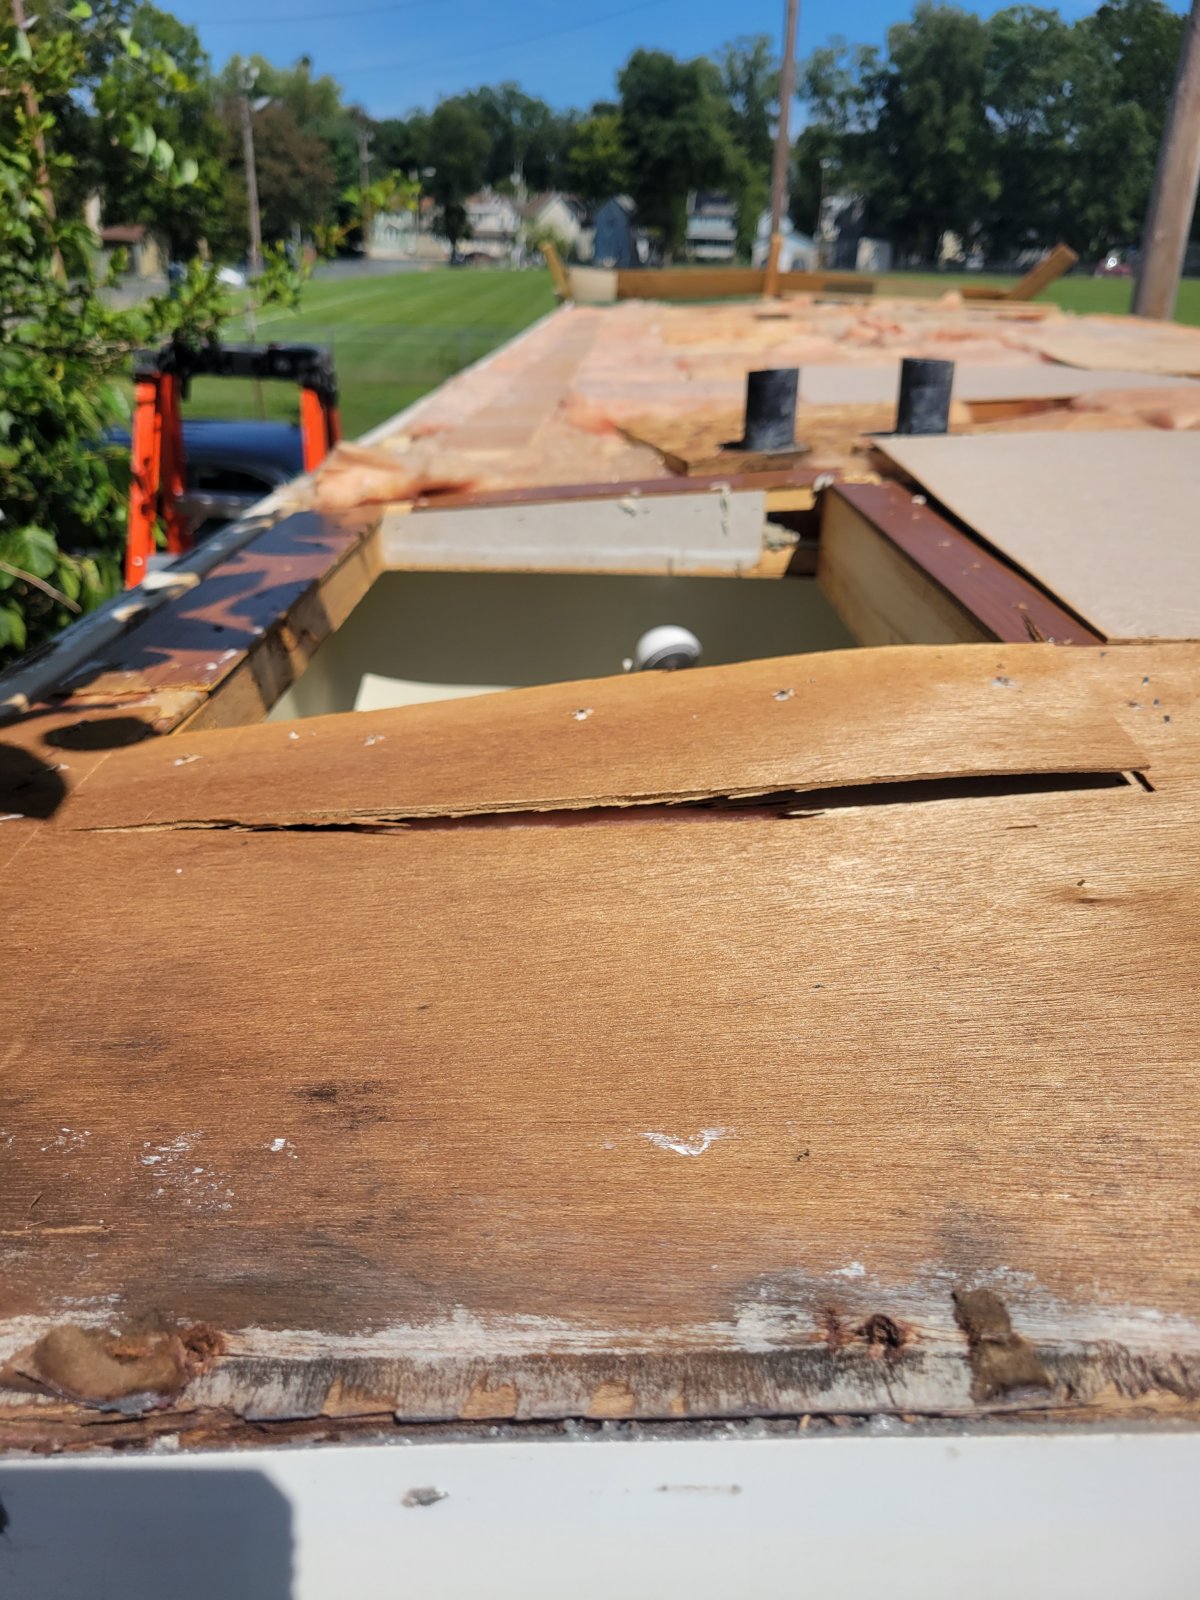
I have changed the way I do the roof decking cutouts. Too much work trying to figure out how to get the 14 x 14 vent holes, the AC hole, the shower dome hole, or the fridge hole. You can still do it like shown in the Winter project post: make holes 2" smaller than the opening and then cut to fit in place OR try this approach.
- You "must" put cardboard or other covering inside the camper over the 14 x 14 openings. I use cardboard and use the 4 screws that held up the plastic vent surround to hold the cardboard to the ceiling. This will keep all the sawdust and dirt out of the camper
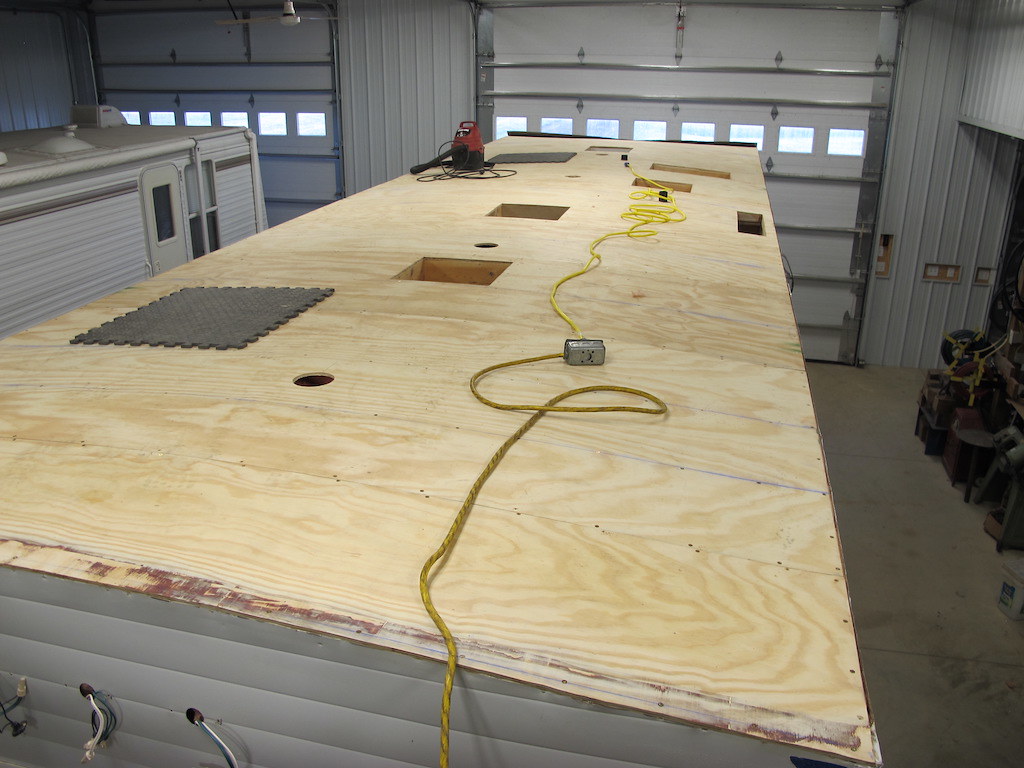
- I put the decking on with no cutouts. Screw it in place.
- I then cut out the openings. I drilled a 1/2" etc. hole in the 14 x 14 opening. You can figure out where to put the starter hole in a big target. I then use a router with a 3/8" straight shank cutter and the roller bearing on the end. Then route out the opening perfectly to the attic rafter opening. The router makes a mega saw chip mess but is fast and a perfect fit. Looks like this after the shop vac treatment. If you do not have a router, how about a saber saw (jig saw) or a Sawzall?

The opening should be a close fit. But you can be 1/8" - 1/4" off will not be an issue on the larger openings. Using the router or the saber saw will create the perfect hole size cut to fit the rough opening.
The tank vent pipes and the radio antenna hole should be a close fit, again no more than 1/4" excess. I hole saw these holes; you need to measure and drill. But you have to go off of the side of the camper, accounting for the deck to be shorter than the wall, and the last sheet of decking screwed to the roof to be accurate.
The crank Wine guard antenna is a different story. Those 2 holes have to be dead on (within 1/16") of the center of the hole in the ceiling. I saved the old OSB sheet under the bud board to use as a template to drill the decking hole in. You have to install the deck sheet next to the TV attend hole first, then measure off that sheet edge to the center of the ceiling hole in both directions. Transpose of the crank hole center to the new deck sheet with the antenna. You can make the crank hole and the coax hole bigger if needed to give you some forgiveness. The bottom line: The crank in the ceiling has to line up with the roof mount antenna, or else the crank will jam when cranking. The coax hole has to line up the roof mount base of the cord will not fit through the hole.
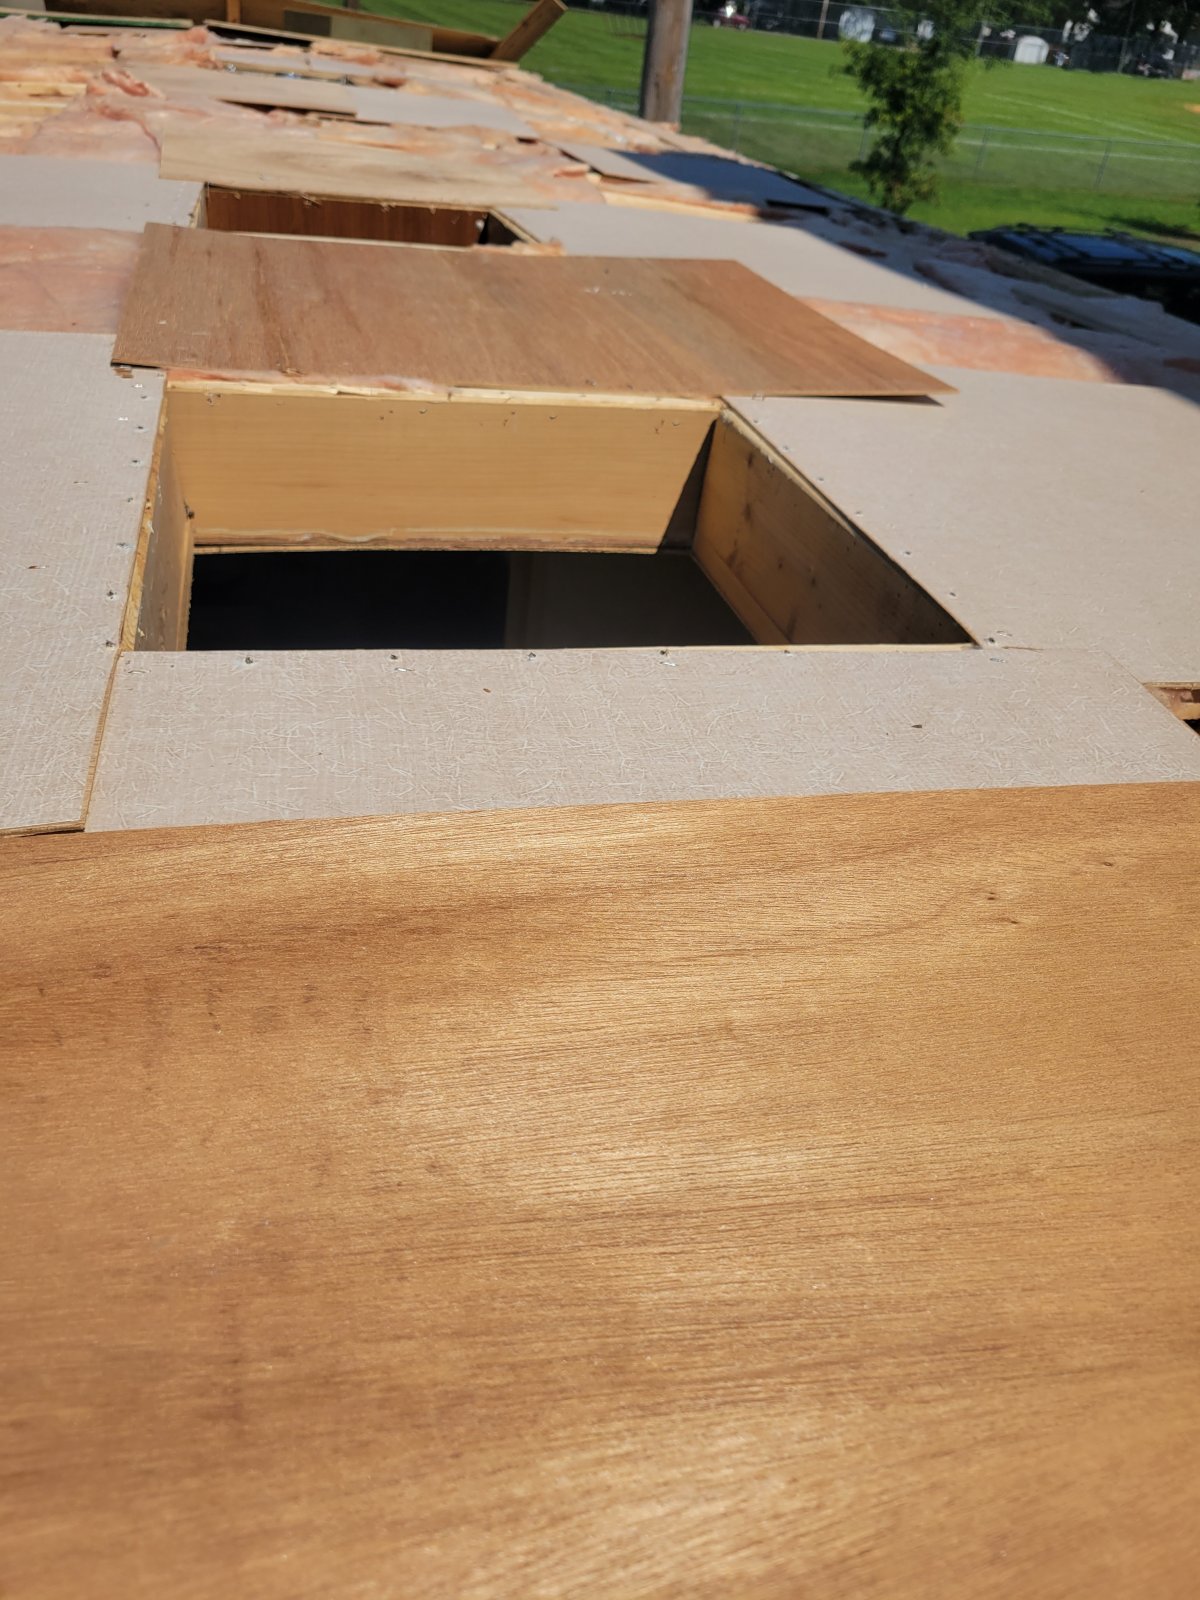
Here are some pics I found of the cut out process above.
Here is the tank vent pipe hole. The sheet next to it is installed. I start by laying the new sheet on top of the installed sheet and push it to the pipe. This sets the left to right of the camper sheet direction as I lined up the end of the sheet with the installed sheet. I also lay lines to where the OD of the hole will be. I then measured the pipe to the installed sheet. Then dill the hole.

Measure from install sheet to pipe

Drill hole

Test fit the sheet.

And now, to route out the shower dome. Once it is screwed down and I rough marked the opening (I have to measure that from the installed sheet) I drill a hole for the router bit to go through


This question:
Quote:
|
I also recall seeing a post about how to carefully remove the very fragile skylight?
|
I never did a post on reusing old skylights or tank vents, but this is how you can "try" to get them up and not crack them.
The shower dome is the worst as the seal is so big. Use the heat gun and warm up the entire flange all the way around. Using an all-edge dulled, 1" wide, metal stiff blade scraper, lay it flat to the roof and push it into the butyl caulk between the dome and the rubber. You are trying to cut out the seal and push it into the inside ceiling opening. Do this in a corner and do it a few times. Gently lift and heat some more until it breaks just a little free; it is only up maybe 1/16" at this point. Warm the flange some more and keep cutting the caulk under it as you go around the dome. After you cut about 4 to 6" in both directions from the corner, it will start to lift a little. You may have to cut in like this on the other 3 corners. It will take a good amount of time to get it up and save it. But it can be done. In the worst case, you have to buy a new one. The tank vents and the fridge vent come up the same when trying to save them.
To this question:
Quote:
|
On the front of the trailer, I believe the order is wood, rubber roof, front siding, and then the front cap molding. Does that sound right?
|
See this post; it shows the exact order. Scroll a little down it. You have to first staple the needed excess membrane to the first vertical solid rafter. Start by having the gutter rails on, then start on the front siding to the rubber, butyl tape on the rubber after a dry test fit, and mark the rubber with a line where the edge of the siding will be to line up the butyl.
https://www.sunlineclub.com/forums/f...tml#post154611
Then go here for the rest of the front molding strip. The gutter rails are already on, then the front left and right wall corners, then the front top cap molding. Before screwing down that front roof cap molding, measure the distance between the left and right corner molding. It may have to trim the overall length of the cap molding. You do not want to start from one end, screw it down with all the butyl, then find out it's 1/8" too long to fit. AHHHHH  https://www.sunlineclub.com/forums/f...tml#post154679
Ok more yet to come
__________________
Current Sunlines: 2004 T310SR, 2004 T1950, 2004 T2475, 2007 T2499, 2004 T317SR
Prior Sunlines: 2004 T2499 - Fern Blue
2005 Ford F350 Lariat, 6.8L V10 W/ 4.10 rear axle, CC, Short Bed, SRW. Reese HP trunnion bar hitch W/ HP DC
Google Custom Search For Sunline Owners Club
|
|
|
|
|
09-01-2023, 04:01 PM
|
#9
|
|
Junior Member
Join Date: Oct 2021
Location: New Jersey
Posts: 15
SUN #12992
|
Excellent information and the timing is perfect. We've got almost everything off and I came in to check on the post. Boom! You posted how to get the skylight off just when I needed it
So far it's coming off fine. It's not QUITE as bad as I thought it was but we're taking it easy.
2 hours of daylight left. We should have everything off then I can read what you posted in more details. I can eat dinner and start to prep my brain for removing the roof and fixing any wet spots. (I think we have at least one)
Thanks John B!
__________________
|
|
|
|
|
09-01-2023, 05:01 PM
|
#10
|
|
Moderator
Join Date: Nov 2006
Location: Ohio
Posts: 12,656
SUN #89
|
With your crew coming tomorrow, I will talk to some of the decking install heads up. I will do the rubber install, the sun, and what EPDM you bought after this reply. I suspect you will not get the roof torn off, all new decking installed, and start the rubber on Saturday. But maybe you will get close. 
Here are a few things to know about how Sunline built a roof system for a bud board roof, and then later, someone wanted to install the decking.
First, do not assume they built the rafters on 16" centers. There are "in the nominal league" of 16" but not like a house roof is. Some centers are 14", some 17", and any configuration of a nominal 16". The floor plan is partly driving this. A shower dome has to have a rafter on both sides for roof support. It has to go in a specific spot in the shower surround. That will shift the 16" center pattern. It's the same as the roof AC hole, the fridge, and even 14 x 14 crank-up roof vents.
Then, there is how square the rafters are to the side walls and parallel to the front or rear walls. Bottom line: The rafters are "close" to square. They are "close" to parallel, but they are not by any means "all" square and true like a house can be. It does not matter on a budboard roof if a rafter is square or on 16" centers, as you are not installing true square 4 x 8 sheets of rigid plywood on them.
The end result needs to be; the deck sheet to deck sheet joint has to land on a rafter center of sorts the full width of the camper to allow each sheet to have screws land in the rafter and not split it apart, being so close to the edge.
This is how I get around it to combat this squareness and parallel issue. When the old roof is all off and all rot fixed, I create a plan where each sheet-to-sheet joint will be, on each side of the camper and this takes some figuring. Your crew can divide and conquer while someone figures this all out while they are dealing with rot and shimming.
I start with 2 tape measures clamped in place from the front first rafter all the way to the back wallone tape on each side of the camper. See here; the yellow tape measures are still in place while the decking is getting started.

First, the first rafter at the front wall may not be square to the sides or the rear wall rafter. Don't assume you will start a square 4 x 8 deck sheet, even with the front or rear wall. Most times, it won't work. I start with one side of the camper, I know a few things first, but I want the sheet at the front wall that will taper down the roof pitch and flare out into the front wall siding to be as wide as I can be and still screw it to a rafter center. 48" sheet width is what we have to start with. The sheet is usually less than 48"; it might be 40", 38", or something else, but it will be as wide as I can make it and not have a 12" wide sheet joint trying to make the flared transition.
This is the area I'm talking about doing the sloped transition. Here is a 2006 T264SR

Here is a 2004 T1950. The 14 x 14 vent hole is closer to the front wall than the T264SR, and that changes the slope/angle of the transition from arch rafter height to flat rafter height.

That first sheet at the front wall creates a joint on the rafter it will land on. I marked the center of the sheet joint in pencil right on that rafter.
Then, from that point, I start looking at where the next 48" wide sheet joint will land, starting at the first sheet joint. Here, you have to play with all the rest of the sheet joints. The second sheet might be a 42" sheet to land on a rafter center. The 3rd sheet might be a 47" wide sheet to land on a rafter center. And so on down the whole roof. The rear wall sheet can be 12" or 39", but the rear end wall sheet should have at least 1/2" to 1" more sheet hanging over the back of the wall, the wall is not true straight across. You will trim the last sheet in place.
Once you take your first good estimate down one side of the camper where the sheet joints will land, you start on the other side, trying to see if they will match up enough to have a surface to screw to.
I start the other side using an 8 ft straight edge squared off the side you started with to line up the marks on the tape measures. Don't assume you can start with the front rafter; it might not be square to the sides. You shift the opposite side tape measure and clamp so the numbers on each side of the tape are in line with each other. Then check that the sheet joints will land on enough rafter to be able to put screws in. You may need to shift both tape measures to get the best sheet joints. You may find some intermediate sheets might work at 48", or at least one of them if you shift where the centers land on which set of rafters.
The end result is that out of the 5 1/2 new re-roofs I have done, almost every sheet had to be cut in width to fit. This means you will use more 4 x 8 sheets and have more waste, but it means the roof joints come out OK. I had to use 9 sheets on a 2005 T2363, a 2007 T289SR, and a 2007 T286SR. I suspect your T276SR will take 8 to 9 sheets to get the joints to become usable.
As you can see, I started putting sheets down somewhere in the middle of the roof and custom-fit the front wall and the back wall.
This one is long enough; I'll start more in the next reply.
__________________
Current Sunlines: 2004 T310SR, 2004 T1950, 2004 T2475, 2007 T2499, 2004 T317SR
Prior Sunlines: 2004 T2499 - Fern Blue
2005 Ford F350 Lariat, 6.8L V10 W/ 4.10 rear axle, CC, Short Bed, SRW. Reese HP trunnion bar hitch W/ HP DC
Google Custom Search For Sunline Owners Club
|
|
|
|
|
09-01-2023, 06:13 PM
|
#11
|
|
Moderator
Join Date: Nov 2006
Location: Ohio
Posts: 12,656
SUN #89
|
More heads up on fitting decking sheets.
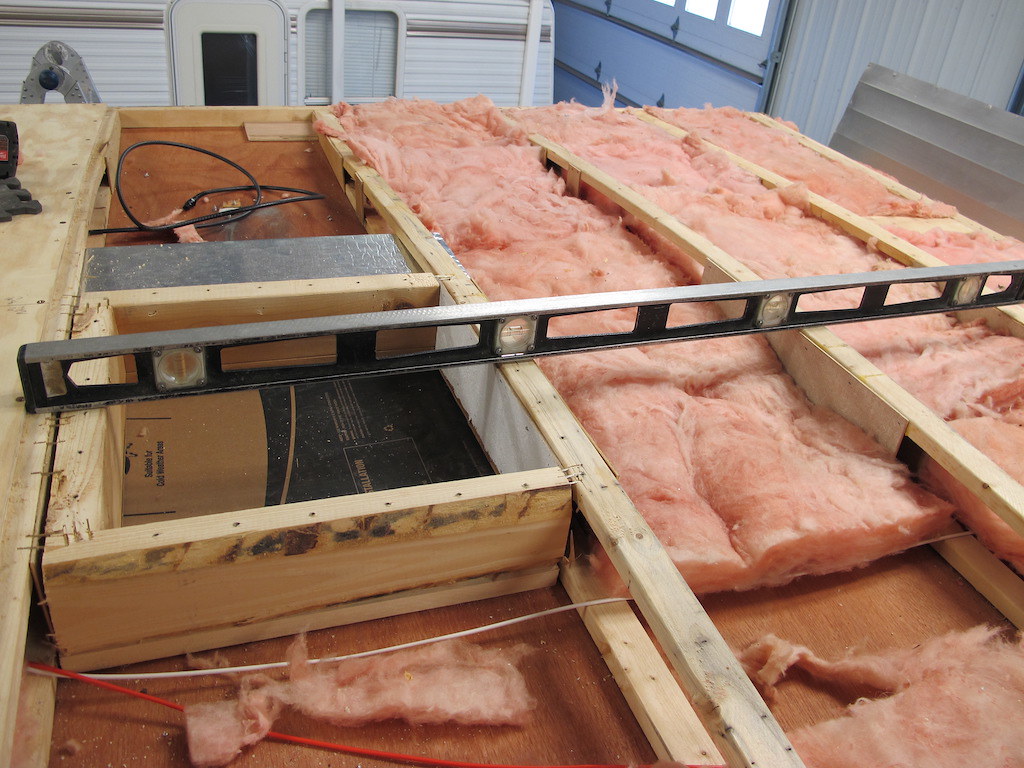
At the fridge vent and the shower dome, Sunline created wedge-type shims out of 1/8" luan to help blend in the roof rafters. This worked on a budboard roof but not on a solid plywood roof. You need to deal with these areas to make a smooth inline rafter top to support the plywood and not create a water ponding issue. The roof slope has to be intact with the plywood decking.
I could not find quickly all the pics I wanted to show, so these will help show what I am talking about. Your camper, I'm sure, has something different, but it still needs attention.
Here is the fridge vent opening. See the stacked shims.
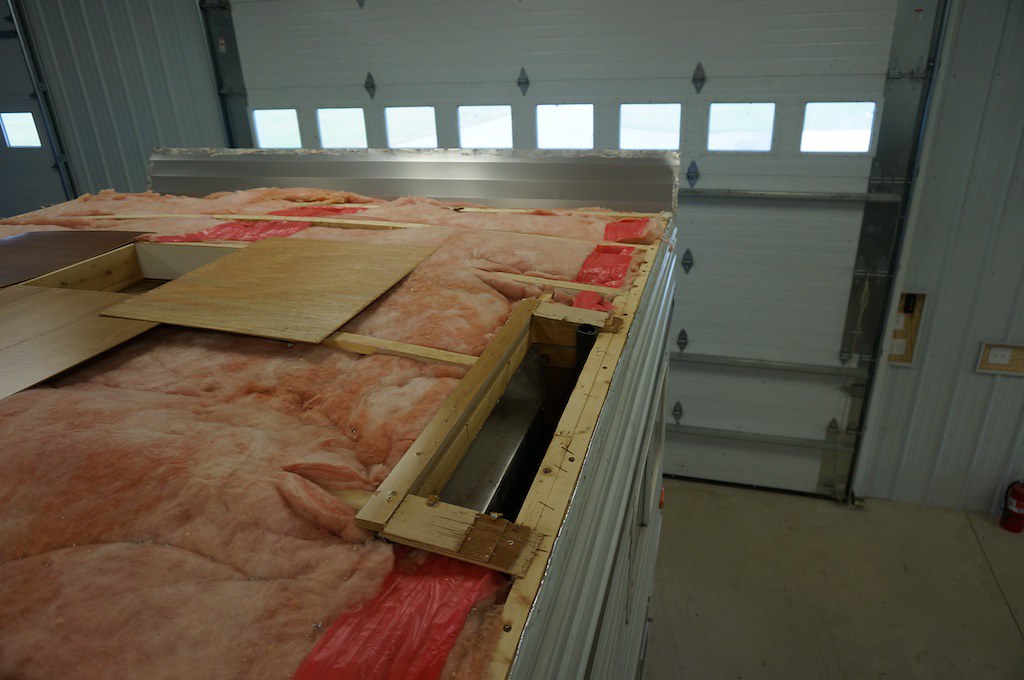
Here is with the shims removed and the rafter bumps in the fit-up. A plywood deck will not sit flat on these rafters; you have to deal with this joint.

The bump

The bump is just one example. There are others, but I can't find the pics right now. Where the shower dome goes, and the fridge vent, the tops of the rafters need to be in the same plane, not short pieces lower or higher, which can create a ponding situation when you screw down the decking. Put a straight edge over the tops of the openings. The entire shower dome and fridge rough opening must be flat and in line so that when the decking goes on, it is not forced down or up due to low or high spots in the rough opening framing. You can shim, plane, or cut wedge filler strips, but it needs to be flat.
If you can't figure out what I am referring to, post pics of your rough opening with the roof off, and I can point to them.
The next topic is the rear wall and the new 3/8" higher roof surface. I changed the way I do the last rear wall decking sheet from the "Winter Project" camper to have more molding rear wall coverage to create a better seal. The problem is the molding is not short on the rear wall leg as the rooftop is 3/8" plus higher then it used to be. The overlap of the molding on the back wall needs more coverage, and here is how I trimmed the last sheet to get more using the same molding.
You shave the 3/8" decking down in the last 4 to 6" to about 3/16" to 1/4"

You can sand it down with a belt sander and a 40 or 60-grit belt, or power plane it down like I did.


Next Topic: On the rear wall, the wall is not straight; it can bow in or out in the middle. I leave the last wall decking sheet longer by about 1/2" to 1" to overhang the wall.
Then, I trim off the back sheet using the router with the 3/8" bit with the bearing on the end set just enough to cut the deck and not the siding. If you do not have a router & bit, trace a line on the sheet in place, remove it, and saber saw it off.


Next topic, use screws that have been countersunk flat on the decking. Staples will lift over time from the road vibration while towing. I have a camper in the back barn that a dealer did like this. It leaked badly, and the new PVC roof had staples sticking up, ready to poke through the membrane.
I use no. 6 x 1" 1/8" or 1 1/4"lg, whichever you can get a construction screw with the wedge head. It's not a true flathead but sits well in a countersunk hole. I have a bit with a depth gauge that works slick for this. If you do not countersink them, you will snap off the heads, trying to smash the wood out of the way, and the screw will stick up, which is a membrane hole poker. Also, do not go too deep; those little indentations will not bond to the glue, and the membrane be loose there.


Next topic: You must make a rafter top filler at the front wall to blend the transition from full rafter height to down to a flat 2 x 3 rafter.
Here are a few examples.
The problem is that the straight edge shows an air space that needs to be filled for the deck sheet to sit flat on the 2 x 3.
You make a filler wedge to fill this gap

The roof decking will then sit nicely and smoothly on each rafter top and be tapered to fit under the front siding.

Here is a rafter wedge in place on a different Sunline
To make the rafter wedge, I traced the rafter profile I needed into a clearer no knots 2 x 4, then used the bench saw and cut multiple times to create the rafter cap.
Next topic: Remember to sand/chamfer/round the radius off of all roof decking opening edges and the outer perimeter of the roof at the gutter rails. That sharp edge can cut the membrane. I use a portable belt sander.
Sand all decking joints
Run a sharp edge scraper over all screw heads to find any edges sticking up. Sink them until they are flush or sand them.
This should get the decking down—more in the following reply on the rubber and glue.
__________________
Current Sunlines: 2004 T310SR, 2004 T1950, 2004 T2475, 2007 T2499, 2004 T317SR
Prior Sunlines: 2004 T2499 - Fern Blue
2005 Ford F350 Lariat, 6.8L V10 W/ 4.10 rear axle, CC, Short Bed, SRW. Reese HP trunnion bar hitch W/ HP DC
Google Custom Search For Sunline Owners Club
|
|
|
|
|
09-01-2023, 08:20 PM
|
#12
|
|
Junior Member
Join Date: Oct 2021
Location: New Jersey
Posts: 15
SUN #12992
|
Wow! Great info. My head is spinning!
Great tips on cutting the holes and the tear down. Think I got them. Gonna dig out my router bits tomorrow.
To summarize the rest ..
I have to play tetris with the sheets.
I have to account for the difference in thickness between bud board and plywood. Especially in the back and front.
Screw not staple and make sure no rough edges. Round everything.
I will have to build up or trim down to make sure there's no place for water to pool on the plywood and not any air gaps...
This last one is gonna be fun. I'll need to re-re read those sections. I get what you're saying I need to do, not quite yet seeing how to do it. But it's late and I have time for it to sink in. Like you said, chances are the plywood around be ready until at least Sunday. But that's ok!
Looking forward to your next reply!
Bob L.
__________________
|
|
|
|
|
09-01-2023, 08:55 PM
|
#13
|
|
Moderator
Join Date: Nov 2006
Location: Ohio
Posts: 12,656
SUN #89
|
Hi Bob, I sent you a PM. Have a look
__________________
Current Sunlines: 2004 T310SR, 2004 T1950, 2004 T2475, 2007 T2499, 2004 T317SR
Prior Sunlines: 2004 T2499 - Fern Blue
2005 Ford F350 Lariat, 6.8L V10 W/ 4.10 rear axle, CC, Short Bed, SRW. Reese HP trunnion bar hitch W/ HP DC
Google Custom Search For Sunline Owners Club
|
|
|
|
|
09-02-2023, 09:13 AM
|
#14
|
|
Moderator
Join Date: Nov 2006
Location: Ohio
Posts: 12,656
SUN #89
|
Hi Bob,
Here are some adders to the "Winter Project" post and heads-up things about dealing with gluing down a membrane outside in the sun and heat. For those following along, here is the Winter Project roof post https://www.sunlineclub.com/forums/f...avy-16834.html
First, I'm unsure if you removed the new membrane from the box and rolled it up. This is very important, as it can have permanent creases if unrolled.
It is also essential when rolling it up to take great care not to get any dirt or dust on the membrane. I have seen and later serviced a camper roof where a good friend bought the roof membrane, and they had it shipped to the RV dealer to install. The dealer left it in the box as they stated they had no room to spread it out and leave it spread out before installing it. When they did take it out, they did not care appropriately about the dirt, and they installed it with the dirt still on it. There are poke pointy marks all over the roof and permanent creases. Those pointy dirt marks will wear into the membrane over time, creating potentially tiny holes. This is like installing vinyl floor tile with dirt under it; the dirt cracks through sooner or later. OK, you get the point, no dirt, and get it rolled up.
I rolled the membrane up with no core at first. It does work. But I have since switched to rolling it up onto a 2" sch 40 PVC pipe 10 ft lg. If you have a clean pipe of 2", 3, or 4" laying around, this makes a better roll-up. I painters taped the membrane to the pipe so it would not slip, then rolled it up. I roll it up so we can lift the pipe and membrane onto the roof at the back and unroll it from the deck side down. It works great.

Next is the glue situation. From doing it, I learned some things about bonding down EPDM inside or outside on fresh wood. The sun and summer temperature are "not" your friend. With high heat and, worse, high sun heat, the glue is absorbed into fresh wood like a sponge and sets up very quickly. This is a problem as you have to have the glue to have a wet transfer to the membrane.
It appears Class A's supplied fast-setting glue, which can make it even more complex. Fast and slow-setting adhesives are available. The fast-set glue is used almost exclusively by RV manufacturers on the assembly line. They have the scaffolding, setup, manpower, and controlled temperature shop and want to do this fast so the roof is set for them to deal with walking all over it the same day, caulking roof vents and moldings, setting AC unit, etc., when the camper exits the assembly line the same day.
With all that said, here is what I would do: review and see if it fits your situation. I would do the roof in my shop if I had a choice, but I have done one roof in the hot June sun, and it came out OK.
Line up everything to go for first thing in the morning. Make sure there is no dew on the roof; cover the roof with a tarp the night before to ensure there is no dew on the roof. The goal is to get the roof membrane glued on by mid-morning before things heat up too severely. They state the temps have to be above 50F, and we have had some cold snaps here this summer, so make sure you are above 50F before applying the glue.
Let's start with the membrane setting and glue process.
The following assumes the decking is all prepped, sanded, and ready to start the membrane process.
See this link for an updated process on prepping and installing the roof membrane. This is in my shop, but we will tweak it for outside. You still need to do all these same steps; we will deal with the sun/heat part.
https://www.sunlineclub.com/forums/f...tml#post154533
Here is the issue with many of the online videos at the factory: they show them rolling the glue onto half the roof simultaneously. That is a real problem for the nonfactory installer. Too much glue is exposed at once; the glue is soaking into the decking too fast for the "nonfactory" installer. I did this half roof on my first roof job but have since changed the process to only a 4 ft x 8-foot section at a time to be glued for "inside" the shop. The glue is absorbing too fast. And I was doing this in the winter with the heat on only 65F. I had to shut the furnace off not to have the blower on.
THIS WAS A REAL EYE-OPENER when I was outside in the sun (early afternoon) doing the gluing. The glue soaking and drying was even faster, too fast. I had to apply the adhesive at a higher rate to get enough time to get the membrane down to have a wet transfer to the membrane. I had to use almost twice as much glue. It was too hot out and in the direct sun. Lesson learned, do not do this in the hot sun.
I suggest only doing a 2 ft x 8-foot glue section at once. One helper on each side so you can roll the glue, then spread down only a 2 ft running length section of membrane. Squeegee it out, and then move on. Do it early before the sun is hot, and you will have a better chance of success. Bottom line: You have to do a peel-back test to confirm the wet glue is completely transferred to the membrane. Do the peel-back test quickly on each section until you know you have the glue rate right.
This is the peel-back test; you have to see total coverage on the membrane, or you do not have enough glue put on. Increase the glue. This pic is a large section, you do not need a section this large to see if it is right or not.

Most folks who do their first roof job do not apply the correct quantity of glue. This is not paint; you must apply the towards the max rate to get the glue transfer right.
The next topic is how to deal with the gap at the side walls from the new deck sheet to the edge of the side wall. I used to use the Dicor non-sag method. It does work, but it takes three days to reapply and fill that gap before you apply the membrane.
Like this:

Here is the new and improved method you can do the day after the membrane glue cures. The butyl tape method
See the full method here: https://www.sunlineclub.com/forums/f...tml#post154611

Remember, the gutter rails will be installed in the same screw holes they came out of. The roof deck will just be 3/8" higher than it used to be.
If you follow the T-1950 restore post updates on gluing, butyl install, and the Winter Project post, this should cover it. Just reduce the size of the exposed glue to about 2ft x 8 ft as a start for doing this outside. If there is no total glue test transfer to the membrane, you need more glue and work faster. The two guys on each side of the roof will be busy, but after the first 3 to 4 sections, the chaos will tame down as you know what to expect.
Do not walk on the membrane until the glue has fully cured. I always waited until the next day. Try a lift-up test to make sure it is cured and bonded. Just tug on a membrane flap hanging over the side; it should be solidly bonded and not lift at all.
Another big tip: Use a drill mixer attachment to completely mix the gallon of glue. What is on the bottom of the can has different solvents in it than the top of the can, and it will work differently due to that. Once mixed, it works the same effect throughout the whole can.
It will take 9 tubes of caulk to do the entire roof. And, you need one tube of Surebond SB-140 butyl caulk or other skylight butyl to install the shower dome. You also will need more rolls of butyl tape than the kit supplied. I do not know what length roll they gave you, but it will not do all the areas needed.
I hope this helps,
John
Consider post a few pics of your process when you are doing it, nwe all learn from each other.
__________________
Current Sunlines: 2004 T310SR, 2004 T1950, 2004 T2475, 2007 T2499, 2004 T317SR
Prior Sunlines: 2004 T2499 - Fern Blue
2005 Ford F350 Lariat, 6.8L V10 W/ 4.10 rear axle, CC, Short Bed, SRW. Reese HP trunnion bar hitch W/ HP DC
Google Custom Search For Sunline Owners Club
|
|
|
|
|
09-02-2023, 12:42 PM
|
#15
|
|
Junior Member
Join Date: Oct 2021
Location: New Jersey
Posts: 15
SUN #12992
|
OK. Lots of information there which is fantastic. Now that I have the roof rafters exposed it's also starting to make a bit of sense.
When putting the 3/8 on, I feel like I should remove all of the pre-existing sheets around the 14x14's, and the AC. As well as this long 3/8 inch thick board along the sides and around the TV antenna. Then use my 4 foot level to make sure there are smooth transitions between the rafters. Just by eyeballing it, there's a lot of work to do here.
I'm still not quite getting what I need to do around the openings. The need to be level rafter to rafter and any high/low spots side to side need to be accounted for.
But do they need to be level side to side? The rafters of course have a slight curve. So do I need to build up the ends so that the vents, AC, etc, sit flat or is this curve so little that I don't need to worry about them?
Here's a picture dump so far. We're now working on removing the factory shims and will start piece-fitting the plywood. I feel a trip to Lowes coming on
Overview from back
Fridge vent
Skylight and rear vents

AC and front

__________________
|
|
|
|
|
09-02-2023, 06:30 PM
|
#16
|
|
Moderator
Join Date: Nov 2006
Location: Ohio
Posts: 12,656
SUN #89
|
Quote:
Originally Posted by Rlanger
OK. Lots of information there, which is fantastic. Now that I have the roof rafters exposed, it's also starting to make a bit of sense.
When putting the 3/8 on, I feel like I should remove all pre-existing sheets around the 14x14s, and the AC. As well as this long 3/8 inch thick board along the sides and around the TV antenna. Then, use my 4-foot level to ensure smooth transitions between the rafters. Just by eyeballing it, there's a lot of work to do here.
I'm still not quite getting what I need to do around the openings. The need to be level rafter to rafter and any high/low spots side to side need to be accounted for.
But do they need to be level side to side? The rafters of course have a slight curve. So do I need to build up the ends so that the vents, AC, etc, sit flat or is this curve so little that I don't need to worry about them?
|
Hi Bob,
You are doing significant, good progress.
And yes, you need to remove all the budboard support items for the most part, but maybe not all 100% exactly. I'll explain as it will lead into the questions in blue.
Yes. The thick 1/2" long luan at the side wall areas will come off. Yes, all the 1/8" thick approx 24" x 24" luan sheets at the openings come off. Save these 1/8" sheets as much as possible. If they match your wallboard inside, some are papered, some bare, they come in handy when doing wallboard fixes as the wallpaper matches. The bare board works as shims.
Yes, the 1/2" OSB for the TV antenna comes off; save that for a hole template.
The 1/2" OSB at the tank vents and the radio antenna come off.
So what else is left? Here is where some leftover shim stuff needs to come off, and some can stay. There are generally thin shims Sunline put in at openings.
Here are the big picture needs when we install decking over a budboard roof system. See if you agree.
-We know we want the 3/8" decking to touch the top of the wall plate; we are going to screw the deck down tight there.
-We also know we want the decking to touch the tops of all the rafters when screwed down, with no mega air gaps for long runs unsupported.
- There are box outs, 2 x 4's, etc. used to create roof openings, like for the roof AC unit, crank-up roof vents, the fridge vent, and the shower dome. Those box-outs must have 1 1/2" wide heavy wood at the opening to create a place to screw all the flange screws in for roof vents, tank vents, shower dome, etc.
- Here is a big one. We need all the tops of those box-out openings to touch the bottom of the new decking. The decking is to be not pulled down or pushed up (by very much) and create a ponding or hump situation in the new roof. These box-outs also build strength for the opening being there.
Those are the needs, so how, in this situation of all mixed mashed up wood, do we deal with all that is there? Good question; I'll explain this in pics. The words get hard to describe all that can be seen. The mix mash is all over when it comes to box-out openings.
Here is a 2007 T286SR I was restoring for a friend. This is a front kitchen layout.
I am going to show the fridge vent opening. This is with the membrane lifted.

Here is the opening as Sunline created it. See all the segmented shims creating a wedge effect to support the budboard and smooth out the rafter top surface to some extent.
In this case, the wedge shim method actually worked as found for the decking. I did not lift up any of those shims. You have to run a straight edge over them and see if the profile of the curved rafter would follow the tops of the shims, and it did. I lucked out, "once". This does not happen often... 
They are 1/8" shims and a small air gap between the decking in small locations. But the wedge shims are enough that the decking jumps the small air gaps, we can screw the decking down, the decking touches the higher spots, and the decking supports the roof loads over the air space. And the decking can screw flat to the top of the rafter, the wall plate, and all around the box out the opening. Remember, this is a camper and not a house.
Here is a deck sheet not yet routed out to the opening, but you can see, in this one case, those shims worked as is.
I have many more instances to show; it is not all as easy as the above example.
Here is the shower dome box-out on that same camper. While the box-out is not that bad, the tie-in to the rafter is terrible and must be addressed.
This bump-up is way too much. The decking will buckle up trying to go over this when we screw down to the rafter.
In that case, I had to pull out the top staples and plane down the 2 x 4 top to blend it in. Then restaple the 2 x 4 in place to the rafter. I have a stapler to shoot those big staples. What to do if you do not have that big stapler? Maybe a thin (~ 1/32" - 1/16" flat metal strip over the top to tie the 2 x 4 to the rafter and flat head screw it or shoot 1/4" staples. Ideally, an aluminum sheet would work if you have any.
More in the next reply,
__________________
Current Sunlines: 2004 T310SR, 2004 T1950, 2004 T2475, 2007 T2499, 2004 T317SR
Prior Sunlines: 2004 T2499 - Fern Blue
2005 Ford F350 Lariat, 6.8L V10 W/ 4.10 rear axle, CC, Short Bed, SRW. Reese HP trunnion bar hitch W/ HP DC
Google Custom Search For Sunline Owners Club
|
|
|
|
|
09-02-2023, 07:01 PM
|
#17
|
|
Moderator
Join Date: Nov 2006
Location: Ohio
Posts: 12,656
SUN #89
|
These pics are from a 2007 T289SR, a rear living layout I was restoring for a friend. This is a different camper than the one above. This camper will have a 3/8" walk-on deck.
This roof had a lot of fixes to deal with at the box-out openings. Let's start here: the shower dome, the bath vent, and the fridge vent all in a row.

A closer look at the shower dome, the box-out is low here, and so is the bath vent opening.

It is hard to see here, but on the shower dome I had to add wood at the inward side of the opening to raise the inward 2 x 4 up to the rafter. The square covers the shim wood.
Here with the square removed. The shims were wedged also. Pass the straight edge over the rafter and shim within 1/16" to may 1/8" away. This is where the bare luan can come in handy.

By adding shimming to the tops of the 2 x 4's to the top of the rafters, the decking fit the entire opening with very little to no gaps.
The shims are hard to see, but they are between the decking and the tops of the 2 x 4. This is all the pics I had of this area.
Now the fridge vent box-out. Amazingly, the fridge vent opening worked as it. But, look at the rafter where the bundle of wires is, the end of the rafter is 1/4" low of the wall plate, I had to shim up the top of that rafter and blend it in to meet the wall plate.
 NOTE: See those wires, and see where they come up through the wall plate?
 Here is a recommendation to not have an issue with screwing into one of those wire bundles. Go up and down the length of the camper and put painters tape marking on the side wall wherever any wires come up the wall and cross into the attic. Make sure you keep track of where the painters tape is at to "not" put a decking screw or a gutter rail screw right through these wires. I had to learn this the hard way...
Here is a roof vent opening between 2 rafters. The 2 x 4 wood is low, we have to shim this up to meet the rafters.


Here is the segmented wedge shims in place

More in the next reply. Want to make sure this posts and my internet does not go out.
__________________
Current Sunlines: 2004 T310SR, 2004 T1950, 2004 T2475, 2007 T2499, 2004 T317SR
Prior Sunlines: 2004 T2499 - Fern Blue
2005 Ford F350 Lariat, 6.8L V10 W/ 4.10 rear axle, CC, Short Bed, SRW. Reese HP trunnion bar hitch W/ HP DC
Google Custom Search For Sunline Owners Club
|
|
|
|
|
09-02-2023, 07:46 PM
|
#18
|
|
Moderator
Join Date: Nov 2006
Location: Ohio
Posts: 12,656
SUN #89
|
At the front bedroom roof vent, we are at the same camper, 2007 T289SR. At the camper's center, the rafters and most of the box-out of the vent opening are in line. See here
Then I looked at the rafter at the front of the opening and saw something did not look right with that rafter. Put the level across it, and it showed up.

The rafter sunk, this is not good. It dropped to 5/8" low in that area. This has to be corrected.

This sunken rafter and the box-out had to get shimmed to come back in line with the other rafters and not create a ponding situation and heavy flex of the decking. You can see the segmented shims under the deck board.

Different lengths of 1/8" shims are stacked together to create an arched effect on top of the rafter.

The box-out shims blend into the rafter-top shims.

This camper was built better at the front wall transition from the full truss rafter height to a flat 2 x 3 rafter. Amazingly, the first three rafters are in line with each other, tapering down. I usually have to create a rafter shim to create this once-smooth taper. Both sides and the center taper down evenly.
It takes three rafters to taper down—the left side.

The right side

I now create the front deck sheet that is custom fit in both width (it is not parallel as the front wall is not square to the sides) and with a blended taper at the front wall. I screw down the decking at the vent seam first, and let the deck sheet hang out in the open. This deck sheet crosses two rafters before the taper to the front wall. This deck sheet starts at the roof vent, where the rafter shimming had to be done.

Then I screw down the decking to the other rafters and wall ends, working towards the front of the camper from the vent, one rafter at a time. You can see here how the blend from full height to 2 x 3 height is smooth and full rafter supported.


The tapered end to meet up with the front wall siding.


As FYI, here are a few pics of the completed decking on this 2007 T-289SR


While hunting up those pics, I found a few others to help the cause. I use fiberglass mesh drywall tape over the deck sheet joints.


I acquired that tip from Dicor tech service. Their membrane instructions stated to use a special solid seam tape, but I could not find it for sale anywhere. When I asked about it, they noted the instructions were outdated. They now use mesh drywall tape. The glue goes between the mesh to the wood, creating a good bond with the membrane at the seam. The fiberglass mesh jumps the gap to support the membrane. For those who use solid duct tape or another solid tape, the glue does not stick to the tape as it is not pourus, and the membrane is not glued to the decking at the tape joint.
Sanding the deck joints, all openings, and decking edges the membrane will go over. A 3" wide belt sander does a good job of this.
Using a putty knife with a sharp blade end to check for high screws. It will find every one of them. Hand tighten down as needed.

The above should help show how to overcome most of what you may encounter with getting all the rafters and box-outs to create a smooth transition with the decking. I am sure you will find others I have not shown.
Ask away for any clarification.
I hope this helps.
John
__________________
Current Sunlines: 2004 T310SR, 2004 T1950, 2004 T2475, 2007 T2499, 2004 T317SR
Prior Sunlines: 2004 T2499 - Fern Blue
2005 Ford F350 Lariat, 6.8L V10 W/ 4.10 rear axle, CC, Short Bed, SRW. Reese HP trunnion bar hitch W/ HP DC
Google Custom Search For Sunline Owners Club
|
|
|
|
|
09-02-2023, 07:58 PM
|
#19
|
|
Moderator
Join Date: Nov 2006
Location: Ohio
Posts: 12,656
SUN #89
|
Hi Bob,
Here is something to consider adding to your roof, attic vents. Since you now have full walk-on decking, it is easier than adding to a budboard roof. These vents really do help. The camper is cooler in the summer and it lets the trapped moisture out of the attic during the fall and spring when people are sleeping inside.
See this post for all about this. https://www.sunlineclub.com/forums/f...-do-19983.html
Every camper should of had these as standard to vent the attic space. Sadly, other than higher-end 4 season packages, only seem to have them. And some brands now are starting to add them on the non 4 season campers, finally. I add them to every camper I now restore.
In your chaos right now, you do not have to add them during the roof job, but look where you would place them and what is below that area with the roof wide open. You can add them later when you get caught up.
Also, if you want to run power to any vent opening for a Maxx air fan or other item, with the roof wide open, now is the time to add the wires. Deal with the hook-up later if needed.
John
__________________
Current Sunlines: 2004 T310SR, 2004 T1950, 2004 T2475, 2007 T2499, 2004 T317SR
Prior Sunlines: 2004 T2499 - Fern Blue
2005 Ford F350 Lariat, 6.8L V10 W/ 4.10 rear axle, CC, Short Bed, SRW. Reese HP trunnion bar hitch W/ HP DC
Google Custom Search For Sunline Owners Club
|
|
|
|
|
09-03-2023, 05:46 AM
|
#20
|
|
Junior Member
Join Date: Oct 2021
Location: New Jersey
Posts: 15
SUN #12992
|
Good morning John B.
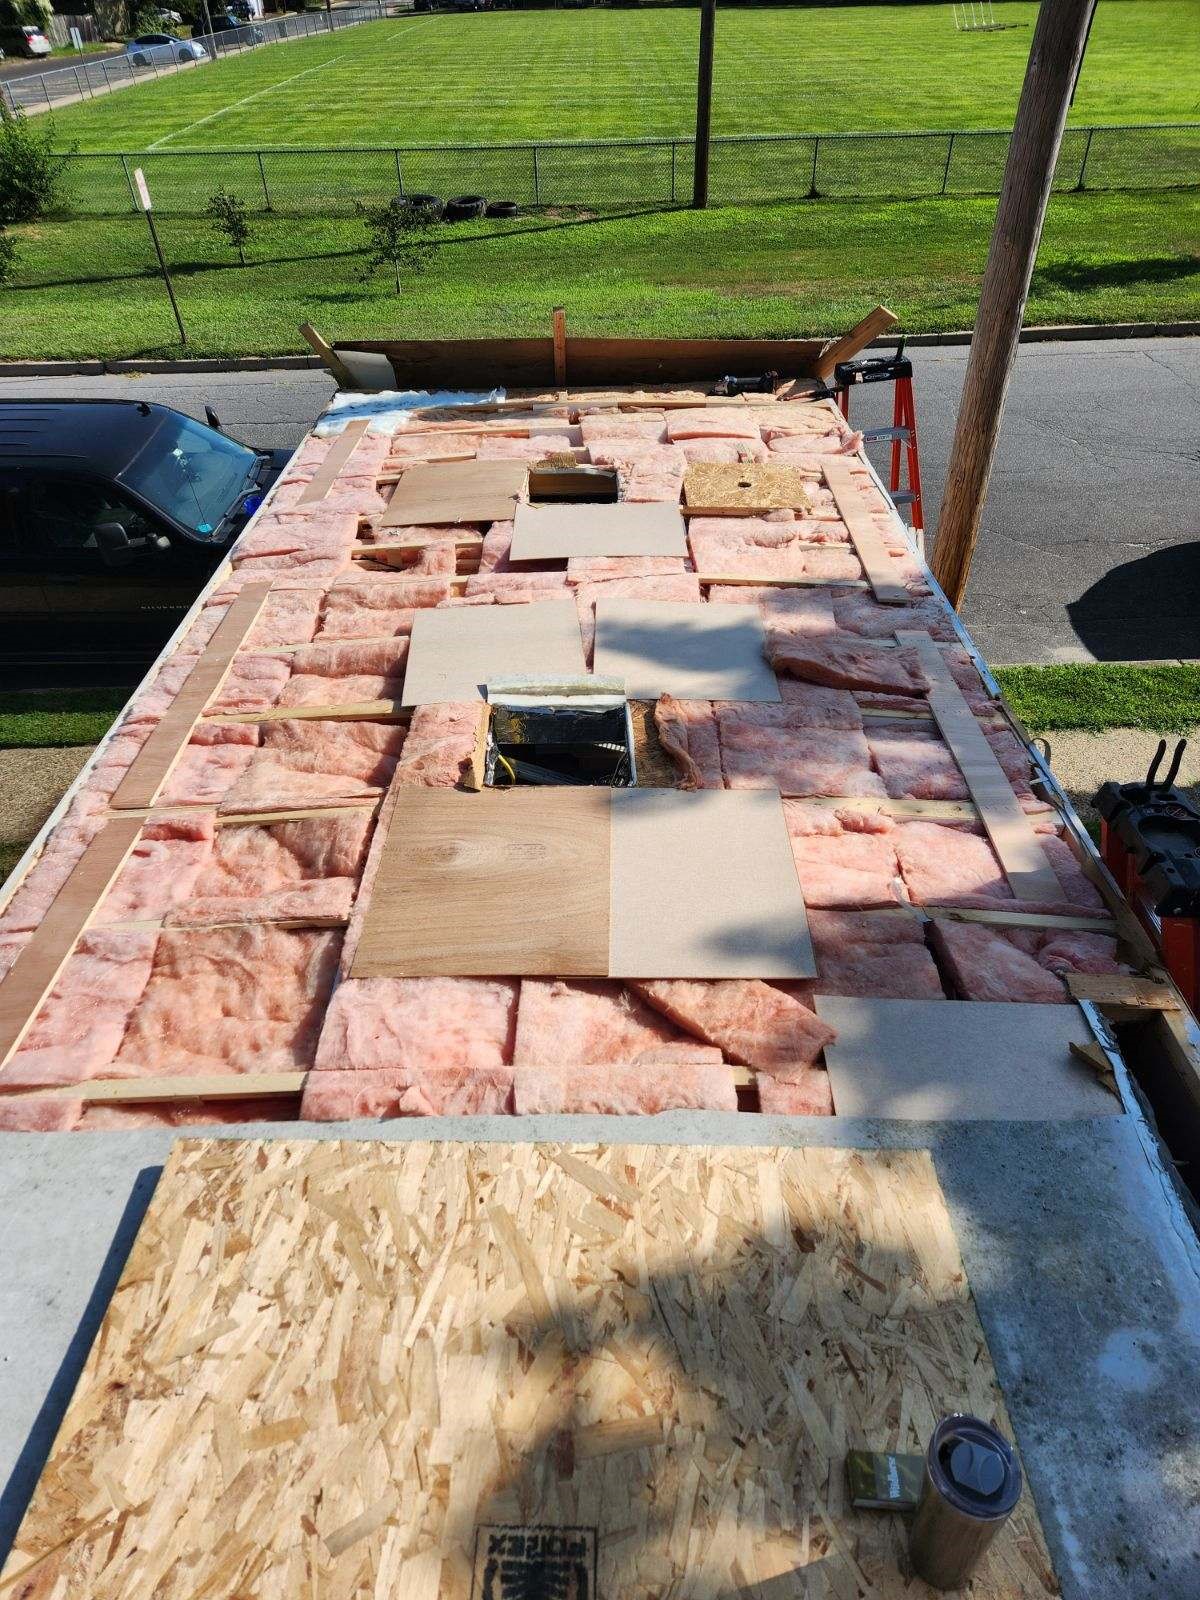
believe it or not, we got almost all of the decking down last night save the front and back pieces. Looks like, for the most part, we got lucky. Almost all of the rafters were square with the sides and in the front not much needed to be modified. A small shim here and there but easy fixes.
True to your posts, once we got back to the fridge vent things changed fast. There was one rafter that had to be built up quite a bit. We kept measuring and remeasuring thinking we were doing something wrong.
Conversely two or three rafters down we met one that was obscenely high. For this one sanding wasn't enough and building up the adjacent rafters would have thrown off the whole works. So for this one, we removed the stapled-on 1/8 side pieces of the rafter, forced the top piece of the rafter down (didn't take much force), and then put new pieces of 1/8 on each side that are longer than the originals to hold everything in place. I had to cut them to follow the arch.
I wish I had pictures of this process but alas we were focused on the work and the setting sun.
I'm glad you posted that information on using drywall tape to seal the deck seams. I too saw the dicore post that said to use construction tape and have three rolls of it ready to go. But I actually thought about that last night, "Wait a minute. This bonding glue says it doesn't stick to plastic. Tape is plastic..." I'll be returning those to Amazon and picking up fiberglass drywall tape instead.
Today we're going to finish the decking, all the cutouts and sand, sand, sand.
Originally we were going to start putting on the EPDM tomorrow. But based on the forecast and the warning about heat, I'm not going to have enough glue. I ordered more, but it won't be in for a few days due to the holiday and my local Camper World and other stores say they don't have any in stock.
So tonight we'll close up the vent openings with some 1/8, lay out the roof, and then cover her up for a few days. This will also give me a chance to really dive into some of the other posts about finishing this up, including the attic vents and especially the gutter hack.
Questions:
When you round the sides, how much are you taking off? Just enough that it's not sharp or rounding it like trim molding? I want to make sure I don't run into problems when I use the butyl hack to fill in the gaps.
When you taper the front deck down, do you use a belt sander to make it reach a point? Also to confirm, how far back do you start the front taper? Right where the front panel starts?
Sorry if these were answered already and I missed them.
Thanks again John B for all this great information. This project would have been a disaster without you!
Now... Off to Lowe's
Bob L.
__________________
__________________
|
|
|
|
|
|
|
Currently Active Users Viewing This Thread: 1 (0 members and 1 guests)
|
|
|
 Posting Rules
|
You may not post new threads
You may not post replies
You may not post attachments
You may not edit your posts
HTML code is Off
|
|
|
|
 » Recent Sunline Discussions
 |
|
|
|
|
|
|
|
|
|
|
|
|
|
|
|
|
|
|
|
|
|
|
|
|
|
|
|


 Linear Mode

