 |
|
 05-21-2017, 11:11 AM
|
#1
|
|
Member
Join Date: May 2017
Location: Tennessee
Posts: 39
SUN #9333
|
Water damage around front window
While getting our new to us 2004 T-2199 ready for our first camping trip, I was flipping the mattress and bumped the bottom curtain holder. Now I'm truly heart broken.
That little bump revealed that the wall at the bottom corners of the window is only paper thin due to previous water leaks. 
The window had been resealed by a previous owner and it appears that the work was done well.
During inspection, I looked that area over really well, but since there was no signs of a water leak, I didn't push on the wall to check for weak spots.
Question...
1-is the camper safe to pull and use?
2-does anyone have a picture of the framework around the front window?
3-can the repairs be made from the inside without having to remove the outer siding?
I don't have a covered area or garage big enough to work on the trailer, so it would have to be tarped during repairs.
I was planning on replacing the roof in a year or two(if we enjoy camping like we think we will), so that timeline may have to move to the left a bit to repair the front wall.
I've already started resealing all of the openings on the roof and plan to remove one window at a time to reseal all of those but this new damage wasn't something I was expecting or something I look forward to right away.
Kind of bummed out right now[emoji45]
Sent from my iPhone using Tapatalk
__________________
|

|

|
|
05-22-2017, 09:51 PM
|
#2
|
|
Moderator
Join Date: Nov 2006
Location: Ohio
Posts: 12,656
SUN #89
|
Hi John,
I may be able to help. To your 3 questions.
Quote:
Originally Posted by JohnByrum

Question...
1-is the camper safe to pull and use?
|
1. As long as the entire front wall is not rotted, towing the camper should be OK to use it with caution while keeping an eye on it. You can check by pushing on the wall around the widow on all sides. If the whole thing gives way, that is a problem. If it feels as solid as a camper wall can be, check another wall that is good for the feel, then your damage is not that bad, yet. You can then make the judgement call on if it is OK to use. Any camper wall has some flex to it. We cannot tell from here, how good or bad it might be at this point.
Quote:
Originally Posted by JohnByrum
2-does anyone have a picture of the framework around the front window?
|
Yes, I have many pics of resealing the front window. I just have not yet created a post of them on how the window reseal. See this link to my photo bucket with many more of the front window area.
These are not in any order from start to finish, they are all part of the process from removing the window to final install. These are pic's on my Flicker photoserver page. https://flic.kr/s/aHsmbt5efS
Here is the outside looking in on the frame

The inside looking out on the frame

These 2 links show other windows being resealed and the process is the same for the front. They may help.
http://www.sunlineclub.com/forums/f7...tml#post131769
http://www.sunlineclub.com/forums/f7...tml#post135419
Quote:
Originally Posted by JohnByrum
3-can the repairs be made from the inside without having to remove the outer siding?
|
It all "depends" on what the damage is and how much damage there is if the siding has to come off. If you want to do a check on how wide spread the water damage is without removing anything, this post on a moisture meter can help you understand if the wet is 2" out from the window or several feet away and all the way to the floor line. You would scan the entire front wall inside. Most all water flows down to the floor and then under the camper if it is been leaking long enough and heavy enough. Checking the bottom black waterproof membrane will tell if the water is down there. http://www.sunlineclub.com/forums/f7...per-17613.html
You can also have a look by pulling off the inside window flange with all the screws and looking at the wood sill. Just have a helper on the outside holding it in case the window wants to start falling out with flange off. Most times it is stuck to the wall. You can then put the flange back on when your done looking.
Here is a pic with the inside flange off. You can see the wood and the opening in the camper. In this case you can also see they did not center the window in the opening very well. This means the sealing tape is not even all the way around. The thin area has less sealing tape to create a better seal. Look at the bottom gap and the top gap are very different.


If the wood is only rotted right by the window metal frame, then yes, that can be changed out without removing the siding and most times not even the inside wall board. You just extract the bad wood frame at the window opening edge and replace.
If the rot goes many feet away from the window and includes many wall studs, then this is more involved. First we would need a pic of the entire front wall inside to see what cabinets and bed setup are located to help which way to pick to do the repair. The issue is, what method will give the best long term repair and look the best inside and out when you are done.
If the wall board is in good shape and not totally gone, and there are a lot of cabinets the wall board goes over, then in this case, taking the siding off can give you the ability to do a nice clean repair from the outside, replace all bad wood, fasten the wall board to the new wood and then put the siding back on.
If the wall board is badly rotted and almost gone, then it may have to come out as it is gone. In this case you have to take the wall down inside. And you may need to still take the siding off as the siding is stapled to the studs and the cabinets are screwed through the wall board from the outside in. This is the more worst case repair but you do not know this until yet can sort out how far the water damage has gone. The moisture meter can help tell you this.
Taking the siding off and putting it back on, is not that bad. And it can be done without damage to it. Plus you get to reseal the corners which helps the camper last longer if you are talking about a roof redo.
Now to problem. The front window has been known to leak 2 ways. Water comes in the frame seal to the camper sides. Or water leaks in the corners of the glass to the inside of the metal frame. Do you know which you had or both?
If the prior owner only stopped the leak on a frame to siding seal leak by putting a small bead of caulking on the outside edge of the window frame to the camper siding, odds exits when the caulk cracks the leak will come back again in the near future. It will work, but it is not long term.
For the front window which takes a beating when towing in the rain driving water hard into the window frame seal, it really needs the window pulled out and resealed with butyl tape and then caulked. The caulk alone can hold water out, but it is thin for a primary seal. It is great for a secondary seal in addition to good sound butyl sealing tape under the flange.
Hope this helps.
John
__________________
Current Sunlines: 2004 T310SR, 2004 T1950, 2004 T2475, 2007 T2499, 2004 T317SR
Prior Sunlines: 2004 T2499 - Fern Blue
2005 Ford F350 Lariat, 6.8L V10 W/ 4.10 rear axle, CC, Short Bed, SRW. Reese HP trunnion bar hitch W/ HP DC
 Google Custom Search For Sunline Owners Club
|
|
|
|
|
07-13-2020, 12:10 PM
|
#3
|
|
Member
Join Date: Jun 2009
Location: Pennsylvania
Posts: 73
SUN #869
|
I just found some warping on the inside below my 2007 T1950 front window too:
(1) The exterior gray putty between the frame and the siding looks perfect;
(2) The white rubber gasket in one corner is dislodged a little;
(3) That dislodged spot has a lot of dirt, revealing the path of the water;
(4) The black thin rubber seal on the hinged cover isn't fitting well in the corner (although, it shouldn't be needed since the window itself should shed water);
(5) The other exterior window corner with warping under it looks great and I can't find a water source/path.
But my big question is: What are some ways to correct the white gasket not staying in the corner? Caulk? New Gasket?
I am happy to use caulk in that I go over my T1950 every year, several times a year (like the roof, etc), so I would be on top of re-caulking.
Thanks in advance!!
-Tony
__________________
|
|
|
|
|
07-16-2020, 08:41 AM
|
#4
|
|
Moderator
Join Date: Nov 2006
Location: Ohio
Posts: 12,656
SUN #89
|
Tony,
The front window can have leaks from 2 main places.
1. The window flange seal to the siding. This is the putty tape area that you mentioned looked good. I have had to fix a good number of these leaks on my project campers and other friends. There cannot be "any" separation or hair line crack in the putty tape. If there is, that is the start of a problem that will come in time.
2. The glass seal to the metal frame. We have had this issue reported before on the forum. I have never had to replace the glass itself yet and I am not 100% sure how the glass is bonded to the metal. On the single hung windows, even on your camper, the glass is sealed direct to the metal frame what moves up and down. The white strip on the outside is "not" a water seal, it is a dirt seal. But, the front window is made a little different.
See this thread by HenryJ, he had a leak and he caulked the white outside seal to the frame and it appeared to help. He has now sold the Sunline but he had it a good while. There are others on the forum that also caulked that seal and the issue stopped.
https://www.sunlineclub.com/forums/f...hts-10605.html
https://www.sunlineclub.com/forums/f...dow-12172.html
You may want to remove the metal ring inside the camper and look to see if the water is coming in from the siding to window flange seal, or the glass to frame seal. If you take the metal ring off, you can look all the way to the front wall and see if it is a putty tape leak or not.
Here are a few posts on that issue
https://www.sunlineclub.com/forums/f...eak-10529.html
https://www.sunlineclub.com/forums/f...eak-13170.html
If you are going to caulk the front rubber to metal seal inside the rock guard I recommend using Geoseal Proflex RV or Dicor non sag sealant. The Proflex may be a little better in this case. To work with either, see this thread on how to apply and smooth it out. https://www.sunlineclub.com/forums/f...tml#post137746
The Proflex will spread out just like the Dirco does using this soapy wet finger method. Only put the Proflex on in no longer then about 2ft to 3ft lengths and then spread it out. Do not do in the hot direct sunlight, it dries too fast. Once it starts drying, the Proflex will ball all up trying to spread it. Either caulk must have the surface perfectly clean to bond permanently.
I suggest you "do not" use a silicone caulk, sooner or later it will release from the substrate and leak. It is good caulk, just camper outside sealing is not a good application of it. Way too much flexing.
Hope this helps and let us know how you make out.
John
__________________
Current Sunlines: 2004 T310SR, 2004 T1950, 2004 T2475, 2007 T2499, 2004 T317SR
Prior Sunlines: 2004 T2499 - Fern Blue
2005 Ford F350 Lariat, 6.8L V10 W/ 4.10 rear axle, CC, Short Bed, SRW. Reese HP trunnion bar hitch W/ HP DC
Google Custom Search For Sunline Owners Club
|
|
|
|
|
07-17-2020, 11:40 AM
|
#5
|
|
Member
Join Date: Jun 2009
Location: Pennsylvania
Posts: 73
SUN #869
|
John, Thanks for all that info! You're a saint for replying to these messages with thoroughness!
I did come across all of those links in my research ...that you referenced with convenient links. But I still don't have solutions to one or two things.
(1) I did remove the white gasket and it's obvious that the front window is sealed to the flat part of the metal frame with clear caulk of some kind. It is silicon for sure, because some of it oozed out at the factory at the corners. When I push on the window's corner where it rests against the metal frame (and caulked), mine displays a tiny bit of water movement when pressure is applied to the glass corner. So I may need to seal it better somehow. But EVEN IF tiny, tiny amounts of water got through that caulk, the metal window frame has and interior channel in it to hold water if it DID get through the caulked seal, and I see no water. I n other words, if water got through the glass-to-metal caulk seal, it would hit the deep channel first and I'd see that water in the channel. So I am still lost on where the water is coming from, causing the warping of the paneling.
(2) The large flap, which I think you're calling a rock guard, has a black rubber seal strip around the inside (as photographed above). Mine is letting water in when it rains because that seal is partially detached. BUT since the window glass is fully sealed with caulk against the frame, the rock guard shouldn't be needed at all for water proofing (just rock guarding). So why did they put that seal in? I guess for redundancy. I will replace the black rubber strip seal on that rock guard, but I don't expect any changed water infiltration results since the glass caulk seal against the aluminum window frame is what ultimately keeps water out. Let me know if you have any thoughts on this.
(3) The warping I found inside doesn't seem wet. It could be from the distant past, and if it is, maybe water isn't actually getting in now! I Say that because I did just pull off silicon caulk from the top of the window where the outside frame meets the siding, revealing the butyl tape seal. This is from the previous owner, so it's possible that water got in from long ago and it's not longer getting in, I don't know. I think I'm going to caulk all the way around where you did with your non-leveling Dicor. But I think I'm going to use regular window and siding caulk since It's easy to work with and I do have the time to inspect it every year and re-caulk if needed; I'm an expert caulker  as I'm a handyman for 16 apartments for 20 years now.
In summary, I don't think the water is getting in via the glass-to-frame caulked seal; if it were, there'd be water in the interior channel in the frame before it could reach the wall. The only other place is the frame-to-siding seal, which I will caulk.
I think it will be a waiting game. I JUST noticed the warped interior, so I have no way of knowing if it's new or it has been there the whole time I've owned it for the last 3 years.
-Tony
P.S. I just touched the silicon caulk seal of the glass-to-metal frame and it's a lot stickier than regular silicon caulk, FYI.
__________________
|
|
|
|
|
07-17-2020, 04:21 PM
|
#6
|
|
Moderator
Join Date: Nov 2006
Location: Ohio
Posts: 12,656
SUN #89
|
Tony,
Very good/excellent info in your last reply! I have the entire window out of my 2004 T1950 project camper right now and I need to go look at it for some thoughts I have now sparked from your last post.
I'll report back soon.
PS. hold off on the house caulk for the moment, I'll explain more when I come back.
John
__________________
Current Sunlines: 2004 T310SR, 2004 T1950, 2004 T2475, 2007 T2499, 2004 T317SR
Prior Sunlines: 2004 T2499 - Fern Blue
2005 Ford F350 Lariat, 6.8L V10 W/ 4.10 rear axle, CC, Short Bed, SRW. Reese HP trunnion bar hitch W/ HP DC
Google Custom Search For Sunline Owners Club
|
|
|
|
|
07-17-2020, 07:09 PM
|
#7
|
|
Member
Join Date: Jun 2009
Location: Pennsylvania
Posts: 73
SUN #869
|
Cool! I wouldn't caulk anything until a few weeks from now; I'm still not sure about it and may just try the Dicor.
__________________
|
|
|
|
|
07-17-2020, 11:15 PM
|
#8
|
|
Moderator
Join Date: Nov 2006
Location: Ohio
Posts: 12,656
SUN #89
|
Hi Tony, I made a trip to the barn and took some pics to share. Your pics showing water beads at the glass seal are excellent.
That said, you might have 2 problems going on at the same time. First some comments on your last reply.
Quote:
Originally Posted by tony17112acst
John, Thanks for all that info! You're a saint for replying to these messages with thoroughness!
|
Your welcome.
Quote:
Originally Posted by tony17112acst
snip..
I did remove the white gasket and it's obvious that the front window is sealed to the flat part of the metal frame with clear caulk of some kind. It is silicon for sure, because some of it oozed out at the factory at the corners.
When I push on the window's corner where it rests against the metal frame (and caulked), mine displays a tiny bit of water movement when pressure is applied to the glass corner. So I may need to seal it better somehow.
But EVEN IF tiny, tiny amounts of water got through that caulk, the metal window frame has and interior channel in it to hold water if it DID get through the caulked seal, and I see no water.
In other words, if water got through the glass-to-metal caulk seal, it would hit the deep channel first and I'd see that water in the channel. So I am still lost on where the water is coming from, causing the warping of the paneling.
Snip..
P.S. I just touched the silicon caulk seal of the glass-to-metal frame and it's a lot stickier than regular silicon caulk, FYI.
Snip..
In summary, I don't think the water is getting in via the glass-to-frame caulked seal; if it were, there'd be water in the interior channel in the frame before it could reach the wall. The only other place is the frame-to-siding seal, which I will caulk.
I think it will be a waiting game. I JUST noticed the warped interior, so I have no way of knowing if it's new or it has been there the whole time I've owned it for the last 3 years.
|
A few comments, from this pic of yours

I do agree the caulk/sealant that is on the outside below your thumb does look like silicone. But it being sticky after all these years, is not a trait of normal silicone. Most silicones that I have seen (which is not every one of them, but many) cure when exposed to atmosphere (air).
Question, to the left or right of that questionable silicone strip looks to be the adhesive used to bond the glass to the metal frame. Can you pick at the more clear sealant and is it sticky too? It is odd that the strip of caulk in question has changed color to a more milky/tan color then the other sealant that looks to be bonding the glass to the metal frame. Or the pic is just tricking me and there is no real color change, all the sealant looks like that and all of it is sticky too. Have a look and report back.
A question in my mind is, did a prior owner put some kind of caulk in that corner to try and stop a leak and that oozed caulk and it is not original from the window manufacture (Kinro)? If they did, it would explain why that small strip of questionable caulk is something else and the color is off, like some other form of caulk/silicone.
The water droplets you show, are evidence that the glass to metal frame seal is leaking at some level. It may or may not be the problem of the warped interior, but it is a problem that needs to be addressed.
The white vinyl molding strip you removed, does that snap into a channel? How is it held in place? If it just snaps into a channel, then I would be willing to pull mine out and have a closer look for comparison. At this stage, the caulking to seal the glass to the frame should occur with the white molding strip out and then insert the white strip possibly while the caulk is still wet. That would be a better seal then trying to seal just the white molding strip only. Granted, sealing the white molding to the aluminum frame can help shed water from ever getting to the glass seal, so doing that can help. Just I would do the inside as well as the white molding.
If that small strip of questionable caulk was an add on and not the original glass seal, and it might be silicone, I myself would remove it before putting new good caulk on. Since it may be silicone, it needs to be totally removed as there are going to be bonding issues with other caulks as most do not stick to silicone.
I use 3M General Purpose adhesive remover to get silicone totally off the surface of camper parts. Granted, I buy it by the quart and use it on many campers as my last resort go to chemical when others do not work. They do sell it in a spray can for less cost than a quart. You have to let it soak, wet a rag and hold it on the caulk and it will dissolve the silicone in time that can be wiped off and not remove the paint . https://www.3m.com/3M/en_US/company-...3786499&rt=rud
There are other brands of adhesive remover, just I have not tested them on camper paint to know how they work.
The channel inside the camper next to the glass, you are correct, that channel would need to fill and flow over before water made it down the wall. Here are some pics to show others and see if yours looks just like this.
The outside like yours with the white vinyl molding in place.

The inside next to the glass, the channel we are referring to. The red arrow is pointing to it. The glass is sealed to the back side of the metal that creates part of the channel. Any water past the glass makes it into that channel. And there are no drains for the channel unless it overflows the channel.

Last year I had water come in my slide end wall window on the T310SR. It is a sliding left to right window with a felt seal between the glass and the frame. Water off the top of the slide made it past the felt and into the channel which is similar to your front window. But that slide window has drains to the outside from the channel. In my case, the drains were pinched too close (shut actually) and they did not drain very well to at all. Monsoon rains beat on the window, overflowed the channel and leaked down the inside of the wall. It did not affect the wall board as it ran by so fast, but it did affect the slide floor as that is where the water stopped and pooled. I got it all fixed up and corrected the window drain issue. Point being, a leaking front window at the glass seal can overflow the channel if the leak is bad enough. And let go, can warp the wall board. That may not be your case right now, but may have been in the past which prompted someone to add that silicone looking caulk. Bottom line, the window glass seal needs to be addressed now that you found it.
Quote:
Originally Posted by tony17112acst
(2) The large flap, which I think you're calling a rock guard, has a black rubber seal strip around the inside (as photographed above). Mine is letting water in when it rains because that seal is partially detached. BUT since the window glass is fully sealed with caulk against the frame, the rock guard shouldn't be needed at all for water proofing (just rock guarding). So why did they put that seal in? I guess for redundancy. I will replace the black rubber strip seal on that rock guard, but I don't expect any changed water infiltration results since the glass caulk seal against the aluminum window frame is what ultimately keeps water out. Let me know if you have any thoughts on this.
|
I agree with your thoughts, the rock guard has 2 seals. One is the fiberglass panel to the frame and the second a seal of the pivoting cover to the metal frame attached to the camper. See here in pics of my 2004 T1950 front cover. Yours I think is the same, is it?
The are also drain slots, the breaks in the cover seal to the metal frame so if water gets in, it can drain out.


I believe those 2 seals are there to limit water (shed it actually) from getting in, but mostly to keep dirt and dust out of the front window. Sunline use to use a brand window from Hehr for the front window. The rock guard on those did not fit tight to the window frame, they were more of a large cover to protect the glass and had no seals to the window frame. Since the cover has so much open space, it never needed drains and it did shed water and debris from hitting the window. The Kinro front window is just made different. On my T310SR, the front window is in our bedroom over the bed. We have 2 single hung windows and an entry door with glass in the bedroom. There is a lot of natural light in the bedroom and we never open the front rock guard. I actually put a piece of pink foam board in the air space between the glass and the rock guard and leave it locked in their all the time. The wife made a curtain inside to cover the entire window over the head of the bed. We winter camp and the insulation helps slow down the cold getting in and the heat going out. I can attest, dust does get into that space, it is not a dust proof seal, but it helps.
Since your window lets a lot of light into your T1950 living space, I assume you open it all the time. And you look out the window so you wash it often and the dirt does not build up as badly as mine that never opens.
The pics above show my seal for the fiberglass shrunk and are coming out in the corners. I will address this when we get to putting the window back in.
Quote:
Originally Posted by tony17112acst
(3) The warping I found inside doesn't seem wet. It could be from the distant past, and if it is, maybe water isn't actually getting in now! I Say that because I did just pull off silicon caulk from the top of the window where the outside frame meets the siding, revealing the butyl tape seal. This is from the previous owner, so it's possible that water got in from long ago and it's not longer getting in, I don't know. I think I'm going to caulk all the way around where you did with your non-leveling Dicor. But I think I'm going to use regular window and siding caulk since It's easy to work with and I do have the time to inspect it every year and re-caulk if needed; I'm an expert caulker as I'm a handyman for 16 apartments for 20 years now. |
Since you have warped wall board, pics can help, please post, that suggests somewhere or sometime, water may have been in the area. Having seen enough front window leaks take out the front wall and floor of a camper, I suggest you check to see if your window frame to siding putty seal has leaked at some time in its life. Do this ideally before you caulk around the edge of the window. This check will not take long, 30 minutes to an hour and you will know with confidence you have an issue or all is good.
If you take the inside metal frame off with all the screws in it, you can look directly at the putty tape that was used to seal the window frame to the siding. The putty tape was wider then the rough opening and it is exposed in that air space. If it was that area was wet at some point in its life, the can be wood water stained from a water leak and or black dirt could be showing. Water leaks leave a trail, even if that dried up years ago. See here,
When you take the metal frame off, you can see directly to the putty tape and the wood frame.

With a flash light you can see right to the putty tape and the wood frame for inspection.

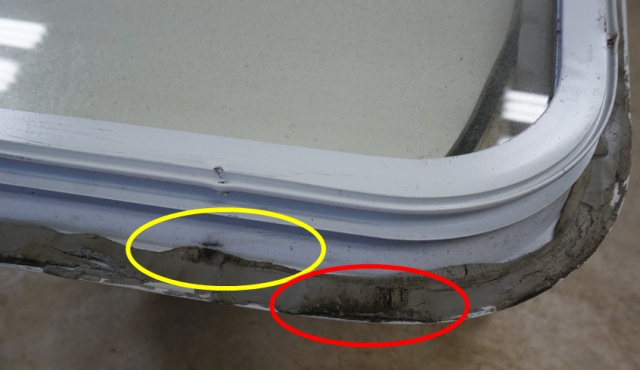
This is a putty tape seal failure from my T1950 front window. The putty tape has shrunk, it pulled away from the siding. These failure can also pull away from the window flange and stick to the siding. In this case it was from the siding. Over time water wicks into the putty tape separation and dirt and black looking mold starts from the water getting in. Again, over time the separation gets bigger and when the separation makes it to the inside, you can see the black dirt and small mold forming inside. This failure just started and a lot of water did not leak into the camper by pure luck. I have seen many of these putty tape failures on the front windows that look worse and it can took out the whole front wall. I also find Sunline did not always center the window in the opening, this means there can be limited sealing of the window flange to the siding in some cases, especially in the round corners.

A closer look. Red is the putty tape separation from the siding and water wick path from outside to the inside. Yellow is the dirt/mold that leaked in some and affected the inside of the camper leaving tracks that a leak occurred. You can look for this with the metal flange off.
And a real close up.

To be safe, if you take the metal inside flange off, prop a board etc. against the rock guard or have someone hold the window to the camper as a just in case that the window does not fall out. I have never had one fall out that easy, I always have to heat gun heat the flange to get the seal to break loose. But one never knows, yours may not be that sealed tight.
Taking the inside flange off to check for leaks will not affect the putty tape seal to make it any more bad then it may be. The seal was made/formed a few days to weeks after Sunline assembled the camper. The seal is either good and dry or bad and it had a leak at this point. If that area is all dry, no water stains, no mold marks, all the putty tape is pristine looking on the inside, then put the inside flange back on and it points to the window to glass seal only. If you find it had leaked in, then lets talk about what to do to correct it for long term.
You already know the glass seal needs to be addressed, but you do not know if the putty tape seal leaked somewhere in its life or is still leaking.
Do you have a moisture meter and scanned the wall? This is another way to see if the problem is still active. One of these https://www.sunlineclub.com/forums/f...per-17613.html
A leak that was later sealed out, may show dry to the meter but may also be dry rot and the meter cannot find dried out dry rot, but a visual inspection can.
Hope all this helps. Let us know what you find out.
John
More on the caulk to use after you can report back on this reply.
__________________
Current Sunlines: 2004 T310SR, 2004 T1950, 2004 T2475, 2007 T2499, 2004 T317SR
Prior Sunlines: 2004 T2499 - Fern Blue
2005 Ford F350 Lariat, 6.8L V10 W/ 4.10 rear axle, CC, Short Bed, SRW. Reese HP trunnion bar hitch W/ HP DC
Google Custom Search For Sunline Owners Club
|
|
|
|
|
07-19-2020, 01:00 PM
|
#9
|
|
Member
Join Date: Jun 2009
Location: Pennsylvania
Posts: 73
SUN #869
|
JohnB, I'll answer your questions in the order you brought them up in your last post.
ADHESIVE:
* The silicon-looking adhesive is indeed crystal clear all the way around the glass except for that corner which is where the dirt was tracking due to the rock guard letting in water PLUS the white dirt gasket pulling away from the corner.
* The coloring in the photo is accurate.
* It is still a little sticky in all locations equally.
* My judgment is that it was NOT added by a previous owner because of the dirt.
WHITE GASKET:
* Yes, it does snap into a channel in the aluminum frame nicely.
* After me discovering that it isn't designed to keep water out, I will likely not add any caulk to it.
CHANNELS: Yes, mine has never had water in it and it. It seems to be we're in agreement that if there's no water in the inside channel, then water isn't getting past the silicone-like seal linking the glass to the metal frame. I feel like I could add some protection to that seal, but it wouldn't change anything.
ROCK GUARD:
* Mine does look the same as yours.
* My rubber fiberglass-to-frame seal is pristine and not pulling from the corners like yours.
* My Foam rubber flap-to-frame seal (the one with the drain slots) is what is coming off in the corners. I bought a window seal that I may try out. Like you said, it's not for waterproofing, just to keep dirt and dust out. SO I'm going to worry about this lastly.
INSIDE FRAME REMOVAL:
* All of the putty tape was pristine with no dirt or discoloration.
* The entire white aluminum frame (top, sides, bottom) is pristine - no dirt.
* The wood frame on the top and sides and bottom is pristine, but the lower corners show dirt and evidence of moisture.
* Only the white bottom plastic corner staples have rust, the top corners staples do not.
* I see there are only two small spots where the putty tape has receded from the edge (looking from the inside), but when I inspect the outside at those same spots, there is putty present and looking outstanding. So I think when the factory attached the inner frame, it may have clamped it so tightly, that it may have pinched if off and is no longer continuous and then the heat had it shrink a little on the inside where it's not a factor.
* My window was centered nicely, unlike yours in a previous post.
My summary is that after removing the inner window frame, I still see no evidence of how water got (or maybe gets) in, just that it did/does.
OPTIONS:
* Put the inside frame back on and caulk/dicor the outside as a redundant measure to keep water out. And if it IS getting in through the putty, the the caulk should stop it.
* Spray the front window with a hose for 15 minutes and see if any drips are getting through the silicon-like glass-to-frame seal and check the inside channel for water.
* Remove the window and remove the putty/butyl and try some other material like dicor. But if the factory selected butyl putty, I'd guess that's the best otion and i'd just be making it worse.
* What about applying minimum expanding foam from the inside into the area where the frame covers up? The only thing I worry about there is if the window need replaced, is it possible with all that dried foam. But it's supposed to be water proof and there is no known solvent that can remove it, so it's a great candidate for something permanent ...unless it fails the heat/cold expansion.contraction properties.
I'll try to get some photos soon. Thank you again!
I'm hoping this thread is invaluable for future Sunline owners!
__________________
|
|
|
|
|
07-20-2020, 10:41 AM
|
#10
|
|
Member
Join Date: Jun 2009
Location: Pennsylvania
Posts: 73
SUN #869
|
Here are some photos for my previous post.
__________________
|
|
|
|
|
07-20-2020, 06:10 PM
|
#11
|
|
Moderator
Join Date: Nov 2006
Location: Ohio
Posts: 12,656
SUN #89
|
Tony, some comments. Excellent investigation. Ill comment on your responses and then get into the pics.
Quote:
Originally Posted by tony17112acst
JohnB, I'll answer your questions in the order you brought them up in your last post.
ADHESIVE:
* My judgment is that it was NOT added by a previous owner because of the dirt.
|
After your last note, I agree. Since the sticky is all over on the sealant, it appears that is the sealant Kinro used to bond the glass to the frame. Im not sure what that material is, I would say there are high odds it is not silicone even though it looks like it.
Quote:
Originally Posted by tony17112acst
WHITE GASKET:
* Yes, it does snap into a channel in the aluminum frame nicely.
* After me discovering that it isn't designed to keep water out, I will likely not add any caulk to it.
|
Thanks for the info on the channel. I agree, it needs to be sealed at the window itself for the primary sealing.
Quote:
Originally Posted by tony17112acst
CHANNELS: Yes, mine has never had water in it and it. It seems to be we're in agreement that if there's no water in the inside channel, then water isn't getting past the silicone-like seal linking the glass to the metal frame. I feel like I could add some protection to that seal, but it wouldn't change anything.
|
Agree, I do not think the glass to the frame is the large part of the issue at this point. But I would address that corner since you know water can wick/seep into the corner.
Quote:
Originally Posted by tony17112acst
ROCK GUARD:
* Mine does look the same as yours.
* My rubber fiberglass-to-frame seal is pristine and not pulling from the corners like yours.
* My Foam rubber flap-to-frame seal (the one with the drain slots) is what is coming off in the corners. I bought a window seal that I may try out. Like you said, it's not for waterproofing, just to keep dirt and dust out. SO I'm going to worry about this lastly.
|
Agree, you can address the foam seal when time permits.
Quote:
Originally Posted by tony17112acst
INSIDE FRAME REMOVAL:
* All of the putty tape was pristine with no dirt or discoloration.
* The entire white aluminum frame (top, sides, bottom) is pristine - no dirt.
* The wood frame on the top and sides and bottom is pristine, but the lower corners show dirt and evidence of moisture.
* Only the white bottom plastic corner staples have rust, the top corners staples do not.
* I see there are only two small spots where the putty tape has receded from the edge (looking from the inside), but when I inspect the outside at those same spots, there is putty present and looking outstanding. So I think when the factory attached the inner frame, it may have clamped it so tightly, that it may have pinched if off and is no longer continuous and then the heat had it shrink a little on the inside where it's not a factor.
* My window was centered nicely, unlike yours in a previous post.
My summary is that after removing the inner window frame, I still see no evidence of how water got (or maybe gets) in, just that it did/does.
|
Ill comment on the wood and the first blue wording highlights in my next reply as it will tie into options/next steps.
The second blue wording Ill comment on now. One thing I do know, odds are high the factory did not overtighten the inside flange to the point it squeezed all the putty thin to almost nothing. Reasons for saying this,
*The white headed screws will strip out in the aluminum framing (as it is so thin in the screw groove) if you try to put too much torque into them.
*You stated the putty tape from the outside looks good. I'm assuming this is the entire perimeter of the window flange. If the flange was over compressed to point it squeezed all the putty out, then you would not see much of any putty on the outside between the siding and the window flange in the valleys of the corrugated siding. While you may see the window flange tight to the siding on the high spots of the corrugated siding, the window frame flange has a recess so to speak to allow sealing tape to not squeeze out totally flat. The outer edge of the frame can touch the siding but yet sealing tape is still in the small recess. You may not have realized this until you have a window out and seen how their frame is made.
*The window frame and inside flange is made to a certain thickness of wood wall thickness. Once the inner frame bottoms out when being tightened, you really cannot not put a lot more squeeze into the putty tape as the flange will no longer be compressed much more. Having seen stripped out screw threads in the window frames, the thin window frame area for screw threads is one large limiting factor to not squeeze the putty dead flat, you just cannot get enough pressure.
*I have only done 13 campers worth of water damage repair so far, 9 of them Sunlines, I have not yet seen moldings, windows or doors ever squeeze the putty tape to be so thin that it creates a skip in that local area. But nothing is impossible and someone doing 100s of campers rot repair may have seen this. I have learned long ago, nothing is impossible, just some times things are more probable or not very probable. The learning never stops.
I agree, at some time in your campers life, moisture made its way into the left and right corner. I will add more in the next reply and on your Options list.
To this comment,
Quote:
Originally Posted by tony17112acst
I'm hoping this thread is invaluable for future Sunline owners!
|
This is an excellent thread that can be very valuable to others. Thanks for taking the time for to post pics and good feedback. Someone wanting to check their own front window can repeat the process.
Be back soon.
__________________
Current Sunlines: 2004 T310SR, 2004 T1950, 2004 T2475, 2007 T2499, 2004 T317SR
Prior Sunlines: 2004 T2499 - Fern Blue
2005 Ford F350 Lariat, 6.8L V10 W/ 4.10 rear axle, CC, Short Bed, SRW. Reese HP trunnion bar hitch W/ HP DC
Google Custom Search For Sunline Owners Club
|
|
|
|
|
07-20-2020, 10:28 PM
|
#12
|
|
Moderator
Join Date: Nov 2006
Location: Ohio
Posts: 12,656
SUN #89
|
Hi again Tony,
Your pics are of great help. This is what I am seeing from them, but the pics may be deceiving so have a look and confirm what I am stating is correct or not.
First off, there is one other way water can be at the bottom of the window, but after seeing your wall board, and the bottom 2 corners, I think this is a long shot. I feel you have other issues going on I will talk to below. The other way water can collect at the bottom of the widow is from excess moisture in the camper during times when the furnace runs and the windows sweat from the excess moisture in the camper. I can explain all this as I have seen what it can do, but I have no background to your camping or how many years you have owned the camper to know if at least during your use, this ever came to be.
Did you buy the camper new or used and if so what year/month?
Have you camped in during cool months when you needed to run the furnace and the windows sweat? If so, approx. how many days of camping would that be?
Does the camper store outside when you are not camping?
Is the camper covered during the winter months?
I am trying to create a timeline of your known camping with this camper and how many years a prior owner may have had it. After I see this info, I can try and back into if it adds up to be part of the problem.
Your Pics, This is what I see, please confirm.
This pic of yours shows several horizontal wall paper ripples below the right side corner all the way down the front wall to the knee bend area.

I zoomed in on that pic and drew on it so we can talk to it.

Closer

The screws

*The approx. 1/2 down wrinkled paper under the inside white metal window flange with all the screws in it, does not concern me all by itself. I have seen those wrinkles on other 2006 and 2007 Sunline campers wall board/paper even on known dry walls. The wall board from those years is different than the 04/05s.
*The top red circled area is concerning. The wall paper missing, the dark brown wall board wood color, the rust bleeding staples point to excess moisture in this area. Is the missing wall paper piece stuck to the back side of the metal flange ring you removed? It can add to this story.
*It appears the wood is water stained in this corner. The wood may be solid, but the grayish water staining which may be dry now (or not) points to water being there at some point in its life.
*The white powdery looking substance on top of the 1/8 luan wall board points to what I have seen when water has been present for a duration of time and the white aluminum ring, the zinc plated screws oxidizing and the wet react creating that white substance. Some is from the clamp ring, screws and some may be from molding.
*The yellow horizontal ripple in the wall paper suggests a large enough wetness, long enough to release the glue from the luan.
*The rusted screws in red suggest those screws were wet enough, long enough the zinc coating corroded and active rust started. You will notice the other screws are pristine silver like new. The rusting screws threads says that area was wet a good amount of time, somewhere in its life.
* The other several horizontal ripples in the wall paper below table support rail area mimic a wet wall, again at some point in its life.
The left side. This pic shows several horizontal ripples in the wall paper above and below the bottom of the window.


The red circled area has signs the wall board and the screws have been wet for a duration of time somewhere in its life.
The yellow circled area is more concerning. You have horizontal wallboard ripples above and below the bottom of the window. While the yellow area below the window suggests a window to siding flange leak, the yellow circle above the bottom of the window suggest a leak from the roof front rubber to siding seam, a front top left or front left side yellow body light, or a left hand side corner molding leak. Since the left side wood of the window opening is so clean and pristine at a high a level, it suggest those ripples came from an area other than the window flange to siding seal.
NEXT STEPS: Here are my thoughts to try and understand what happened to create these findings. Then once you have good confidence you know how this all fits, and you create a get well plan for all areas and decide what that means.
*You stated you go over the camper yourself and caulk all areas. What month/year did this start and approx. how long between caulking inspections?
*Can you post pics of the roof rubber to front siding seam? Im looking for the current and old caulk and how it touches the rubber and the front siding. Take special note/pics at the very corner where the left siding corner molding connects to the roof.
*Check the top left and side front left yellow body lights. Is there caulk along the top of the light to the siding? Is there water in the light? Either of those 2 lights can allow water into the left area above the bottom of the window. Removing the light, you can stick your finger in the hole to feel see the insulation.
*Check the front left side corner molding putty tape from the roof all the way to the bottom on both the front left wall and the left side wall. Are there any splits/separations in the putty tape? This is a hot spot for leaks. Even check the right side corner molding while you are at it.
*Do you have a moisture meter? If you do not, suggest looking into one. This post can help on the brand and type. https://www.sunlineclub.com/forums/f...per-17613.html
*Using the moisture meter you can confirm the front wall is dry that finger touch does not tell or if it is still wet with wet insulation behind it by scanning the inside of the wall. You can scan the left ceiling and front wall up high to see if there is wetness at the roof line. You can also scan the right side inside wall under the window all the way to the floor.
*You can scan the left side wall in the cargo hole area under the couch to see if the front wall and the floor in the cargo hole is wet or dry.
*You can scan the black darco under the camper looking up to see if the insulation is wet in the floor.
*Look at the bottom most piece of the siding on the front wall. There are hex head screws holding the bottom piece to the wall just above the A frame rails. Are the screw heads rusted? Remove the screws on the left side and see if the threads have started to rust. You can remove and then put them back in without creating issues.
Summary:
What your pictures show, or at least point to, at some time in this campers life the front window had a putty tape leak to allow water into the bottom corners.
The wall board ripples on the left and right point to a fair amount of water at some point in the campers life to get the wall board to ripple like that. The left side suggests water entry up high on the left side in addition to the window. Possible locations I listed above.
Since you are diligent on the caulking, you may have stopped an active leak when you started doing your caulking assuming you bought the camper used. The water may have got in before you started caulking it. An unknown now is, did the wall, ceiling, floor insulation ever dry out? Did the wall board ever dry out? Touching it by hand will tell a very wet wall, but cannot tell semi dry wall board and wet insulation behind it. The wallboard may be drying out.
Once you know some more about the above, it is a large step closer to help confirm you know all of the problem and then figure out what you want to do.
Here are some comments on the Options you stated
Quote:
Originally Posted by tony17112acst
OPTIONS:
1. Put the inside frame back on and caulk/dicor the outside as a redundant measure to keep water out. And if it IS getting in through the putty, the the caulk should stop it.
2. Spray the front window with a hose for 15 minutes and see if any drips are getting through the silicon-like glass-to-frame seal and check the inside channel for water.
3. Remove the window and remove the putty/butyl and try some other material like dicor. But if the factory selected butyl putty, I'd guess that's the best otion and i'd just be making it worse.
4. What about applying minimum expanding foam from the inside into the area where the frame covers up? The only thing I worry about there is if the window need replaced, is it possible with all that dried foam. But it's supposed to be water proof and there is no known solvent that can remove it, so it's a great candidate for something permanent ...unless it fails the heat/cold expansion.contraction properties.
|
For item 1, in this case caulking the exposed putty tape can be a stop gap measure. It would work, but there is a better long term fix.
Item 2, is a good test, you can learn from it and figure out what it means. Towing in the rain, beats water into the front window to siding flange area badly. So does heavy rain water off the roof. Do the test with the inside ring off. Stuff dry paper towels in the corners so you can see the water getting in by the wet towel and help it from going all over. It can help on the window to siding seal leak as a test as much as the glass to frame leak.
Item 3, Sunline followed the RV industry standard on putty tape. In my opinion, that type of sealing tape works, but has limited life. After 3 to 5 years of the camper living outside all the time, the putty tape starts degrading and it keeps getting worse the more it is exposed to the sun. Part of this is due to the quality of the product itself and the amount installed. I have found better quality commercial building butyl tape that has performance above and beyond what putty tape has to offer. On large steel buildings, they need/demand 20 to 30 year plus sealants. I also changed the installation method of the better butyl tape to compensate for the non-flat mounting surfaces where the old method does not always cover. After installing the new butyl, then add a second seal of either Dicor non sag or Proflex RV over the exposed butyl add even more protection. You must touch the siding and the flange to cover the butyl and encase it. If interested, I can link the exact brand and procedure on the better sealing option.
Item 4, I would offer a better long term solution then the foam, after you figure out all that is going on and what that fix it plan would be, pull the window, confirm you found the putty tape failure that you cannot see from the outside or inside. That putty tape seal in this location is a leak waiting to happen. Sooner or later, it will leak. Clean off all the old tape and install the new type of tape and caulk the exposed edge. This process will take about 4 to 5 hours the first time, but it is a long term fix that can be removed without excess effort if you ever have to replace the window. And redone all over again when the window is installed.
I sense this problem is bigger than the front window.
Hope this helps
John
__________________
Current Sunlines: 2004 T310SR, 2004 T1950, 2004 T2475, 2007 T2499, 2004 T317SR
Prior Sunlines: 2004 T2499 - Fern Blue
2005 Ford F350 Lariat, 6.8L V10 W/ 4.10 rear axle, CC, Short Bed, SRW. Reese HP trunnion bar hitch W/ HP DC
Google Custom Search For Sunline Owners Club
|
|
|
|
|
07-21-2020, 11:48 AM
|
#13
|
|
Member
Join Date: Jun 2009
Location: Pennsylvania
Posts: 73
SUN #869
|
Thanks again for your incredible detailed help on this!!
BACHGROUND:
* We purchased this camper 3 years ago (2017) from someone that listed it on here, but they had no forum activity except for the classified listing, so I do not know the background.
* We never have camped in cool weather. We turned on the furnace only once since ownership.
* We only use the camper 2-3 times per year and take it out a maximum of 2 days.
* It does sit outside full time with no cover.
* We're in humid PA and got some light mildew forming very lightly on random surfaces, but I can't decide if it could have been from moisture getting in that front wall or if it was from the excessive rain we had last year (which is when we noticed it).
* Here is the listing on this site from when I purchased it with an interior photo! https://www.sunlineclub.com/forums/f...950-17693.html
ANSWERS:
* The screws with a little rust all came from the bottom of the interior frame, the pristine screws were all from the upper. The sides had no rust on the screws, I believe.
* I don't know if that small piece of wall paper is stuck to the inner frame because I installed that frame now.
* The wood is definitely solid.
* I use self-leveling Dicor on the roof once a year since I purchased it 3 years ago. I check for any cracks and put new Dicor over any I find. I have also cleaned the roof each year except this year.
* There is caulk on every amber/red light lenses.
* I DID find that one left amber marker light was broken on top! ...easily big enough to let water in. I am starting to think water got in that way. I did drill tiny holes in the bottomg of every lens when I purchased the camper 3 years ago, but I think my holes are too small to let water out. I have never seen water in any of the lenses, but I just ordered 4 amber lenses that are coming in today. I did just recently flip the broken lens so the gaping opening is now facing downward, so if any water was getting in that way, it's no longer possible.
* I did (just today) go over the left and right butyl putty on the side corners (front) and re-seated it to close any cracks I found. Every crack I found was so tiny, I just don't water water getting in, but I could be mistaken.
* The bottom hex head screws on the bottom-most siding on the front are all white on the heads, but I did remove them and all have rust on them.
* Yes, everything feels dry, but as you say, we cannot know for sure what's on the inside. BUT when I press real hard, I hear crackling noises which could indicate dryness. But it hasn't rained here for 4 weeks!
FRAME-TO-SIDING SEAL UPDATE:
I spent many hours going over the butyl putty tape around the front window to prep it for some kind of caulking. I trimmed the excess bulging out with a pizza cutter, then pushed it in super tightly with a window screen roller (which is basically a blunt plastic pizza cutter), which worked GREAT! Then I used a putty knife with a wet cloth over it to smooth it out everywhere, which was easy to do on a 95+ degree day.
I spent so much time getting it perfect, that I'm starting to think I will not need any extra layer of caulk/dicor since it looks BETTER than the original factory seal, which is deemed good enough to keep out moisture.
Again, I don't feel any dampness (until it rains and I can check), so I may not have a leak, just evidence that it leaked in the past.
ROCK GUARD SEAL UPDATE:
I purchased some white foam rubber widow strip seal and removed the old black one and applied the new one. Unfortunately, the adhesive isn't that great. And it's a little tiny bit hicker than the old black seal, so it's stopping the middle sides from sealing tightly. BUT as we agreed, this seal is just to help with dirt and dust, it's not for water proofing from rain (like the silicon-like seal is for the glass itself and the butyl putty tape is).
So I think it's a waiting game on the next time it rains for me to check. the only thing extra I may want to do is to add something like silicon to the glass seal just as added protection.
I'll attach some photos you requested ...thanks a million!!!!
-Tony
__________________
|
|
|
|
|
07-23-2020, 06:03 PM
|
#14
|
|
Moderator
Join Date: Nov 2006
Location: Ohio
Posts: 12,656
SUN #89
|
Hi Tony,
Good detail you provided, again. I will comment on it. Sorry this took so long, been at Jury Duty all week. I will break this reply up into 2 parts to help viewing it.
Quote:
Originally Posted by tony17112acst
Thanks again for your incredible detailed help on this!!
|
You are very welcome. Glad to help as I can. We all learn something from these open discussions. Including me. I learn new things and confirm things I have found myself happened to other campers too. Which is a key learning, the problems may be bigger than we think.
I took your last reply, cut out some items and will comment on them. The blue items are of specific interest that I will create a summary statement at the end.
Quote:
Originally Posted by tony17112acst
BACHGROUND:
* We purchased this camper 3 years ago (2017) from someone that listed it on here, but they had no forum activity except for the classified listing, so I do not know the background.
* We never have camped in cool weather. We turned on the furnace only once since ownership.
* It does sit outside full time with no cover.
* We're in humid PA and got some light mildew forming very lightly on random surfaces, but I can't decide if it could have been from moisture getting in that front wall or if it was from the excessive rain we had last year (which is when we noticed it). [/COLOR]
* Here is the listing on this site from when I purchased it with an interior photo! https://www.sunlineclub.com/forums/f...950-17693.html |
I looked at the pics in the for sale post. The front wall pic is too far away and not enough resolution to help tell if the wall paper ripples were there when you acquired the camper. If by chance, you have some older pics of the front wall, that can help establish a time line. They may be fainter, smaller and then getting larger and that info and those pic dates can help.
The light mildew forming on random surfaces, please explain that a little more. Where did you see this? What did it look like? Is it able to be captured in pics now?
Quote:
Originally Posted by tony17112acst
ANSWERS:
*The screws with a little rust all came from the bottom of the interior frame, the pristine screws were all from the upper. The sides had no rust on the screws, I believe.
* I DID find that one left amber marker light was broken on top! ...easily big enough to let water in. I am starting to think water got in that way.
I did drill tiny holes in the bottom of every lens when I purchased the camper 3 years ago, but I think my holes are too small to let water out. I have never seen water in any of the lenses, but I just ordered 4 amber lenses that are coming in today. I did just recently flip the broken lens so the gaping opening is now facing downward, so if any water was getting in that way, it's no longer possible.
|
7/26/20. Corrected sizing typo error on drill bit size, was 3/64 and now 7/64" I just goofed a typo 
Good for you on drilling the holes. That does help. I use a 7/64s drill bit and drill 2 holes per lens in the bottom for the drain holes in my lights. I have found that is large enough to allow water to wick/drain out but not so big it creates other issues of water getting in. Going down to 1/16 might be on the edge of capillary action holding water until it evaporates out . 1/32 to - 1/64 drill, I would say has high odds capillary action will hold the water in until it evaporates out. But still, even the 1/64 hole will allow it to evaporate out over time versus no hole. The longer it sits in the lens, days verses hours the more chance it has to wick behind the lens into the camper. I will say this though, the bulb socket fit is very good on these lens surprisingly. While I have had lenses on the campers I have worked on 90% filled with water, oddly enough, they did not leak past the vinyl bulb socket. Some did leak past the foam seal to the siding that did not have the Dicro on them.
Here is a pic of my 2 holes. Also note the Dicor is on the sides of the lens as well as the top

Is this the pic of the cracked lens that was pointing up that is now pointing down? You must of cleaned off the Dicor if you flipped it.

Where was the location of the one amber lens that was broken and pointing up?
Good to confirm the rusted window flange screws where in the lower corner areas only and the window frame has good wood. That is good info on the window to siding seal.
Quote:
Originally Posted by tony17112acst
* I did (just today) go over the left and right butyl putty on the side corners (front) and re-seated it to close any cracks I found. Every crack I found was so tiny, I just don't water water getting in, but I could be mistaken.
* The bottom hex head screws on the bottom-most siding on the front are all white on the heads, but I did remove them and all have rust on them.
FRAME-TO-SIDING SEAL UPDATE:
I spent many hours going over the butyl putty tape around the front window to prep it for some kind of caulking. I trimmed the excess bulging out with a pizza cutter, then pushed it in super tightly with a window screen roller (which is basically a blunt plastic pizza cutter), which worked GREAT! Then I used a putty knife with a wet cloth over it to smooth it out everywhere, which was easy to do on a 95+ degree day.
I spent so much time getting it perfect, that I'm starting to think I will not need any extra layer of caulk/dicor since it looks BETTER than the original factory seal, which is deemed good enough to keep out moisture.
|
As a stop gap measure, cleaning up the putty tape and squeezing to close gaps is a good thing to do. But, it is not a long term fix for a camper that lives outside all the time.
It is also good that you removed and checked all the screws on the bottom of the front siding. That is an important piece of information.
Quote:
Originally Posted by tony17112acst
Again, I don't feel any dampness (until it rains and I can check), so I may not have a leak, just evidence that it leaked in the past.
Snip
* Yes, everything feels dry, but as you say, we cannot know for sure what's on the inside.
|
By using a moisture meter, it helps greatly show what is going on inside the wall, ceiling and floor when we are out of ways to detect the problem short of taking the camper apart.
The meter will look into the wall, ceiling and floor cavities and provide good information if a leak is still active and wet inside the walls, ceiling or floor. The way the water can seep into a wall cavity, the insulation soaks up some of the water and stays wet. Some of the water goes all the way down to the black darco membrane under the camper and festers there. The 1/8 luan wall board can start absorbing some of the water, but often times the vinyl wall paper stops the moisture from reaching the inside of the camper. In time, the luan will rot enough thickness of the wall board you will feel the wetness and or seeing rippled wall paper. By the time the ripples start appearing, there can be a good amount of water damage inside wall and lower sill boards. The moisture meter is reading the moisture up to ~ 3/4 into the what you are scanning where you cannot feel it from the outside. If you really want to know, suggest using the meter.
In your case, you may have stopped the leak, or not. Not sure on the exact time you have owned it, but it appears you have owned it for about a 3 year time frame. It is possible the wetness was active at the time you acquired it and you might have sealed up the roof area if it was coming in from there. The corner molding, window flange seal and the amber light could have been leaking for a while. When all the screws along the bottom of the front wall have rusted threads, I would estimate that could indicate approx. 2 to 5 years of wetness to get to that point. If the heads were rusted, that means heavier water and or longer time. It is hard to pinpoint the timing, as there may be 1 leak source or 5 different ones. The volume of water and at least 1 to 2 years is needed to start the break down of the coating on the screws and start the rusting.
By chance, did any of the screws have brown goo on them? That goo would be rotted wet wood and that indicates active water rotting is still present.
Quote:
Originally Posted by tony17112acst
ROCK GUARD SEAL UPDATE:
I may want to do is to add something like silicon to the glass seal just as added protection.
|
I agree, you want to caulk that area. I myself would not use silicone based caulk. I would recommend using Geocel Proflex RV caulk. https://www.geocelusa.com/product/pr...xible-sealant/
It is rated to bond both glass and aluminum. This caulk will hold up on the outside of the camper better and not release its bond like silicone based caulks can. I have seen myself when others have used silicone on the outside, the caulk breaks loose on one side many times in only about a 2 to 3 year time frame. The silicone is still flexible, but it broke loose it attachment on one side and it leaks around the silicone.
A summary in the next reply.
__________________
Current Sunlines: 2004 T310SR, 2004 T1950, 2004 T2475, 2007 T2499, 2004 T317SR
Prior Sunlines: 2004 T2499 - Fern Blue
2005 Ford F350 Lariat, 6.8L V10 W/ 4.10 rear axle, CC, Short Bed, SRW. Reese HP trunnion bar hitch W/ HP DC
Google Custom Search For Sunline Owners Club
|
|
|
|
|
07-23-2020, 06:08 PM
|
#15
|
|
Moderator
Join Date: Nov 2006
Location: Ohio
Posts: 12,656
SUN #89
|
Here is the Summary and possible next steps
Summary:
By the rusted thread screws all along the front bottom siding, indicates the wood behind that area has been wet at some point in its life all the way across the bottom front. Sometimes the leak entry point is only on one side of the camper or there are several leak points that I will call “seepers”. They are not a big hole, but they seep in an amount of water over a long period and never get a chance to dry out as new wetness keeps coming.
Over time the amount of water accumulated was large enough that as the camper was off level, by even a small amount, like when towing or being stored, the water runs the full width of the camper between the black darco membrane and the bottom siding wood board above it. This creates wood damage where ever the water touches, which can be floor joists and the outer floor band boards on the left and right side of the camper to name a few.
This project camper of mine had an active corner molding leak and a front window leak. While it had the start of roof leaks, the roof water was not far enough along yet to cause all this damage. This camper may be in a more advanced condition than yours, but you can see what it did to the front wall, the lower band board on the left and right of the camper. https://www.sunlineclub.com/forums/f...2-a-18706.html
Need more info on the amber cracked clearance light that was pointing up, but that location is for sure a suspect, but not to rule out corner molding leaks. Even tiny cracks in the putty tape can wick in water. Towing in the rain at 50 mph creates wind-blown water into those cracks at 50 mph. If there is a 20 mph head wind you are towing in, that adds to the problem creating 70 mph of water wind driven into those cracks. Water run off the roof when the gutters overflow allows roof water to beat into the putty tape. Any cracks, tiny or large are a bad thing in putty tape.
Putty tape: This is my personal experience with the putty tape that is used to seal the sides of the camper. The siding corner moldings, doors, windows, shore line cord hatches, water heater flange seals, furnace flange seal, fridge vent siding panels, etc. all use and rely on putty tape as their only sealant. Basically, any penetration in the siding is a leak potential when sealed with only putty tape that is past 3 to 5 years old. It just does not hold up.
With all the penetrations in the camper siding, putty tape leaks can be as bad for water damage as roof leaks. Yet, there is no direction in any Sunline manual (and maybe any other RV manufacture too) that talks about to do anything with the putty tape seals or siding seals. At least on the rubber roofs, the roof manufacture and Sunline tells us to observe the caulking frequently and address any cracks are they start.
I only give the putty sealing tape that was used 3 to 5 years before it can become comprised when the camper lives outside all the time. It may not be all bad at once, and most times is not all bad at once. But on a leak, any sealant failure is bad. When the camper lives outside all the time, the odds become larger that water will find a putty tape seal failure and start wicking water in. A camper stored under cover has lower odds of water damage as it is only exposed a fraction of the time.
What can you do to help prolong the camper life from water leaks? If you want to keep the camper a long time here are some things that can be done to help the putty tape situation.
1. Gutter spout extensions. I see your camper has these, at least in the pics that showed up. Good for you! These help lower the amount of water beatings into the corner moldings and any siding penetration below them.
2. Double seals at “all” putty tape locations. Every siding penetration regardless of location. Clean all exposed putty tape sealed areas. Using Proflex RV or Dicor non sag caulk, seal over all exposed putty tape. The caulk must touch both the siding and the flange of the item you are sealing over. While I have used a lot of Dicor non sag, and it works well, I now tend to like the Proflex RV better for the putty tape seals. It comes out looking better and does not shrink like the Dicor can requiring touch ups. Proflex however cannot be used on the rubber roof as it will negativly react with the rubber.
3. The front window of the Sunlines with the Kinro windows, these should have the window pulled out and new commercial building butyl sealing tape installed. (Do not use standard RV putty sealing tape) Then caulk over the new exposed butyl. The front windows are a known place of leaks due to the towing issue with the front window with driving water into the sealants. If one does not have the ability to replace the putty tape, then caulking over cleaned off putty tape is next best.
Rubber roof seams/seals. The next areas get move involved but does address the problems. While the Dicor caulking does help slow down the leaking, it is not fool proof and the leaks can occur between your roof sealant inspections. This may be part of your issues. Your caulking work looks very good, but the camper may not have been always done that well. That said, a camper living outside during north east coast winters with snow and freezing temps challenge a Dicor only seal as far as longevity aggravated each year as the original caulk gets older. Even when the caulking touch ups are done properly. I have experienced this myself on my T310SR. I was all over the roof caulk 4 times a year, including cleaning and 303 UV treating the rubber and the caulking. One November (2009), I did my last Dicor check for the season. Everything was good. Come March I ended up with a large crack in the original Dicor at the right rear corner that looked perfect in November. The junction between the rear wall roof molding and the right rear wall corner molding. That event was enough proof to me that you just cannot keep after the roof caulk fast enough once it gets old enough when the camper lives outside all the time uncovered. This was with a 6 year old camper at that point.
From that event, I researched and came up with using Eternabond on all the roof seams over the top of good Dicor caulk. First make sure all the Dicor is good as your first seal. Wait at least 1 month for the gassing off of the Dicor to cure, bleach clean the roof and then start applying Eternabond tape.
*First check the roof all around for a "rubber band/tire tube" soft feeling of the rubber. Just press/pat the roof to feel for it. Take special note to the gutter rails area and front and rear rubber to siding seal seams. That extra soft feeling means there as a leak under that area. This rubber band feeling is not the same as the total softer feel of the Sunline roof. Correct any found wetness area before starting the Ebond process.
*The front and rear roof seams are the worst actors. Start with them.
* Next comes the gutter rails, and get rid of the vinyl screw cover in the gutter rail and E bond over all the screws after they are checked for rust, replaced as needed and confirmed there is no damage.
*In time, keep going to get all the roof vents and other roof items.
This may take a good amount it time to do, but it will, stop the Dicor from failing and create a lasting sealant system. Cleaning the roof and applying a UV inhibitor like 303 Aerospace UV treatment after each cleaning is an added level of protection for the rubber, the E bond, all roof plastic and any exposed Dicro. This E bond process does not have to be done all at once, but ideally create a plan on how to get to it sooner, then years later. This post can show you what this Ebond process is all about. I had a bad batch of tape that had adhesion issues, but the company stood behind it and sent me new. The problem no longer has happened. Every camper I do a new roof on now gets this E bond treatment with good Dicor under it. https://www.sunlineclub.com/forums/f...ics-11610.html
For the last 10 years since I put that Ebond treatment on, I have never had to do a Dicor caulk check or add any more roof caulk. The number of years of a no leak roof just keeps growing. Granted I now store the T310SR in my barn, but I still have high confidence I have no roof leak issues due to failing roof sealants.
Your roof looks to be in good shape and your caulk looks good too. Consider the E bond treatment if you plan to keep the camper a good long time. If you do not have time to get to the Ebonding this year, consider a total camper cover and cover the camper during the off season.
Hope this helps. It may be more then you were thinking about, but with your great caulking abilities, you could clean the old putty tape on all areas of the camper and have a good seal of Proflex or Dicor non sag over all the problematic putty tape seals in not that long of as time period. For sure before winter comes along.
John
__________________
Current Sunlines: 2004 T310SR, 2004 T1950, 2004 T2475, 2007 T2499, 2004 T317SR
Prior Sunlines: 2004 T2499 - Fern Blue
2005 Ford F350 Lariat, 6.8L V10 W/ 4.10 rear axle, CC, Short Bed, SRW. Reese HP trunnion bar hitch W/ HP DC
Google Custom Search For Sunline Owners Club
|
|
|
|
|
07-26-2020, 06:50 PM
|
#16
|
|
Moderator
Join Date: Nov 2006
Location: Ohio
Posts: 12,656
SUN #89
|
In case someone is drilling drain holes in their marker lights, I made a typo in the post 14 above. I have corrected it,
7/26/20. Corrected sizing typo error on drill bit size, was 3/64 and now 7/64" I just goofed a typo
Quote:
|
Good for you on drilling the holes. That does help. I use a 7/64s drill bit and drill 2 holes per lens in the bottom for the drain holes in my lights.
|
Thanks
John
__________________
Current Sunlines: 2004 T310SR, 2004 T1950, 2004 T2475, 2007 T2499, 2004 T317SR
Prior Sunlines: 2004 T2499 - Fern Blue
2005 Ford F350 Lariat, 6.8L V10 W/ 4.10 rear axle, CC, Short Bed, SRW. Reese HP trunnion bar hitch W/ HP DC
Google Custom Search For Sunline Owners Club
|
|
|
|
|
07-31-2020, 12:29 PM
|
#17
|
|
Member
Join Date: Jun 2009
Location: Pennsylvania
Posts: 73
SUN #869
|
JohnB, thanks again for all of the important and detailed info! I decided to order the ProFlex RV (clear) and it finally came and I just put it on around the front window where the butyl putty is.
I have almost the whole tube available to do the rest on each side of the front (not the roof) to make sure water isn't getting in there. It may not be getting into the sides since I'm not seeing evidence.
I also installed the two top amber marker lights (brand new) and used the ProFlex RV to go over the top and sides. I am sad to say that when I cut the wire to the lights and stripped them, the copper stranded wire was totally dark brown which is what happens when moisture corrosion starts. Keep in mind that's INSIDE the wire shielding ...but It's my impression you could get the tip of a long wire wet and oxidation will travel inside, so it's not like water is inside the wire. But it IS evidence some moisture may have got into the hole that the marker light covers.
I think I'm just going to document with photos and see if it gets worse over the year and the winter. I my part of PA, I haven't had rain for about 4 weeks now and am waiting patiently. We have never driven this camper in the rain; if we see it's going to rain, we just don't go anywhere. we haven't been on a traveling vacation for the 4 years we've owned it, so we never were in the rain.
__________________
|
|
|
|
|
08-01-2020, 09:01 PM
|
#18
|
|
Moderator
Join Date: Nov 2006
Location: Ohio
Posts: 12,656
SUN #89
|
Tony, you are very welcome. Glad to help.
Just making sure on this paragraph,
Quote:
|
I have almost the whole tube available to do the rest on each side of the front (not the roof) to make sure water isn't getting in there. It may not be getting into the sides since I'm not seeing evidence.
|
If what you mean is, you are caulking the left and right corner moldings on both sides of it, Yes, for sure do them. The front corner moldings are prone to allow water in as the camper gets older. The water flowing off the roof beats into the front wall corner molding edges as the water runs off the roof. This is just from the camper being in storage. Towing in the rain can drive the water in, but the standing still roof water flowing over the wall can also be bad.
There is a topic we have not talked about yet in this post, when you store the camper, is the camper to be level, nose high or nose low?
After seeing enough front and back wall water damage, my thoughts are to level the camper. Nose high may help lower some of the water going over the front wall, but then it increases the water going over the rear wall. And the same being nose down. Then even more water goes over the front. Being level, the flow of water is closer to even which side it goes over.
How did you like working with the Proflex RV? Did you use the soapy wet finger to spread it out?
John
__________________
Current Sunlines: 2004 T310SR, 2004 T1950, 2004 T2475, 2007 T2499, 2004 T317SR
Prior Sunlines: 2004 T2499 - Fern Blue
2005 Ford F350 Lariat, 6.8L V10 W/ 4.10 rear axle, CC, Short Bed, SRW. Reese HP trunnion bar hitch W/ HP DC
Google Custom Search For Sunline Owners Club
|
|
|
|
|
08-03-2020, 11:08 AM
|
#19
|
|
Member
Join Date: Jun 2009
Location: Pennsylvania
Posts: 73
SUN #869
|
John,
Working with the Proflex RV (clear version) was almost exactly working with silicon. If it gets on an edge or surface you don't want it on, you got to wipe it off immediately with a paper towel or something, because it dries fast, and like silicon, a wet rag will not remove it. Mineral spirits works great on it if it's on your fingers, etc. But I did not need to use soapy water on my finger to "tool" it in. Be aware that it DOES shrink considerably as it dries, but since it's so sticky, I han no problems with any undesirable gaps forming. I chose not to use Dicor (non-leveling) because it does collect dirt easily and it would look terrible on the front. So I do have this fear with the Proflex Rv, because silicon does the same thing, and this seems to have a lot of properties silicon has ...we'll see.
Black streaks are what I hate most about having this camper, which is awesome in other many other areas. These streaks are almost impossible to remove in the Krytal Kote. I have tried so many chemicals and tested so many ways to remove them! I once was told to use the product Awesome. I did and my rag was getting whiter and whiter. When I did searches on it, I found that it's a paint remover! You'll find it in art forums; it's what people use to dissolve paint off small figurines to repaint. So I will never again use it. But I did find that Scrubbing Bubbles is the only thing that works with a nylon scouring pad with hours and hours and hours of work for just one side. So when I see black streaks, I see my life go down the tubes with a sentence of hard labor. So, I figured if I tilt the front downward, I'd have fewer black streaks in the rear; and it worked. But I recently switched back to pure level because there were very few in the back either way. By the way, the awning protects the door (right) side perfectly! No black streaks ever on that side where the awning is. I play around with the idea of mounting a pvc pipe (smaller than the awning diameter) against that left side gutter to stop water from overflowing and creating black streaks too. Then I'd only have black streaks on the front, and I could live with that, cutting down my labor hours. I clean black streaks off 5-6 times per year and it's incredibly frustrating. I keep the gutters clean too. Having something to store the camper UNDER would be the greatest solution, but that's a big pile of money. I'm in the woods, and stuff lands on the roof despite it being stored in a clearing.
__________________
|
|
|
|
|
08-03-2020, 05:30 PM
|
#20
|
|
Senior Member
Join Date: Nov 2018
Location: Pennsylvania
Posts: 328
SUN #10986
|
I haven't tried it, but an RV'er friend tells me that White Rain hairspray removes black streaks almost magically. Care to be our guinea pig?
__________________
__________________
|
|
|
|
|
|
|
Currently Active Users Viewing This Thread: 1 (0 members and 1 guests)
|
|
|
 Posting Rules
|
You may not post new threads
You may not post replies
You may not post attachments
You may not edit your posts
HTML code is Off
|
|
|
|
 » Recent Sunline Discussions
 |
|
|
|
|
|
|
|
|
|
|
|
|
|
|
|
|
|
|
|
|
|
|
|
|
|
|
|
|
|


 Linear Mode

