 |
|
 03-23-2020, 07:39 AM
|
#1
|
|
Senior Member
Join Date: Nov 2019
Location: Pennsylvania
Posts: 114
SUN #11695
|
Late 70s 11FKS Build
__________________
__________________
|

|

|
|
03-23-2020, 08:11 AM
|
#2
|
|
Moderator
Join Date: Nov 2006
Location: Ohio
Posts: 12,656
SUN #89
|
Hi Jay,
I just saw your rebuild video, GREAT WORK!!!
It looked like you Kregged the joints. Good deal. That will work well. I have used a lot of the pocket hole screw methods on my rebuilds. Since you are into just about a total rebuild, here is something to think about for the sidewalls and the roof etc.
Sunline used large staples to assembly the walls etc. Originally I thought this was not the greatest, but after trying it, it does offer some advantages and is for sure faster. Not saying you need to change from Kreg to staple, just mentioning it as FYI in case it helps.
See this post and the following as we are building walls and rafters. If you build truss rafters, lets talk on the process. I learned a few things doing my first ones. This link will drop you in the middle of a long ongoing post rebuilding a 2004 T1950 travel trailer. Here I start talking about the Senco 1" wide 16 ga. stapler. Two more posts down, I show the walls being made.
https://www.sunlineclub.com/forums/f...tml#post151085
Keep up the great work and we look forward to seeing the rest of your handy work.
John
PS. Where did you get the 2 x 4's that straight and small size knots? Locally here, I gave up trying to find non warping small size knots 2 x 4's. Had to go to larger wood, 2 x 10 or 2 x 12 and rip to get better lumber and not turn into rocker chair rails once I ripped it. Less waste also
__________________
Current Sunlines: 2004 T310SR, 2004 T1950, 2004 T2475, 2007 T2499, 2004 T317SR
Prior Sunlines: 2004 T2499 - Fern Blue
2005 Ford F350 Lariat, 6.8L V10 W/ 4.10 rear axle, CC, Short Bed, SRW. Reese HP trunnion bar hitch W/ HP DC
 Google Custom Search For Sunline Owners Club
|
|
|
|
|
03-23-2020, 05:31 PM
|
#3
|
|
Senior Member
Join Date: Nov 2019
Location: Pennsylvania
Posts: 114
SUN #11695
|
Quote:
Originally Posted by JohnB

Hi Jay,
I just saw your rebuild video, GREAT WORK!!!
It looked like you Kregged the joints. Good deal. That will work well. I have used a lot of the pocket hole screw methods on my rebuilds. Since you are into just about a total rebuild, here is something to think about for the sidewalls and the roof etc.
Sunline used large staples to assembly the walls etc. Originally I thought this was not the greatest, but after trying it, it does offer some advantages and is for sure faster. Not saying you need to change from Kreg to staple, just mentioning it as FYI in case it helps.
See this post and the following as we are building walls and rafters. If you build truss rafters, lets talk on the process. I learned a few things doing my first ones. This link will drop you in the middle of a long ongoing post rebuilding a 2004 T1950 travel trailer. Here I start talking about the Senco 1" wide 16 ga. stapler. Two more posts down, I show the walls being made.
https://www.sunlineclub.com/forums/f...tml#post151085
Keep up the great work and we look forward to seeing the rest of your handy work.
John
PS. Where did you get the 2 x 4's that straight and small size knots? Locally here, I gave up trying to find non warping small size knots 2 x 4's. Had to go to larger wood, 2 x 10 or 2 x 12 and rip to get better lumber and not turn into rocker chair rails once I ripped it. Less waste also |
John,
Are there any other advantages to using staples other than time saving? FYI we are also gluing the joints along with the pocket holes.
For the lumber, we are ripping 2x4's from Lowe's and, when possible, are salvaging cut off pieces from a local furniture framework manufacture. The wood from the furniture company is hardwood which I believe it poplar.
Thanks for the advice and we will gladly use it to help us efficiently build this beast!
Jay & Jenette
__________________
|
|
|
|
|
03-23-2020, 06:56 PM
|
#4
|
|
Moderator
Join Date: Nov 2006
Location: Ohio
Posts: 12,656
SUN #89
|
Hi Jay,
Your glue and screw Kreg setup is very good. The cross grain pocket hole screw setup is very strong. And on the floor joists on a truck camper setup, my personal thought, it may be better than stapling as the screws are in shear and the glue also added strength. On a trailer, the steel frame supports the wood directly so it is taking the load without a fastener being in the mix. Sunline did use staples in the trailer floor system, but only to attach the outer band board to the floor joints, so those staples where not under full camper load. The truck camper floor is "different" and I am not sure exactly how Sunline fastened the floor joists together.
To the walls, the wall supports the roof loads and the cabinet loads, at least in trailer campers. The way the wood is stacked in the wall construction, the vertical down weight is wood on wood, the fastener is not taking down vertical loads per say, but they do take side loads and hold the studs in place. Here staples offer a good solution. Kreg joints do also, I'm not trying to derate that.
The staples are put on both sides of the wall stud. At least 2 staples per side. That joint when the wood is not rotted or the staples rusted out, is strong, amazingly strong. When I take campers apart for repair, when that joint is good and not rotted, you about tear the wood apart trying to get the joint apart if you are trying to break it apart. You are not going to break the staples. The staples allow a level of flex in the joint, yet still holds well. If you are repairing and want to save the wood, pulling the staples out, the wood is not damaged.
Here are the building speed advantages. After doing this, I can see why Sunline used this method as it is quick and very accurate.
I built and 8' x 8' work table on top of saw horses. 2 x 4 stringers under the 2 sheets of plywood and the top screwed to the 2 x 4's.
This pic is a side view of the work table. The 2 x 4's drop into the slots on the end of the metal saw horses.

Here is a shot of the saw horses to show the pockets the 2 x 4 drop in.

I numbered the 2 x 4's and the plywood sheets so when I break down the table by unscrewing the plywood top, I can put it back together when I need it again. It's a great work table, but it eats floor space when not needed. I had the saw horses and left over 2 x 4's and plywood. You do not have to do it this exact way, just showing as an idea.
Here is the work table in action on building the rear wall of the camper.

Since I trued up the edges of the plywood, and the plywood is cut square, I can use the outer edges of the work table to create a square wall fairly quick. And I can clamp the wood in place before stapling to create the outer frame.
A close up of the joints showing the staples. Again top and bottom are stapled.

We build the outer perimeter first, clamp it square, then start filling in the stud locations and windows etc. Like you, we measure the old wall and use those dimensions to transpose to the new wall. On window openings, you have to be very picky. Think siding and the hole in the siding that has to line up with the rough opening. When rebuilding, we have to match the rough opening to the hole in the siding. Sunline had it easy, they side the whole thing and then cut out the siding hole in place. If the opening was goofed a little out of square, they just routed out the side and matched it perfect.
I find I'm more picky about making the parts exactly right, and true, but this thing is a camper, it's softwood and the openings have a level of forgiveness by the window frame outer flanges to seal to the siding. We find often, the camper was never built exact square and true, we are being way too picky, but that is what we do. Sometimes we have to build an out of square wall part to match what Sunline did so the item going in the hole, fits.
After you confirm you have the outside perimeter the size and squareness you want and need, then measure all openings from the outside perimeter so the siding will match. Try to not get accumulated error from just measuring little pieces, go back to the datum surface.
The work table can only be so flat the way it is made. The flatter the better but being realistic flat is good enough. Then you have studs or cross members with some warp to them. You need to shim under the wood you are stapling so the joint is solid when you shoot it. I use a bunch of 1/8" luan or tapered wood shims. It's not a big deal, but something you just need to do.
Line up you boards, true as you need, shim to the table as needed, then shoot the staples. If you hold/clamp the boards from bouncing, there is no movement during the stapling process. And it's fast and once past the cost of the stapler, the joint is cheap with only 4, 16 ga. 1" wide x 1" long staples in them. The cost per joint is way cheaper then Kreg screws. But the cost of a good stapler that big, does cost. This is like PEX piping fittings. Once you absorb the cost of the PEX crimper, the joints are very cheap and rugged. I went with Senco and I can attest that is one sweet stapler. There are other brands. Roofers use this size stapler as one trade using them.
You will need hearing protection. Muffs or ear plugs. When you start stapling 20 or 30 shots in a quick fashion, the noise is a repeated very loud bang that does not give up. Also suggest you get a one shot stapler or it has the ability to have one shot. The board can bounce after a shot sometimes, and that bounce of the gun up, resets the safety and can double fire the gun having 2 staples on top of each other. With single shot, you have to release the trigger and pull again before the 2nd staple shoots.
Hope this helps. Ask away if you need more
Looking forward to seeing more of your progress. We all learn and pick up tips from each other. Me especially.
John
__________________
Current Sunlines: 2004 T310SR, 2004 T1950, 2004 T2475, 2007 T2499, 2004 T317SR
Prior Sunlines: 2004 T2499 - Fern Blue
2005 Ford F350 Lariat, 6.8L V10 W/ 4.10 rear axle, CC, Short Bed, SRW. Reese HP trunnion bar hitch W/ HP DC
Google Custom Search For Sunline Owners Club
|
|
|
|
|
03-24-2020, 03:45 PM
|
#5
|
|
Senior Member
Join Date: Nov 2019
Location: Pennsylvania
Posts: 114
SUN #11695
|
Quote:
Originally Posted by JohnB
Hi Jay,
Your glue and screw Kreg setup is very good. The cross grain pocket hole screw setup is very strong. And on the floor joists on a truck camper setup, my personal thought, it may be better than stapling as the screws are in shear and the glue also added strength. On a trailer, the steel frame supports the wood directly so it is taking the load without a fastener being in the mix. Sunline did use staples in the trailer floor system, but only to attach the outer band board to the floor joints, so those staples where not under full camper load. The truck camper floor is "different" and I am not sure exactly how Sunline fastened the floor joists together.
To the walls, the wall supports the roof loads and the cabinet loads, at least in trailer campers. The way the wood is stacked in the wall construction, the vertical down weight is wood on wood, the fastener is not taking down vertical loads per say, but they do take side loads and hold the studs in place. Here staples offer a good solution. Kreg joints do also, I'm not trying to derate that.
The staples are put on both sides of the wall stud. At least 2 staples per side. That joint when the wood is not rotted or the staples rusted out, is strong, amazingly strong. When I take campers apart for repair, when that joint is good and not rotted, you about tear the wood apart trying to get the joint apart if you are trying to break it apart. You are not going to break the staples. The staples allow a level of flex in the joint, yet still holds well. If you are repairing and want to save the wood, pulling the staples out, the wood is not damaged.
Here are the building speed advantages. After doing this, I can see why Sunline used this method as it is quick and very accurate.
I built and 8' x 8' work table on top of saw horses. 2 x 4 stringers under the 2 sheets of plywood and the top screwed to the 2 x 4's.
This pic is a side view of the work table. The 2 x 4's drop into the slots on the end of the metal saw horses.
Here is a shot of the saw horses to show the pockets the 2 x 4 drop in.
I numbered the 2 x 4's and the plywood sheets so when I break down the table by unscrewing the plywood top, I can put it back together when I need it again. It's a great work table, but it eats floor space when not needed. I had the saw horses and left over 2 x 4's and plywood. You do not have to do it this exact way, just showing as an idea.
Here is the work table in action on building the rear wall of the camper.
Since I trued up the edges of the plywood, and the plywood is cut square, I can use the outer edges of the work table to create a square wall fairly quick. And I can clamp the wood in place before stapling to create the outer frame.
A close up of the joints showing the staples. Again top and bottom are stapled.
We build the outer perimeter first, clamp it square, then start filling in the stud locations and windows etc. Like you, we measure the old wall and use those dimensions to transpose to the new wall. On window openings, you have to be very picky. Think siding and the hole in the siding that has to line up with the rough opening. When rebuilding, we have to match the rough opening to the hole in the siding. Sunline had it easy, they side the whole thing and then cut out the siding hole in place. If the opening was goofed a little out of square, they just routed out the side and matched it perfect.
I find I'm more picky about making the parts exactly right, and true, but this thing is a camper, it's softwood and the openings have a level of forgiveness by the window frame outer flanges to seal to the siding. We find often, the camper was never built exact square and true, we are being way too picky, but that is what we do. Sometimes we have to build an out of square wall part to match what Sunline did so the item going in the hole, fits.
After you confirm you have the outside perimeter the size and squareness you want and need, then measure all openings from the outside perimeter so the siding will match. Try to not get accumulated error from just measuring little pieces, go back to the datum surface.
The work table can only be so flat the way it is made. The flatter the better but being realistic flat is good enough. Then you have studs or cross members with some warp to them. You need to shim under the wood you are stapling so the joint is solid when you shoot it. I use a bunch of 1/8" luan or tapered wood shims. It's not a big deal, but something you just need to do.
Line up you boards, true as you need, shim to the table as needed, then shoot the staples. If you hold/clamp the boards from bouncing, there is no movement during the stapling process. And it's fast and once past the cost of the stapler, the joint is cheap with only 4, 16 ga. 1" wide x 1" long staples in them. The cost per joint is way cheaper then Kreg screws. But the cost of a good stapler that big, does cost. This is like PEX piping fittings. Once you absorb the cost of the PEX crimper, the joints are very cheap and rugged. I went with Senco and I can attest that is one sweet stapler. There are other brands. Roofers use this size stapler as one trade using them.
You will need hearing protection. Muffs or ear plugs. When you start stapling 20 or 30 shots in a quick fashion, the noise is a repeated very loud bang that does not give up. Also suggest you get a one shot stapler or it has the ability to have one shot. The board can bounce after a shot sometimes, and that bounce of the gun up, resets the safety and can double fire the gun having 2 staples on top of each other. With single shot, you have to release the trigger and pull again before the 2nd staple shoots.
Hope this helps. Ask away if you need more
Looking forward to seeing more of your progress. We all learn and pick up tips from each other. Me especially.
John |
Thanks John.
We have learned about using the shims under the framework when assembling the walls. We have just been building them on the floor, but I like the horses and plywood work table which gets the walls off of the ground and having square edges of plywood to reference. We may give that idea a shot with some of the next walls. Our camper is defiantly not square or built perfect, but we are managing so far. We will continue to use the Kreg pocket holes for now.
I will post the link to each update on my youtube channel.
Thanks Again!
__________________
|
|
|
|
|
03-24-2020, 09:26 PM
|
#6
|
|
Moderator
Join Date: Nov 2006
Location: Ohio
Posts: 12,656
SUN #89
|
Good deal Jay, the Kreg and glue will work well. I have a few of their kits and still use them as needed. I have 3 more campers to restore and build walls for, so absorbing the cost of the stapler made more sense doing 4 campers then just a one up unit.
We were going to use the concrete floor too as a wall build surface. Yes it works, but it's down there... Since I had the wood laying around, it took a little time to create the work table, but well worth it. Higher, you can clamp to it and square up the wall easier. I can knock down table without too much issue, and store it for the next project. Plus I need my saw horses back eventually. We use the large work table for lots of things on the camper rebuild, not just for walls. Cleaning siding, building cabinets, what ever come up.
__________________
Current Sunlines: 2004 T310SR, 2004 T1950, 2004 T2475, 2007 T2499, 2004 T317SR
Prior Sunlines: 2004 T2499 - Fern Blue
2005 Ford F350 Lariat, 6.8L V10 W/ 4.10 rear axle, CC, Short Bed, SRW. Reese HP trunnion bar hitch W/ HP DC
Google Custom Search For Sunline Owners Club
|
|
|
|
|
03-25-2020, 05:55 AM
|
#7
|
|
Senior Member
Join Date: Nov 2019
Location: Pennsylvania
Posts: 114
SUN #11695
|
Thanks for the advice. I just uploaded the latest video. Check it out here.
Also subscribe to my channel if you would like notifications on new videos I post.
__________________
|
|
|
|
|
03-25-2020, 11:54 AM
|
#8
|
|
Moderator
Join Date: Nov 2006
Location: Ohio
Posts: 12,656
SUN #89
|
Good idea on using the construction adhesive on the floor plywood. That will help make the floor "solid" under the flexing of the truck camper.
Keep up the good work!
John
__________________
Current Sunlines: 2004 T310SR, 2004 T1950, 2004 T2475, 2007 T2499, 2004 T317SR
Prior Sunlines: 2004 T2499 - Fern Blue
2005 Ford F350 Lariat, 6.8L V10 W/ 4.10 rear axle, CC, Short Bed, SRW. Reese HP trunnion bar hitch W/ HP DC
Google Custom Search For Sunline Owners Club
|
|
|
|
|
03-30-2020, 07:54 AM
|
#9
|
|
Senior Member
Join Date: Nov 2019
Location: Pennsylvania
Posts: 114
SUN #11695
|
For all following, here is the latest video...
__________________
|
|
|
|
|
03-30-2020, 11:03 PM
|
#10
|
|
Moderator
Join Date: Nov 2006
Location: Ohio
Posts: 12,656
SUN #89
|
Good work. And good pics. Very helpful for our truck camper folks what it looks like inside.
Black ants. Yuk. I had one camper repair with them in it. It was a very wet back wall and they were after the nice wet and out of the sun place. They scatter everywhere. Ant spray is now always ready when I take a wet camper apart.
On the staple pulling, there is no super easy way, but this is the last iteration I found to be easier.
The staples on the newer campers are 5/16" wide. The really old trailers might be narrower. On the 5/16" staples, I have a good steel long 1/4" wide screwdriver. The longer length helps the angle to get it under the head. Get it started under the head with a hammer tap, then twist enough to raise the head

Rotate

Grab and pry out,meaning tip the handle to pry with. I have used vise grips, needle nose, flat nose pliers and now these end cutters. You only squeeze enough on the end cutters to grab and pivot to pull it out. Not to cut it off. I find so far, it works the easiest to pull them out. Can't use it on all places, but where it works, it is easier for me anyway.


The front bottom sheet you took off, it looked you had to beat it apart, was that sheet a folded over seem to the sheet above it or was it screwed on and it was stuck to the screw bodies/heads left and you had to yank it off the what was left of the screws?
I have not yet found a good way to get rusted head screws out yet. I see you used a dremel grinder. A good choice. In my case it was a 4 1/2" grinder but not on siding, on cabinets screwed in from the outside so the burn marks was not a problem. On siding it would be.
I have tried to drill the heads off and the hardened screw takes the tip off of high speed steel and cobalt bits almost instantly. I have not yet tried a carbide tipped bit to cut the screw. If that would work, then it would be a easier solution.
Keep up the good work
John
__________________
Current Sunlines: 2004 T310SR, 2004 T1950, 2004 T2475, 2007 T2499, 2004 T317SR
Prior Sunlines: 2004 T2499 - Fern Blue
2005 Ford F350 Lariat, 6.8L V10 W/ 4.10 rear axle, CC, Short Bed, SRW. Reese HP trunnion bar hitch W/ HP DC
Google Custom Search For Sunline Owners Club
|
|
|
|
|
03-31-2020, 05:56 AM
|
#11
|
|
Senior Member
Join Date: Nov 2019
Location: Pennsylvania
Posts: 114
SUN #11695
|
John,
The btm frnt sheet was a folded over seam. I had to grind all of the screw heads off and then the only thing holding it on was the very small amount of screw shanks from all of the headless screws
__________________
|
|
|
|
|
03-31-2020, 09:43 PM
|
#12
|
|
Moderator
Join Date: Nov 2006
Location: Ohio
Posts: 12,656
SUN #89
|
Quote:
Originally Posted by Kxracer704
John,
The btm frnt sheet was a folded over seam.
|
Hi Jay,
Some time when you have your camera at the camper, please take some pics or video of that folded over siding seam. You should have those seams on the roof and the where the roof joins the wall siding. Or it may be different in different locations.
We have many club members with the older all metal roofs like yours. Knowing how those seams are made, how they come apart, and maybe if they can go back together, would be a big help. I do not recall anyone posting yet on how to get that joint comes apart or is put back together. Some have cut the siding off at the roof line taking the seam with it and later installed a rubber roof.
Thanks
John
__________________
Current Sunlines: 2004 T310SR, 2004 T1950, 2004 T2475, 2007 T2499, 2004 T317SR
Prior Sunlines: 2004 T2499 - Fern Blue
2005 Ford F350 Lariat, 6.8L V10 W/ 4.10 rear axle, CC, Short Bed, SRW. Reese HP trunnion bar hitch W/ HP DC
Google Custom Search For Sunline Owners Club
|
|
|
|
|
04-01-2020, 08:51 AM
|
#13
|
|
Senior Member
Join Date: Nov 2019
Location: Pennsylvania
Posts: 114
SUN #11695
|
Quote:
Originally Posted by JohnB
Hi Jay,
Some time when you have your camera at the camper, please take some pics or video of that folded over siding seam. You should have those seams on the roof and the where the roof joins the wall siding. Or it may be different in different locations.
We have many club members with the older all metal roofs like yours. Knowing how those seams are made, how they come apart, and maybe if they can go back together, would be a big help. I do not recall anyone posting yet on how to get that joint comes apart or is put back together. Some have cut the siding off at the roof line taking the seam with it and later installed a rubber roof.
Thanks
John
|
John,
See attached photos for some of the aluminum seams on my camper.
[IMG] 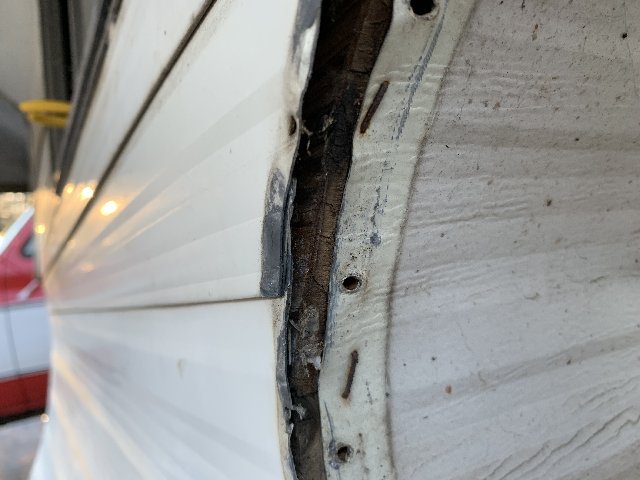 [/IMG]
[IMG] 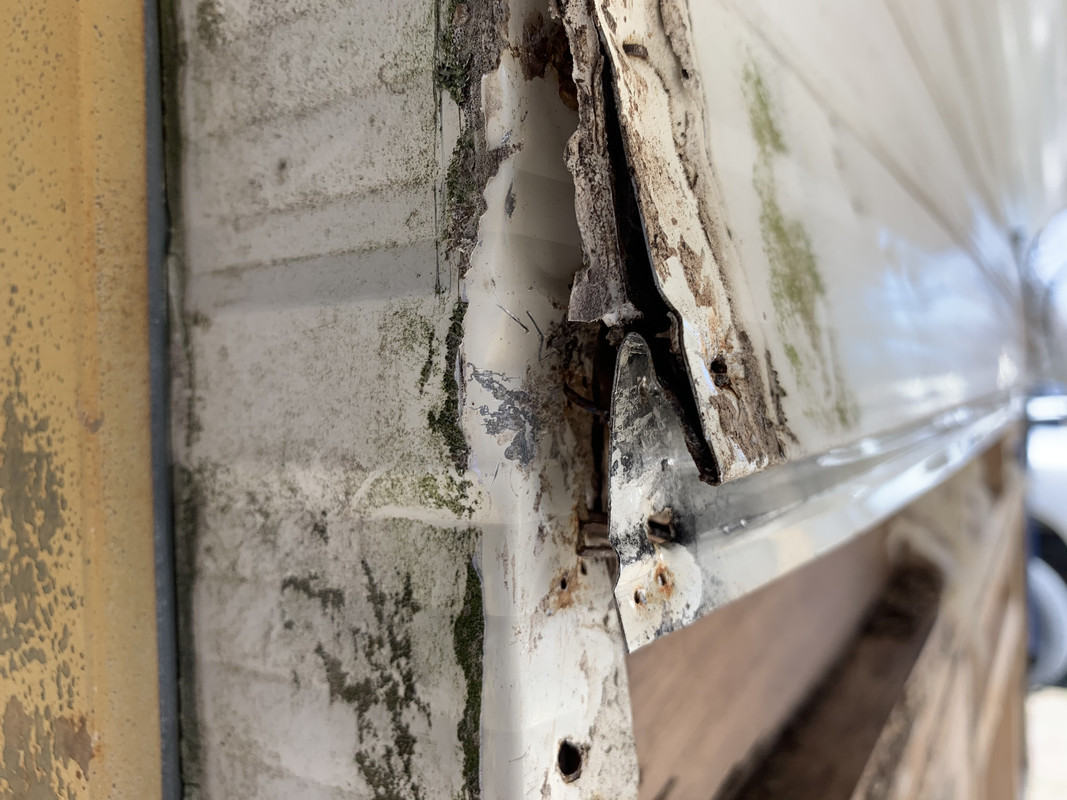 [/IMG]
[IMG]  [/IMG]
[IMG] 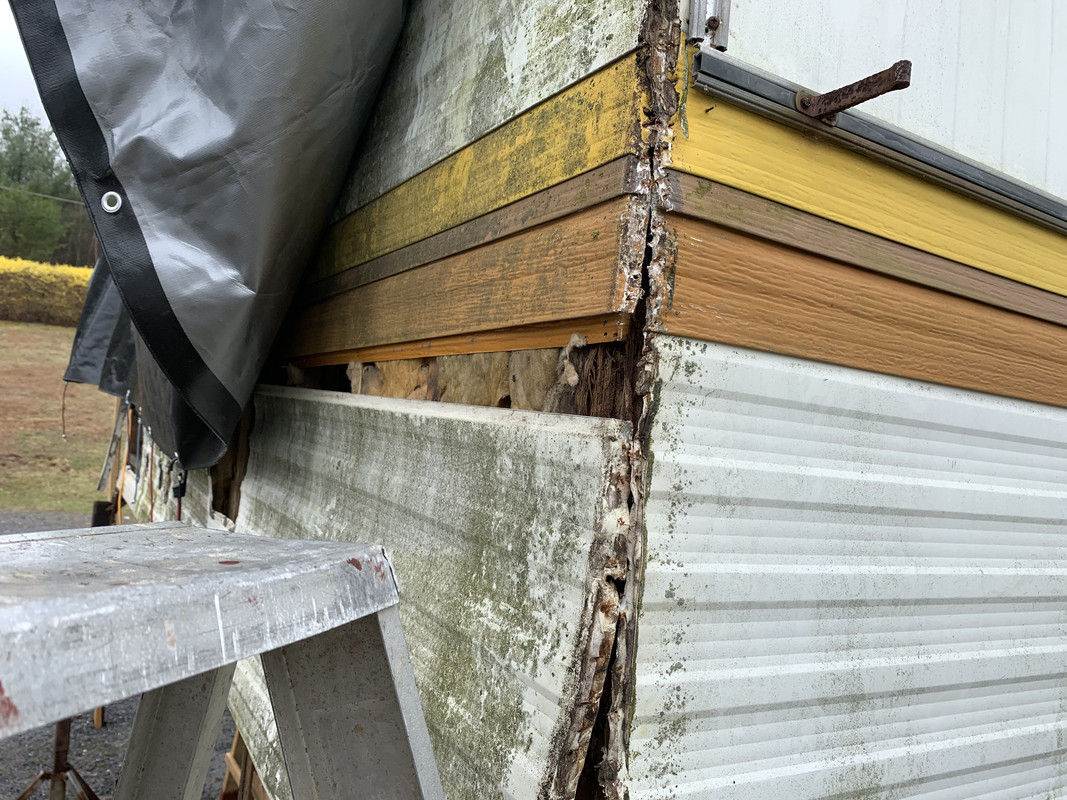 [/IMG]
[IMG] 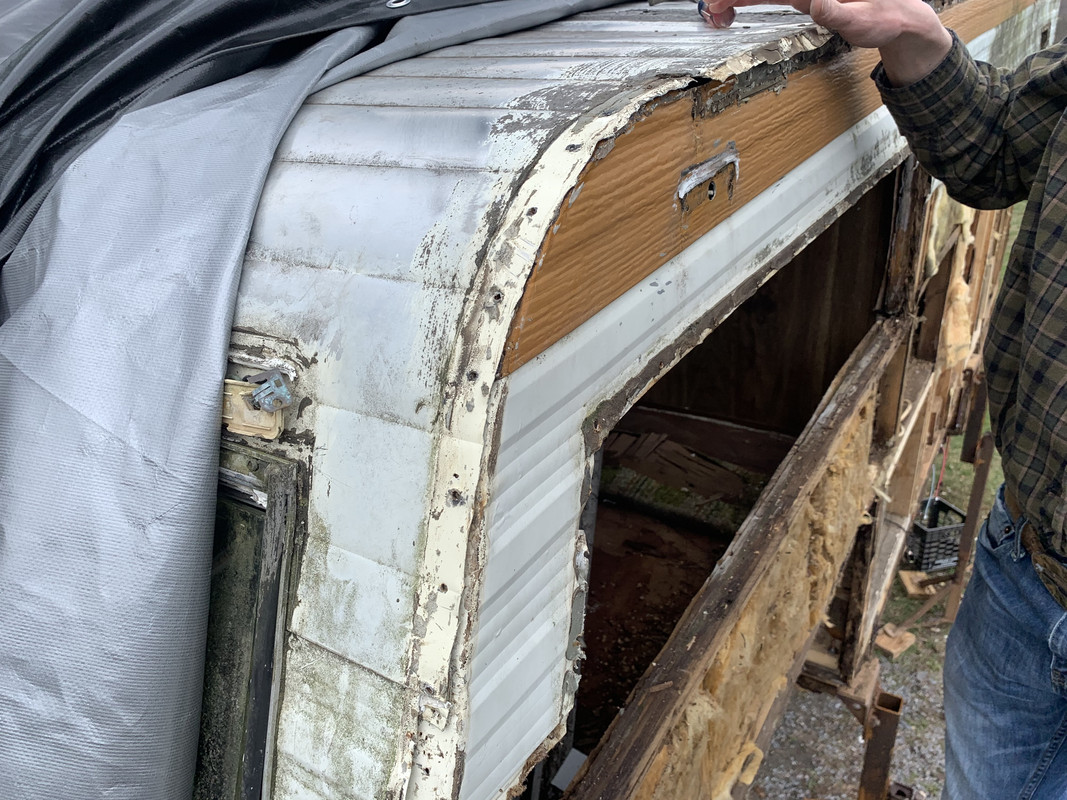 [/IMG]
__________________
|
|
|
|
|
04-01-2020, 11:46 AM
|
#14
|
|
Moderator
Join Date: Nov 2006
Location: Ohio
Posts: 12,656
SUN #89
|
Thank you Jay, Very helpful.
This pic shows the type of overlap joint on the wall siding is the same as the newer Sunline campers. The sheet below just pushes up into the bottom of the stapled sheet above it.
On the front walls of the newer campers, (I do not know what year they started it) they apply butyl caulk in the front wall sheets to that lap joint before inserting the next sheet. This was to help stop water from beating into the front of the camper while towing. I have pics of that when you get to putting the camper back together. Recommend you do that on the rebuild. It is only on the front wall. To get the front siding off with that butyl caulk in there, one needs to use a heat gun and warm it to get it apart. I'm assuming by the looks of it, yours does not have the butyl in that joint.
The roof sheet seams, those are the ones that are different then the rubber roof campers by your pics and was what I had thought you meant by folded over seam. You may have not yet made it to that seam yet.
This pic below, the front of the camper has a large sheet with approx 3" wide curved ripples to the sheet. This same curved siding is still used on Sunline campers all the way to the last 2007 campers on the front and rear walls, but it does not go up and onto the flat roof itself like yours. It stops right at the start of the flat part of the roof.
In your case, the curved rippled sheet runs up and down the roof to join to a crinkled texture roof sheet. But, up on the roof where that curved sheet meets the crinkled sheet, it is seemed different. And then each crinkle sheet on the roof is seamed to the next. That joint is different from rubber roof campers to metal roof campers and I'm assuming different then the wall overlap joint as it would leak on the roof. Since the roof surface is horizontal and flat they had to make a different crimped seam that would not leak, at least when it left the factory. It looks like your roof seam I am talking about may be buried under some gray roof coating. Your hand in this pic is almost at the seam I am am referring too. When you get that seam apart, is would be good to know how it comes apart and if they had any caulk in the seam when it was formed.
It looks like you are humming along with taking the camper apart. Great! keep up the good work. Thanks for sharing.
__________________
Current Sunlines: 2004 T310SR, 2004 T1950, 2004 T2475, 2007 T2499, 2004 T317SR
Prior Sunlines: 2004 T2499 - Fern Blue
2005 Ford F350 Lariat, 6.8L V10 W/ 4.10 rear axle, CC, Short Bed, SRW. Reese HP trunnion bar hitch W/ HP DC
Google Custom Search For Sunline Owners Club
|
|
|
|
|
04-01-2020, 07:52 PM
|
#15
|
|
Senior Member
Join Date: Nov 2019
Location: Pennsylvania
Posts: 114
SUN #11695
|
Here is the latest video...
__________________
|
|
|
|
|
04-01-2020, 09:05 PM
|
#16
|
|
Moderator
Join Date: Nov 2006
Location: Ohio
Posts: 12,656
SUN #89
|
You are doing great! Buzzing right along I must say. Good job.
Thanks for sharing.
John
__________________
Current Sunlines: 2004 T310SR, 2004 T1950, 2004 T2475, 2007 T2499, 2004 T317SR
Prior Sunlines: 2004 T2499 - Fern Blue
2005 Ford F350 Lariat, 6.8L V10 W/ 4.10 rear axle, CC, Short Bed, SRW. Reese HP trunnion bar hitch W/ HP DC
Google Custom Search For Sunline Owners Club
|
|
|
|
|
04-28-2020, 07:28 AM
|
#17
|
|
Senior Member
Join Date: Nov 2019
Location: Pennsylvania
Posts: 114
SUN #11695
|
__________________
|
|
|
|
|
04-28-2020, 10:10 AM
|
#18
|
|
Moderator
Join Date: Nov 2006
Location: Ohio
Posts: 12,656
SUN #89
|
That was a surprise in the fridge compartment. Have not seen one that bad before. Mud daubers, bees, snake skins but not that next.
The water heater door, most of them were white when new. That is an all gas operated Atwood heater. They still sell them or you can upgrade to a combo electric and gas heater with electronic ignition verses manual light.
And yes, gravity works well in any state. Any leak from above seems to stop when the leak can not go down any further. Roof leaks, window leaks, corner molding leaks all stop dripping water at the floor and rots out the outer band board area.
The crank out windows with the little panes are known as Jalousie windows.
You are doing good, keep up the good work.
John
__________________
Current Sunlines: 2004 T310SR, 2004 T1950, 2004 T2475, 2007 T2499, 2004 T317SR
Prior Sunlines: 2004 T2499 - Fern Blue
2005 Ford F350 Lariat, 6.8L V10 W/ 4.10 rear axle, CC, Short Bed, SRW. Reese HP trunnion bar hitch W/ HP DC
Google Custom Search For Sunline Owners Club
|
|
|
|
|
04-28-2020, 02:00 PM
|
#19
|
|
Junior Member
Join Date: Apr 2020
Location: West Virginia
Posts: 29
SUN #11851
|
Im loving your refurbish!!!
I am refurbishing a classic myself and want to keep tracking your progress as well. Its looking great brother!!!!
Keep charging!!!
__________________
|
|
|
|
|
04-29-2020, 12:12 PM
|
#20
|
|
Senior Member
Join Date: Nov 2019
Location: Pennsylvania
Posts: 114
SUN #11695
|
A Few Build Questions
During this build process I've come across a few things I have questions about :
1. First question is does anyone know where the original battery location was on this 1977 Sportster Deluxe 11 FKS? The 2 locations that may have worked are the large compartment on the passenger side rear of the camper or on the driver side between the heater and propane storage compartment. Here of some photos of both of those areas.
[IMG]  [/IMG]
2. I noticed vents on the bottom part of the aluminum siding under the bunk. What are the function of these vents and what is the proper installation so they function properly? See photo.
[IMG]  [/IMG]
3. When assembling the modular walls together I am using Spax #8 & #10 and other deck screws throughout the camper. I have noticed some of the main wall assembly has been fastened using framing nails. I realize that truck campers flex during transport and am wondering if the Spax and other deck screws will shear instead of bend like framing nails. Will this be a problem in the future?
[IMG]  [/IMG]
4. On both the driver side and passenger side of the camper at the bottom near the truck bed wheel wells there are external gas line fittings that are bulkheaded thru the camper siding. I feel that these gas lines are vulnerable in this location and am considering moving the connections 100% inside of the camper. Does anyone know why the fittings are located here and the purpose of them being outside of the camper?
[IMG] 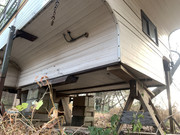 [/IMG]
[IMG] 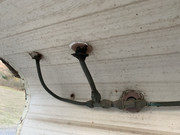 [/IMG]
Thanks,
Jay
__________________
|
|
|
|
|
|
|
Currently Active Users Viewing This Thread: 1 (0 members and 1 guests)
|
|
|
 Posting Rules
|
You may not post new threads
You may not post replies
You may not post attachments
You may not edit your posts
HTML code is Off
|
|
|
|
 » Recent Sunline Discussions
 |
|
|
|
|
|
|
|
|
|
|
|
|
|
|
|
|
|
|
|
|
|
|
|
|
|
|
|
|
|


 Linear Mode

