 |
|
 12-29-2020, 06:53 PM
|
#101
|
|
Senior Member
Join Date: Nov 2019
Location: Pennsylvania
Posts: 114
SUN #11695
|
__________________
__________________
|

|

|
|
12-29-2020, 10:25 PM
|
#102
|
|
Moderator
Join Date: Nov 2006
Location: Ohio
Posts: 12,649
SUN #89
|
Good test on your inverter setup.
What model Victron unit do you have? Been looking at them for some time now to get a better readout on my battery bank state of charge.
Those brass nuts you were using, that is a perfect application for them. Nice little video you made seeing the swedgeing of the nut on the back side. From what I learned, they are called "Rivnuts". https://www.rivetnut-original.com/?g...RoCc-AQAvD_BwE
And yes, you are at the point in the rebuild, there are "lots" of little things to get done. Those little things add up to big time...
Good job, thanks for sharing.
John
__________________
Current Sunlines: 2004 T310SR, 2004 T1950, 2004 T2475, 2007 T2499, 2004 T317SR
Prior Sunlines: 2004 T2499 - Fern Blue
2005 Ford F350 Lariat, 6.8L V10 W/ 4.10 rear axle, CC, Short Bed, SRW. Reese HP trunnion bar hitch W/ HP DC
 Google Custom Search For Sunline Owners Club
|
|
|
|
|
12-30-2020, 06:07 AM
|
#103
|
|
Senior Member
Join Date: Nov 2019
Location: Pennsylvania
Posts: 114
SUN #11695
|
Quote:
Originally Posted by JohnB

Good test on your inverter setup.
What model Victron unit do you have? Been looking at them for some time now to get a better readout on my battery bank state of charge.
Those brass nuts you were using, that is a perfect application for them. Nice little video you made seeing the swedgeing of the nut on the back side. From what I learned, they are called "Rivnuts". https://www.rivetnut-original.com/?g...RoCc-AQAvD_BwE
And yes, you are at the point in the rebuild, there are "lots" of little things to get done. Those little things add up to big time...
Good job, thanks for sharing.
John |
Victron BMV-700
And the threaded inserts I used are actually steel. The manufacturer is AVK. Part number ALS4T-1032-130. They work great.
__________________
|
|
|
|
|
12-30-2020, 10:34 AM
|
#104
|
|
Senior Member
Join Date: Nov 2019
Location: Pennsylvania
Posts: 114
SUN #11695
|
Quote:
Originally Posted by JohnB
You have to sort out the hot water need on how you use it. Hot rated meaning, the water inside the hose you are using on is hot water. Cold water upstream of the water heater can reach 150psi from heated water expansion, but the water is not hot, so cold hose could be used there if wanted.
The Camco brand has the 150psi and 180F rating, and it can be used on hot or cold water.
John
|
I plan to add a check valve at the cold water inlet of my hot water heater. Would this prevent the heated water expansion you mentioned in the cold line upstream of the hot water heater?
__________________
|
|
|
|
|
12-30-2020, 12:14 PM
|
#105
|
|
Moderator
Join Date: Nov 2006
Location: Ohio
Posts: 12,649
SUN #89
|
H'mm, I thought on this and here are the thoughts.
Yes it will work, do not know how long. With the added cost for the valve, it may be cheaper to buy pressure rated hose and skip the check.
Things may work well on day one, year one, but over time, my gut says the check can leak and then you are back to no real check valve protecting the incoming piping.
This is how I came to that conclusion.
If you add a check valve, rated for 150 psi, hot potable water, lead free, at the incoming side of the water heater, and it never leaked, (needs to be rated as bubble tight valve, class 6 I believe), then technically, the pressure build in the water heater would not back up the incoming supply line.
If there is a leak past the check, the pressure will back up through even a tiny leak if no cold water is drawn at a faucet/toilet etc. for a few hours. The issue may be, finding a potable water rated 3 plus GPM check valve that does not leak or get calcium build up backing into the seat from hard water in the heater making even a good check valve leak.
There are a few other issues with a check in the incoming line, they can have a work around, just you need to do them and know them. Draining the camper through the low point drains "may" create an issue as water cannot back up and drain out the cold side like it normally would. Cold water enters the bottom of the heater and hot goes out the top. As a work around, if you pull the plug on the water heater drain the heater. There may be a few other issues, just they do not come to mind right now.
I think the 2nd biggest issue is, cost to buy a really good check valve, rated lead free, for potable water, rated not to leak, costs $$. And then, any piece of dirt/calcium backed up from the heater holds the seat open anyway.
Now, all that said, if you install an air bladder/accumulator tank in the camper, then that will address the normal heat expansion issue at the source. The only issue I can see, the day the bladder leaks, and they do over time, there is no working bladder tank anymore and the over pressure backs up again.
If I goofed some thoughts on this, ask away to confirm. The only true work around is to use pressure rated components equal to or greater than the pressure rating of the safety relief on the water heater.
John
__________________
Current Sunlines: 2004 T310SR, 2004 T1950, 2004 T2475, 2007 T2499, 2004 T317SR
Prior Sunlines: 2004 T2499 - Fern Blue
2005 Ford F350 Lariat, 6.8L V10 W/ 4.10 rear axle, CC, Short Bed, SRW. Reese HP trunnion bar hitch W/ HP DC
Google Custom Search For Sunline Owners Club
|
|
|
|
|
12-30-2020, 12:30 PM
|
#106
|
|
Moderator
Join Date: Nov 2006
Location: Ohio
Posts: 12,649
SUN #89
|
Quote:
Originally Posted by Kxracer704
Victron BMV-700
And the threaded inserts I used are actually steel. The manufacturer is AVK. Part number ALS4T-1032-130. They work great.
|
Thanks for the info on the Victron. These have changed and come down in price since I looked at them years ago.
I see they now have Bluetooth and a phone app.  It seems the BMV-700 needs an extra dongle to get the Bluetooth at $49 to talk to the phone.  The BMV-710 has the Bluetooth built in and costs close an upgraded BMV-700
I really like what the Victron's do with counting coulombs, I just need to sort out the cost. Go cheaper and no phone app and wish I had it, or spring for the extra $$ and get the one I want the first time....
Thanks for the AVK info. They sell these things in kits, I need to get one as they do come in handy every now and then.
__________________
Current Sunlines: 2004 T310SR, 2004 T1950, 2004 T2475, 2007 T2499, 2004 T317SR
Prior Sunlines: 2004 T2499 - Fern Blue
2005 Ford F350 Lariat, 6.8L V10 W/ 4.10 rear axle, CC, Short Bed, SRW. Reese HP trunnion bar hitch W/ HP DC
Google Custom Search For Sunline Owners Club
|
|
|
|
|
12-30-2020, 04:13 PM
|
#107
|
|
Senior Member
Join Date: Nov 2019
Location: Pennsylvania
Posts: 114
SUN #11695
|
Quote:
Originally Posted by JohnB
Thanks for the info on the Victron. These have changed and come down in price since I looked at them years ago.
I see they now have Bluetooth and a phone app. It seems the BMV-700 needs an extra dongle to get the Bluetooth at $49 to talk to the phone. The BMV-710 has the Bluetooth built in and costs close an upgraded BMV-700
I really like what the Victron's do with counting coulombs, I just need to sort out the cost. Go cheaper and no phone app and wish I had it, or spring for the extra $$ and get the one I want the first time....
Thanks for the AVK info. They sell these things in kits, I need to get one as they do come in handy every now and then. |
I opted for the basic 700 model without Bluetooth. I believe the higher models have more features like temp control. Regardless of the model, I am very happy with the BMV-700. Low end or high end, you will be happy with the upgrade.
__________________
|
|
|
|
|
12-30-2020, 04:25 PM
|
#108
|
|
Senior Member
Join Date: Nov 2019
Location: Pennsylvania
Posts: 114
SUN #11695
|
Quote:
Originally Posted by JohnB
H'mm, I thought on this and here are the thoughts.
Yes it will work, do not know how long. With the added cost for the valve, it may be cheaper to buy pressure rated hose and skip the check.
Things may work well on day one, year one, but over time, my gut says the check can leak and then you are back to no real check valve protecting the incoming piping.
This is how I came to that conclusion.
If you add a check valve, rated for 150 psi, hot potable water, lead free, at the incoming side of the water heater, and it never leaked, (needs to be rated as bubble tight valve, class 6 I believe), then technically, the pressure build in the water heater would not back up the incoming supply line.
If there is a leak past the check, the pressure will back up through even a tiny leak if no cold water is drawn at a faucet/toilet etc. for a few hours. The issue may be, finding a potable water rated 3 plus GPM check valve that does not leak or get calcium build up backing into the seat from hard water in the heater making even a good check valve leak.
There are a few other issues with a check in the incoming line, they can have a work around, just you need to do them and know them. Draining the camper through the low point drains "may" create an issue as water cannot back up and drain out the cold side like it normally would. Cold water enters the bottom of the heater and hot goes out the top. As a work around, if you pull the plug on the water heater drain the heater. There may be a few other issues, just they do not come to mind right now.
I think the 2nd biggest issue is, cost to buy a really good check valve, rated lead free, for potable water, rated not to leak, costs $$. And then, any piece of dirt/calcium backed up from the heater holds the seat open anyway.
Now, all that said, if you install an air bladder/accumulator tank in the camper, then that will address the normal heat expansion issue at the source. The only issue I can see, the day the bladder leaks, and they do over time, there is no working bladder tank anymore and the over pressure backs up again.
If I goofed some thoughts on this, ask away to confirm. The only true work around is to use pressure rated components equal to or greater than the pressure rating of the safety relief on the water heater.
John
|
The check valve I am currently planning to use is a shark bite brand push to connect check that is lead free and rated to 200psi. I originally was planning on adding the check valve to prevent hot water from backing up into the cold lines and having hot water run out of close proximity cold side fixtures like kitchen sink. I read this from multiple sources and it made sense to me. What are you thoughts of adding the check valve for this purpose?
Also I ended going to my local rv service center and bought potable water line by the foot. I was told this hose is good to 150psi but cold water only. I do not see any markings on the hose anywhere, but it looks to have a thin wall to me for the possible rating. I referenced your older post on this thread about the different hoses and figured Id give it a shot. I bought 4 @ $1.10 per ft. So if it doesnt work, no big deal.
__________________
|
|
|
|
|
12-30-2020, 06:08 PM
|
#109
|
|
Moderator
Join Date: Nov 2006
Location: Ohio
Posts: 12,649
SUN #89
|
Quote:
Originally Posted by Kxracer704
The check valve I am currently planning to use is a shark bite brand push to connect check that is lead free and rated to 200psi. I originally was planning on adding the check valve to prevent hot water from backing up into the cold lines and having hot water run out of close proximity cold side fixtures like kitchen sink. I read this from multiple sources and it made sense to me. What are you thoughts of adding the check valve for this purpose?
Also I ended going to my local rv service center and bought potable water line by the foot. I was told “this hose is good to 150psi but cold water only”. I do not see any markings on the hose anywhere, but it looks to have a thin wall to me for the possible rating. I referenced your older post on this thread about the different hoses and figured I’d give it a shot. I bought 4’ @ $1.10 per ft. So if it doesn’t work, no big deal.
|
Yes, you are right, we had club member here on the forum report hot water came out of the cold faucet. They would leave the water heater on 24 hrs per day. The smaller campers, the way it was piped, cold water supply tee'ed into the water heater inlet. Down stream of the tee, at the heater was a faucet in the bathroom I think it was. Hot water backed out maybe 6 to 12" in the cold piping. Then when the bath cold faucet down stream opened, it got a slug of hot water from the cold faucet until it cleared out. I'll see if I can find that post. I think it happened in the morning when they first starting using the water. Which all fits, it had all night long to heat the water and then came out 1st thing in the AM. I do not think the kitchen sink did it as it was farther away and not downstream of the heater.
On the newer campers with electronic ignition, it is easy to flip the switch inside on and off to turn the heater on, gas or electric. For a lot of reasons, there is great benefit to shutting down the water heater when not using it. In a camper, one may only use hot water for 1 to 2 hrs a day. The other 22 hrs a day the heater bakes on hard water scale onto the heater when you are not even using it. And it increases the expansion issue when the air pocket dissolves in the top of the heater. And the heat back up issue if yours is piped that way.
Ours has the electronic ignition and we do flip it off when done using it. Just have to remember to turns it on 20 minutes before needing it. And it becomes habit over time that we do not miss very often. Just turn the heater on when sitting down to eat, and by the time we are done, the water is hot.
An all gas heater, you have to go out and light/turn it on and off outside. Still doable, just more inconvenient. But it does help turning it on and off. Maybe a compromise on an all gas heater, shut it down at night when you are done using hot water. Then the next day when you need it, turn it back on. Depending on when you turn it on the next day, you are limiting the being on making scale and migrating heat to be less hours a day. The 22 hours of non use being on, may turn into 6 to 10 hours being on with no use. You cut the problem down and saved your water heater by a good percentage.
To your hose, yes that is the potable water hose. I can tell by the thin plastic liner on the outside, the nylon braid and the white liner inside. If I recall right, you may have only had hoses back by the water pump what may be the issue? Is that right?. How far away would the hoses be from the water heater? 3 ft, 10 ft?
The 150psi hose takes care of any hose pressure issue. The sharkbite check is an OK one, no issue there regardless of brand, sooner or later is may not 100% check off all pressure. BUT, if you change the hose to be all 150psi, at the pump area where the hose is, if the length is "enough" feet away, the water back by the pump would not get exposed to the high heat. If the check weeped a little, the pressure will pass, but there is little flow to speed up heat migration. You may just get by that way. By going to the higher pressure hose, you mitigated the pressure issue which was the biggest issue.
I would not want to use cold rated hose right at the water heater on the cold inlet, that may be an issue, but many feet away, with the check, that could work, even when the check weeps.
You can test all this some day when you get it all up and going. I you have 3 plus feet of pex etc. before the hose at the pump, then your odds are good you will not have an issue. Less may work too, the 3ft is a real guess.
Hope this helps
John
__________________
Current Sunlines: 2004 T310SR, 2004 T1950, 2004 T2475, 2007 T2499, 2004 T317SR
Prior Sunlines: 2004 T2499 - Fern Blue
2005 Ford F350 Lariat, 6.8L V10 W/ 4.10 rear axle, CC, Short Bed, SRW. Reese HP trunnion bar hitch W/ HP DC
Google Custom Search For Sunline Owners Club
|
|
|
|
|
12-31-2020, 07:18 AM
|
#110
|
|
Senior Member
Join Date: Nov 2019
Location: Pennsylvania
Posts: 114
SUN #11695
|
Quote:
Originally Posted by JohnB
On the newer campers with electronic ignition, it is easy to flip the switch inside on and off to turn the heater on, gas or electric. For a lot of reasons, there is great benefit to shutting down the water heater when not using it. In a camper, one may only use hot water for 1 to 2 hrs a day. The other 22 hrs a day the heater bakes on hard water scale onto the heater when you are not even using it. And it increases the expansion issue when the air pocket dissolves in the top of the heater. And the heat back up issue if yours is piped that way.
|
Heres a sneak peak for the build. I just purchased a new electric ignition water heater. Atwood GC6AA-10E. So Ill be able to enjoy the luxury you mentioned of just flipping a switch in the camper to fire up which ever heating source on the water heater Id like. I also still plan on installing the check valve as we discussed. Hopefully I can make it accessible and can remove it easily in the future if need be.
Quote:
Originally Posted by JohnB
To your hose, yes that is the potable water hose. I can tell by the thin plastic liner on the outside, the nylon braid and the white liner inside. If I recall right, you may have only had hoses back by the water pump what may be the issue? Is that right?. How far away would the hoses be from the water heater? 3 ft, 10 ft?
|
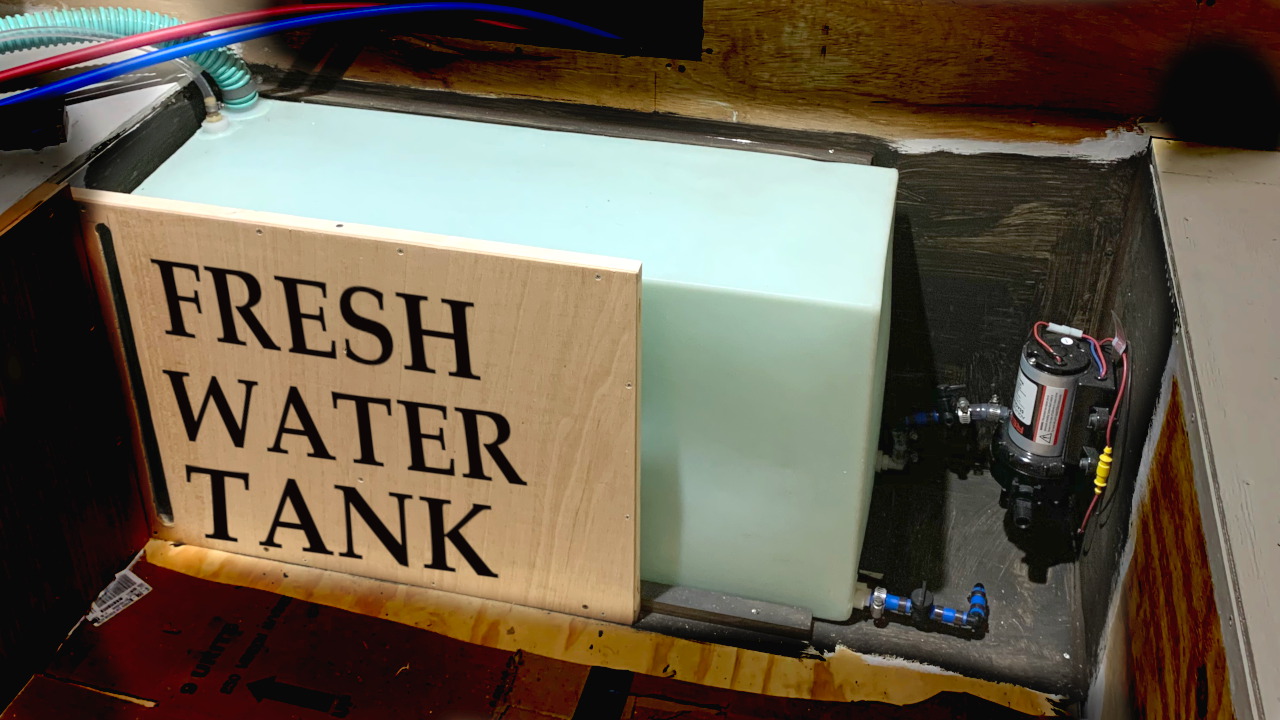
I dont know exactly what your asking here but I currently only have vinyl clear hose on the tank to pump suction portion of the plumbing. I planned to integrate the anti vibration loop per your recommendation on the pump outlet. This is where the hose I just purchased hopefully will work. My estimate for the distance from the hose to the water heater inlet is about 4-6. Note: I only plan to use this potable water hose for the anti vibration loop. After the loop I plan to adapt it to pex and run the rest of the plumbing from there.
Quote:
Originally Posted by JohnB
The 150psi hose takes care of any hose pressure issue. The sharkbite check is an OK one, no issue there regardless of brand, sooner or later is may not 100% check off all pressure. BUT, if you change the hose to be all 150psi, at the pump area where the hose is, if the length is "enough" feet away, the water back by the pump would not get exposed to the high heat. If the check weeped a little, the pressure will pass, but there is little flow to speed up heat migration. You may just get by that way. By going to the higher pressure hose, you mitigated the pressure issue which was the biggest issue.
|
Do you think the hose I purchased, just by looking at it, is actually rated to 150 psi? I could not find any marking on the hose itself.
__________________
|
|
|
|
|
12-31-2020, 09:57 AM
|
#111
|
|
Moderator
Join Date: Nov 2006
Location: Ohio
Posts: 12,649
SUN #89
|
Some thoughts below.
Quote:
Originally Posted by Kxracer704
Quote:
Originally Posted by JohnB
On the newer campers with electronic ignition, it is easy to flip the switch inside on and off to turn the heater on, gas or electric. For a lot of reasons, there is great benefit to shutting down the water heater when not using it. In a camper, one may only use hot water for 1 to 2 hrs a day. The other 22 hrs a day the heater bakes on hard water scale onto the heater when you are not even using it. And it increases the expansion issue when the air pocket dissolves in the top of the heater. And the heat back up issue if yours is piped that way.
|
Heres a sneak peak for the build. I just purchased a new electric ignition water heater. Atwood GC6AA-10E. So Ill be able to enjoy the luxury you mentioned of just flipping a switch in the camper to fire up which ever heating source on the water heater Id like. I also still plan on installing the check valve as we discussed. Hopefully I can make it accessible and can remove it easily in the future if need be. |
First off, congrats on the new water heater!!! Good for you. The model you picked is that what most of the 2004's to 2007 Sunlines have in them. The 2003 and older had a prior vintage control system for the electric/lp gas heater.
On the check valve, not totally sure how you will pipe this, just passing along on the sharkbite check if you did not know. Use the check on semi rigid or rigid tubing such as PEX etc. Do not use it on the fresh water hose. Odds are high the hose is too soft and the O ring seal and grippers in the check will not hold for seal pressure and may blow off. The hose will collapse to much and blow off.
On the heat migration issues, I found 2 posts on this by members. All with good stuff in them. Have a read on them. Also look at the 2 valve bypass setup option I mention rather then the one cheaper 3 way valve and check valve setup. That RV check valve is bad news, sooner or later it will have issues, either it will not seal off or the stem falls out in the heater.
https://www.sunlineclub.com/forums/f...cet-19557.html
https://www.sunlineclub.com/forums/f...ion-18993.html
Quote:
Originally Posted by Kxracer704
Quote:
Originally Posted by JohnB
To your hose, yes that is the potable water hose. I can tell by the thin plastic liner on the outside, the nylon braid and the white liner inside. If I recall right, you may have only had hoses back by the water pump what may be the issue? Is that right?. How far away would the hoses be from the water heater? 3 ft, 10 ft?
|
I dont know exactly what your asking here but I currently only have vinyl clear hose on the tank to pump suction portion of the plumbing. I planned to integrate the anti vibration loop per your recommendation on the pump outlet. This is where the hose I just purchased hopefully will work. My estimate for the distance from the hose to the water heater inlet is about 4-6. Note: I only plan to use this potable water hose for the anti vibration loop. After the loop I plan to adapt it to pex and run the rest of the plumbing from there. |
OK, got it. I was not sure if you were redoing something or not. I went back and found this one pic. You are only planning a vibration loop at the pump with new hose, OK Got it.
Quote:
Originally Posted by Kxracer704
Quote:
Originally Posted by JohnB
The 150psi hose takes care of any hose pressure issue. The sharkbite check is an OK one, no issue there regardless of brand, sooner or later is may not 100% check off all pressure. BUT, if you change the hose to be all 150psi, at the pump area where the hose is, if the length is "enough" feet away, the water back by the pump would not get exposed to the high heat. If the check weeped a little, the pressure will pass, but there is little flow to speed up heat migration. You may just get by that way. By going to the higher pressure hose, you mitigated the pressure issue which was the biggest issue.
|
Do you think the hose I purchased, just by looking at it, is actually rated to 150 psi? I could not find any marking on the hose itself. |
The only thing I can tell from the pic was that the hose showed the "traits" of potable water hose the RV industry uses. As to the pressure rating, that is an unknown. The brand Sunline used at least had a pressure rating on it. It was cold hose and 150psi. The two brands of hose I bought have pressure and temp ratings on them. I use the hot and cold ratings in different places.
Is there a manufacture labeled on the hose? May be able to back into a rating if we know who made it. If there nothing on the hose, you sort of have 3 options, trust what the guy who sold it to you said, test it yourself with water pressure, and last resort, buy label rated hose. Wish you were closer, we can work out something and I cut off what you need off my roll. The freight is more then the hose, but that is an option if you want to use it.
Hope this helps
John
__________________
Current Sunlines: 2004 T310SR, 2004 T1950, 2004 T2475, 2007 T2499, 2004 T317SR
Prior Sunlines: 2004 T2499 - Fern Blue
2005 Ford F350 Lariat, 6.8L V10 W/ 4.10 rear axle, CC, Short Bed, SRW. Reese HP trunnion bar hitch W/ HP DC
Google Custom Search For Sunline Owners Club
|
|
|
|
|
12-31-2020, 09:58 AM
|
#112
|
|
Moderator
Join Date: Nov 2006
Location: Ohio
Posts: 12,649
SUN #89
|
Since you are building the camper from the bottom up, literally... I'll pass along a few things to think through and maybe incorporate into your hook up on the new water heater if wanted.
Use a dedicated 15 amp circuit breaker for the electric element for two reasons;
1. The power draw of when the element is on needs that much. The element I think is 1,400 watts on 120 V is 12 amps by itself.
2. The ability to turn off the 120 VAC to the element and not accidently burn out the element when the heater is drained.
Number 2 was a feature Sunline put in and works well. In the power center they put the WH breaker at the very end of the breaker stack. It was easy to find it at the end of the row. When you drain the water heater, create the habit to make sure the breaker is flipped off. Reason, they have a little rocker switch panel for the heater which has the "Electric, LP gas and DSI fault light in it" That is all 12 volt DC and live anytime the battery is hooked up. If someone accidently bumps the Electric rocker when the heater is drained, and the shore power is plugged in, the element burns out in seconds. We have a few posts by members who just plan forgot and toasted it. It happens. With the breaker off and the heater drained, no issues.
Consider the 2 valve bypass setup verses the 1 valve and a check as mentioned above.
Install a water heater drain valve setup verses using the plug. Ideally the heater is drained after each camping trip. This is a topic in itself to drain or not to drain. I do it for water quality issues and to keep the scale build down to be bleed any leftover minerals out more frequently. The drain valve makes this easy to do and it allows you to easily drain some water out to recreate the air pocket in the top of the heater when it dissolves itself while camping. (part of the thermal expansion issue)
Did your new heater come with a electric, LP gas and DSI fault panel? Atwood has their own, or use to. Sunline used a KIB tank panel with pump switch, tank levels and the WH switches/DSI fault. Not sure if your camper even has tank level sensors to worry about.
__________________
Current Sunlines: 2004 T310SR, 2004 T1950, 2004 T2475, 2007 T2499, 2004 T317SR
Prior Sunlines: 2004 T2499 - Fern Blue
2005 Ford F350 Lariat, 6.8L V10 W/ 4.10 rear axle, CC, Short Bed, SRW. Reese HP trunnion bar hitch W/ HP DC
Google Custom Search For Sunline Owners Club
|
|
|
|
|
01-01-2021, 08:38 AM
|
#113
|
|
Senior Member
Join Date: Nov 2019
Location: Pennsylvania
Posts: 114
SUN #11695
|
Quote:
Originally Posted by JohnB
If there nothing on the hose, you sort of have 3 options, trust what the guy who sold it to you said, test it yourself with water pressure, and last resort, buy label rated hose.
|
There is no manufacturer printed on hose. I'm going to try option 2 and test the hose at 120 psi (highest my air compressor will go). If it passes that test, I'm installing it on the pump outlet.
Quote:
Originally Posted by JohnB
Use a dedicated 15 amp circuit breaker for the electric element for two reasons;
1. The power draw of when the element is on needs that much. The element I think is 1,400 watts on 120 V is 12 amps by itself.
|
Yes, the heating element says it will pull 1400w. I am planning to account for this with my AC electrical system.
Quote:
Originally Posted by JohnB
2. The ability to turn off the 120 VAC to the element and not accidently burn out the element when the heater is drained.
|
This is a good point and I did not think about how easy it would be to fry the element. I will have to be conscious about flipping that breaker off when drained.
Quote:
Originally Posted by JohnB
Install a water heater drain valve setup verses using the plug. Ideally the heater is drained after each camping trip. This is a topic in itself to drain or not to drain. I do it for water quality issues and to keep the scale build down to be bleed any leftover minerals out more frequently. The drain valve makes this easy to do and it allows you to easily drain some water out to recreate the air pocket in the top of the heater when it dissolves itself while camping. (part of the thermal expansion issue)
|
I thought about adding a valve instead of a plug because of ease of use. Do you have any recommendations on the valve type? Also should I plumb a tube on the end of the valve to the outside of the water heater door somehow so it actually drains outside of water heater compartment?
Quote:
Originally Posted by JohnB
Did your new heater come with a electric, LP gas and DSI fault panel? Atwood has their own, or use to. Sunline used a KIB tank panel with pump switch, tank levels and the WH switches/DSI fault. Not sure if your camper even has tank level sensors to worry about.
|
I bought the Atwood switch panel as an add on accessory for the WH install. I'm wiring all of the 12VDC wires to it and it is probably the most wires I've installed in the camper yet haha. It's amazing because the original WH in the camper had 0 wires, all mechanical using gas pressure only. Also I will not have tank level read outs. My eyes will be the tank level gauges haha.
Quote:
Originally Posted by JohnB
Also look at the 2 valve bypass setup option I mention rather then the one cheaper 3 way valve and check valve setup.
|
I plan to add 3 separate valves for the WH bypass plumbing. Similar to photo attached. And the check valve I was planning on adding is shown with red rectangle.
__________________
|
|
|
|
|
01-02-2021, 05:07 PM
|
#114
|
|
Moderator
Join Date: Nov 2006
Location: Ohio
Posts: 12,649
SUN #89
|
Quote:
Originally Posted by Kxracer704
I thought about adding a valve instead of a plug because of ease of use. Do you have any recommendations on the valve type? Also should I plumb a tube on the end of the valve to the outside of the water heater door somehow so it actually drains outside of water heater compartment?
|
I have seen the water heater drain done a few different ways. This sort of all start with the valve and then how to connect it and what your annual maintenance is on the heater.
Some folks managed to pipe it in with rigid connections. The ones I saw were all brass. The end of the valve just missed as the door closed. This allowed the water to flow out of the black metal enclosure. This valve by my foggy memory, had garden hose threads on the outlet end. It may have been a 1/4 turn valve. I do not exactly recall.
I have seen others use like a car radiator drain, this too was rigid. Brass adapter in the tank, then the auto style drain screwed into it. The little wing screw could be reached by hand or pliers. The drain hole was small though like a radiator drain, but it was a valve. This setup I'm sure had some water flow down the black metal then out over the door, as it would if you pull the nylon drain plug Atwood provided.
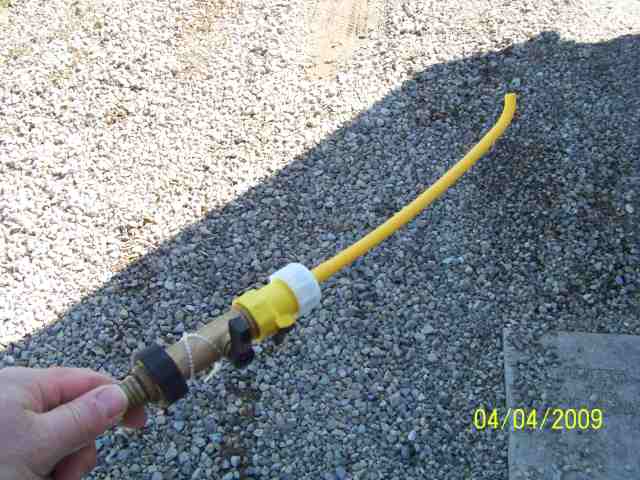
I created a little different setup. I have multiple needs for the draining. Every spring at start up time, I flush the heater with a water hose wand. Some folks make the wand, in this case I bought one a long time ago. Since the tank is dry after the winter storage, the sediment is on the bottom of the tank loose. You pull out the drain system/plug, shove the wand in, turn on the water and the sediment burbles out sort of all over, but it comes out is the main thing. You keep doing it a few times. See here.
The wand setup. This plastic wand is from Camco. It works, just have the wand in the tank before turning on the water. The wand will flex back out in the open with high pressure.
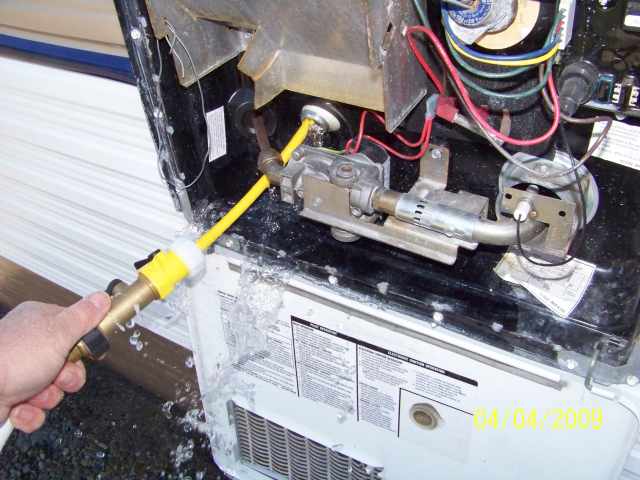
Here is flushing the tank.
Some folks have figured out how to vacuum the sediment out with a shop vac. I tied to make that work as it has some possible benefits, just I could not get the hose that would slip up in the hole to go down to the bottom of the tank. You have to find the biggest hose that will fit up the 1/2" NPT hole, yet be super flexible to fall down to the bottom and not suck itself closed. I managed to create the adapters from a 2" shop vac hose to to 3/8" polyethylene hose, just I could not get it to scrape the bottom of the tank. I tried 1/4" poly and it did not want to cooperate either. 1/2" poly was too big for sure. Maybe vinyl tubing might work.
This annual flushing/vacuuming is a need. The crud that can collect in the bottom of the heater does build up over time and can get pretty bad over time. The crud can accelerate the tank corrosion given the right water conditions. If you flush it every year, the crud stays manageable and low in quantity.
With the annual flushing need, what ever valve you put in, needs to come out once a year at least. With that, I avoided the rigid piping install at the tank.
I use a nylon rated NPT to hose barbed fitting. Like this on on the right.

The nylon helps make sure you do not mess up the tank threads as the nylon will cross thread and not the tank.
Then a flexible pressure/temperature rated hose with a stainless worm drive clamp and a brass 1/2" NPT valve on the end of the hose. The hose is about 1 ft long. The hose and valve folds up and stores inside with the cover closed.
I can get a pic of this tomorrow if wanted. Let me know.
The gas line going over the top of the drain plug area for sure hampers access to get to the drain plug/any fittings you install. The drain plug, a socket and an extension, it works. My nylon hose barb fitting, I can just sneak a 7/8 open end wrench in from the top and you one flat at a time turning.
The draining with the hose and the valve works very well. All the darining water is outside the black enclosure. Dealing with the fitting at the tank, I'm glad I only do it once a year.
I'm sure you will create something that works for you, or change it a few times until you get it just right.
The 3 valve bypass 2 way valve you linked will work. The 3 way fittings from Flair-it is what I used. Cost wise, both methods may be about the same. The 2 way valves are a little cheaper, but there are 3 of them and 2 tee's. The 3 way valves cost a little more, but only 2 of them and no tees. Both work, do which you like or have access to the parts. I get the Flair-it on line.
Hope this helps
John
__________________
Current Sunlines: 2004 T310SR, 2004 T1950, 2004 T2475, 2007 T2499, 2004 T317SR
Prior Sunlines: 2004 T2499 - Fern Blue
2005 Ford F350 Lariat, 6.8L V10 W/ 4.10 rear axle, CC, Short Bed, SRW. Reese HP trunnion bar hitch W/ HP DC
Google Custom Search For Sunline Owners Club
|
|
|
|
|
01-02-2021, 06:33 PM
|
#115
|
|
Senior Member
Join Date: Nov 2019
Location: Pennsylvania
Posts: 114
SUN #11695
|
Quote:
Originally Posted by JohnB
Then a flexible pressure/temperature rated hose with a stainless worm drive clamp and a brass 1/2" NPT valve on the end of the hose. The hose is about 1 ft long. The hose and valve folds up and stores inside with the cover closed.
|
Thanks John. I will make something work similar to how you have yours plumbed with the hose barb to a hose and a valve on the end that gets folded up into the compartment when the access door is closed.
__________________
|
|
|
|
|
01-05-2021, 01:24 PM
|
#116
|
|
Moderator
Join Date: Nov 2006
Location: Ohio
Posts: 12,649
SUN #89
|
Quote:
Originally Posted by Kxracer704
Thanks John. I will make something work similar to how you have yours plumbed with the hose barb to a hose and a valve on the end that gets folded up into the compartment when the access door is closed.
|
Here are a few to see. You can repeat or adapt to what you can get. Finding lead free potable water brass drain valves is hit and miss in the big box stores. It is getting better now, but a few years ago it was really hard to get one rated.
This pic below is the second one I did when we bought our T310SR, now about 14 years ago. I also want to point out the condition of the aluminum gas valve body and the bracket holding the valve. This pic is from today. Notice there is very little corrosion on the valve and bracket, the air shutter and the electrode holder bracket. We bought this camper used and at the time, (about 2 1/2 years old then) the bare aluminum did not fuzzed up yet with corrosion. All I did was remove the valve and bracket, mask off the gas jet, spray paint the valve, bracket and air shutter with Rustoleum metal spray paint. In this case I picked silver as that was on the shelf in the barn.
If you have a new heater, consider doing something to help protect the valve and the cut edges of the metal bracket, and air shutter. Maybe wait until the warranty runs out or what fits you.
Also one thing I need to do, is add a piece of pipe foam insulation under the hose threads on the drain valve so it does not scratch the paint over time.

Here is one of my project campers, I sort of went wild with the hose length. Need to cut the hose back about 4". In this case, the valve will rub off the part number decal over time. Notice the corrosion on the valve, bracket and air shutter. The pic does not show it well with being washed out with the flash on, but it's there. Bare untreated aluminum and exposed steel edges outside like this will corrode over time.

Here is one with the foam pipe insulation to protect the paint and hose rubbing. The gas valve is not painted either.

Hope this helps
John
__________________
Current Sunlines: 2004 T310SR, 2004 T1950, 2004 T2475, 2007 T2499, 2004 T317SR
Prior Sunlines: 2004 T2499 - Fern Blue
2005 Ford F350 Lariat, 6.8L V10 W/ 4.10 rear axle, CC, Short Bed, SRW. Reese HP trunnion bar hitch W/ HP DC
Google Custom Search For Sunline Owners Club
|
|
|
|
|
01-05-2021, 05:56 PM
|
#117
|
|
Senior Member
Join Date: Nov 2019
Location: Pennsylvania
Posts: 114
SUN #11695
|
__________________
|
|
|
|
|
01-05-2021, 10:24 PM
|
#118
|
|
Moderator
Join Date: Nov 2006
Location: Ohio
Posts: 12,649
SUN #89
|
Nice job on the cabinet and counter!
The edging on the counter looked like southern yellow pine by the grain and color. And if that is really old wood, it is hard when aged and a lot different then what can buy in the lumber yards of today.
My farther built the house I grew up in back in the 50's in upstate NY. All the lumber, walls studs, floor joints, rafters, were southern yellow pine. By the mid 70's the bathroom was redone and they had to move a few wall studs to put a new shower stall in. The comments from the carpenter, this house is made of iron, trying to drive a nail into anything is work the wood is so hard. I recall seeing the sap leach out on the sides of the rafters in the attic. Barely any knots and straight as an arrow 65 years later when we sold the home. That kind of lumber is far and in between now a days.
Keep up the good work and thanks for sharing.
John
__________________
Current Sunlines: 2004 T310SR, 2004 T1950, 2004 T2475, 2007 T2499, 2004 T317SR
Prior Sunlines: 2004 T2499 - Fern Blue
2005 Ford F350 Lariat, 6.8L V10 W/ 4.10 rear axle, CC, Short Bed, SRW. Reese HP trunnion bar hitch W/ HP DC
Google Custom Search For Sunline Owners Club
|
|
|
|
|
01-06-2021, 06:02 AM
|
#119
|
|
Member
Join Date: Nov 2019
Location: Ohio
Posts: 48
SUN #11689
|
Your doing a great job!
__________________
|
|
|
|
|
01-16-2021, 05:42 AM
|
#120
|
|
Senior Member
Join Date: Nov 2019
Location: Pennsylvania
Posts: 114
SUN #11695
|
__________________
__________________
|
|
|
|
|
|
|
Currently Active Users Viewing This Thread: 1 (0 members and 1 guests)
|
|
|
| Thread Tools |
Search this Thread |
|
|
|
| Display Modes |
 Linear Mode Linear Mode
|
 Posting Rules
|
You may not post new threads
You may not post replies
You may not post attachments
You may not edit your posts
HTML code is Off
|
|
|
|
 » Recent Sunline Discussions
 |
|
|
|
|
|
|
|
|
|
|
|
|
|
|
|
|
|
|
|
|
|


