 |
|
 06-29-2023, 01:17 PM
|
#1
|
|
Junior Member
Join Date: Jun 2023
Location: Massachusetts
Posts: 17
SUN #13710
|
Roof replacement material for 1977 15' RC
Hi,
I'm just starting a complete renovation of my (new to me) 77 15' RC. I'm wondering where to get the aluminum sheets that appear to be the same for the roof as the sides. I need to install new roof. Also, is there a better material used now or is it the same aluminum sheets as originally installed?
Thank you, Ted
__________________
__________________
|

|

|
|
06-30-2023, 07:05 AM
|
#2
|
|
Moderator
Join Date: Nov 2006
Location: Ohio
Posts: 12,656
SUN #89
|
Hi Ted,
There are many options for you, but before I go into other roof membranes there is an option you may not have thought of, re-using your old roof and treating it with a life time high solids silicone coating.
Before I get into what is all involved tell us this.
Do you still have the original roof intact with the roof metal seamed to the front and rear top siding? Meaning you pulled it off in all one piece. Or did the old roof get all cut up taking it apart?
Ill be back later tonight with more pending the answer above.
John
__________________
__________________
Current Sunlines: 2004 T310SR, 2004 T1950, 2004 T2475, 2007 T2499, 2004 T317SR
Prior Sunlines: 2004 T2499 - Fern Blue
2005 Ford F350 Lariat, 6.8L V10 W/ 4.10 rear axle, CC, Short Bed, SRW. Reese HP trunnion bar hitch W/ HP DC
 Google Custom Search For Sunline Owners Club
|
|
|
|
|
06-30-2023, 08:50 AM
|
#3
|
|
Junior Member
Join Date: Jun 2023
Location: Massachusetts
Posts: 17
SUN #13710
|
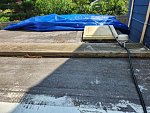
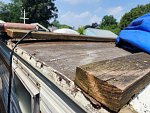
John, I still have the roof in place Some dents, leaking where screws hold roof vents, two 2x6 pressure treated (roof rack) boards screwed to roof that I'm removing leaving many screw holes. Someone had covered roof in a black roofing material that was brushed on. I'm contemplating disassembling entire camper since there's a patchwork of floor fixes, some rotted wood on walls and ceiling. Curious about recoating roof though. Then maybe I would keep camper together and do more patchwork fixes.
__________________
|
|
|
|
|
06-30-2023, 10:54 PM
|
#4
|
|
Moderator
Join Date: Nov 2006
Location: Ohio
Posts: 12,656
SUN #89
|
Hi Ted,
Someone covered the roof with a black coating, and there are these two, 2 x6's screwed to the roof. Hmm, I suspect they were trying to create a patch to hold the roof up, maybe?
Can you post a few pics of the roof? Seeing what you are up against may help to be able to give you some better ideas to think about.
If you think of having to dismantle a large part of the camper to correct other issues, that creates an opportunity for a few things I wanted to talk to you about.
I "think" your camper has a flat roof; is that correct? Years ago, they made them that way. If it is a flat roof, do you know of any depressions in the roof to create ponding water?
The newer campers have an arched roof to help shed the water. The method to create the arch and how high it changed over the years at Sunline. They started with solid sawed arched rafters and then went to a truss-type rafter. Either method created enough arch not to have ponding water and keep water away from crank-up roof vents and roof AC units as time passed.
If your rafters have a lot of rot, even on a flat roof, that rot should be addressed as if you are rebuilding the camper; the roof needs to be sound and leak free to protect all your hard work. I'll wait for the pics of these 2 x 6's across the roof before I speculate more about what they are trying to do.
As to what to do with the roof, repair the old one or start over with a new one, there are pros and cons to both. Before I start into this much more, please post some pics so I can talk specifically to your camper and what you are up against.
To your direct question, yes, some places still sell seamed roofing. I cannot comment on the cost; I never bought them, just saw them for sale.
Other roofing options beyond the seamed metal roof, several have come along since your camper was made. There are pros and cons to all of them. Here are the ones I know of, have seen, and worked on many of them.
1. One piece of all metal roof membrane, no seamed sections or seamed attachment to the front and rear siding, all aluminum membrane. This was used years ago as the next step beyond the seamed roofs in the evolution of camper roofs. This was a very good membrane; I have seen and worked on how well a 23-year-old non-maintained roof membrane has held up. The membrane was in great shape; the camper had many leaks due to the sealants used and no maintenance. The work involved in fitting this all-one-piece metal roof costs more labor hours to manufacture with more skilled workers. In time, this good labor-intensive and higher-cost membrane was discontinued in the industry to open door for lower overall cost roofing membrane options. I know Sunline did at least one special order for all metal roofs, but I am unsure if it made it mainstream.
2. EPDM rubber 2-part membranes came along, and Sunline used much of this material once they left the seamed metal roof. A black solid waterproof layer bonded to a white reflective shed layer. This is a time-tested and proven roofing membrane. The membrane can last 10 to approx 13 years with very little maintenance. Being maintained, it can go a lot longer and then be recoated. But again, sealant failures are the weak link and the roof leaks due to the lack of sealant maintenance. You can buy 60 mil commercial-grade EPDM to put on a camper still today, but the RV 40 mil grade is getting very hard to find for sale anymore. It is somewhat being phased out by the RV manufacturers of today.
3. TPO, is a formulation of plastic roofing. There were formulation issues when it first came out, but they have now been solved. It has been widely used on RVs for a long time and is still a current choice of some RV manufacturers. The membrane can be warranted for 15 years by some manufacturers. Again, the TPO roofs leak due to a lack of maintenance of the sealants, not the membrane. Sunline never used this material that I know of.
4. PVC, is another plastic formulation membrane. It is never too RV'er than TPO and is now used often by some RV manufacturers. It has about the same life space as TPO and now competes with the TPO. And it, too, leaks just like the rest due to failed sealants. Sunline never used this material; it was too new when they closed up.
5. Fiberglass (filon) sheeting. This is a one-piece membrane of fiberglass. It is used on some towables, but maybe more so on motorhomes. It is a good membrane and can survive the lack of cleaning. But it, too, leaks where the sealants have not been maintained.
Options 2 to 5 need a sub straight under them to glue the membrane too. 3/16", 1/4", and 3/8" thick plywood/OSB are often used. The 3/8" is considered walkon; the thinner ones are not in my mind. Sunline on the EPDM used a dense fiberboard (think dense corrugate board) to glue the EPDM too. It was not a direct wall on roof, though.
I would say before you think about which roof option you may want, including repairing and coating your old one, the roof structure (rafters) needs to be understood if they are rotted or not and need a few or all replaced. Your camper is not that big; replacing all the rafters, if it comes to it, is not that hard; if the ceiling board is still good, you may be able to reuse it.
Post some pics, and we can go deeper into this. You have many options that will work, but the material cost differs. The labor time would be more item-specific.
Hope this helps
John
__________________
Current Sunlines: 2004 T310SR, 2004 T1950, 2004 T2475, 2007 T2499, 2004 T317SR
Prior Sunlines: 2004 T2499 - Fern Blue
2005 Ford F350 Lariat, 6.8L V10 W/ 4.10 rear axle, CC, Short Bed, SRW. Reese HP trunnion bar hitch W/ HP DC
Google Custom Search For Sunline Owners Club
|
|
|
|
|
07-01-2023, 08:21 AM
|
#5
|
|
Junior Member
Join Date: Jun 2023
Location: Massachusetts
Posts: 17
SUN #13710
|
 https://www.sunlineclub.com/forums/m...cture7379t.jpg
Do these links work. They are in a new phot album called "1977 Sunline 15' RC restoration" . More coming today now that I think I figured how to send photos.
Thanks for looking at them. Ted
__________________
|
|
|
|
|
07-01-2023, 12:25 PM
|
#6
|
|
Moderator
Join Date: Nov 2006
Location: Ohio
Posts: 12,656
SUN #89
|
Quote:
Originally Posted by TedD

|
Hi Ted,
Not sure what time of day you uploaded or you made it to "all" the pics in your club photo album, but we can see your album here: There were eight pics when I saw them. Is this all 8 of them? https://www.sunlineclub.com/forums/m...albums896.html
In the link you created, you selected the incorrect command structure for the entire album; you did the URL commands correctly, but you pasted in a thumbnail (small) picture instead of an actual URL path that would end in HTML, which is the entire album. We see only one thumbnail (small) pic on your link, not the album.
For the future, if you want to link the entire album
-Go to the album you want to create a hot link to.
- When you are in the album, and you see your pics
- Move your mouse up to the URL from your browser, mouse select the URL, and "copy" the complete URL into your scrap buffer. It should end in HTML
- Change to a new window in the post you want to insert the hotlink.
- Place your cursor where you want it to show, and do a "paste."
- The link will show up. If you do a preview, you can fire it off to ensure it works before submitting the reply.
If you want to link a pic from your album (large size so we can see it better) and insert it in the middle or anywhere in a post/reply, go to your album, click into the pic you want to link to the post; NOTE: make sure you are viewing the larger picture, not just the thumbnail.
When the pic views in your album full size, look at the bottom and look for the BB code. Copy that entire BB code into your scrap buffer, change windows to your post/reply and paste in the complete BB code. It will have all the commands it needs to show it.
Like this one on your roof, this is the full size.

This would be the thumbnail size.
I'll be back later with more comments on your camper; let us know if 8 is all the pics for now.
John
__________________
Current Sunlines: 2004 T310SR, 2004 T1950, 2004 T2475, 2007 T2499, 2004 T317SR
Prior Sunlines: 2004 T2499 - Fern Blue
2005 Ford F350 Lariat, 6.8L V10 W/ 4.10 rear axle, CC, Short Bed, SRW. Reese HP trunnion bar hitch W/ HP DC
Google Custom Search For Sunline Owners Club
|
|
|
|
|
07-01-2023, 01:01 PM
|
#7
|
|
Junior Member
Join Date: Jun 2023
Location: Massachusetts
Posts: 17
SUN #13710
|
Yes, that is all the pictures.
Thanks for the tips on uploading photos.
Ted
__________________
|
|
|
|
|
07-01-2023, 05:50 PM
|
#8
|
|
Moderator
Join Date: Nov 2006
Location: Ohio
Posts: 12,656
SUN #89
|
Hi Ted,
Seeing the pictures helps answer a lot of questions before even being asked.
Here are some thoughts; you see how this fits with you.
Since you have not yet removed the roof, you can try and salvage it. The biggest issue I see is the black tar-looking coating. We have another club member who recently restored a Sunline truck camper—this one. https://www.sunlineclub.com/forums/f...ild-19616.html
Jay (Kxracer704) does this by video, whereas I do it with pics and typing. I have not yet made it into the online big video world. He did finish his camper, and we talked offline about the roof. He wanted to salvage the old roof; it was in a different condition than yours (a little better), but still, he had to scrape, chemical clean, and wire brush leftovers of some coating off many areas of the metal. It was work, but he made it happen.
The restoration was, applying Henry's Tropi-Cool high solids silicone coating to the finished camper roof and roof seams. On the roof, metal seems joints and an Eternabond product called web seal was applied. It has the Eternabond sealant on one side (the sticky side) and a roofing fabric on the other side that the coating bonds to. This was insurance that all seams would be double-sealed.
Then, Henry 885 (thick sealant joint repair, like 1/8" to 3/16") was used at every screw flange, fridge vent, or anything that had screws in it as a first thick coat. The seams also got the 885 treatment.
Once the 885 was cured, qty, 2, 22 mil coats of Henry 887 were rolled on to create a sealed minimum 44 mil roof coating setup, not relying on any caulk to create a water seal. This creates a lifetime roofing product short of mechanical damage.
I have done four campers to date with this Henry sealing method and learned a lot about silicone coatings, where they work well, and where they don't. Proper adhesion is critical, and an adhesion test needs to be done before applying any roof coating to ensure the surface is prepped correctly and there are no other bonding issues.
I have not "yet" made it to do a post on this coating, but I have uploaded some pictures of the first camper I have done with it. See my Flickr photo hosting site here to get a feel for some of what is involved. https://www.flickr.com/photos/camper...77720295784623
You have at "least" two things to decide on that come to mind if you want to save the existing roof.
1. Do you rebuild the camper with a flat roof or a newer style arched roof like it has now? The Henry treatment is rated for ponding water, not to affect it if some ponding happens. I sense you will be in for all-new rafters anyway; which do you install, flat or arched? If you go arched roof, then the odds are high that you will not be able to reuse your old roof as the metal will not be wide enough. The arch creates a longer dimension of material to cover wall to wall over the arch. Your existing metal has a 90-degree bend on the side walls to create an overlap seal when the roof is flat. Going arched, you might be 1/2" to 1" total short on metal at the sides bend area due to the lost length of the arch.
If you go with reusing your existing roof and doing a Henry coating, you must deal with that black tar-looking coating. You could do a test section to see how complex it is going to be to get it off. We can talk about the how-to if you want to try cleaning it.
If you go arched, you will have new rafters that are arched, and new decking, 3/16" or 1/4", would work well and keep the weight down on your single axle camper. This link will drop you into a long restoration post on a nonslide camper we rebuilt. The link starts where the roof decking goes on https://www.sunlineclub.com/forums/f...tml#post151483
And this link shows a new EPDM membrane being glued on. The TPO or PVC membrane would go on like this, also.
https://www.sunlineclub.com/forums/f...tml#post154533
We can discuss this more if wanted, but this gets you the "what" needs to be thought through on reducing the old versus a new roof, arched or flat.
I will go through question 2 in the next reply.
__________________
Current Sunlines: 2004 T310SR, 2004 T1950, 2004 T2475, 2007 T2499, 2004 T317SR
Prior Sunlines: 2004 T2499 - Fern Blue
2005 Ford F350 Lariat, 6.8L V10 W/ 4.10 rear axle, CC, Short Bed, SRW. Reese HP trunnion bar hitch W/ HP DC
Google Custom Search For Sunline Owners Club
|
|
|
|
|
07-01-2023, 06:32 PM
|
#9
|
|
Moderator
Join Date: Nov 2006
Location: Ohio
Posts: 12,656
SUN #89
|
2. What advantages of dealing with the roof tar and keeping my old roof repaired and coated versus new decking and membrane, EPDM, TPO, or PVC?
My gut instinct (without doing a quote estimate) is the all-new roof will cost a little more in out-of-pocket materials than dealing with old metal and getting the black tar-looking stuff off. That tar stuff is a decision point; if you damage the metal a lot getting it off, that may be part of the kill shot on reusing the old. I have some suggestions about how to start a test on getting it off when and if the time comes.
The labor to do the old roof with a Henry coating can be close to or maybe a little less than the new roof. But do not get me wrong, both will cost out-of-pocket and take a lot of time.
Sealability and longevity, the Henry method, done right with adhesion testing, is a long-term method. And doing a new flexible membrane with double sealing of every joint and the screwed area is also a long-term method. I have created above and beyond what the RV manufacturers do for a membrane roof. Doing a camper restoration is too painful to do the status quo of relaxing on roof caulk to prevent leaks. I double-treat every caulked area with Eternabond Roof Seal tape or the correct primer and Henry 885 coating.
Roof moldings. Here is a large difference between your seamed metal roof and the new flexible EPDM/TPO or PVC membrane method. And the moldings add to the new flexible membrane roof.
The seamed metal roof has seamed front and rear siding to the roof joints needing no roof molding or all the screws and caulk the other flexible membrane methods require. This feature alone is one reason so many older campers survive without roof leaks as long as they do without maintenance. The front and rear seams on the other flexible membranes require molding to create the joint with caulk sealants, which is one of the highest leak zones on that roof style. That said, double sealing the flexible membrane front and rear molding joints does create a lasting leak-free method, but you have to double seal it.
The seamed metal roof has the side walls lap joint from roof to side wall with no molding. The flexible membrane requires a gutter rail and sealant to stop the leaks behind the gutter rail: this side area plaques both the seamed metal roof and flexible membrane roof. The side wall screws must be dealt with; it is cheaper with the seamed roof as the lap joint is part of the roof.
This is going to come down to your choice. You can save your existing roof with a lot of work and coat it to create a long-term flat roof. And you can create a long-term arched roof with decking and a flexible glue-on membrane or a one-piece metal roof (non-seamed metal but new) with a lot of work.
There is one benefit that the new decking may give you where the old metal seamed roof may not be as strong; a new decked roof is screwed a lot to every rafter, creating rigidity in the camper. The seamed metal roof also has rigidity as the metal helps give you some, but it is not screwed to every rafter. This is not a major item, more of an incremental gain for a decked roof. Sunline created a lot of undecked seamed metal roofs and even undecked bud board flexible EPDM rubber roofs where the ceiling board glued to the rafters created the initial rigidity, and they are still on the road today.
OK, all that thinking should get you started, most likely to ask more questions.
I would say this, before you do a major demo, create a plan for the rebuild before starting the demo.
Hope this helps
John
__________________
Current Sunlines: 2004 T310SR, 2004 T1950, 2004 T2475, 2007 T2499, 2004 T317SR
Prior Sunlines: 2004 T2499 - Fern Blue
2005 Ford F350 Lariat, 6.8L V10 W/ 4.10 rear axle, CC, Short Bed, SRW. Reese HP trunnion bar hitch W/ HP DC
Google Custom Search For Sunline Owners Club
|
|
|
|
|
07-03-2023, 01:55 PM
|
#10
|
|
Member
Join Date: Jun 2013
Location: Rhode Island
Posts: 52
SUN #5317
|
24" flashing
Quote:
Originally Posted by TedD
Hi,
I'm just starting a complete renovation of my (new to me) 77 15' RC. I'm wondering where to get the aluminum sheets that appear to be the same for the roof as the sides. I need to install new roof. Also, is there a better material used now or is it the same aluminum sheets as originally installed?
Thank you, Ted
|
I replaced my roof 5 years ago with 24" roll flashing no leaks!
__________________
In everything give thanks!
VICMIR
2002 Solaris 260SR
2005 Ram 2500 (The Happy Camper)
|
|
|
|
|
07-03-2023, 02:50 PM
|
#11
|
|
Junior Member
Join Date: Jun 2023
Location: Massachusetts
Posts: 17
SUN #13710
|
Quote:
Originally Posted by vicmir
I replaced my roof 5 years ago with 24" roll flashing no leaks!
|
What did you coat/cover the flashing with?
__________________
|
|
|
|
|
07-04-2023, 06:21 AM
|
#12
|
|
Member
Join Date: Jun 2013
Location: Rhode Island
Posts: 52
SUN #5317
|
Quote:
Originally Posted by TedD
Hi,
I'm just starting a complete renovation of my (new to me) 77 15' RC. I'm wondering where to get the aluminum sheets that appear to be the same for the roof as the sides. I need to install new roof. Also, is there a better material used now or is it the same aluminum sheets as originally installed?
Thank you, Ted
|
I have a sample of how to fabricate the roof. A visual is always best. My cell is 401-954-2955. I'd be happy to discribe how to do. If you handy, you can do it.
__________________
In everything give thanks!
VICMIR
2002 Solaris 260SR
2005 Ram 2500 (The Happy Camper)
|
|
|
|
|
07-05-2023, 07:47 AM
|
#13
|
|
Junior Member
Join Date: Jun 2023
Location: Massachusetts
Posts: 17
SUN #13710
|
John, I watched several videos from the truck camper resto. Thank you for that link. At this point I'm not sure what method I'm using for roof repair/replace. I know you said I should have a plan before proceeding with restoration, but I'm leaning towards a complete tear down/resto, so if I do then I'll dismantle the roof carefully in case I choose to reuse it.
So much to learn. I have woodworking skills and tools, just lacking camper experience so your replies have been well received. The video series from Jay (Kxracer704) has helped define the path I may take with restoration.
__________________
|
|
|
|
|
07-05-2023, 06:22 PM
|
#14
|
|
Moderator
Join Date: Nov 2006
Location: Ohio
Posts: 12,656
SUN #89
|
Hi Ted,
It sounds like you are formulating a plan, and total restoration is a plan. Take the camper apart slowly to learn how it leaked. And take "lots" of pics of the disassembly process before you even take anything apart. And while your are taking it apart. It is hard to remeember exactly how it all was when togehter. The pics remember a lot more then our minds do when we are "into" and big take it apart project.
These posts below may help; they are of other Sunline club members who did some major restoration. We have more in our posts, but these came to mind to look back and find them. The methods of how Sunline built the campers changed over the years. In your case, you can incorporate some of the newer methods into your existing setup. Assuming you will reuse the siding, ensure the outside perimeter and all the door and window opening are the same as your old one so the same siding will fit over the new walls etc. The walls can be thicker if wanted, just remember the inside cabinets sizes if you plan on reusing them so that they fit the inside perimeter it you go wall to wall.
Ask away any questions as you work your way through this restoration process. When you have time, skim over the pics in these posts for hints on how the camper is built and how they were repaired them. You can read all teh words as needed.
This post is a total transformation and may help on floors, walls, and interiors. Frank, took an old popup frame and created a single-axle travel trailer. Many pics were lost in one of his file server moves, but there are still plenty to look at. https://www.sunlineclub.com/forums/f...ect-11053.html
This one is close to yours, just a little smallera 79 12 1/2 MC. Sunline Fan started the total rebuild process, and it is still ongoing. Life got in the way, but knowing him, he will get back onto this, some day. https://www.sunlineclub.com/forums/f...-mc-18647.html
This one by Yellow Jacket is newer, an 87 -T1550. He did a lot of work on this one. https://www.sunlineclub.com/forums/f...ion-19403.html
This one by Thomascine is also an 87 T-1550. She did a good job on this too.
https://www.sunlineclub.com/forums/f...air-17458.html
Here are a few of mine: newer Sunlines, 2004 and newer. You can see the similarities and the differences from the evolution of yours to what the last campers were made like.
This is a total restoration, just not a start-over restoration. There are lots of pics in this one. A 2004 T950 https://www.sunlineclub.com/forums/f...avy-17684.html
This is a major repair post with a walk on the roof of a 2006 T264SR. Lots of pics here too. https://www.sunlineclub.com/forums/f...avy-16834.html
This one is a 2004 T2475 with the front wall repair. It is a partil restore at this point, I need to get back to the rest of it. It shows some good pics on how the front corner moldings and front roof seam works with the front wall if you decide to use a flexible membrane in place of youyr metal mebrane.
https://www.sunlineclub.com/forums/f...2-a-18706.html
I have "lots" of other picture on other newer Sunline repairs/restorations and willing to share, so just ask as needed.
Consider adding your restortion work in a post too. These kinds of posts help others big time who will come after you. We do not have many large repair posts on the 70's campers, yet anyway.
Hope this helps.
John
__________________
Current Sunlines: 2004 T310SR, 2004 T1950, 2004 T2475, 2007 T2499, 2004 T317SR
Prior Sunlines: 2004 T2499 - Fern Blue
2005 Ford F350 Lariat, 6.8L V10 W/ 4.10 rear axle, CC, Short Bed, SRW. Reese HP trunnion bar hitch W/ HP DC
Google Custom Search For Sunline Owners Club
|
|
|
|
|
07-06-2023, 07:15 PM
|
#15
|
|
Junior Member
Join Date: Jun 2023
Location: Massachusetts
Posts: 17
SUN #13710
|
Hi John,
I looked at so many pictures and past posts today I now need to digest all I read. I looked at a great one of yours (you provided a link I saw in today's Newsletter for "Mark") re: Telerip 1, from 2017. Wow, I learned a lot from that. I started disassembling today. I'll upload pictures by the weekend. Thank for your reply today!
__________________
|
|
|
|
|
07-11-2023, 05:30 PM
|
#16
|
|
Junior Member
Join Date: Jun 2023
Location: Massachusetts
Posts: 17
SUN #13710
|
Hi John, I just uploaded pictures of the roof with the PT wood removed and the front of camper removed. I'll remove roof tomorrow and sides/ back wall next. Then I'll try to salvage roof.
__________________
|
|
|
|
|
07-11-2023, 05:48 PM
|
#17
|
|
Moderator
Join Date: Nov 2006
Location: Ohio
Posts: 12,656
SUN #89
|
Hi Ted,
Wow, you are moving right alongyour photo album. https://www.sunlineclub.com/forums/m...albums896.html
The early stages of these restorations are the ugly part. You, for sure, had corner molding leaks for a long time.
You are doing the restoration correctly; there is too much damage to splice in a few new boards. It is easier to replace and rebuild, and when you are done, you have a nice, structurally sound, better then new sealed-up camper to have fun in.
Keep up the good work!
John
__________________
Current Sunlines: 2004 T310SR, 2004 T1950, 2004 T2475, 2007 T2499, 2004 T317SR
Prior Sunlines: 2004 T2499 - Fern Blue
2005 Ford F350 Lariat, 6.8L V10 W/ 4.10 rear axle, CC, Short Bed, SRW. Reese HP trunnion bar hitch W/ HP DC
Google Custom Search For Sunline Owners Club
|
|
|
|
|
07-13-2023, 06:46 PM
|
#18
|
|
Junior Member
Join Date: Jun 2023
Location: Massachusetts
Posts: 17
SUN #13710
|
Thank you for the encouragement John. We took the roof off today and all but one side is remaining. The wood frame disintegrated in all four corners as we pulled off the skins. There is not enough to map out a new template for framing new walls. I really only have the aluminum and pictures to go by. I will upload pictures soon.
Ted
__________________
|
|
|
|
|
07-13-2023, 11:06 PM
|
#19
|
|
Moderator
Join Date: Nov 2006
Location: Ohio
Posts: 12,656
SUN #89
|
You are doing great Ted!
Yes, these campers gain their structural strength by the sum of all the parts being intact. The inside wall board is glued, and some staples to the wall studs to give the wall strength. The siding is stapled to the wall studs, giving the wall strength. The cabinets and any walls inside the camper add rigidity to the walls. Take away any part of that combo and the whole camper starts getting wigglely.
You are doing great!
John
__________________
Current Sunlines: 2004 T310SR, 2004 T1950, 2004 T2475, 2007 T2499, 2004 T317SR
Prior Sunlines: 2004 T2499 - Fern Blue
2005 Ford F350 Lariat, 6.8L V10 W/ 4.10 rear axle, CC, Short Bed, SRW. Reese HP trunnion bar hitch W/ HP DC
Google Custom Search For Sunline Owners Club
|
|
|
|
|
07-14-2023, 08:23 PM
|
#20
|
|
Junior Member
Join Date: Jun 2023
Location: Massachusetts
Posts: 17
SUN #13710
|
Hi John, Today I finished removing the last (passenger side) wall. It was good enough to use for template to create new one. Nothing in this camper is usable. I apparently purchased a basket case. Next week I'll remove the floor and bring the trailer out to have the bearings, brakes, etc checked and replaced as needed. While that's out I plan to start cutting 2x4's to match the size of original frame pieces then start building new walls. I'll also look into new stove elec vs gas, new heat pump with AC if they make a light enough one and then see if I can get new roof panels, or scrape tar of this one.
__________________
__________________
|
|
|
|
|
|
|
Currently Active Users Viewing This Thread: 1 (0 members and 1 guests)
|
|
|
 Posting Rules
|
You may not post new threads
You may not post replies
You may not post attachments
You may not edit your posts
HTML code is Off
|
|
|
|
 » Recent Sunline Discussions
 |
|
|
|
|
|
|
|
|
|
|
|
|
|
|
|
|
|
|
|
|
|
|
|
|
|
|
|
|
|


 Linear Mode

