 |
|
 03-05-2020, 07:50 PM
|
#81
|
|
Senior Member
Join Date: Sep 2016
Location: Virginia
Posts: 814
SUN #8893
|
Quote:
Originally Posted by JohnB

Sunline didn't do the best job on how they mounted the rear stop/turn/tail lights. All the 2004, 2005 and some of the 2006's I have had apart have no backer board behind the siding to hold the rear tail lights on. They just screwed into the very thin siding. I have seen some that the holes were stripped out. A prior owner plugged them with putty and drilled new holes. The heavier light of the stop/turn light bouncing down the road can affect the holding power on those screws, and it is worse if the installer over tightened them or tried too very much. The putty tape may have been what made them semi work. Even if this old method they used was not the greatest, it did work. I suspect just about all Sunline's were made this way except the last year or so.
|
Thanks JohnB! That makes sense. Yes, the clearance lights on mine do not screw into wood but they are small. I thought for sure the tail lights would screw into wood since they are bigger. Well, the new ones will be screwed into wood!
Thanks again for the info. It is much appreciated!
Tommie
__________________
__________________
|

|

|
|
03-10-2020, 08:52 PM
|
#82
|
|
Moderator
Join Date: Nov 2006
Location: Ohio
Posts: 12,654
SUN #89
|
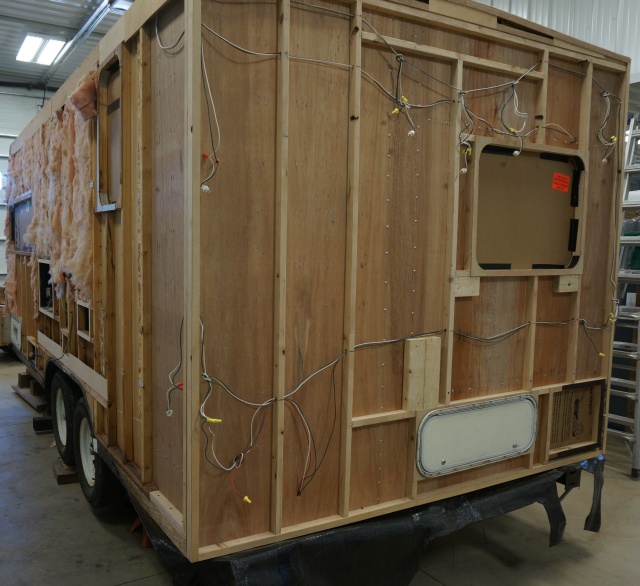
We had a one day work weekend and concentrated on getting the walls ready for siding.
I treated the water-stained wood with Rot Dr. CPES before the weekend. The CPES seals the wood and encapsulates any dry rot mold spores not to come back later on.
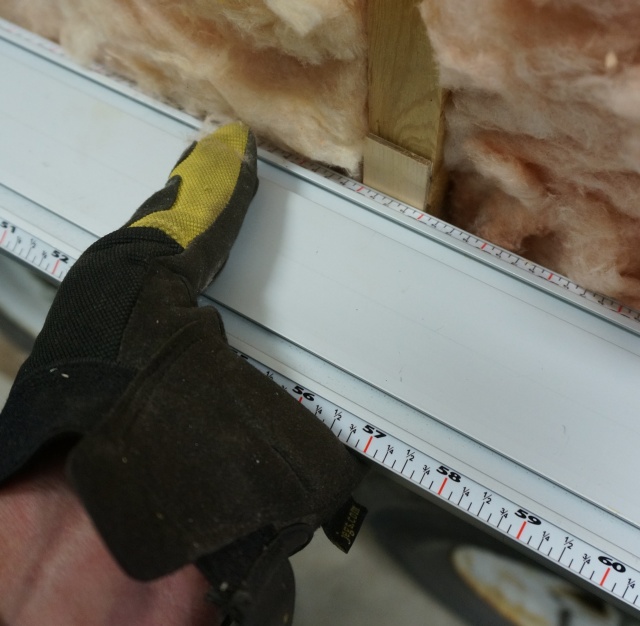
Then we need to add shims at all the windows, most of the openings in the wall, and at certain wall corners—the walls made from wood can have a bow in or out to them. To compensate for the bow, on the end walls, 1/4” of shim made up of 2, 1/8” strips stapled on the corner boards. When you place an 8 ft. straight edge across the wall you will see the walls studs bow in, out, or are straight. During the siding installation, local shims are added at the studs as needed to allow the siding to be more straight rather than follow the bow of the wall studs.
You can see here at the windows the added shims, which also helps obtain the correct compression of the window flange to create a positive seal to the siding with the butyl sealing tape.
Here is the front wall, all shimmed out.
A closer pic at the window. You can see the new luan wood around the window frame. There are also older intact shims that were not damaged, and we left them in place. We just cut out the bad parts.

Here is the left sidewall, which needed many new shims as so many of the openings had leaks started. The front cargo hole was all re-shimmed, and we corrected the corners to have better butyl compression.

Here is a large area of the left wall shimmed zoomed in a little. The bathroom window on the back left side also needed shimming to replace rotted shims.

The rear wall. It is harder to see the shims as all the wood is new on the back wall, and they blend in, making it hard to see the added shim.
And the rear right sidewall. You can see the wide shim at the roofline and he windows, cargo doors etc.

This shimming process is straight forward. It just takes more time than one thinks it would. There are a lot of little cut pieces after you rip a 4 x 8 x 1/8” luan sheet to make the shims.
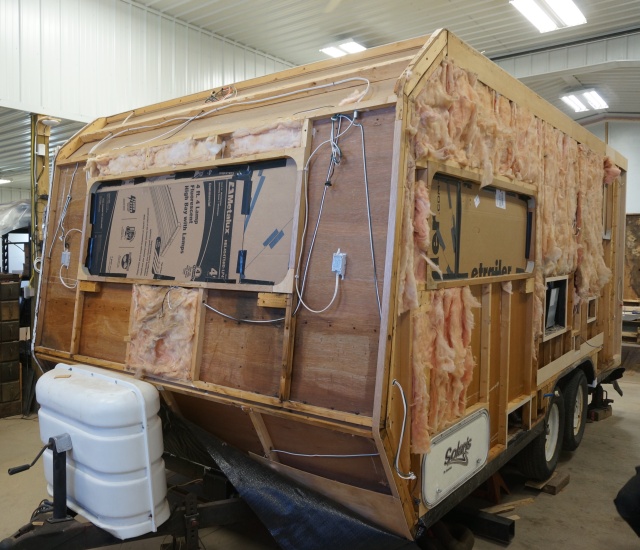
Next up, insulation. We used a combo of old usable leftover insulation and new.


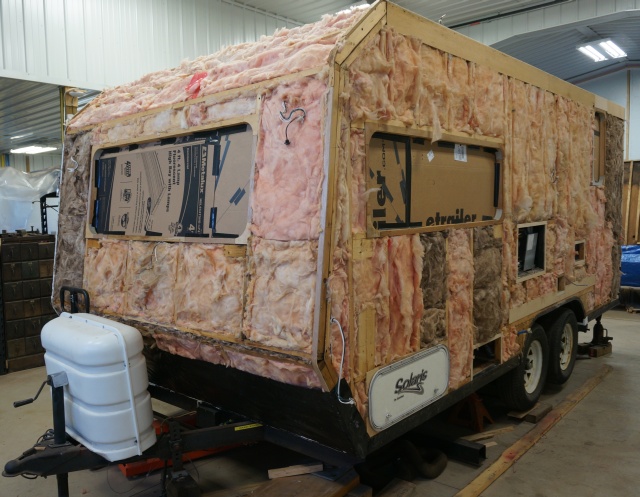
The camper framing is now ready for siding. Just we have to clean up all the siding, repair corrosion holes, remove the stuck-on putty tape, straighten bent parts as needed and clean up all the moldings. The cleaning process is a “job” to do an entire camper—more on this next time as we start into the cleaning process.
All for now, more yet to come.
Work tally on time and materials to get to this point;
Work completes Day 35 of the repair.
3/6/20; 1 worker for a total of 0.5 hr.
3/9/20; 2 workers for a combined total of 11.83 hr.
Weekend subtotal: 12.33 hr.
283.69 hr. - Total work hours accumulated to date: 3/9/20
New material use: 3/9/20

$1,397.86 Prior material subtotal 3/1/20
$48.65 work weekend material subtotal. 3/9/20
-------
$1,446.51
Materials Subtotal to date 3/9/20
Thanks for looking.
John
__________________
Current Sunlines: 2004 T310SR, 2004 T1950, 2004 T2475, 2007 T2499, 2004 T317SR
Prior Sunlines: 2004 T2499 - Fern Blue
2005 Ford F350 Lariat, 6.8L V10 W/ 4.10 rear axle, CC, Short Bed, SRW. Reese HP trunnion bar hitch W/ HP DC
 Google Custom Search For Sunline Owners Club
|
|
|
|
|
03-11-2020, 05:53 AM
|
#83
|
|
Moderator
Join Date: Dec 2006
Location: Pennsylvania
Posts: 2,285
SUN #128
|
Wow she’s really coming along!
__________________
Pam
Lance 1475 "Snoopy"
2012 GMC Sierra 3500HD 4x4 D/A
2012 Arctic Fox 30U, SUNLINES - 2006 2753 "Tweety", 2007 QUE "QUEtSE", 2364, 1660
|
|
|
|
|
03-16-2020, 07:59 PM
|
#84
|
|
Moderator
Join Date: Nov 2006
Location: Ohio
Posts: 12,654
SUN #89
|
Quote:
Originally Posted by Tweety
Wow shes really coming along!
|
Thanks Pam. Yes, we are gaining! 
There is still much yet to do. I would estimate we are about 50 - 55% done with the progress posted above. Yet to do; frame painting, axle area work, A frame reinforcing, siding, all windows and doors, rubber roof and all roof items mounted, caulk and seal, fresh water system, interior assembly, awning and outside areas yet to go. I'm sure I missed an area, but it will all come together.
But, the list is a lot shorter than it was.  And, putting things together is more fun than taking rotted wood apart 
__________________
Current Sunlines: 2004 T310SR, 2004 T1950, 2004 T2475, 2007 T2499, 2004 T317SR
Prior Sunlines: 2004 T2499 - Fern Blue
2005 Ford F350 Lariat, 6.8L V10 W/ 4.10 rear axle, CC, Short Bed, SRW. Reese HP trunnion bar hitch W/ HP DC
Google Custom Search For Sunline Owners Club
|
|
|
|
|
03-18-2020, 03:55 PM
|
#85
|
|
Moderator
Join Date: Nov 2006
Location: Ohio
Posts: 12,654
SUN #89
|
We had a two day work weekend making good progress concentrating on cleaning the siding and starting the install.
Cleaning stuck on putty and butyl tape off of siding, moldings, windows, and doors are a reality when restoring a camper. And cleaning an entire camper full of it is a task. But, like anything in repetition, you get better and faster, the more you do it. I continue to tweak the cleaning process trying to make it easier/quicker each time while keeping the same quality result.
Here is the latest basic process. Find a work surface to support the siding. My cleaning equipment list:
1. Heat gun
2. Plastic and metal scrapers
3. Mineral spirits (deep cleaner that cuts putty and butyl tape)
4. Naphtha (a high flash cleaner that leaves no residue)
5. Clean rags
6. Paper towels
7. LAs Totally Awesome
8. Water in a spray bottle
9. Metal flattening/bending tool
10. Lots of elbow grease and patience
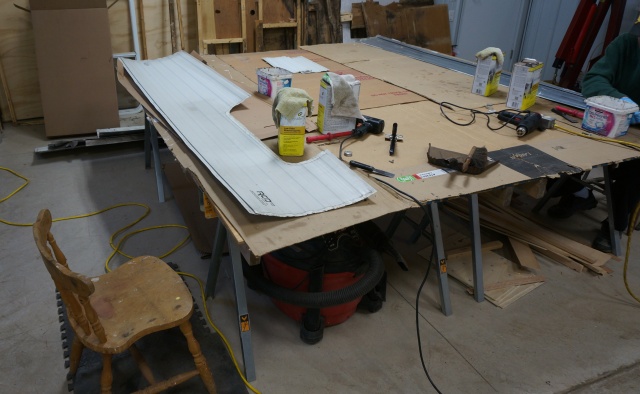
The large front top siding shown here has butyl chalk, butyl tape, and putty tape. There are slight differences in cleaning off butyl verses putty tape, and with this front siding sheet, I can show how to deal with each.
Here is where you start. A dirty piece of siding with sealing compounds all over.

The top roof seam between the siding and a rubber roof uses butyl sealing tape. Butyl being a good sealing product stays stuck on, gooey, and harder to get off. To make it easier to scrape, I clamp the sheet to the work table and put a large 6 x 6 black behind it to hold it.
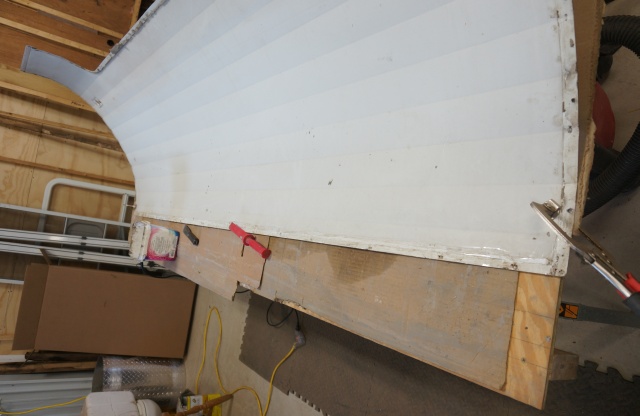
Since this white siding is the side you see, we use plastic scrapers so it will not scratch the siding. I use these from Harbor Freight https://www.harborfreight.com/4-piec...set-95832.html They are non-marring automotive scrapers. I can re-sharpen them on the bench grinder or sander when they get dulled up. They work the best I have tried over the years. They are sturdy and made from hard enough plastic. Metal scrapers can be used on the silver side if wanted.
You scrape what you can or try to on butyl.

The barn was at 55F, so the butyl was even more stuck on, then it would be in the summer and 70 F making the scrap off close easier. The heat helps soften the butyl and release. Do not add excess heat, too much heat turns the butyl into bubble gum like taffy, making it harder to get off. A little heat, then use the scraper, and it will come up.

Once you have scraped all that you practically can, you start the chemical clean. I find using a thick terry towel rag or better, old cotton washcloths with mineral spirits scrubs better than a smooth rag or worse, polyester rag. Wipe the cleaner on several feet of siding, so it starts working to soften the butyl and then start scrubbing. Sometimes scrubbing with the rag pushed by the plastic scraper helps. More elbow grease helps too.

There is also butyl caulk on the front siding joints. It is only on the front siding joints to help road splash from getting in between the joints. Im not sure what year Sunline started caulking the front joints, if you are restoring an old Sunny and it has none, consider adding it when you install.
Butyl caulk, I always seem to have to warm before I start scraping. Where butyl tape sometimes can come off with 70F ambient and no added heat.

When done scraping, go to the mineral spirits cleaning like mentioned.
Putty tape around the windows, doors, corner molding, or any siding penetration can be rock hard stuck on, or pliable stuck on. Use the plastic scraper and get off what you can first. If it will not come off, add a little heat. Then do the mineral spirits cleaning. You can tell the difference between butyl and putty sealing tape. It is night and day different with putty tape not sealing as well.
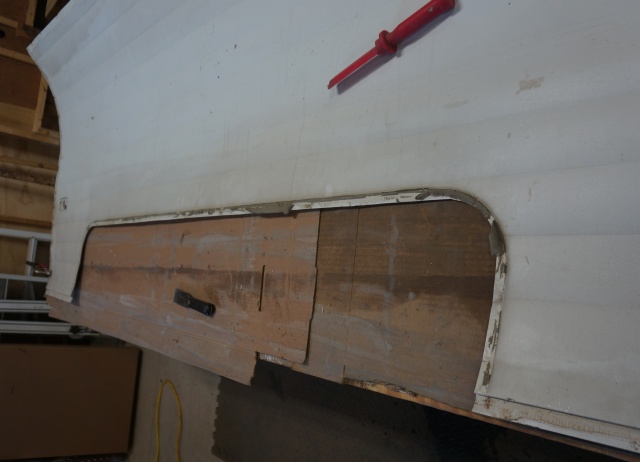
You need to check and clean both the inside and outside sealants off. Some siding pieces do not have any sealants on the inside, while others do. The end walls always have sealants on both sides and at the ends.
After all the old sealants are off, straighten up any staple holes or bent edges. You need a tool that can press the siding flat. Normal pliers, if they are wide and flat like linemens electric pliers, can work. Ordinary narrow pliers can work, but they can also leave crease marks in the siding. I use sheet metal seaming pliers used to bend and flatten thin sheet metal. I have had these a long time. Used them when doing aluminum siding work on houses. You flatten out every staple and rough area.

After the metal flattening, you remove the leftover oil residue from the mineral spirits. You want to get all that residue off, or it will affect the new sealants you put on. I use Naphtha found at some lumberyards. It is a high flash cleaner, works quick, evaporates off quickly, and removes the oily film and does not affect the paint.

A new process I now do, clean the outside exposed siding before putting it on the camper. Cleaning the heavy crud off when it is laying flat on a table has shown to be a lot easier and faster than cleaning it on the camper. I use LAs Totally Awesome non-diluted from the bottle. Magic Eraser scrub, and it cleans up well. Then using a paper towel wipe the yuk off. Rinse with clean water and paper towel dry. A 4 feet long section is a good size if you are by yourself to work quickly. Do not do an area too large that the Awesome will dry, as the crud drys back on. If Awesome remains on long enough in full strength, it can affect the paint. This cleaning process is easier and faster results lying flat verses on the camper with the siding vertical in the daylight and wind. With the siding cooler and flat, the chemical works better and quicker. It seems when cleaning the siding of the camper outside, the Awesome wants to dry fast and run down the side of the camper, making it not as effective.

Spray on and scrub

Wipe crud off

Rinse with water and towel dry. Nice and clean

Clean siding sorted in piles for what piece goes where.


Next up, start the siding installation process. We start at the top of the camper. Using an ice pick or small nail, line up the old screw holes to position the siding in the correct starting location. Check fit front and back. A good thing to do when removing the siding is to draw lines on the wall studs at the bottom of the siding sheet where you staple it. When putting the siding back on, check that line and check the fit of any cutouts. Then staple it on. On long sheets, I staple a few studs spaced down the whole length with one staple first to make sure the sheet is in the exact correct space. Then go back and fill in the rest of the staples. Two staples per stud.

BenB hard at work

As you add each layer down the side, you have to constantly keep checking you have the siding pushed up into the sheet above it and aligned front to back correctly. If you do not have the sheets inserted deep enough, window cutouts at the bottom then do not line up. You also run a straight edge down the wall and shim area where the studs are warped inwards. The shim only need to go at the stale area.


The more cutouts you have, the more precise you need to be on getting the sheets lined up. Check twice, staple once. If you goofed, pull the staples and start over.

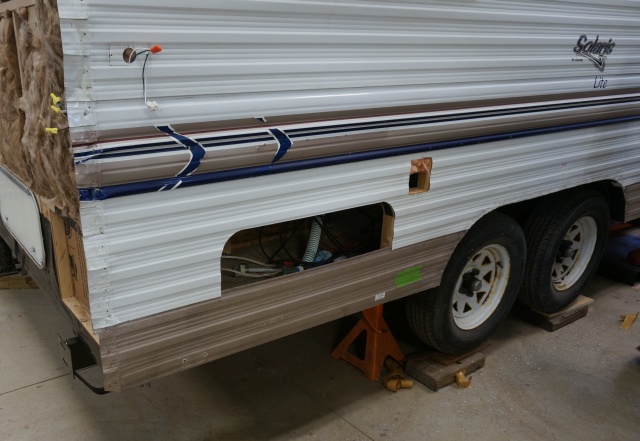
Here is where we ended up for the weekend. The left side completed except for the bottom gold siding. At the fender well area, there is butyl tape sealing the siding to the fender well.

All for now, more yet to come.
Work tally on time and materials to get to this point;
Work completes Day 37 of the repair.
3/14/20; 2 workers, combined total, 11.17 hr.
3/15/20; 2 workers, combined total, 13.33 hr.
Weekend subtotal: 24.50 hr.
308.19 hr. - Total work hours accumulated to date: 3/15/20
New material use: 3/15/20

$1,446.51 Prior material subtotal 3/9/20
$56.01 work weekend material subtotal. 3/15/20
-------
$1,502.52
Materials Subtotal to date 3/15/20
Thanks for looking.
John
__________________
Current Sunlines: 2004 T310SR, 2004 T1950, 2004 T2475, 2007 T2499, 2004 T317SR
Prior Sunlines: 2004 T2499 - Fern Blue
2005 Ford F350 Lariat, 6.8L V10 W/ 4.10 rear axle, CC, Short Bed, SRW. Reese HP trunnion bar hitch W/ HP DC
Google Custom Search For Sunline Owners Club
|
|
|
|
|
03-18-2020, 06:31 PM
|
#86
|
|
Senior Member
Join Date: Sep 2010
Location: Michigan
Posts: 854
SUN #1546
|
Wow I am constantly amazed and totally fascinated to see the work you are doing John on the 1950, my camper model!
__________________
 Joan & Miss Emme Lu Who
Full Timing in T-1950 2005 Anniversary Model
1997 6.5L Chevy Turbo Diesel Truck
"Pure Michigan"
Facebook: Apackof2 for the Rd
|
|
|
|
|
03-20-2020, 10:06 AM
|
#87
|
|
Moderator
Join Date: Nov 2006
Location: Ohio
Posts: 12,654
SUN #89
|
Thanks Joan, more yet to come!
__________________
Current Sunlines: 2004 T310SR, 2004 T1950, 2004 T2475, 2007 T2499, 2004 T317SR
Prior Sunlines: 2004 T2499 - Fern Blue
2005 Ford F350 Lariat, 6.8L V10 W/ 4.10 rear axle, CC, Short Bed, SRW. Reese HP trunnion bar hitch W/ HP DC
Google Custom Search For Sunline Owners Club
|
|
|
|
|
03-20-2020, 03:34 PM
|
#88
|
|
Senior Member
Join Date: Jul 2012
Location: Ohio
Posts: 1,126
SUN #4040
|
I wish I lived closer I'd come and help, ( or get in the way). I'm going stir crazy, camper in storage yard to muddy to work.
__________________
Jim and DW Darlene
2001 T-2553 Sunline Solaris
2006 GMC Sierra Duramax 2500HD 4X4
Firestone Transforce AT tires
Reese Dual Cam Sway Control
|
|
|
|
|
03-20-2020, 10:11 PM
|
#89
|
|
Moderator
Join Date: Nov 2006
Location: Ohio
Posts: 12,654
SUN #89
|
Yeh, it soggy here too. No worries about running out of campers to fix. I have 3 more project campers to go through. That is at least 3 more winters worth...
__________________
Current Sunlines: 2004 T310SR, 2004 T1950, 2004 T2475, 2007 T2499, 2004 T317SR
Prior Sunlines: 2004 T2499 - Fern Blue
2005 Ford F350 Lariat, 6.8L V10 W/ 4.10 rear axle, CC, Short Bed, SRW. Reese HP trunnion bar hitch W/ HP DC
Google Custom Search For Sunline Owners Club
|
|
|
|
|
03-21-2020, 05:25 AM
|
#90
|
|
Senior Member
Join Date: Jul 2012
Location: Ohio
Posts: 1,126
SUN #4040
|
By then but you'll have 3 more +
__________________
Jim and DW Darlene
2001 T-2553 Sunline Solaris
2006 GMC Sierra Duramax 2500HD 4X4
Firestone Transforce AT tires
Reese Dual Cam Sway Control
|
|
|
|
|
03-25-2020, 10:00 PM
|
#91
|
|
Moderator
Join Date: Nov 2006
Location: Ohio
Posts: 12,654
SUN #89
|
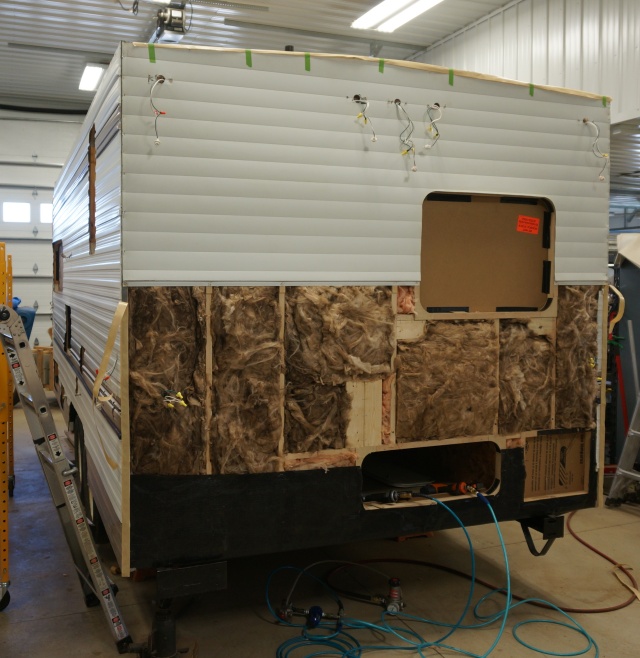
We had a one and a half-day work weekend continuing progress on the siding install.
Started out installing the right-hand side. Start at the top and work your way down. Again, the first top piece of siding has to line up where it came off, to allow all the siding openings to end up in the correct place.

I took some pics of the shimming process. Here are the shims. Cut up pieces of 1/8” luan plywood cut 1” wide by approx. 1 1/2" long.

Using a straight edge, hold it across the wall studs. Take note where there are openings already with window/door shims. You are looking for studs that bow outward or inward. I find an 8 ft long straight edge works the best. I use to use a 1” x 4” x 8 ft straight pine board. I now use a circular saw guide clamp that I use when cutting plywood. You can use whatever you have that is straight and long enough for the area you are working.
Here is a stud warped inward next to the one around it.
See the gap at the stud

You then make a judgment call on to add 1 or 2 shims or none. I find it is better slightly bowed in then out. But, having a stud warped out 1/16” is not an issue. If 2 shims create too much bow out, then I only use 1 shim. Here is a test fit with one. Just right. The shim gets stapled in with the siding.
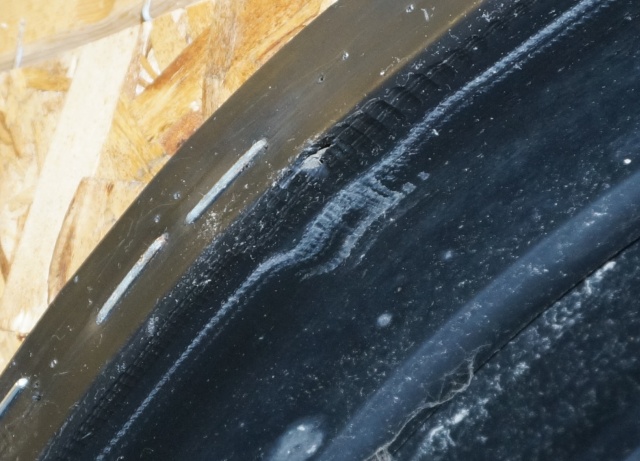
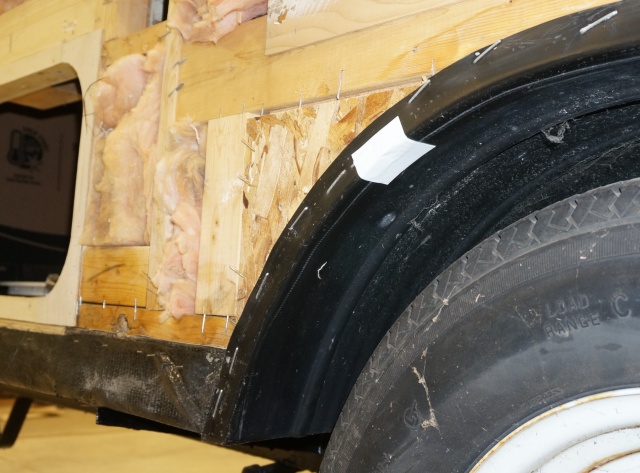
The last two non-slide campers I have worked on with plastic wheel wells have had this hole dug in them. At first, it looks like a mouse chewed hole. But after a closer look, it is a leftover router dig when Sunline trimmed the siding at the wheel well. They dug into both the front and rear of this fender well. It seems when they route the turn, they were not careful enough to hold the router outward, and it cut the fender.

A close-up. If you look close, you can see the router bit digs into the plastic, but not through except in the hole area.
There was no leak (amazingly) at any of these I have found so far. Sunline pumped caulk up in this area, and the caulk just barely covered the hole, but it was covered. Seeing this, we just patch over it with a piece of Eternabond tape and move on.
Since we added a new cargo door, we routed out the siding before installing the last bottom piece. A carbide bit with a roller on end does quick work on this cutout. Only the chips are very fine with this bit versus a standard non ferrous aluminum trim bit where the chips come out in curly ques. I did not have that bit, so I used my normal carbide trim bit, and it worked well.

Next came the lower gold siding. The siding in the areas of heavy water damage had some real bad siding corrosion going on, and the gold siding in that area had a lot. The bottom carbon steel staples set up a classic corrosion cell eating up a hole at every staple area. We had to patch them. I line the inside with Eternabond tape, and we will caulk the outside bottom after install over the hole areas. This 2” wide strip shown in the pic, is located at the bottom of the camper. The staples holding the siding on, shoot straight up.

The gray is the Eternabond on the backside shining through the staple holes.

When the siding is stapled in open exposed areas, like the bottom gold siding, we use stainless staples versus the galvanized Sunline used. We do use galvanized steel staples in the siding under the covered lap joint areas.
Here is another lower gold piece of siding where the corrosion made a hole in the siding up higher. Any area that had wet wood a long time, just look and odds are you can see some level of corrosion starting on the bare backside. We look close and patch seal any corrosion spot, hole or not in an open area that does not have butyl sealing tape behind it

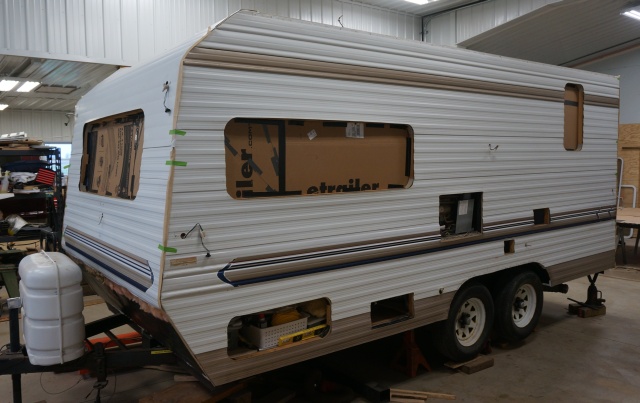
The last of the right side siding installed.

Now to the front siding. You need to put down a 1” wide x 1/8” thick strip of butyl sealing tape on the sidewall ends of the front and back walls. And you have to line up the large top sheet and make sure it lines up correctly with the window. I have done this by myself before with C clamps, but this is much easier with a helper.

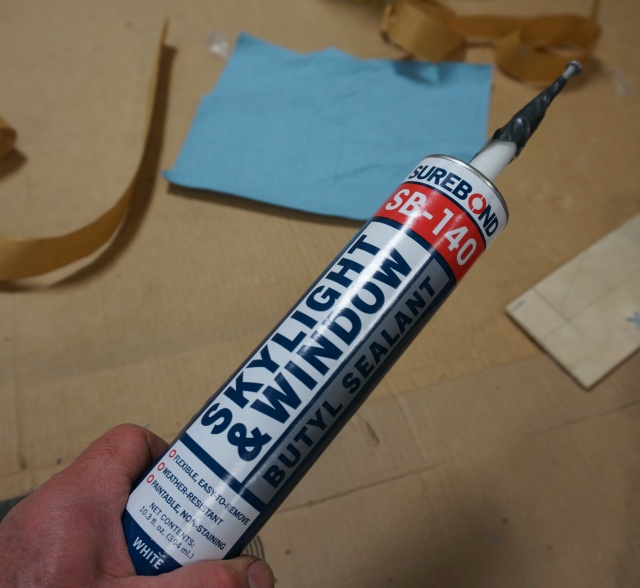
Something “not” to forget is, on the front wall, you need pump butyl caulk in the siding joints “before” installing the next sheet below it. The butyl seals out water flying up from towing in the rain beating on the front siding joints. I use Surebond SB-140. Good stuff.
Butyl caulk bead in place for the next siding sheet

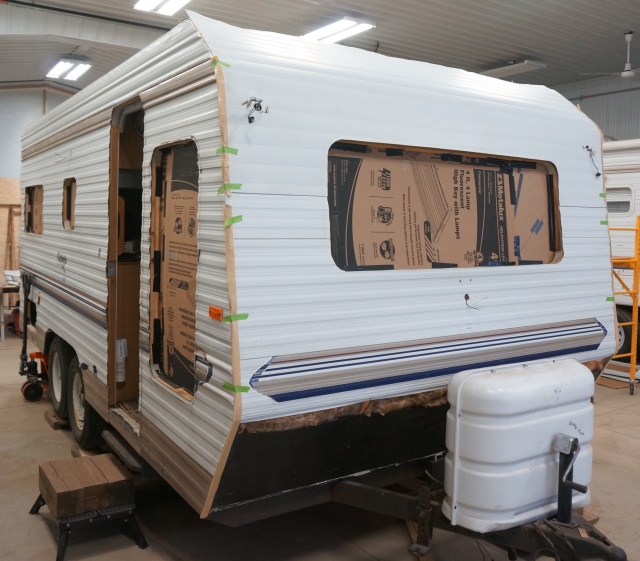
The last bottom piece of siding we left off for now. We will be installing the aluminum diamond plate upgrade on this bottom piece at a later time. We also put the release paper stuck back on to any exposed butyl tape on the sidewall edges. You can see the brown paper with the green tape holding it on. We do not want dirt getting on any exposed sealing tape until the corner molding goes on.
Now to the back wall. You start by bending over and stapling the siding tab extensions of the sidewall siding over the back wall. I use a plastic dead blow hammer to push and pound the tabs over. You want a nice tight fold here to make the corner molding work correctly when the time comes. This area will get a 1” wide strip of butyl sealing tape. This same tab procedure is also done on the front wall.

Then work the large top sheet and make sure any openings line up and the roofline.
As we work down the wall and come to the piece of siding with the tail light in it, we add backer board behind the light, so the light fixture screws have something more than siding to hold the screw. We add a piece of board to the stud, then add the plywood attached to it.


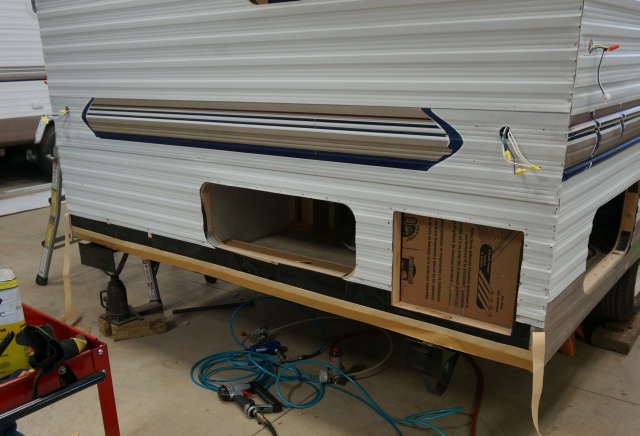
The last back wall siding piece has butyl sealing tape on the camper black waterproof membrane where the screws go through the siding to create a seal with the siding and wall. I use stainless screws with a stainless flat washer and a tab of butyl tape to create a better screw seal.
Poke a hole first

Thread butyl to screw head, before inserting in the siding

Screw in

Trim off excess

A few complete shots where we left off.

All for now, more yet to come.
Work tally on time and materials to get to this point;
Work completes Day 39 of the repair.
3/21/20; 2 workers, combined total, 12.17 hr.
3/22/20; 2 workers, combined total, 7.33 hr.
Weekend subtotal: 19.50 hr.
327.69 hr. - Total work hours accumulated to date: 3/22/20
New material use: 3/22/20

$1,502.52 Prior material subtotal 3/15/20
$43.63 work weekend material subtotal. 3/22/20
-------
$1,546.15
Materials Subtotal to date 3/22/20
Thanks for looking.
John
__________________
Current Sunlines: 2004 T310SR, 2004 T1950, 2004 T2475, 2007 T2499, 2004 T317SR
Prior Sunlines: 2004 T2499 - Fern Blue
2005 Ford F350 Lariat, 6.8L V10 W/ 4.10 rear axle, CC, Short Bed, SRW. Reese HP trunnion bar hitch W/ HP DC
Google Custom Search For Sunline Owners Club
|
|
|
|
|
03-25-2020, 10:07 PM
|
#92
|
|
Senior Member
Join Date: Sep 2010
Location: Michigan
Posts: 854
SUN #1546
|
Following and continue to be amazed!
__________________
Joan & Miss Emme Lu Who
Full Timing in T-1950 2005 Anniversary Model
1997 6.5L Chevy Turbo Diesel Truck
"Pure Michigan"
Facebook: Apackof2 for the Rd
|
|
|
|
|
03-26-2020, 02:57 PM
|
#93
|
|
Junior Member
Join Date: Jun 2011
Location: Indiana
Posts: 25
SUN #2417
|
New project
Good luck we have a 2002 t2053 it our second Sunline our other one was a 1982 our new one has a little issue our front decal is wore off and need to find out where to get a replacement but every thing inside is great .
__________________
|
|
|
|
|
03-27-2020, 06:31 AM
|
#94
|
|
Moderator
Join Date: Dec 2006
Location: Pennsylvania
Posts: 2,285
SUN #128
|
Well...you’re going to have a better than new trailer when you’re done. Sure wish we had a pole barn. I’m sure Steve would enjoy rebuilding one too. I know this one is for personal use, but if you ever do sell one you’re going to have a bidding war!
__________________
Pam
Lance 1475 "Snoopy"
2012 GMC Sierra 3500HD 4x4 D/A
2012 Arctic Fox 30U, SUNLINES - 2006 2753 "Tweety", 2007 QUE "QUEtSE", 2364, 1660
|
|
|
|
|
03-27-2020, 10:13 PM
|
#95
|
|
Moderator
Join Date: Nov 2006
Location: Ohio
Posts: 12,654
SUN #89
|
Thanks Pam,
The pole barn really helps for the winter blues, but, during warmer months a tarp outside does work too. If Steve wants to practice camper rebuilding, come on over! I have 3 more to go
__________________
Current Sunlines: 2004 T310SR, 2004 T1950, 2004 T2475, 2007 T2499, 2004 T317SR
Prior Sunlines: 2004 T2499 - Fern Blue
2005 Ford F350 Lariat, 6.8L V10 W/ 4.10 rear axle, CC, Short Bed, SRW. Reese HP trunnion bar hitch W/ HP DC
Google Custom Search For Sunline Owners Club
|
|
|
|
|
12-13-2020, 10:43 AM
|
#96
|
|
Moderator
Join Date: Nov 2006
Location: Ohio
Posts: 12,654
SUN #89
|
We are starting back up the T1950 camper restoration project. Yeh!!
At the end of March, Covid shut down the state and all camper weekend work came to a screeching halt. By the time the state started opening up, spring had sprung, and way too many other things were going on with summer. But winter is here, again, and BenB and I are back onto the T1950.
We have done two more workdays and now catching up on the pics.
Next up, clean all the moldings, windows and prep them for new butyl tape, which is a process. First, you scrape off all the old putty tape. Some can be so hard and crusty you hit it with a little heat from a heat gun, and it softens it up to scrap off. I use rigid plastic scrapers to protect the white finish. In small nooks and crannies, an all edge dulled thin screwdriver works.


Once you are past the scraping to get the most you can off, comes the chemical clean. I start with mineral spirits and a rag. The mineral spirits will dissolve the putty tape and not take the paint off. Wipe it on, let it soak a few minutes, then scrub and keep ongoing.
Once the moldings make it through the mineral spirits cleaning, they need to have the deformed metal from the screws flattened out. I created an anvil setup that fits in the vinyl screw strip slot to back up the metal. Then using the right width metal bar, flatten the bulged screw holes. I use a dead blow hammer to help keep the banging noise and steal hammer bounce down.


Different shape moldings need a separate top bar to get into the molding space and width.

Once done with the mineral spirits, straightening out screw hole flanges on moldings and cargo doors, you start on a final cleaning before putting new high-quality butyl sealing tape on the flanges and siding. For the final cleaning, I use Naphtha from this brand. https://www.sunnysidecorp.com/produc...=t&b=s&n=80032 Im not hung up on the brand, but our local Menards lumber yard sells it.
Naphtha is a high flash cleaner that will cut light stuck on putty tape, not affect the paint, and it dries quickly and leaves no residue. Naphtha cleans off any light dirt, leftover residue from the mineral spirits and preps the new butyl surface. Do the final clean the same day or the day before you put the butyl on. You do not want more dust and dirt to land on your cleaned surface. Do the final cleaning in groups large enough for your work time that day. You only need to do the windows, moldings, doors, etc., and the camper where the butyl tape will seal. Use a rag, wipe, and scrub if needed. Use nitrile gloves when using Naphtha to protect your hands.
Ensure the Naphtha is dry before putting new butyl tape on as it will dissolve the butyl. I do not use putty tape which is the conventional sealing tape used as it dries out and splits on the camper after a few years allowing leaks to start. I use GSSI Sealants MB-10A butyl sealing tape. GSSI Sealants, Inc., used for commercial steel buildings. It is high-quality butyl and is the longest-lasting butyl they offer. They do offer RV butyl, but in talking with them, the RV butyl formula is tweaked to trim easier, and as such, it will not last as long. I buy mine online from Best Materials in Phoenix AZ. They make it in different sizes, I mainly use 1 wide by 1/8 thick x 50 ft rolls. I also use some 3/4 wide x 1/8 x 50 ft .
https://www.bestmaterials.com/detail.aspx?ID=19987
I stopped buying butyl tape on Amazon or other online RV stores as they do not know how to ship the product and what you get is all balled up, unusable. Best Materials being a roofing supplier, knows how to pack the tape. I get it by the case; they also sell it in single rolls. If you have a commercial roofing supply house near you, see what they have.
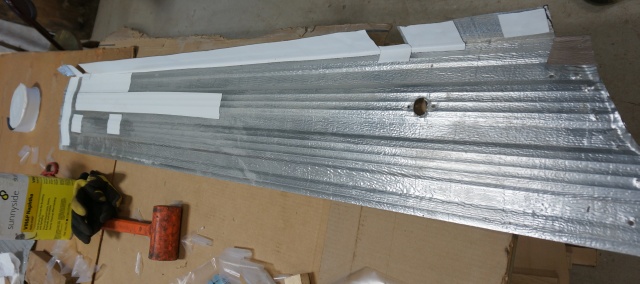
We cut strips sized to fill in the corrugated aluminum siding valleys to make sure there are no voids in the sealing tape. This extra strip practice does use a little more tape, but you do want leaks. We made up a small wood template to cut the strips, then put on the siding and leave the release paper still on it until you use it.

This pic shows the valleys filled in at a cargo door and water heater opening.

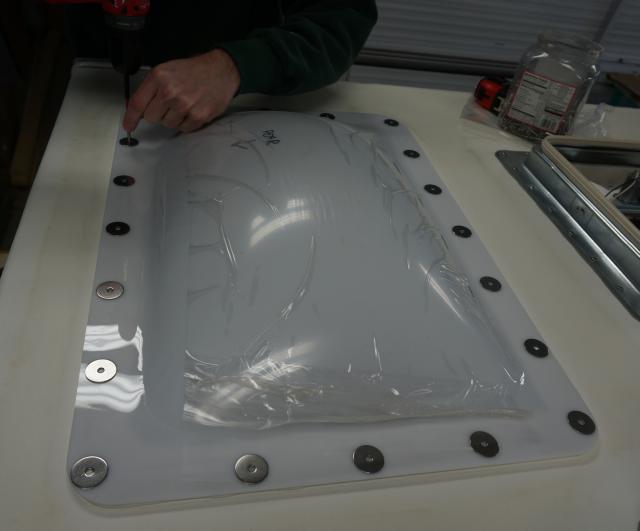
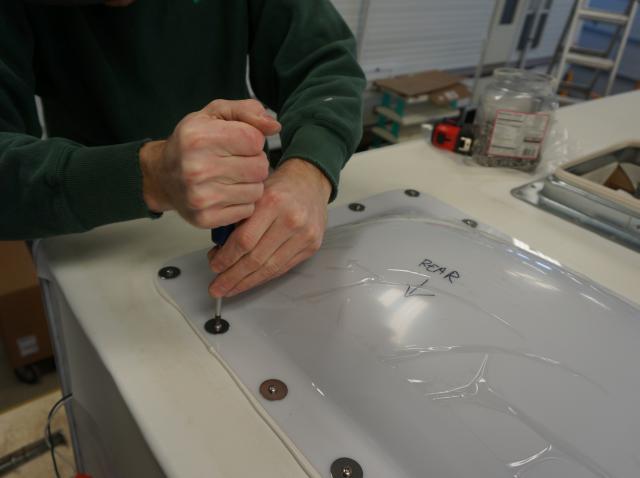
And all the windows. You work it around the round corners in pleats. You are again leaving the release paper on until you use it.

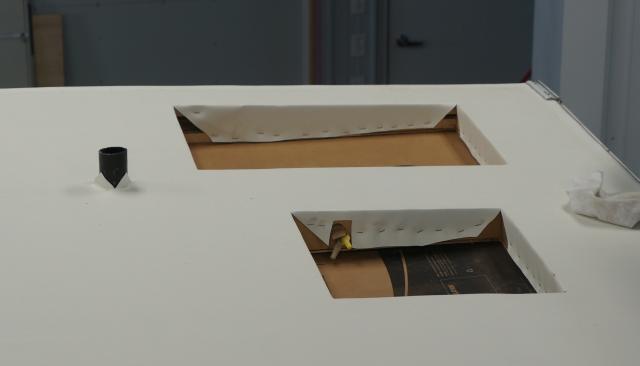
We were able to finish up and install all the camper's windows plus one right rear cargo door. The main entry door is just temporally screwed in to keep shop dirt out of the camper. It needs to be painted and then installed. If anyone needs more details on installing, ask, and I will explain more. There are some tricks in setting windows and doors, so they come out correctly.


All for now, more yet to come. The roof membrane is next on the To-Do list.
Work tally on time and materials to get to this point;
Work completes Day 41 of the repair.
11/30/20; 2 workers, combined total, 13.00 hr.
12/7/20; 2 workers, combined total, 13.67 hr.
Work subtotal: 26.67 hr.
354.36 hr. - Total work hours accumulated to date: 12/7/20
New material use: 12/7/20

$1,546.15 Prior material subtotal 3/22/20
$69.02 work weekend material subtotal. 12/7/20
-------
$1,615.17
Materials Subtotal to date 12/7/20
Thanks for looking.
John
To see more of my stored photos, see here on Flickr for my photo album https://www.flickr.com/photos/camper...7712351653736/
__________________
Current Sunlines: 2004 T310SR, 2004 T1950, 2004 T2475, 2007 T2499, 2004 T317SR
Prior Sunlines: 2004 T2499 - Fern Blue
2005 Ford F350 Lariat, 6.8L V10 W/ 4.10 rear axle, CC, Short Bed, SRW. Reese HP trunnion bar hitch W/ HP DC
Google Custom Search For Sunline Owners Club
|
|
|
|
|
12-18-2020, 09:29 PM
|
#97
|
|
Moderator
Join Date: Nov 2006
Location: Ohio
Posts: 12,654
SUN #89
|
Next up, putting the roof membrane on. We are using Dicor Brite Ply 40 mil thick EPDM rubber roofing. Surface preparation is essential, as well as getting the bonding adhesive on correctly. There will be many pics in this post, and I will split them into two posts to help them load faster.
Roof decking preparation. The deck was already installed back in March before Covid hit. Roof decking preparation items to be completed before installing the membrane.
1. The deck surface needs to have all screws checked for height, so no screw heads are above the surface. Use a sharp edge putty knife and skim over all screws to check for high screw heads. Correct as needed.
2. Screw heads to be flush with the deck or very slightly below. The roof membrane will not bond to the steel screw heads, and having countersunk screws much over 1/32” can create an unsupported membrane and little pockmarks.
3. All deck sheet seams need to be sanded smooth.
4. All deck sheet openings and roof perimeter edges need to be sanded with a small radius to remove the sharp saw edge. The rubber membrane pressed tight over a sharp 90-degree corner can tear over time from flexing of the camper when towing.
5. The deck should be clean. Vacuum all dust followed by a high flash cleaner wipe down the before applying the membrane. Any dirt bumps will, in time, wear a hole in the rubber.
6. Roof deck seam joints to be sealed using fiberglass mesh drywall tape. The fiberglass mesh allows the glue to bond to the deck through the mesh's openings and provides enough support to the membrane.
7. The decking temperature and the air temperature need to be warm enough for the glue to work and to cure when applied. I called Dicor as I cannot find the application temperature range printed on their instructions or the can. I came away using 60F as the low-end range in application temperature and keeping it at that temp for at least 24 hours to cure. You store the can between 50 – 60F for maximum storage life. They stated not to go below 40F during storage.
Pictures of the membrane install process.
The camper has been sitting since March in the same workshop I was de-rusting my truck frame last winter. A light layer of dirt and rust accumulated on the roof. The shop-vac worked well to vacuum up the dust. Ah yup, it needed a vacuum.

The vacuuming was followed by a Naphtha or Lacquer thinner wipe down of the roof deck to remove any last fine dust.

The fiberglass mesh drywall tape is applied over all the roof decking sheet seams.

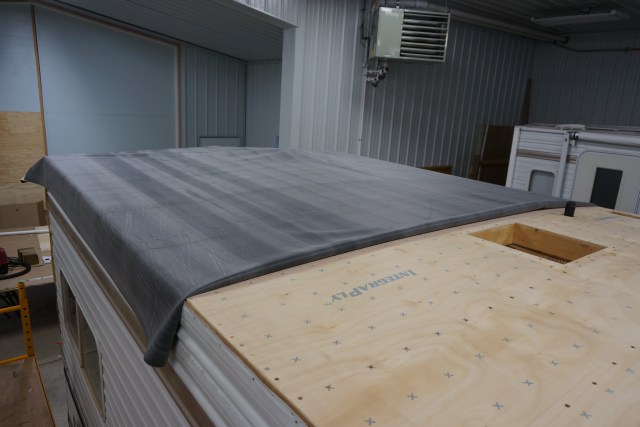
Next comes getting the membrane placed and positioned on the roof, ready to start the bonding process.
When the membrane ships in sizes smaller, it is gently folded in the shipping box. You are to take the membrane out of the box soon after receiving and unfold it, so wrinkles/folds in the rubber do not set in. I created an unrolling and storage method by correctly wrapping the coiling to unroll on the roof using a 10 ft length of 1 1/2” or 2” PVC Sch. 40 pipe. It stores the membrane wrinkle-free and makes it easy and straight forward rolling it out on the roof.

A ladder is placed on both sides of the camper's rear wall. Using a helper, you can walk the membrane roll up onto the roof quickly and safely. 
Unroll the membrane until approx. 4” to 6” overhangs the front of the decking down the front wall under the front siding. Let the excess membrane go over the rear wall.

Once the membrane is rolled out to the front wall, center the membrane left to right along the camper's full length. Lift and measure the excess overhanging the left and right sides to be even with 1/2" to 1”.

When the membrane is centered on the camper's length, pull up the excess rear wall rubber and lay it on top. In my case, the supply house added a few extra feet to my order as it had a wrinkle on one end. I only ordered one extra foot, and they gave me about five extra feet.

Allow approx. 6” to overhang the rear wall. Mark the membrane and cut off the excess straight across. I find using a pair of scissors cuts the EPDM very easily.


Go to the front of the roof and fold back half of the membrane over the top of the rear half, exposing the front half of the roof decking. The roof is now ready to start applying the bonding adhesive.
Getting the correct amount of glue per square foot is a critical need. If you have never done this before, it is common to not put enough glue on, and guessing you put down enough does not work. The bare wood can soak up the glue quickly and does not leave enough glue left to thoroughly coat the membrane if the glue is applied too thin. If you let it go like that, the rubber will not be fully bonded to the roof.
Bonding adhesive (glue) application rate
The membrane must have the correct amount of glue to be bonded to the decking permanently. Too little and too much glue both create problems. I made a method to know I was putting down the correct amount. The spec for Dicor 901BA glue is 160 to 180 sq. ft/gallon. I targeted 170 sq, ft/gal. to be in the middle of the spec.
Online instructions state to glue coat half the roof at once regardless of roof length. I have learned only to apply glue a 4 ft long-running length of exposed roof decking to better control the glue bond. This smaller section does not take that much longer to do a roof, but it does create more control over the glue application, to not have it dry up too much before you can put the rubber on.
The glue is pre-measured to be the right amount of glue in the paint roller pan that needs to go on a 4’ x 8” section of decking. Then using a paint roller, roll all the glue onto that area as even as you can. The odds are high you put it on too thin at first; keep adding until all the glue in the roller pan is on the 4 x 8 section evenly. Since the gallon can is a round cylinder, the can is proportional to the glue's height. I did the math to proportionally split the gallon in this cylinder size covering 170 sq. ft. down to the 4 x 8 section, 32 sq. ft. You pour out the correct amount for the 4 x 8’ part of the roof by measuring the can's glue height reduction.
Here is the math if you want to follow it. I can explain it more if needed. The result is; there is 7” of liquid in the can per 170 sq feet. I need only to pour out the right amount to fit the 4 x 8’ section.
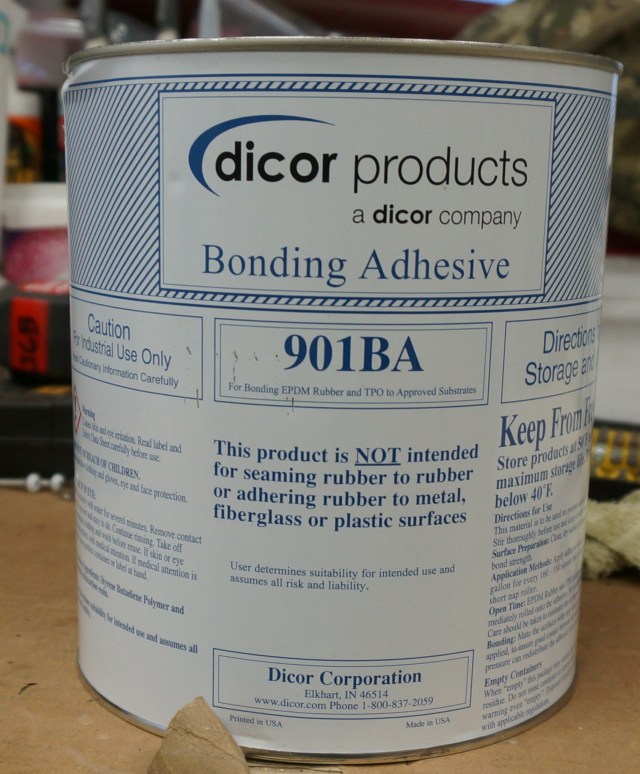

The glue is 1/2” down from the top of the can, making the glue height 7”.

Now the math.
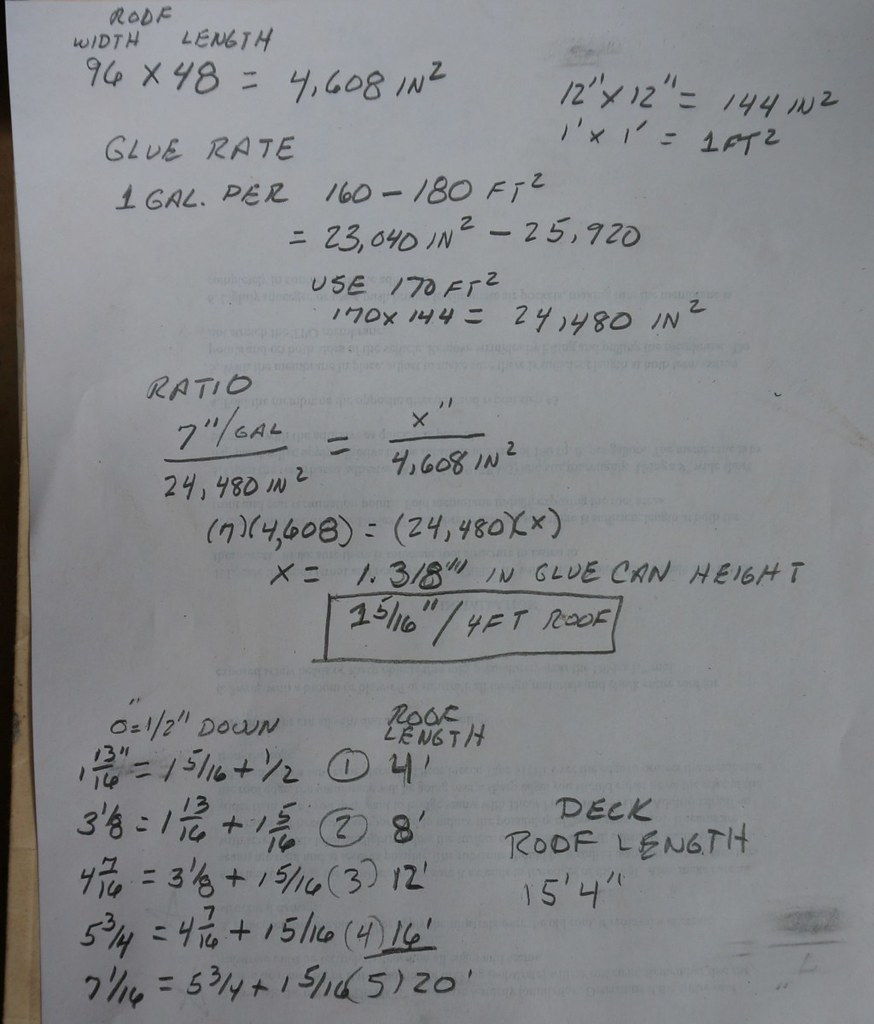
Using the rate of 7” of glue to 170 sq feet (24,840 sq inch), we need to proportionally create the amount for a 4’ x 8” or 32 sq ft (4,608 sq inches) roof patch. The glue height reduction comes out to, pouring 1 5/16” of liquid height out of the can from when you start pouring.
Slowly pour the glue into the roller pan in small amounts. Check the glue level going down in the can often. When the tape measure shows the glue has lowered 1 5/16” in height from where you started, you are done. If you over pour, pour some back in the can. Remember to add the 1/2" open-top space from the top of the rim on the first time you pour it out, and each time you pour out another batch. It can help if you write down the measurement you are starting from each time, which makes it less easy to forget it.

The roller pan looks like this. All this glue is to be evenly applied to the 4 x 8’ area on the roof.

Then up, you go to the roof and start rolling it on.

I had an issue I wanted to point out; in case you end up in a similar situation regardless of how you get into it. The key to glue application is to know how to check it and correct for it. The more roofs you do, the more tricks you learn—most the hard way. The manufactures instructions do not always spell out what happens when Murphy’s law strikes again.
The issue started in the first area we put the glue down. The bare wood will quickly begin absorbing the glue. As we kept putting the glue on, the shop furnace kicked on, hanging from the ceiling directly behind us. The blower started pushing hot air over the top of the glue. After we had all the glue out of the roller pan, we pulled the membrane over the glue, and we had to stop and deal with a vent pipe cut out in the membrane. The hot air blowing over the area was evaporating the solvents in the glue off quickly, and the glue was drying too fast. Dealing with the tank vent pipe made the time before applying the membrane even longer with the glue exposed to the blowing heat. The result was, too much glue evaporated off and soaked into the wood deck by the time the membrane was rolled over the deck.
Here is how you check and see if the rate is correct. You lift the membrane to check the glue is evenly transferred to the membrane. Here is what “not enough” glue looks like. There is not enough glue coverage transferred to the membrane.

The key is, check each section you put on and realize what wrong looks like. And start the recovery instantly. Peel the rubber back from the glued area, shut down the furnace, and get more glue. Re-apply more glue and make it milky thick looking.

Then work the membrane back over the top of the area. This time it will roll over harder as it is sticking to everything, work quickly, but not rushed, and stretch out the wrinkles. Check again that you have a good transfer of the glue onto the membrane. The glue needs to be applied thick enough so the glue transfer looks like this on the membrane.

Once the excitement is over, pour out another 1 5/16” of glue and do the next 4 x 8 or a slightly smaller section to the end of the roof.

Here is how you get the air bubbles and some smaller wrinkles out. I use a squeegee with a very flexible wiper to smooth out the wrinkles, press the membrane to the glue, and rake the air bubbles to the side of the camper where they can burp out into the air. The squeegee works well. You do this on all of the roof surfaces after you roll the membrane over the fresh glue.
Start in the middle and pull to the side to bleed out the air pockets.


More in the next post
__________________
Current Sunlines: 2004 T310SR, 2004 T1950, 2004 T2475, 2007 T2499, 2004 T317SR
Prior Sunlines: 2004 T2499 - Fern Blue
2005 Ford F350 Lariat, 6.8L V10 W/ 4.10 rear axle, CC, Short Bed, SRW. Reese HP trunnion bar hitch W/ HP DC
Google Custom Search For Sunline Owners Club
|
|
|
|
|
12-18-2020, 09:32 PM
|
#98
|
|
Moderator
Join Date: Nov 2006
Location: Ohio
Posts: 12,654
SUN #89
|
If you have antenna wires to deal with, apply masking tape to the ends, so they do not get all glued up.
Once the front half of the deck is complete, go to the back half and start over. You are still applying glue in 4 ft x 8 ft sections. Fold the unglued membrane back over the top of the front part you just glued down. Start rolling the glue down.

If you have nothing sticking up on the roof, like vent pipes, antenna wires, this all goes pretty smooth. You may only have one roof section like that.
Here is how I deal with vent pipes or other items sticking up.
When you approach the 4 x 8 section where the roof needs a hole cut out for a pipe etc, do not yet apply the glue. Unroll the small 4 ft section of rubber to meet up with the vent pipe and stop with the fold at the pipe. 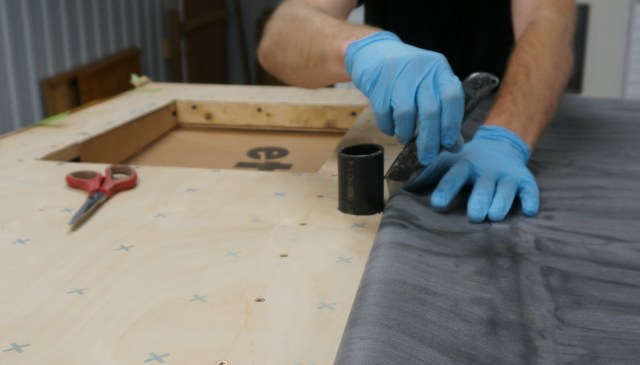
With a sharp drywall knife, lift the membrane and make a 1/2 inch long slit in the top fold of the membrane at the center of the pipe, starting at the fold line going along the roof's running length.
Lift the membrane and, using scissors, cut the slit the length of the pipe's diameter along the roof’s running length.
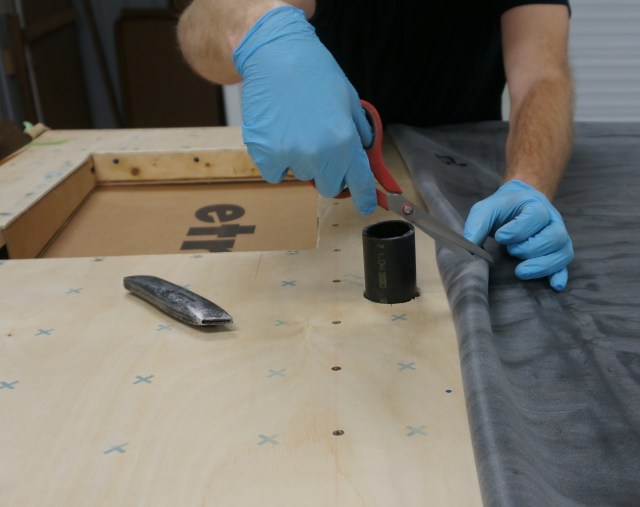
Make another slit 90 degrees to the first one, half the distance of the pipe's diameter on each side of the first slit.

The slits looks like this.
Do a dry test fit of the rubber over the pipe.
If the rubber is stretching to get over the pipe, slit an opening a little longer in the direction needed.

Test fit it, then roll the membrane back out of the way, apply the deck glue, pull/roll the membrane back over the glue, and squeegee out the air bubbles and ripples.

Do a test check that you put enough glue down, squeegee over the lifted spot when done, and re-squeegee the raised area. Suggest you test each 4 x 8 section for glue transfer until you get experienced enough to know it was applied thick enough, and did not dry to change the rate before placing the membrane on top.

Depending on temps and humidity, it can take 24 to 48 hours to set up the glue. You can inspect if it is fully cured by lifting the side overhang flap with a gentle tug and seeing if it is bonded or still tacky.
The roof sure looks good when done. We will cut out the hatch/opening holes later.

We moved onto putting new butyl tape on the roof and corner moldings. They all need a final Naphtha or another high flash off cleaner application before applying the butyl to insure a clean surface.
We also prepped the gutter rail for flat head screws since the molding is off of the camper. The countersinking of the holes goes quickly and easily on the drill press. As part of the restoration and water infection sealing upgrade, we will Eternabond treat all roof seams, vents, gutter rails, and over any Dicor caulking once cured. Using flat head screws on the gutter rail allows a smoother Eternabond application over the screw heads. You do not want to countersink too deep, or the screw will pull through. I stop at approximately 1/32” high on the screw head versus flush. That said, I have also converted some gutter rails on other campers with stainless pan head screws and Eternabonded over them. It works, just not as flush fitting in the gutter.
Below are some tips on applying butyl tape to different types of moldings.
This molding is the roof to rear wall molding. It is a 90-degree molding, screws on the top of the roof, and a compression flange only on the rear wall. This molding looks like this molding from another camper repair.

We only line the screw side on this molding. On the rear wall side, we will put the butyl tape on the back wall. I use 1” wide and 3/4" wide butyl tape to cover the full width of the screw flange on the molding. We stack two pieces side by side to cover the screw flange.
The first butyl goes tight against the vertical 90-degree flange. Then you have to peel the release paper off to apply the second strip of butyl.

The second strip of butyl

Then put the release paper back onto the exposed butyl, or else everything will stick to it that you do not want it to.

The next molding, which is the hardest to apply the butyl to, is the corner moldings. With this molding, you line both the screw side and the 90-degree side.
Start with pinching in tight a 1” wide strip of butyl to the corner.


Pull the release paper off on the first strip, place the second strip of butyl next to the 90-degree folded butyl, and replace the release paper on the first strip. Same as the rear wall molding.
One other molding I will mention is the gutter rail. I fill the entire width of the molding with butyl tape. It takes two 1” strips or 1” and 3/4” to cover the width. This is not the standard practice by the RV manufacturers as they usually only be one 1” wide strip of butyl down the center, and call it good. After seeing enough leaking gutter rails at the screws, I add the extra butyl.
There is only one strip of 1” wide butyl in this pic. A second 3/4" wide strip will go next to this to fill the entire width.
All of the other moldings also get total width coverage with butyl sealing tape. Yes, full coverage uses more butyl tape, but these restoration projects are too painful to rebuild to not add extra butyl tape to prevent a leak.
We finished all the moldings, which are ready to install on the next workday. To finish out the day, we pulled a spring pack off the camper to measure it.


We intend to do an axle over/under (axle flip) on the camper to gain some ground clearance. What made me think there may be something wrong with the springs is that there is low wheel well clearance between the top of the tire to the bottom of the fender. I have a nominal 1 5/8” tire clearance. Which is a large difference then the Dexter recommended 3” wheel clearance. But, Sunline has created lower height campers and wheel well clearance for many years. I am trying to back into, is the spring flattened creating the small wheel clearance, or was this camper always like this from new?
Here are a few pics before and during the camper being taken apart to show the clearance.
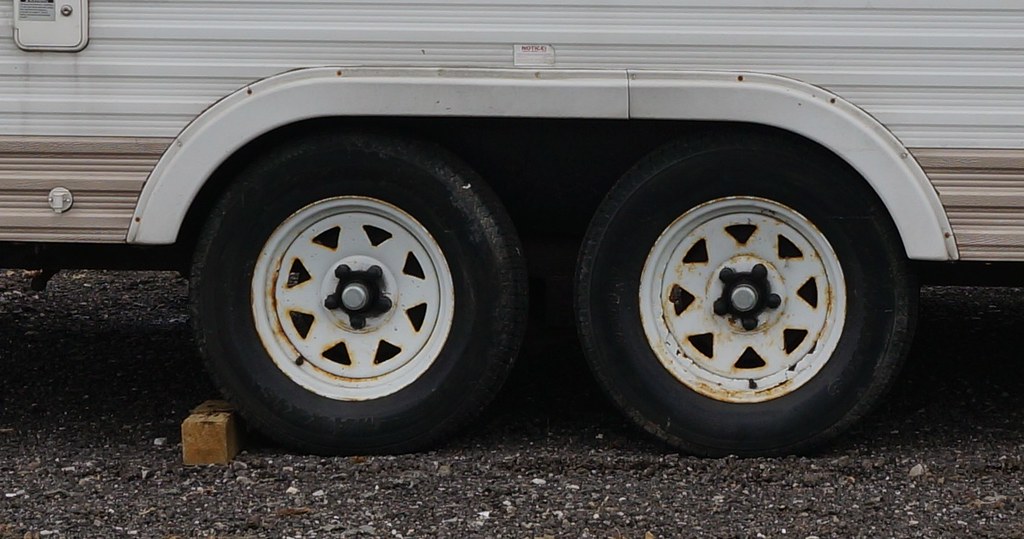
A better pic to see the clearance

This one shows the 1 5/8’. The camper is not yet loaded with camping gear.

Note: This T1950 is a 2004 model on a 4” channel iron frame. The 2005 to 2007’s are on a 6” I beam frame. With the taller frame comes more fender clearance and the same suspension setup. But, Sunline made a lot of T1950’s and other 4” frame 5,000 to 5,500# GVWR smaller campers. I suspect I am going to learn some Sunline history, sorting this out not known before.
These are Dexter springs, and there is a number tag on them. I called Dexter and ended up with the parts department. They could confirm the fully loaded arch height and spring eye distance of the spring; she did not have the paperwork on the free unloaded arch height, which I have. I need to get back in touch with their engineering group to help sort this out.
If anyone has the year 2004 or older 5,000 or 5,500# Sunline on a 4” channel iron frame, please let us know your wheel well clearance.
That is all for this update. Next up will be to start installing all the moldings.
Work tally on time and materials to get to this point;
Work completes Day 42 of the repair.
12/14/20; 2 workers, combined total, 13.00 hr.
367.36 hr. - Total work hours accumulated to date: 12/14/20
New material use: 12/14/20
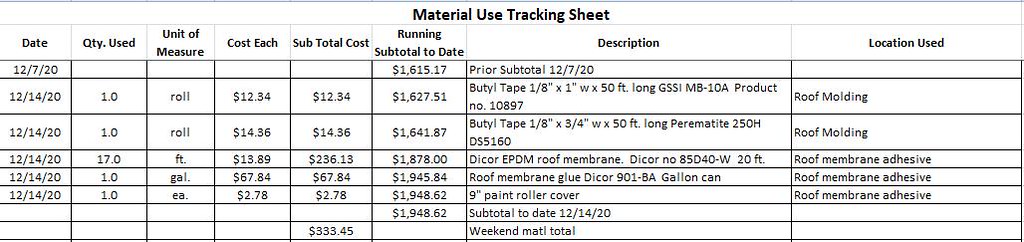
$1,615.17 Prior material subtotal 12/7/22/20
$333.45 work weekend material subtotal. 12/14/20
-------
$1,948.62
Materials Subtotal to date 12/14/20
Thanks for looking.
John
To see more of my stored photos on this T1950 project camper, see here on Flickr for my photo album https://www.flickr.com/photos/camper...7667376730349/
__________________
Current Sunlines: 2004 T310SR, 2004 T1950, 2004 T2475, 2007 T2499, 2004 T317SR
Prior Sunlines: 2004 T2499 - Fern Blue
2005 Ford F350 Lariat, 6.8L V10 W/ 4.10 rear axle, CC, Short Bed, SRW. Reese HP trunnion bar hitch W/ HP DC
Google Custom Search For Sunline Owners Club
|
|
|
|
|
12-30-2020, 02:28 PM
|
#99
|
|
Moderator
Join Date: Nov 2006
Location: Ohio
Posts: 12,654
SUN #89
|
Next up, roof items, and we started with the corner moldings and other roof attached items. The roof and corner moldings need to start in sequence, the way they overlap each other. It begins with the gutter rails.
We need to fill the new roof decking to the siding gap and blend the roof membrane to the siding on the camper while creating a siding seal. I keep tweaking the process on this edge, and I find filling the transition from the new roof deck to siding with butyl sealing tape works.
Clean the siding and the back of the membrane to get the talc/dirt off. Talc is used on the rubber during manufacturing, so it does not stick together on the roll.

Apply the 1” wide butyl tape to the edge of the roof deck, which can get a little tricky with the release paper still on. You want to get the edge of the tape up to the new deck plywood and not short of it, but not beyond the plywood, or a bubble up of butyl under the membrane will occur when you lay it over. Or a hole of unfilled butyl under the membrane.


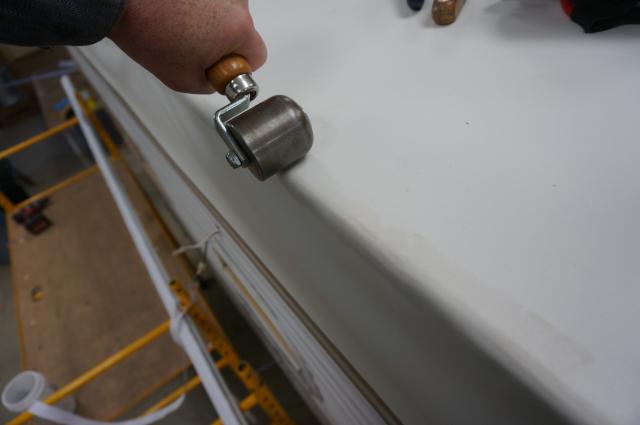
Once the tape is in place, using a solid roller, roll the top first, then the side. I tried a more pliable rubber roller, it was too soft, and it will not compress the butyl flat to the roof.

Using an ice pick or other small pointed tool, lift the flap and find the gutter rail's first screw hole. Then make a hole in the membrane to the siding hole, and align the gutter with that first siding screw hole. This ice pick sets the starting height and front to back distance of the gutter rail. This only works if you have the original siding with the actual gutter and you with the old screw holes.

Hold the gutter back so it will not stick until you are ready.

Align the other end of the gutter the same way with an ice pick to set the roof's height. Then stick the front and put a screw partway in, not tight yet.

Probe the gutter center with the pick to align the gutter's drooping center, then insert a screw. Probe a few more holes between the unscrewed areas to ensure the gutter rail will be parallel with the roofline. Then finish installing the screws. You will need a drill motor with a clutch, which will be set to deliver the even screw tension and be tight.


Once the gutter rails are on, you can pick the back or front of the camper moldings as next to go on. We selected the back wall. I lap the rubber over the back wall, which is different than how Sunline did it. Sunline would terminate the rubber at the end of the roof and not overlap down the back wall. After seeing too many rear seam failures, any added protection to keep water out of the rear wall is a need.
Add extra butyl in the depressions of the siding. Make sure you cover openings/gaps in the longwall siding to the rear wall siding with butyl.

Start with cleaning and installing a 1” strip of butyl to the siding where the rubber will fold over and seal to the siding.

Trim the rubber at the corners and prep for a corner molding. You fold the rubber in the corner to make a nice corner seam. I do not cut the corner rubber to go around the corner; I only fold it. I missed a pic of this folding. I will get one on the next camper roof.
Since this is all new wood on the back wall, you cannot probe old roof screw holes in the wood, but you can probe with the ice pick the rear wall siding screw holes. There is often a witness line in color change on the siding where the molding used to align. Before putting in any screws, warm the metal and butyl with a heat gun. The corner moldings go over the top of the gutter as shown.


You have to be careful on the side walls. The sidewall has no screws on the corner moldings, and the molding's lip/cap on the sidewall has to be tight to the sidewall to close all gaps. This rear corner is a classic leak area, so take note. You can see the gaps in this pic between the molding and the siding. That gap has to be closed by pushing the molding into the camper more before putting the screws in.

Heat the molding and siding, push hard to press the molding into the back wall and down on the top, then draw up one screw on the top back wall or the roof down. The molding has to be down and in. Look at the gap on the sidewall; the screw has to close the gap and be tight. If it is not, correct the issue before going further down the molding with more screws.

Keep heating the molding and siding as you go. You only pull off enough release paper to handle the small area you are working at plus a foot or two more. Do not pull the entire length off at once. You will see the butyl ooze out when the molding is tight, and that is a good sign. Set the drill clutch torque, and do a final hand tighten on the screws to see both sides are tight and the gaps/siding depressions filled with butyl. Trim excess butyl when done.


The top rear wall molding goes on next. I missed pics on this camper, but I have on others if someone needs them. Just ask, and I will direct you to a post to show installing the rear roof seam molding.
The rear wall molding is completed.

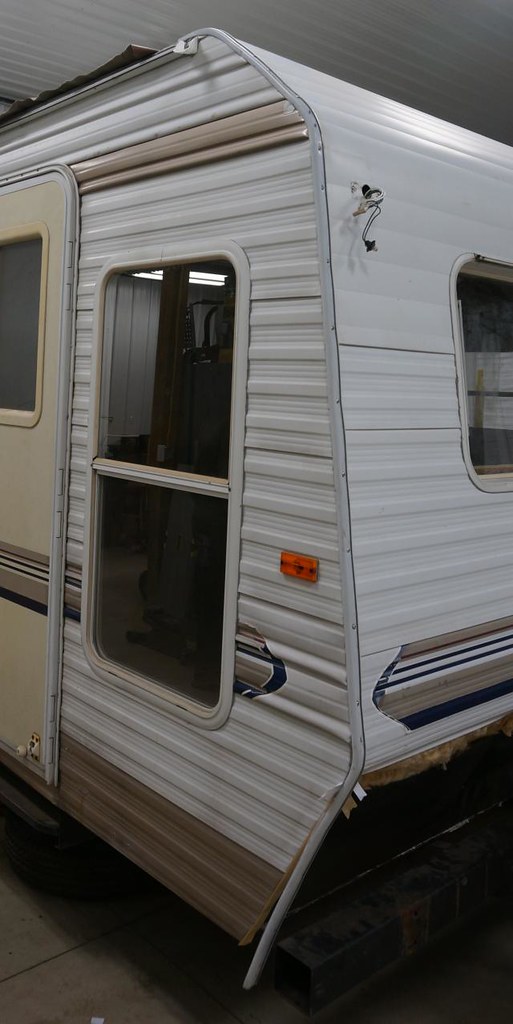
The front wall corner moldings go in the same fundamental way as the back. If you need more detail, let me know. You start with stapling down the rubber to the front roof rafter/header. Then clean the rubber to get talc & dirt off where butyl tape will go. Fold the front siding down, pencil mark a few spots, so you know the edge of the siding. Apply butyl tape to the rubber so it will stop at the end of the siding.

Fold siding over, make sure the metal pops out and does not sink in on the front curve, staple siding to the roof.

Install front corner moldings, install gutter drip spouts, trim excess rubber away.

Both left, and right-side front corner moldings are now complete. The bottom section of the front wall siding and molding is waiting for the aluminum diamond plate upgrade.
We started in with mounting roof items. We made it through the shower dome, two tank vents, a bathroom vent with a fan hatch, the fridge vent base, and a fridge stack vent fan upgrade.
Cut and staple rubber to roof openings.
Clean roof in the area of all roof mount items to remove talc and dirt from rubber. Install tank vents, bathroom vent hatch, and prep shower dome and pencil mark the roof for the dome perimeter centered in the roof opening. Apply SB-140 butyl caulk up to the marked outline of the dome to set the shower dome. If more info is needed on setting shower domes or roof vents, just ask.

I add stainless fender washers on all shower domes to help prevent cracking of the plastic at the screws over time. The classic shower dome cracks come from point pressure at the screws that had no washer under them and excess torque on the screws.
Use the drill motor to start screws and stop just above the washer or super low on the clutch setting. Use a hand screwdriver to set all screws even and not over compress the shower dome flange. The shower dome mounts to a non-true flat surface due to the arched roof. By mounting the dome in butyl caulk, the caulk allows the dome to be flat and still seal to the roof. The caulk thickness takes up all the unevenness of the arched roof.
You can gauge the amount of butyl ooze from the sides to see if the dome is set even. 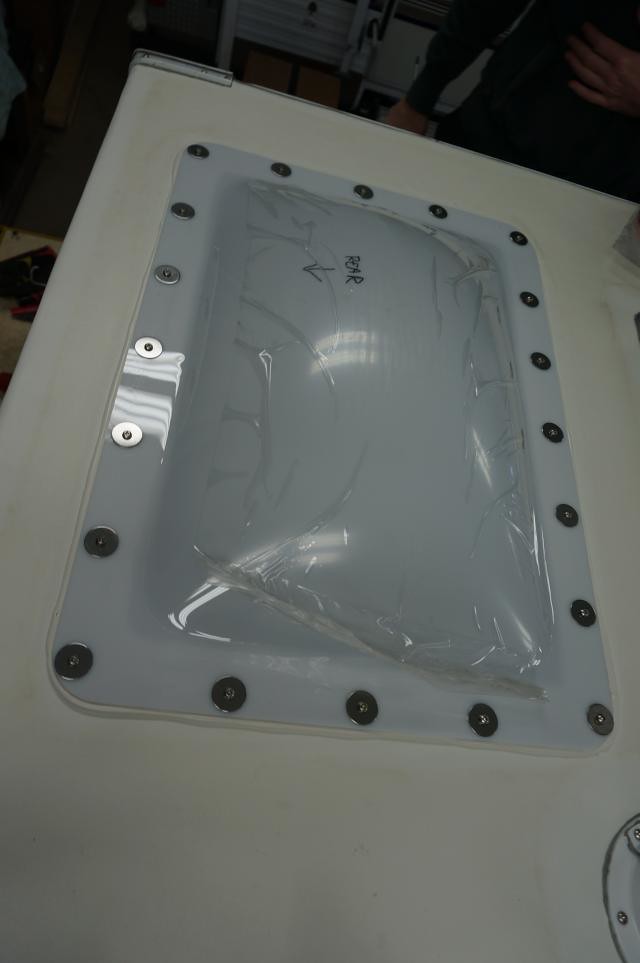
View of other roof-mounted items to complete out the day’s work.
Fridge fan upgrade added to the fridge vent stack.


That is all for this update. Next up will be to finish the roof items install.
Work tally on time and materials to get to this point;
Work completes Day 44 of the repair.
12/20/20; 2 workers, combined total, 8.83 hr.
12/27/20; 2 workers, combined total, 12.5 hr.
Work subtotal: 21.33 hr.
388.69 hr. - Total work hours accumulated to date: 12/27/20
New material use: 12/27/20
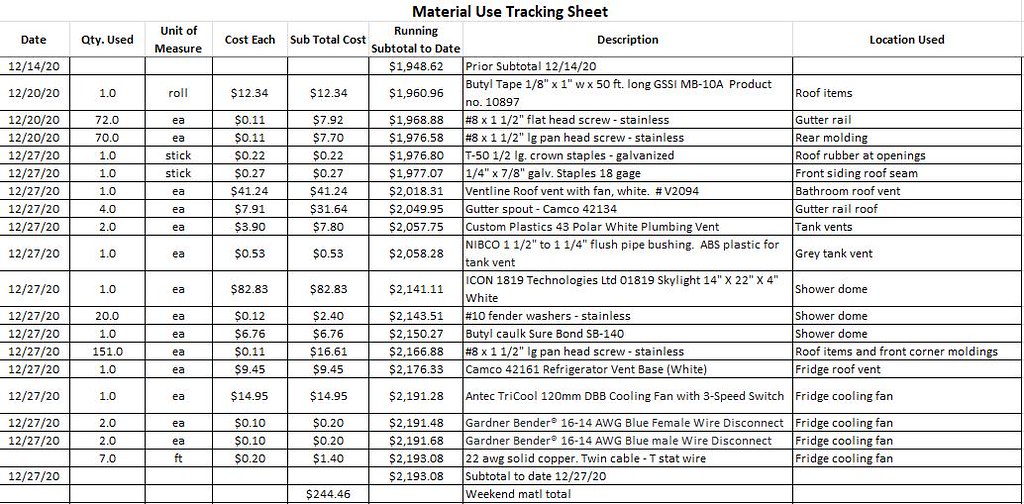
1,948.62 Prior material subtotal 12/14/22/20
$244.46 work weekend material subtotal. 12/27/20
-------
$2,193.98
Materials Subtotal to date 12/27/20
Thanks for looking.
John
To see more of my stored photos on the roof install, see here on Flickr for my photo album https://www.flickr.com/photos/camper...57717387538671
__________________
Current Sunlines: 2004 T310SR, 2004 T1950, 2004 T2475, 2007 T2499, 2004 T317SR
Prior Sunlines: 2004 T2499 - Fern Blue
2005 Ford F350 Lariat, 6.8L V10 W/ 4.10 rear axle, CC, Short Bed, SRW. Reese HP trunnion bar hitch W/ HP DC
Google Custom Search For Sunline Owners Club
|
|
|
|
|
12-31-2020, 03:17 PM
|
#100
|
|
Senior Member
Join Date: Sep 2010
Location: Michigan
Posts: 854
SUN #1546
|
It does my heart good to see a 1950 saved and brought back to her (even better than)glory days! The roof looks beautiful! 
However, looking at that roof corner makes me wonder if my corner is that bad 
Also John was looking for the same detailed threads of your 2363 restore but I can't find any? Could you post the link(s)??
Thanks!
__________________
Joan & Miss Emme Lu Who
Full Timing in T-1950 2005 Anniversary Model
1997 6.5L Chevy Turbo Diesel Truck
"Pure Michigan"
Facebook: Apackof2 for the Rd
|
|
|
|
|
|
|
Currently Active Users Viewing This Thread: 1 (0 members and 1 guests)
|
|
|
 Posting Rules
|
You may not post new threads
You may not post replies
You may not post attachments
You may not edit your posts
HTML code is Off
|
|
|
|
 » Recent Sunline Discussions
 |
|
|
|
|
|
|
|
|
|
|
|
|
|
|
|
|
|
|
|
|
|
|
|
|
|


 Linear Mode

