 |
|
 07-02-2023, 07:46 PM
|
#1
|
|
Junior Member
Join Date: Jun 2023
Location: New York
Posts: 15
SUN #13709
|
 Solaris T-2653: Moisture in back wall
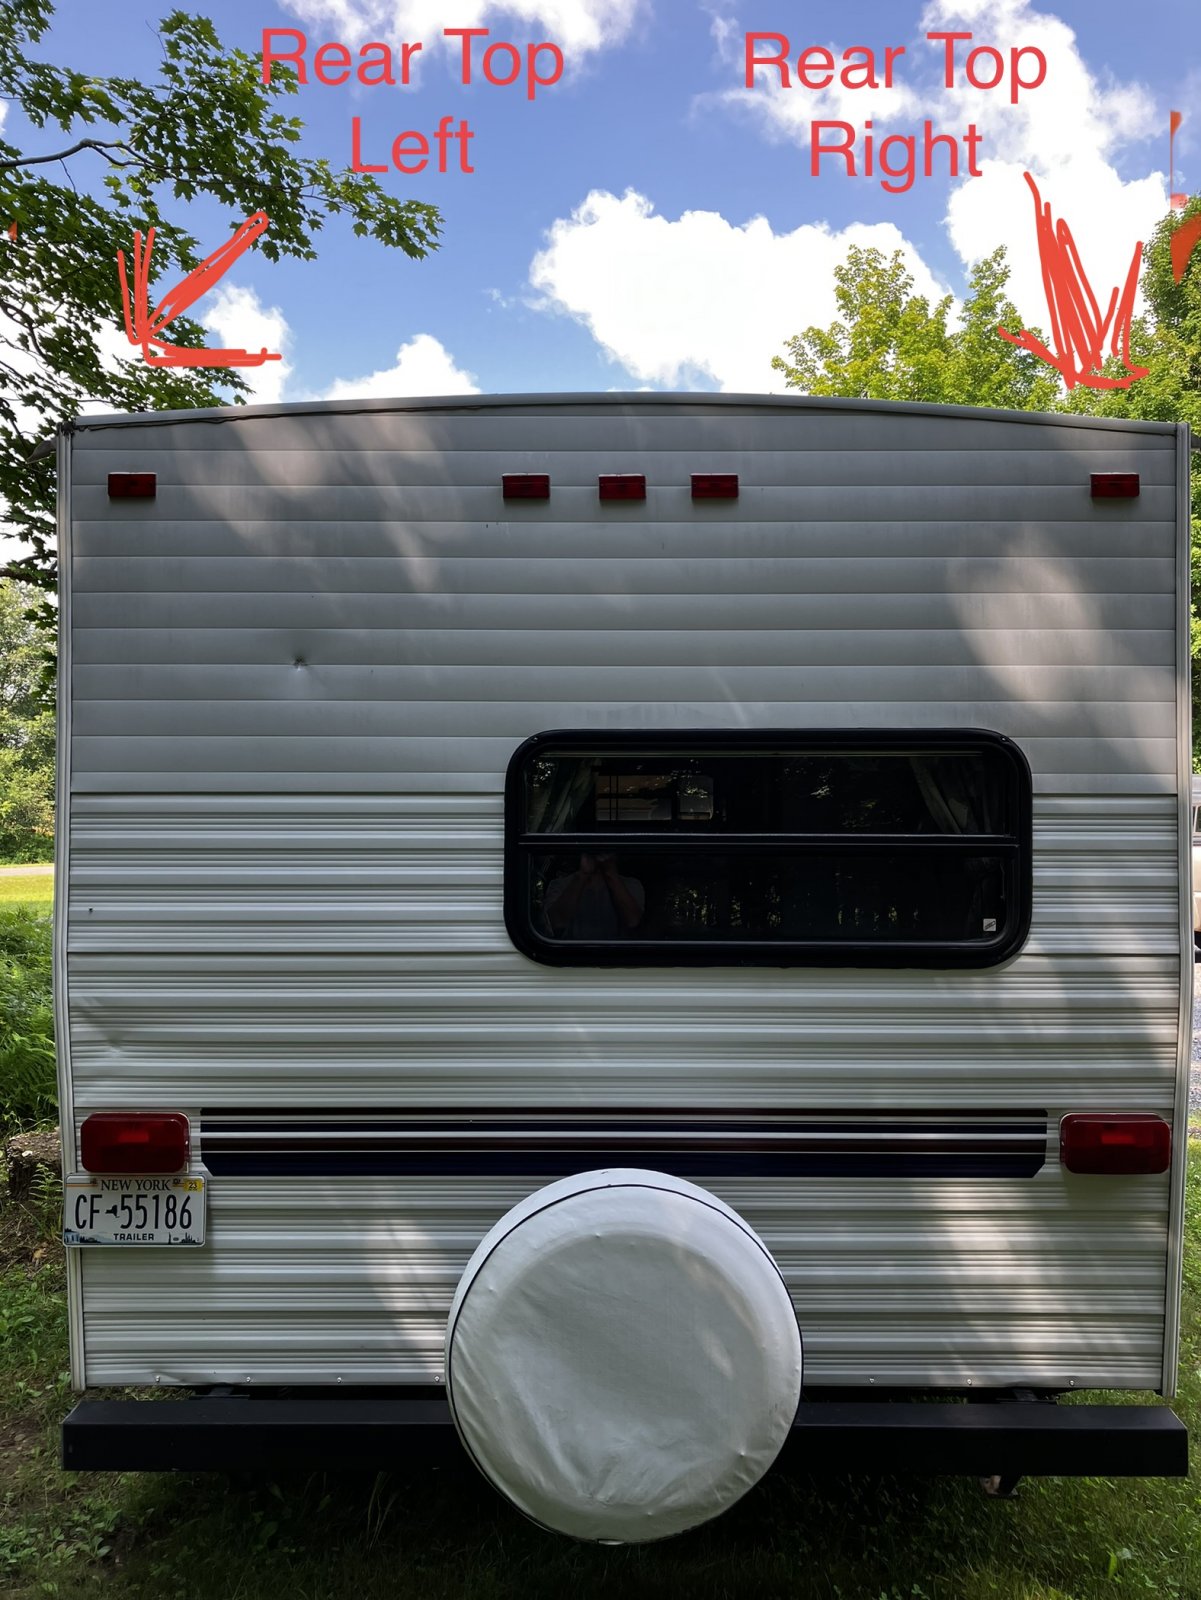
My wife and I recently purchased a 2000 Solaris T2653. When initially inspecting the camper before we actually purchased it, I brought a moisture meter with me to get various readings on the walls and ceiling inside the camper. There were only a couple of places where the readings were somewhat "high". One area being the front left corner (where an exterior marker light is located), with a slightly higher reading and the other area was near the bottom of the rear wall off to the right bottom corner of the rear window, with a significantly higher reading (than the rest of that same wall).
Nearer to the top of the wall, it read between 0 and 1%, whereas in the lower right area of the wall it read between 14 and 16% moisture.
To the touch, it feels colder and the wall in that area of concerns seems to be detached as there is play in the wall and not tight as it is in the rest of the walls.
Has anyone experienced similar issues and have any ideas, if water is getting in, how to fix it? I have not found any holes near the top exterior side of the camper (but then again, the moisture meter did not pick up on any moisture near the top of the interior wall). There is a rubber glass seal that seems to have shrunk over time (as there is a 1" gap near the corner of the glass, where the ends of the seal to meet together, but that gapped seal is on the opposite side of the wall where the higher moisture readings are). I am wondering if the aluminum siding on the exterior of the back wall could possibly be separated in some way as to be letting water get in?
Note: The moisture meter I used is a KleinTools ET140, with the mode set at Drywall
On the bright side, the camper itself was very well taken care of. After refilling propane tanks, filling the water storage tank, and cleaning out wasp nests and bug carcasses from the water heater, refrigerator, and furnace lighting areas, we tried every component in the camper and found each to work very well! Also, not only did the camper come with a 3" original Sunline binder of every piece of equipment installed from the manufacturer, it also came with two leather Sunline embossed drink coasters, a cutting board and two Sunline embossed baseball caps!
We are the third owners of it and are excited to use it for camping toward the end of this month (July-August 2023).
I just rechecked the back wall for moisture again tonight after a past few days of heavy rain.The following are a couple photos to indicate the readings on the moisture meter...
__________________
__________________
|

|

|
|
07-03-2023, 10:04 PM
|
#2
|
|
Moderator
Join Date: Nov 2006
Location: Ohio
Posts: 12,656
SUN #89
|
Hi Chrisco1963,
Welcome!
I see you have found a moisture meter. That Klein ETR-140 in drywall mode appears similar to the General Instruments one I use. I read the instructions, and it seems to have a 0 to 100% scale in the drywall mode. The General Instruments one does as well in what they call "wall mode". It is not a true % of moisture in the wood, but gives a good scale of how wet, wet is or it's dry.
Let's compare notes so I can try to understand the scale on the meter you have so I can help give you some places to look for leak entry points.
Here is the one I use in a post. https://www.sunlineclub.com/forums/f...per-17613.html
And this file will help explain for the General Instruments what the % number in Wall mode mean on a camper https://www.sunlineclub.com/forums/d...o=file&id=5638
Let's try this, in your drywall mode, place the meter sensor on the plam of your hand and let me know the number. Mine will peg into the 90's. While the two brands most likely will be skewed in wetness scale, the plam test may be enough to give me a feel for what the meter is telling you.
Also, please do this to better help if you can. This is for the back wall area.
Post pics of:
Inside the camper looking at the entire back wall. Cieling to floor, and left to right. If needed take a few pics so I can see all that is mounted in the wall.
Outside the camper, take a pic of the entire back wall facing it.
From a ladder, take a picture of the rear wall to the roof seam. There is a molding that covers down the back wall siding about 3/4", has a 90-degree bend at the roof line, and then goes onto the roof itself about 1" inwards. Do the width and close up on both the left and right corners. Also, feel the rubber roof at the corners for a more soft rubber band feeling than the rest of the roof area. Only feel for what you can reach from the ladder. Do not walk directly on the roof. We need to talk about how to walk on the roof with support boards.
The pics help tell us what you are seeing, and we can see what you have.
Meter readings. Ideally, make a sketch (or write on a picture) of the inside of the back wall and write in the meter reading % numbers. And post, you can take a pic of whatever you make and post that pic. See the file I attached in the PDF it shows how another Sunline friend scanned his camper. You only need to write down the % wet areas. We are trying to define a region of wetness. Exp. Starts at 85% at the edge of the rear wall and then fades down 30% at 2' in, then to 0% by about 3' inwards, and draw a cloud of the wetness pattern.
1. Place the meter on the ceiling starting at the back wall and scan the entire area the entire left to right of the camper, and go down the wall until the numbers drop down close the 0 to 10%.
2. And down at the floor line of the back wall, scan from the floor up left to right.
3. Scan around the perimeter of any windows or doors on that back wall. If there are cabinets on the wall, open them up and scan the well inside.
4. Scan the side walls starting at the joint between the back wall and the side wall, and do both the left and right sides. Water jumps between walls at the corners.
5. Scan down on the floor along the bottom of the back wall, left to right.
6. Go under the camper, and scan up on the black plastic membrane looking for wetness. Heads up, there are steel supports in that area, and the meter may peg close to 100% false reading when it sees steel. Just scan up to or close to the steel.
From the above, it is a good start telling the story of where water is getting in and what you can do to repair it or seal it up to prevent more leaks.
Camper leaks are, most times, seeper leaks. It is not a big hole per se; there are fine cracks in the sealants that can wick water through the failing sealants.
The meter tells a story once you use it enough and see what is inside the wall, floor, and ceiling.
I hope this helps,
John
__________________
Current Sunlines: 2004 T310SR, 2004 T1950, 2004 T2475, 2007 T2499, 2004 T317SR
Prior Sunlines: 2004 T2499 - Fern Blue
2005 Ford F350 Lariat, 6.8L V10 W/ 4.10 rear axle, CC, Short Bed, SRW. Reese HP trunnion bar hitch W/ HP DC
 Google Custom Search For Sunline Owners Club
|
|
|
|
|
07-05-2023, 05:59 AM
|
#3
|
|
Junior Member
Join Date: Jun 2023
Location: New York
Posts: 15
SUN #13709
|
Solaris T-2653: Moisture in back wall
JohnB,
Thank you for your response and willingness to help.
I took some pics of suggested areas of the camper and also created a spreadsheet of % moisture readings taken a rod the back wall , as well as a few taken along ceiling and side walls nearest to back wall.
You can see all the photos in a photo album I created on my profile page.
[IMG]https://www.sunlineclub.com/forums/members/13709-albums897.html
Also, I have not had the chance to take photos, or % Moisture Readings along the underside black plastic membrane as with a couple past days of rain deluges, the ground was too sloppy for me to be crawling round down there . Ill try to get some uploaded sometime in the near future.
__________________
|
|
|
|
|
07-05-2023, 06:19 AM
|
#4
|
|
Junior Member
Join Date: Jun 2023
Location: New York
Posts: 15
SUN #13709
|
Third time’s a charm ( I’ve tried submitting responses with pic twice, with no avail (once due to user error - forgot to click on Submit - lost everything I wrote and second time , after clicking Submit, Error Message came (too quick to read, but caught a glimpse of something like “Message Will Not Be Sent…”) (more than likely User Errors on both counts as I am a newbie to this site)
So here is a very condensed version of the previous two…
I’ve uploaded a Photo Album on my Profile Page of views of various areas of the camper more specific per your suggestion. Most are either captioned in the description area, or on the pic itself, some that are not captioned as I felt they were perhaps self-explanatory. Some of the pics uploaded sideways, even though they were right side up in my computer’s photo album.
I have not taken photos nor %readings along the underside at the black plastic Membrane yet as ground is pretty sloppy after rain deluges we’ve recently had. Perhaps I can get these in the next day or two.
Please let me know if you need any clarification of any of the photos or photos of readings.
-Chrisco1963
__________________
|
|
|
|
|
07-05-2023, 07:34 AM
|
#5
|
|
Moderator
Join Date: Nov 2006
Location: Ohio
Posts: 12,656
SUN #89
|
Hi Chrisco1963,
First off, you get an A+++ on the perfect clarity of your pics and the notations. You get extra credit for the spread sheet!
Your camper inside looks really good for it's age. You have something very good to start with pending how far you want to repair what you have.
Are you handy with basic wood tools? Almost everything in these Sunline's is repairable pending what your wants and needs are.
I looked over all your pics, again great pics, clarity and detail. I can see you have a keen eye on things to hone in on. There is a story behind every one of those pics on what is going on behind the wall, cieling etc.
https://www.sunlineclub.com/forums/m...albums897.html
This is a quick note to let you know your pics came through and I will comment on them soon. I can give you some options on short term and long term repairs so you can decide what and when you want to do it.
Be back later,
Thanks
John
__________________
Current Sunlines: 2004 T310SR, 2004 T1950, 2004 T2475, 2007 T2499, 2004 T317SR
Prior Sunlines: 2004 T2499 - Fern Blue
2005 Ford F350 Lariat, 6.8L V10 W/ 4.10 rear axle, CC, Short Bed, SRW. Reese HP trunnion bar hitch W/ HP DC
Google Custom Search For Sunline Owners Club
|
|
|
|
|
07-06-2023, 06:50 AM
|
#6
|
|
Junior Member
Join Date: Jun 2023
Location: New York
Posts: 15
SUN #13709
|
Solaris T-2653: Moisture in back wall
JohnB,
Thanks for the extra points! That sure will help in my final grade!!
I look forward to your response and help with this moisture problem. Our plan is to use this camper for camping at a local State Park (Higley Flow State Park, South Colton, NY) for two weeks July 23-Aug 6, 2023.
So, for now, a short term option would be great; to at the very least seal up any cracked/failed roof seams or joints. With the long-term intention to repair any damage that has occurred from historical failure of previous owners to routinely maintain the seams properly.
To answer your question ("Are you handy with basic wood tools?") I do have about 40 years of experience as a carpenter, so yes, I'd say I am handy with all sorts of wood tools. One challenge for me will be to find a work area big enough and dry enough to park the camper and have room for scaffolding to be work off around it, while it is opened up to do the repairs. While I am at it, I may as well throw in the desire to have a heated area, as we never know when we'll see the first snowflake up here in The North Country, it will probably be a winter project no matter what.
I have never repaired a camper before, so I have admit it appears to be a bit of a daunting task, however after viewing your posts and pics of some of your (and others) projects on this site, I am inspired to do a proper job of it.
This camper's interior is immaculate and my wife is very pleased to have it, so I believe it is worth the effort to try to save/repair it's structural integrity.
One thought I concerning any short-term solutions, is that whatever is done to "get by" for now, doesn't make it more difficult to open/remove seams/joints when it comes time to park it for the long-term, major structural repairs.
I am confident that you will direct me in best ways to accomplish the short-term necessary needs to prevent any current water penetration problems, while realizing that soon following this upcoming camping trip, more major repairs will be occurring.
-Chrisco1963
P.S. After reading another post on an unrelated topic about trailer tire date codes, I looked up the date code on the tires on our camper.
(two tires have DOT Date Code: 3616, one tire has Code: 3416, one tire has Code: [blank])
I went to How old are my tires? - CheckTire.com and determined the following:
Entered DOT code: 3616
Date of production: 2016-09-05
Tire age: 6 years 10 months 1 day
Your tire is 19.3% younger than the average in your country.
Your tires are over 5 years old, you should consider replacing them.
------ ------ ------ ------
Entered DOT code: 3416
Date of production: 2016-08-22
Tire age: 6 years 10 months 15 days
Your tire is 18.8% younger than the average in your country.
Your tires are over 5 years old, you should consider replacing them.
------ ------ ------ ------
The tire brand for all 4 ST Radial tires is TowStar; they all have very good tread, with no weather checking, but the white spoke rims are showing rust spots.
Should I be concerned about pulling it 45 miles (90 miles roundtrip) to the campground? (we did pull it home from where we purchased it about 65-70 miles away, with no issues - ignorance is bliss - as it wasn't until after the purchase and trip that I learned anything about tire date codes).
__________________
|
|
|
|
|
07-06-2023, 11:17 PM
|
#7
|
|
Moderator
Join Date: Nov 2006
Location: Ohio
Posts: 12,656
SUN #89
|
Hi Chrisco1963,
Thank you for your short and long-term needs and wants. A 40-year carpenter, yes, you are very well qualified.  You have the skills to do this; we can help with how the camper comes apart and some methods to restore it if you choose to. You can embellish those ideas to fit what you have to work with or use them as it is. And we can learn from your skills also. I use the word restore, as this is the long-term approach if you want to go that route. A Sunline camper that is immaculate looking inside but has water damage is a perfect camper setup for restoration.
I'll add more on Friday, but here are my thoughts.
Short term, You need to stop more water from getting in. I see the below as the leak source by your pictures and moisture readings for the back wall area. There are other areas to talk about, but we will start on the back wall.
- A leak at the back junction of the roof. This has been ongoing for a long time. Years worth. It is a slow seeper leak, and I can see wood rot in the last rafter at the top of the back wall. (No I do not have X-ray vision, I have seen this many times before) The water wicks in, and after the volume are large enough, it starts going down the walls as well as staying in the attic above the ceiling.
See here; I'll explain what is happening under the roof membrane.
When you see the rear roof molding lift and the gray putty tape exposed that I estimate is about 1/4" at the left end by your pic, this is from the screws at the top are into rotted wood. That rear arched molding is straight when you start applying it. As you screw it down when assembling it, the screw holds it down. When the screw threads cannot hold it (rotted wood), the molding starts to flex back straight, and it lifts off the back of the roof. The seeping
We need to deal with that entire rear roof seam and part way down the left and right gutter rail. The how-to, we will get to that.
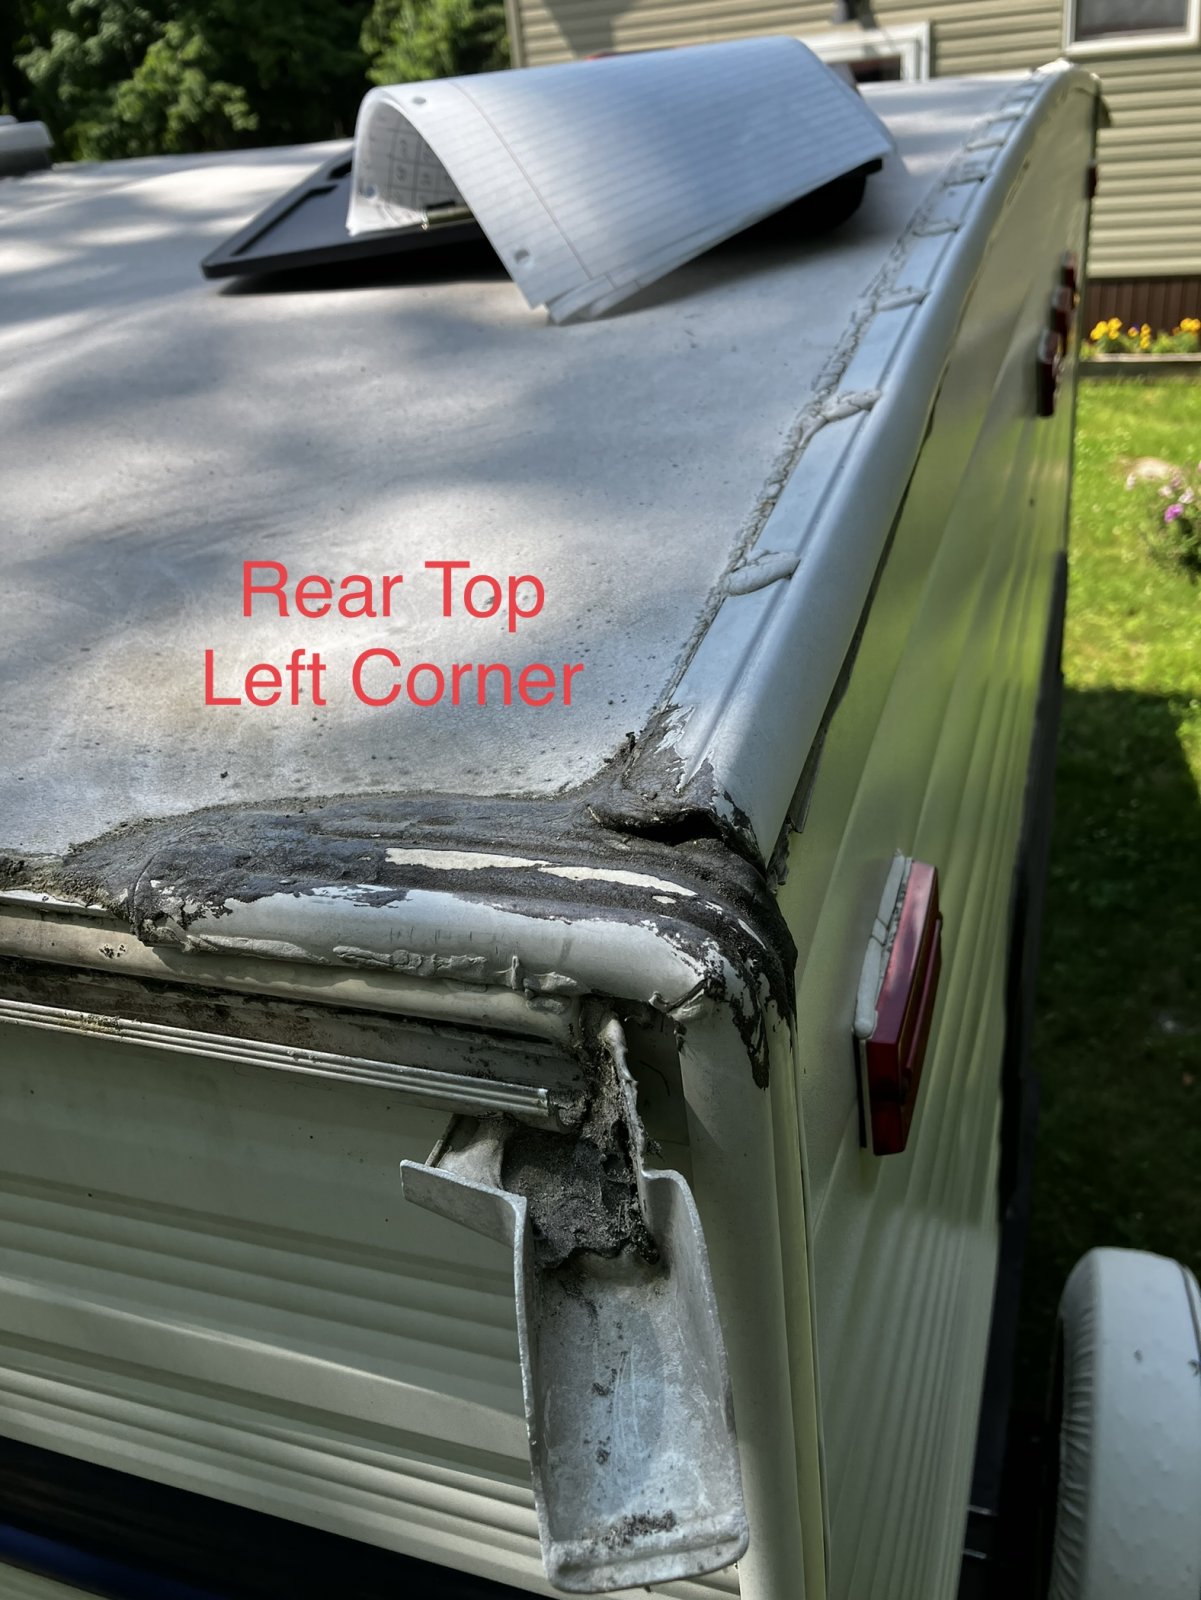
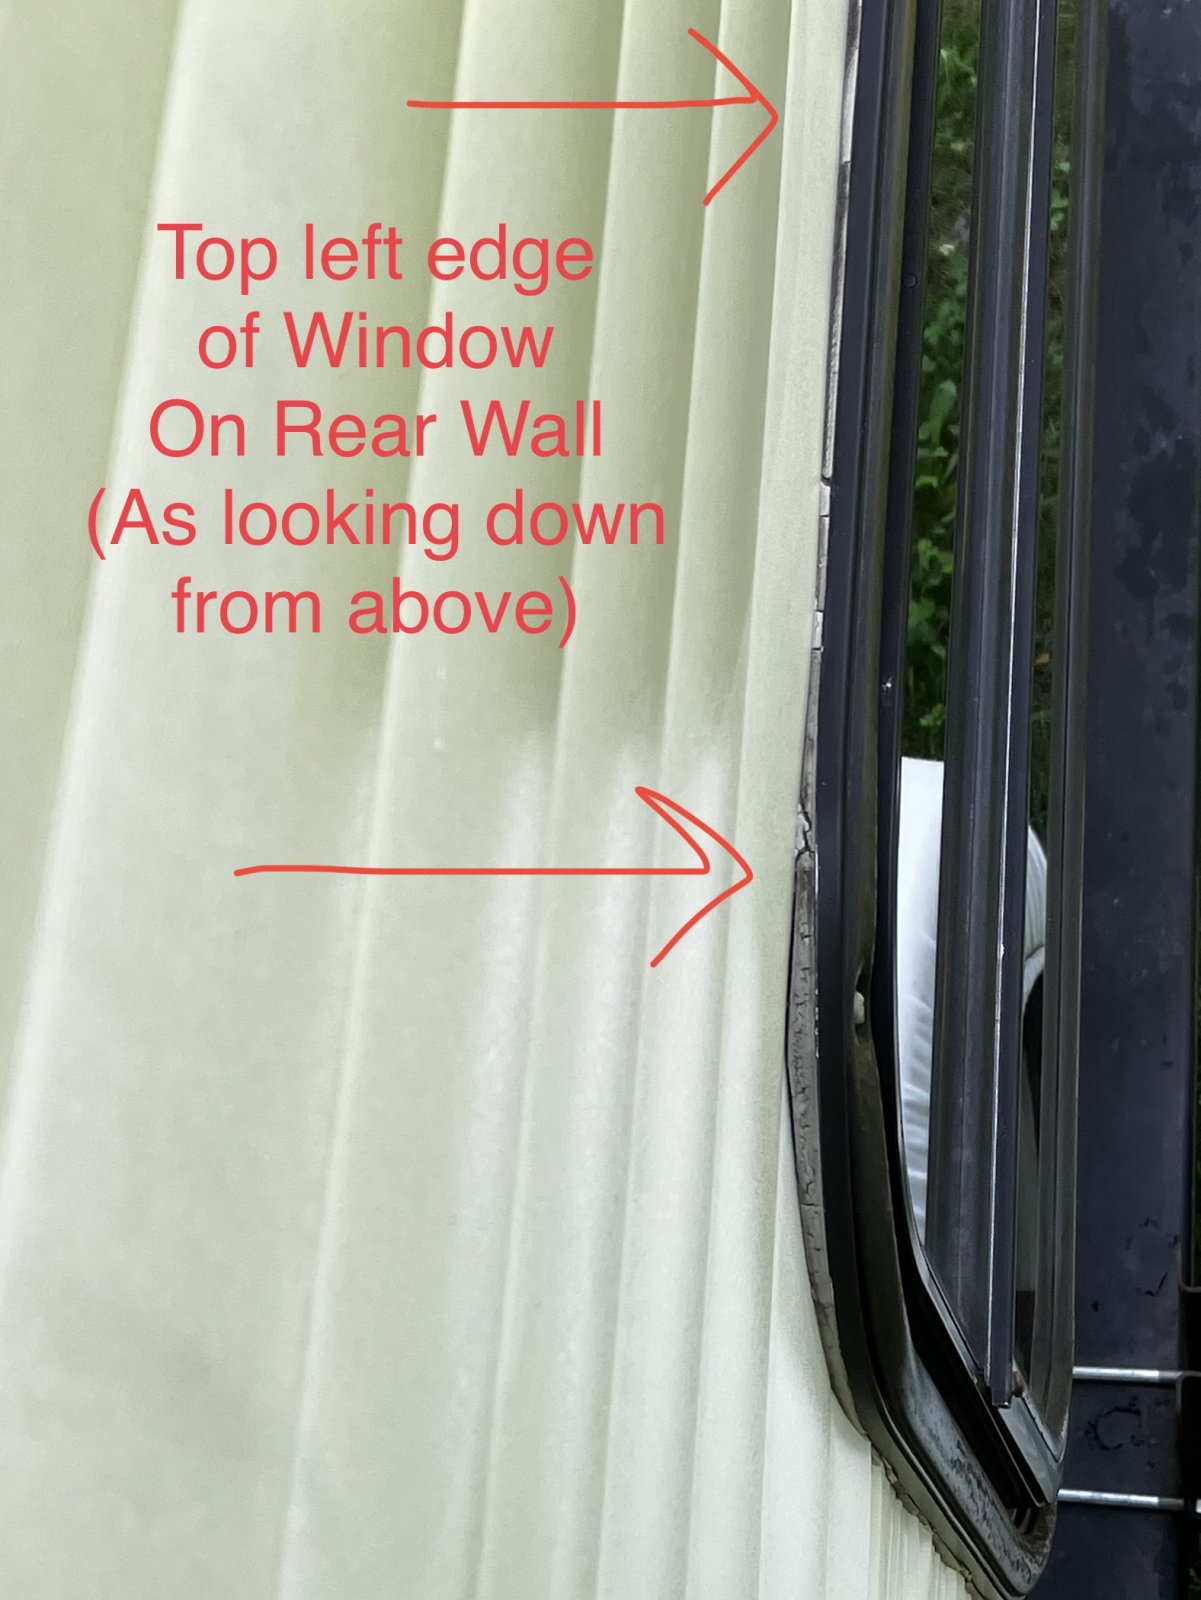
- Siding leaks - corners. Siding leaks can be as bad if not worse than roof leaks in many cases. By seeing what is in your pics with the dried-up and cracked putty tape, and the moisture meter readings, odds are high, you have corner molding leaks. These let water seep into the corner wood, and the water runs down.
Here is the rear wall side of the corner molding.
This issue is on the left and right wall side also. Here is part of the left side. The issue is from the roof line to the bottom of the floor line. We need to seal all of this up
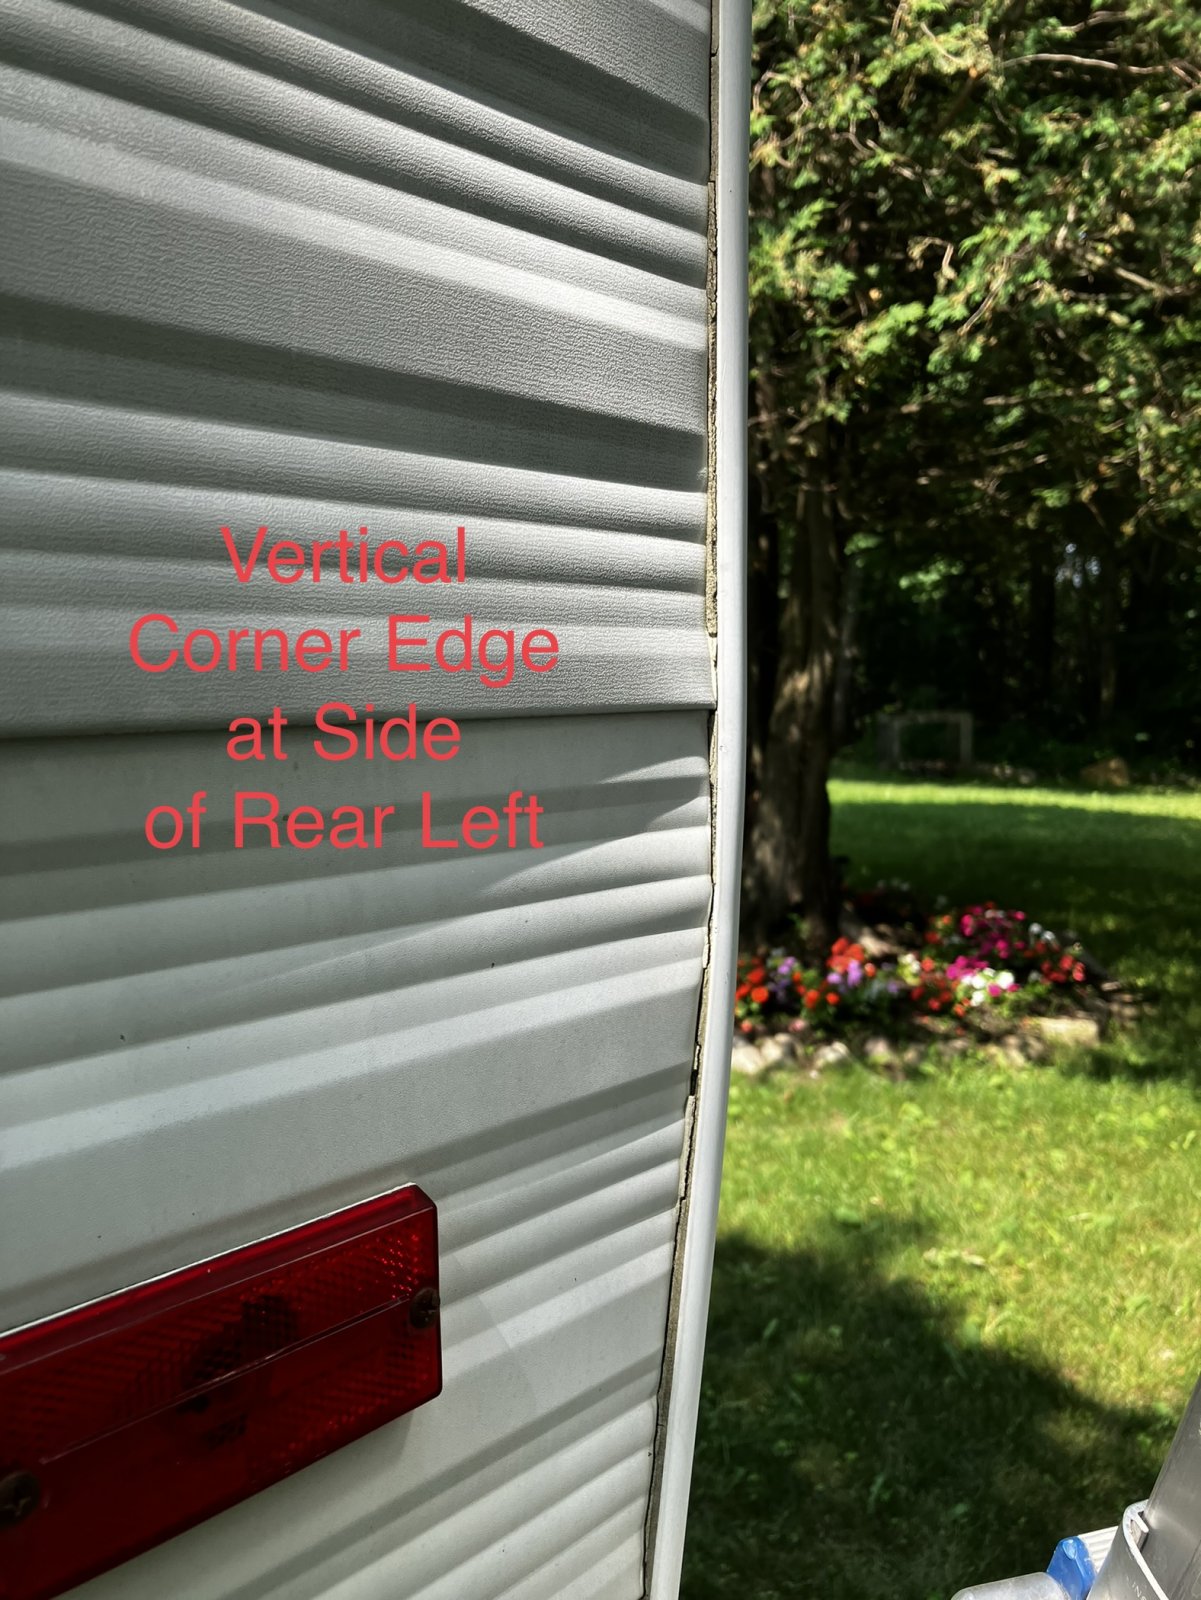
We need to clean up this joint area and seal it on both sides of the rear corner moldings, the left and right corners. The how-to, we will get to that.
- Window frame to siding leaks. From your moisture readings, you have a leak from the window frame, past the siding, then into the wall cavity. This is the same type of leak as the corner moldings. The seal between the siding and the window frame is compromised.
The window frame seeper leaks, and go down the wall. We need to clean and seal up the frame to the siding joints. The how-to, we will get to that.
- DOT lighting on the back wall. There are holes in the siding for screws to hold the lighting fixtures and to let the wires get through. On the top red clearance lights, if you look closely, they might be full of water. The stop/turn lights may also have issues, but they do not fill up with water as like the clearance lights.
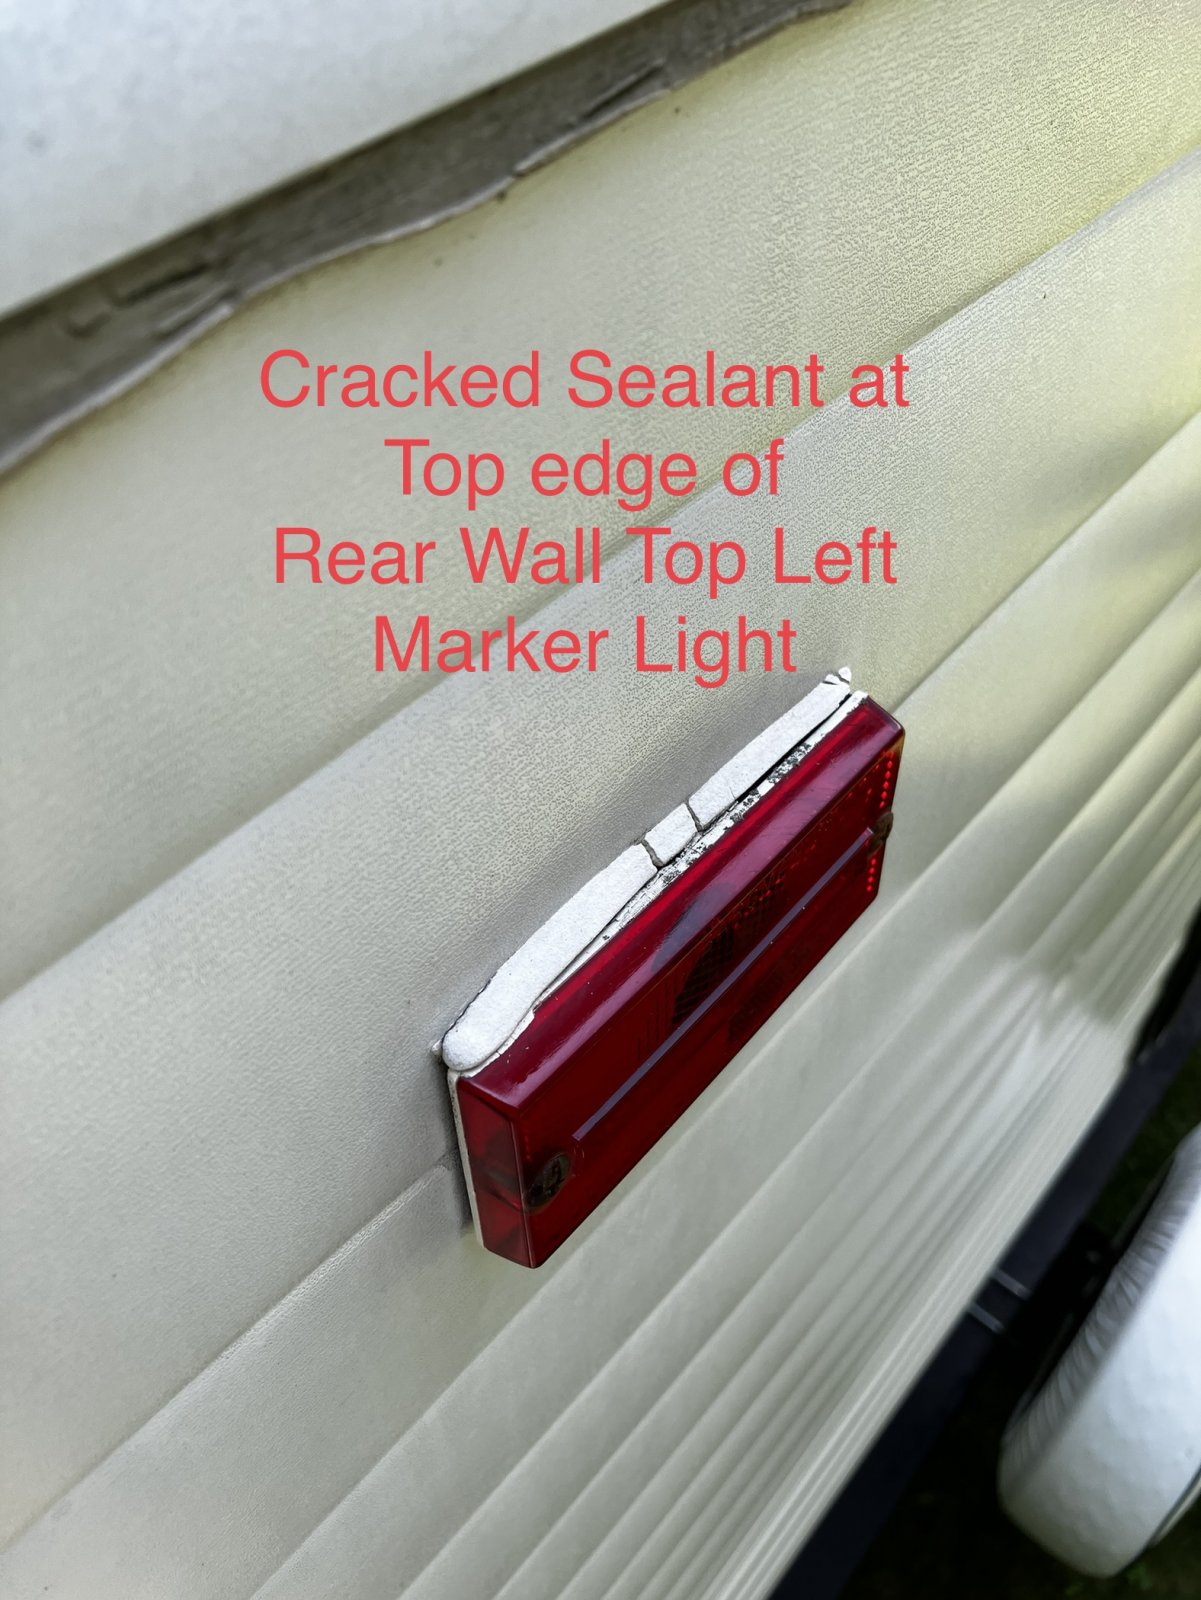
The DOT lights can also be seeper leaks into the wall cavity. But there are ways to tell if they leak now and how to seal them up. The how-to, we will get to that.
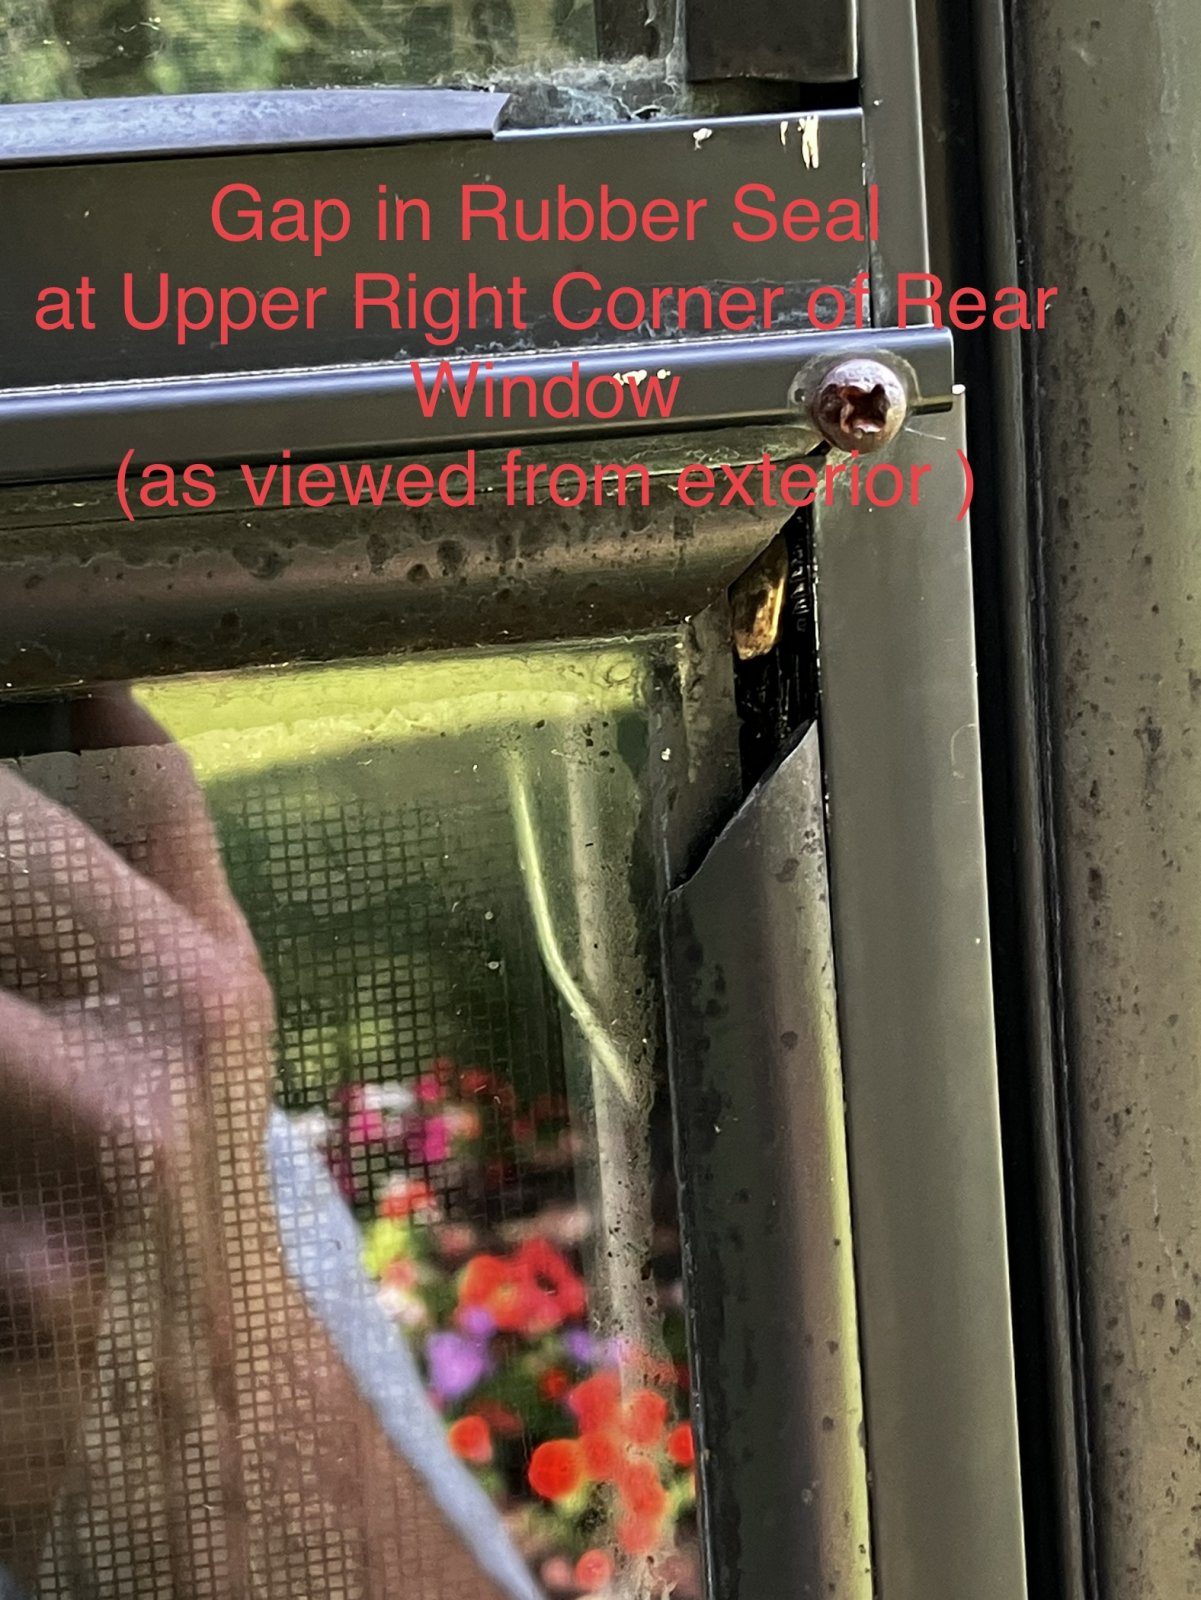
Window unit leaks - There are drains in each window that opens. We need to make sure those drains are open and allow any water that sneaks in around the open window a place to drain out. If not, it can overflow inside the camper in the living space. This pic shows a shrunken glazing bead. This is common; the vinyl glass bead keeps dirt out of the channel and makes it look better. And it does help prevent water from getting to the actual glass sealant. The glass itself is sealed to the metal window frame. That is the water-tight seal, not the vinyl glazing bead. Point: The glazing bead shrink by itself is not a leak.
You mentioned you might want to do the long-term corrections, but we also need to seal up the camper not to take on more water until the long-term work can come. On Friday, I'll give you at least one option to seal up the camper in the back area but be able to get it off and not damage the siding or roof to do the long-term repair.
Be back with more soon on the what to do's.
Tires: For all practical purposes, you are at the 7-year mark on the tires. Trailer tires most times age out before they wear out. You really cannot go by tire tread like we do on autos. The aging process breaks down the rubber internally as time ticks by. The tire gets weaker every year, not even rolling down the road. Sun exposure also speeds up the aging issue.
I know you said 45 miles to camp and then 45 miles back. You were lucky on the travel home from where you bought the camper. You are on borrowed time now; 5 years is a good limit. Having dealt with camper damage from a tire tread that flew off, changing tires is cheaper and easier than repairing blown-up siding and wheel wells, from my experience. I know what I would do, but you need to weigh your risks to change them now or later. Ensure the tires are aired up to the max cold side wall pressure, either new or old. Tandem and triple axle trailer ties need the full capacity of the tire to deal with the stresses inside the tire when turning the camper that gets dragged around the turn as they do not steer.
On the tire that you could not find a date code, look on the inside of the tire. They only are required to mark one side of the tire. The last tire shop may have mounted it with the date inside. If there are no dates on either side, that tire is very old before they had to have dates, and they need to be changed.
I know the pain of the cost of tires; I just put 5 new tires on the truck and 5 new tires on the camper a month ago. The spares as well. I even had to do the car at the same time. I am well invested in tires this year...
I hope this helps,
John
__________________
Current Sunlines: 2004 T310SR, 2004 T1950, 2004 T2475, 2007 T2499, 2004 T317SR
Prior Sunlines: 2004 T2499 - Fern Blue
2005 Ford F350 Lariat, 6.8L V10 W/ 4.10 rear axle, CC, Short Bed, SRW. Reese HP trunnion bar hitch W/ HP DC
Google Custom Search For Sunline Owners Club
|
|
|
|
|
07-07-2023, 09:15 AM
|
#8
|
|
Junior Member
Join Date: Jun 2023
Location: New York
Posts: 15
SUN #13709
|
Solaris T-2653: Moisture in back wall
JohnB,
Thanks, I look forward to your response. In the meantime, with more rain coming later today and in an attempt to keep seams dry
we covered it with what we had in a tarp. {fingers crossed}
__________________
|
|
|
|
|
07-07-2023, 07:12 PM
|
#9
|
|
Moderator
Join Date: Nov 2006
Location: Ohio
Posts: 12,656
SUN #89
|
Hi Chrisco1963,
Lets talk short-term and what can be done to stop existing leaks while not creating much extra work if you decide to do long-term repair restoration work. I have been thinking about this to help give you a few options. We have not discussed how long it will be between short-term and long-term fixes. Or if the long-term will happen?
Ill take this approach to help the cause. First, you need to have fun camping come the end of July. And maybe camp more to the end of the camping season. Make sure the camper layout and everything camping is something you like and want to keep doing. Assuming you like the camping experience, the camper layout is a major factor if the long-term repair comes to be. There will be much effort on your part to do the long-term repairs. You really will only do this if you like the camper layout.
Assuming the above is a good thought process; Ill give you two short-term options to buy you time to know you want to do the long-term repairs.
1. When the camper is not being used, cover it. I see you have already found this method, and good for you to take this way. The tarp, as you have it, does help. If this becomes your short-term stop-gap measure, a longer tarp that will go to the bottom of the siding will help better, as there is still the potential for exposed leaks with your current tarp. This is the fastest stop-gap measure. It does not help when camping or towing in the rain, but it limits the exposure to leaks.
Some pros for the tarp:
A. It is fast to get started. You already did it.
B. The cost is low to mild for the tarp.
C. It is effective to stop the leaks while the camper is stored.
D. If you cover the whole camper, other leaks yet to be discussed are stopped when the camper is covered.
Some cons for the tarp:
E. If you camp often, the tarp becomes a hassle to get it on and off.
F. Wind whip can become an issue as time goes on if bad storms hit. Rips from wind must be patched, Gorilla tape to the rescue.
G. You can still take have a leak when you camp or get the camper ready to go camping if it rains when the tarp is off.
H. Nothing addresses the rear wall molding lifting due to the rotted rafter. This is a risk.
An estimate of 4 to 6 months during the non-winter months is good for tarp use. Or keep replacing the tarp. If you want to go a year or more with the camper in storage and go through winter, consider an actual camper cover. They are about $500 +/- and last about 3 to 4 years before a large rip happens. But they protect the complete camper during long-term storage and can be cheaper than renting indoor storage. If you go the camper cover route, make sure it is a breathable material.
2. Seal up all the siding and roof leaks for the back wall area with the appropriate sealant that can be removed with some effort not to impede a quality long-term repair. This approach stops all leaks and can go through winter or the following year if needed.
The sealant approach will take some time to do. There should be prep work before the sealant can be applied to be effective. Putting a new sealant over dirty or bad old sealant will not stop leaks. I have seen this done before by others, and it does not work.
For the entire back wall, including left and right back wall corner moldings, window, marker lights, and taillights, I estimate 1 to 2 workdays to prep the surface for the first-time person doing this. All siding joints must be scraped with a plastic scraper to cut into the joints and remove the old dried-up putty tape at the exposed surface, washed, and bleached to remove the mold from the old putty tape at the siding joint.
The roof molding area at the back wall and some left and right gutter rails areas need all the old caulk removed and the surface cleaned. This involves using a heat gun with an all-edges dulled stiff blade 1 wide putty knife and working off a step ladder. You are doing a 75 to 80% clean, all dirt needs to be removed, but the surface does not need to be bare (100% clean). I estimate this prep work to be 4 to 6 hours for the back roof area.
Applying new sealant (Dicor non-leveling, non-sag lap sealant) to the back wall/siding areas to caulk every siding joint, I estimate 4 to 6 hours.
We need to see if we can better fasten the left side rear roof to the end wall molding. Replace molding screws with longer screws to try and screw through the rotted rafter and into the top wall plate to hold the molding down. Once fastened, apply a new sealant (Dicor self-leveling lap sealant) to the rear wall roof area using a step ladderestimate 1 2 hours.
This link will show the siding sealing process to make it look acceptable. You may have some better caulking tricks; please share how. https://www.sunlineclub.com/forums/f...tml#post137746
The pros of sealing all joints.
A. You have sealed up and stopped all leaks in the back wall area.
B. The sealed rear wall can go through all rain and towing in the rain with high confidence that the leak will not worsen in this area.
C. This sealed method can last a year or more if the top left rotted rafter does not let go and the molding lifts off the roof.
D. The cost of the sealant is mild cost. Estimate $50 to $60.00
E. Using Dicor and not some other caulking, the Dicor can be removed with mild effort if the restoration process is chosen. Dicor will come off with a heat gun and scraper, then a chemical clean with mineral spirits followed by a high flash cleaner (Naphtha, etc) to remove the mineral spirits residue for a 100% clean. Note: Do not use silicone of any formulation, as getting all that off for restoration is a major effort.
F. There is no removing and reinstalling the tarp after every campout.
Cons of the sealant method.
A. Using the Dicor sealant method will add approximately 4 to 6 hours of extra cleaning work to get the new Dicor off on the rear wall siding above and beyond the normal cleaning if you do a long-term repair.
B. Cleaning and applying the new sealant beyond the tarp method takes time and effort.
C. The sealed-up rear wall is the only area addressed; if other active leaks exist in other areas, they are still ongoing.
D. We need to talk more about what to do with the potential leak area on the roof by the AC roof unit. This is not included in the above time estimate.
NOTE: Neither option addressed the wet walls and ceiling; these methods are a stop-gap measure to buy time until the camper walls and ceiling are opened to dry out and repair. Suggest only waiting up to one year as the rot in the wall will still progress during the warm summer and fall months.
Ill mention that the caulking on all of your roof that you showed us pictures of is compromised and no longer effective, requiring replacement. By the pictures, routine roof maintenance on the sealants by prior owners was not done in a long time. You are most likely to have the start to some level of active leaks going on elsewhere. If you want to get into where they may be, let me know we can look into those areas also.
Think the above over on what you want to do. If you want to go with the sealant method, let me know, and I can go into more detail with pics of the prep, cleaning, and rear roof molding.
I hope this helps
John
__________________
Current Sunlines: 2004 T310SR, 2004 T1950, 2004 T2475, 2007 T2499, 2004 T317SR
Prior Sunlines: 2004 T2499 - Fern Blue
2005 Ford F350 Lariat, 6.8L V10 W/ 4.10 rear axle, CC, Short Bed, SRW. Reese HP trunnion bar hitch W/ HP DC
Google Custom Search For Sunline Owners Club
|
|
|
|
|
07-07-2023, 07:47 PM
|
#10
|
|
Moderator
Join Date: Nov 2006
Location: Ohio
Posts: 12,656
SUN #89
|
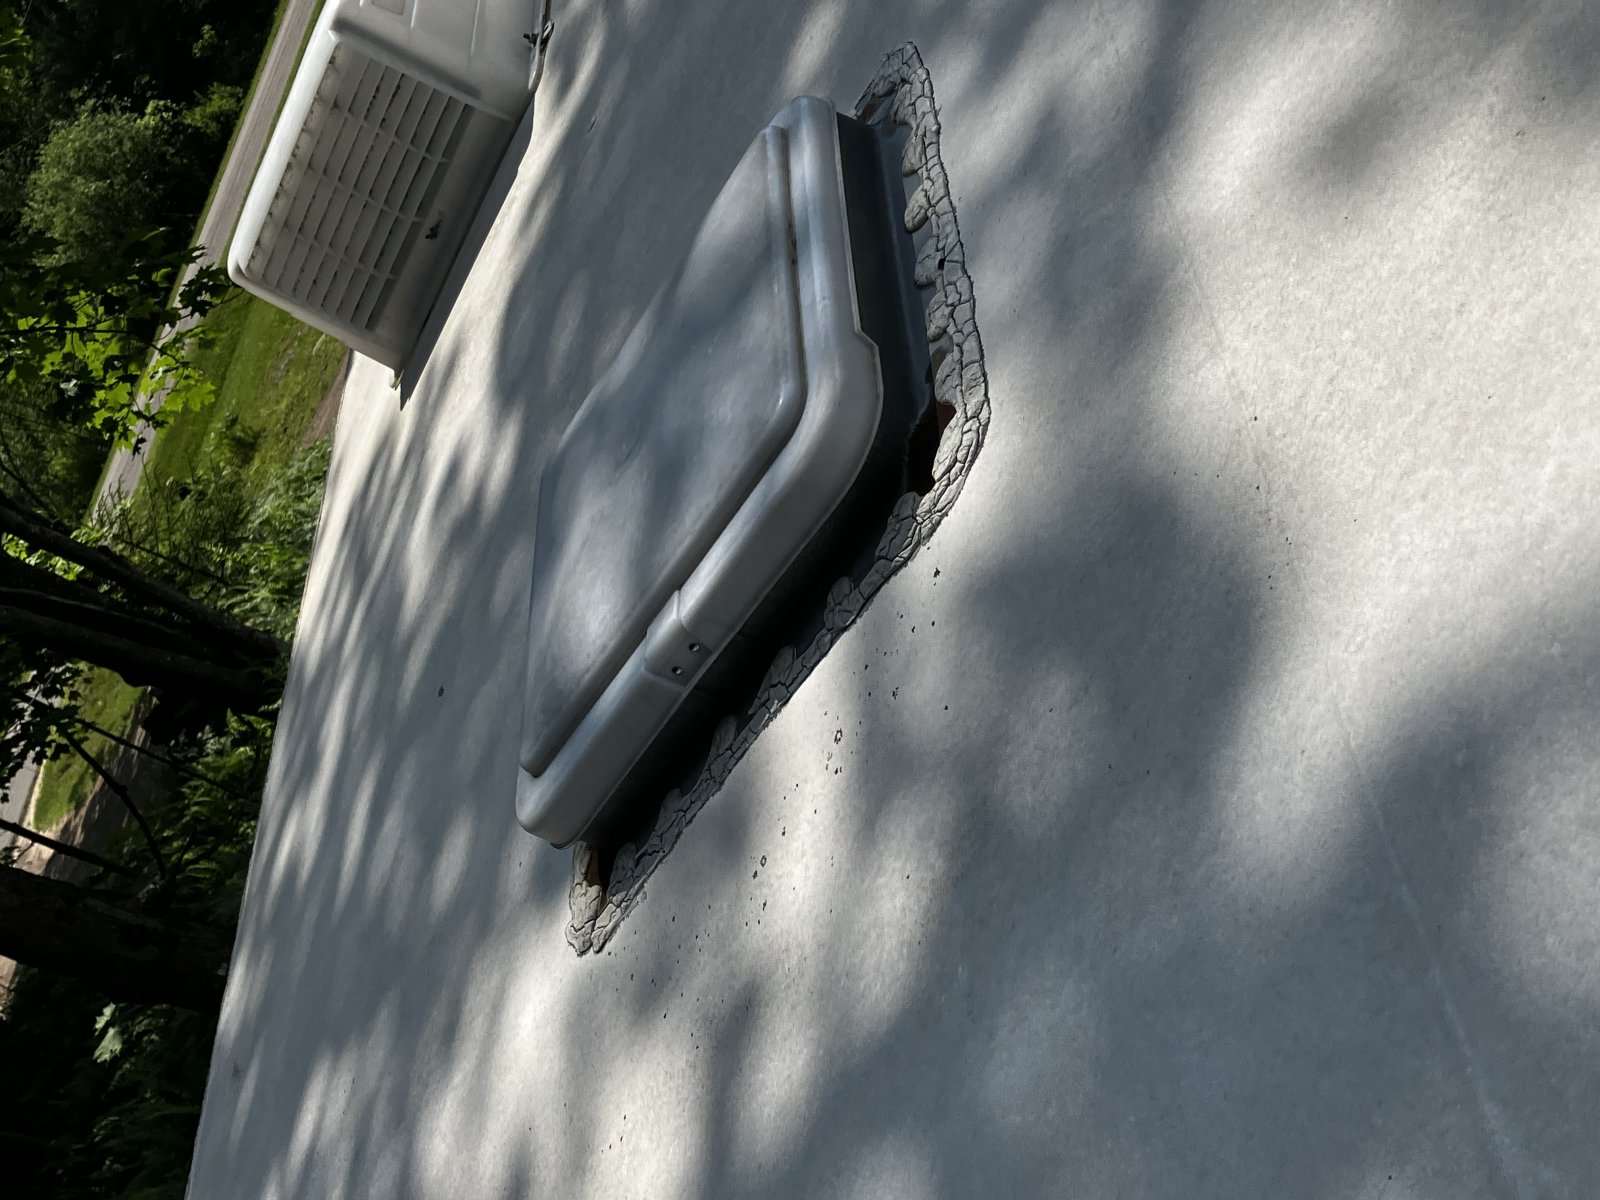
The roof issue by the AC unit, from this pic
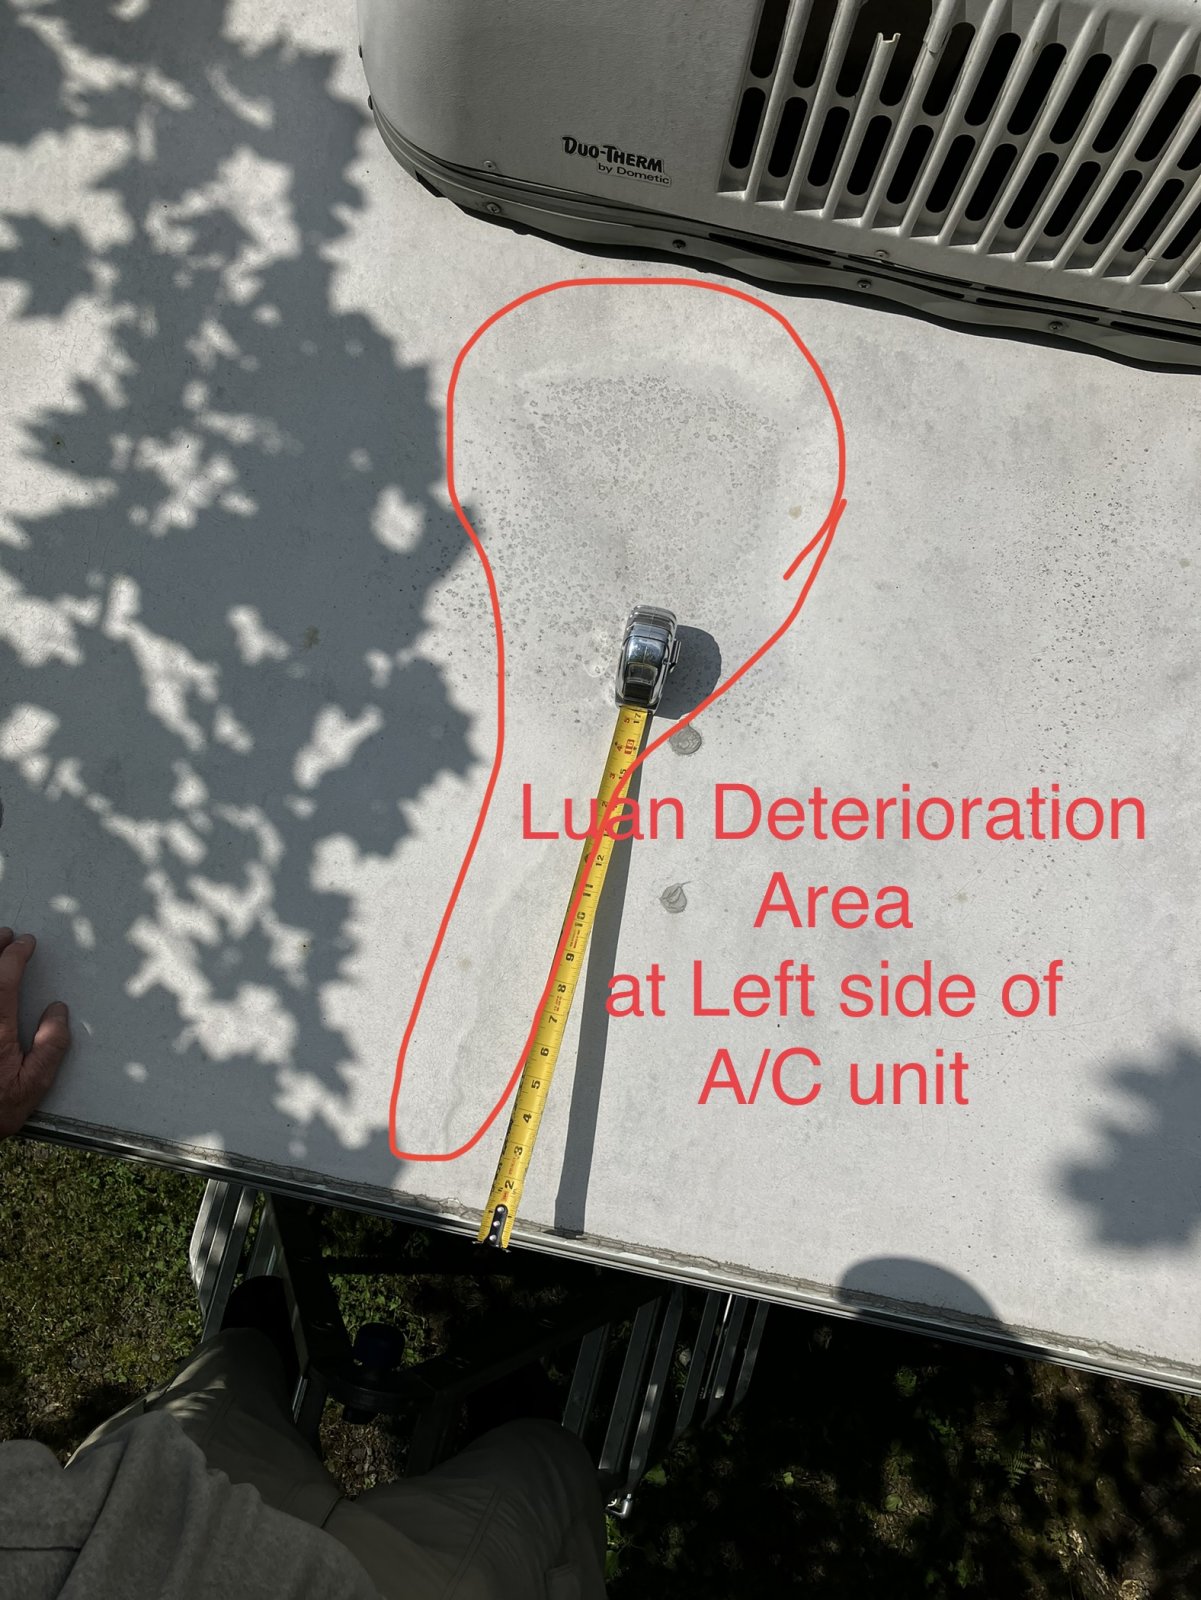
I can tell by the roof mold marks there has been ponding water in your red-circled area.
The faint jagged line heading to the gutter rail, "looks" like there has been a tear in the membrane backer material Sunline nicked named, Budboard. I am not sure, but bud-board, maybe known as Unicore in the industry, was used on the front and rear walls of campers built in that era as it was bendable.
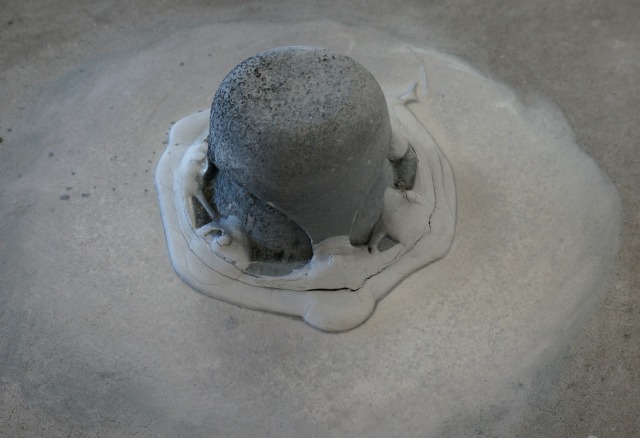
This is what your roof looks like. This is an area lifted up with the gutter rail removed.


Your roof is not a direct walk-on roof. The crease in your picture and then the ponding area may have come from "someone" a long time ago who stood or kneeled between the rafters and broke the budboard backer. Two summers ago, I helped a friend repair their Sunline camper who had someone walk all over the roof with no added plywood support and broke the budboard badly in many spots.
Here is what a broken budboard looks like from the inside. It does not leak, but it will not shed water right either, and you end up with ponding which can, in time, be a real issue. These breaks, I suspect, came from someone's foot or knee.


See the ponding spots, there are not leaking yet, but the budboard was broke.

Your picture may suggest someone broke the budboard. Here is a way to tell the difference between a leak and a broken budboard.
Only the EPDM membrane is intact when a leak has deteriorated the budboard; If you press down on the depressed area, you get a rubber band bouncy feeling when the bud board has deteriorated. Think of the feeling of an old tire tube, it feels like that. Does yours feel like the tire tube?
If you press down, and the EPDM goes down but still has some stiffness, and no tire tube bouncy feeling, then there "might" be a broken bud board under this area.
You can also try using your moisture meter on the roof. I have successfully found wet spots on the roof with my meter. It scans through the rubber and heavy corrugate board or what's left. There was one time the roof had mold on it, and the entire roof read 100%, which I knew was a false trip, that roof I could not use the meter on, but I have used it on others. See if your meter can find moisture in that area. Compare it to a good area for readings. The roof does need to be dry from rain/dew etc.
If yours is a broken budboard, that is a different repair than trying to seal up a leak.
Curious about what you will find out if you test for this.
John
__________________
Current Sunlines: 2004 T310SR, 2004 T1950, 2004 T2475, 2007 T2499, 2004 T317SR
Prior Sunlines: 2004 T2499 - Fern Blue
2005 Ford F350 Lariat, 6.8L V10 W/ 4.10 rear axle, CC, Short Bed, SRW. Reese HP trunnion bar hitch W/ HP DC
Google Custom Search For Sunline Owners Club
|
|
|
|
|
07-07-2023, 08:03 PM
|
#11
|
|
Moderator
Join Date: Nov 2006
Location: Ohio
Posts: 12,656
SUN #89
|
I'm unsure if you saw this, but this link is for one of my project campers. I never finished the post, but we did finish the camper, and it has made it to the campground several times. But the post is far enough along you can see a lot. You can scan the pics or read them as wanted.
Your 2000 camper is built very similarly to this one. The rear wall on this camper had major water damage, so much so the entire wallboard was gone. I acquired it to restore it and use it for the family.
This will give you some insight into how your camper is built. While you may not need to deal with everything I did, parts of this are what you will do if you go for the long-term repair.
https://www.sunlineclub.com/forums/f...avy-17684.html
The front and rear roof seams combined with the four corner moldings are classic leak spots on the flexible membrane roof campers when the roof has not been maintained correctly, or the siding joints are not sealed. We did not yet talk about your front wall or front roof seam; if you want to look, there are some ways to know other than the moisture meter if you have or had a leak in the front wall or corners. Let me know, and I'll explain more.
John
I know the more you look, the more you find.
__________________
Current Sunlines: 2004 T310SR, 2004 T1950, 2004 T2475, 2007 T2499, 2004 T317SR
Prior Sunlines: 2004 T2499 - Fern Blue
2005 Ford F350 Lariat, 6.8L V10 W/ 4.10 rear axle, CC, Short Bed, SRW. Reese HP trunnion bar hitch W/ HP DC
Google Custom Search For Sunline Owners Club
|
|
|
|
|
07-08-2023, 06:38 AM
|
#12
|
|
Junior Member
Join Date: Jun 2023
Location: New York
Posts: 15
SUN #13709
|
T-2653: Moisture in back wall
Good morning JohnB,
I appreciate the time and well written responses, indicating pros and cons to each option.
At this point, to prep for our upcoming camping trip, we would like to try the application of new lap sealant method , specifically at the back area of the camper (corner joints, around the window, running/signal lights, and roof-wall joint), then if time allows continue on roof where dry/cracked sealant exists around through-the-roof accessories (a/c unit, roof vents, antennas, etc and along the side edge and front seams).
The tarp is helping as we have it, but for actually camping, 1, that saying, You might be a redneck, if
comes to mind and Id rather not be THAT guy with a tarp over his camper, in a State Park. And 2, if we do decide to do the complete restoration process of at least the rear wall in near future, at least wed have better peace of mind that rain is not continuing to infiltrate into the seams.
I checked on Amazon for the Dicor and can purchase it there,, however, some of the reviews say that when it arrived the tubes were broken, so I am reluctant. I have checked local rv dealerships and they either dont have it in stock, or dont carry it. I can order it through Camping World website for $9.50 (for a 10.3 oz tube of the leveling type for roof) and $8.49 ( for a 10.3 oz tube of the non-sag type for the vertical seams). How many tubes of each would you recommend getting to have enough ?
I can get a gallon of mineral spirits and denatured alcohol at our local Lowes. Fortunately, I already have a heat gun. Ill be rounding some edges of scrapers/chisels later today as prep work.
Thanks also, for your included repairs, restoration projects and techniques. With ALL YOUR PHOTOS of the steps taken! Wow, in itself, if this forum continues til the end of time, one sure, has and will be an excellent reference to future generations- WELL DONE!
Whatever techniques you can provide in cleaning of areas, removal of old sealant and application of new Dicor would me most welcome. I have views the link for applying the Dicor along vertical seams and the wet finger-tapping technique. Very clever!
And I will be reviewing the other links youve already provided in this thread to glean from you knowledge.
Chrisco1963
P.S. I have decided to not take the chance with my current tire situation and go ahead with the purchase of new ones. Any recommendations on brands? The current ones are TowStar 205 75 R15, with a Load Rating D 8-Ply Radial tire. Rims are 5hole 4.5 lugs (I believe, but Ill check pamphlet in my Manuals Notebook to see if it states it for sure).
Also, should I also replace the rims, or just the tires?
__________________
|
|
|
|
|
07-08-2023, 07:32 PM
|
#13
|
|
Moderator
Join Date: Nov 2006
Location: Ohio
Posts: 12,656
SUN #89
|
Hi Chrisco1963,
First off, thank you for the good words. Very much appreciated. Helping good camper folks trying to help themselves is rewarding for me. And the pics really help a lot also. Words can often mix up the meanings, but the picture makes it all that much more clear.
Good decision on doing the caulk sealing on the back wall. This buys you time, knowing at least the areas you sealed will stop the leak to not make the situation worse. And you don't have to look like a Redneck" in the campground. 
I have seen blue tarps over the roofs of campers in the campground. Generally on older popups, but not exclusive to pop-ups. It happens.
Getting the caulk tube not damaged, yes, that is a real issue. I gave up using Amazon on butyl tape or caulk tubes. Putting three tubes of caulk in a box 3 ft long 12 x 12" with airbags inside or worse, nothing, the caulk tubes are projectiles sliding back and forth. It's nuts. Butyyl tape is even worse in small quantities.
This is what I do if you cannot find it locally. I use RVUpgrades out of Ohio. These folks, https://www.rvupgradestore.com/shop-...m?Search=dicor
They offer free freight over $99. In my situation, I order enough to buy an entire case of 12; then, I know (have high odds) all 12 will come in a box that is sized tight to not damage the tubes. The box is the same as Dicor shipped them in. I use so much of this caulk I can justify the case. I have bought individual tubes of different colors, and they pack better than Amazon, but still, they also have things dropped shipped from a supplier if they are out of the item in their warehouse. And if they are dropped shipped, then there is a risk, but I would say a lot less risk than Amazon. I have been able to use all small order tubes from RVUpgrades; some had minor damage but were still usable.
Hope many tubes?
For just the back wall, I would estimate 2 tubes of non-leveling, non-sag. On the roof molding for the back wall, that can be 1 1/2" tubes of self-leveling.
As FYI, here is what the entire roof will take since you were thinking about doing a piece at a time to get the whole roof eventually. For the roof on your size camper, 8 to 9 tubes of self-leveling and 1.5 tubes of non-leveling for the gutter rails.
Doing all four siding walls on the camper will take 8 to 9 tubes of non-leveling.
Note: The entire camper tube count would include the back wall area and the back wall roof area.
You mentioned getting a gallon of mineral spirits (MS) and denatured alcohol (DNA) at the hardware store. You do not need the MS and DNA to clean the walls for now. Ideally, you do not use it now, you can use it, but then it comes with extended dry time. I'll explain.
To clean the exposed putty tape on the siding joints, the dirt, and mold need to be removed after scraping. Yes, you can use mineral spirits on a rag that will cut everything, dirt mold, and anything else left, but there is always a but... the MS gets absorbed into the putty tape under the molding, and it will start to turn gooey if new Dirco is put over wet MS. The MS also will dissolve Dicor, and we use the MS on purpose when cleaning the moldings, windows, siding, etc. when they are off the camper in the repair-restoring process. We use it to clean it all off totally.
If you use it now on the siding joints, I have found you have to wait three days for the MS to evaporate out of the exposed putty tape and not have this gooey situation happen. I learned this the hard way.
I will explain what I recommend for cleaning the siding joints in the next reply with tips and pics on scraping and cleaning before caulking that you can clean and caulk the same day. We do not use MS.
On the tires, Good choice to change them now. Do not forget the spare tire; it might be the original from Sunline. Your camper came from Sunline with ST205/75R15 load range C. That said, I have no objection to using load range D, on your model camper. But if you go D, you should air them up to 65 psi cold pressure, not the 50 psi of the LR C's. On this C load range to D, see this post where we discussed this. https://www.sunlineclub.com/forums/f...res-20657.html
Again, going to the D load range is not bad; understand why you are and what pressure to run them at. The extra capacity does help ward off interply shear in the tires.
Your question on brands of ST trailer tires. This is a very personal thing, some have their brands and have had good luck with them, and I am not stating otherwise, but here at the three, I would recommend.
Not in any order of being better:
1. Goodyear Endurance. The Good Year in your size will only come in D; they do not offer C. https://www.goodyear.com/en_US/tires...ire/24464.html
2. Maxxis M8008 Radial trailer tire. There still may be a 65 mph speed limit on these. This is not an issue in my case, as I only tow at a max of 60 mph for safety reasons. I have used these in the past and had no failures, but at year 5, the weather-checking cracks can show up in the treads and sidewalls more so than in other brands. https://www.maxxis.com/us/tire/m8008-plus-st-radial/
3. Carlisle Radial Trail HD. And only this HD type on a Trailer Trailer. https://www.carlislebrandtires.com/o...dial-trail-hd/
The Carlisle may be the lower cost of the three. Discount Tire sells them in our area. Or they can be ordered from Jeg's.com as they sell them for race car trailers.
I use the Carlisle Radial Trail HD ST tires on my 10K flatbed trailer and all my project campers. I also have my family members using them on their travel trailer campers. I no longer use ST trailer tires on my big T310SR Sunline, a 10,000# loaded camper. I switched to LT commercial truck tires after ST trailer tire failures in my load size. All the ST and LT tires I use are sized in load range to make sure I have at or over 20% extra reserve tire load capacity over the heaviest loaded tire to ward off interply shear, which can tear the tire apart in turns on a tandem or triple axle setup. In some cases, what Sunline out on has the extra required reserve, other times I had to upsize the load size.
I change all trailer tires, ST or LT, after 5 years. This goes with the brand recommendation above.
Wheels, yes, yours are rusted. They look original. I'm assuming they may be power-coated paint which the new ones are. What I have found on the wheels is that rust starts after 15 to 20 years, and if they are powder coated, once the rust starts, it wicks up rust under the paint, and you do not see it. If you go to wire brush them to paint them, you end up brushing off 75% of the paint that fell off from the brushing, and 75% of the wheel is rusted. That only looked like 15% rusted before I started. I gave up on this and bought new rims when they got 15 to 20 years old and had moderate rust.
Here is the brand rim I would recommend if you go with steel wheels. Dexstar. They are a good quality wheel. The last set I bought in Feb. this year, was still made in USA. https://www.dexstarwheel.com
Etrailer sells them in your size. https://www.etrailer.com/Trailer-Tir...r/AM20422.html. They have free freight for over $99
Your wheel size would be 15" with 5 lug on 4.5" hole centers.
Your choice if you want to go to new wheels now. Think of it this way, you are putting on new tires that will last 5 years. Can you paint and save your wheels to last another 5 years?
More tips for cleaning in the next reply.
I hope this helps.
John
__________________
Current Sunlines: 2004 T310SR, 2004 T1950, 2004 T2475, 2007 T2499, 2004 T317SR
Prior Sunlines: 2004 T2499 - Fern Blue
2005 Ford F350 Lariat, 6.8L V10 W/ 4.10 rear axle, CC, Short Bed, SRW. Reese HP trunnion bar hitch W/ HP DC
Google Custom Search For Sunline Owners Club
|
|
|
|
|
07-08-2023, 11:05 PM
|
#14
|
|
Moderator
Join Date: Nov 2006
Location: Ohio
Posts: 12,656
SUN #89
|
Here are a few tips on cleaning the siding joints with exposed putty tape prior to sealing them with Dicor or other caulking.
You first start with a scraper. You want a plastic non-marring scraper not to scratch the siding. Any stiff plastic scraper will work; I use these as they have worked out well for this task. They come in a set of four. https://www.harborfreight.com/4-piec...set-95832.html
You see a new longer set next to an older, shorter set. These do last; I have repaired/restored 16 campers with the first set and am now working on the second set. When the ends are dull, I can tell as they do not cut as easily; I take them to the bench grinder and sharpen them. While the set has a large, approx 1" wide scraper, I have not used it much, but I do the other 3 sizes.

Here is a window that needs to be sealed. While this is a window, the same process works on any other putty tape-sealed item, (moldings, doors etc.). You can see excess old putty tape pushed out between the window frame and the siding.

Looks like this close-up; note the black yuk-looking area. That black is dirt and mold and must be cleaned to allow a good bond with the sealant.

Using a sharp plastic scraper, you push and trim off the excess. Angle the scraper to cut clean and create a small V as best you can into the old putty tape. As the old tape peels off, it can expose a cleaner-looking putty. The black will remain where the putty is slightly recessed, and the scraper can not escape.

You will find the scraper tip will get dull and rounded with use. It will mash so to speak, rather than cut and take more power to cut the old sealant away. When this happens, sharpen the tip of the scraper and go again. A sander or bench grinder works well. Even a hand-flat file can work.
A close-up of the amount you can scrape. The high spots of the siding scrape close to clean, the depressions not so much.

Here is another window to show. This one has a lot of black mold/dirt on all the exposed putty tape.

Here is the first pass at scraping.


Now to the top of the window where the siding has no grooves/corrugations. This area is a lot easier. A sharp scraper peels the old putty tape right out of the joint. Hold the scraper on an angle to create a V in the old putty tape. This V allows the new caulk to reach in better.


Once you have scraped off all you can, you clean the joints. This cleaning is a two-part cleaning process.
1. I suggest starting with a cleaner you can mix and rinse off with water. You are going to clean the joint. You are after getting the dirt out of the joint. To get the white siding clean back to white, I use a product called; LA's Totally Awesome. Awesome All Purpose Concentrated Cleaner (32oz) | LA's Totally Awesome
You can find it at Dollar General. The cleaner comes in concentrated form, which you dilute to your needs. There is a method that needs to be followed to have good results.
A. Do not do this cleaning on hot sun mid-afternoons with hot siding. Everything dries too fast. Cloudy, early morning, and early evening are best, or on cooler 50F days if you are early in the year.
B. Mix up in a bucket an Awesome/water mixture.
C. Hose rinse the area to be cleaned. The wall needs to be wet all the way to the bottom of the wall, as the cleaner will run downhill.
D. Scrub the joint to remove dirt using a medium, stiff-bristled scrub brush. Start at the top and work your way down. The odds are high that the black mold will remain, but the dirt will be washed out.
E. Right after scrubbing the joint, rinse the wall well with water all the way to the bottom. Do not let the cleaner dry on the wall. Do small enough areas so the crud does not dry back on.
F. To enhance getting black streaks out of the siding near the joint, use a Mr. Clean Magic Eraser dunked in the water/Awsome mixture and gently rub/scrub the siding and the molding or window frame. Again rinse well before and after the cleaning action.
Notes: Do not spray full strength Awesome on the dry siding. It will run down and leave white streaks; if left long enough at full strength, it can remove the paint. Always wet the wall first. The wetting action creates a diluted strength.
Heads up, work small areas, then rinse and go at it again. The curd runs downhill and will dry below you. Work from the top down, but pending the drying conditions, do 2 or 3-foot sections, then rinse, start over, and keep going.
2. Once the area is cleaned for dirt, you have to remove the mold. The drying conditions go for the demolding process, do not do this on hot siding on a hot summer day.
A. Mix-up solution of water and fresh household unscented bleach. Mix 3 parts water to 1 part bleach. You will only need to create about 1 to 2 qts of mix. Create more as needed.
B. Using a small brush, an old toothbrush is OK; apply the beach solution to the exposed black putty tape. The solution takes time to work. Keep it wet for 10 to 15 minutes.
C. After the soak time, scrub with more bleach solution as needed. The black mold will go away with enough scrubbing with the solution and time to soak. Rinse very well when done. DO NOT let the bleach dry on; keep it wet with bleach solution. You will see the color of the old putty tape appearing. Sunline changes types over the years; some are gray, some more white, and some tan.
NOTES: Do not bleach the decals. If decals are in your path, rinse well; any bleach over-spray onto the decals soon after it gets on the decals. Do not let the bleach soak on a large area of the decals. The bleaching can fade the decal.
Remember to rinse well, and do not let the bleach solution go dry on the siding. Only do enough areas you can keep track of.
Once you have completed the cleaning process and the walls are dry, you can apply the Dicor sealant.
Do not apply the Dicor on hot siding or full sun; it will dry quickly and shrink/wrinkle.
__________________
Current Sunlines: 2004 T310SR, 2004 T1950, 2004 T2475, 2007 T2499, 2004 T317SR
Prior Sunlines: 2004 T2499 - Fern Blue
2005 Ford F350 Lariat, 6.8L V10 W/ 4.10 rear axle, CC, Short Bed, SRW. Reese HP trunnion bar hitch W/ HP DC
Google Custom Search For Sunline Owners Club
|
|
|
|
|
07-08-2023, 11:06 PM
|
#15
|
|
Moderator
Join Date: Nov 2006
Location: Ohio
Posts: 12,656
SUN #89
|
More on the roof cleaning tips on Sunday
__________________
Current Sunlines: 2004 T310SR, 2004 T1950, 2004 T2475, 2007 T2499, 2004 T317SR
Prior Sunlines: 2004 T2499 - Fern Blue
2005 Ford F350 Lariat, 6.8L V10 W/ 4.10 rear axle, CC, Short Bed, SRW. Reese HP trunnion bar hitch W/ HP DC
Google Custom Search For Sunline Owners Club
|
|
|
|
|
07-10-2023, 05:37 PM
|
#16
|
|
Moderator
Join Date: Nov 2006
Location: Ohio
Posts: 12,656
SUN #89
|
On the roof, scrape and clean; sorry, I'm a day later than I wanted. Too many things on the go. This maybe help.
Removing old sealant and applying new on the roof.
The roof molding and parts of the roof need to be prepped and cleaned as required for the new lap sealant to bond to the rubber membrane and the molding/flanges. When the old lap sealant is deteriorated, removing the old one and installing a new one is a better approach for a lasting seal. Applying new caulk over deteriorated sealant will not create a lasting bond. Apply new sealant over cleaned older sound nonheavy split sealant is OK, but you have to get all the dirt and mold out of the joints, or the new sealant will not create a totally good bond.
The rubber roof membrane and the aluminum moldings or roof-mounted flanges that touch the new lap sealant need to be clean “enough” that the sealant will bond directly to the roof membrane and moldings/ flanges. The area about 1” or more from the adjacent molding/flange needs to be cleaned for the rubber roof. You do not have to clean the whole roof now, just the area where we will apply the new sealant.
You must assess what method you will use or a combo of both; the rubber and moldings will need to get them clean enough. Let me explain; clean enough.
The goal is to scrape off the old lap sealant from the moldings/flanges as the first part of the prep work. It “depends” on how clean the scraping process left the molding and if further cleaning is needed. If the scraping leaves the molding with clean well-adhered traces of lap sealant and no dirt or mold, you do not have to remove 100% of the old sealant. The molding must be cleaned to leave no dirt, loose old sealant or mold in areas next to where the acceptable leftover traces of sealant exist, as they will contaminate the bonding of the new lap sealant.
The rubber part of the roof also has old lap sealant, dirt, and mold. If the sealant is deteriorated, you can scrape the old lap seal off, and again it needs to have a good sound base to bond the new sealant to. An area of approx. 1” of the roof beyond the old sealant needs to be cleaned, as when the new sealant is applied, it will flow over into this cleaned zone.
There are two methods to clean the dirt and mold; you need to assess which to use.
Method 1. Using a water-based cleaner with a scrub brush to get the dirt off. Follow the dirt cleaning with a bleach-water solution mixture to de-mold the area. You can use the same process as the siding cleaning and putty tape demolding (as stated in the reply above) using either laundry detergent (Tide) in water or the Awesome. Rinse well, let it dry, and then do the 3 parts water to 1 part bleach mold treatment process. You will scrub both the moldings and the 1” area or larger of the rubber roof. Scrub gently on the rubber as you remove too much of the white shed layer on the rubber membrane with heavy scrubbing. Let the cleaner do the work; the brush is only to assist. With this cleaning method, you can apply the new lap sealant when the process is completed and dry. NOTE: If you use the Awesome, remember to water rinse the walls before doing the roof and immediately after, as some cleaner will run down the walls and can cause streaking. Clean small areas and rinse.
Method 2. If heavy dirt is embedded into the roof membrane and old sealant, the Awesome or laundry detergent will not clean it very well. Use a rag with mineral spirits (MS) on the rag in a "spot" treatment cleaning method. Dip a section of the rag in MS, wipe on, wait a few minutes, then scrub with the rag. (Not a scrub brush). Reapply MS as needed. Do not let the MS soak for a long time or dry on the roof, do not use MS on large areas, as it is not to be used for general roof cleaning, only spot treatment.
Once the MS cleaning has removed all the dirt and mold, wipe dry any excess MS. Following this with a high flash cleaner to remove MS residue. Suggest using Naphtha or denatured alcohol to remove the MS. If you have access to buy the Naphtha, use it over the denatured alcohol. While both cleaners will remove the excess MS, the Naphtha has mild cleaning dirt properties. The alcohol will only remove the MS residue and not clean any dirt.
Here is an example of heavy embedded dirt on a tank vent cover over the roof Lap sealant.

Cleaned with MS.
If you scrape the old sealant off and see an exposed edge of butyl tape under the moldings/flanges, MS can migrate into the butyl. After the high flash cleaner final clean application, let the roof dry to evaporate off any MS absorbed in the butyl tape for 2 to 3 days before applying the new lap sealant. If you do not let the MS evaporate off and apply new lap sealant, you risk the new sealant and the butyl tape dissolving into goo. If no exposed butyl was seen, then you can apply new lap sealant when the surface is dry after the high flash cleaner wipe down.
Here are some tips on scraping the old sealant off.
Start with a 1” wide, stiff metal blade scraper. Dull over all edges to not dig into the roof rubber or scratch the white molding paint. Use a bench grinder, sander, or file to round over all edges.
A simple one or two-speed electric heat gun, 1,200 to 1,800 watts, is your best friend when scraping off old Dicor. Gently warm the old sealant, then push the scraper into the caulk to scrape and dig it off. More heat makes the push easier, but too much heat creates goo and a risk of burning the paint or rubber. You will get a feel for how much heat is enough. You may only need a little heat on very hot summer days in the sun. More heat is needed on colder spring days in the 40’s and 50’s F.
Keep the heat gun moving, do not focus on one spot for very long; you will burn. Use the lower heat setting until you find the right heat and travel speed combination. You can use high heat when you have sorted out the right about of heat.
Point the heat gun toward the area to be scraped so you are heating ahead of the scraper.
Here are a few pics of the process.
This one is a front seam; you warm up the old sealant, lay the scraper close to flat to the rubber area, and gently wiggle and push. You want to avoid digging the rubber. The front metal siding can take a little more pressure by pushing at metal, not rubber. Once you get a bead of old sealant to roll up, keep the heat ahead of the putty knife and keep pushing.

Here is a rear seam. You heat and push the same as I did on the front seam. The screw heads, warm the caulk mound and work the putty knife around the head of the screw to dig up the old sealant.

All this outer perimeter work can be done from a solid step ladder. When you need to service the roof's middle, lay a tarp down to protect the rubber, then place 3/8 to 1/2" small sheets of plywood to span the rafters to kneel on. I use 30” wide by 42” or 24 x 48” sheets. Wide enough to span the approx.16” on center rafters yet light enough to carry up the ladder.
See here for more on the tarp and plywood setup.
https://www.sunlineclub.com/forums/f...1-a-11508.html
Hope this helps
John
__________________
Current Sunlines: 2004 T310SR, 2004 T1950, 2004 T2475, 2007 T2499, 2004 T317SR
Prior Sunlines: 2004 T2499 - Fern Blue
2005 Ford F350 Lariat, 6.8L V10 W/ 4.10 rear axle, CC, Short Bed, SRW. Reese HP trunnion bar hitch W/ HP DC
Google Custom Search For Sunline Owners Club
|
|
|
|
|
07-10-2023, 06:25 PM
|
#17
|
|
Moderator
Join Date: Nov 2006
Location: Ohio
Posts: 12,656
SUN #89
|
Here is something you might want to do. In this left rear corner, the top chord on the rafter is rotted. The screws cannot hold the molding down to the roof. The end wall molding has lifted and will keep lifting.
As a stop-gap measure, once you scrape off the old Dicor sealant, you can access the screws that hold the molding down. They will all be very loose or thread rotted. New screws of the same length will have nothing to bite into.
I have a 2007 T2499 as a project camper half torn apart in my back barn. It has major water damage, but the rear end wall rafter is still intact; I took a few pics of it to help show you how longer screws may help. You are trying to get a longer screw from the top of the molding into the top wall plate wood, assuming the top wall plate has some strength. The top wall plate is 1" tall by 1 1/2" depth of the wall.
At the left-most end of the wall. 3" is the top of the rafter to the bottom of the wall plate; in the center, it is 5 1/2". If you can get some no. 8 or no. 10, screws long enough; they can reach from the top of the roof down into that top wall plate to hold your rear molding down better until you get to repairing the back wall.

3" at the left side

5 1/2" at the center

Hope this helps
John
__________________
Current Sunlines: 2004 T310SR, 2004 T1950, 2004 T2475, 2007 T2499, 2004 T317SR
Prior Sunlines: 2004 T2499 - Fern Blue
2005 Ford F350 Lariat, 6.8L V10 W/ 4.10 rear axle, CC, Short Bed, SRW. Reese HP trunnion bar hitch W/ HP DC
Google Custom Search For Sunline Owners Club
|
|
|
|
|
07-13-2023, 06:11 PM
|
#18
|
|
Junior Member
Join Date: Jun 2023
Location: New York
Posts: 15
SUN #13709
|
Solaris T-2653: Moisture in the back wall
JohnB,
First and foremost
thank God for you and your wisdom!! Im not sure what I wouldve done to repair this camper without you vast knowledge, encouragement and step-by-step pictures.
Today, I took the time to start working on my back wall, vertical corners around window and marker/signal lights. I started by scraping the seam tape from under each part as you described (our local Harbor Freight had the non-marring scrapers in-stock). Then once that was cleaned out, I proceeded with cleaning of the dirt from those areas (I found the Awesome at our local Dollar General), with diluted solution. Again per your suggestion, frequently wetting the whole back wall with straight water. Next step was applying the bleach solution to get rid of the mold.
I followed your steps and was able to get reasonable results. Ill let it all dry for a couple of days, then Ill begin with the Dicor sealant (this too , I was able to pick up at a local RV dealership -shout out to Steves RV in Potsdam, NY!) process. Once that is completed on the vertical seams and around the window and lights, I will allow time for the Dicor to cure (at least couple of days), then Ill begin to tackle the seam and raised angle piece at the roof joint.
In between steps, Ill keep the tarp in place as weve been having a lot of rain lately.
Its getting down to the wire before we go camping with it on July 23 for two weeks, but hopeful that it will be ready.
I am assuming that by applying the Dicor in the vertical seams and around the windows first before tackling the top seam, is best so that dirt and mold from top seam doesnt get in the already cleaned vertical areas. (?) is a couple of days sufficient time before cleaning top seam? Meaning any water/chemicals running down while I clean the top areas is ok to be in contact with freshly applied Dicor?
On a side note, the rims and tires I ordered from eTrailers and Jegs, respectively arrived today. Ill get those mounted and balanced in the next day or two I ended up getting 4 Dexstar rims and the 5 Carlisle Tires. The spare rim looked to be good (as in no rust spots or bubbles in the powder-coating).
. Also, Ill be installing a new tongue Jack as well as the one thats on it now, has seen better days.
-Chris
__________________
|
|
|
|
|
07-13-2023, 10:06 PM
|
#19
|
|
Moderator
Join Date: Nov 2006
Location: Ohio
Posts: 12,656
SUN #89
|
Hi Chris,
Thank you again for the really good words. I'm humbled. . You are very welcome, and I am glad to help. We all learn from each other.
You are doing great! Now to your questions.
Quote:
Originally Posted by Chrisco1963

snip...
I am assuming that by applying the Dicor in the vertical seams and around the windows first before tackling the top seam, is best so that dirt and mold from top seam doesnt get in the already cleaned vertical areas. (?) is a couple of days sufficient time before cleaning top seam? Meaning any water/chemicals running down while I clean the top areas is ok to be in contact with freshly applied Dicor?
-Chris
|
Since you are working outside, you have to alter your approach to meet the needs. Yes, if rain is coming, for sure put the trap back on. Your thought process is good, to have the lower part sealed up so water and cleaning chemicals do not infect what is below.
Taking that approach here is what Dicor states as their cure time and what % in stages. https://dicorproducts.com/product/no...-lap-sealants/. Click the installation tab. It states:
Quote:
Dicor states:
Approximate Lap Sealant Cure Times: (approximate times for 50-70° F weather)
5 Minutes Skins over
4 Hours Waterproof
48 Hours Cure 80%
30 Days 100% Cure
|
It states, In 2 days, you are at 80% cure. Waterproof in 4 hours. This cure time question has come up before. From my experience with dealing with Dicor, I agree it can be waterproof in 4 to 8 hours, but, heads up, it will be soft. It won't leak but will be soft as we apply it thickly to caulk the corner joints, windows, etc. Take care when putting the tarp on and off that it does not rub hard on the caulk as it is soft.
If you can wait longer than 24 hours, it gets more abuse-proof. So if you are up against time, you could start cleaning above at 24 hours, just 48 hours, buying you more margin. Just remember to let it rain gently down with the water spray over the newly applied Dicor, do not give a direct concentrated hose hit.
The bigger heads-up is when you apply the self-leveling sealant when you get up on the roof. That caulk bead will be very thick and must be to be effective. Be careful when pulling the tarp over that area; do not rub the caulk if you can help it with the tarp. Maybe put a 2 x 4 on the roof to hold the tarp away from the caulk until it gets several days of curing. If there is no forecast for rain, leave the tarp off. Again in 4 to 8 hours, it will be waterproof; it is just soft.
You are doing great; keep up the good work.
John
__________________
Current Sunlines: 2004 T310SR, 2004 T1950, 2004 T2475, 2007 T2499, 2004 T317SR
Prior Sunlines: 2004 T2499 - Fern Blue
2005 Ford F350 Lariat, 6.8L V10 W/ 4.10 rear axle, CC, Short Bed, SRW. Reese HP trunnion bar hitch W/ HP DC
Google Custom Search For Sunline Owners Club
|
|
|
|
|
07-13-2023, 10:57 PM
|
#20
|
|
Moderator
Join Date: Nov 2006
Location: Ohio
Posts: 12,656
SUN #89
|
Quote:
Originally Posted by Chrisco1963
On a side note, the rims and tires I ordered from eTrailers and Jegs, respectively arrived today. I’ll get those mounted and balanced in the next day or two I ended up getting 4 Dexstar rims and the 5 Carlisle Tires. The spare rim looked to be good (as in no rust spots or bubbles in the powder-coating).
. Also, I’ll be installing a new tongue Jack as well as the one that’s on it now, has seen better days.
-Chris
|
Yes, I have bought from Jegs also, and they delivered right to the house.
A few things to help the cause, In case you did not know about trailer wheels. If you bought load range D, which is 65psi, request high-pressure stems, and they would be snap-in stems. They will likely not cost you any more, but they will hold up a lot better than the regular stems, but you have to ask for them, or the shop may give you standard snap-in stems. If you are considering adding a tire pressure monitor (TPM) at some point in the future, request all metal stems now, as the added weight of the screw-on aftermarket TPM sensors can fatigue the rubber stems. If you plan on towing a lot, getting a TPM is a good thing. I do use one. If you do not have a TPM, manually check the pressure every time you go on a trip and air up to max cold side wall pressure before you start the trip.
Next up is lug nut torque. 100 ft. lb on dry threads is the target for your 1/2" -20 fine thread wheel studs. Make a star-torquing pattern. And most important, since trailer wheels are lug-centric (which means there is no center machined pilot on the brake drum like an auto to hold the wheel), the lug nut holds all the weight and keeps the wheel on. As such, the lug nuts must be checked three times after a wheel is installed. There are different guidelines on the miles, but this guide does work.
1st check: 20 - 50 miles from installation. (the most important one)
2nd check: - approx. 100 miles after the 1st.
3rd check: - approx 150 miles from the 2nd check.
If, on the 3rd check, no lug nuts take any more torque, then you are good. If they do, then go a 4th time or more times. If one nut keeps taking torque after about five times, the threads are stripped in the nut or the wheel stud, and it needs to be repaired.
Your new wheels will have paint in the lug nut chamfered hole. That paint has a thickness and will squirt out as time goes on. Newly painted wheels are prone to not being tight after installation because the paint needs to be swedged out. Even wheels that have been on before still have to be fully seated. It takes re-torquing checks to accomplish this.
The Harbor Freight 1/2" drive torque wrench will work for wheel lug nuts if you do not have a torque wrench. They have them on sale sometimes for less the $20. and keep it in the camper with a 13/16" socket and a short extension to reach into the wheel.
When you screw on the lug nuts, stop and take the nut off if you feel one starting to get hard to tighten before it reaches the wheel. The threads can gall when this happens, and in the bad luck case, the stud threads get messed up, and you have to change the wheel stud. Having had this happen, I run a 1/2"-20 fine thread tap through the nuts before putting them on when working on older campers. The issue is the cone end of the lug nut gets swedged, and the thread is tighter and more prone to gall. I do the tapping in a vise, starting the nut on the tap (start at the non-cone end with the tap) first out in the open, then putting the nut in a vise, using a cordless drill motor with a clutch on low setting, and running the tap in and out. You will see it cut a sliver of metal when it goes through the cone. NOTE: Start the nut on the tap first, then put it in the vise. You can mess up the nut cross threading it with the tap if you try to start with the nut in the vise first and screw it in with a drill motor.
Hope this helps
John
__________________
__________________
Current Sunlines: 2004 T310SR, 2004 T1950, 2004 T2475, 2007 T2499, 2004 T317SR
Prior Sunlines: 2004 T2499 - Fern Blue
2005 Ford F350 Lariat, 6.8L V10 W/ 4.10 rear axle, CC, Short Bed, SRW. Reese HP trunnion bar hitch W/ HP DC
Google Custom Search For Sunline Owners Club
|
|
|
|
|
|
|
Currently Active Users Viewing This Thread: 1 (0 members and 1 guests)
|
|
|
 Posting Rules
|
You may not post new threads
You may not post replies
You may not post attachments
You may not edit your posts
HTML code is Off
|
|
|
|
 » Recent Sunline Discussions
 |
|
|
|
|
|
|
|
|
|
|
|
|
|
|
|
|
|
|
|
|
|
|
|
|
|
|
|


 Linear Mode

