 |
|
 04-08-2020, 05:57 PM
|
#81
|
|
Senior Member
Join Date: Jul 2012
Location: Ohio
Posts: 1,126
SUN #4040
|
I start by sucking all fluid from master resivovir then bleeding master with clean. then bleed lines one by one till all are clear.
__________________
__________________
Jim and DW Darlene
2001 T-2553 Sunline Solaris
2006 GMC Sierra Duramax 2500HD 4X4
Firestone Transforce AT tires
Reese Dual Cam Sway Control
|

|

|
|
04-10-2020, 09:39 PM
|
#82
|
|
Moderator
Join Date: Nov 2006
Location: Ohio
Posts: 12,654
SUN #89
|
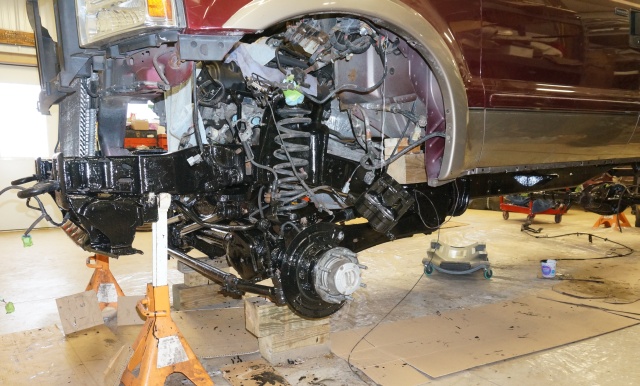
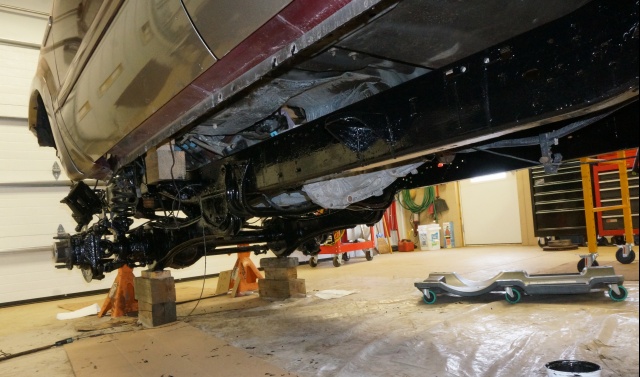
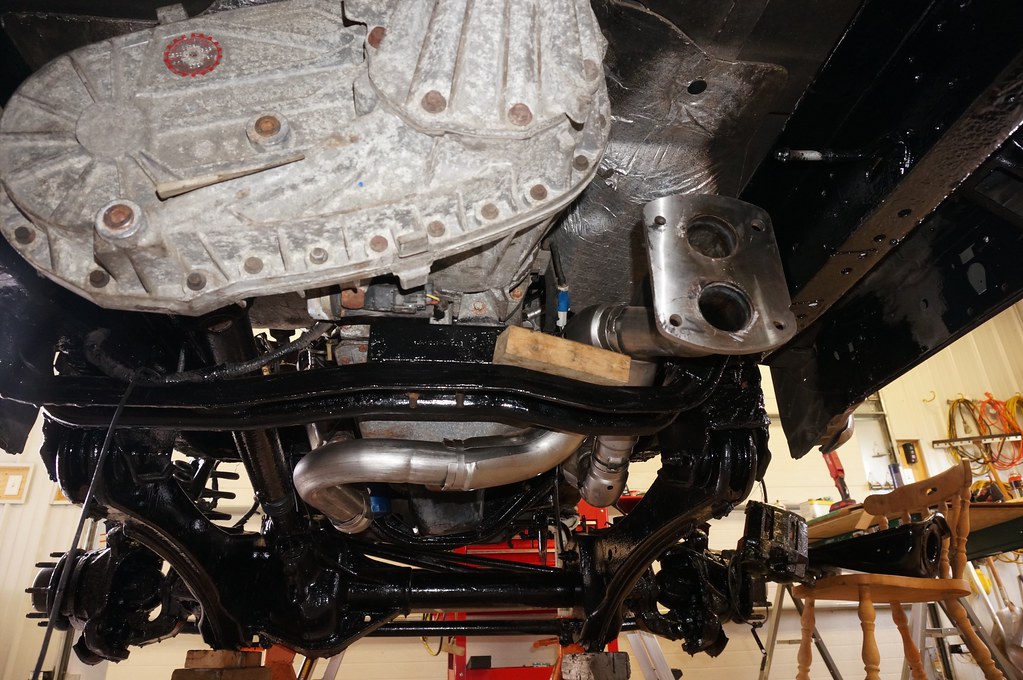
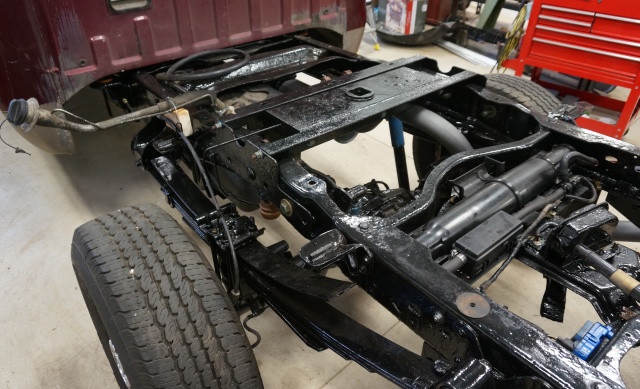
An update on the latest progress. The rest of the truck frame degreased with KBS Klean and then phosphoric acid-treated with KBS Blast from the back wall of the cab area to the front bumper mount. The whitish powder residue is a zinc coating film from the Blast treatment. Sometimes it leaves the white zinc and sometimes not. The zinc coat is all over.

There are lots of knock and crannies in a 4 x 4 front end. That equals a good amount of time to rust chip, clean, treat, and then coat.

Then comes the KBS Rust Seal coating treatment. All of the treated areas get two coats of the Rust Seal. And it takes several hours between each coat to cure to leave no fingerprint test. I started at 32% humidity. That was tough on getting things to dry, AKA lots of hours, ~6 hr wait for the second coat at 65F. Then a rainy day comes, you open up the barn and get 72% humidity and things dry in about 2 hours at 65F. Had to do the frame across four days, partly due to waiting time, the other need, not to get yourself all full of the coating. By letting some areas cure, and not do other areas under the front end, you are less likely to come out all black from bumping into wet areas. The next day you go back and fill in some more until you get all areas.
The frame itself is all done. I still have the right side rocker panel area on the cab yet to do, will do that with the painting of the next parts. Some pics of the outcome.

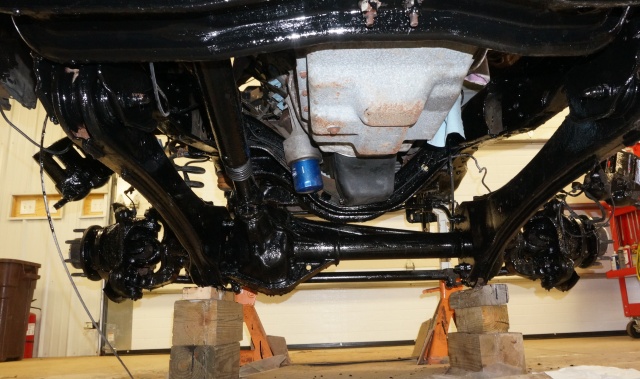

Here is a picture of the LH inside frame rail that had all the fuel, brake, and wire harness lines filling it. If I did not lift the cab, this frame rail would not be able to be coated so nicely. All the lines etc. are hanging in the middle for coating.


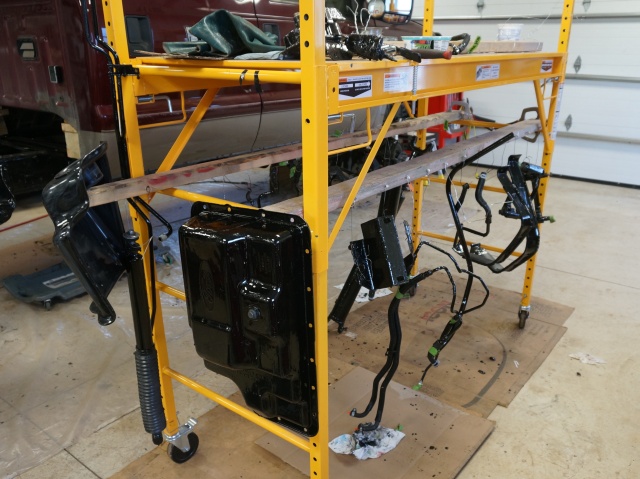
Next steps, some of the new and old parts cleaned, treated, and ready to Rust Seal coat. Yes, I am coating the brand new tranny and power steering lines and other new parts. The rust deterrent Ford uses on parts does not last. Coated, they will give many times better service. 

A few other odds and ends yet to do. A few pics of the steel fuel pump locking jaws all cleaned, acid-treated, and ready to coat. Also, FYI, a pic of the fuel pump saddle bonded to the bottom of the tank. The fuel pump unit fits inside the saddle and clicks into place.

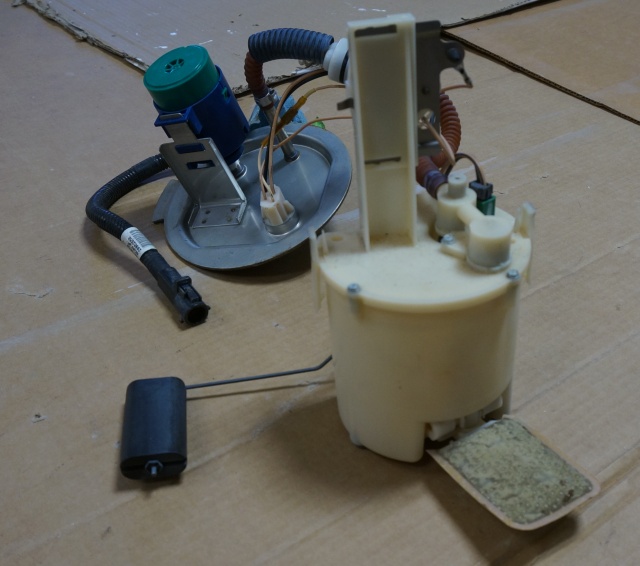
Some pics of the old fuel pump unit. A new fuel pump will be installed. It is all apart now, and it is time to reset the wear clock.

Since I lifted the cab, what about the rest of the cab mounts, including the top mounts? Again now is the time while it is all apart. I ordered new parts to replace the cab mounts, tops, and bottoms. When comparing the overall height of the new tops to the old ones, the older ones are permanently compressed about 3/8 to 1/2. All the top mounts need to be replaced at the same time not to put a bind in the cab when it bolts down. Here is a pile of the old ones.

And the problem child cab mount that seized up coming off, I had to drill the head off. There was no good way to cut it off behind the front seat. Also, for reasons not known, the left side bolts have larger heads then the right side bolts. Yet the urethane upper and lower mounts are the same. See the heads of the left next to the drilled off the right side.

That brings us up to date. To date, I have used 6 1/2 Qts of Rust Seal, and I still need to do the loose hanging parts, the RH inside rocker panels, the B & W 5th wheel hitch, the spare wheel, the bottom of the truck bed and the front and rear bumpers. Plus, the rest of the engine work and putting the whole truck back together. The driveshaft will be rebuilt and re-balanced. Once past the coating process, the rest will go quicker and more fun, putting parts back on.
Thanks for looking.
John
__________________
Current Sunlines: 2004 T310SR, 2004 T1950, 2004 T2475, 2007 T2499, 2004 T317SR
Prior Sunlines: 2004 T2499 - Fern Blue
2005 Ford F350 Lariat, 6.8L V10 W/ 4.10 rear axle, CC, Short Bed, SRW. Reese HP trunnion bar hitch W/ HP DC
 Google Custom Search For Sunline Owners Club
|
|
|
|
|
04-11-2020, 05:29 AM
|
#83
|
|
Senior Member
Join Date: Apr 2011
Location: Maine
Posts: 3,357
SUN #2097
|
The newer trucks cab mount bolts are underneath instead of inside that was one of the improvements in the later trucks. Guess it makes it easier with the threaded ends inside. It is not unusual to find two different vendors of parts I think it's to ensure they have a steady supply of parts my V6 Tacoma had Denzo spark plugs on one side and KYB on the other from the factory. People are going to have to put sunglasses on just to look at that thing when you are done!
__________________
|
|
|
|
|
04-12-2020, 05:18 PM
|
#84
|
|
Senior Member
Join Date: Nov 2015
Location: Ohio
Posts: 141
SUN #7990
|
Quote:
Originally Posted by mainah

The newer trucks cab mount bolts are underneath instead of inside that was one of the improvements in the later trucks. Guess it makes it easier with the threaded ends inside.
|
Maybe easier if it's not rusted. Helped my neighbor with an 06 Chevy, bolts went up from the bottom. Both rear cab mounts the nut broke the weld and then the whole just spun. You have to drill a hole inside the cab floor so you can put a socket on to hold. Spun a front one too, that's in the under cab front support rail, have to cut access in the in the side of the channel.
__________________
Current Camper: 2006 Sunline T-264SR
Previous Camper: 1998 Coleman Mesa
Tow Vehicle: 2002 Chevrolet Avalanche 2500, 8.1L, 4X4
DirecLink Brake Controller, Draw-Tite Ultra Frame Receiver, Reese HP Trunnion Bar Hitch W/ HP DC
|
|
|
|
|
04-12-2020, 05:47 PM
|
#85
|
|
Senior Member
Join Date: Apr 2011
Location: Maine
Posts: 3,357
SUN #2097
|
Not familiar with the Chevy's but up here they are the worst as far as rust. I have been out of the fix it buzz for a long time but my neighbor does body work etc (he is the master of rusty stuff) The Ford fix with the bolts seem to do the trick for them.
__________________
|
|
|
|
|
04-19-2020, 04:22 PM
|
#86
|
|
Moderator
Join Date: Nov 2006
Location: Ohio
Posts: 12,654
SUN #89
|
An update on work progress. Part 1.
Here is almost the end of the parts coating process. It is amazing how long it takes to coat parts. Lots of fine work that takes time. New transmission lines, new power steering lines, new tranny pan, drive shaft parts, brake caliper parts, new tranny dipstick tube, new RH spring tower.

I gave up my paintbrush for wrenches. Now to put some parts back on, YEH!!!
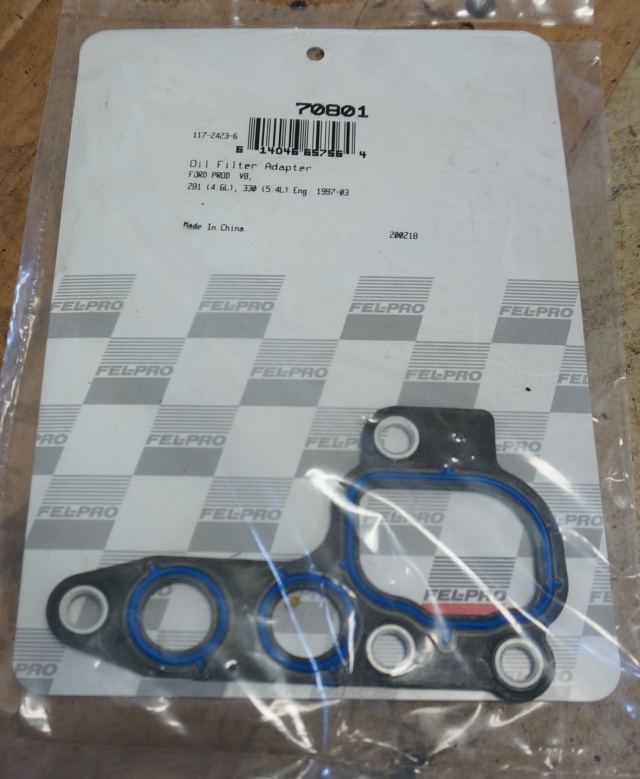
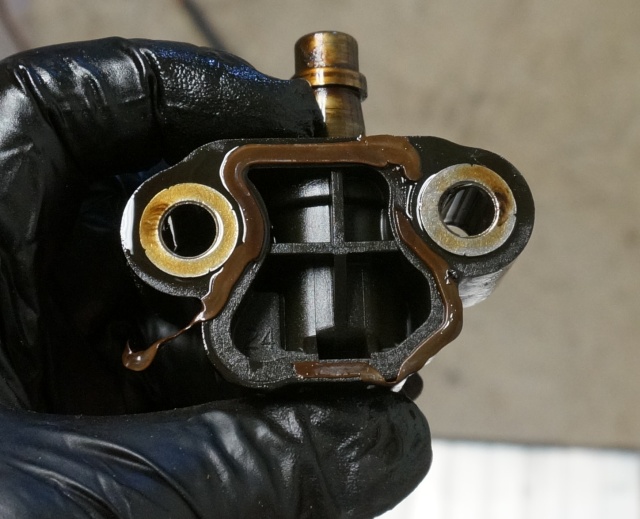
With the cab lifted approx. 7, I took advantage of this to change the oil cooler adapter gasket. The extra room makes changing this $9 gasket a whole lot easier. This gasket is a known leak source, oil, or antifreeze for this vintage truck. The time was right, and I changed it. It did not appear to be leaking. You have to jack up the engine and unhook the engine mounts to change it. Most folks who have done this said they could not get the adapter out of the truck due to the engine hitting something in the firewall area, not allowing the engine mount to come out. With the cab lifted, I could get it out without much issue.
As found


With the engine lifted and the motor mount out

Motor mount


Oil cooler adapter off. Coolant and oil ports
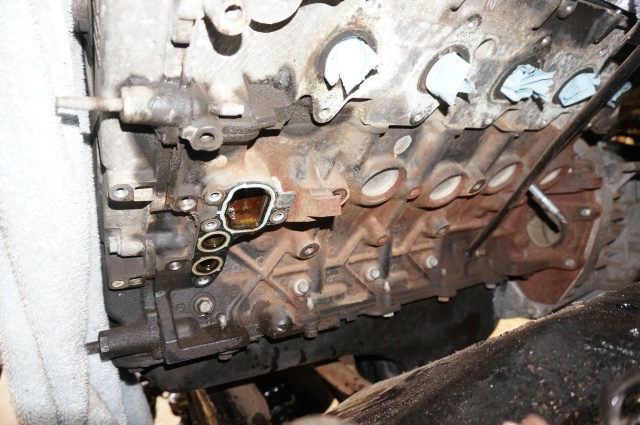
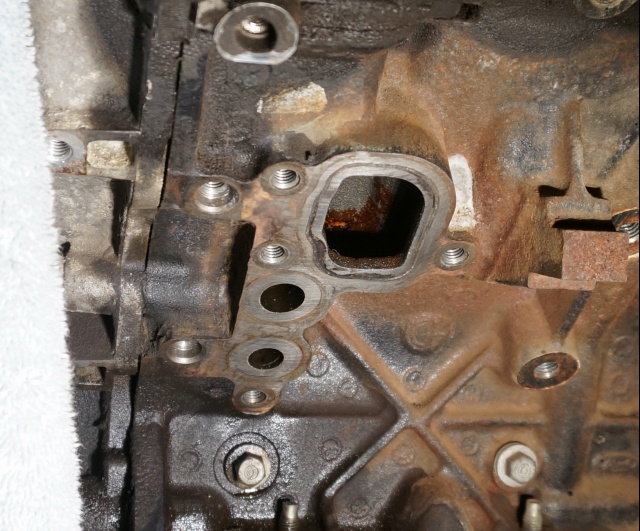
Adapter out in the open. Heads up, oil and antifreeze want just to keep coming out of this thing.
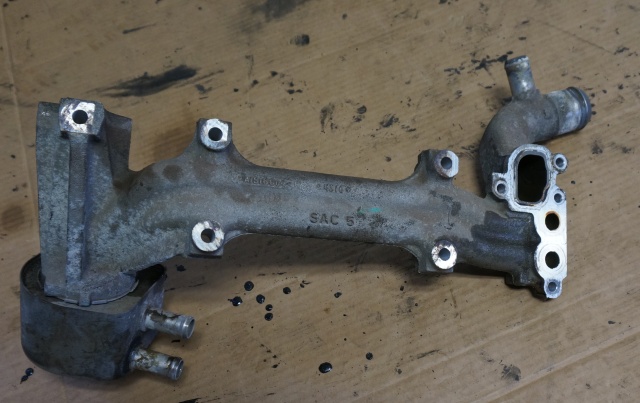
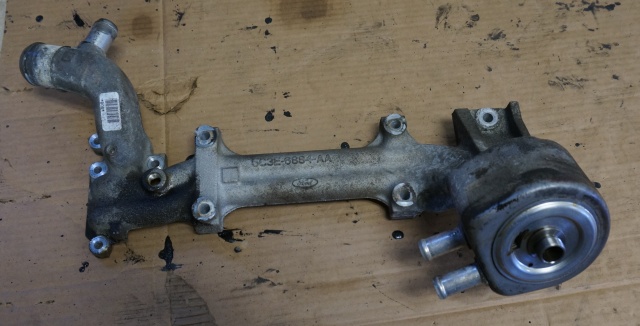
New gasket

Once you get this apart, putting it back together is straight forward.
Next up, the cab/body isolator mount topic. In reading the Ford service manual, it states a new body mount bolt must be installed whenever a bolt is removed. It never said why it just mentions this in many places in the truck body section. On my truck, there are 8, 2 piece (top and bottom) body mounts consisting of 3 different types of urethane/rubber mounts and 4 different bolt configurations. Six of these have the bolt head up in the cab section. The front fender area has the bolt heads on the bottom inside the frame, so the bolt points up like a stud. The bottom of each mount is threaded, and they put some super-duper Loctite on bolts threads. They list a torque spec for each type. It may be that they want to ensure there is always fresh Loctite when being installed to call for all new bolts. Do not know why for sure, so ordered all new bolts. I had 4 already, and bought 4 more.
He is an overview shot of all 8 mounts with the bolts next to them. The right end of the pic is the back of the cab, and the right end is the fender mount with a nut on the end of the stud.

Here is the old top mount compressed to not come back compared to the height of a new one. Seeing the difference in aged height, you do not want to replace one of these top mounts if they are compressed like this. You should change all of them, or the cab will not set even on all the mounts.

I made it to the point to lower the cab back down. I stopped 1 1/2 short of full down to allow some working room in the overhead valve train area. I reversed the method on how I lifted the cab to lower it. Once it was close to the 1 1/2 down, I put a 2 x 4 block between the cab and the mount to act as a spacer. No bolts are holding this in place at this point. I may need to raise the cab again for other work.
Once I got it close the down stopping point, you have to watch the front bumper area cab mount as it is a bolt/stud up from the bottom. They give you a big hole to hit, but I was 2 out of location front to back. I had to reposition the floor jack to roll forward and gave it a push in the back, and it came right in.

The front bumper area can mount. Stud up, bolt head on the bottom.

A top view with the body in the correct place over the stud

2 x 4 block setup with a new cab mount

My new stainless exhaust manifold studs came. I could not find any Ford document that listed the V10 3 valve used these. I did find a TSB on the 5.4 V8 and the 2 valve older V10 for this broken stud issue. This TSB is all I could find to link; there other places that listed the 2 older 2 valve V10, just not the 3 valve V10. https://testing-public.carmd.com/Tsb...24/tsb05-05-04
The TSB calls out the stainless studs and stainless nuts, but that nut part number is discontinued. After enough digging and calling my Ford parts wholesale dealer, they confirmed there was a stainless stud upgrade for my truck even though the parts callout still called for carbon steel studs.
Here are the carbon steel studs, the same as what was in the truck that I bought before knowing to look for stainless. There is a zinc type coating on the studs to make them look silver in color.

Here are the new stainless studs, stainless flat washers which must be used, and the new nuts which I think are carbon steel, but different than the original. Here is the latest Ford stainless upgrade parts kit.

The flat washer is not a standard stainless washer; it is thicker and smaller OD to fit the manifold.
A close up of the new stainless stud (copper color) next to the prior new carbon steel stud. They are slightly different in the lengths but will interchange.

Beechmont Ford in Cincinnati is the parts dealer I use and has been great to work with. I drove down on the first online order shipment as the freight was so high to ship a catalytic converter, and met the online parts person. The rest of the orders were all sent. You have to use this parts portal to get the wholesale pricing. https://parts.beechmontford.com/
All my local Ford dealers wanted to charge me full MSRP or above MSRP pricing. I highly recommend these folks if you need OEM parts. They are a huge full-service dealership. They took back all the new carbon steel studs and nuts, credited my account, and waved the return restocking charge. I never had to even get into, the Ford parts callout stills today lists my truck on the older studs that will fail. All the other parts I have bought that have a revision, I get the revised parts. Just not these studs.
More on the timing chain change out in Part 2, next post
__________________
Current Sunlines: 2004 T310SR, 2004 T1950, 2004 T2475, 2007 T2499, 2004 T317SR
Prior Sunlines: 2004 T2499 - Fern Blue
2005 Ford F350 Lariat, 6.8L V10 W/ 4.10 rear axle, CC, Short Bed, SRW. Reese HP trunnion bar hitch W/ HP DC
Google Custom Search For Sunline Owners Club
|
|
|
|
|
04-19-2020, 10:19 PM
|
#87
|
|
Moderator
Join Date: Nov 2006
Location: Ohio
Posts: 12,654
SUN #89
|
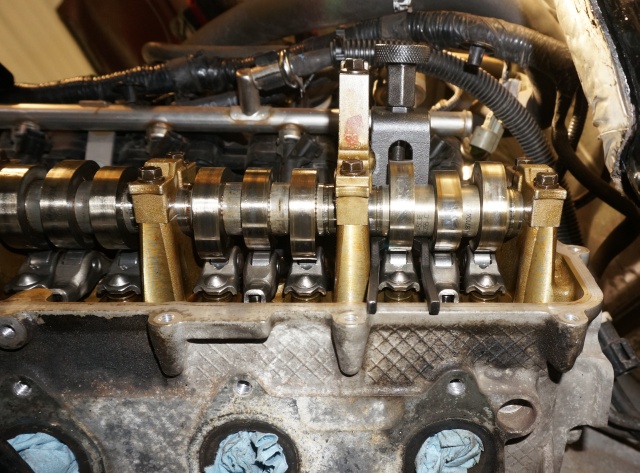
Work progress continued. Part 2 Timing Chain drive.
Here is the start of the timing chain and valve rocker roller upgrade. My vintage V10 has the same inherent issues the 5.4 V8 has of this era truck. I intended to check and upgrade the four areas of known problems for this vintage engine which are:
1. Oil seals leaking in the timing chain tensioner cylinders, reducing oil flow to the overhead valve.
2. Broken plastic chain guides, creating loose timing chain tension and chain mechanical interference.
3. Bearing failures on the valve rocker rollers aggravated by a lack of proper oiling of the bearings.
4. Low oil delivery capacity from the oil pump partly due to pump design and volume capacity as the truck wears.
I’ll do this in pics to make it easier to see. Here is where I started.
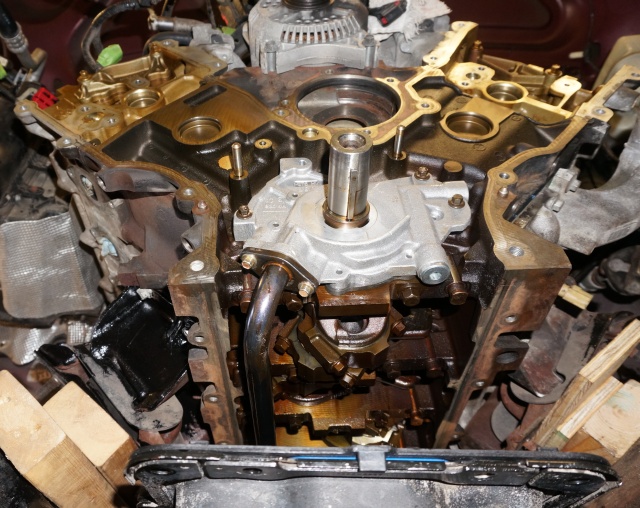
Valve covers off and ready to take the front cover off

Front cover off

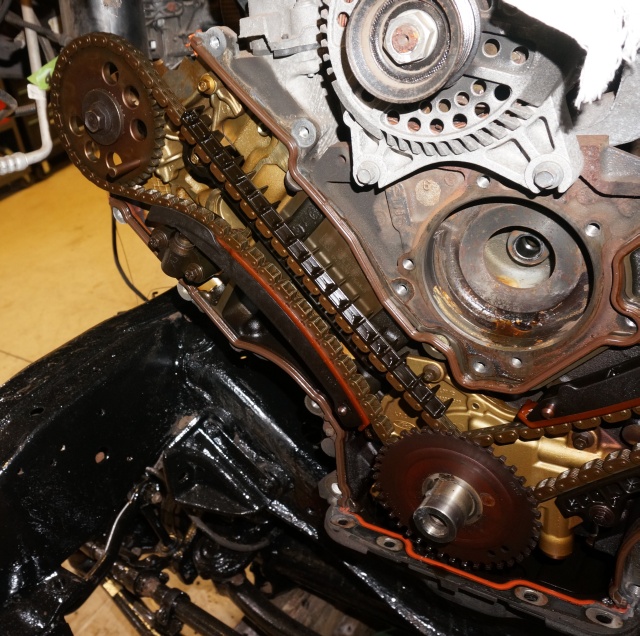
Left side timing chain drive showing chain tensioners and chain guides.

Left side overhead-valve cam drive

Right side timing chain drive showing chain tensioners and chain guides.
Right side overhead-valve cam drive

I removed a small quantity of individual valve rocker rollers to unload the pressure on the camshaft bearings. You position the crankshaft in a particular position on cylinder 1 and remove 7 of the 30 roller rockers, then rotate the crank 180 degrees and remove a few more. This process unloads the valve spring pressure on the camshaft. There is a unique tool made to do this.
The 3 part tool

Tool in place to start compressing the valve spring. You need to push the valve stem down by hand as compress the spring, so the valve stem keepers do not fall off. Right side shown.

With the spring compressed, pull out the roller rocker

The rocker is out, and now you take the tool back out. It goes in and comes out in 3 pieces


On the left side, you take the balance shaft off first then take out the select rocker rollers.

Once those select rocker rollers are out, you can take the timing chain, sprockets, and guides off.

Then remove the camshafts. You can see all the rocker rollers left in that you can take out easily.

All the rockers out

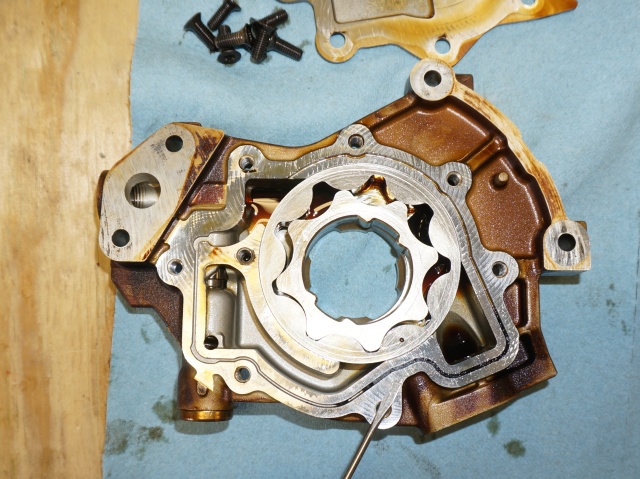
Then to get the oil pump out, which was a challenge. I was able to get the two bolts out of the pump suction pipe without dropping the oil pan, but I am not sure I can get them back in without removing the oil pan.
The bolts for the suction pipe are just below the top of the oil pan. The one closest to the edge was not bad, the one more inside was a bugger, but I got it out. It appears on the 5.4 V8 engine, getting the bolts back in is doable as I have seen it on a video. The oil pump on the V10 may larger and covering more of the inside screws. We shall see. They are different part numbers. I can lift the engine without too much effort now if I have to take down the oil pan to get it back together.

The oil pump suction pipe with the 2 bolts that are the challenge.

And the parts lined up by RH and LH side for inspection.

I have not made it through the cleanup and inspect on all the parts, but I have found an issue already with oil leaks on both timing chain tensioner cylinders. Oil has been blowing by at the leaking gaskets on the tension cylinders, which is the first problem listed above. Finding this now before substantial damage comes, made all this work worth it.
The LH side tensioner gasket failure. The seal break on the bottom left happened when removing the tensioner, but the gasket break on the top right and bottom right were leaking.
See here where the tensioner came off. There is no gasket stain left due to the oil leak at the bolt on the right side of this pic.

And the RH side tensioner in place
RH side removed with a gasket failure at the bolt hole area.

The leak on the top left in this pic on the front of the block

These two leaks are concerning, and I do not know how long they have been going on. When oil blows by at the tensioners, it is not delivering all the volume to the top cam shift drive.
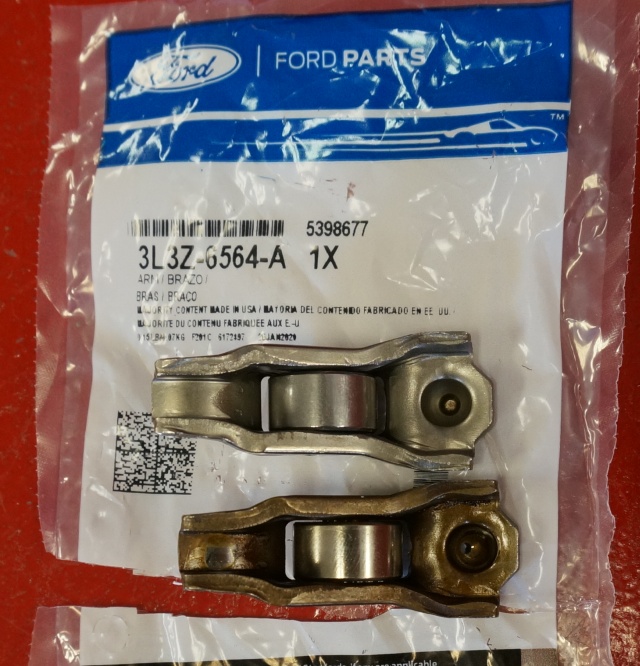
Here is the old roller rocker next to the new. The oil hole, which is filled with oil by the lash adjuster, has changed. The older rocker has a significant sized oil hole pointing more upwards.
The new design has a smaller oil hole pointed towards the bearing, so the bearing gets better lubrication. On the original design, reports were there was a volume issue trying to supply all 30 rollers with the same amount of oil and out to the bearing.

Backside
Topside
The new oil hole pointing to the bearing with a flashlight under it

All new revised parts to install plus a new Melling larger volume oil pump not shown.

I have more inspection yet to do, and parts clean up. Then onto putting it back together. The good news, I did not see any broken chain guides or bad rocker roller bearings.
I’m now up to date on posting progress. More yet to come.
Thanks for looking.
John
__________________
Current Sunlines: 2004 T310SR, 2004 T1950, 2004 T2475, 2007 T2499, 2004 T317SR
Prior Sunlines: 2004 T2499 - Fern Blue
2005 Ford F350 Lariat, 6.8L V10 W/ 4.10 rear axle, CC, Short Bed, SRW. Reese HP trunnion bar hitch W/ HP DC
Google Custom Search For Sunline Owners Club
|
|
|
|
|
05-12-2020, 05:11 AM
|
#88
|
|
Senior Member
Join Date: Jul 2012
Location: Ohio
Posts: 1,126
SUN #4040
|
Wow thing have really changed over the years, better or worse?? Hope you have it together and running by camping season.
If it wasn't for this weather and virus we would have been out by now.
You still have a camper or two to finish.
Now if people (me) quit bugging you you'd me futher ahead.
Good luck
Jim
__________________
Jim and DW Darlene
2001 T-2553 Sunline Solaris
2006 GMC Sierra Duramax 2500HD 4X4
Firestone Transforce AT tires
Reese Dual Cam Sway Control
|
|
|
|
|
05-13-2020, 09:41 PM
|
#89
|
|
Moderator
Join Date: Nov 2006
Location: Ohio
Posts: 12,654
SUN #89
|
Hi Jim,
Progress on the truck is happening, every day. I'm not done "yet", but I am a lot closer. I have not made it to posting the progress, but hope to soon. There is much to show. I have now found the 3rd bullet that would of made for a real bad day camping if it let go while on the road. The main carrier bearing on the drive shaft ready to let go, timing chain tensioners with blown seals lowering the oil pressure and volume and the latest, the engine oil pump blowing by and not much detection by the lack of usable dash gages. A fix for all three of these is in the restore plan. I found other issues that needed to be addressed, but they would not have left me stranded. A 15 year old truck can be that way.
Yes, we too would normally have been in the campground in early April or sooner with no virus issues and a truck to pull the camper. ")
The camper restore project has taken a back seat with the virus deal. Maybe June will show some hope on getting back to that.
Stay tuned for incoming progress pics.
John
__________________
Current Sunlines: 2004 T310SR, 2004 T1950, 2004 T2475, 2007 T2499, 2004 T317SR
Prior Sunlines: 2004 T2499 - Fern Blue
2005 Ford F350 Lariat, 6.8L V10 W/ 4.10 rear axle, CC, Short Bed, SRW. Reese HP trunnion bar hitch W/ HP DC
Google Custom Search For Sunline Owners Club
|
|
|
|
|
05-14-2020, 05:18 AM
|
#90
|
|
Senior Member
Join Date: Jul 2012
Location: Ohio
Posts: 1,126
SUN #4040
|
I really think the way they are opening things up and people not paying attention we will be back in the same boat by mid June. I see more people out and about with out masks than with.
__________________
Jim and DW Darlene
2001 T-2553 Sunline Solaris
2006 GMC Sierra Duramax 2500HD 4X4
Firestone Transforce AT tires
Reese Dual Cam Sway Control
|
|
|
|
|
05-14-2020, 05:49 PM
|
#91
|
|
Moderator
Join Date: Nov 2006
Location: Ohio
Posts: 12,654
SUN #89
|
Here is a long overdue update on the truck. A lot of parts have made it back onto the truck, but I am not yet done.
The valve timing chain drive rebuild is complete. I ended up having to take the oil pan off to change the gasket. I had to lift the engine up to get it out and back in. And this meant I had to backtrack a little on the truck cab, and I just had it lowered down the day before to a 2 x 4 spacer block in place of 8” up. The oil pan needed 2, 2 x 4 blocks. Oh well, it’s only time. Forty-five minutes later, we are back to 3” high enough to do the oil pan change out and moving forward. Pics of the process.
Oil pan off

A view of the crankcase of the 2005 6.8L V10 3 valve redesign engine

The pan gasket problem area. This was the area where the largest part of the oil leak came from.

New Felpro gasket in place.


New Melling slightly larger volume oil pump installed. More on this oil pump later.

Timing chain and roller rocker parts all-new with cams and caps all cleaned ready to install.

The front cover with baked-on oil slung as found.

Cleaned up front cover with new Felpro gaskets and main crank seal ready to install.

Here is the wear on the old chain guides next to the new. You can see the wear pattern, and for 120K miles, this looks acceptable to me.

Chain guide pictures of the wear groove, about 1/32” deep.

Things were going well, and then I hit a snafu with the chain guides. There is what I feel, an expansion bushing on one end. The old chain guides had the bushing centered in the slot. The new parts expansion bushings, were sort of all over the place in opposite directions.
The first guide set
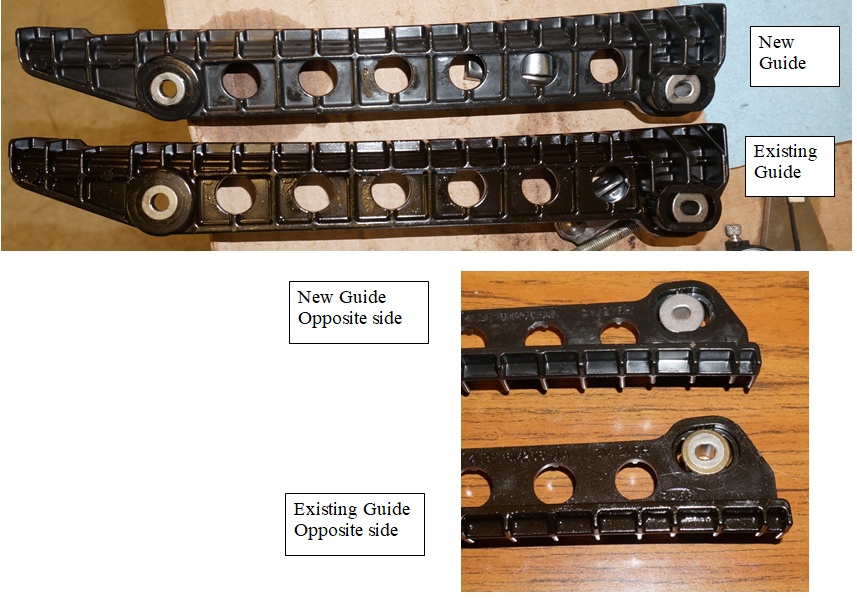
Location of the guide bushing

The second guide set

Location of the guide bushing

Not knowing if Ford changed this on purpose, I contacted the Ford dealer where I bought the parts. Their shop guys were not sure, so the parts manager sent to Ford my pictures I sent them and the questions. With the virus situation shutting down operations, Ford's headquarters were all out of the ordinary work hours/place/personnel, like most of the rest of the US, and those in the know where not to be found. The dealer has not got a lot of anything from them on other requests. After two weeks waiting on an answer that still has not come, and the dealer inquiring several times, I decided to center the bushings and install as the original and put the engine back together. The bushing moved real easy so that it may have been nudged out of location in shipping. I cannot see installing them the way they came as there is no rhyme or reason to the situation, in which the bushings were pushed to opposite ends of the expansion slot.
Moving on, you start with installing certain cylinder locations with rocker rollers and the camshaft.
Left side
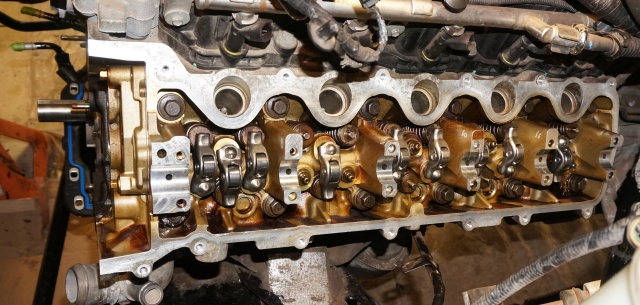
Right side

Camshaft. The journal caps get installed too. They are not shown in this pic.

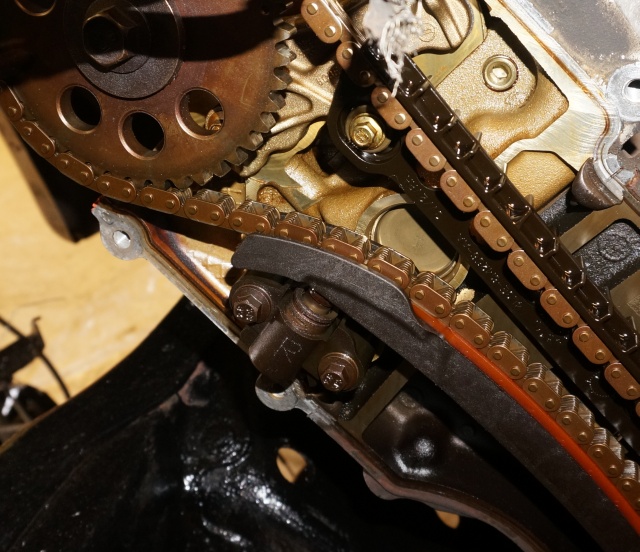
The fixed chain guide goes in. Then there is a tool you put on the crankshaft that lines up with a dowel to put the cylinder 1 on top dead center to set the timing.
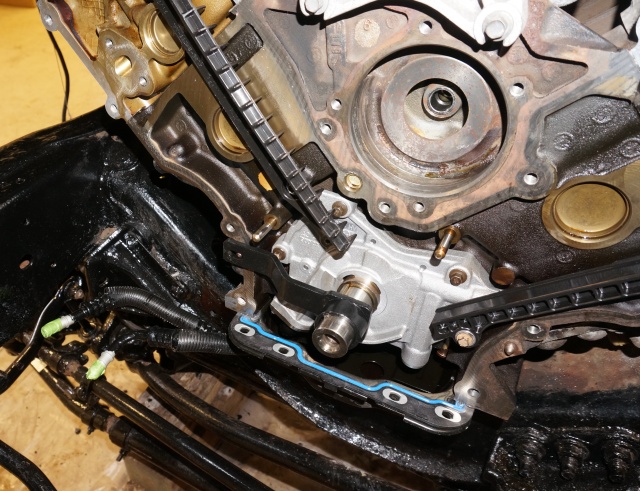
Then hooking up the chains and align the timing marks on the camshafts with the timing marks on the crankshaft sprocket. Install the tension take up guides and new tensioners.

Then using a special tool, install all the rest of the roller rockers. This location, I had to modify the tool to miss an oil port on the camshaft journal and add clearance to the tool to miss the cast bump on the side of the journal.
After triple checking the timing marks, put the front and valve covers on, and ignition coils.
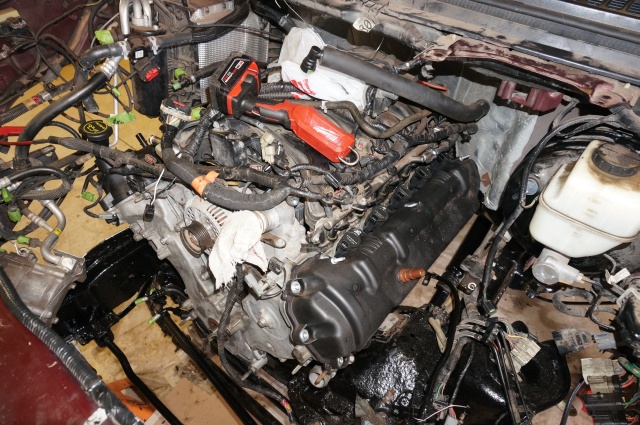

Then keep putting engine parts on taking advantage of the extra room with the engine lifted up.
New starter

Exhaust manifolds. New stainless studs

New Felpro gaskets

Manifold, carbon steel coated nuts with stainless flat washers, all from Ford.

New catalytic converter. The old one had a crack in it. If you want to see the testing, to determine the cat was going bad, here is a post of mine on the Ford Trucks forum.
https://www.ford-trucks.com/forums/1...0420-help.html
Here is the cracked cat looking down the pipe.

New next to old. The new one gets all-new oxygen sensors

Mounted the new spring tower on RH side to replace the rotted out one. I’m still up on 2, 2 x 4’s with the cab at this point.

Put the coil spring in place

Spring, shocks and front brakes in place

I am checking the rotor runout. It is still good.

New water pump, mount power steering pump, mount new transmission lines up to the front area.
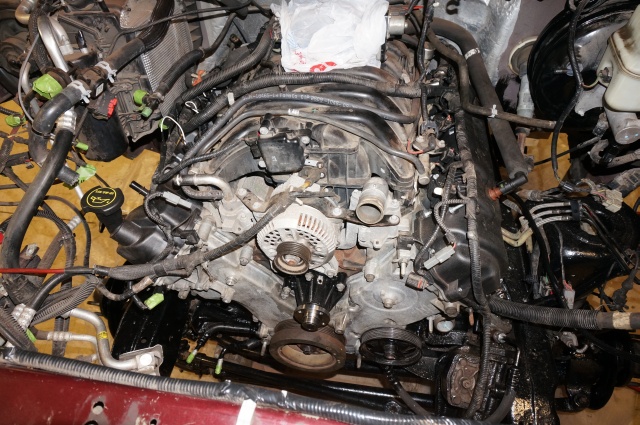
Now we can lower the truck cab down on all new cab mounts. Install new coolant hoses, new belt tensioner, new idler pulley and, new serpentine belt. I made a handle for holding the fan pulley. It later turned out not to work the way I needed it too.

Put the main engine radiator in, hooked up all the new transmission lines and, all new power steering lines.

Treated the inner front fender area with a combination of KBS cavity coater and Fluid film as needed and put wheel line back in on the left side. The right side will stay open for a while yet to allow easier adjusting of the steering column and new oil pressure sending unit.

The engine compartment parts completed less the battery yet to be installed. Yeh!


More in the next reply.
__________________
Current Sunlines: 2004 T310SR, 2004 T1950, 2004 T2475, 2007 T2499, 2004 T317SR
Prior Sunlines: 2004 T2499 - Fern Blue
2005 Ford F350 Lariat, 6.8L V10 W/ 4.10 rear axle, CC, Short Bed, SRW. Reese HP trunnion bar hitch W/ HP DC
Google Custom Search For Sunline Owners Club
|
|
|
|
|
05-14-2020, 06:01 PM
|
#92
|
|
Moderator
Join Date: Nov 2006
Location: Ohio
Posts: 12,654
SUN #89
|
We are continuing with the re-assembly.
I was installing the brake rear dust shields, parking brake, new axle oil seals, and tightening the bearing nut. I wish trailers would use this bearing nut setup. It is so much better than the older castle nut setup.

Right rear brakes done.

Left side brake, and shock absorbers installed

New EVAP canister with all new hose fittings, fuel pump driver module, and a new EVAP vent hose added to a cleaner area, and the spare tire hoist. The old system had the vent in the worse dustiest place next to the spare tire behind the rear wheels.


More as I upload more pics off the camera. Be back later
__________________
Current Sunlines: 2004 T310SR, 2004 T1950, 2004 T2475, 2007 T2499, 2004 T317SR
Prior Sunlines: 2004 T2499 - Fern Blue
2005 Ford F350 Lariat, 6.8L V10 W/ 4.10 rear axle, CC, Short Bed, SRW. Reese HP trunnion bar hitch W/ HP DC
Google Custom Search For Sunline Owners Club
|
|
|
|
|
05-14-2020, 06:51 PM
|
#93
|
|
Moderator
Join Date: Nov 2006
Location: Ohio
Posts: 12,654
SUN #89
|
More assembly.
Rebuilt driveshaft with new, U joints, carrier bearing, KBS coating and, balanced as an assembly.

Fuel tank assembly. New fuel pump, and new locking ring KBS coated

Fuel tank installed

New O ring snap-on fittings, all new EVAP, and fuel pressure hose when flex line is used.

Off road package bump shields in place. All new fuel tank straps as the old ones we badly rusted.

Now onto fixing up the front and rear bumpers. These have a lot of rust on the inside. In an attempt to save them, I took them apart, cleaned them up, treated them with KBS Rust seal, and put them back together. I will get a few more years out of them, and they may not need to be replaced. Time will tell.
Front bumper inside

Rear bumper inside

Both ready for cleaning

Parts being KBS coated.


Rear bumper assembled.

Front bumper assembled. Fluid film treatment on fasteners

Front bumper installed. The front of the truck is starting to look like a truck. 

More on the oil pump in the next reply.
__________________
Current Sunlines: 2004 T310SR, 2004 T1950, 2004 T2475, 2007 T2499, 2004 T317SR
Prior Sunlines: 2004 T2499 - Fern Blue
2005 Ford F350 Lariat, 6.8L V10 W/ 4.10 rear axle, CC, Short Bed, SRW. Reese HP trunnion bar hitch W/ HP DC
Google Custom Search For Sunline Owners Club
|
|
|
|
|
05-21-2020, 11:35 PM
|
#94
|
|
Moderator
Join Date: Nov 2006
Location: Ohio
Posts: 12,654
SUN #89
|
Hi Everyone,
We have had some good progress, I will do this in pics. Ask away for more detail if wanted.
The truck bed has yet to be touched and the truck is getting to the point of needing it. Which is a real good thing! 
The muffler and pipes from the end of the cat to the end of the tail pipe where changed last year to a Walker aluminized pipes with a stainless muffler. I wanted to go all stainless but with the cost difference, I can buy 3 Walker systems for the cost of 1 Ford setup. I added KBS high heat coating to the exhaust system to help make it last longer. And a new is a milestone, the truck "has left the jack stands!" We are now on 4 tires.


There was some issues with the oil pump, but I will post on that whole area later next week. Startup of the engine went very well once past the oil pump issues. The engine fired right off instantly. The truck saw the light of day in the barnyard earlier this week idling while JohnB was inspecting the engine running. It seems CindyB wanted to take a picture of grandpa's funny looking truck and show it to the grandkids.

Now to the truck bed. Raised it off the ground and started into it.

At the tailgate area looking towards the cab direction. Frame rail rust to deal with.

At the back of the cab area looking to the back tailgate area.


The wheel wells were in great shape, very little to no rust. The Ford coating held up well for the limited winter use this truck saw.

The othe wheel well

After needle gun descaling, the rust is seen to be more than originally thought. But, the rust is still low in the big picture of things for a 16 year old truck.


Then comes the degreasing, the acid etch to prime the metal and 2 coats of KBS rust seal.


Inside the bed rails was treated with KBS cavity coater. This is somewhat similar to Fluid Film. The cavity coater is sprayed in through a tube and nozzle and coats the inside of the bed rails. It is a wax forming compound that keeps air and moisture locked away from the metal to not allow rust to advance.
Then came the B & W turnover ball gooseneck hitch. This hitch came with the truck and the ball has never been out since 2007 when I got the truck used. Needless to say, the whole hitch was rusted badly.
B & W parts with KBS Rust Seal coated.

And time to get the truck bed onto the frame. The gooseneck hitch had to go on first. And what makes the B & W hitch so nice is the turnover ball feature. Just not when it has been rusting for a good number of years. It took a lot of scraping and fitting to get the ball locking system to work like it was supposed to. It's only time... It was 4 hours of time.


Mounted on the truck
And the bed mounting. Raise the bed.
Back up the truck and move the bed over the top.

Let the truck bed down on the frame

Bolt the bed down, put the rear bumper on and tidy up the running boards, and a host of other odds and ends, and your done.
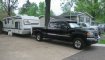
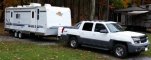
Test drive the truck to go gas it up, then do a test pull on the camper. It past the tests with no adjustment or fiddling with wires etc. It was great! Here it is loaded and ready to go camping.

More on the oil pump issues next week.
Thanks for looking.
John
__________________
Current Sunlines: 2004 T310SR, 2004 T1950, 2004 T2475, 2007 T2499, 2004 T317SR
Prior Sunlines: 2004 T2499 - Fern Blue
2005 Ford F350 Lariat, 6.8L V10 W/ 4.10 rear axle, CC, Short Bed, SRW. Reese HP trunnion bar hitch W/ HP DC
Google Custom Search For Sunline Owners Club
|
|
|
|
|
05-22-2020, 06:30 AM
|
#95
|
|
Senior Member
Join Date: Jul 2012
Location: Ohio
Posts: 1,126
SUN #4040
|
Good job. Ready to go for the first big camping weekend of the year. HOPE it's somewhat rain free.
__________________
Jim and DW Darlene
2001 T-2553 Sunline Solaris
2006 GMC Sierra Duramax 2500HD 4X4
Firestone Transforce AT tires
Reese Dual Cam Sway Control
|
|
|
|
|
06-24-2020, 06:14 PM
|
#96
|
|
Moderator
Join Date: Nov 2006
Location: Ohio
Posts: 12,654
SUN #89
|
This reply is a follow-up report on the truck,
There were a few areas that I did not mention earlier that I would like to show and point out. The first being the EVAP canister system that deals with fuel fumes in the fuel tank. There is a charcoal canister that absorbs/filters the fumes from the fuel tank system. The canister system can get clogged and make it hard to fill the fuel tank at the gas pump. For the longest time, I had to feed the gas in slowly, or it would kick off almost instantly if I tried to have gas go in too fast. There are a couple of things that can cause this. The tank not being vented enough during fueling being one of them. And there a few items to that are also.
The EVAP canister system comes as an entire unit with the breather and a valve to allow the system to breathe to atmosphere. Ford put this breather next to the spare tire mount, which can be a filthy place. Dust is flying all over this area. They created a baffled filter of sorts to help dirt etc. fall out rather than get into the charcoal canister. After 15 years of use, this system was in a questionable state. I replaced the entire unit while I had the bed off and added a breather hose and filter away from the area.
In this pic is what was originally supplied. The breather area if the small rectangular box with a hose going in one side and a round pipe nipple out in the open on the other end. It is on the left side of this pic.

Here is a pic the new EVAP canister system and a breather hose added to the small rectangular box-fresh air intake. This is a 3/4" ID hose, more significant than the fitting.
The new breather hose is routed down to the fuel tank neck area to be held in place in a cleaner area than behind the rear axle by the spare tire. The hose is just laying over the frame at this point.
I went down to the local NAPA auto parts store to get a filter that could handle gas and oil fumes. The clerk came back with a breather that went in the air cleaner of a carbureted engine. WOW, I have not seen one of them in a while
This breather use to be for the crankcase vent. I mounted it on the end of the hose and attached the hose to be held in place up next to the fuel neck door. It is out of the dust bowl behind the wheels and protected enough from flying water etc. and out in the open to vent correctly. So far., the EVAP test passes all the time, and I can fill the tank with fuel and not have it kick off as bad as it used to. I did not come up with the idea all on my own, others on the Ford truck forum have done something similar to get the heavy dust away from the canister breather intake. I just created my own vent hose setup.
The next area deals with the new stainless exhaust studs. Before I did the conversion, I wanted to make sure I had a method on how to drill out a broken stainless stud if the event ever comes. These studs are made from 300 series stainless, which has a unique attribute to it. The steel work hardens when it is forged, beat with a hammer, or a spinning drill bit not cutting. The more the metal is worked, the harder it can get, and it can get hard enough locally that you cannot drill it with high-speed steel bits or even cobalt given the right circumstances.
Dealing with stainless steel in my job for the last 30 years, you get to know the beast of stainless metal and how to work with it. I found the right method, the right lube, and the right bits on how to drill out these studs. It took some trial and error, but I got it to work. If you end up having to get stainless bolts or studs out, this can help.
Here are some pics of the working process.
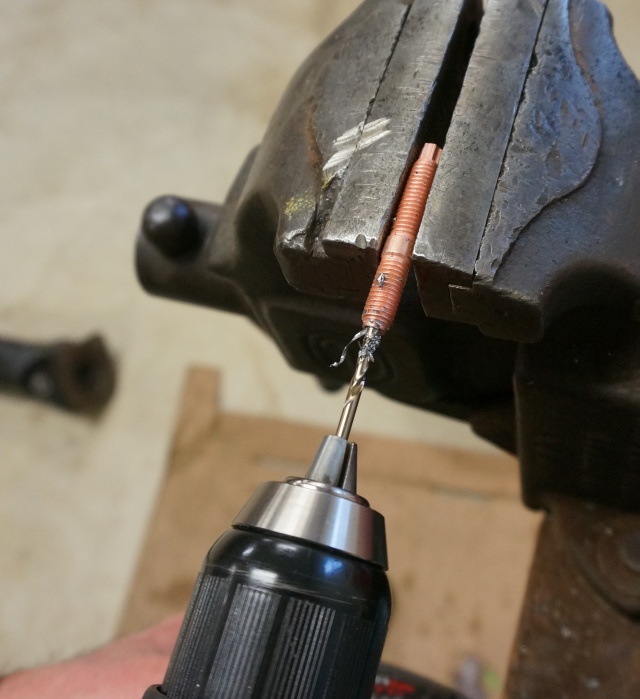
The green tape is a drill stop indicator

How deep I was able to drill it, and this is far enough plus extra as the stud would be broken off if it was in the block.

Anyone needing to know how to do this and what to buy, read my write up on the Ford Trucks forum before you attempt to drill these out. If you work harden the stud in the block from the get-go, it makes it that much harder to ever drill through it. The post calls out the bits, the lube to use, the drill speed to use, and where to buy the tools. Along with which bits do not work. This thread also talks about why stainless should work better than the carbon steel studs of the past in this Ford modular motor. The drilling is halfway down the post.
https://www.ford-trucks.com/forums/1...bon-steel.html
Then comes the oil pump issues. After investigating oil delivery issues on my vintage truck, the 5.4 V8 had the problem of oil delivery worse than the V10s but still, common problems crossed over Ford made a lot more V8s and the V8s in this era have variable valve timing which used oil pressure as part the VVT. The back of the pump plate would flex under specific pressures allowing oil to blow out the back of the pump. The volume of the pump was also in question as the engine had higher miles on it; more wear in the bearings allows more oil top bleed out and the need for more volume in the whole system. The oil delivery issue was more complicated by blown gaskets on the timing chain tensioners. During my restoration, I changed the oil pump along with the timing chain drive rebuild.
Here is the old pump,
Here is the new Melling replacement number M176HV pump with 8% more volume and a stronger backplate for less flexure that fits in the same space. I went with the standard pressure spring in the relief valve.
A look at the inside of each. Old pump on the left, new pump on the right.

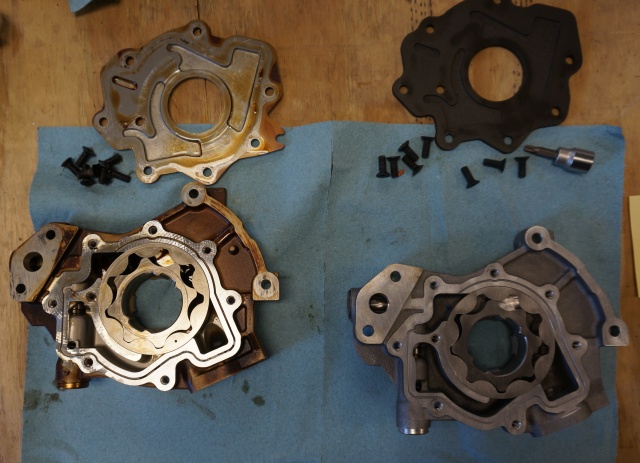
This pic shows the old pump with oil deposits built up in the hydraulic seal groove. A small screw driver is pointing to the build-up. That groove is pump pressure created to help seal the oil in the pump. There are no real seals in this pump, on purpose. A certain amount of oil intentionally leaks out the front of the pump to oil the chain drive system.
Close up of the new Melling. Hard to tell the difference to expect the rear plate is a different material.

This pic of the old pump shows arrows where the oil was reported to blow out the back of the pump in the pressure zone of the pump.

Jasper, who rebuilds engines and transmissions, has a video showing the Ford pump next to the Melling pump. They are talking about the 4.6 and the 5.4 V8s, but the issue is the same on the V10s.
https://youtu.be/BUdLPh25c0w
With more investigation, I find that I only have an oil pressure switch, not an analog pressure sending unit. The pressure switch trips at 7 psi, creating an OK signal. Anything above 7 psi shows up as OK on the dash gauge. The gauge has an L and an H, and the 7 psi puts the needle in the middle of the L & H. This engine specs out at 40 to 75 psi at 2,000RPM and 200 deg F. By the time you get down to 7 psi and an indication you have lost oil pressure, it really late to know about the problem. So I installed an analog pressure sending unit and a real gage in the cab. I left the Ford switch intact, working as it is tied into the PCM. I teed off the port where the OEM switch was and added a remote oil sending unit mount. There just is not much of any room to add the analog sending unit at the switch location. Some pics of the setup.
The oil pressure port tie in below the power steering pump. Where the brass elbow is, was where the old pressure switch mounted.

The analog oil sending unit, the Ford pressure switch, and copper brake-line feeding it. The new setup is mounted to the firewall under the master cylinder. Less vibration to the analog sending unit here and where there is room. The setup is behind the fender liner.


All wired up

Here is the gauge pod in the cab above the backup camera and the Scan Gage II reader to read out get real engine data. With older trucks, you have to keep adding aftermarket things to get all the towing needs covered.


And with the tire pressure monitor.

I have close to 450 miles on the truck since the restoration. The only issue I have had so far in all this disturbing of everything is the front left ABS wheel shaft sensor gave me fits after about 100 miles. I kept getting an ABS fault every time I made a hard right turn. It only happens on hard right turns. The scan reader told me it was that senor not sending the right signal, but only when turning. I checked the wire, and it was not pinched nor looked to be pulled too tight. After troubleshooting it enough, I replaced the sensor, and all is good now. Either the cable got yank during the rebuild, or it was its time to give up the ghost, but it is gone now. The truck runs great.
I also learned this engine was supposed to have a higher temp thermostat. The new one is a 190F that Ford called the current PN, but the old one, a 185 F, is what came from Ford in 2004. The engine spec is
T start to open: 181-189F
T stat fully open: 206-212F
I used to only get to 200F when pulling/climbing long mountains in eastern PA with the camper. The engine was at 190F most all the time after warm-up. Now I can get 200F while towing in the flatlands of Ohio, but it stays there and 190 - 195F when non towing. By the spec. it should have been hotter all along. 200F is in the sweet spot of the operating range, and these engines run better at temperature then colder.
All for now. I still have a transmission pan and filter upgrade to do, but wanted to make sure the truck ran and operated all correctly before doing the oil filter upgrade.
Thanks for looking.
John
__________________
Current Sunlines: 2004 T310SR, 2004 T1950, 2004 T2475, 2007 T2499, 2004 T317SR
Prior Sunlines: 2004 T2499 - Fern Blue
2005 Ford F350 Lariat, 6.8L V10 W/ 4.10 rear axle, CC, Short Bed, SRW. Reese HP trunnion bar hitch W/ HP DC
Google Custom Search For Sunline Owners Club
|
|
|
|
|
|
|
Currently Active Users Viewing This Thread: 1 (0 members and 1 guests)
|
|
|
 Posting Rules
|
You may not post new threads
You may not post replies
You may not post attachments
You may not edit your posts
HTML code is Off
|
|
|
|
 » Recent Sunline Discussions
 |
|
|
|
|
|
|
|
|
|
|
|
|
|
|
|
|
|
|
|
|
|
|
|
|
|


 Linear Mode

