Journey with Confidence RV GPS App RV Trip Planner RV LIFE Campground Reviews RV Maintenance Take a Speed Test Free 7 Day Trial ×
Sunline RV Forum
Sunline User Photos

Go Back   Sunline Coach Owner's Club > Technical Forums > Repairs and Maintenance
Click Here to Login

Join Sunline Club Forums Today


Reply
 
Thread Tools Search this Thread Display Modes
Old 06-15-2020, 12:35 PM   #1
Junior Member
 
Join Date: Jun 2020
Location: Florida
Posts: 3
SUN #11989
sagapi44 is an unknown quantity at this point
Unhappy Wet Floor in Rear Hatch 2006 Solaris

My 2006 29' Solaris has a wet floor in the corner in the passenger side rear hatch. I inspected the roof, vertical corner, and resealed the hatch/replaced hatch weather stripping, and its still wet. Is there a typical place these trailers leak that I should check?
__________________

__________________
sagapi44 is offline   Reply With Quote
Old 06-15-2020, 04:09 PM   #2
Senior Member
 
Join Date: Feb 2008
Location: Minnesota
Posts: 211
SUN #527
ScottK
Water can travel in strange ways and directions to get to that corner. What model Solaris do you have? That can help folks tell you where to look.
__________________

__________________
1988 Saturn T-1550 (sold 6/10)
2004 Solaris T-1950 (sold 5/14)
2007 Solaris T-276SR (sold 3/20)
2020 Forest River - No Boundaries 19.8
2013 Toyota Tundra Crewmax (sold 7/21)
2021 Ford F-250 CrewCab
ScottK is offline   Reply With Quote
Old 06-16-2020, 10:39 AM   #3
Junior Member
 
Join Date: Jun 2020
Location: Florida
Posts: 3
SUN #11989
sagapi44 is an unknown quantity at this point
Quote:
Originally Posted by ScottK View Post
Water can travel in strange ways and directions to get to that corner. What model Solaris do you have? That can help folks tell you where to look.
Hey Scott, it is a T286SR. My current plan is to cut out and replace the rotted OSB just a 10x10" corner in the bottom of the hatch compartment and change out the marker side light that is just above the hatch. but i have fresh lapsealant on the roof and the vertical joint is pretty tight. Maybe the screws under the vinyl trim for the vertical corner piece?

-Steven
__________________
sagapi44 is offline   Reply With Quote
Old 06-16-2020, 04:42 PM   #4
Moderator
 
JohnB's Avatar
 
Join Date: Nov 2006
Location: Ohio
Posts: 12,654
SUN #89
JohnB is on a distinguished road
Hi Steven,

What you are describing points to either a roof corner leak or a corner molding leak or both at the same time as the first set of suspects. Clearance lights, the actual cargo door flange and rear tail lights are also suspect. Will talk to the most probable first.

The roof corners flex a lot as the camper tows down the road. The entire camper box/frame flexes and all that flexing works on the 4 roof corners. Any sealant that has any hairline crack in it, is suspect.

Here is a failed rear corner joint. This one is really bad inside the wall/ceiling but does not look that bad from the outside. The leak went under the rear wall molding and in the the crack between the rear wall molding and the right side gutter rail. This is off my 2005 T1950 project camper.


The corner molding itself is a water infection area as time goes on. The roof can be totally dry, yet the corner molding from the roof line down to the bottom of the floor allows water to wick in that corner. Water then keeps going down and stops were it cannot get out. Then it starts rotting whatever it can were it pools. In your case, this may be the rear cargo compartment under the bed. You may also have a cargo door flange leak. Water coming out of the roof gutter, beats on that cargo door flange. The corner molding and the cargo door have the same sealant problem.

Here are a few pics of how the corner molding leaks. If you look close at the putty tape the is between the corner molding and the siding, it may look black from mold and dirt. You can clean it and see better, but you can also many times see cracks in that putty tape. The left rear side of the camper has that sealant exposed to the wind when towing. And towing in the rain, beats water at that sealant. When the cracks form they start opening up a path for water to wick into the walls of the camper. This normally takes a few years from new to get to this cracked stage. I would say about year 4 to 6 it can start the cracking. The putty tape shrinks, separates from the molding or the siding and the crack shows up.

See here with the molding off. This sealant should be gooey and it's not. It's flexible but its harder than it should be from being dried up.


The dirt you see circled is where the putty tape released from the molding and allowed water and dirt to wick in. Over time the water path gets large enough water can make its way to the side lap joint and then into the camper.

A year ago I helped a good friend repair his camper. He had a 2007 T286SR which would be the same as yours. His roof was totally dry. But he had a corner leak, actually leaking on both the left and right rear wall.

See here on his. This is with the rear siding removed so you can see the leak path.


And here is the lower water damage at the back wall. We found this early enough it did not do as much damage as it could 2 more years into the future if it was let go. And he stores his inside over the winter.


More in my next reply on what you can look for to see how far the water damage may have migrated beyond the storage area. I recommend doing some more investigating first, and then come up with the fix it plan. I have to go right now, will be back with more.

Until then, see this thread on a moisture meter. I recommend you get one. It's a worthwhile tool for anyone who owns a camper. This takes a lot of the guesswork out of camper leaks. https://www.sunlineclub.com/forums/f...per-17613.html

Hope this helps

John
__________________
Current Sunlines: 2004 T310SR, 2004 T1950, 2004 T2475, 2007 T2499, 2004 T317SR
Prior Sunlines: 2004 T2499 - Fern Blue
2005 Ford F350 Lariat, 6.8L V10 W/ 4.10 rear axle, CC, Short Bed, SRW. Reese HP trunnion bar hitch W/ HP DC

Google Custom Search For Sunline Owners Club
JohnB is offline   Reply With Quote
Old 06-16-2020, 10:25 PM   #5
Moderator
 
JohnB's Avatar
 
Join Date: Nov 2006
Location: Ohio
Posts: 12,654
SUN #89
JohnB is on a distinguished road
Quote:
Originally Posted by sagapi44 View Post
My current plan is to cut out and replace the rotted OSB just a 10x10" corner in the bottom of the hatch compartment and change out the marker side light that is just above the hatch. but i have fresh lapsealant on the roof and the vertical joint is pretty tight. Maybe the screws under the vinyl trim for the vertical corner piece?
The screws behind the vinyl trim as not high on the suspect list of a water infection point. That is not to say it cannot be, but it is less likely. Part of getting a water infection is about the odds and the conditions exposed to a potential leak. The screws are protected behind the vertical vinyl strip of the corner, and the bottom of the vinyl is not sealed totally so any water that made it down the molding and behind the vinyl would get out the bottom easier then wick in through a screw.

BUT, those corner screws do tell a story. By popping out the vinyl strip, start up high close to the roof and take a screw out and look at the threads. If they are pristine silver with no rust, then the wood they are screwed into is dry and odds are low a leak from up high is there. You can put the screw back in if it is good.

Then jump down about 8 to 12 inches and and remove another one. Check if it is pristine or starting to rust. Put it back in if pristine and move down another 8 to 12 inches and check another. Check all the way to the bottom of the wall. If you start to see a pattern of rust starting all the way to very rusted and goo on the threads, then a leak started up where the rust started and rot is underway were the goo is. The screws rust out most times from the inside out. Not the outside in on a camper as new as yours.

This pic (2004 T2475) shows the screw rusting from the threads on the inside. The corner in this case was wet from a roof leak, but a corner molding leak can look the same in the area where water was.


Here is another place to look. Since you have a wet cargo hole floor, the cargo door unit is suspect. It may be the foam seal is not tight sealing the door to the frame or it is leaking in between the door frame flange seal to the siding which is sealed with putty tape. Pull the vinyl screw strip off and look at the screw heads. If the heads have rust on them, take a screw out. If the screw is badly rusted, the wood behind has been wet and the putty tape seal can be suspect. See this cargo door that had a flange seal putty tape failure. The screw heads at the bottom are rusted from the threads on the inside.


Here is the other side of the camper cargo door with the same issue


Here is the damaged wood behind that cargo door


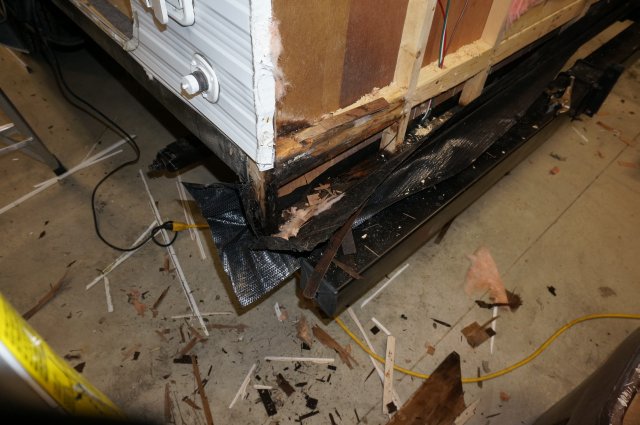
Since you have a slide camper, the rear wall is built to have a dam at the bottom below the floor. This dam feature will hold water and rot out the bottom of the back wall. Bad enough it can affect the camper floor above it.
Look at the bottom back wall sheet of siding by the bumper. That bottom piece of siding is held on with hex screws at the bottom. Look at the heads. If they are starting to rust, there is water behind that area. If the heads are white, take a few of those screws out near the wet cargo area and look at the threads. If they have started to rust, water is down in that wall dam area.

This picture is off of a non slide camper to show the screw at the rear wall I am talking about. This is a 2005 T2363 with a wet rear wall. The screw heads are rusting. While the non slides do not have the below floor dam area, a wet back wall can look the same on the outside.


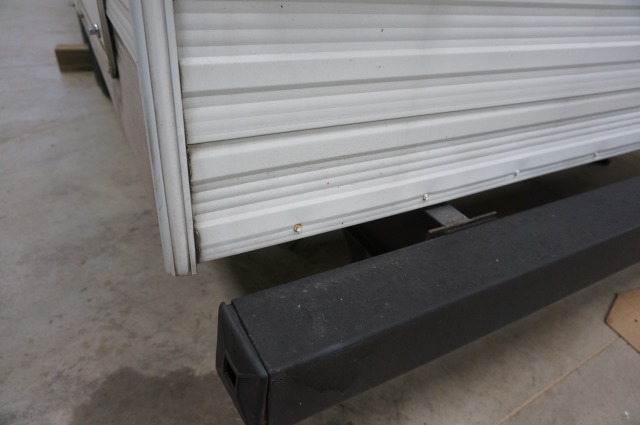
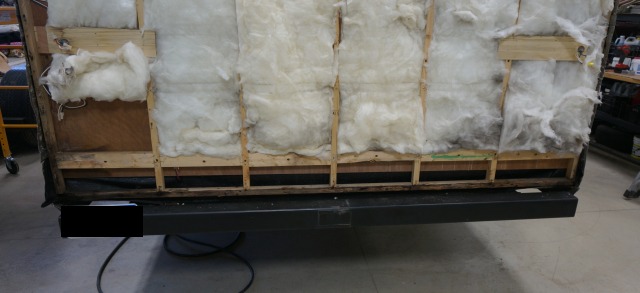
Here is a slide camper (2006 T264SR) that had a left rear roof leak and a left wall corner leak. The water settled in the well below the floor. The camper floor is at the 2 x 4 height, the bottom of the well is at the bumper. Put you hand under the bumper and feel the black plastic at the bottom of the rear wall. If the plastic is mush, then the bottom board is rotted out. If the board behind that black plastic is rock hard, then odds exist water did not make it down there long ago. A moisture meter on the black plastic will tell for sure.


Those screw checks I mentioned above will help tell you where some of the water came in and where it may not have.

Using the moisture meter, you can scan inside the camper at the side wall and rear wall of the back of the camper and see if it is wet behind the wall board. And you can scan the floor to see how large the wet area is. You can scan the black plastic membrane on the bottom of the camper scanning up, to see if the insulation in the floor is wet and how big an area that it or the back wall is wet at the bottom. While inside the camper and in the closet next to the bed over the cargo door area scan the wallboard to see if it is wet, scan the side wall at and the rear wall, starting at the corner and working outward, ceiling to the bottom of the cabinet which is the top of the pass through cargo hole.

The ideal need is, before taking the camper apart, check all the areas around the wet wood you found. How did it get wet? A leak from up high, a leak from getting in the corner molding, a leak getting in from the cargo door flange, a leak at the clearance light other areas?

You really want to find "all" the leak sources and figure out how to address each of them so when you do your fix so water will not be getting in to damage your new repair. Most times you can find more than one smoking gun leak, there generally are several.

Take pic's and post to of the suspect areas, and the roof corner. They can tell a lot we and you do not often see.

Hope this helps

John
__________________
Current Sunlines: 2004 T310SR, 2004 T1950, 2004 T2475, 2007 T2499, 2004 T317SR
Prior Sunlines: 2004 T2499 - Fern Blue
2005 Ford F350 Lariat, 6.8L V10 W/ 4.10 rear axle, CC, Short Bed, SRW. Reese HP trunnion bar hitch W/ HP DC

Google Custom Search For Sunline Owners Club
JohnB is offline   Reply With Quote
Old 06-19-2020, 08:52 AM   #6
Junior Member
 
Join Date: Jun 2020
Location: Florida
Posts: 3
SUN #11989
sagapi44 is an unknown quantity at this point
Thank you so much for the detailed description and photos! I will be doing some investigating this weekend. Over the week i noticed a crack in the indicator light above the hatch, got a replacement and pulled it off. the plastic lens was full of water, the light bulb was rusted into the connector, the wood behind the light was wet with standing water, not rotted but wet. I replaced this light and am hoping it has dried out enough so that i can leak test it this weekend as well.

-steven
__________________
sagapi44 is offline   Reply With Quote
Old 06-19-2020, 11:00 AM   #7
Moderator
 
JohnB's Avatar
 
Join Date: Nov 2006
Location: Ohio
Posts: 12,654
SUN #89
JohnB is on a distinguished road
Yes, the clearance lights crack over time and fill up with water. And sometimes they leak behind the foam gasket. Amazingly some times, the bulb will be rusted out, but the water did not sneak behind the bulb socket. Not always though.

Here is a post on replacing the Bargman 68 series clearance lights. And the 2 holes I drill in them from brand new to let the water get out. https://www.sunlineclub.com/forums/f...tml#post147061

In your case, water may have entered the wall from the clearance light. But it may also have come from above or a corner molding. Odds are good, you may have more than one source of the leak. The moisture meter will help show if the leak is above the clearance light if you scan in the inside bedroom cabinet wall above the clearance light. And scan below it too.

Your welcome on the detail. Glad it helped. Good luck this weekend on your investigation. We are here to help you sort out what you find.

Take pics and post of the areas you have questions on. They really help show what you have.

John

PS, If you are handy with basics wood tools, this is all fixable. We can help explain how it all comes apart and how to put it back together. Just realize, it will take time.
__________________

__________________
Current Sunlines: 2004 T310SR, 2004 T1950, 2004 T2475, 2007 T2499, 2004 T317SR
Prior Sunlines: 2004 T2499 - Fern Blue
2005 Ford F350 Lariat, 6.8L V10 W/ 4.10 rear axle, CC, Short Bed, SRW. Reese HP trunnion bar hitch W/ HP DC

Google Custom Search For Sunline Owners Club
JohnB is offline   Reply With Quote
Reply

Tags
hatch, leak, leaking, solaris


Currently Active Users Viewing This Thread: 1 (0 members and 1 guests)
 

Posting Rules
You may not post new threads
You may not post replies
You may not post attachments
You may not edit your posts

BB code is On
Smilies are On
[IMG] code is On
HTML code is Off
Trackbacks are Off
Pingbacks are Off
Refbacks are Off


Similar Threads
Thread Thread Starter Forum Replies Last Post
Solaris hatch covers Mountainman4 Sunline Travel Trailers 4 05-28-2019 10:29 PM
2002 T-1950 Rear Floor Rot Tinker Introduce Yourself 6 08-10-2015 04:14 PM
Another Wet Floor henryj Sunline Community 2 08-14-2013 07:14 PM
1994 T 1550 Rear compartment floor rot CH3N02 Sunline Travel Trailers 4 09-23-2012 06:27 AM
Wet floor, dewinterizing, and other things BillG Repairs and Maintenance 12 05-02-2010 08:31 PM


» Featured Campgrounds

Reviews provided by

Disclaimer:

This website is not affiliated with or endorsed by Sunline RV or any of its affiliates. This is an independent, unofficial site.


All times are GMT -6. The time now is 11:06 PM.


×