 |
 02-25-2024, 03:05 PM
|
#1
|
|
Moderator
Join Date: Nov 2006
Location: Ohio
Posts: 12,656
SUN #89
|
Trailer Frame Inspection - Where to look. (Picture heavy)
Fellow Sunline Club members,
This is a friendly heads-up informational post to urge you to add a camper frame inspection to your annual maintenance plan. Once you know where to look, the inspection itself will only take 10 to 15 minutes the first time. Less time the next time; this inspection is only a visual task and takes no special tools other than a flashlight.
This information can also apply to someone looking to buy a used camper or looking at one you own of any brand. I am not an expert on trailer frames, nor do I create trailer frames for a living; I am only passing along some of my findings as a goodwill gesture to help you keep your camper going for a long time. I have seen enough cracked RV trailer frames to see patterns in how they cracked, and I will present the findings on some of the ones I have seen so you can check your camper or one you are considering buying.
Please do not take this message as a the sky is falling warning that all used campers have frame issues, as this is not the case. The number of camper frames with failures in the big picture is low compared to the total number of campers on the road today, but frame failures happen. Many camper owners may have never considered inspecting their camper frame as part of annual maintenance; this topic falls into an out-of-sight, out-of-mind thing. Since this is a Sunline forum we are on, I will talk mainly about Sunlines. The last Sunline was built in the fall of 2006; come this fall, the last Sunline ever built will be 18 years old. We have many club members camping with campers older than 18, myself included. If you have a camper of any brand towed over 5,000 miles, consider adding an annual frame inspection.
You often cant control the bad roads you end up on while traveling with your camper. Many campers do not have shock absorbers that tame down the excessive frame flexing. Towing over small or large bumps of bad roads aggravates and accelerates the camper frame flexing, which, in time, leads to metal fatigue that will start and continue to crack a camper frame as the miles add up. When you inspect your frame, if you find small cracks during the inspection, that is the time to create a plan for when and how to address the problem. Correcting it before the next camp may be necessary if you find advanced damage; if you do not know what it is you are looking at, look for someone to help you sort out when to get it addressed. After your first inspection, consider the follow-up inspections as an end-of-season activity. This gives you time to create a get-well plan if you find something before the start of the next camping season.
What I will present can also happen to other brand campers in the same common high-flex areas. This is an industry-wide issue, not just Sunlines. I have several friends with different brands with the same problems as the camper towing miles add up.
When campers are towed, the mileage accumulates. The more miles towed; the more flexing occurs in the steel of the camper frame. Flexing of the camper frame is normal and on purpose in most cases. Metal fatigue starts when the flexing metal stresses exceed the fatigue limit of the metal and design used in the application. A metal fatigue failure is an accumulative situation where the metal flexes back and forth to the point a crack starts in the metal. The design, manufacturing process, or the metal's exposure during the flexing cycles all play into the starting of a crack. That crack can take a long time in some cases and less time in others to get started, depending on several factors influencing it. Once the crack has started, the crack can increase in size more quickly with each normal flexing cycle of the camper frame during towing. As an example, if you towed the same low to medium annual miles per year, using the camper in the same manner, it may take 5 to 10 years in some cases to start a tiny crack and only 1 to 3 years for the crack to increase significantly in size, which in time, can lead to a metal failure.
Several factors influence the advancement of metal fatigue. Any factor alone can create metal fatigue; some may take longer or never show up while you own the camper. The next person who buys the camper may see the issue. The more combined factors, at the same time, can accelerate metal fatigue. Here are some common factors that can start a crack in a camper frame. Not in any order of importance, see how your camper stacks up to these factors:
1. Consider the number of miles the camper was towed since it was new. The 5,000-mile mark I discussed is subjective, but failures have occurred during this mileage period when combined with other factors.
2. The road or off-road conditions the camper was towed over. Smooth roads flex the camper less than rough roads or off-road travel. Unlike campers in a seasonal campground, campers with very little mileage may never experience metal fatigue.
3. The amount of cargo weight added to the camper. All campers have a weight rating; unless you have weighed your camper loaded ready to camp, you do not know if you have a lightweight load, at the weight limit, or over the weight limit.
4. The size and adjustment of a weight distribution hitch if one was used.
5. The amount of rusting/corrosion of the frame in high flexing areas.
6. The design of the trailer frame and the suspension system. The camper owner has no control over this; however, in the RV industry, trailer frames are considered a light-duty application compared to a construction trailer hauling heavy equipment used daily. The RV application has several specific considerations regarding the design process; some are lightweight, ability to handle the weight and size ratings, lower cost, lower duty cycle, towability efficiency, and a limited design life of the camper are all parts of the process. Engineers can design a camper frame that will not fail in a long-life RV application; however, the cost may not be practical for the average RVer in terms of both RV cost and the size and cost of the tow vehicle to handle it.
7. Damage to the trailer frame. Damage can come in many ways, and some are; corrosion/rusting of the metal, overweight loading, mega-pot hole-laden roads, the frame being stressed by dragging it on the road driving out of a high-up gas station, and any impact or situation to the frame which creates high stress in the metal it was not designed to handle.
As you can see, all the above can be an everyday situation when towing your camper. I did not bring up the expected design life of a camper frame, as Sunline is no longer with us to ask that question. And I have not yet heard a tangible answer from any other brand camper. I can say that a maintained and repaired Sunline can last a good long time. Our 2004 T310SR, which we bought in 2007 and was built in November 2003, is now 20 years old, has over 50,000 miles we put on it, and is still going strong. Yes, I have done some major repairs and upgrades that are documented here on our site. If I maintain and keep repairing it, I can see it lasting another 15 to 20 years and another 50,000 miles. We have new members joining all the time, some with 30 to 40-year-old Sunlines. Age alone is not a factor; the seven items listed above are.
If you want to read more on metal fatigue, I found this steel supplier site with a simpler explanation of metal fatigue. https://www.metalsupermarkets.com/wh...metal-fatigue/
And if you want a deeper techno-involved reading on metal fatigue, see here on Wiki. https://en.wikipedia.org/wiki/Fatigue_(material) Engineering websites delve even deeper into this.
Now, what to look for when inspecting your camper frame. I will try to do most of this with pictures so you can see what a failure looks like. I will do this in separate replies to make it easier to read. We have the intro post, which you are reading now; the inspections Part 1 A-Frames, part 2, the suspension area, and Part 3 and Part 4 are how some of the repairs or preventive reinforcements were done.
Some of you reading this post may do your first frame inspection and find the start of something with frame cracking or advanced frame failing. If you discover something, feel free to ask about it, take pics, and post so we can see what you have. We are here to try and help. You are also welcome to ask questions or comment about anything presented. We can all learn from each other.
I will first show a few pics with labels on several camper frame parts or areas. As the post goes on, these same labels will be used in discussion, and the pics will help show what we are talking about. You can ask about your camper using these terms so we know what you are trying to describe.
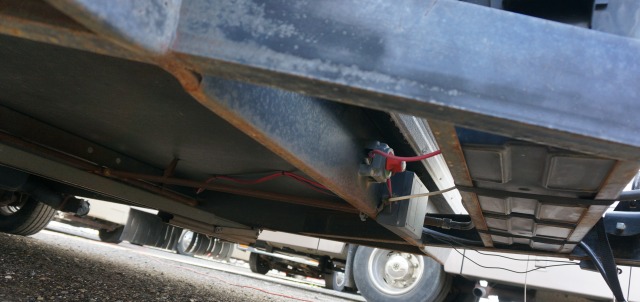
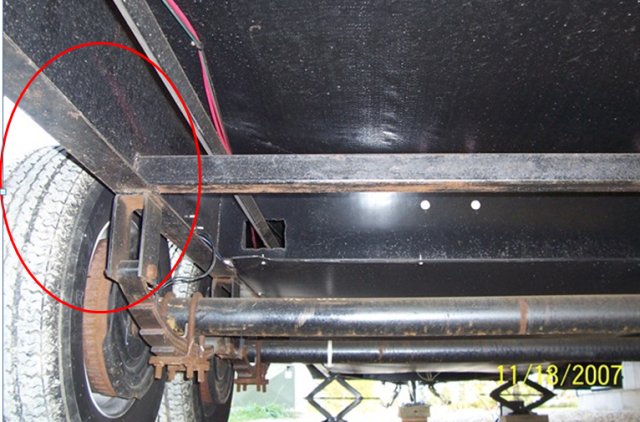
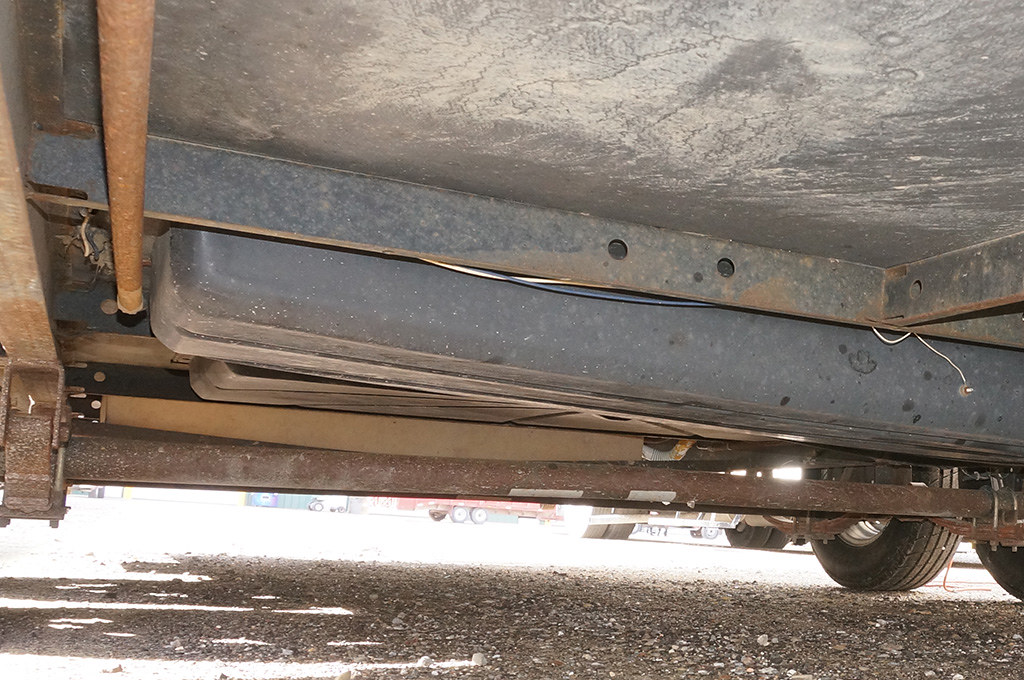
The following picture is from our 2004 T310SR, a 10,000# GVWR-rated travel trailer with a super slide (coach and dinette slide). Note: Most 8,600# and 10,000# GVWR Sunline travel trailers with I-beam style main frame rail campers were built like these pictures.
This T310SR camper is one of the larger Sunline travel trailers. The same frame principles exist in all the Sunline frames; they may be made from different sizes, steel grades, and steel shapes, but the overall design concepts are similar.
This camper's A-frame area is made from a 6 tall x 8.2 #/ft. C channel attached to a 10 tall frame header. Sunline used several steel shapes over the years to make the A-frame; some shapes were C channels in various sizes, rectangular tubing, or other shapes. Sunline used what is known as a through header design A-frame where the A-frame rails protrude through the header in most cases, unlike other brands, that attach the A-frame, which is made separately, and then is attached as a unit under the main frame rails and header.
Here is a typical Sunline-style A-frame. The A-frame area is one of the high areas of flexure of a travel trailer camper where cracks in the frame may exist.

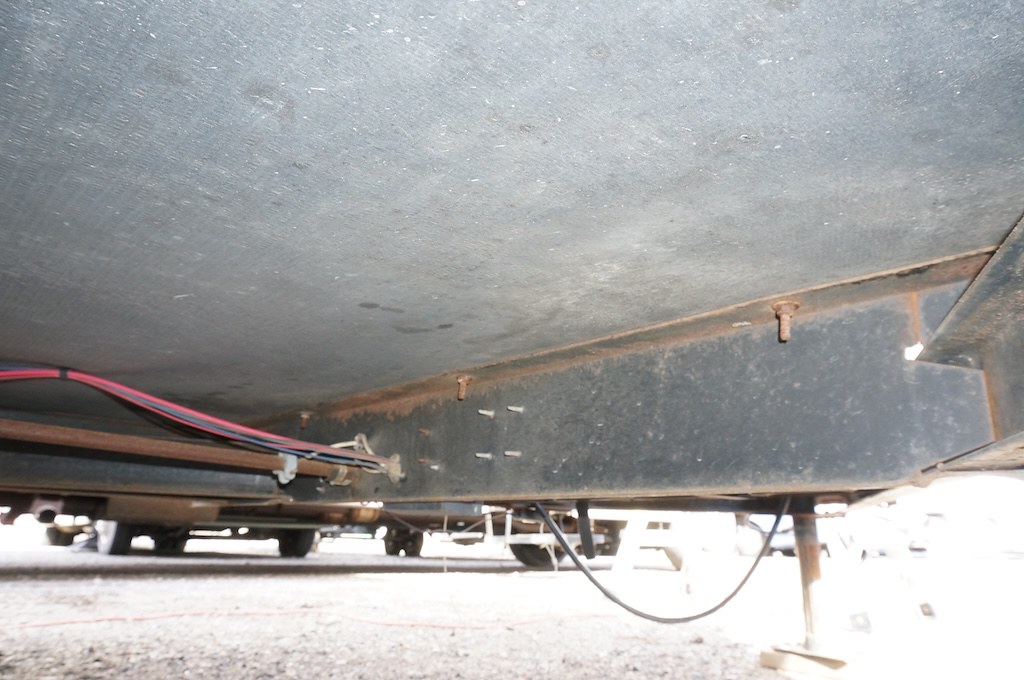
The next area of higher frame flexing is the axle and suspension area that attaches to the wheels and tires. This 2004 T310SR is a leaf spring tandem axle setup like many, but not all, Sunlines. The pictures show the original Sunline suspension attached to the main frame rails. This camper uses a 10 tall x 9 #/ft. I-shaped main frame rails are often called an I-beam in the non-tech world. Technically, it is a thin RV beam, MH beam, in the RV and manufacturing housing industry, or M beam (miscellaneous), and it is not a true ASTM, I, or S shape beam. We will call it an I-beam for camper conversations. The main frame rails are welded to the main frame header by the A-frame area. The main frame rails have several cross supports (not shown) running left to right between the frame rails along the length of the camper. The rear bumper attaches to the back of the two main frame rails.

View looking under the camper towards the left side suspension system.

View of some of the main frame cross-supports. This model has an enclosed tank compartment, which traditionally only was supplied on certain models of the larger campers.

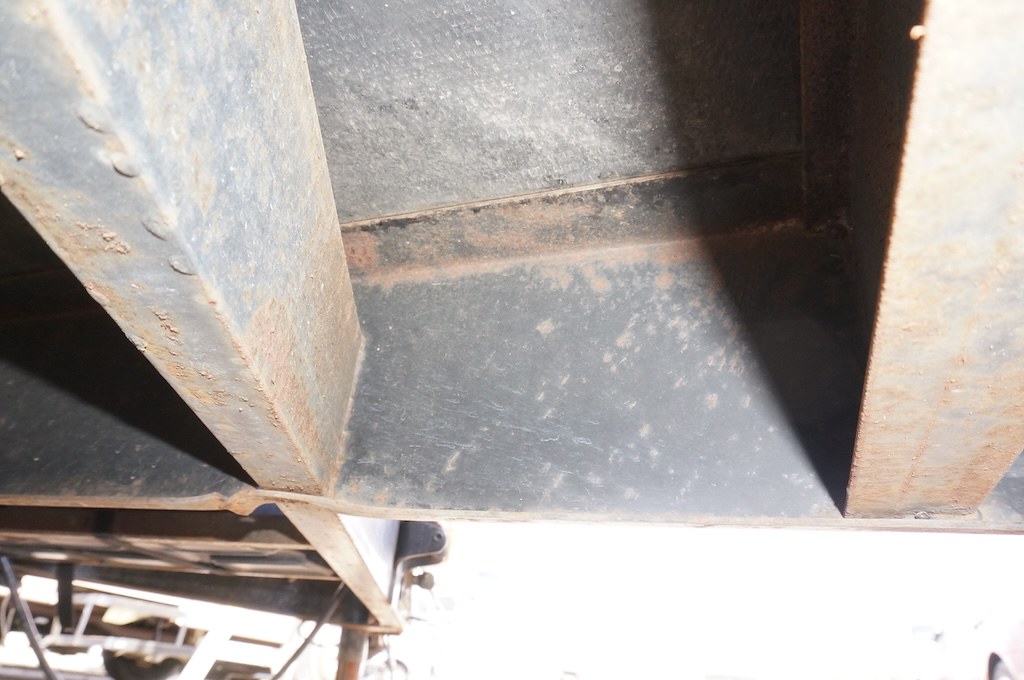
Here are some views of T310SR looking down the I-beam frame at the suspension area.
The view is looking forward from the left rear wheel area.

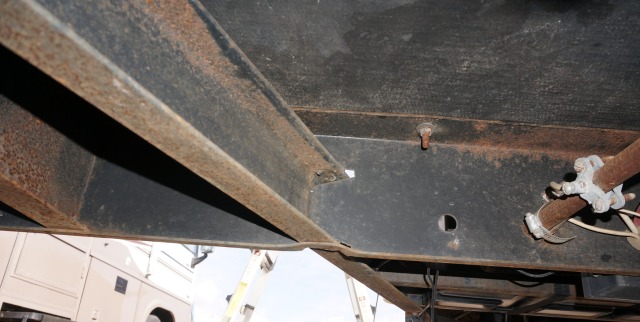
View of left side looking towards the back of the camper at the rear axle area.

This is a 2004 T-2499, 7,000 lb. GVWR non-slide tandem axle travel trailer. For this model and manufacturing year, they used a 5 tall x 6.7 lb./ft C channel as the main frame rails and the A-frame on a leaf spring suspension. As you can see, the main frame rails are made from different steel shapes, but the hangers, axles, equalizers, and shackles are very similar to the larger T310SR camper.

Not all 7,000# GVWR class campers used this C channel approach; some years used rectangular tubing for the main frame and A-frame. In the model year 2005, there was a frame redesign to change to 6 I beam main frame rails with 4 channel iron A-frames. This frame redesign in 2005 also changed the 5,500# and 6,000# GVWR travel trailers.
Many 2004 and older 5,000# GVWR class travel trailers used a 4 C channel main frame rails with a 4 C channel A-Frame.
Sunline also made many single-axle travel trailers and fifth-wheel campers with different combinations of main frame rails and A-frame or pin boxes. While there is a difference in the axle, suspension, and hitch areas, the trailer hitch area, the A-frame or pin box area, and the suspension area are areas of high flexure when towing. These are the main areas the frame inspection will be looking at.
More in the next reply on inspecting the A-Frame area.
__________________
Current Sunlines: 2004 T310SR, 2004 T1950, 2004 T2475, 2007 T2499, 2004 T317SR
Prior Sunlines: 2004 T2499 - Fern Blue
2005 Ford F350 Lariat, 6.8L V10 W/ 4.10 rear axle, CC, Short Bed, SRW. Reese HP trunnion bar hitch W/ HP DC
 Google Custom Search For Sunline Owners Club
|

|

|
|
02-25-2024, 03:06 PM
|
#2
|
|
Moderator
Join Date: Nov 2006
Location: Ohio
Posts: 12,656
SUN #89
|
Part 1, Inspecting the A-Frame area.
Trying to keep the wording shorter and not repeat things as much, I will talk about the areas of inspections with pictures of damaged A-frames so you can see some of the things to look for during an inspection. The reasons for damaged frames will be explained in detail later in the repair replies.
All areas of the A-frame need to be looked at during the inspection, which includes: (Suggest using a flashlight to see into dark areas as cracks do hide in the deep dark areas.)
1. The ball coupler. Look for any cracking in the welds of the coupler to the A-frame or bent/damaged coupler parts. Look up from the bottom at the ball latch area.
2. The A-frame rails, which start at the ball coupler, pass through the frame header and attach to the main frame rails under the camper. Inspect the entire length for signs of cracking or twisted shapes.
3. The frame header. Inspect the full width of the camper for damage where it is attached to the A-frame rails and for straightness. Take note of a bowed bend in the center of the camper.
4. The A-frame support angles create the battery tray. Inspect these battery tray angles for being bent/twisted open or upward/downward, indicating that the A-frame rails have been twisted excessively.
5. The LP tank mounting tray is attached to the top of the A-frame. Inspect for cracking of the welds from the tank tray to the top of the A-frame rails.
6. While under the camper inspecting the A-frame, turn and look towards the front axle, inspecting the main frame rails for any cracking or twisting of the top or bottom flanges of the main frame. A twisted top or bottom flange indicates that excess stress has been applied; even a small twist is a concern. Closely inspect the main frame where the cross supports are welded to the main frame rails for cracking of the welds.
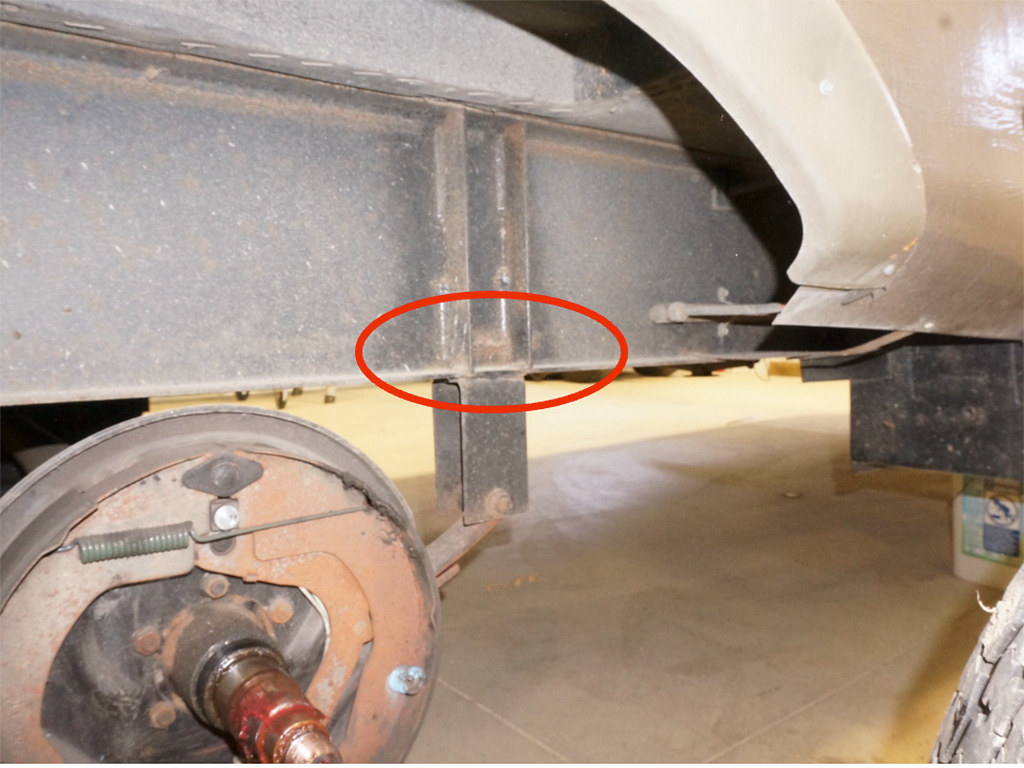
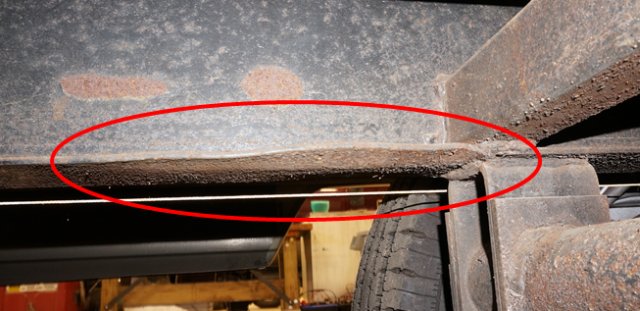
I will start with a 2005 T-2363, which has a failed A-frame, almost to the point the right-side A-frame rails were broken free from the header. The camper has a 5,500# GVWR (Gross Vehicle Weight Rating), a 6” I-beam main frame with a 4” C channel A-frame, and the owner used a WD hitch. I was helping a camper friend inspect this trailer on a dealer’s lot who wanted to buy it. After finding water damage and the A-frame damage, combined with the dealer's unwillingness to lower the selling cost, they decided to pass on it. These findings are from Oct. 2017; the camper was manufactured in Feb. 2005 and was approximately 12 ½ years old. By the looks of the damage, I estimate the damage started roughly 3 – 4 years before and kept growing in severity. This is a very nice camper; I tried to acquire it as a project camper to restore, as it was perfect for restoration. However, the dealer wanted too much for it and knew they could sell it as is come spring. All this damage is repairable.
Here is the camper.

The first part of the A-frame inspection. I started following the left-side A-framer rail to the header and looked closely at the header joint. So far, this side looks good. While here, and I have no pic, I also look just inside the A-frame at this same joint while not yet under the camper. All looked OK.

Next up, go to the right side and do the same thing: start at the ball coupler and follow the A-frame rail to the header.

It's too dark; you have to look closer with more light.

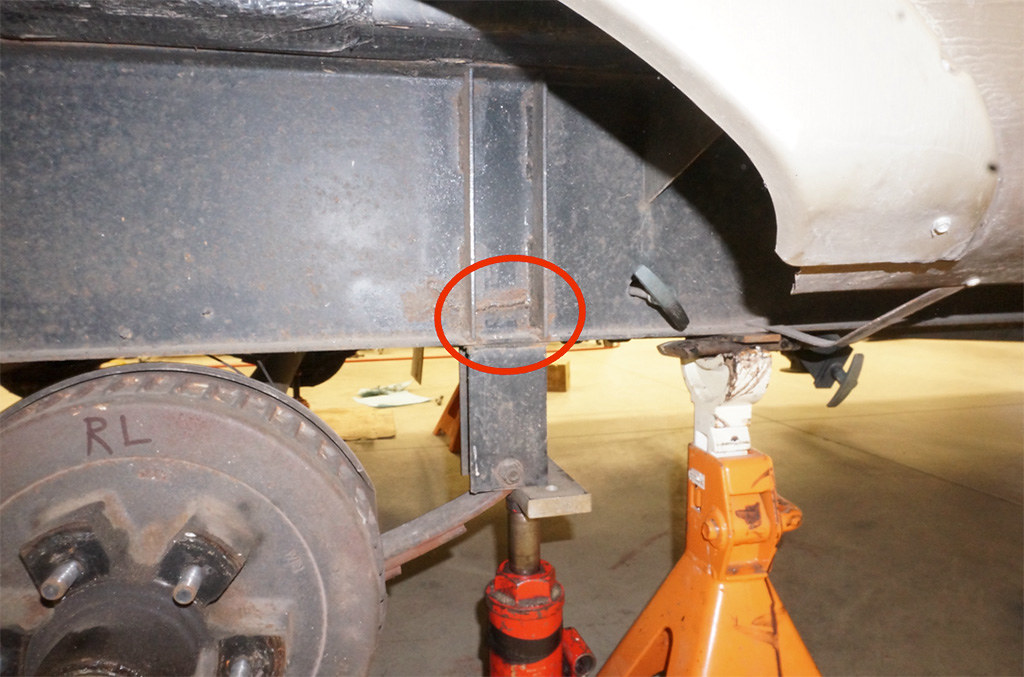
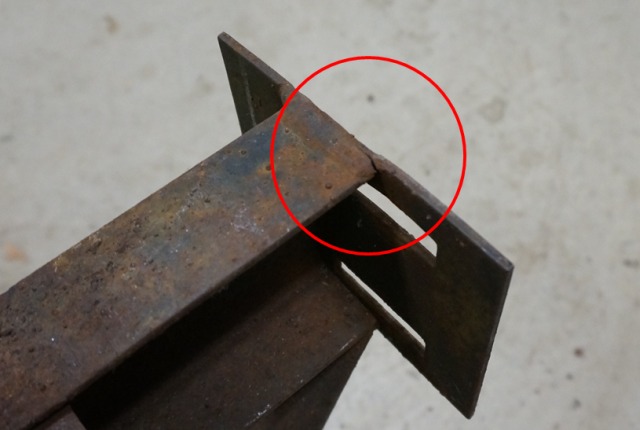
Knowing where to go looking, ah yup, there is a problem. See if you can see it.

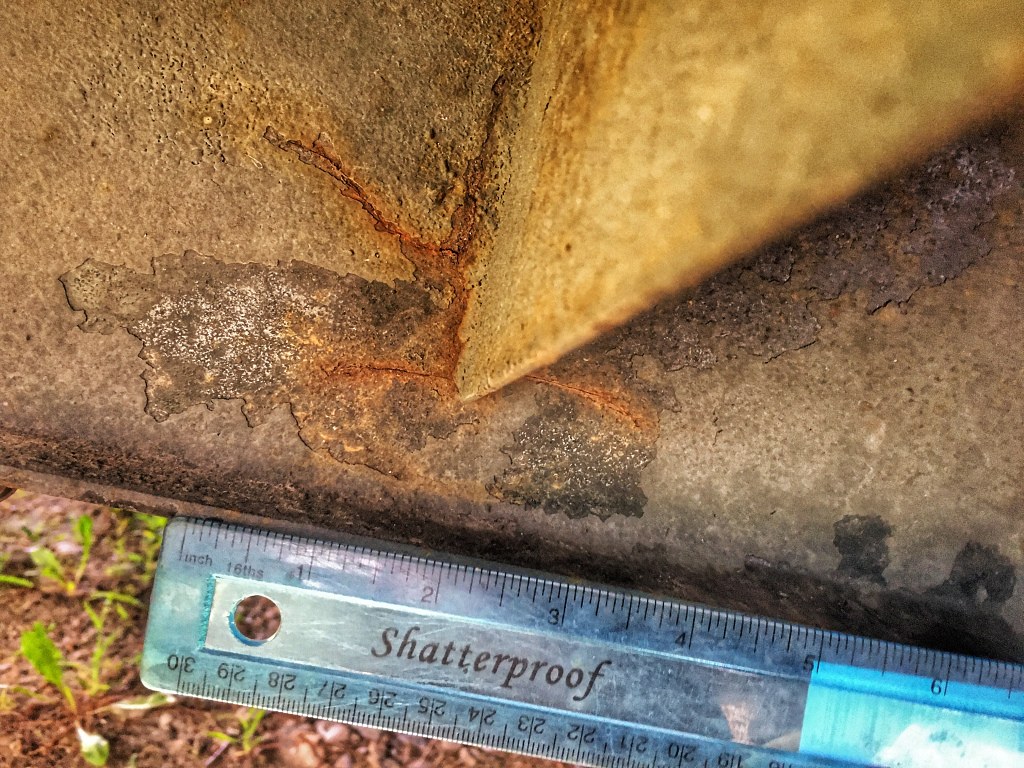
A closer look to the right of the white hex screw head above the top of the A-frame rail. The tell-tale of a crack is to look for a rusted witness line. The fresh exposed metal rusts along the crack line as the metal cracks and time goes on. When you see this, you know you have to dig deeper. NOTE: They do not all crack like this; this is an advanced crack this high up.

Now look for a bent header and battery tray angles.

The battery tray angles do not look bad; the header may have a slight bow in the center, but I can't tell yet.
Now it's time to crawl under with a flashlight and start looking from the back side of the header. This is a must, as you can see more of what is happening.
A scan to the left side.

Now, to start honing in on the right side of the problem area.

The header metal is cracked free at the bottom of the A-frame rail.

Look closer with more light.
A few things are wrong with this picture; see if you can find the three things.

1. A crack runs almost to the top of the header.
2. The header metal is cracked at the bottom of the A-frame rail.
3. To my surprise, they never weld the back side header tab to the middle of the A-frame rail? That header tab, which the web of the channel passes through, I "thought," is typically welded on both sides. In this case, I know the tab is welding on the outside, just not on the inside.
Let's look at the right side at this same joint.
NOTE: You are seeing the bottom header metal bend up to the bottom of the A-frame rail, where the channel extends through the header. This is normal; I have seen this on all the frames I looked at. They weld the bent-up tab to the channel, at least on one side.
Since I only found what looked like a missing inside weld on the right side from my pics last night doing this post. I now see the left side may also not be welded inside the header tab to the channel. It is just that this side is not flexed open like the right side is to see the split. If there is a weld on this left side tab, it is very light. There is a full weld fillet on the outside. A one-sided fillet weld does not have much strength when the joint flexes. I will have to dig into this more on my campers in the barn.

While under the camper, look back at the front axle and check the main frame flanges and cross-member welds for cracking.


Next is a 2004 T-2475, which had a buckled header and the start of a failing A-frame. This camper has a 5,500# GVWR, 4” C channel main frame with a 4” C channel A-frame, and the owner used a WD hitch. This is now one of my project campers; the owner did not know there was A-frame damage and had used the camper the prior session. These findings are from April 2018; the camper was manufactured in April 2004 and was approximately 14 years old when the damage was found. I estimate the damage started roughly 3 to 4 years before. This damage has been repaired, and we will talk about it in the repair post.
This camper has the same 4" channel A-frame rails but uses a 4" channel main frame rails. As such, the header is shorter in vertical height than the 2005 T2363 shown above.
This camper is undergoing restoration and is in the process of repairing the A frame. I will show highlights here as I do not have the step by step pics like on the T-2363.
Here is where we are starting from. This camper has a buckled header.


In the case of a bent/buckled header, I pull a string tight across the bottom of the header to see how good or bad it is.

I can measure the bow in the center. The header sections outside the A-frame rails bend down, and the header center can be twisted or not so twisted and bowed or not so. In this case, I have a 5/8" difference in the center.


Now, look down the bottom of the header, left to right across the camper.

Now, to look inside the A-frame at the header connection, the A-frame rail. This is still the outside area of the A-frame where the battery angles are.
The right side is buckled where the header metal joins the A-frame rail.

The left side is also buckled. And you can clearly see there is no weld on this side tab. The T2363 had welded on this side but not the inside.

Next are more pic closeups of the A-framer rail to the header, still not yet under the camper.
The left side joint. The header is cracked off the A-frame rail


The right side also cracked in this area.

Now to looking at the damage from under the camper.

Here is the left side. You can see the header buckled where it meets the A frame rail. You can also see they did weld the header tab to the A-frame rail, just on the inside this time. There is no weld on the outside. It appears they only do a one sided fillet weld. The convention on which side may be a change in the frame sizes. I will still look more into this.


Here is the right side. The same looks as the left side.

Some of our early club members may recall this post from July 2008 when club member Clarkdc asked about their 2007 T-2499 with a bent frame header. The camper has a 7,000# GVWR, a 6” I-beam main frame with a 4” C channel A-frame, and the owner used a WD hitch. This camper was 1 to 2 years old when the damage occurred and may be the most advanced damage the club has seen. This has all been repaired, and they are still camping with the unit. https://www.sunlineclub.com/forums/f...99-a-9326.html
That post highlighted several other 2005 to 2007 campers from club members with the T-2499 once they knew to go looking. The T-2499 has a very high loaded tongue weight for its weight class, which accelerated the failures. We have not heard yet of any 2003 or 2004, T-2499s with A-frame damage. Those 03 and 04 model years utilized 5” C channel main frame rails with 5” C channel A-frame. The same type of 4” channel A-frame damage is showing up on other models; it has just taken longer, years’ worth in many cases, to be realized.
Here are a few pic highlights from that post from other members that I did not have pics of.
Bent battery tray angles and header

Another bent header.
This post by shepards2, is with a 2007 T-257SR, which had a totally failed header. The right side A-frame rail while still intact, completely broke free from the header. This camper has a 7,000# GVWR, an I-beam main frame (I am not sure if it is a 6” or 8” I beam due to the slide) with a 4” C channel A-frame, and the owner did “not” use a WD hitch. He towed it with a 1 ton Dodge dually. The camper was built between mid-2005 and October 2006. The damage was reported on Sept. 2021; the camper was approx. 16 years old with a reported estimated 20,000 miles. https://www.sunlineclub.com/forums/f...ams-20258.html
I know of another 2007 T-257SR from a club member, which had a buckled header and the start of a failing A-frame rail separating from the header. He had just bought it used and had not yet towed it to camp. I saw the damage myself in his driveway and pointed it out to him so they could fix it. It was repaired, and he used the camper until he bought a new one. The damage was found in April 2018; the camper was approximately 12 years old.
Last summer, while camping with other Sunline friends, I found a friend’s 2003 T-2363 with a very broken frame header, which he bought used a few years back. This camper has a 5,500# GVWR, 4” C channel main frame with a 4” C channel A-frame, and the owner used a WD hitch. The entire mid-section of the header was separated from the A-frame rails. He had no idea this damage was there. What saved him from being able to tow the camper was that he created a large battery holding rack across the top of the A-frame, had parts of it welded to the outer parts of the header, and bolted to the A-frame rails. This battery tray helped add rigidity to the A-frame in place of the header. He has now had the A-frame repaired and is using the camper again.
If any of our club members find A-frame issues, please post here on this thread so we can help keep them all in one location.
In the next reply, we will see the inspection of the suspension area.
__________________
Current Sunlines: 2004 T310SR, 2004 T1950, 2004 T2475, 2007 T2499, 2004 T317SR
Prior Sunlines: 2004 T2499 - Fern Blue
2005 Ford F350 Lariat, 6.8L V10 W/ 4.10 rear axle, CC, Short Bed, SRW. Reese HP trunnion bar hitch W/ HP DC
Google Custom Search For Sunline Owners Club
|
|
|
|
|
02-25-2024, 03:06 PM
|
#3
|
|
Moderator
Join Date: Nov 2006
Location: Ohio
Posts: 12,656
SUN #89
|
Part 2, Inspecting the suspension area and main frame.
I will talk about the areas of inspection with pictures of damaged main trailer frames so you can see some of the things to look for during an inspection. The reasons for damaged frames will be explained in detail later in the repair replies.
All areas of the main frame system need to be examined during the inspection, including: (Suggest using a flashlight to see into dark areas.)
1. The main frame rails, both the left and right sides, the entire length of the camper. Depending on the frame style, C channel, I-beam, rectangular tubing, etc., does not matter; all frames need to be looked at for cracks in the metal or welds. Look over both the outside, inside, and under the frame rails.
2. Special note for campers with I-beam style main frame rails. Check the I-beam's top and bottom flange for distortion (bending) along the entire length of the main frame rails. Most of the frame rails’ strength is carried by the top and bottom flanges being straight in their original position. Distortions can include a slight or significant bend up or down of any part of the top or bottom flange or, worse, a crack in the top or bottom flange. Make a heightened inspection at spring hangers or axle subframe mounting frame area.
If you have experienced a very rough, bouncing road to camp, check the lower flanges at the leaf spring hangers or the torsion axle subframe area if equipped when you get to camp. If you find any bending in the frame flanges, keep an eye on it and get it checked out soon. If the flanges have a significantly bent lower flange, it indicates the potential of a weakened frame rail due to a prior event. The camper or frame may not look that bent right after the bad towing event. However, if the flanges are damaged, the frame rail is weaker than before the event. Going forward, when normal towing mileage increases, the frame keeps flexing, and damage can/will continue to increase, even on regular roads, creating significant problems later. Not correcting the bent flange within 500 to 700 miles after, can make for a much more extensive repair if the flange is bent bad enough.
3. The suspension area has a higher probability of cracking or bending and should take extra time for inspection. The tires may be in the way to see clearly; use a flashlight for added lighting. On leaf spring suspension, check the hanger welds for cracks where they attach to the frame, signs of bent hangers, and cracks in the main frame web steel near spring hangers. On a torsion axle suspension, check the subframe for weld cracks to the main frame and where the torsion axle mounts to the subframe.
4. The main frame cross members run left to right of the camper along the length of the main frame rails. Look for cracks at the weld connections of the cross members to the main frame rails.
5. Check the rear bumper mounting metal for weld cracks where the metal mounts to the main frame rails.
6. If your Sunline has a freshwater tank under the camper, check the support angles under the fresh tank for bending the support rails. This is most important on I-beam style frames. (More on this in the next reply, talking about specific model issues)
The inspections may seem like a lot, and it can be the first time you have ever done this. Part of the main frame inspection can be combined with the A-frame inspection when you are under the camper. Everything is new to you, and you may be unsure what to look for. Ask questions, take pics, and post, and we may be able to help. Each time you do an inspection, you will improve, and the task will be faster.
What you will see in the pictures are mainly I-beam-style damages and cracks. These cracks are not only a Sunline issue; they exist on many other brands of these styles of frames, including many new campers above a 3,500# GVWR. The Sunlines may have fared better than most. Regardless of the style of the frame, the inspection is done similarly. On the Sunlines, the heavier campers with the I-beam web cracks show up sooner/less miles than the smaller campers. The heavier camper weight can stress the frame faster without added reinforcements, resulting in cracking sooner.
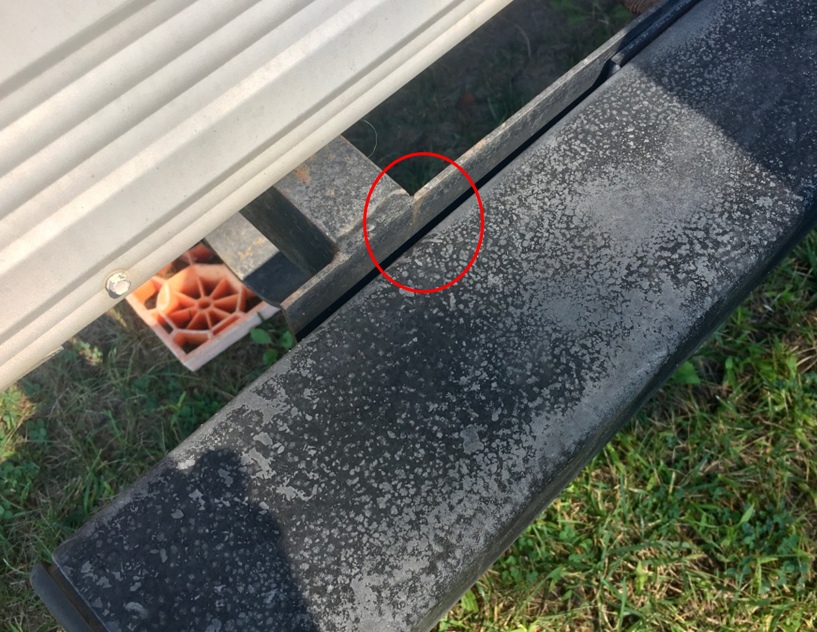
The first camper I will show is a 2007 T-286SR, which uses a 10” tall I-beam style frame on an 8,600 lb. GVWR camper. The mileage on this camper is not precisely known. However, my friend bought it new as one of the last Sunlines made. They did cross-country travel a few times, starting in Michigan and trips from the north to Florida a few times before these frame cracks were found in June of 2018 when I was camping with them. We had a campfire talk; I walked up to the camper, and yes, it had a main frame rail web crack problem. I pointed them out to him. They had no idea the cracks were there. A local welder has fixed them, and the camper is still being used.
I did not take pics of the cracks before they were repaired, so you cannot see the rust-stained crack lines. I did some restoration and axle work on this camper a year after the repair; here are the repaired pictures with circles of where the cracks were over the spring hangers in the I-beam web section. I underlined the crack weld in red so you can see the weld more easily.
Here is the overall axle setup on the right side of the camper. The red-circled areas show the web cracking.

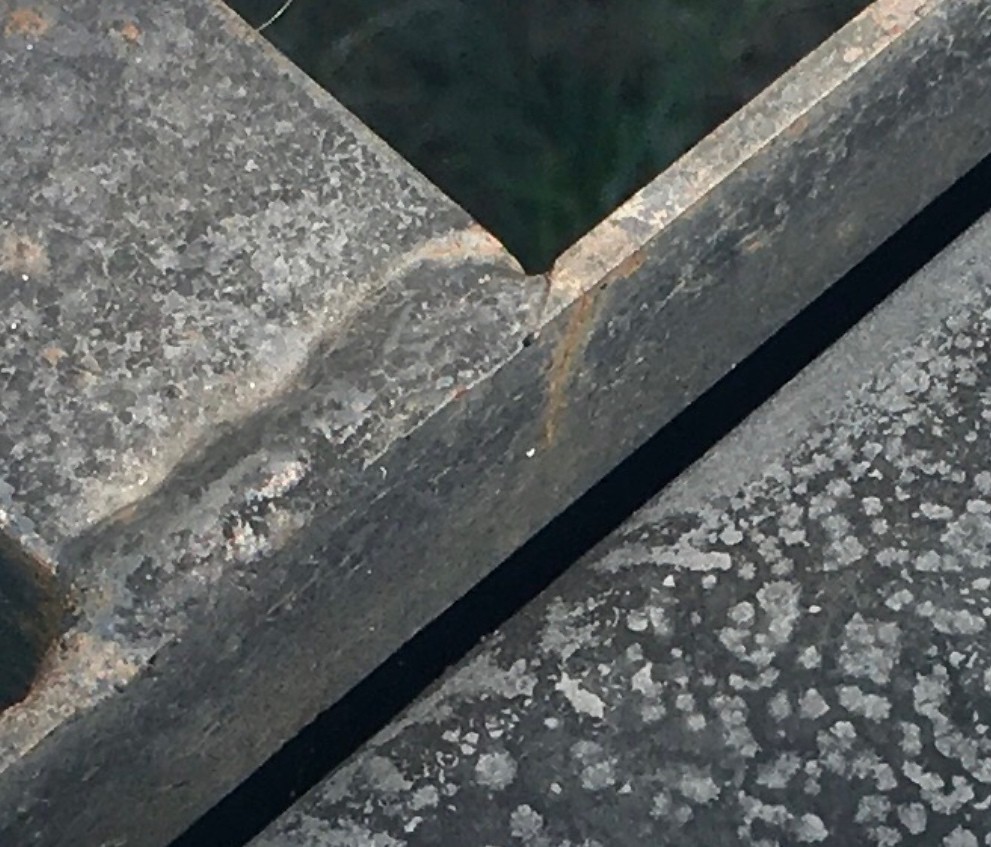
Here is the right-side rear web crack.

Close up

Here is the right-side front web crack.
Close up

Here is the left-side rear web crack.
Close up.

Here is the left-side front web crack.

Close up.

The main frame web cracked at all 4 spring hanger locations. The 2 equalizer hangers did not show signs of cracking during this inspection.
This next camper is a 2007 Komfort brand travel trailer from one of my camper friends who lives in the northwest US area. I’m sharing these pictures with his permission as it helps us see the frame web cracking issue on the thin I-beam style frames used in the RV industry if they are not reinforced enough. He had a 2007 Komfort brand camper, a higher-end camper like Sunline, just made in Oregon instead of Pennsylvania. This camper has a 10,000 lb. GVWR is on a 10” I-beam style frame, like the Sunlines of the era. The crack damage was found in the spring of 2012. Their camping style included many boondocking sites requiring off-road travel to get to the campsite. Note: Komfort had a history like Sunline, making very good campers, and started from a small independent company. In 1995, Komfort RV was acquired by Thor. As reported on the web by prior owners, the older Komfort campers were liked better than the newer ones. In the 2011/2012 time frame, the Dutchmen division of Thor redesigned the Komfort campers and used the brand name.
The crack damage occurred as an I-beam web crack above the equalizer hanger. This crack was found relatively soon after the metal cracked. There was minimal rust on the crack line. It is tough to see in pictures until all the paint is removed during the repair process. The camper was repaired with added reinforcements and used without any future cracks in the 11 years following when he sold it, even in off-road conditions.
The camper up on jack stands ready for the repair.

The axle area. Something to note: Komfort did not have the angled web reinforcement at the equalizer hanger as Sunline did. Komfort used a V-shaped 1/4" plate between the hanger, and the ends were welded to the bottom of the main frame rail. We will talk about this more in the repair reply. Both reinforcement methods have been shown to fail and crack the web. This picture is during part of the repair process, it is used to show the over all suspension setup.

Here is a closeup of the equalizer hanger web crack. In the picture, it is hard to see the faint crack line with some dirt and paint in the area.

Here is the cracked area after the wire brush treatment to prep the surface for welding.

Here is the crack during part of the grinding process during the repair.
 The next camper is a 2005 T-1950
 with 6” tall I-beam style main frame rails rated at 5,500 lb. GVWR. This camper has been in full-time use across the US annually for the last nine years. The towing mileage by the prior owner is unknown. Most all towing is on over-the-road conditions in established campgrounds with hookups. These cracks were found when I did axle work for my friend in October 2022. This cracking follows the same pattern as the larger campers; it just took longer to show up.
Here is the right-side suspension setup. The prior year, a dealer installed the Dexter HD shackle kit and greaseable bronze bushings.
At this time, only the front right and left spring hanger areas had web cracks. The rear spring hanger or the center equalizer hanger did not have any web cracks.
The front right web crack. It was easy to see during the axle removal. The camper was getting an axle under/over conversion (aka axle flip) to gain more ground clearance.
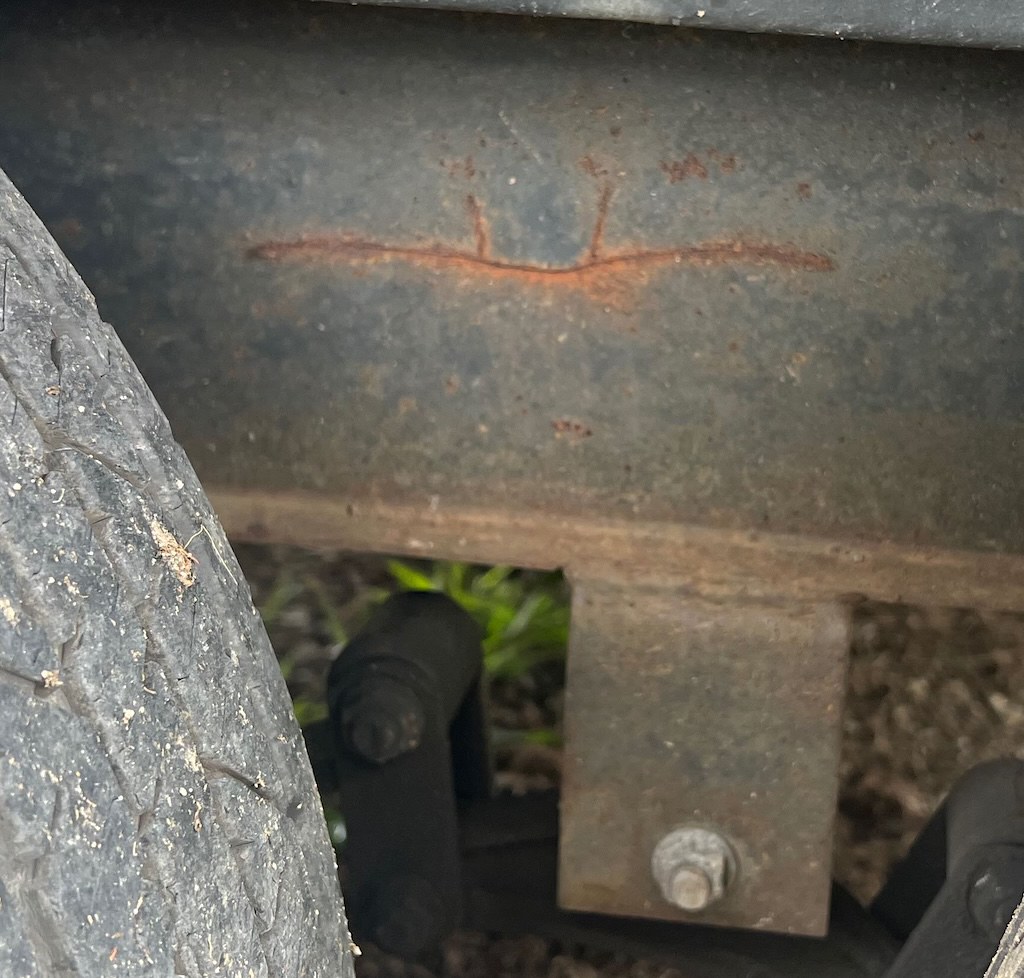
Here you can see pics of the rusting witness line to look for.


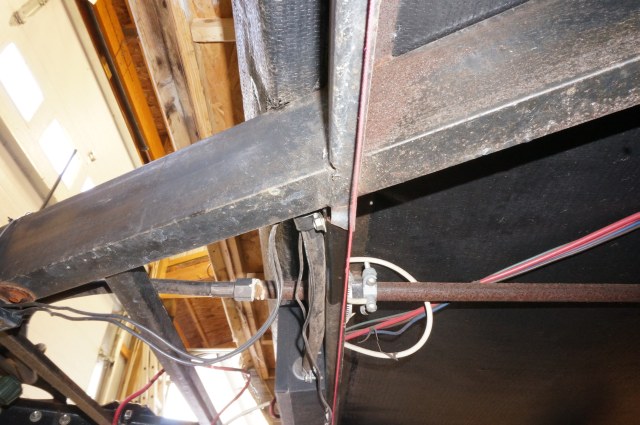
This right front hanger area web crack happened at a cross support member. Here is inside the frame at the crack location. You can also see the LP gas pipe clamp cracked off. I an unsure if the pipe clamp crack came from the frame flexing/twisting or not.

A close up pic.

Here is the left front axle area. The frame web cracked at the same cross member as the right front side. It also had a web frame crack at the outrigger support forward of the front axle.

The left front cross member crack.


Inside the frame of this left front axle web area crack, it is the same cross member that cracked on the right side


Here is the left outrigger support that holds up the outer left wall to the main frame rail. The crack is at the very bottom of the outrigger bracket.


Here is the inside of the outrigger crack
 This link will take us to a 2005 T2753
 with a 6” I-beam main frame rails and a 7,000# GVWR.
https://www.sunlineclub.com/forums/f...eam-20493.html
Club member, flbradjr, Brad found I-beam web cracks near the center equalizer hanger and in the cross members where they attach to the frame rails in August 2022.
Right side of the camper web crack above the equalizer hanger.

The same web crack inside the frame at the cross support member.

The left side of the camper, web crack above the equalizer hanger.
Hard to see, but inside the frame at a cross support member. The flashlight is pointing to it.

See Brad’s post for more pics and info.
The next few pictures are from a 2007 T2499 with a 6” I-beam main frame rails and a 7,000# GVWR. We were camping with one of our Sunline friends, having a campfire chat. The topic of frame cracks came up, and we walked over to their camper. Yes, they have web frame cracks, that had not realized before.
The left side main frame web crack above the equalizer hanger.

The right side main frame web crack above the equalizer hanger.

They also have a leaf spring and equalizer issue that I noticed when zooming in on these pictures. I will alert them of this. The rear leaf spring is also bending the bottom flange of the main frame and the front leaf spring is hitting the equalizer hanger.
 Next is a bent spring hanger on our 2004 T310SR.
 This camper has a 10” I-beam frame rated 10,000# GVWR. The bent hanger was found on May, 9, 2009 when doing suspension work. The towing mileage has been approximately 4,000 miles since we acquired it in September 2007. The milage by the prior owner is unknown, but I can tell by the lack of wear and use, this camper was not towed much by the prior owner. The bent hanger was straightened and reinforced; more on this in the repairs reply.
You and see the bottom of the hanger is bent inwards by 7/16". This is not normal.
 On the same camper, our 2004 T310SR is a bent lower frame flange behind the left rear axle spring hanger
. This camper has a 10” I-beam frame rated 10,000# GVWR. This is a major deformation (bending) of the lower flange rendering the camper unusable in this condition. I’m sharing this detail so we can all see and learn from it. I was not doing annual frame inspections at the time until I learned the hard way, how bad, bad can get if small things are let go unnoticed or repaired. Trying to create a timeline of the damage, I backtracked my pictures. Here is a timeline leading up to the significant issue.
1. Some small event or events, not known at the time, occurred in late 2009 or early 2010. By December 2010, a picture review showed a slight deformation of the lower flange behind the left rear axle hanger—my towing mileage lines up with approximately 11,000 miles at this period.
2. In 2012, I had to readjust the slide room to work correctly as the slide opening in the camper started to become out of square. The left main frame rail was slightly bending downward, creating this issue. The towing mileage at the end of 2012 was approximately 17,000 miles. After the slide adjustment, the slide worked OK and continued camping.
3. On July 24, 2014, we headed out of Albany NY, down I-88 to I-86 to camp at Watkins Glen SP on the lower end of Seneca lake. The towing mileage at the end of 2012 was approximately 21,000 miles. During this I-88 road stretch, what started in Albany as brand new black top interstate, ended up with the last 15 to 20 miles of mega pothole concrete road. The road had no pull-offs until a rest stop to escape this pothole interstate. I slowed to 50 mph in the right lane, semis whizzing by doing 70 mph for the last 15 to 20 miles. What the truck tire track missed; the camper tires hit dead on at highway speeds. When we made it to camp, everything in the camper was tossed around. The swivel rocker in the back of the camper stowed upside down for travel landed right side up and put a big ding in the side of the slide room siding. This event, now looking back, started increasing the lower flange damage by orders of magnitude.
4. By the end of October 2016, the left side main frame rail had bent down far enough, the slide room no longer would work or could be adjusted to work without damaging the slide roof going in or out. The camper was no longer usable in this condition. Mileage at the end of October 2016 was 24,760 miles, 3,409 miles since the mega pothole ride on 7/24/14. The camper underwent major frame repairs and reinforcement, and we continue using the camper today, where we are at the 50,000-mile mark. More details are in the repairs reply.
Here are pictures of what normal flanges look like before the heavily damaged lower flange. The bottom flange behind the hanger is straight and true.
The shock absorber was a test fit that was never mounted outside the frame, they where inside the frame later on. The picture is to show the normal condition of the lower frame flange behind the rear axle spring hanger.

As FYI, when the slide is adjusted correctly and there is no main frame damage, the ends of the slide room flange gaps are parallel with camper opening wall flanges as shown in this picture. This is not intended to declare a bent frame if the slide flange gaps are not parallel, this can also be caused by a misaligned slide drive.

Here is the start of a lower flange bend. It is very slight in 2010 caused by some unknown event. This was the time to reinforce this slight bend. I was not educated enough 13 1/2 years ago on how critical these thin I beam flanges have to be held in true location to handle the stress of towing a heavy camper. Live and learn, we all do.

Here are pictures from the 2016 time frame trying to sort out what went wrong with the left main frame rails. There was very slight deformation on the lower flange on the outside of the frame. I added hanger support reinforcement a number of years before to be proactive and not have web frame cracks. That hanger reinforcement helped the outside flange, but not enough to help the inside of the lower flange.

Here is the inside behind the left rear hanger. This is the major damage.


If you see this, this is a problem.
 The last is a 2007 T2499 with torsion axles
 where a subframe is welded to the bottom of the 6" I-beam main frame rails. This camper is rated at 7,000# GVWR. Club member EMAM and his wife travel the country with their Sunline. There axle mounting had bent metal and cracks.

See their post here, with more pictures and the resolution. https://www.sunlineclub.com/forums/f...99-a-9812.html
I hope all this helps give you some insight on what to look for when inspecting your camper frame.
Thanks
John
__________________
|
|
|
|
|
02-25-2024, 03:07 PM
|
#4
|
|
Moderator
Join Date: Nov 2006
Location: Ohio
Posts: 12,656
SUN #89
|
This reply will be for extra frame areas to inspect on specific years and models. There may be other years and models with specific repeat damage patterns; the ones listed here are the ones I know of. If other club members report their findings, we can help expand the list of unique frame issues if enough repeat patterns occur.
NOTE: Do not misunderstand that these models “all” have these issues, as this is not the case. From our limited info, these models seem to have a repeat pattern after enough towing mileage and road conditions have accelerated the metal fatigue. All the damage found can be repaired.
Model: T2363, model years, 2005 through 2007. This 5,500# GVWR camper had some design changes during the 2005 model year, which included:
1. Changing the main frame rails from 4” C channel to a 6” I-beam. All 5,500# and 7,000# GVWR campers had this change.
2. The freshwater tank was moved from under the bed “inside” the camper to be located “outside” and hung off the main frame rails under the camper in the same general area floor plan-wise as the tank was in before.
Two T-2363 campers were reported here on the forum with unique damage associated with the floor plan—and at least one, 2007 T2753.
This post by member beecrazy (Don) shows their 2005 T-2363. https://www.sunlineclub.com/forums/f...tml#post101020
The report in 2012 was a bent fresh tank support angle next to the rear axle hanger. Don bought the camper used, and he found the problem soon after acquiring the camper. We know it was 7 years since the camper was made, unknown is how many miles the prior owner(‘s) towed the camper and under what conditions.
Here is Don’s bent tank angle.
 During that post, member Tweety reported that their 2006 T-2753
 also had both tank angles bent, and they have the new 6” I-beam frame. Their tank is in front of the front axle but close to the spring hangers of the front axle. Using the I-beam style main frame, this issue may appear on other floor plans with the fresh tank under the camper and near the front or rear axle spring hangers.
The next 2005 T-2363 I am reporting in this post. In 2022, I inspected a 2005 T-2363 for sale at a dealer for a camper friend. That camper was found to have a damaged A-frame, as I reported above in the prior post. While reviewing the limited pictures I took during that inspection, I saw that the camper had the same bent tank angle behind the rear axle hangers as beecrazy reported. Pictures of the main frame cross member at the equalizer hanger area were also found, where the lower parts of the cross member were cracked and separated where it attaches to the main frame rails. I did not find this during the 2022 inspection; I found it while reviewing pictures for this post on the cracked frame header a week ago. I have limited pictures from the 2022 inspection and no knowledge of who bought the camper from the dealer.
This is the third camper reported on the forum with these bent tank angle issues when they are directly next to an axle spring hanger. I see a possible pattern of how this damage may occur with the 2005 new I-beam style frame. I am unsure if this damage happened on the older style frames. I will report on this in the repairs post. I want to state that not all T-2363s have this issue. I restored a 2005 T-2363 in early 2019 for a good friend, and their camper did not have this damage. They bought the camper new, and their camping trips had lower mileage to the campsite.
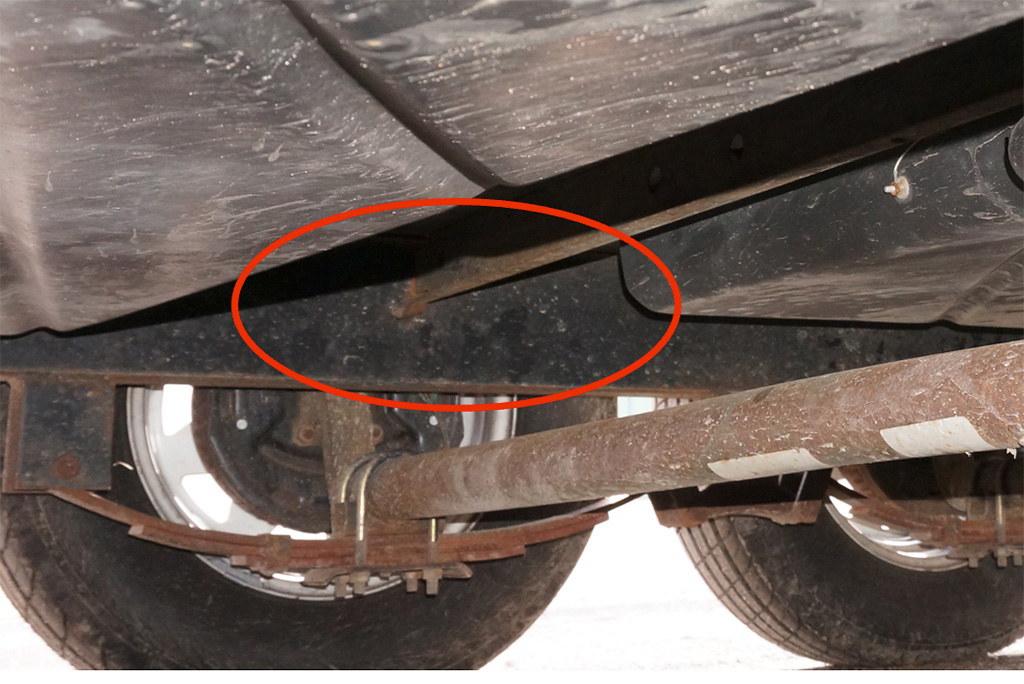
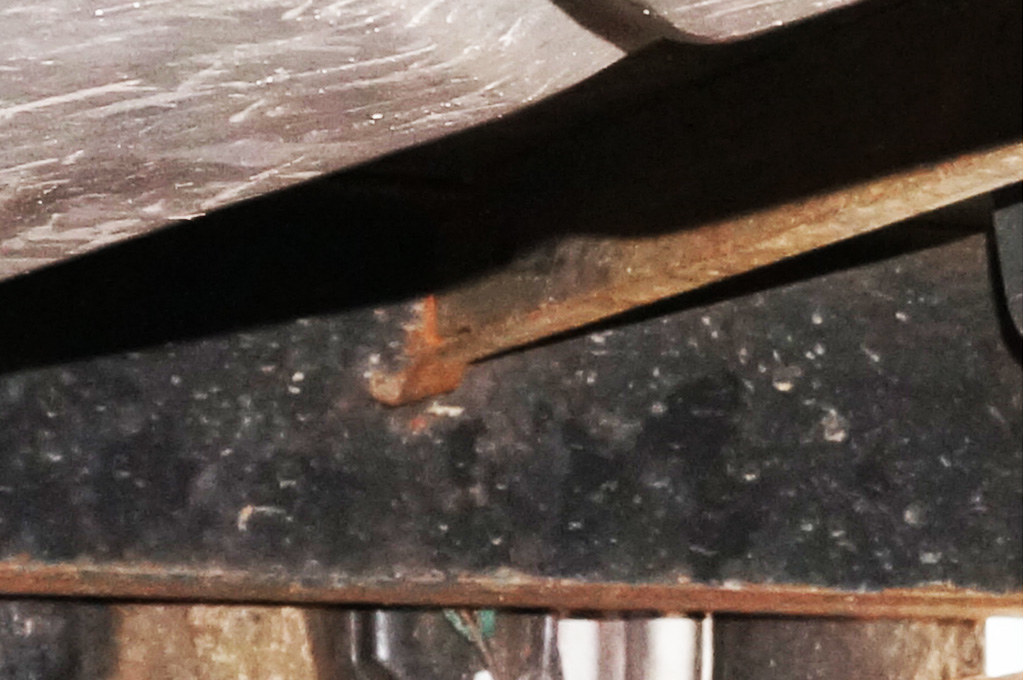
Here are the pictures of the damage from my inspection.
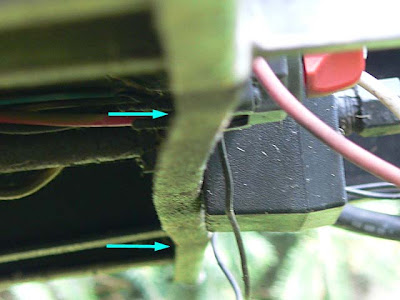
Bent fresh tank angle by rear axle hanger. I drew in a straight red line to help show how far the bend is.


There is a possible web crack at this outrigger support. This is my only picture of this area—the rust witness line is a characteristic of a cracked web section.

A buckled and cracked cross member on the left main frame rail.
Here is a close-up showing the damage. Sorry, the pic is so fuzzy.
Here is a clearer picture of the right-side cross-member weld to the right frame rail. On the bottom, the cross-member buckled and cracked loose from the frame.

A closeup

I have seen Sunline use this style of cross-member on many of the pre-2005 I-beam frames. They continued to use it when they went to the new I-beam frame design. It is a Z-shaped profile cross member. Here, on the front part of this same 2005 T-2363, you can see what a non-bent cross member looks like. There is low side stress in the frame in this area and no buckling of the cross member.
This is a close-up. The cross-member is notched to fit over the top of the frame, and in older frames, the Z cross-member could also be reversed; the lower cutout would then be on top.
 Model T-1950: The damage was found on model years 2005 through 2007.
 This 5,500# GVWR camper had some design changes during the 2005 model year, which included:
1. Changing the main frame rails from 4” C channel to a 6” I-beam. All 5,500# and 7,000# GVWR campers had this change.
NOTE: The T-1950 model has a unique left rear main frame rail jog, which is required due to the left rear bathroom and how the black tank drain piping is routed. The jog starts as a 6" I-beam short after the rear axle spring hangers and then jogs outwards with a 3" channel iron cross member, then turns 90 degrees and extends to the bumper mount with a a 3" channel. This frame feature is unique to the T-1950 floor plan. The T-1950 floor plan was popular, made many years before the 2005 main frame redesign. It is unknown if the T-1950s made before the 2005 I-beam frame change have the same frame issues. The recommendation is to check the jogged area behind the rear axle for frame cracking, as shown in these pictures.
This picture from a 2004 T1950 helps show the frame jog. The 2004 T-1950 does not have the 6" I beam frame; it uses a 4" C channel frame.

Two T-1950 campers with the 2005 6” I-beam style frame have been reported on the forum as having cracked the main frame rails web sections on both the frame's left and right rear side where the frame jog area is located.
I have a 2004 T-1950 that has been restored. This prior-generation main frame rail is made from a 4” C channel. I inspected the areas in question and found no frame cracking at the frame jog. However, I reinforced the joint as a precaution. The prior owner told me they took the camper cross-country twice. I do not know the total towed mileage or the road condition it was exposed to. I will report on the reinforcement I did in the repairs reply.
Club member Tod Osier, with his 2006 T-1950, was the first to report the issue in 2020. See Tod’s post here with pics. https://www.sunlineclub.com/forums/f...ded-19648.html
The issue is that the frame jog flexing, combined with the rear axle turning stress in the main frame rail, cracks the main frame rail web section on the left rear side. If the towing mileage and road conditions are high enough, the cross-frame support in this area also cracks the rear right-side frame rail.
Here are two pics from Tod’s post to show the problem. This is the left rear frame jog area.

This is the right-side rear frame crack just below the frame outrigger.
 After seeing Tod's damage, club member A Pack of Two (Joan) found the same problem on her 2005 T-1950 in August 2020.
 Joan was out of a reliable cell service area then, so I helped her to post her pictures. The thread is slightly out of the correct date order; here is the post with several pictures.
https://www.sunlineclub.com/forums/f...cks-19848.html
The left side frame jog area.


The right-side outrigger area.
NOTE: Both 2005 & 2006 T-1950 were towed cross country several times by their owners. Both campers are considered to have higher-than-average mileage. It is unknown how many miles and what road conditions either camper has that allowed this metal feature damage to occur.
Model T-1950 left rear bumper mounting bracket. The main frame design of using either a 4” C channel or a 6” I-beam does not seem to be a factor, with the left rear bumper mounting bracket having a cracked weld. The jogged frame to make the black tank drain piping work and possibly having the spare tire mounted on the left rear of the bumper may be factors in why this location cracks over enough miles towed. It is suggested all T-1950 owners be on the alert for the left rear bumper mount.
Here, the left bumper mounts on a 2005 T-1950 with the mounting plate cracked where it joins the jogged frame rail. This camper has a spare tire on this side of the camper. The water heater and rear cargo storage door occupy the center of the camper all the way to the right side.
The next camper is a 2004 T-1950 with a cracked bumper mounting plate.


The right side shorter bumper mounting plate had the start of a crack.
Both of the T-1950 with bumper mounting plates cracks, did cross country travel. The owners of both campers never knew there was cracks in these locations until forum members alerted them of where to look.
This ends the frame inspection postings. The next two section deal with how the damage occurred and some possible repair options.
__________________
Current Sunlines: 2004 T310SR, 2004 T1950, 2004 T2475, 2007 T2499, 2004 T317SR
Prior Sunlines: 2004 T2499 - Fern Blue
2005 Ford F350 Lariat, 6.8L V10 W/ 4.10 rear axle, CC, Short Bed, SRW. Reese HP trunnion bar hitch W/ HP DC
Google Custom Search For Sunline Owners Club
|
|
|
|
|
02-25-2024, 03:08 PM
|
#5
|
|
Moderator
Join Date: Nov 2006
Location: Ohio
Posts: 12,656
SUN #89
|
Part 3 is held for A-Frame area repairs coming soon.
__________________
Current Sunlines: 2004 T310SR, 2004 T1950, 2004 T2475, 2007 T2499, 2004 T317SR
Prior Sunlines: 2004 T2499 - Fern Blue
2005 Ford F350 Lariat, 6.8L V10 W/ 4.10 rear axle, CC, Short Bed, SRW. Reese HP trunnion bar hitch W/ HP DC
Google Custom Search For Sunline Owners Club
|
|
|
|
|
02-25-2024, 03:09 PM
|
#6
|
|
Moderator
Join Date: Nov 2006
Location: Ohio
Posts: 12,656
SUN #89
|
Part 4 is held for suspension area repairs coming soon.
__________________
Current Sunlines: 2004 T310SR, 2004 T1950, 2004 T2475, 2007 T2499, 2004 T317SR
Prior Sunlines: 2004 T2499 - Fern Blue
2005 Ford F350 Lariat, 6.8L V10 W/ 4.10 rear axle, CC, Short Bed, SRW. Reese HP trunnion bar hitch W/ HP DC
Google Custom Search For Sunline Owners Club
|
|
|
|
|
03-01-2024, 11:40 PM
|
#7
|
|
Moderator
Join Date: Dec 2006
Location: Michigan
Posts: 6,155
SUN #123
|
John, towing aside, are there any specific advantages while in storage to support the trailer from the front of the frame so that the weight is not stored only on the tongue jack long term?
I know we've previously discussed how it's not a great idea to store the trailer with all scissor jacks down in case a tire goes flat (although I store my 286 this way and watch the tire pressures), but I'm wondering if there's advantages to storing with at least the front jacks down.
__________________
2007 T-286SR Cherry/Granola, #6236, original owner, current mileage: 9473.8 (as of 6/18/21)
1997 T-2653 Blue Denim, #5471
1979 12 1/2' MC, Beige & Avocado, #4639
Past Sunlines: '97 T-2653 #5089, '94 T-2251, '86 T-1550, '94 T-2363, '98 T-270SR

|
|
|
|
|
03-02-2024, 03:44 PM
|
#8
|
|
Moderator
Join Date: Nov 2006
Location: Ohio
Posts: 12,656
SUN #89
|
Quote:
Originally Posted by Sunline Fan

John, towing aside, are there any specific advantages while in storage to support the trailer from the front of the frame so that the weight is not stored only on the tongue jack long term?
I know we've previously discussed how it's not a great idea to store the trailer with all scissor jacks down in case a tire goes flat (although I store my 286 this way and watch the tire pressures), but I'm wondering if there's advantages to storing with at least the front jacks down.
|
Hi Jon,
I'll give you some of my thoughts on your topic as there are a few things to think through.
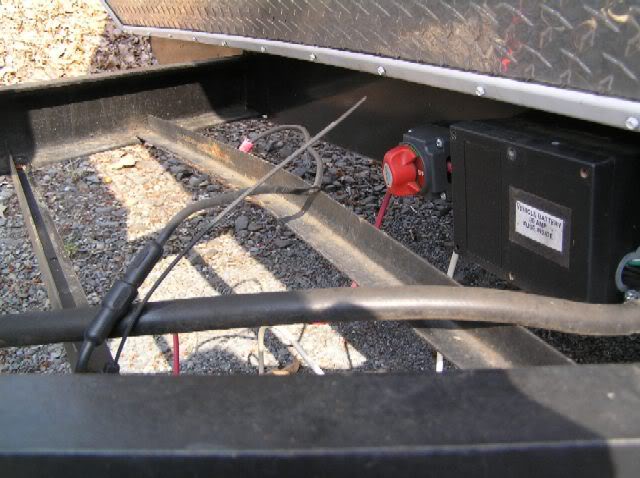
The BAL scissor stabilizers on the Sunlines are not a true jack per se. They are made for stabilizing when the camper is set up for camping. I know we call these jacks as a nick name, however they not rated to lift the weight of the camper. BAL specially says this in their owners manual. See the support tab for more on this under install and operation. https://balrvproducts.com/product/cl...scissor-jacks/
I have the 7,500# static rated ones, like your on your T286SR. The key being static rating, not a lifting rating which is a dynamic loading. On mine, they unscrew themselves due to the heavier camper if I attempt to lift much weight, they are not bending any under stabilizing, they cannot hold the weight of trying to lift. I do lube the acme screw on them which I'm sure the lowers friction also affects the back off. Your camper is lighter than mine so you may not see that issue, but still they are not made to lift or support the weight of your camper.
The tongue jack is made and rated to lift and support the weight ratings. It is not hurting the jack by sitting all winter or years on end, not moving.
The camper frame is not hurting either when resting in place. Yes, keep the tires aired up, they need that to have long life in storage. If you are trying to help the camper frame during storage with the stabilizers, lets think about that a moment.
Fortunately, we have a Sunline with a 10" main frame in the larger Sunline campers. The camper when stored has plenty of frame strength to handle storage without any extra support. I have high confidence that Sunline frames will not be damaged in storage standing still. Again, assuming you are not overloading the weight inside the camper, which I doubt you are.
In your case, you have extra frame capacity as a safety margin as long as you adhere to the 8,600# max loaded GVWR. After doing all this frame and suspension work and investigating other Sunlines, I discovered your T286SR rated at 8,600# has the same frame, springs, axles, and tires as the 10,000# GVWR Sunlines. I'm not sure why Sunline derated the shorter, larger slide campers. It may be the same reason the smaller 5,500# rated campers have the same axles, tires suspension and frame as the 7,000# GVWR campers in the more newer ones. As they were made, the Sunlines have much more cargo capacity than most new campers still built today.
Point being, the camper frame during storage, is OK, no issues and they do not need help with extra supports if you are trying to help the frame.
Use this analogy: you have a great shape Excursion with a frame with less capacity than your Sunline T286SR does. Do you worry about the Excursion's frame during the off-season? Ah, I didn't think so. Grinned: Don't worry about the Sunline; it's good. 
I hope this helps to wrestle with the decision.
John
__________________
Current Sunlines: 2004 T310SR, 2004 T1950, 2004 T2475, 2007 T2499, 2004 T317SR
Prior Sunlines: 2004 T2499 - Fern Blue
2005 Ford F350 Lariat, 6.8L V10 W/ 4.10 rear axle, CC, Short Bed, SRW. Reese HP trunnion bar hitch W/ HP DC
Google Custom Search For Sunline Owners Club
|
|
|
|
|
03-05-2024, 05:56 PM
|
#9
|
|
Moderator
Join Date: Nov 2006
Location: Ohio
Posts: 12,656
SUN #89
|
For those who subscribe to this post, it turns on the yellow light as something new; I updated the fourth post on the thread today, extra frame areas to inspect on specific years and models.
More yet to come.
__________________
__________________
Current Sunlines: 2004 T310SR, 2004 T1950, 2004 T2475, 2007 T2499, 2004 T317SR
Prior Sunlines: 2004 T2499 - Fern Blue
2005 Ford F350 Lariat, 6.8L V10 W/ 4.10 rear axle, CC, Short Bed, SRW. Reese HP trunnion bar hitch W/ HP DC
Google Custom Search For Sunline Owners Club
|
|
|
|
|
|
Currently Active Users Viewing This Thread: 1 (0 members and 1 guests)
|
|
|
 Posting Rules
|
You may not post new threads
You may not post replies
You may not post attachments
You may not edit your posts
HTML code is Off
|
|
|
|
 » Recent Sunline Discussions
 |
|
|
|
|
|
|
|
|
|
|
|
|
|
|
|
|
|
|
|
|
|
|
|
|
|
|
|
|
|


 Linear Mode

