Always on the lookout for advice, I offer the following report and photo journal of sorts.
Having never operated an LP gas system before, and being told by the previous owner that "the tanks are empty" I decided to tackle them first.
My aim was to get them filled, and then spend some time with the furnace running to see what the consumption looked like + be able to do some stuff inside without freezing. I figure it to be a bit like exposing cadets to tear gas and telling them to take their masks off. Nothing like real world experience in a controlled environment.
Well, after I PEEL the old tank cover off (it was shot, I knew that) I see that the bottom of the tanks are VERY rusty - I roll my eyes, liberate the tanks, and ..... they feel half full!?
Ok, sez I, the fill station (an RV shop and store) is 5 mins up the road so I take them in, thinking I'd still like to get them "topped off". No good - the valves are outdated and have to be changed, and one tank is so goobered up (parts of the "foot" missing from rust) that it won't pass recetification even with the new valve.
BUT he's nice enough to *give* me an old tank to rehab myself, then get them to install a new valve, recert, and fill (rather then sell me a new one for $90 which they had in the store) - So I take it.
I buy a battery box and a tank cover and head back planning to use up what I have and then return to this matter later. What I'll do is clean up the empty, get it done, and have it on standby.
The Platform the tanks sit on is hella rusty too, but that will have to wait for more paint friendly temps.
A check of the refer after all night being on shows it's working - yea!

The rest of my time was spent on locks... The previous owner didn't have keys to the 2 outside compartments or the locking door over the water filler so I started looking and found that these compartments can be accessed from the inside by pulling up cushions and seat bottoms. (The water door was already open)
I do so, and remove the screw holding the "tongue" on, get the doors open, and remove the old locks. Then install new ones.
While in the rear compartment, I find that the left rear corner of the floor is rather shot - soft and cruchy. Given where it is, it will be low on the list, but I WILL be soliciting the advice of those of you who have dealt with this when the time comes!

Then I spent some time looking, thinking, and planning. With the refer OK and the RV joint up the street having Atwood 6 gal units used for sale, I'm feeling rather upbeat about this again. I've always valued something where I can get my hands dirty on it, rather then buy it perfect and new - because almost always it ISN'T perfect and I have to do something... (I'm an engineer of sorts, I can't help it

)
On with the pics... (Larger versions
HERE)

Kitchen Cabinet - paper was stapled to back wall and bottom, black things are dead lady bugs. You can see the de-lamination of the back, and sagging ceiling here. "Gerbil-ed" edge at the top was from previous owner enlarging the opening to admit a microwave oven here, when I opened the oven water ran out of it, cluing me in to trouble inside.

Fridge Cabinet - the gaping hole used to be a drawer, why it's gone will become evident, again de-laminated paneling....

Inside Refer Cabinet - This is the view looking though the drawer slot and looking up. That's daylight up there. The remains of a panel "floor" below the refer is on the left, metal work that "supports" the refer on the right.

Top of water heater - Shot from the same location as the picture above, but looking down this time.

Water Heater - looking straight in on it this time. The crack I feel is at the bottom where I can't show it - just out of the shot are two gray water lines with Ts in them and those Ts are connected to one another by lines that look like the belong connected to these valves rather then each other. (I know this is a winterizing thing) But I don't see a check valve...

Comedy Shot - a wardrobe for VERY short people... Someone added 3 shelves in the wardrobe making that hanger bar rather useless...


Front "bunk" - some water damage here - I'm really not concerned about the look, I just want to stop the source... This I can't really attribute to a window, and up here the outside is aluminum not rubber roofing, though I suppose a breach in the left front corner of the roof could lead to this...

Front "bunk / ceiling - it seems to descend from this point, where the lathe is (BTW is it normal for them to be untreated naked wood?)

Outside of Refer - that black hole at the lower left is the hole seen in the interior shot. Cooling assembly is kinda rusty. You can see how the wood is shot here.

Less then effective repair of a less then effective door...

Water Heater outside....

Interesting story - the yellow chock is what *I* put down. The plywood was the previous owners answer when he just jacked the A frame without chocking and the trailer nearly rolled into the back of his truck. Fortunately I had them available, the trailer had no chocks with it...


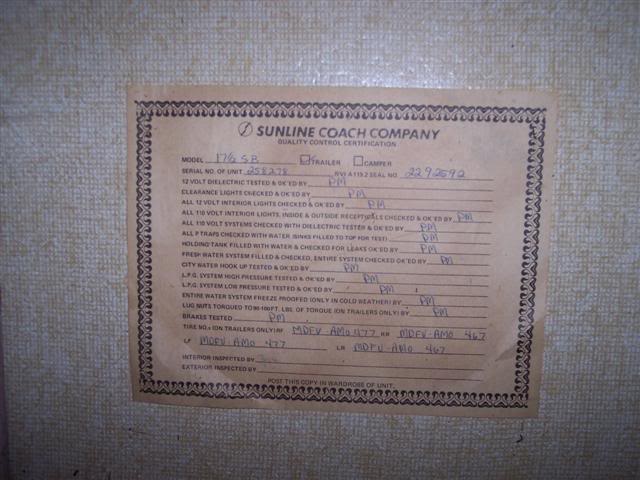
Like so many of us apparently, this is my ID sticker...

Overall "Beauty" shot. She's mine, warts and all :P
In the next three shots, can anyone tell me what these are/are for? They are held on by bolts clamping them to the frame, there is one on each side, they are just behind the propane tanks. There is a pin you can slide out, and then the "claw" will rotate downward.


Well that's all for now, comments always welcomed.


 Linear Mode


