It's been several months since I've posted on here. I have a 1984 Sunline Trailer that I have slowly been converting into a tiny house to save on rent. I have always liked the idea of living in a camper since I was a child honestly. Now as an adult, with a pretty annoying / illegal landlord (peeks in my windows and comes in my place with no notice, etc), the idea of moving into my camper, surrounded by nature and acreage and solitude, is very appealing. I like the idea of being mostly self sufficient and to actually own where I live. So I figured it might be fun to record my modifications to the camper. I have so much to do and so little time, and I have very basic knowledge so any helps and tips you can all provide to me would be greatly appreciated.
My main weaknesses are that the person that had it before me totally went crazy on the wiring and there are so many loose wires that seem to go no where.... I know I need to rectify that but I really don't want to tear into the walls too much if I can help it, nor do I fully know what I'm doing, but I'm reading up on properly grounding the camper and all components, etc. I don't want to start a fire in my camper or shock myself from stray voltage from shorts or lightning. So if any of you are in Maine and know about the electrical quirks of Sunlines feel free to message me and maybe you can help me out! lol.
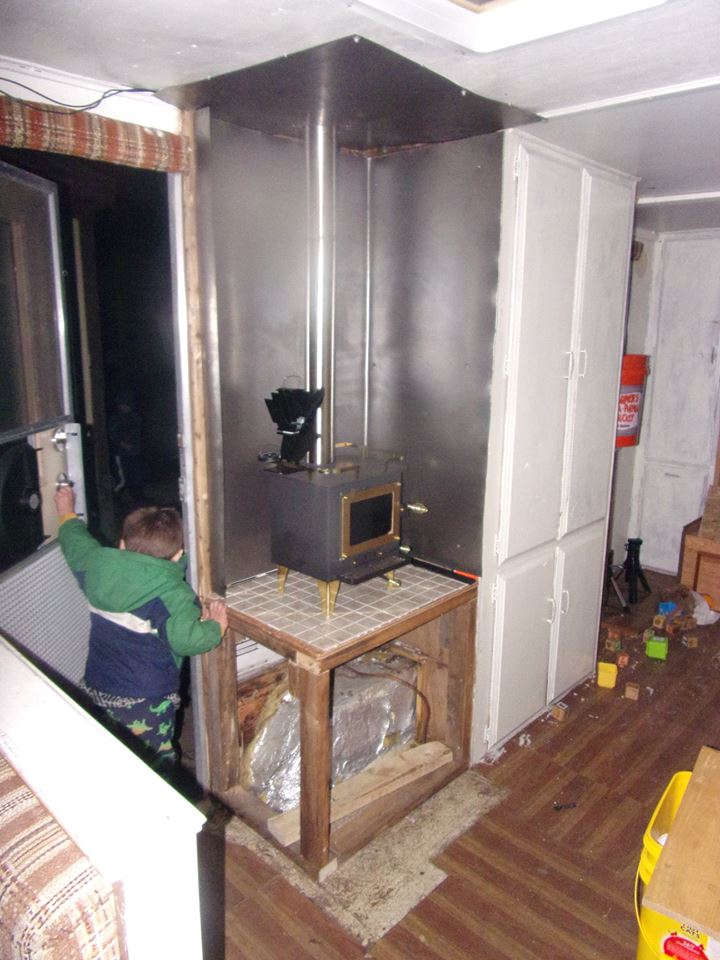
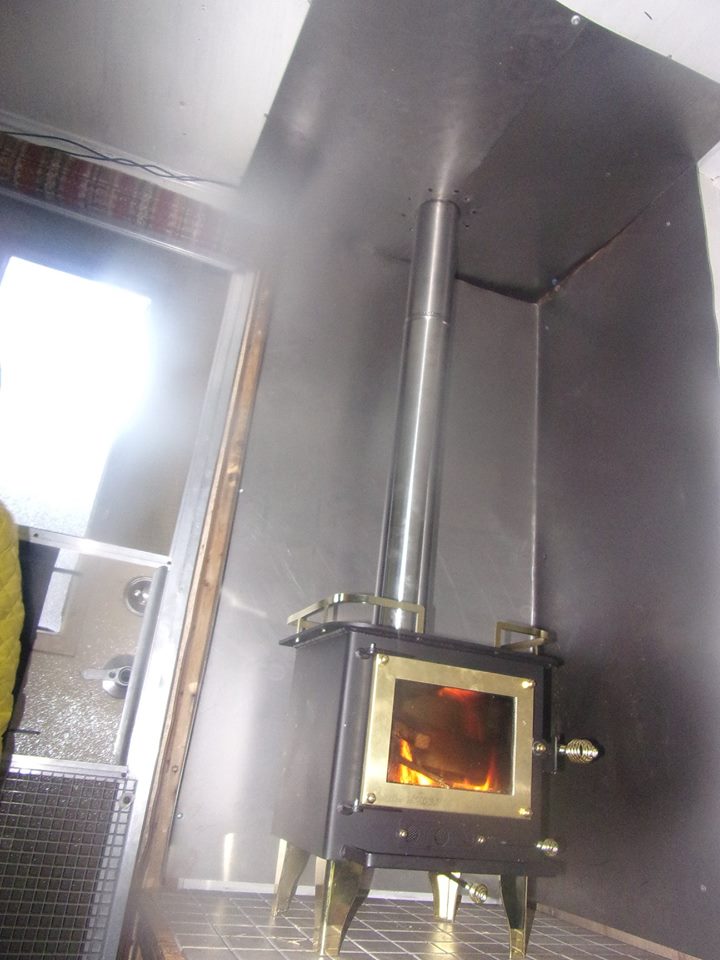
So I have decided to break down a list of the modifications I am making to this camper. The prior owner had modified a few things himself, so I'm undoing some of his doings.... For starters he tore out the original fridge and put in a 110V dorm fridge and microwave. Those had to go, so they were taken out. In their place, I am going to put a Cubic Mini Grizzly Wood Stove where they were sitting, with storage underneath for wood, and a drawer or two for other things. There are a ton of loose wires in that area he just capped and left there....

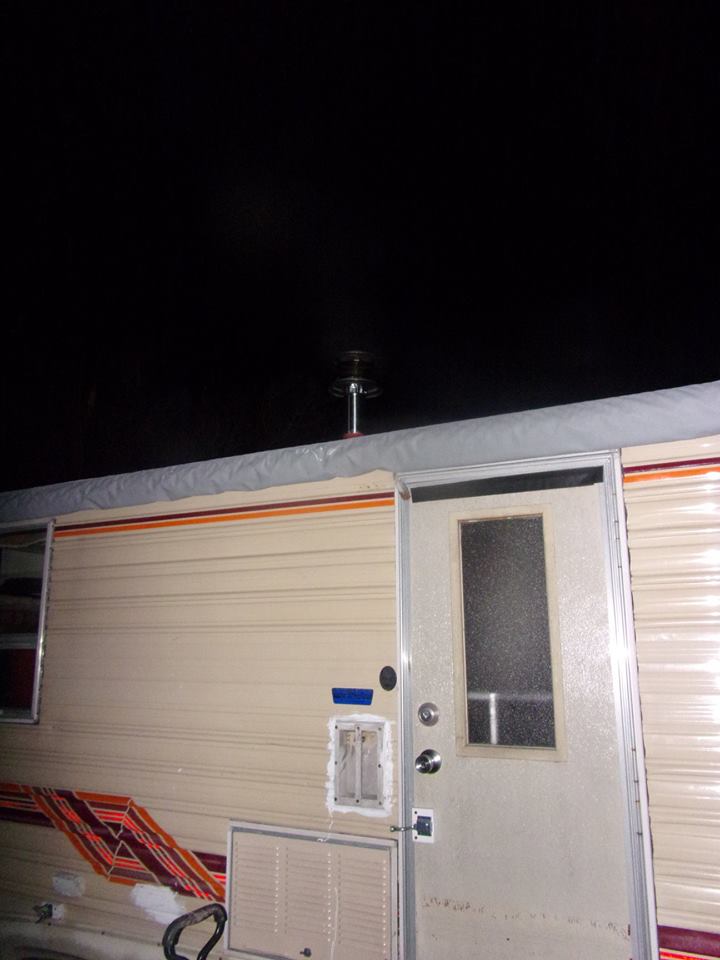
I will be putting a fresh air intake through the vent were the air intake was for the fridge, but making it so I can close it when the stove is not in use. I will be going up through the roof in an area that is bare metal right now because we had taken out the vent that was up there last summer. I will putting in a high temperature silicone boot around the 3 1/4 inch double walled steel stove pipe, and on top of that will have a steel vent cover to keep out rain, etc. Around the stove I will be putting steel metal sheets, with at last 1" spacing from the walls and ceiling to provide an air gap to protect the camper from excess heat. This is according to the manufacturer's recommendations. I have a small thermoelectric fan and a couple thermometers to go with it, as well as a small steel bucket for ash and a small shovel. I can't wait to start my first fire. Of course smoke and carbon monoxide alarms, and fire extinguishers as well.
Last year we tore into the nuts and bolts of this camper, and resealed the roof as it wasn't holding standing water out because of a very shoddy job by the prior owner... He took out things such as the tv antenna, but left the wires, taped over the holes with duct tape and some of the vents, and put elbow pipes up as caps, sealed around those also with duct tape, and sealed the entire roof with the water resistant silver tar typed stuff. He claimed he did so much work to the camper and it was in great shape with no leaks.... One thing in our favor, we got it before his "work" had caused much damage. The gray silver tar stuff is not made for standing water let me tell you. It's not water proof and it gets extremely hot.... It took days to scrape most of that stuff off. We scraped out the old putty around the vents, took out the rusty screws, some of which he had put in with sheet rock screws, and replaced. We of course took off the duct tape too. Put in proper rubber boots with silicone and screws, replaced flashing with a very sticky roof shield like material, and used the white Gaco 100% silicone elastrometric roof sealant. It's the only one I would recommend for the price. The other "elastrometric" roofing materials can't resist standing water and crack over time. This one so far is great, has a long life, and zero leaks thus far. And the roof is SOOOO much cooler, as is the temperature inside the camper.
We also took out the toilet, and I built a composting toilet last year out of a bucket system. This month I will be redoing my design based on a week and a half of practical "in the field" testing. Let's just say, urine diversion is a must. So I bit the bullet and ordered a Urine Diverter from the UK for $45. I couldn't find anything cheaper that looked anywhere near as nice as this one in the US..... But hey, it beats a $900 Nature's Head toilet. Yes I could build something but it wouldn't be as nice. I will be rebuilding the box that goes around the bucket so it is easily removable. I used a 5 gallon bucket last year. I am unsure exactly how big I will build the new system but hoping to make it more user friendly. Stay tuned.
The guy that owned the camper before me had taken out the window over the sink and put in an AC unit. It would leak water through it into the camper and into the wall. Needless to say that had to go. He put an unsealed wood frame around it and sealed around it with bathroom caulking which degrades to uv light really fast. The wood was leaking, the caulking was coming off, and water was blowing right through the AC machine. I was ecstatic to find the original window under the bed in the back, so I reinserted it, put new putty around the windows, and screwed it into place. No leaks to date knock on wood. I've never been one for AC anyways....
I also discovered that the original water heater had sprung a leak (the tank had a large rusted out hole, right next to the inverter / battery charger and the water pump. All were no good. The design of the water heater was a laugh as well. Talk about the most inefficient way to heat water.... So I bought an on demand ventless propane water heater. It was pricey at roughly $200. Also bought a new 12 volt water pump. Had some pipes to unplug with boiling water, but all seems to function now.
The 'best' (aka worst) surprise was finding out the prior owner had left the black water tank full of sludge all winter. Absolutely full to an inch below the bottom of the toilet.... When no water goes down the pipes you know something's up. It was fun getting that thick sludge out. Sealed up the black water tank with some plastic and silicone below the toilet, and held onto the toilet in case I ever want to install it again. Plugged up the water lines temporarily too that go to the toilet. I really like the idea of a composting toilet myself so that is the way I'm going. Cedar chips, wood ash, and no black water tank. Now the black water tank in theory can be used as excess gray water storage but.... I think that is frowned upon.
Speaking of water I will be harvesting rainwater, but I also have a river a few hundred feet away, and a well with running water on top of a steep hill that my mother lives on. So if there isn't enough rain we will be fine. I will be filtering all potable water with the black Berkey Water Filters, which I am installing into some small buckets to filter water. The lower bucket will have a spout. The filters are pricey at $120 for two of them but they will go for a long time. They filter out bacteria, viruses, heavy metals, etc.
I am converting the entire camper to 12 volt DC. I have ordered two 100 watt monocrystaline solar panels, a 20 amp mppt charge controller, and have yet to order the batteries, but I plan to get a couple sealed lead acid 120 AH deep cycle batteries and a vented battery box to go somewhere inside the camper to provide a more stable temperature for them. They are flame resistant as well which I like. I would love to do lithium but the price!!!!! I will be grounding my system when I figure out how to do it in the best way, and will put in fuses and a lighting arrester, bus bars, etc etc.... I am learning this on the fly.... It's pretty greek to me... Or french. I struggle with french.....
The lights have all been changed over to LED on the inside at least. I plan to get a solar rope light as well from Harbor Freight for ambient light at night when I don't want to use much power and don't need a lot of light. They are 22' long and are only around $9. My water pump and lights don't draw much power, nor does my water heater. My main power draw will be to my new "fridge". I have a Go Plus 54 Quart 12 volt Refrigerator coming, and it doesn't use a lot of power really to run. I hope it's a decent fridge. It has good reviews, but obviously it's not one of the higher end ones that retail around $900+. I have no idea just where I'm going to put it, but my plan is to hard wire it to the 12 volt so as not to burn out the connection. I really need to go through all the wiring in that camper but it's so daunting.... lol.
I forgot, I also went through and repainted all the walls in the camper just about, and the ceiling. I will be redoing the floor at some point too. He put down these fake wood sticky tiles... and they are breaking and peeling up..... It was kind of dark in there, but now it has a much more modern feel, even though most of the stuff is original in there.
I am sure I'm forgetting stuff. But anyways I will post updates in this thread, and I may start up a you tube channel to post about the happenings on "the farm" that I hope to have with my little camper life. If you are interested in following, let me know.

If you have advice, let me know that too.


 Linear Mode


