 |
|
 04-01-2021, 08:02 AM
|
#21
|
|
Moderator
Join Date: Nov 2006
Location: Ohio
Posts: 12,658
SUN #89
|
Quote:
Originally Posted by JaycoJake06

snip..
So here are some pics of the trailer before I tore it apart. Also a pic of yesterday's work putting the deck on. The leading plywood is not attached yet as I need to decide on a few details on final termination. It's 1/4" birch, flexes well, looks like it's blemished in the pic but that's just some weird color spots like knots or something. The rest is 3/8 BCX sanded one side. I'll need to shim the 1/4" to match the 3/8" at the rafter.
I'll have a fair bit of filling and sanding to the deck plywood before applying the membrane. I'm thinking plastic wood? Not sure what would be the best filler. I used subfloor glue and staples as fasteners, was too concerned about splitting thin rafters with screws. The factory used screws and there was damage.
|
Hi Jake,
A few comments,
I am not sure what roof material or glue you are using. I use the Dicor 901BA
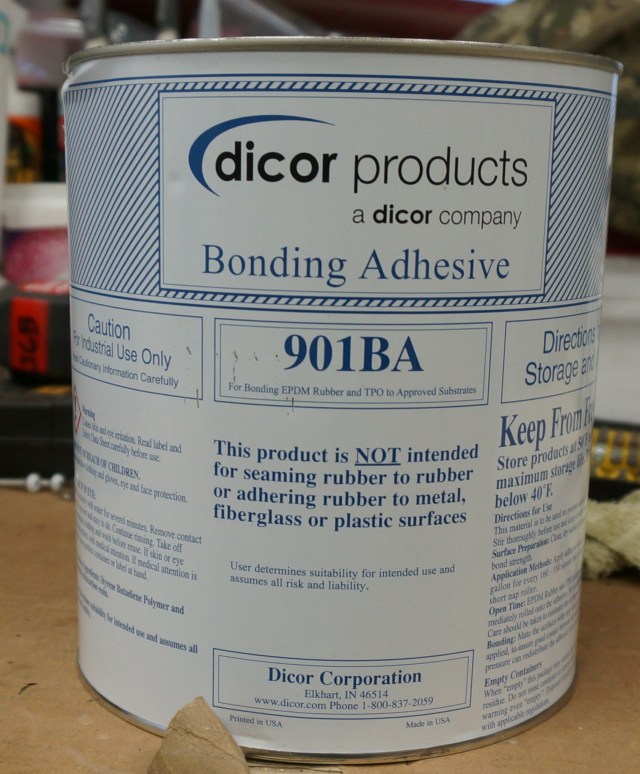
This water based glue needs a porous substrate to bond to. As such, the glue will not bond to plastic wood. So I do not use filler per say, I have other methods to deal with gaps etc.
What areas are you filling? If you are doing the plywood seam joints, I use fiberglass mesh drywall tape. I called Dicor and talked with them on it as their instructions state to use their fleece backed tape on the seams if the gap is over 1/16" and I cannot find it for sale anywhere. They said they changed that and the old instructions are not updated. They said to use the mesh tap as it will span the joint gap, and the glue will go through it to create a much better bond. The new glue does not bond to the fleece tape which is part of why they do not use it anymore. The older oil based glues may have bonded to it.
And yes , run the sander over all the joints and high spots. I use a 3" x 21" belt sander.

Another area to talk about, the 4 x 8 sheets wrapped over an arched roof 8 ft. wide, the plywood falls short about 3/8 to 1/2" split even on both sides in the flat at the side wall to roof transition. That creates a 3/8" tall bump and hollow area the roof membrane needs to go over the top of. I have created 2 ways on how to deal with that bump/hollow area. For sure, sand a radius on the top of the sheet to not cut the membrane.
First method was to use Dicor non sag caulk tooled out and fill the voided transition it and build it up. That does work well but it can take 3 coats to build it up enough. And it takes time for the Dicor to cure. A week or more can go by building it up that way, but it does work.
The next method which I now use all the time, is to build up that area with commercial grade butyl tape. It sticks to the wood and the membrane. You can do the roof membrane the same day you put the butyl down. I started tucking a 1" x 1/8" wide strip of butyl in that joint and it works, but the 1" is too wide and too thin and you have to keep rolling the membrane to flatten it out. The next revision was to get 3/16" thick x 3/8" butyl which fits right in that void nicely. This one https://www.bestmaterials.com/detail.aspx?ID=16289
Also, what membrane are you using, EPDM, TPO or PVC?
A heads up on the glue, lets talk about the glue and getting the right rate applied. Unless you have done this a few times, you never put enough glue on the first time and an area too big. That fresh plywood will suck up that glue big time if you are using the wet method of applying the membrane. You have to put enough glue on to transfer to the membrane and it be well coated. If you want to go over this, just ask, I'll explain more.
On the topic a staples on the decking, there can be issues with staples. In your case you put construction adhesive between the deck and the rafter and then stapled, that might elevate the issue, not sure.
I do screw all my decks and intentionally. But, I do it the long way. I use a depth gage set stop type of countersink with a short pilot drill. This creates a clean cut hole at the surface and a starter pilot in the rafter. There is no bulging or bunching up of the wood at the surface. The starter hole in the rafter takes care of rafter wood splitting. I use a cordless drill with a clutch setting to set the screw torque. The goal is a dead flush screw to a very slight depression (1/64" to no more then 1/32"). Not a big depression, as then poke marks show up on the membrane where there is no support and the glue does not stick to metal. A sharp edge putty knife test over the top will tell you if the head is slightly up, then hand tighten down. This takes longer to do, but creates a better job in my view. Then sand over all of that in case a screw corner is up.


The staple issue I have found, under towing road vibration and twisting, staples can back out. I have seen them do this on siding and roof membranes and that's bad news.
I have a project camper I acquired that had a new PVC roof installed by a local shop to the prior owner. They stapled the deck on, in this case, 1/4" luan plywood. They did several things not right on that roof job which are not a long lasting install. They cracked the membrane with the awning brackets creating two holes in the roof in sort order after the new roof was on. This allowed water to get into the wall. Three years went by and the wall and floor was gone, that and the window flange leaks. They also never caulked the top joint of gutter rail to the membrane. Some manufactures don't, but that is a risk for a leak, sooner or later
I also see the staples lifting in the center of the roof. This is not a little, it is approx. 1/8" to 3/16" in some spots. Those lift areas have non popped through yet, but in time they can. I have this camper apart enough to dry it out. When rebuild time comes, I will have to tear off the entire roof and start over.
Since you glued the decking to the rafters, the sheet movement and the staples will be greatly reduced. It may not even show up, but keep an eye on it. The glue will do most all the anti twist and movement prevention of the plywood I would think, not allowing the flexing plywood to start pulling up the staples.
You mentioned, you had damage from the Jayco screws, what damage did you find? Did you unscrew the screws to lift the old decking or just lift the sheet pulling the screws out? Always good to learn on these things.
Hope this helps.
John
__________________
__________________
Current Sunlines: 2004 T310SR, 2004 T1950, 2004 T2475, 2007 T2499, 2004 T317SR
Prior Sunlines: 2004 T2499 - Fern Blue
2005 Ford F350 Lariat, 6.8L V10 W/ 4.10 rear axle, CC, Short Bed, SRW. Reese HP trunnion bar hitch W/ HP DC
 Google Custom Search For Sunline Owners Club
|

|

|
|
12-29-2021, 04:24 PM
|
#22
|
|
Member
Join Date: Dec 2020
Location: Wisconsin
Posts: 34
SUN #12409
|
Where I left off with posts a year ago with my Jayco project
Since my last posts almost a year ago there's been a lot going on but I kept plugging away at my Jayco. You'll see from previous posts that I used a really nice straight oak 2x4 as a final roof termination plate at the front of the trailer. After the 3/8" CDX plywood was installed up to the final piece, I used a piece of 1/4" birch plywood in order to bend it to form the final taper to the front. It was a bit stubborn but was secure after I drilled and countersunk #10 drywall screws at the leading edge corners. The screws ended up under the front metal siding that wrapped over the edge. This picture was taken right after applying the contact glue before laying down the TPO roofing membrane. The plywood was just a 1/2" or so longer than the roof was wide so that made edging it pretty easy with chalk line and circle saw. I stapled aluminum roofing drip edge bent on a 90 degree angle to edge off the plywood unto the siding all along the trailer's sidewall top. The end is barely visible in the picture, I neglected to take pictures of this. Imperfections in the roof plywood were filled with a type of "plastic wood" before I sanded all joints and imperfections. I have to admit, I skipped putting tape over joints and such, hope I won't be sorry. I just couldn't see any point in that. After sanding I vacuumed and mopped the roof repeatedly to get all the dust off. I used 45 mil commercial roofing grade TPO with recommended contact adhesive - man did that stuff stick!! No moving it once it's down, we applied it very carefully, used a kind of roller on a pole to push bubbles out. We screwed up at the end where I actually re-did the portion where the bathroom skylight and vents are.
__________________
__________________
My next task is only as hard as I'll make it. 
|
|
|
|
|
12-29-2021, 04:36 PM
|
#23
|
|
Member
Join Date: Dec 2020
Location: Wisconsin
Posts: 34
SUN #12409
|
We installed the roof membrane going the long way down the 27' roof length. We measured out roughly 5' at a time, marked spots then rolled the adhesive on the plywood and the membrane. This took some creative rolling and puzzle solving. After the recommended "set" time of about 15 minutes we carefully layed the membrane unto the plywood keeping it tight as we went. Once both surfaces touched, that was it, no do-overs! I screwed up at the last section - over the bathroom vents and skylight. Had some nasty wrinkles. I ended up cutting the wrinkles out, then filling and sanding, then installing a new piece over the bad section. Not ideal, but it worked, doesn't look bad. The Carlisle factory people assured me as long as things are clean, it's OK to glue TPO to TPO. This "patch" can be be seen in future pictures.
__________________
My next task is only as hard as I'll make it.
|
|
|
|
|
12-29-2021, 06:10 PM
|
#24
|
|
Member
Join Date: Dec 2020
Location: Wisconsin
Posts: 34
SUN #12409
|
Getting closer
Once the membrane was down and allowed to gas off for a few days I covered the roof with plastic as the bats were returning now that early spring has arrived and I wanted to avoid their guano. Next steps were to clean up the raingutter side rails and install them with new #10 stainless steel "bit tip" screws 1" long. The original screws were #8 zinc and badly rusted. I cleaned the old butyl tape off the railing with a combination of a heat gun, scraper and laquer thinner. Then I used a 3/3" thick flat bar to drop into the groove of the railing and a hammer to smack it flat where the original screws had dimpled the holes. It all takes time and patience!
I developed a method of tensioning the roof membrane as I attached the railing by trial and error. Partially down the first straight section I used a piece of gorilla tape to try to position the roof membrane tightly 4' ahead of my progress. BAD IDEA! First off, it didn't hold well, but mainly the tape left an ugly black residue of glue that only got worse with my attempts at using different solvents for removal. I gave up on that quickly, the black scar remains.
Once the rain gutter side railings and rear termination bar were installed I attacked the siding. A few weeks earlier I repaired or replaced the rotten framing up front with custom cut pieces, epoxy glue and screws. I had pre-measured and calculated where the siding would end at the front of the roof in order for it to hit a flat spot on the center of the oak 2x4 in order to terminate the roof and siding joint securely. Now the moment of truth arrived as the siding is installed from the bottom up and I was sweating the last piece. Thankfully, it worked out. I planned on removing about 6" of that front siding, I could see no point in it wrapping over so much roof up top.
Once the pieces were in place, I patiently worked with the last piece to trim it off just right in order to make a secure and neat joint. The roofing membrane lays over the plywood and drops down wild unto the open area up front. The siding lays over the membrane unto the plywood and terminates at the location of the oak 2x4 below the plywood. A 1"x1/8" rubber strip lays under the aluminum commercial roofing termination bar that's attached with 1-4" stainless steel bit tip screws on 3" centers with 3/16" holes pre-drilled through the bar and 1/8" screw holes into the wood. After installation each screw was caulked with Dicor self leveling caulk, then caulked again a day later. A thin bead of ProFlex caulk was placed along the leading and trailing edges of the term bar, allowed to cure for a couple of weeks, then a 4" strip of Eternabond tape went over the length of the termination assembly. Another thin bead of ProFlex caulk was applied to leading and trailing edges of this tape, as well as along the length of the upper edge of the rain gutter railings and the rear term bar.
I got pretty lax in picture taking, the best pic of my biggest concern-the front termination-was taken after returning from a camping trip, there's a lot of black specs or something on the siding. I'll be washing it in spring.
__________________
My next task is only as hard as I'll make it.
|
|
|
|
|
12-29-2021, 10:06 PM
|
#25
|
|
Moderator
Join Date: Nov 2006
Location: Ohio
Posts: 12,658
SUN #89
|
Great Job Jake!!!
Using contact adhesive on the RV roof, yes, I can see that being a challenge. You did well. The commercial roofs are flat which may be easier on using the contact adhesive. The arched roof of a camper, well it adds another dynamic to the mix.
The water based wet glue approach is more forgiving. You can move the membrane around to get air pocket out and deal with vent pipes sticking up above the roof line easier. It will set up overnight.
Thanks for reporting back.
John
__________________
Current Sunlines: 2004 T310SR, 2004 T1950, 2004 T2475, 2007 T2499, 2004 T317SR
Prior Sunlines: 2004 T2499 - Fern Blue
2005 Ford F350 Lariat, 6.8L V10 W/ 4.10 rear axle, CC, Short Bed, SRW. Reese HP trunnion bar hitch W/ HP DC
Google Custom Search For Sunline Owners Club
|
|
|
|
|
12-30-2021, 07:20 AM
|
#26
|
|
Member
Join Date: Dec 2020
Location: Wisconsin
Posts: 34
SUN #12409
|
Thanks, John! I'll post more pics and progress today. I'm working on putting together the "rest of the story".....(sic) I miss Paul Harvey
__________________
My next task is only as hard as I'll make it.
|
|
|
|
|
12-30-2021, 09:48 AM
|
#27
|
|
Member
Join Date: Dec 2020
Location: Wisconsin
Posts: 34
SUN #12409
|
Quote:
Originally Posted by JohnB
Great Job Jake!!!
Using contact adhesive on the RV roof, yes, I can see that being a challenge. You did well. The commercial roofs are flat which may be easier on using the contact adhesive. The arched roof of a camper, well it adds another dynamic to the mix.
John
|
I chose the contact adhesive method by chance and price. Found a local commercial roofing outfit that had recently received a 10'x100' roll of 45mil TPO that was damaged at one edge where a fork lift hit it. I talked 'em into cutting the roll length in half, got it for $150. The damaged edge on 10' of width wasn't a concern for my 8' wide roof. The 5 gallons of adhesive cost me another $140, then another $15 for 10' of aluminum termination bar. I sold the remaining membrane and glue for $50, so my roofing cost me around $275 with tax.
__________________
My next task is only as hard as I'll make it.
|
|
|
|
|
12-30-2021, 10:18 AM
|
#28
|
|
Member
Join Date: Dec 2020
Location: Wisconsin
Posts: 34
SUN #12409
|
Triumphant exit from the barn and its bats
Final touches requiring the scaffolding in the barn were completed with the installation of that cheap plastic trim strip material to cover the screws along the rain gutter railings. A/C unit was left up on the scaffolding during the project so was simple to reinstall with the help of my grandson Alex on leave from his Army post in VA. Then out into the springtime sunlight she came! Alex helped me re-install the awning once we were out on the level. That was a learning curve! I tinkered with that awning off and on all summer long to get it right, needs a new canvas, tho. The "patch" to cover my botched roofing over the bath venting and skylight can be seen in the picture. I hadn't applied a thin bead of caulking to the patch edge yet when this pic was taken.
I weighed it and the truck together on a CAT scale with and without the WD bars in place, then weighed trailer only then truck only. Yes - it's a 1/2 ton truck but honestly crunching the numbers the rig should be fine. I also plugged the numbers into the RV Tow Check app that showed it to be OK. I'm sure I'll hear pushback on that, but I won't buy a different truck unless experience tells me different. I towed the trailer 1,400 miles this summer during three camping outings with no problems. Fuel mileage sucks, tho, the best I could get by holding to a maximum cruising speed of 63mph was 7.5-8.5mpg depending on terrain and fuel quality.
__________________
My next task is only as hard as I'll make it.
|
|
|
|
|
12-30-2021, 11:03 AM
|
#29
|
|
Member
Join Date: Dec 2020
Location: Wisconsin
Posts: 34
SUN #12409
|
Solar and Dish antenna get installed
The wife just had to have TV working so I replaced the "free" TV antenna with a new Winegard antenna and amplifier, then bought a satellite receiver and added "Dish For My RV" to my Dish TV subscription.
In order to power the TVs I installed a 1000 watt inverter and 400 watt solar panels, controller, battery monitor and a 100 amp hour Renogy Smart Lithium Iron Phosphate (LiFePO) battery. That battery weighs a whopping 26 pounds, I plan to install another 200 watt panel and another LiFePO battery then get rid of the 140 pounds of lead acid batteries presently sitting on the tongue. I installed the battery and system inside the front pass-thru stowage area and it takes up less than 1/2 that area's width. I added circuitry to accomodate the inverter, not sure yet if I'll incorporate existing circuitry or how I'd do that. I have some ideas, tho.
I see the solar wires are lying loosely in the pics, I've since secured them with zip ties (gotta love zip ties!). I bought an empty heavy plastic electrical component box at a local big box store and mounted the guts of the controls inside the box. I plan to replace the "Wanderer" PWM controller with a more efficient "Rover" MPPT controller next spring as well, although the Wanderer works just fine. Not convinced on that yet.
__________________
My next task is only as hard as I'll make it.
|
|
|
|
|
12-31-2021, 08:24 AM
|
#30
|
|
Member
Join Date: Dec 2020
Location: Wisconsin
Posts: 34
SUN #12409
|
Correction: My brain's memory shorted out. My solar array is really 2-100 watt Renogy panels, not 2-200 watt panels as my poor brain's memory recalled.
__________________
My next task is only as hard as I'll make it.
|
|
|
|
|
01-05-2022, 03:33 PM
|
#31
|
|
Member
Join Date: Dec 2020
Location: Wisconsin
Posts: 34
SUN #12409
|
A learning experience - Thanks John B!
Yep! I sure learned a few lessons about myself, not the least of which is to recognize and subdue my "child state" when I see what I think I want and go for it "half cocked", especially this time without looking at something so important as the roof! I should have known better when the guy told me he didn't have a ladder so I couldn't look at the roof but he assured me it was good and tight. Once I bought it I was stuck with it and had to suck it up and deal with it!
A special THANK YOU goes to John B at https://www.sunlineclub.com/forums/ for his outstanding craftsmanship, pictures and narratives on replacing roofs on his Sunline campers! His excellent posts were a major motivator for me, I was feeling pretty disheartened when I first opened up that roof!
__________________
My next task is only as hard as I'll make it.
|
|
|
|
|
01-05-2022, 09:32 PM
|
#32
|
|
Moderator
Join Date: Nov 2006
Location: Ohio
Posts: 12,658
SUN #89
|
Hi Jake,
Thanks for the good words, I'm humbled by them. 
We all learn the hard way sometimes, me too many of the times. But, once learned the hard way, you never forget and become better for it.
Have fun camping this coming season.
Thanks
John
__________________
Current Sunlines: 2004 T310SR, 2004 T1950, 2004 T2475, 2007 T2499, 2004 T317SR
Prior Sunlines: 2004 T2499 - Fern Blue
2005 Ford F350 Lariat, 6.8L V10 W/ 4.10 rear axle, CC, Short Bed, SRW. Reese HP trunnion bar hitch W/ HP DC
Google Custom Search For Sunline Owners Club
|
|
|
|
|
|
|
Currently Active Users Viewing This Thread: 1 (0 members and 1 guests)
|
|
|
 Posting Rules
|
You may not post new threads
You may not post replies
You may not post attachments
You may not edit your posts
HTML code is Off
|
|
|
|
 » Recent Sunline Discussions
 |
|
|
|
|
|
|
|
|
|
|
|
|
|
|
|
|
|
|
|
|
|
|
|
|
|
|
|


 Linear Mode

