 |
|
 12-11-2020, 04:20 PM
|
#1
|
|
Member
Join Date: Dec 2020
Location: Wisconsin
Posts: 34
SUN #12409
|
2006 Jay Flight rotting roof replacement
I've picked up a lot of info re; my Jayco (darn furriners!) from this forum! Thanks to everyone and especially John B who's detailed posts have been most enlightening!
So I have some questions and hope to do some brainstorming with this thread. I'm new to forums so this will be an experiment in posting as well as brainstorming my Jayco issues. This is a 2006 Jay Flight 29BHS I bought from a private owner, I think he's the 2nd owner.
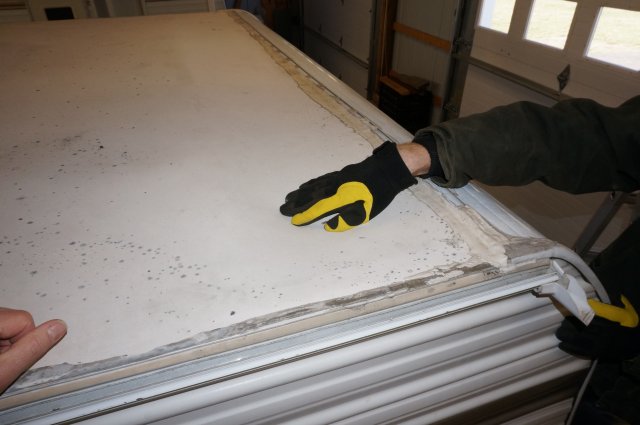
I live in south central Wisconsin, bought the trailer early September knowing it had a roof problem, used it twice with good results and dug into the roof project a couple of weeks ago. The weather has been mild for December, yesterday it reached a sunny high of 55 degrees but this evening, Dec. 11th, it's 33 and snowing. Winter as arrived.
I removed the entire rotted roof membrane and sheathing, roof trim rails and siding corners. The framing isn't too bad but needs some repair. I need to make some decisions about how far to go with "restoration". I plan to post a number of pictures in this thread but am unsure of what my results will be. So, here goes. This first pic is of the trailer in my barn put to bed for the winter.
__________________
__________________
|

|

|
|
12-14-2020, 04:03 PM
|
#2
|
|
Member
Join Date: Dec 2020
Location: Wisconsin
Posts: 34
SUN #12409
|
I see the post and pic worked, now to continue. Why post here with a Jayco? Well, there is a similar post on the Jayco site and I hope to get a few more opinions. I'm struggling to make some decisions. The overall goal is to have a trailer ready for a 3-4 month trip to Alaska in summer/fall of 2022 in a caravan with other RVers in my family. Bought this one as a bunk house in order to have grandkids join my wife and I on trips to the Wisconsin northwoods but I think it's bigger than what I want to travel to Alaska alone as she has signaled she won't go along. Therein lies my dilemma, do I put a lot of effort and cash in this one to make it really right, or do the minimum and replace/repair the obvious roof and corner problems and then replace the trailer with something smaller?
So - while I have the roof off and the walls opened, now is the best time to repair walls and what-not as well. I want to do that as efficiently as possible without making a major restoration out of this! And maybe I'll just take this one to Alaska.
These next pics are of the roof after washing it with bleach and the interior bedroom ceiling. The ceiling sag is barely noticeable. There are a few very small similar ripples above the rear bunk and that ceiling sag is virtually non noticeable.
__________________
__________________
|
|
|
|
|
12-14-2020, 04:14 PM
|
#3
|
|
Member
Join Date: Dec 2020
Location: Wisconsin
Posts: 34
SUN #12409
|
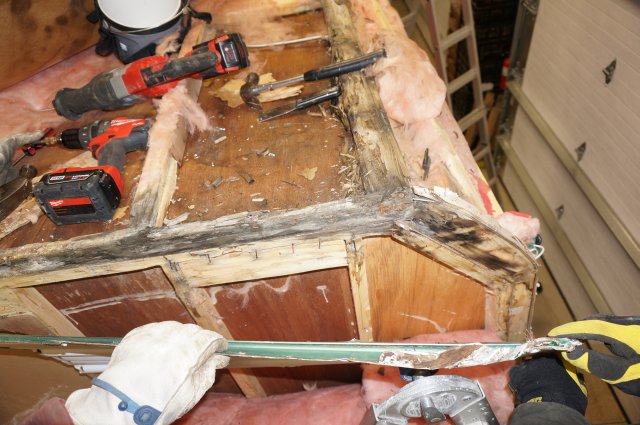
It's late November here in southeastern Wisconsin, temperatures are well above normal so I dug into the project anxious to see what I'll find. I've been watching videos on YouTube, one series by RVRoofInstall.com is especially enlightening. Now that I have scaffolding built around the front third of the trailer where the worst damage is I rip into it.
Nope, it's not pretty. Rot looks like fire damage and is just as bad! I was amazed at the amount of moisture present and the crude method of terminating the roof membrane where it meets the front wall. Nope! Copious amounts of caulk just don't do the job!
If one looks closely at the edges of the aluminum it almost looks like there's an electrolysis going on that's corroding the aluminum. I suspect I may have stray voltage, maybe I should remove all the insulation and inspect what wires I can see.
__________________
|
|
|
|
|
12-14-2020, 04:32 PM
|
#4
|
|
Member
Join Date: Dec 2020
Location: Wisconsin
Posts: 34
SUN #12409
|
I debated removing the entire roof as the center portion looked and seemed solid. That membrane is really glued down to last! Where the wood wasn't rotted there was no easy pulling this membrane up. I used a heat gun on it and that worked to a degree but was slow going and frustrating as the warmed roofing tore easily. I dropped that experiment quickly and went on to removing the antennas, A/C unit, bath fan and skylight. While walking around up there I heard and felt crackling of failing wood underfoot. I'm 160 pounds, healthy roof deck shouldn't be doing this. Rot appeared at the roof openings for the various components. After removing the components I went to the roof edges and sliced the membrane all along the edges, was able to pull up membrane all along the edges easily because those edges were rotted. Enough of this. I went to snapping chalk lines along rafter edges and slicing the roof into sections with a circle saw. Had to be careful as the roof was actually screwed down pretty good, where it wasn't rotted it was secure and I did some damage to a few rafter pulling the 1" screws out. All fixable, just a good thing they weren't glued as well as screwed! The roof at the rear of the trailer was as bad as the front, just didn't extend as far. Another poor roof membrane termination method back there.
__________________
|
|
|
|
|
12-14-2020, 04:42 PM
|
#5
|
|
Member
Join Date: Dec 2020
Location: Wisconsin
Posts: 34
SUN #12409
|
Once the decking was pulled I cleaned up much of the small debris with a shop vac, and there sure as a lot of it! Went to removing the long side termination bars (rails?) and sure saw a lot of rusty screws. Where there's rust, there's moisture. Many of the screws wouldn't back out on their own because they had lost much or all of their threads and just pulled right out. Obviously they don't seal against moisture! None of them were caulked, just hidden under the cheesy plastic trim strip that snaps into the rail. All of the trim stripping had dirt, algae and debris under it, some even were wet. This trailer's been in my barn now for over a month. The wetness I'm finding has been seeping into the roof and walls like a smoldering fire for years!
__________________
|
|
|
|
|
12-14-2020, 05:06 PM
|
#6
|
|
Member
Join Date: Dec 2020
Location: Wisconsin
Posts: 34
SUN #12409
|
The first week of December has come to an end and I'm using the last day of 50 degree sunny warmth to finish opening up the trailer. Snow and cold is coming tomorrow! I removed the four corner rails and gently tugged the wall paneling back to peer inside. For the most part the rear seems OK, minor repairable damage that I'm hoping won't require removal of that rear siding. The front, though, is a different story.
__________________
|
|
|
|
|
12-14-2020, 05:09 PM
|
#7
|
|
Member
Join Date: Dec 2020
Location: Wisconsin
Posts: 34
SUN #12409
|
These are pics of the right front corner - the worst place I'm aware of right now.
When I first brought the trailer home I cleaned up both broken interior front corners of the front pass-through storage space and glued replacement wood next to the rotted corners in order to fasten pieces of 1/8" dairy board to cover the holes. That wood is visible in a couple of pics of the right front corner. I'm leaning toward removing the front siding but am reluctant as I'm working on this with no help. Maybe I an find some kind of wood epoxy/putty I could pack into those corners, clamp 'em with corner clamps until they set, then replace the corner moldings with new butyl tape and caulk. I don't know, sounds pretty hack, but that may be all this is worth. It's not like the trailer is falling to pieces.
That's where I'm at right now, roofing and corners are off, end wall panels slightly open. I'm hoping it will dry over the winter and next spring I'll have a decision made as to how much deeper I should dive. I encourage anyone to offer suggestions!
__________________
|
|
|
|
|
12-16-2020, 10:14 PM
|
#8
|
|
Moderator
Join Date: Nov 2006
Location: Ohio
Posts: 12,651
SUN #89
|
Hi JaycoJake,
You do have a “project” on your hands. I wonder if your TPO roof had the fleece backing on it. When Jayco started using TPO as a roofing membrane, the industry was using fleece backed TPO. If a leak happened, the fleece would wick water all over. Your camper looks way worse than any of the Sunlines I have had apart, and I have 3 project campers with major water damage. Have a look at the backing of your old membrane, it may be glue filled some but see what it looks like. A few pics are helpful. This is just a learning for all of us, and at this point, not part of your correction process. We all learn from these posts.
A few things first off that are easier to explain.
Quote:
Originally Posted by JaycoJake06

If one looks closely at the edges of the aluminum it almost looks like there's an electrolysis going on that's corroding the aluminum. I suspect I may have stray voltage, maybe I should remove all the insulation and inspect what wires I can see.
|
The corrosion I see in your pics, I have seen before. Like this,

This corrosion can and has happened on the Sunlines too. This is what I have found creates the problem. When a leak starts and is ongoing for a long time, slowly seeping, (which is what most camper leaks do) there are galvanized steel screws used to hold the camper together. In time, the screw coating goes and the screws starts to rust. Now there is steel rusting, next to wood rotting, with aluminum buried in the middle, plenty of oxygen and moisture. That combo creates a corrosion cocktail, especially to aluminum. You will see this at the screw holes and on the siding where water lays over time. If there is any of the rusting screw iron water touching siding, it starts making pin holes of corrosion in the siding. Even the rotting wood byproducts water can start the corrosion in aluminum. The rusting steel just starts it faster.
For the siding pin holes, I have used a product called Eternabond Roof seal to put on the inside of the siding to seal off the holes. It comes in a tape. The siding is off the camper at this point. This link will drop you into the middle of one of my project camper posts showing the repair tape used on siding corrosion spots, even if the corrosion has not yet created pin holes.
https://www.sunlineclub.com/forums/f...tml#post145052
On the moldings, this all depends on how bad the corrosion is. In some cases, you can get by reusing the old molding. In other cases, you have to replace the moldings as the screw holes are so far gone there is no meat left for the screw had to hold against. The moldings are available and you do not have to go back to Jayco to get them. A lot of these parts are used across the RV industry on many brands. Jayco does not make them, they buy them.
Now to, what to do with your situation.
There is a lot of water damage and there is no wood structure left in places to hold screws to make a repair that will last much of any amount of time. I know it sounds like you are cautious on removing the siding on the front and rear walls, but taking the front and rear siding off is a need and makes for a good repair. All that roof water went down both ends. At the floor level is where it stops as it can't get out.
I am not 100% positive on Jayco processes, but RV siding on wood studded campers is generally stapled on to the wall studs. The siding is installed from the top down and ending at the bottom. To remove the siding, you start with the bottom piece and work up the wall. I have done this myself and the front and back walls are not as bad as the long side walls. On the front wall, they may have pumped butyl caulk in the siding horizontal joints. The caulk is applied to the bottom interlocking area, then the top of the sheet below inserts up into the caulk. This helps keep water out when towing in the rain beating on the front wall. If your front sheets do not separate, when all the staples are out, odds are high the caulking is holding them. Use a heat gun to warm the entire width. Then start at one end, keep warming until that end starts releasing and work your way across. The rear wall is normally not caulked.
Once the front and rear siding is off, you can access what needs to be replaced on those wall studs. You can epoxy treat the wall board if it is water stained to stop future dry rot and still intact to help stiffen it up. I use the Rot Doctor penetrating epoxy for this. The S-1 now as the CEPS is no longer available. https://www.rotdoctor.com/products/product.html If the wall board is totally gone, then will need to be replaced.
You can also hold back by hand a few inches of the side walls siding on the ends and look into the first wall cavity. If you are fortunate, the side wall siding does not have to come off.
By this picture, Jayco did not create the folded over side wall tabs to create an extra sealing surface. The lack of that siding folded tabs allows water to get in easier from the side moldings. When it comes time to seal this area back up, lets talk on how to help make that seal more robust.

This link will drop you into a repair post showing the Sunline method of folded over long side tabs at the corners. Butyl sealing tape is then use over those tabs as the front panels are put on. This post also shows the siding coming off https://www.sunlineclub.com/forums/f...tml#post144339
This ceiling panel can be replaced if it is too far gone to epoxy treat. When the roof is off it can be replaced as you have access to all the mounting points.

There are 3, RV surplus places in Elkhart IN that I have been to that sell the ceiling board. I was there a year ago and bought considerable wall boards and ceiling boards in 4 x 8’ sheets. Not sure which end of WI you are at, when the time comes if it is drivable, they can offer a lot of your hard to find RV materials at surplus prices. If you want to go that route, I can link the places.
The roof trusses, you have two options, saw a new one out of a 2 x 4 and make them solid, or create the same type of ripped truss rafters. Let’s talk on bending the top cord if you decide to make the trusses. I learned a lot making my first roof trusses and what to do the next time I make them.
Addressing the front wall, rear wall and all the roof structure should make a big dent in creating a repair that will work and hold up. It is not a total restore, but it creates a good roof system that you then have choices on what roofing membrane to install. EPDM rubber, TPO, PVC are common membranes used on campers. All 3 have pro’s and con’s. There is also a direct to deck high solids silicone coating system I am investigating/testing currently that could be used. I’m looking at it to restore worn EPDM or metal camper roofs, but they do rate it for direct to deck applied to wood. A cost analysis of the 3 major types and this coating system may help guide which route you take.
Once the roof is done, there is also ways to seal up the rest of the camper that is not part of the roof. We can show you how to do this with using the correct kind of caulk to seal up all doors, windows or other penetration's in the siding.
You mentioned pumping some epoxy into the corners as a patch, from my background, that concept to rebuild corner wood is not practical. To rebuild rotted wood with epoxy and resin like they do on old boats, is not fast nor cheap and it very time consuming to layer it up. Ripping a 2 x 10 or whatever size you pick, into wall studs is quick, strong, cheap and will last when you put screws in it. All the corner moldings are screwed into the wood corners.
The materials are not totally outlandish in cost, but they do cost. The labor/time will be a large amount. This post shows a re-roof we did on my son’s camper. There was 268 work hours to do the job which included the front & rear wall rot rebuild, and an all new walk on roof with all new roof items, (vents, fridge vents, tank vents, shower dome). However, the wood rot in your roof system is worse then what is in that post. You will have some more wood repair in the roof system. https://www.sunlineclub.com/forums/f...avy-16834.html
If you decide to sell the camper at a later date, showing a new roof and repaired front and rear walls sealed up correctly will help in selling the camper. Finding an older used camper with a solid roof is not easy. You may get a good part of all your materials back in the selling price, the labor you put into the camper, you may never recover that cost unless you work dirt cheap. These camper repairs of this magnitude is a labor of love. They can be a great benefit to you if you keep the camper. Selling it, the new owner gets a good camper at a reasonable price.
If you are planning on taking the camper to Alaska, the trailer suspension needs to be checked and all worn parts replaced before you go. Odds are high yours may have the spring bushings, equalizer bushing and the shackles worn in need of replacing unless someone did them. Between 8,000 to 10,000 miles and the bushings are shot. The brakes and wheel bearings need servicing and the tires need to be in low years of age. We have posts here on our forum showing how to fix all this.
ST trailer tires age out verses wear out most times. Five years is about it from the actual tire manufacturing dates and they should be replaced even if they look perfect. The rubber weakens from pure time and sun damage. Trailer tires are not like truck tires that miles and tread are a gage for replacement. More on this tire topic if needed. A blow out on camping trip makes for a bad day camping. That and hoping it does not beat up the camper in the process of the tread flying off.
I know this task ahead of you looks daunting, and it is a lot of work. But it is not complex with the skills you already have shown just taking it apart. We can help fill in some of the “how to” do it as you need help.
Hope this helps and ask away on any questions you need more detail on.
John
__________________
Current Sunlines: 2004 T310SR, 2004 T1950, 2004 T2475, 2007 T2499, 2004 T317SR
Prior Sunlines: 2004 T2499 - Fern Blue
2005 Ford F350 Lariat, 6.8L V10 W/ 4.10 rear axle, CC, Short Bed, SRW. Reese HP trunnion bar hitch W/ HP DC
 Google Custom Search For Sunline Owners Club
|

|
|
|
12-17-2020, 07:22 AM
|
#9
|
|
Member
Join Date: Dec 2020
Location: Wisconsin
Posts: 34
SUN #12409
|
Thanks, John! Wish I had a heated workshop! I suppose, since I have it this open, I may as well remove the front and rear siding. I agree that pumping it full of epoxy will be ineffective. I was hoping for some miracle shortcut.
Yes, the TPO is fleece backed. The water wicked over a tremendous roof surface area! I've read about Eternabond in your and other's posts. Good tip, I'll use it. The corner moldings look like they're OK, will require a lot of cleanup as do the long side rails, I can do that over the winter in my heated garage.
Yeah, I wish Jayco would have used those folded corners on their siding. Those corners really went bad.Thanks for the Rot Dr. tip, I'll be using that! Not sure yet what I'll do with the ceiling panels. May just glue 'em back up and call it good.
We're expecting milder temps again by the weekend and Monday here in Wisconsin, I'll dig into the siding and post pics next week. I see what I need to do, the heat gun has been immensely helpful during this entire project. One step at a time!
__________________
|
|
|
|
|
12-26-2020, 11:09 AM
|
#10
|
|
Member
Join Date: Dec 2020
Location: Wisconsin
Posts: 34
SUN #12409
|
Siding Removal
I took advantage of a 37 degree day earlier in the week to remove the siding from the front of the trailer. I was dreading what I would find.
The siding is put on in sections, beginning at the bottom. They mate with the top straight edge slipping into an "S" bend in the bottom of the adjoining piece with no caulk or glue. The inside edge of the "S" is longer than the outside of the "S" and that's where the staples are placed holding the siding to each stud. This is hidden under the straight edge of the adjoing piece as it's slipped into the "S". I used a semi-sharp small screwdriver to pry each staple out far enough to grab it with a small channel lock pliers and pull it out. Had to be patient to avoid bending or tearing up the siding edges. Actually a good design, no signs of leaking at any joints.
Once I got the siding off I was surprised and am encouraged to find that the framing had looked much worse than it turned out to be. Will require some creative wood replacement but thankfully the floor and walls aren't damaged. The rot appears to be limited to the outermost corner stringers/nailers at both corners. The right front corner was still very wet, the stringers at both corners came out in crumbling pieces.
Sure looks ugly, though!
__________________
My next task is only as hard as I'll make it. 
|
|
|
|
|
12-26-2020, 11:13 AM
|
#11
|
|
Member
Join Date: Dec 2020
Location: Wisconsin
Posts: 34
SUN #12409
|
Cleanup
I removed the rotted 2"x1/2" "stringers" from each corner, the inside wall paneling edges were sandwiched in between the "stud" and stringer at each corner. I had to be careful not to damage that paneling. The studs are OK except for at the lower portion of the left front corner.
I plan to remove an d replace rotted framing wherever I can get to it and treat the dry rot wherever I find it with Dr. Rot and build up the bad places in the lower right front corner stud with some plastic wood, then install new stringers. In order to replace the bad stud I would need to take siding off the long side, I don't think that's worth doing. The new wood stringers should be plenty strong enough.
It will have to sit like this for the next couple of months until weather warms in spring. Thankfully the window didn't leak a bit and that framing was fine.
__________________
My next task is only as hard as I'll make it.
|
|
|
|
|
12-26-2020, 11:14 AM
|
#12
|
|
Member
Join Date: Dec 2020
Location: Wisconsin
Posts: 34
SUN #12409
|
Ready to Hibernate
So there she'll sit for the winter. I removed the rear corner moldings and poked around looking for rot, thankfully the corner framing is still solid. I dropped the window back in place and put some temporary paneling in the storage compartment along with mouse traps. Hoping for an early spring!
Happy New Year! 
__________________
My next task is only as hard as I'll make it.
|
|
|
|
|
12-28-2020, 06:28 PM
|
#13
|
|
Moderator
Join Date: Nov 2006
Location: Ohio
Posts: 12,651
SUN #89
|
Hi Chuck,
You did great!!! We knew you could do it.
Ah, yup, the water follows the corner down and takes out everything in it's path. You also had corner molding leaks by the looks of it. Water running down from above does rot out the bottom as water hangs down there, but your rot is from the entire roof to floor on the corners. That much rot points to roof water and corner molding sealant failures.
You should be able to replace the corner wood. Some times, you can pull back the siding at the corner board just enough to replace the corner wood. You can re-staple the siding to the new wood. If you need to go a foot or more back, well that gets even harder. Then some level of siding most likely needs to come off.
The Rot Dr, yes their S-2 penetrating epoxy will help a lot. It will stiffen up the front wall board and help stop dry rot in the future with encapsulating the wood/mold spores. You will need to get a organic vapor respirator. The fumes are bad news. Rot Dr. sells Moldex respirators on their site. I bought mine their years back and replacement filter cartridges. That said, they are for sale at other places too.
You are doing great!!! Keep up the good work and looking forward to your progress.
John
__________________
Current Sunlines: 2004 T310SR, 2004 T1950, 2004 T2475, 2007 T2499, 2004 T317SR
Prior Sunlines: 2004 T2499 - Fern Blue
2005 Ford F350 Lariat, 6.8L V10 W/ 4.10 rear axle, CC, Short Bed, SRW. Reese HP trunnion bar hitch W/ HP DC
Google Custom Search For Sunline Owners Club
|
|
|
|
|
03-27-2021, 09:33 AM
|
#14
|
|
Member
Join Date: Dec 2020
Location: Wisconsin
Posts: 34
SUN #12409
|
Spring Rot Doctor treatment
Spring arrived (sort of) early and I got back at it. Bought a gallon of a mold killer called Concrobium from Amazon, used it in a pump strayer and sprayed it everywhere I saw blackened wood. Let it dry for over a week then went to rot treatment. Bought product from Rot Doctor after talking to Steve (the Doc) a couple of times. He's very helpful. My first order was 2 pints (one each hardener and resin) S-1 Clear Penetrating Epoxy Sealer, 2-1.5 (ea) pints System Three General Purpose Epoxy Resin (fast set for cold weather) and a respirator. The S-1 got painted on with a discardable 4" cheap China bristle brush and was entirely consumed on the roof structure and ceiling paneling. After a day dry time I got everything 100% ready to go and somewhat trepidly mixed the System 3 and painted it on the undersides of the trusses that should have been supporting the front bedroom ceiling and also on the ceiling panels under the trusses, then wedged my support sticks in the bedroom inside to raise the ceiling paneling against the glued trusses. These were prepared in advance so it took only a couple of minutes. By the time I was back on the roof to go to step 2 of my plan the remaining epoxy had already set up in the bucket. Ooops! While the air temp was only 50, the epoxy had been indoors on my heated floor and I hadn't allowed it to cool down long enough. Yes - temperature play a big role in epoxy set time. Worked great on the trusses, tho! Strong smelling stuff, glad for the respirator! The pic below shows one of the three trusses I glued ceiling to. More on trusses and roof in the next couple of posts.
Ordered again from Rot Doc, another couple pints of S-1, 2 pints (1 ea) SculpWood Epoxy Paste and 2 pints (1 ea) SculpWood Moldable Epoxy Putty. Applied the S-1 to the front framing and paneling, rear corners and used up the rest for a second coat on the worst of the roof. The S-1 stiffened and sealed everything it touched, cured in about a day at average daytime temps in the low 50s. I built and prepared the front framing members, got all set to economize time, then began epoxy treating with the epoxy paste. Good stuff! It mixed to a consistency of cake frosting and buttered on smoothly. It also worked well as an adhesive to strengthen framing joints. Ample working time at 50-60 degrees. This really stiffened up the deteriorated wall and ceiling paneling from the backsides. Once the frosting was buttered on I blended the putty using golf ball size of each, then filled the left front corner rotted upper and lower framing members behind the siding, used three golf ball sized batches. Working time was a bit shorter than the paste but still ample at 50-60 degrees. Once I was satisfied with my rough sculpting I attached the front framing while the putty and paste were still pliable and screwed it on firmly, then removed any putty that squeezed out. The next day after it all set up I was pleased - it ain't goin' nowhere! I'm very pleased with the products - but - whew! Pricey! $250 in all - ouch!!
__________________
My next task is only as hard as I'll make it.
|
|
|
|
|
03-27-2021, 10:34 AM
|
#15
|
|
Member
Join Date: Dec 2020
Location: Wisconsin
Posts: 34
SUN #12409
|
Trusses, gussets and sags
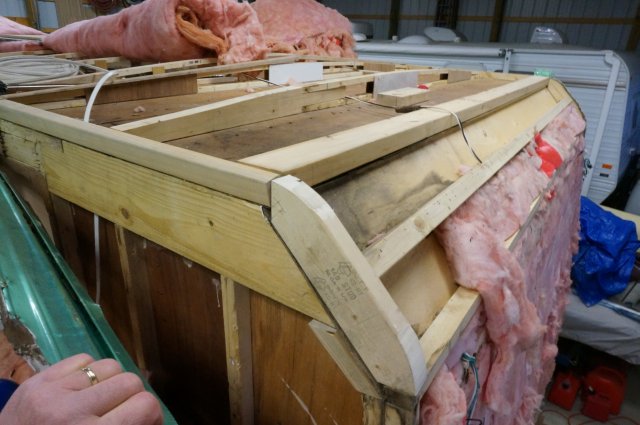
The roof design probably looked OK on paper, as long as an engineer didn't study it too closely. But get a Friday afternoon or Monday morning build of a less than great design? Oh lucky me! With all insulation removed I could inspect framing closely, other than some split ends and some damage I did when removing the old sheathing most trusses looked OK. I patched a couple with gussets made from remaining decent roof sheathing plywood and made an entire solid truss for the rotted rear. The 16" spacing was off on a few and a few others were too short so I added spacers and longer screws. I re-foil taped A/C ductwork where it was coming apart at one of the joints and inspected wiring for damage. Moron (ok, more on) wiring later.
The front end took a lot more time and effort. The front two "rafters/joists" sagged badly and had to be corrected. My solution was a pressure treated 2x4 cut in an arch matching the struss behind it but shortened to avoid interference at the edges. I set this in on edge, drilled holes and sent long screws into the sagging rafter which raised it back up to where it belongs. I did this before gluing the ceiling panel to the trusses described in the previous post.
__________________
My next task is only as hard as I'll make it.
|
|
|
|
|
03-27-2021, 11:02 AM
|
#16
|
|
Member
Join Date: Dec 2020
Location: Wisconsin
Posts: 34
SUN #12409
|
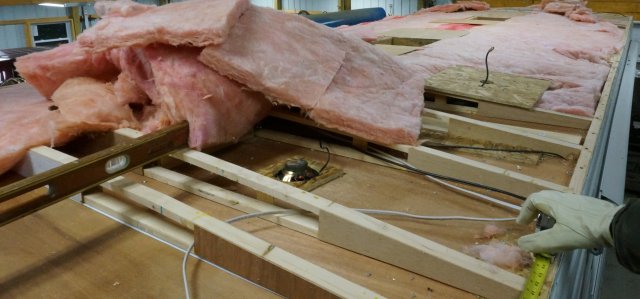
Electricity can do funny things
While tinkering with ideas for roof/siding termination at the front of the trailer the first problem I have is the cheesy wiring layout. I pull a group of wires out of their slot in the front rafter and find a critical failure. The cheesy roof/siding termination had been screwed down to this rafter on 3" centers, and where do you suppose one of those screws landed? Yep - dead center through the group of wires that hadn't been protected with an 8 cent metal 1-1/2" x 3" 18 Gauge Self-Nailing Stud Guard! Yeah, that explains why there was a spark every time I plugged the trailer power in or why I got a tingle of a shock when using the trailer stabilizer jacks on a wet morning outdoors. After more than an hour of scouring my scrap for appropriately sized wire and cutting, nutting and taping, the wiring is as good as it will get. Kind of surprising all of the electrical still worked, although the water heater didn't work when switched to electric. Maybe it will now. Sure am glad there wasn't a fire!!
__________________
My next task is only as hard as I'll make it.
|
|
|
|
|
03-27-2021, 11:31 AM
|
#17
|
|
Member
Join Date: Dec 2020
Location: Wisconsin
Posts: 34
SUN #12409
|
Roof and siding termination
So begins the engineering question I've had since beginning this project last fall - how to terminate the front roof/siding connection. I've been building in-ground vinyl lined swimming pools for way more years than I care to remember. We always terminate our liner at any component like steps, skimmers, lights etc. over the smooth gasketed face of the component, secured with a faceplate or strip pressing against the liner from the pool's wetside with stainless steel screws closely spaced.
To secure the siding over the roof membrane, the way the factory did it, defies logic. Of course this will be a weak spot. The only advantage to siding over the membrane that I can see is that it will be much easier to remove the siding if necessary. In any event, I see a need for a good quality smooth, tough backing for this termination point, siding under or over. Due to the angle of the roof meeting the wall, I decided to spend big, buy a really nice straight smooth oak 2x4 and install it on an angle to match the roof line. I'll use a sheet of 1/4" birch (fairly bendable) plywood for this front section. Still need to decide exactly where on the oak to terminate the plywood. Do I stop the plywood 1/2 way across the width of the 2x4, put a rubber gasket strip down then wrap and terminate membrane there? Or do I end the roof sheathing at the leading edge of the 2x4, bring the siding across the entire 2x4 width and secure it as smoothly as possible, put a rubber gasket strip down, on the siding, then secure the roof membrane to it with a stainless or aluminum commercial grade roofing termination bar and stainless steel screws? Eternabond tape over the whole works? No caulk? I hate caulk!! Seems so hack.
__________________
My next task is only as hard as I'll make it.
|
|
|
|
|
03-27-2021, 11:45 AM
|
#18
|
|
Member
Join Date: Dec 2020
Location: Wisconsin
Posts: 34
SUN #12409
|
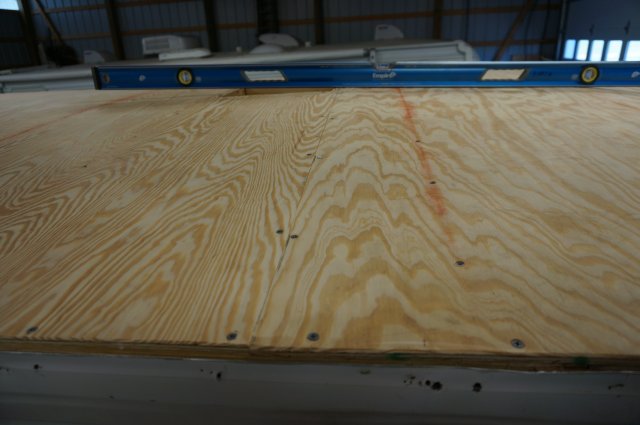
Oh, and one more thing.....
I forgot this pic. Have a look at the wondrous roofline engineering from the factory!
The left most line represents the roofline as it was when I took it apart. The center line represents the factory designed line.
Water pooled in the centerline of the trailer behind that rear rafter. Wonder why??!!
__________________
My next task is only as hard as I'll make it.
|
|
|
|
|
03-28-2021, 10:26 PM
|
#19
|
|
Moderator
Join Date: Nov 2006
Location: Ohio
Posts: 12,651
SUN #89
|
Hi Jake,
It looks like you are gaining!
On the front roof/siding termination. I could not find a pic of yours of what the old roof looked like on the front, between the siding and the roof, not apart. Do you have one?
These 3 pics I "think" I can follow how they where making the siding to roof termination.


See this link to how we did this on a 2006 Sunline. We re-decked the roof with 3/8" plywood and had to deal with the transition where on the standard Sunline budboard roof, the roof was only about 1/16" plus rubber thickness.
https://www.sunlineclub.com/forums/f...avy-16834.html
Here are some highlights on the roof to front wall siding transition. The original setup.
The rebuilt setup. This first one does not have the new transition rafter in it yet.
A test fit of the siding to the new roof deck. Shaved the plywood to be a smooth transition.


This link will drop you into that post where I blended the rafters better to flex a 3/8 sheet of plywood to not crack and blend in the front.

There is a gap under the level of about 3/4", plywood cannot make that tight of a flex
So a rafter cap was made to build up the height of the rafter to the level.
Here is the decking now going over that area

At the sheet seam
The rubber does on purpose go under the front siding. You do not want towing wind force to pick away at the rubber if it was on top of the siding. There is however as better way to seal that front seam I use.


I have done 3 other re-decked roofs since the one above.
This link will drop into the middle of one I am rebuilding now. It has pic of the rafter top cap cut out of a 2 x 4
https://www.sunlineclub.com/forums/f...tml#post151483
You can see here the rubber goes under the siding. It is staples down the side of the front 2 x 3. Not on top horizontal, but on the vertical side to help hold it in place

Now for the seal at the front. Using commercial grade butyl, I use GSSI MB-10A butyl. 1" wide x 1/8" thick. The first step.

Staple down the siding, put the corner molding on

Another butyl filler to create a smoother transition to the cap molding.

Cap molding on top, lined with butyl on the underside.

Cap molding screwed down, warm this up with a heat gun to flow the butyl


Hand check the tightness. I use all Stainless screws. No. 8 x 1 1/2" long pan head sheet metal screw, no 2 sq bit drive

Trim excess butyl. The temp needs to be warm enough to trim, too warm and it will goo all over.

I caulk the entire cap molding with Dicor self leveling to set this joint up for Eternabond.

Wait 3 to 4 week for Dicor to fully cure and gas off. Then apply Eternabond. I use the primer too. No questions asked if it will bond correctly.


Then thin coat of Dicor non sag on the exposed Ebond edge

There a "lots" more pics and info in those 2 posts which may help.
Does your siding setup look like it can work that way? You have heavy corrosion on the top of the sheet where the cap molding goes. You for sure want to Ebond over that cap seam.
Hope this helps
John
__________________
Current Sunlines: 2004 T310SR, 2004 T1950, 2004 T2475, 2007 T2499, 2004 T317SR
Prior Sunlines: 2004 T2499 - Fern Blue
2005 Ford F350 Lariat, 6.8L V10 W/ 4.10 rear axle, CC, Short Bed, SRW. Reese HP trunnion bar hitch W/ HP DC
Google Custom Search For Sunline Owners Club
|
|
|
|
|
03-30-2021, 05:48 PM
|
#20
|
|
Member
Join Date: Dec 2020
Location: Wisconsin
Posts: 34
SUN #12409
|
Quote:
Originally Posted by JohnB
Hi Jake,
These 3 pics I "think" I can follow how they where making the siding to roof termination.John
|
Hey John! You may think you can follow they're methods, I doubt they could!
Thanks for your detailed reply!! Looks like I'm on the right track. I cut my leading rafter as tall as I did in order to leave it with as much strength as possible to suck up the sag in the flat 2x4 rafter. That worked, it pulled both front flat 2x4 rafters backup to straight. But it left me with a kind of steep pitch to the termination. I bought a really nice strong flat smooth oak 2x4 to use as that termination. I mounted that on a slight angle with wedges under it to tip it on the angle that meets the rafter. It all should fit under the curve of the corner molding with a little tweaking. I think. Maybe I'll need a bigger hammer. I'm feeling kinda anal about that front roof/siding termination!
I haven't figured out how you manage to post pics inline like you do, when I click the inline icon it asks me for a url. I no longer have my own website and no pics up anywhere like flickr. Is there another way?
So here are some pics of the trailer before I tore it apart. Also a pic of yesterday's work putting the deck on. The leading plywood is not attached yet as I need to decide on a few details on final termination. It's 1/4" birch, flexes well, looks like it's blemished in the pic but that's just some weird color spots like knots or something. The rest is 3/8 BCX sanded one side. I'll need to shim the 1/4" to match the 3/8" at the rafter.
I'll have a fair bit of filling and sanding to the deck plywood before applying the membrane. I'm thinking plastic wood? Not sure what would be the best filler. I used subfloor glue and staples as fasteners, was too concerned about splitting thin rafters with screws. The factory used screws and there was damage.
Thanks for all your time and help!!
__________________
__________________
My next task is only as hard as I'll make it.
|
|
|
|
|
|
|
Currently Active Users Viewing This Thread: 1 (0 members and 1 guests)
|
|
|
 Posting Rules
|
You may not post new threads
You may not post replies
You may not post attachments
You may not edit your posts
HTML code is Off
|
|
|
|
 » Recent Sunline Discussions
 |
|
|
|
|
|
|
|
|
|
|
|
|
|
|
|
|
|
|
|
|
|
|
|
|
|


 Linear Mode

