 |
|
 08-02-2021, 05:10 PM
|
#1
|
|
Junior Member
Join Date: Aug 2021
Location: New Jersey
Posts: 15
SUN #12825
|
Need Advice Guidance on Repairs
Hi All!
I've been reading the wealth of information that this forum has provided and the responses of the members here are very helpful to each other. I don't have a Sunline - I have a 2003 or 2004 39L Fleetwood Terry. I hope it's OK that I am posting here - I am seeking guidance on doing repairs to this thing and since this is such an informative place...I figured I'd take a shot here if that that's OK! I have many questions and I will try to describe the situation as best I can and post pictures!
It has water damage. I have the front "bedroom" opened up from the inside down to the aluminum skin and the floor torn out to the joists and membrane in the bedroom as well as a part of the living/kitchen area. The front and side wall in this area needs some wood framing replaced and a few of the joists as well. They run the length of the trailer. The sill plate on one of the side walls of the front bedroom (where the storage compartment door is) is just mostly gone and what remains turns to dust if I touch it. Because it is mostly gone the one section of the wall (the aluminum and wood frame) is kind of just hanging there. Since it butts right up to a slide it is kind of "sectioned" off, if that makes sense. The front walls sill has some damage but not the whole front sill. It looks to be a leak from the corner roof seam that ran down these walls and into the floors eventually.
On the roof there is clear seam separation at the corner and I can see the "plywood" or osb peeking out and it's clearly water damaged at the corner.
I have taken out much of the wet, nasty insulation that was between the floor to dry everything out. I read a post where the extremely helpful "JohnB" recommends a moisture meter. So I bought one and have been using it to find wet insulation. Where I can't access the floor from above I've been cutting square flaps and pulling the insulation out from beneath. There are still a few areas I need to get opened up to check. Like under the kitchen/cabinet/fridge area but there's some sort of metal sheeting on the underside in the area so I don't have any access.
There's also water damage to the back bedroom rear wall, that I know. I can feel the sill plate on the right section of the rear is rotten as well as the side section around the "second door" to bedroom is mushy and rotten but that is something I'd like to repair down the road. I'd like to take care of the front section first.
To start these repairs - I am unsure of which part to tackle first. The floor joists/floors...or the framing damage on the 2 walls? The bottom sill plates or the wood framing on the wall itself? I will get to the roof corner after these two things are hopefully completed. I have a huge tarp in the meanwhile. There is the larger slide that butts right up to this "room" and the joists around i have exposed and they damaged.
The wall wood framing is 11/2" by 1 1/8". 2x2s are just slightly too big so I will have to rip maybe a 2x4 down to the right size. I believe the joists are 2x4s but I need to measure again to be sure. I've been reading a lot and watching videos to learn as much as I can before cutting anything apart. Drawing the layout...
I need advice on what section to tackle first...how to dive in and where!
I attached a few pics. One shows the layout from Fleetwood manual and I circled the section that I'm working on. One shows with the laminate floor still mostly on. The pics with the "really" bad damage show the side wall I'm referring to that butts right next to the slide. That wall has the really bad disintegrated bottom sill. I think someone worked on this room before because 3 walls in the room were not original they were taken out and covered w/these ugly dark wallboards.
If more pictures are needed - please let me know!!
Thank you so much for reading - I know it's a lot.
__________________
__________________
|

|

|
|
08-15-2021, 09:35 PM
|
#2
|
|
Moderator
Join Date: Nov 2006
Location: Ohio
Posts: 12,656
SUN #89
|
Hi MC901,
Sorry this took so long to get back to you. I was on vacation and now I'm back home on my main PC.
Reading your water damage, you are in for a large restoration project. You seem to have wood working skills and have done a good job of showing us what you are up against. Here are my thoughts to help give you some things to think on. And please ask for more as needed.
First off, it is not a problem to post here on Sunline Owners Club. While many of us have or had Sunlines, we have no rules or objections for club members having other brand campers. In fact, many of our members who had a Sunline, now have other brands and as still good friends and club members.
Next up, I'm assuming you want to restore the camper. Good for you! When you are done, you can have the camper in better then originally built status as far as creating better sealing of the joints to not have leaks again.
Now what to do and how to do it. Ideally, you started the restoration differently, meaning taking the camper apart from the outside first, then remove the inside as needed. But, we are past that now. You can still do this with what you have started. The reason I bring this up is, leaving the wall board on would of left some level of structure left in the camper to deal with the roof and walls while the wall board was still intact. And it may have saved you some level of wall board replacement. The walls boards in an RV of your (stick and tin as we call it) type of camper, create the rigidity of the structure. The siding also creates some of the rigidity. The wall studs carrying roof load and they create a way to fasten the siding and the wall board. Basically, the sum of all those parts creates the strength of the camper structure.
It appears you may have a walk on roof, or had one if it is not rotted out. Walk on means, the decking when not water damaged can support your direct walking over the roof and not damaging the roof sub straight. On Sunlines, many or ours are not direct walk on roofs. We have to put small manageable piece of plywood down spanning the rafters to support the weight on top of the membrane. And we have to put something on the membrane, a tarp, carpet etc to not damage the membrane with the only wood. If you decking or rafters have damage, you may have to do some of the plywood sheets, tarps etc to service the roof too.
You made the comment about OSB or plywood peaking out. By the damage to the walls, there appears to be roof seam damage. The front wall to roof seams, the side wall gutters rails seam may have had damage and the rear wall to roof seam. Those perimeter seams are classic leak spots. Then comes the corner moldings, windows, cargo doors and any penetration's in the siding. Any water that enters, runs down, and it keeps going down if there is enough water volume until it reaches the floor and the black Darco membrane on the bottom where it cannot get out easily. You more then likely have multiple leak entry points, roof seams, corner molding, slide opening moldings door and maybe windows. The goal of a good restoration is to chase all the damage, find the source, understand it, and then start repairs. The type of type, replace wood or resin treat it may change pending the damage.
The roof is something that needs to be understood. Can you post pictures of the roof, it's seams, caulking and the membrane itself? You need to understand what needs to be done to repair the roof. The reason I'm going to the roof is, we have to sort out if the roof has to be totally removed or can be repaired in place. And it may be a combo of both if the decking is water damaged. The moisture meter can scan the ceiling up and you can scan the roof membrane down assuming the roof has not dried out yet. As long as there is not heavy mold on the roof membrane, the meter can see wetness under the membrane to about 3/4" deep and find wet decking and insulation.
Give us some info on the roof and pics. Once we understand that better, we can start the total rebuild plan. The siding will eventually have to come off, some in parts, some maybe the entire wall. But we do not want to take siding off yet since there is very little or no wall board left inside. Once the siding is off, the entire structure become a lot more, wiggly. Wall studs that are damaged and floor sill plates need to be repaired/replaced will be done, but first we have to sort out the roof and the wall top plates and rafters. Then we can create a plan on how to deal with the walls.
I'll wait for your pics and roof feed back to see how good or bad the roof is. Then we can address the walls & siding.
You are doing great, keep up the good work.
John
__________________
__________________
Current Sunlines: 2004 T310SR, 2004 T1950, 2004 T2475, 2007 T2499, 2004 T317SR
Prior Sunlines: 2004 T2499 - Fern Blue
2005 Ford F350 Lariat, 6.8L V10 W/ 4.10 rear axle, CC, Short Bed, SRW. Reese HP trunnion bar hitch W/ HP DC
 Google Custom Search For Sunline Owners Club
|
|
|
|
|
08-16-2021, 01:31 AM
|
#3
|
|
Junior Member
Join Date: Aug 2021
Location: New Jersey
Posts: 15
SUN #12825
|
Ohhh, I hope you had a great vacation!! Thank you for excellent reply! You bring up some things I hadn't even considered!
There is definitely a seam leak at the front driver's side corner... that's where i mentioned the "peeking" wood beneath. The seams, nothing has been serviced by the previous owners on the roof for who knows how long!
I am sure there are multiple spots where caulking is cracked and whatnot. From the inside it looks like it flowed from that corner, down the wall meeting the corner of the slide and a portion of the front wall.
I wanted to initially attack from the outside like I've researched...but at some point - thin wall paneling had been put up in place of the original wall. It was paneling only...like the thickness of Luan...kind of like what you'd see in an older basement...ugly dark paneling. The original wall was just completely removed under it on the worst wall and the front as well and the dark paneling was in its place. I'm thinking a previous repair. From the water damage, that paneling had "ripples" in it. It provided almost no strength.
The wall on the passengers side across from the "sagging" wall is original and has no damage. My brother had started to take that wall off and found that everything was good behind it so he stopped.
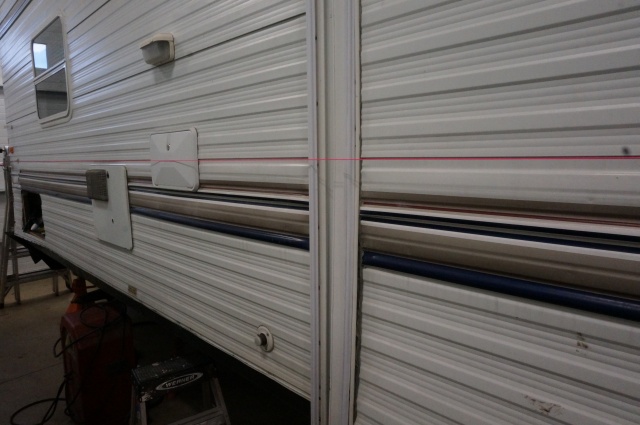
The roof - we have been up there to put a tarp on and off over the whole thing whenever it rains and it feels pretty sturdy. No cracking sounds or obvious, "uh oh - that feels bad" feelings. We have avoided stepping near that corner tho. I can definitely get those pictures tomorrow. I have a few taken from the ground looking up at the side seam of the "sagging" wall in the front that I'll attach now.. it's just open and not sealed looking at the pics now.
I may have someone coming to help with a few of the floor joists tomorrow. They have construction experience but I'm not sure they understand how RVs are built. It's a pretty impatient person so I'm not sure how that's going to go lol they're kind of just butting into the situation insisting that they will put in a floor. I seem to be having problems with someone tearing into this thing while I'm out and then i have to deal with that issue on top of this already mountainous issue.
The wood joists that run right under the slide (right under edge of slide when slide is out - perhaps the trough that it goes down when it retracts) is definitely an area of concern. The darco wraps on the bottom of the two 2x4 and I can feel it from underneath the slide, the softness. From the inside they look so rotted. I have no idea how one would fix that!
I had planned to figure out the sill plate on sagging wall, then the joists, then the wall framing on the sagging wall. Then opening up that corner of the roof to see how much plywood/roof trusses if any would need replacing. Putting back down the original rubber membrane, liquid roof over the entire roof, dicor, eternabond on the seams, new vents, etc. An entire new rubber roof isn't in the cards for the time being. Down the road, if needed!
I know it sounds like a lot!
Thank you again for your insight!
__________________
|
|
|
|
|
08-16-2021, 11:22 AM
|
#4
|
|
Junior Member
Join Date: Aug 2021
Location: New Jersey
Posts: 15
SUN #12825
|
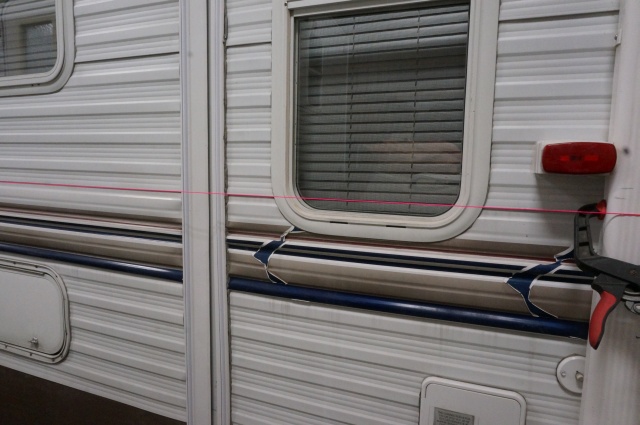
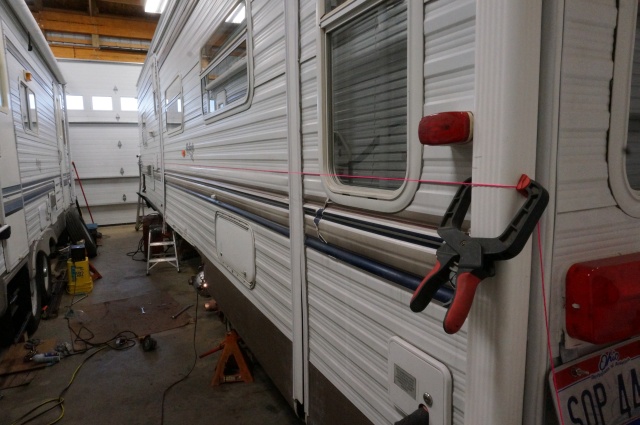
Here are some pictures from the front corner roof/seam area!
__________________
|
|
|
|
|
08-16-2021, 08:02 PM
|
#5
|
|
Moderator
Join Date: Nov 2006
Location: Ohio
Posts: 12,656
SUN #89
|
Hi MC901,
Quote:
Originally Posted by Mc901

I have copied this in from your other post so I can address this here, all in one place with your pics.
I am unsure of where to begin I have a host of problems to do deal with but the first...the sill plate on the driver's side wall on the side of the front wall is completely rotted out. The wall there is sagged a little down due to that and basically disconnected as a result. Now, the joists, the front bottom sill plate and framing right at the corner of the slide there also needs replacing.
The order of attack is where I am currently stuck. The sill plate with the most rot I am guessing would be the first repair. Now - if the very front framing and bottom sill plate also needs repair and joists as well...what do I secure a new sill plate to? Or do I just take it out all at once? Is that structurally safe to do?
I may take off the bottom exterior aluminum to get to the front sill plate. Is there a method to the madness? Can I just cut the vertical floor joists from the front framing to replace the front sill ? I'm just scared to take framing out especially not knowing which order to repair the frame work and joists. . I have pictures in my other thread.
Im at a standstill you could say. I can take direction all day every day but figuring something out like this is new to me! ��
|
You have many good questions, and it will take a good amount of time to get through them all, including these.
Quote:
Originally Posted by Mc901
Hi All!
Snip...
I have a 2003 or 2004 39L Fleetwood Terry.
It has water damage. I have the front "bedroom" opened up from the inside down to the aluminum skin and the floor torn out to the joists and membrane in the bedroom as well as a part of the living/kitchen area. The front and side wall in this area needs some wood framing replaced and a few of the joists as well. They run the length of the trailer. The sill plate on one of the side walls of the front bedroom (where the storage compartment door is) is just mostly gone and what remains turns to dust if I touch it. Because it is mostly gone the one section of the wall (the aluminum and wood frame) is kind of just hanging there. Since it butts right up to a slide it is kind of "sectioned" off, if that makes sense. The front walls sill has some damage but not the whole front sill. It looks to be a leak from the corner roof seam that ran down these walls and into the floors eventually.
On the roof there is clear seam separation at the corner and I can see the "plywood" or osb peeking out and it's clearly water damaged at the corner.
I have taken out much of the wet, nasty insulation that was between the floor to dry everything out. I read a post where the extremely helpful "JohnB" recommends a moisture meter. So I bought one and have been using it to find wet insulation. Where I can't access the floor from above I've been cutting square flaps and pulling the insulation out from beneath. There are still a few areas I need to get opened up to check. Like under the kitchen/cabinet/fridge area but there's some sort of metal sheeting on the underside in the area so I don't have any access.
There's also water damage to the back bedroom rear wall, that I know. I can feel the sill plate on the right section of the rear is rotten as well as the side section around the "second door" to bedroom is mushy and rotten but that is something I'd like to repair down the road. I'd like to take care of the front section first.
To start these repairs - I am unsure of which part to tackle first. The floor joists/floors...or the framing damage on the 2 walls? The bottom sill plates or the wood framing on the wall itself? I will get to the roof corner after these two things are hopefully completed. I have a huge tarp in the meanwhile. There is the larger slide that butts right up to this "room" and the joists around i have exposed and they damaged.
The wall wood framing is 11/2" by 1 1/8". 2x2s are just slightly too big so I will have to rip maybe a 2x4 down to the right size. I believe the joists are 2x4s but I need to measure again to be sure. I've been reading a lot and watching videos to learn as much as I can before cutting anything apart. Drawing the layout...
I need advice on what section to tackle first...how to dive in and where!
I attached a few pics. One shows the layout from Fleetwood manual and I circled the section that I'm working on. One shows with the laminate floor still mostly on. The pics with the "really" bad damage show the side wall I'm referring to that butts right next to the slide. That wall has the really bad disintegrated bottom sill. I think someone worked on this room before because 3 walls in the room were not original they were taken out and covered w/these ugly dark wallboards.
|
I'll start by saying a few big picture things, and then start drilling down into each area.
After seeing your roof, I had to look at what state you are in, is it NJ? Basically here on the east coast, not AZ or TX where there is lots of sun all year round. And if you know, was the camper always here on the east coast?
Assuming this is a north east US camper since it was made, I may change this thought process if it lived west coast or deep south a high sun area.
Your camper being 2003 or 2004 camper, I am semi surprised the roof deterioration is as bad as it it. Are you sure it is a 2003/2004 camper? What does the title declare the model year. Reasoning for this, I have worked on several Sunlines from the 2003 to 2007 time frame that lived outside all their life and the roof membrane not as bad as yours. I know these all lived in the north eastern US outside all the time.
Here is what I see. These 3 pics tell a story.


Your roof membrane is an EPDM rubber roof. That is a good product when cared for correctly. The membrane has a shed layer of white material on the top, and a black EPDM rubber sheet on the bottom. The EPDM rubber sheet is a lot thinner then the entire stack up of white layer and black layer. The black layer is the waterproof part of the membrane. The top white layer is a shed layer, its job is to protect the black layer and reflect heat and UV rays from attacking the black layer and keep some of the heat off the camper. The white layer sheds thickness very slowly over time. I am not sure if your EPDM is a Dicor membrane or maybe Alfa Systems. The older Dicor membrane was 40 mil thick (0.040") I measured some of the Dicor products from the 2003/2006 time frame and the black layer was 15 mil, and the white layer 25 mil. To put this in perspective, 15 mil is about 2 sheets of standard 8 1/2 x 11" sheets of paper thick. Basically not very thick for a roof. The warranty from Dicor was 12 years on the membrane, not the sealants, the actual EPDM membrane.
This picture shows a lot going on. All not good.
It appears by the 3 pics I show above, you have lost the "entire" white shed layer on a potentially 17 year old roof. The membrane edges at the gutter rail have separated from the top decking to the wall siding transition under the gutter rail. Yes, the caulking at the front seam is shot. I suspect, with the shed layer gone, and for several years, the sun baked the black layer heavily shrunk the membrane to pull away from the front seam. A black membrane absorbs heat almost instantly on a hot summer day. I experienced this effect this past June helping a camper buddy repair a roof. Within moments of the the bottom of a new roof membrane upside down (black layer up) on the decking while we positioned it into location the black got so hot I could not touch it. The black layer in the hot June sun mid day in eastern PA, was about 80 to 85F, went from no big deal holding it, to almost burning your hand in less then minutes. I was shocked how fast that black layer absorbed the heat so quickly. The white layer in the same sun, was barely heated. As a point of reference, when a surface temperature exceeds 120F you can barley hold onto it. 130F you can't hold it more then a second or so.
The decking has issues too at the perimeter. The rubber is separated from the decking and ripped at the joint over to the wall edge.
I cannot tell from the few pics, how rotted the decking is or the rafters under the decking at the top wall plate. The rafters set on the walls. When water gets into the attic from a gutter rail leak, like the membrane separation or caulking failure, the rot can get into the ends of the rafter. While the center of the rafter may not be rotted, the ends that sit on the wall can be. Once the end rots, the rafter looses structural holding ability. The rafter can drop down as there is nothing left to hold onto the wall.
You mention a sagging wall area. Need some pics of that area to see if what you have is rotted rafter ends. And if the rot on the sagging wall is at the bottom, the top or both. A rotted rafter end is a big deal. And it does not take much rot to compromise the structural holding ability of the rafter to the side wall top plate. I know you have a Terry, but I "suspect" they did not build them much them that much differently then Sunline, at least in the rafter to wall configuration. See if you can get any pics to show what I am going to explain on your Terry.
Here is a damaged Sunline roof with rotted rafter ends.


Here is a rebuilt section of roof to replace that entire bad section. You can see better how the rafter to wall plate transition is made with the new wood as you can see the boards that are not all black.

Here the rafter frame is setting on the walls top plate as a test fit


Now to a word description. The LH & RH walls are 1 1/2" thick. You stated your Terry is the same. This means the top wall plate is 1 1/2" wide as the wall depth. You notice on the new Sunline roof wood structure, there is an outer 1" thick (wide) by 1 1/2" (tall) left & right walls end cap board that creates the ends of the rafter section. And the rafter end buts up to the 1" thick perimeter end cap on the LH & RH side.
When you place the roof subassembly on top of a 1 1/2" thick wall top plate, the actual rafter is only touching the top sill plate by 1/2" as the 1" thick outer perimeter cap is 1" thick. All the roof rafter load into the wall is only supported by that 1/2" of rafter support. As long as the rafter ends are solid and not rot compromised, that 1/2" works acceptable. If there is rot in that last 1/2" of rafter, then there is structural loss of the rafter to hold up the roof decking loads. Like the raw weight of a full decked walk on roof and snow loads.
If the rater ends are rotted, the wall top plate usually is rotted too as all the water rots both.
Have a look, take pics and report back.
I'm going to go big picture in a discussion now after seeing your first set of roof pics. I'm giving you one opinion based on what I can only see from your pics, and the background I have in doing roof repairs.
A few questions to you,
1. How long do you want to keep this camper?
2. What are your plans after for the camper after you correct the damage to the entire camper? Will you tow it from campsite to campsite, or park it on a seasonal site?
You stated this that I will make some comments too.
Quote:
|
I had planned to figure out the sill plate on sagging wall, then the joists, then the wall framing on the sagging wall. Then opening up that corner of the roof to see how much plywood/roof trusses if any would need replacing. Putting back down the original rubber membrane, liquid roof over the entire roof, dicor, eternabond on the seams, new vents, etc. An entire new rubber roof isn't in the cards for the time being. Down the road, if needed!
|
You have a sagging wall sill plate and you may have rotted rafter ends and wall top plate. That wall took a lot of water over the years. This damage is not new. It could be 6 to 8 years worth. It appears you are prepared to lift the membrane to see how much the plywood and roof trusses have issues. And you wanted to reuse the original rubber membrane. That thought process may sound doable, but it has some technical issues that may not allow the rubber to be be reused. First, the membrane has lost all its shed layer. That by itself is not a problem per say. But this means the left over black layer that is glued directly to 3/8 or 1/2" thick roof decking is very thin, possibly only 15 mils thick. The ends of the membrane are damaged at the wall transition and separated in some places.
There are high odds you will not be able to lift up what is left of the rubber roof to replace the decking and still reuse the rubber. The rubber so thin and bonded to the decking will most likely rip itself apart coming off. If the water has broken the glue bond, that can help some of rubber come up, but there is an issue when you try and glue it back down. The water based glues need a porous deck to bond too. Which means new decking or the old decking if it is still sound and not rotted, has to be scraped and some how get the old glue off the old deck to have the glue work. While you may be able to get different glue to get past the glue issue, there is still the broken membrane at the walls issue and did the super thin black layer not rip all apart in the inspection/repair process.
You would be doing a lot of repair below the roof. A new floor, new wall board, and a lot of more new work below the roof. You said a new roof is not in the cards right now, have you actually priced the materials for a new roof compared to a patched roof? You mentioned using EPDM coatings, are you referring to that brand? This link https://www.epdmcoatings.com/suggested.php
and by that EPDM coatings link for RV's you "must" use RV roof magic. https://www.rvroofmagic.com/index.php
The RV roof magic has a 10 year warranty, that is not bad but there are some mechanical issues to overcome where the membrane is torn and separated from the gutter rails. Lets put this aside for the moment as if you can do a roof coating, I may be able to offer a better product with a lifetime warranty on the product for comparable cost.
Point being, the roof has to be solid and dependable or all your hard work below the roof can be jeopardized by a leaking repaired roof.
There are options for a whole new roof membrane that may be cost effective and solve all the issues of the roof to wall and roof to end seams issues. And bond to your old glue on the decking if you can get the old EPDM off of it. LaSalle Bristle makes a PVC membrane roof that is claimed to be able to bonded over the top of old decking and their glue may not care there is no porous sub straight. I have seen and researched the PVC roof system and talked to the factory rep on it. And I have project camper with this PVC roofing with a bad install, but that is not the PVC's fault.
There are options for you, I'm just preparing you for, your roof fix plan may not work out as you stated or at least from my understanding of the wording.
I myself would suggest you create an entire camper repair "plan" before you start the rebuild. I appreciate your concern about a new roof cost, just there is a lot more to fix besides the roof. And if the roof is not solid and leak free in every way, all the work done below it can get re-infected.
You mentioned installing new floor decking, now. This comes back to how long you plan on keeping the camper? I did not see any mention about treating the floor joists (assuming they are water stained but mechanically not rotted) to prevent future dry rot. The same goes for the wall studs. And you have to deal with the rotted wall sill plates. I cannot tell from the pics, if Terry has the walls on top of the floor or they are screwed to the floor outer band board ( screw in the side of the floor rather then on top of the floor). Ideally that area of the walls connection to the floor system is corrected before you install a new floor.
This may be a lot to absorb all at once. I'm just trying to help you see the entire picture before you start the repair process. There is much talk yet about the roof and the slide floor area repair, the wall studs, the siding removable etc. yet to go over.
Hope this helps. Let me know your thoughts on this first, then we can start into understanding what to do with the roof.
John
__________________
Current Sunlines: 2004 T310SR, 2004 T1950, 2004 T2475, 2007 T2499, 2004 T317SR
Prior Sunlines: 2004 T2499 - Fern Blue
2005 Ford F350 Lariat, 6.8L V10 W/ 4.10 rear axle, CC, Short Bed, SRW. Reese HP trunnion bar hitch W/ HP DC
Google Custom Search For Sunline Owners Club
|
|
|
|
|
08-16-2021, 09:56 PM
|
#6
|
|
Junior Member
Join Date: Aug 2021
Location: New Jersey
Posts: 15
SUN #12825
|
So much good information here. A lot of this I can't every attain even with constant research! I thank you very much!!
2003.
Originating in Rhode Island. .
It sat since around 2012 in the same spot on the coast of NJ. Actually in the driveway right on the bay - It backed up to a channel of water about 300 ft away.
This thing will not travel. It's going to be stationary. We planned to move into it in a few months for maybe a year or so. We did not know about all of this damage. It looked mostly untouched from the inside. Not feeling great right about now...at all. Pretty depressed by this. Very depressing. Currently living in a teeny tiny camper and this whole process has been so frustrating.
When we priced the EPDM membrane - because it is a 39 ft.. it was coming out to about 1000 for a new membrane. So I was advised to buy Dicor RPCRC1 White EPDM Rubber Roof Coating - 1 Gallon. I bought 4 gallons. The only noticeable damage (before we took down the wall paneling and insulation of course) on the ceiling right under this area is a bubble or delamination I guess it's called.
So we were advised to do the rubber roof coating. Replace the decking that is damaged underneath before doing so and applying it, dicor sealant and eternabonding. Hoping that would be a fix until we could replace the EPDM entirely next spring.
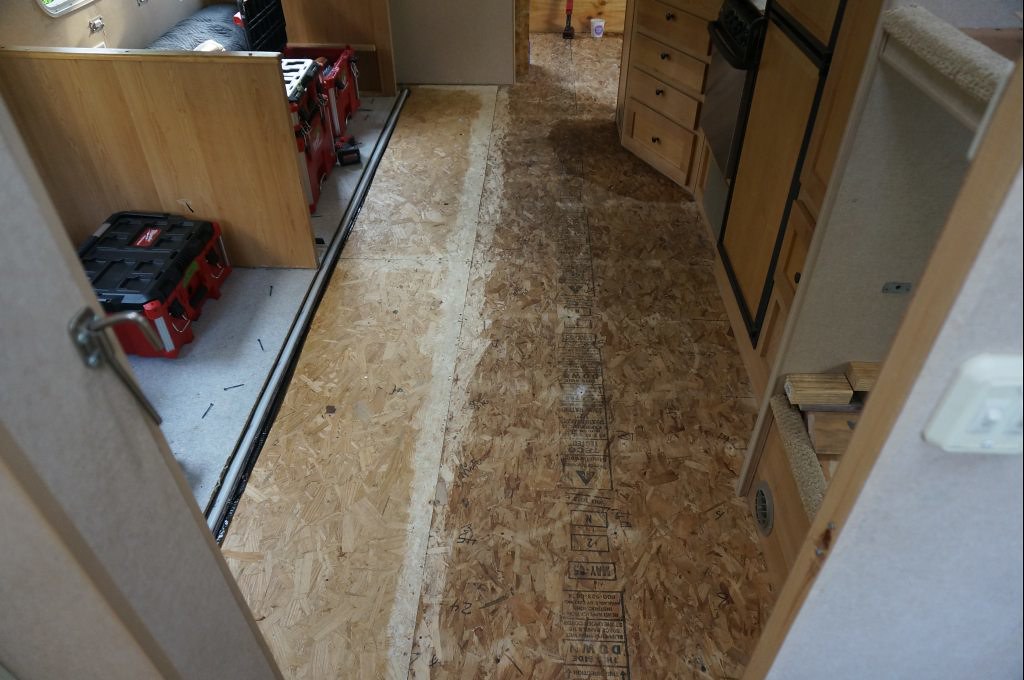
For the floor joists - we plan to treat what will remain with CPES or a comparable product. Replacing the sill plate on the bad wall and front wall and framing on the bad wall and partial replacement on the front which only has damage about halfway. .the side closer to the corner leak. Then putting the CPES sealant on all new wood going in. We may cut two or 3 joists in this area back and sister in New ones. The rest seem pretty solid but we will treat those as well. Then paint everything with something like KILZ anti mold. The joists right around the slide along with the sill plate on the wall right next to it are the worst damaged areas.
The floors do go under the wall framing.
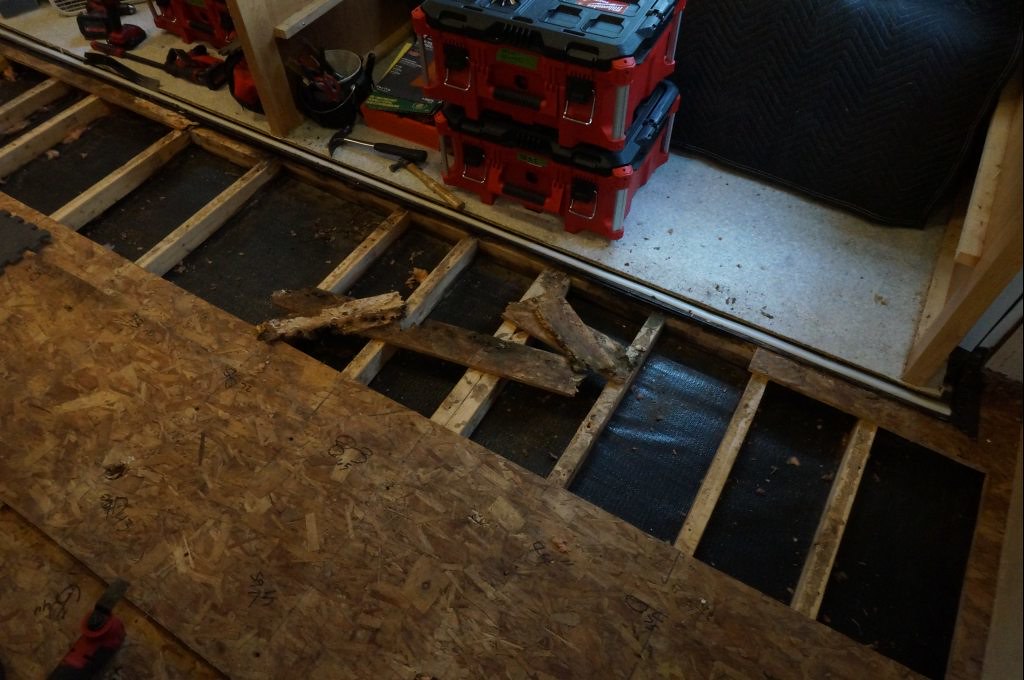
I have uploaded some pictures of the area in question. This is right under that left corner opened roof seam in the previous photos. Most of the pictures show the worst offending wall..."the sagging wall". The corner right underneath. One picture has arrows to show the sill plate area. The pics are various stages of floor removal and what not. But it gives an idea of the inside area. The picture with the corner rot by the slide shows the sagging wall and you can see daylight now because we took out the staples on the darco to see that sill plate and some of the sill fell out, rotted.
The ceiling on the inside doesn't appear to be sagging in that area. Just the bubble and a smaller bubble right underneath in the corner area. If you need any more pictures please let me know.
Thank you for your help!
__________________
|
|
|
|
|
08-19-2021, 07:52 AM
|
#7
|
|
Moderator
Join Date: Nov 2006
Location: Ohio
Posts: 12,656
SUN #89
|
Hi Mc,
OK, I'll comment on your last post. At this point, I sense you need to do something to move forward. I'll try and help the best I can from here. I'm hoping this does not depress you more, it's not mean to be, just I'm giving you some info trying to help you make the best decision you can, given your circumstances, on what I have learned along the way in restoring campers.
What you are up against is, a major restoration effort. I have not seen a 2003 vintage camper with a high amount of water damage as bad as yours. Every wall stud and floor joist has been water stained and or rotted on the left side of the camper. The left front and left gutter rail membrane tear has allowed a lot of water in. Corner molding leaks also add into this I'm sure. The roof leak was so heavy, it is hard to see the other leak areas.
For water staining to be that large, that is a lot of water for a good amount of time, years worth. It all can be repaired, it will just take a lot of work (labor) and sadly with Covid price increases in RV materials, lumber yards and most anything else the material costs will be higher then pre Feb 2020. Not sure of your timeline and or funding situation on this camper, but I am going on the assumption you need to get it repaired to some level of usable, in the somewhat near future. The repairs made in this mode, with a lot of work, can possibly get you there, how long they last is a different topic. The material cost will be larger then normal for a restoration. I'll comment below on the lasting part and some of the pricing part where it fits. I'm also making an assumption, at this point, stopping work on this camper and finding another one may not me possible. If I have any of this wrong, please advise.
Quote:
Originally Posted by Mc901
So much good information here. A lot of this I can't every attain even with constant research! I thank you very much!!
2003.
Originating in Rhode Island. .
It sat since around 2012 in the same spot on the coast of NJ. Actually in the driveway right on the bay - It backed up to a channel of water about 300 ft away.
This thing will not travel. It's going to be stationary. We planned to move into it in a few months for maybe a year or so. We did not know about all of this damage. It looked mostly untouched from the inside. Not feeling great right about now...at all. Pretty depressed by this. Very depressing. Currently living in a teeny tiny camper and this whole process has been so frustrating.
|
Sounds like this camper is near the salt water air. I have seen campers frames that lived or visited close to the ocean, the rust deterioration was very accelerated. Your slide drive system under the camper was hopefully not caught up in this. More on that later if it comes to be.
Some good news, you do not plan to tow this camper. A camper that will be towed for use has different flexing of the joints where leaks can happen faster. Your repairs, the way you presented them will have a chance of lasting longer. I'm not sure if the salt air had anything to do with the roof white layer being totally gone on a camper this new. That may be a new learning for me. This winter I will be helping a friend who's camper is near the coast and I will see first hand how the roof has held up.
Quote:
Originally Posted by Mc901
When we priced the EPDM membrane - because it is a 39 ft.. it was coming out to about 1000 for a new membrane. So I was advised to buy Dicor RPCRC1 White EPDM Rubber Roof Coating - 1 Gallon. I bought 4 gallons. The only noticeable damage (before we took down the wall paneling and insulation of course) on the ceiling right under this area is a bubble or delamination I guess it's called.
So we were advised to do the rubber roof coating. Replace the decking that is damaged underneath before doing so and applying it, dicor sealant and eternabonding. Hoping that would be a fix until we could replace the EPDM entirely next spring.
|
I'm not sure where you priced out the EPDM membrane. RV material costs are all over the map, even before Covid. Now they are worse. In June of this year, I was able to find EPDM by the foot. It was a search as the demand is so high right now with many folks repairing old campers. This source is where I bought just the membrane this June. It is 9.5 ft wide on place of the 8.5 ft wide, but it was cheaper then the precut kits. The sad news, right now even this source dried up. https://www.pplmotorhomes.com/parts/...bber2_47-95B40
In 2019 I was able to buy from RecPro out of Elkhart IN. EPDM 8.5 ft wide for $10.49 /ft plus tax but has free shipping. It is now close to double and Rec Pro no longer carries EPDM. They do offer TPO or PVC roofing both which work also.
Also to note, I do not buy the roof "kit". I buy the glue, butyl tape and caulk separately to save. The costs above are only the actual membrane.
Here is another lead on EPDM, Flair Distribution. They at least have it, the cost is for a total install kit. BUT, heads up, the glue they use has to be a bare wood sub straight to work. https://www.flairdistribution.com/co...34757860950175
The Dicor roof coating you bought is their acrylic coating. I have seen it up close used on two of my Sunline friends campers. That coating is good, it's purpose is to restore the worn white shed layer, and that it will do good at. It is not a lifetime product, but will give you many years before a recoat needs to be done. The only issue I know of on an acrylic coating is ponding water in low spots that do not drain on the roof, can break down the coating. As long as there is not low ponding spots, this has not been reported.
However, the coating does not do well sealing flexible seams, it is not made for that, it is a white layer repair product.
Yes, you have to repair any water damaged plywood under the rubber. Coating the membrane with no supportive sub straight under it, will fail with that type of coating. Or most any type of coating as the super thin black layer of EPDM will soon fail unsupported.
The seams, and especially where the membrane is torn at the gutter rail area. You mentioned using Eternabond on this area (E bond). I have used a lot of Ebond, it works very well but only when applied correctly. If you were going to tow the camper, using Ebond on the side seams trying to patch the rubber membrane back together, I sense would fail in short order. The Ebond tape is not made to hold stressed seams together, only to seal non stressed rips, tears or holes which is does very good at. Something about Ebond, many to most RV roof coatings will stick long term to the top layer of Enond. Over time it starts to peel off the top white layer of the Ebond. Point being, put the Ebond down first , then coat the roof. Only coat up to the edge of the Ebond, it can touch a little, it will peel off on the top over time.
Also to know, do not put Ebond over fresh Dicro caulk. The Dicor caulk gasses off and it takes a good 3 weeks to stop the gassing. After the 3 weeks, then you can Ebond over it and not have gas bubbles appear under it.
Not sure at this point since you bought the Dicor allready and maybe even the Ebond. They do make RV roof coatings to go direct to a wood deck. And they offer seam tape for the edges that you then coat over the tape to be leak proof. For 50 years of warranty. This is more expensive then your approach, but it is rated to do what you are trying to do. Still you have to fix the bad roof decking. If the rubber is still bonded to the decking you can seal/coat over the existing rubber. If you have new wood, it will bond to the new wood. I am not sure it will bond to prior glued decking, the old glue may mess up the bond.
https://crazyseal.com/build-your-own-kit/
Here is their main site. I have tested this product and seen in person on another Sunline friends camper. It is a good product, just this is going for a 50 year roof and the cost will be higher then your approach.
https://crazyseal.com/
If you are considering going the high solids silicone product coating route, (the Crazy seal) lets talk first, there is another company out there in that market that is very attractive and I have tested it too. And it costs less. Still higher then the Dicor acrylic coating, but with a lifetime warranty.
You said your approach was to coat the roof, Ebond and Dicor caulk then next year do a new roof. Maybe think through all this, there is a yet to understand situation, the attic in your camper has water damage in it at some level. While I cannot see inside your ceiling from here, with the amount of water damage to the top wall plate (sagging wall) and the torn membrane, odds are high water is up in your attic doing or did damage to the trusses and the ceiling board. Did you use the moisture meter on the ceiling yet?
It is going to cost money to do a spot roof repair and then come back and tear it all off and start over. Assuming you can even lift the old decking up and not damage the old EPDM in the process. The Ebond material cost to do all roof seams on a 30 ft camper in 2019 was about $400. yours would about 25% more. That is just the Ebond, and not the Dicor caulk, butyl tape and your coating. Plus the decking and wood repair. You may want to rethink how to repair the front half of the camper roof. The time and cost to do a repair, may not be that much off a new roof replace on at least the front half. If the back of the camper leak is bad, then revisit the whole roof situation.
Ad FYI, here is where I buy my Ebond from these 2 places. They are both good commercial roofing suppliers and competitive on cost including tax and shipping.
https://www.bestmaterials.com/detail.aspx?ID=11341
https://www.bigrocksupply.com/eterna...-50-white.aspx
Quote:
Originally Posted by Mc901
For the floor joists - we plan to treat what will remain with CPES or a comparable product. Replacing the sill plate on the bad wall and front wall and framing on the bad wall and partial replacement on the front which only has damage about halfway. .the side closer to the corner leak. Then putting the CPES sealant on all new wood going in. We may cut two or 3 joists in this area back and sister in New ones. The rest seem pretty solid but we will treat those as well. Then paint everything with something like KILZ anti mold. The joists right around the slide along with the sill plate on the wall right next to it are the worst damaged areas.
The floors do go under the wall framing.
|
The CPES, if you can still buy it, is very good. I have used a good amount of it in the past. I cannot find anyplace to buy actual CPES anymore. I have found S1 who I use to buy the CPES from. These folks https://www.rotdoctor.com/
Here is the S1 https://www.rotdoctor.com/products/product.html
Some comments about your plan. The S1 will do a good job on the "sound" (not rotted) wood wall studs and floor joist that have the water staining. But, with the siding on and the black Darco under the floor joists, it is hard to not doable, to treat all 4 sides of the boards. Treating 3 sides is better then not treating them, but the 4th untreated side sill can rot out the board in time. Again not sure how long you plan on keeping this camper. It will take years and I'm not sure how many for the dry rot to affect the untreated side.
A friendly heads up, you have to be wearing a organic vapor respirator when using any CPES or the S1 and safety glasses and nytril gloves or other gloves. The raw exposed fumes during application will harm you. Once it is cured, the concern is gone. Rot Dr sells the correct Moldex respirators at a competitive price.
Having used the S1 and CPES, you will be using a lot of it to treat all the floor joists and wall studs. You may use upwards of a gallon on just the first treatment of the stained wood. You mentioned sealing new installed wood with CPES and then treating everything with Kiltz anti mold. There by no means is there anything wrong with treating new wood. All though, what is the thought process on why you feel it is needed?
I have seen others treat new wood installed in a camper, and I'm not saying it will not help, but what are you trying to solve? From what I have seen, if the camper is properly sealed up, water will not be in the areas needing extra treatment of new wood. If you have water in there, that is the problem regardless if they are treated. I spend the extra money sealing up the camper to be as good as I can, which is very robust on every siding, roof and basement penetration's. The sealants at the penetration's are the issues. We can help with how to seal up a camper better then the day they where built at the factory if you want to go there. But it means there is more work pulling out windows and moldings. That said, doing a restoration the size you are, you really have to seal up every penetration even if you do not pull the camper all apart. We can help on that too.
Quote:
Originally Posted by Mc901
I have uploaded some pictures of the area in question. This is right under that left corner opened roof seam in the previous photos. Most of the pictures show the worst offending wall..."the sagging wall". The corner right underneath. One picture has arrows to show the sill plate area. The pics are various stages of floor removal and what not. But it gives an idea of the inside area. The picture with the corner rot by the slide shows the sagging wall and you can see daylight now because we took out the staples on the darco to see that sill plate and some of the sill fell out, rotted.
The ceiling on the inside doesn't appear to be sagging in that area. Just the bubble and a smaller bubble right underneath in the corner area. If you need any more pictures please let me know.
Thank you for your help!
|
On the slide area, this summer I repaired a friends camper that had very similar rot. The entire wood structure under the slide opening was totally rotted out. I was able to rebuild the floor system without pulling the slide out of the camper. This was on a Sunline but the process my help you on yours. Please take some pictures and post of the wood structure at the slide floor area, under the camper to show the slide drive system, and the what I call the slide trough system. The slide trough is the area in the main camper floor where the slide floor rides on and rests on when the slide is fully extended out. That slide trough more then likely has to come apart to do the wood repair. I lucked out on the Sunline I repaired as I could remove the slide trough with the slide still in the camper to be able to replace all the rotted wood under it, then out it all back together.
For the sagging wall area, I see the rot and the areas, what is it you need help with? How to take the camper apart and fix it? or are you just showing it? If you need help on how to fix it, just ask, I'll type some more as I have done many of them.
Hope all this helps.
John
__________________
Current Sunlines: 2004 T310SR, 2004 T1950, 2004 T2475, 2007 T2499, 2004 T317SR
Prior Sunlines: 2004 T2499 - Fern Blue
2005 Ford F350 Lariat, 6.8L V10 W/ 4.10 rear axle, CC, Short Bed, SRW. Reese HP trunnion bar hitch W/ HP DC
Google Custom Search For Sunline Owners Club
|
|
|
|
|
08-19-2021, 05:44 PM
|
#8
|
|
Junior Member
Join Date: Aug 2021
Location: New Jersey
Posts: 15
SUN #12825
|
Again - excellent excellent info. This is alot definitely &* all super good for me to take in. I have a lot A LOT to think about in terms of the roof and the best repair method for my situation. This is valuable information you've given to me and will be reading and rereading your information.
I think going to start with what's below to give the structure the most stability before opening the roof up from the outside. So I can get some work on this going all the while researching my rig lroofv repair options.
I've been ripping the size I need for the wall studs and measuring the walls/studs & placement...drawing blueprints. The wall studs have a depth of 1 1/2" as mentioned and the front facing width is 1 1/8"...so not quite 2 x 2s.
I would LOVE to hear your method of attack on the wooden framing/ beams/joists that go under the slide without taking the slideout out. This whole part has me in a bind because it is the epicenter or the most damaged and I'm not sure what pieces are crucial in support for this slideout. If I pull something out - I'm concerned with messing something up/support. It's a power gear rack and pinion.
A few questions on the how's of replacing the wall studs & floor joists.
Can I take all or multiple studs that are rotten out in one fell swoop to replace or... is there a more strategic way? I just don't know the capabilities of the structure. I drew in red in an attached picture - can all of that come out at once safely or is piece by piece suggested? For instance - I'm getting hung up on thought processes like ,"OK. So, cut this floor joist back, sister & replace...but the front bottom plate needs replacing too as well as the other end that I'll be securing the joist too ...so I can't secure it to either...Sooo, do i cut them all out at once?* Is that safe to-do?"
I might be overthinking it but I'm not sure so that's why it ask lol
Is there such thing as taking out too long of a floor joist without bracing anything or Can I just cut it back and sister to replace?
The metal frame underneath the darco runs horizontally about every 4 ft.
Orrrr would I sister new wood to the length of replacement needed, secure and THEN cut out the bad joist?
I'm sure there are multiple ways to skin a cat. I'm the type of person that before I do or touch anything - I need to know the how's and the why's of every aspect and research research research.
I uploaded a few pictures of the "trough" area from beneath the slide. I took these about a week ago. So if you need a better angle please let me know!
Some of my pics uploaded Sideways or upside down :/
Thank you for your excellent replies/information!
__________________
|
|
|
|
|
08-22-2021, 05:08 PM
|
#9
|
|
Moderator
Join Date: Nov 2006
Location: Ohio
Posts: 12,656
SUN #89
|
Hi Mc, some comments on the wall studs etc. First off, thanks for the good words of thanks. Much appreciated.
Quote:
Originally Posted by Mc901
I think going to start with what's below to give the structure the most stability before opening the roof up from the outside. So I can get some work on this going all the while researching my rig lroofv repair options.
I've been ripping the size I need for the wall studs and measuring the walls/studs & placement...drawing blueprints. The wall studs have a depth of 1 1/2" as mentioned and the front facing width is 1 1/8"...so not quite 2 x 2s.
A few questions on the how's of replacing the wall studs & floor joists.
Can I take all or multiple studs that are rotten out in one fell swoop to replace or... is there a more strategic way? I just don't know the capabilities of the structure. I drew in red in an attached picture - can all of that come out at once safely or is piece by piece suggested? For instance - I'm getting hung up on thought processes like ,"OK. So, cut this floor joist back, sister & replace...but the front bottom plate needs replacing too as well as the other end that I'll be securing the joist too ...so I can't secure it to either...Sooo, do i cut them all out at once?* Is that safe to-do?"
I might be overthinking it but I'm not sure so that's why it ask lol
Is there such thing as taking out too long of a floor joist without bracing anything or Can I just cut it back and sister to replace?
The metal frame underneath the darco runs horizontally about every 4 ft.
Orrrr would I sister new wood to the length of replacement needed, secure and THEN cut out the bad joist?
I'm sure there are multiple ways to skin a cat. I'm the type of person that before I do or touch anything - I need to know the how's and the why's of every aspect and research research research.
|
These are my thoughts based on the repairs I have done. Use these as a guide and tweak to your situation.
You are thinking about taking out the walls studs, especially in a front left corner and deal with the roof later. I paraphrased this, if I have it wrong, let me know.
I have a few concerns on that approach.
1. In order to change out the corner wood or most any wall stud, the siding needs to come off. The siding is stapled to the wall studs and while you may able to get the old stud out if the wood is rotted enough, odds are high on that same stud can have wood not heavily rotted and you could tear the siding trying to get the old stud out. That and, if you do not take the siding off, then how do you re-staple the siding to the new stud?
If you take the siding off first before removing the wall stud, you can be more careful about pulling the staples out. While there may be a slight tear in some staple pulls, the damage has high odds to be less than trying to take the staple out with the wood stud still attached. The goal is, you want to reuse the siding.
2. There is a problem with structural stability when you have the inside wall board off, and you take the siding off at the same time. The entire structure moves all over even when the wall studs are good. In your case, the inside wall board is already off, and then you need to remove the siding to repair the studs, and your roof is still in place. This creates a new issue with the roof still being on.
3. Your camper took a lot of water down the walls and into the floor. With the membrane split at the gutter rail, and the front seam seal breach, odds are high the wall top sill plate is rotted and so is the ends of the rafter. All the water that went down the wall, had to go over and through the wall top sill plate and the rafter ends got soaked in the process. While you can pull out an old rotted stud with the roof on, you really cannot repair the wall top plate and rafter ends with the roof decking on in that area. Think though this, if you pull the walls studs with the roof on, does not really create a repair plan to the whole area? You cannot attach new wall studs to a rotted top wall plate.
Here are some thoughts on how I would attempt to fix what you have given the inside wall and floor is out.
I would get some furring strips, 2 x 4’s or even a sheet of plywood of any thickness 1/4” and thicker and temporally screw it to the wall studs, with the boards as long as you can in one board, and boards on all studs even if they are overlapped, "inside" the camper in a horizontal fashion across the face of the inside wall studs. Each wall stud gets at least 2 screws, one high and one low on the horizontal brace. The 4 x 8 sheet would work best, but if all you have are 2 x 4’s or furring strips, then you need at least 2 of them across each wall. One higher and one lower. You are creating a wall stiffener with this.
Next, before removing any siding, I would go up on the roof and remove the rotted decking and see what the rafters and wall top plate look like. With the wall studs new bracing added and siding still on, there is a level of support to the roof to be able to take it apart and remove that weight from the walls.
Once you open up the roof, then you know how good or bad the roof in that area is. Remove what needs to be removed, then go back and remove the siding, then the inside bracing, and start rebuilding from the floor up.
A few notes on this: I cannot see what you have, you will need to make the judgment call that you added enough wall reinforcement to support the roof to lean on it to remove the decking.
Do all you can from the sides when removing the roof. If you feel the roof center cannot support your weight, then add vertical supports inside the camper to hold up the rafters from the floor of the camper. Also, if the left floor outer joist (the band board) what is holding up the wall is totally gone, there is not much left holding up the left side wall. You may need to add some level of reinforcement from your added wall bracing to the main frame or floor to hold the wall up that is holding the roof up.
To your questions on do you have to totally replace a wall stud or can you sister on a board? The answer to this is, “it depends” on the situation.
If the top wall plate and top of the wall stud is bad, and the bottom of that same stud is bad, but a 3 or 4 ft section in the middle is OK, I myself would replace the entire stud.
If the top is totally solid, maybe water stained, but all 100% solid, and the rot was only the bottom 1 ft or so, then a repair on the bottom may be done. Cut off the bottom at the end of the rot to be back to 100% solid stud. Then cut to fit a new stud member to fit in the part you removed. The fit is tight, no air gap. All the vertical load down is wood stud butted to wood stud . Then take a new 1 x 2 and glue and screw it 1 to 2 feet in both directions of the cut joint to the side of the wall side. That sister board is only keeping the joint from buckling sideways. The vertical wall stud is still holding the roof up. In many cases, I would run the sister stud to the floor plate and then up 1 to 2 feet past the cut joint. Also resin treat with S1 or other treatment on the water stained wood. In some cases, if all wall studs where rotted 6 " to 8" long up the stud, I would cut all studs at the 6" plus mark straight across to remove all rot. Then add a 2x 6 or 2 x8 etc. on edge to extend the floor sill plate up and attach the wall studs to the new 2 x 6 or 2x 8. Then no sister'ing is needed. Kreg screw(pocket hole screw) the studs to the 2 x 6 or large 1: wide by 1" long staples both sides.
I would most likely not do and entire wall of 4 to 6 or more wall studs in a row like this with sister boards, I would replace the whole stud.
Floor joists fall into the same category and the same fix. The outer band board floor joist I would use all new to at least cross 2 or more steel frame supports where they are. Ideally I would replace all outer band board joists with new up to a solid tie in point to the original outer band board. That may be 10 to 14 feet or more.
Floor joists in the center have different vertical loads. The outer LH and RH band board holds up the walls that holds up the roof. The middle joists hold up the floor and the front wall which has less load then the LH and RH walls do. Those cutting in a repair like the wall studs above could work. This all comes down to a judgment call on the person doing it. I can only give you big picture general ideas from the limited pics we have.
I’ll address the slide floor in another reply.
Hope this helps
John
__________________
Current Sunlines: 2004 T310SR, 2004 T1950, 2004 T2475, 2007 T2499, 2004 T317SR
Prior Sunlines: 2004 T2499 - Fern Blue
2005 Ford F350 Lariat, 6.8L V10 W/ 4.10 rear axle, CC, Short Bed, SRW. Reese HP trunnion bar hitch W/ HP DC
Google Custom Search For Sunline Owners Club
|
|
|
|
|
08-22-2021, 07:04 PM
|
#10
|
|
Moderator
Join Date: Nov 2006
Location: Ohio
Posts: 12,656
SUN #89
|
Quote:
Originally Posted by Mc901
I would LOVE to hear your method of attack on the wooden framing/ beams/joists that go under the slide without taking the slideout out. This whole part has me in a bind because it is the epicenter or the most damaged and I'm not sure what pieces are crucial in support for this slideout. If I pull something out - I'm concerned with messing something up/support. It's a power gear rack and pinion.
I uploaded a few pictures of the "trough" area from beneath the slide. I took these about a week ago. So if you need a better angle please let me know!
|
On the slide area, take some pics under the camper at the slide drive that is inboard of the main I beam frame rails. Also tell me if the rack and pinnion system is mounted on an angle to the main camper floor? This would mean the slide goes in and out of the camper on an angle. This is the flush floor slide concept where the slide drops down close to flush when it is all the way out.
On an above floor slide drive, the slide goes in and out straight, there is no lift or very little lift. The rack and pinnion track would be mounted close to parallel to the floor.
By chance do you have any pics inside the camper when the slide is all the way out? I'm looking if there is a carpet flap on the floor you can lift up and see the slide floor and a trough under that flap. If your is an above floor slide, it may not have that flap.
I need to understand what slide floor system you have, the flush floor slide or the above floor slide. I know of the Power Gear drive system, but they are used in both flush floor and above floor slides.
Once I can see and know the basics of the slide system, we can start talking about how to lift it up to get the rotted floor out from under it. It is hard to tell from the few pic you sent.
Hope this helps
John
__________________
Current Sunlines: 2004 T310SR, 2004 T1950, 2004 T2475, 2007 T2499, 2004 T317SR
Prior Sunlines: 2004 T2499 - Fern Blue
2005 Ford F350 Lariat, 6.8L V10 W/ 4.10 rear axle, CC, Short Bed, SRW. Reese HP trunnion bar hitch W/ HP DC
Google Custom Search For Sunline Owners Club
|
|
|
|
|
08-25-2021, 09:24 PM
|
#11
|
|
Junior Member
Join Date: Aug 2021
Location: New Jersey
Posts: 15
SUN #12825
|
Thank you!!!! I've read your post like many times and will keep doing so lol
The slide is a flush floor slide out. When i pick up the edge of the carpet on the inside it has a flat metal "plate" connected to the end of it. I'll include a picture to show.
It's hard to get a good underside picture of the slide out cause it's in right now. On a little less than half of the slide out - my brother cut the sub floor out right up to the edge of the actual slide floor when it was out, so we'll need to replace that as well.
The trough area I noted in orange on the pics that im attaching. I'll include one to show what the slideout looked like from inside before digging in. They trough has that metal "lip" and the darco wrapped around the bottom of it. When the slide is out... does that "trough" account for the bulk of the structural support?
I'm just trepidatious to dig into the roof and open it up until we have a clear plan with the repair of the roof. Since we can only tarp it. We'd have to remove the termination bars (i think they're called), lap sealant and peel back the membrane to get to the decking, correct?
__________________
|
|
|
|
|
08-25-2021, 09:27 PM
|
#12
|
|
Junior Member
Join Date: Aug 2021
Location: New Jersey
Posts: 15
SUN #12825
|
Forgot the inside carpet flap/metal...
__________________
|
|
|
|
|
08-27-2021, 05:09 PM
|
#13
|
|
Junior Member
Join Date: Aug 2021
Location: New Jersey
Posts: 15
SUN #12825
|
Here is a better picture of the trough area. Hopefully it won't end up Sideways when I upload. This is taken from the inside looking down right at the trough.
Looks metal with a little ramp/slide down.
__________________
|
|
|
|
|
09-01-2021, 10:10 PM
|
#14
|
|
Moderator
Join Date: Nov 2006
Location: Ohio
Posts: 12,656
SUN #89
|
Hi,
Getting back to you. I have been tied up big time. I will do a separate post on the main floor repair I did in June of this year as other Sunline members need to know about how this damage occurred, and that will take a little more time type in those details. When that time comes, I will link it to your post here so you can find it.
But, these pics may help get you thinking if you can do something like this to fix your floor with the slide still in the camper.
Here is a link to the pictures I will use in my post. It shows how I did the repair. This will take you to my Flickr photo site on the floor repair.
https://www.flickr.com/photos/camper...7719815377250/
Your slide trough is made different then the 2006 Sunline you will see in those pics. The pre- 2005 Sunlines had a sheet metal slide trough built into the floor on the flush floor designs. In 2005, Sunline went to a fabricate metal trough with UHMW plastic guide strips.
The main take away for you, is how I jacked up the slide, supported it and then removed the slide trough, the rotted wood and made the repair.
Here are few pics with some explanation so you get this part understood.
The slides are made that the end walls is where a lot of the slide strength is. The big open area of the slide floor does not have a lot of strength to hold anyone standing on it, unless the slide is fully extended and the flush floor of the slide is in the tough full length supporting the tongue end of the slide floor.
Understanding that, if you jack up the slide, you jack at the end walls. Do not lift the entire slide by the center of the floor, you can break the floor.
This is another camper I was repairing a rotted slide floor on. But you can see where the jacking was done.
Place the jack at the end walls or the long side wall pending what you are lifting or holding. Just not by the open area of the floor to light weight of the slide. Make sure any jacks or wood blocks are plumb (level vertically) before you lift.

In this pic, the slide arm was removed to get the new slide floor repair in place, so the jack stand is at the long slide wall.


Next is the camper I did in June with the damage to the main camper floor from when the slide was adjusted wrong, and water flooded the main floor while towing in wet conditions for years.
I jacked up the slide only until the top slide flanges stopped at the top of the slide opening. You can only lift by the amount of room at the top of the slide. In my case this was about 2" and it was just enough to get the slide trough out of the camper.
I made up 2 x 6 posts cut to exactly fit and shimmed more if needed. I started are one end and lift that end and insert a post. Then move to the other end, lift and insert a post. Then, lift only the center floor to even out the floor and insert a post to hold up the center of the floor.
Here are the 2 x 6 posts with a wider support foot on the bottom. The slide is fully extended and the slide arms are holding most of the slide weight as they normally do. I only lifted the side by the camper next to the posts. The slide arms can allow some level of lift, if you go too far, then you will bend an arm. I never had to go that far as the upper top inside slide flange hit the upper part of the slide room opening that stopped all upward movement of the slide room.


This creates a gap at between the slide floor trough and the bottom of the slide floor tongue. Now there is no weight on the rotted slide floor.


Inside looking out

Once you lift and block up the slide, then you can deal with the rooted main floor.
Here are a few pics from the link above which has many more pics.
After using the moisture meter, I determines how much main floor has to come up. I started with about 22" worth and once that was up, I could cut out more if needed. I cut close to the slide trough but took out the last 2 - 3 inches of floor under the trough after the large part of the floor was out., I did this to not have to deal with getting a long large piece of floor out with the trough.

Then take out the little rotted pieces of floor.
All the bad wood out, then S1 epoxy treat the water stained but sound wood that remained.

Replace and sister in new wood.

Used Kreg pocket hole screws in splice boards to attach/support the new floor splice.

The new floor in place with the trough ready to install

The trough is in and you have to sand and blend in the floor joint or it will tear up any floor vinyl you put down. The new to old floor has to be a smooth transition. This can be an issue if the main floor swelled in thickness.
I used PrepStar filler over the whole floor to fill all voids and make all transitions smooth.

New vinyl and new carpet.


Hope this helps.
John
__________________
Current Sunlines: 2004 T310SR, 2004 T1950, 2004 T2475, 2007 T2499, 2004 T317SR
Prior Sunlines: 2004 T2499 - Fern Blue
2005 Ford F350 Lariat, 6.8L V10 W/ 4.10 rear axle, CC, Short Bed, SRW. Reese HP trunnion bar hitch W/ HP DC
Google Custom Search For Sunline Owners Club
|
|
|
|
|
09-02-2021, 11:09 AM
|
#15
|
|
Junior Member
Join Date: Aug 2021
Location: New Jersey
Posts: 15
SUN #12825
|
This is immeasurably helpful, JohnB!!!! There is nothing like this online that I can find from hours of research on my end. Thank you so much for this - it is such an excellent excellent view into repairing such a sticky area on these things.
Your Flickr photo link - isn't working for me. Perhaps I can find through another one of your posts.
This is amazing! 🤗
__________________
|
|
|
|
|
09-02-2021, 11:21 AM
|
#16
|
|
Junior Member
Join Date: Aug 2021
Location: New Jersey
Posts: 15
SUN #12825
|
__________________
|
|
|
|
|
09-02-2021, 02:03 PM
|
#17
|
|
Junior Member
Join Date: Aug 2021
Location: New Jersey
Posts: 15
SUN #12825
|
In regards to making sure the camper is level while in repair mode...we can't hook it up to a truck to level side to side by driving it up on wood planks...is it ok to level with bottle jacks side to side and leave them in place?
Is leveling with a level on the frame or ibeam of the trailer good to get a front to back even keel?
__________________
|
|
|
|
|
09-02-2021, 09:22 PM
|
#18
|
|
Moderator
Join Date: Nov 2006
Location: Ohio
Posts: 12,656
SUN #89
|
Quote:
Originally Posted by Mc901
This is immeasurably helpful, JohnB!!!! There is nothing like this online that I can find from hours of research on my end. Thank you so much for this - it is such an excellent excellent view into repairing such a sticky area on these things.
Your Flickr photo link - isn't working for me. Perhaps I can find through another one of your posts.
This is amazing! 🤗
|
Quote:
Originally Posted by Mc901
|
Hi,
First off, thank you very much for the good words. We are a small forum in the big picture of things, but we have a lot of very talented folks here on Sunline Club all from many different backgrounds willing to help as they can. They all help in many ways. Some just type more then others. I myself just happen to be one of them who types more. And I have a somewhat extreme retirement hobby of restoring campers for friends and family and have gigs of repairs pics on the newer Sunlines. I am currently working on camper number 14 in rot repair, with no. 15 coming this winter. So, we share as we can.
Sorry about the link and glad you found a working one. For reasons not known, when I click my link, it takes me the the URL you posted. This seems to be more me so getting to understand how I can link Flickr and what URL it creates so the open public and see it. I have updated my post above to the link that works for you. I have more pics then I uploaded, just ask if more is needed.
John
__________________
Current Sunlines: 2004 T310SR, 2004 T1950, 2004 T2475, 2007 T2499, 2004 T317SR
Prior Sunlines: 2004 T2499 - Fern Blue
2005 Ford F350 Lariat, 6.8L V10 W/ 4.10 rear axle, CC, Short Bed, SRW. Reese HP trunnion bar hitch W/ HP DC
Google Custom Search For Sunline Owners Club
|
|
|
|
|
09-02-2021, 10:24 PM
|
#19
|
|
Moderator
Join Date: Nov 2006
Location: Ohio
Posts: 12,656
SUN #89
|
Quote:
Originally Posted by Mc901
In regards to making sure the camper is level while in repair mode...we can't hook it up to a truck to level side to side by driving it up on wood planks...is it ok to level with bottle jacks side to side and leave them in place?
Is leveling with a level on the frame or ibeam of the trailer good to get a front to back even keel?
|
I'll try and answer the "level" question in this context. Ideally, when doing camper restoration work, the camper is as level as practical when you are taking off, and putting on siding, wood structure etc. The camper was built in a factory being level when new, so the natural state of what the camper was made to, was level.
That all sounds good, but here is what I have learned. As campers age, and more so when towed, the camper flexes a lot. That flexing changes the camper straightness over time. Very slowly, frame sag sets in. As the years go by, the sag gets larger and in many cases, entry doors no longer close right as the door way frame seems like it is out of square with the door. Slide openings can also be affected by this frame sag.
The frame sag comes from the minimal frame materials/sizes used to get the job done. Some really old campers had beastly frames under them and were heavy. But not any more and they keep getting thinner and weaker every year. Just about any camper built in the last 40 years is not beastly in frame strength. Some are better then others though. And the number of miles towed makes a difference in frame sag. If you want to see just how bad the frame sag is, pull a string tight along the main frame rails from front to back of the camper and look how far from straight the main frame rails are.
The axle area is very rigid and most likely straight in that area. The rear overhang, the part of the camper behind the rear axle hanging out (canter livered out) sags down hill from the axle area. The frame rails starting at the front header back to the front axle, sags down in the middle of the two points. And on a travel trailer, the A frame starting at the tow ball back to the main frame header could be true the front area of the main frame rails, heading down hill or up hill in relation to the main frame rails. This all depends on how good the original welding was done and the strength of the A frame rails.
The roof line and the siding follow the frame sag. You can pull a string down the length of the camper and line it up to a siding joint the same way the main frame rail sags.
So with all this sag going on, what do you level the camper to and what point do you declare is level?
There is no positive have to do it this way answer, on an older camper. You have to see what you have, then pick a happy medium and declare it level. How I would suggest you do this is, pull the string down the length of the camper and line it up starting at the front on a siding joint. Then pull the string all the way to the backwall, pull it tight and have a look. Since your camper was not towed a lot, it may be straighter then most, but I still expect there to be frame sag at some amount.
See here, anchor the front of a string at the front of the camper
Go to the back and pull it tight and align the string to the siding.
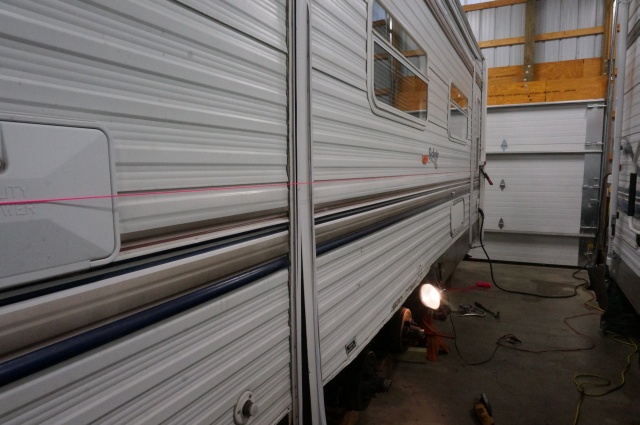
The left side of the camper can be different then the right side, especially with slide openings. On the slide, it may not be adjusted so the siding lines up with the front and back non slide walls. While that will/can be there, just note and move on this point.
That line can be used as your target for what to level to. Find which side of the camper is straighter and go for it to use that one. Worst case, level the camper by putting a level on the floor inside over the axle area. Assuming the floor is not rotted out.
This post may help of you have time to read some of it on frame sag and repairs. This is our big camper that we use all the time. We hit a bad batch of pot holes on an interstate in NY and it bent the lower frame flange behind the rear axle and in front of the front axle. I never realized that event started an accelerated frame sag situation. As a few years went on and more towing miles added up, the square slide room would not fit in the parallelogram slide room opening in the camper. Most would of scrapped the camper at this stage, an insurance company would have, but we loved the camper too much, so I created a repair for it and it is now stronger then original. https://www.sunlineclub.com/forums/f...avy-17444.html
As to how to level the camper, I do not know what you have to work with. You mentioned bottle jacks, they are good for lifting, but not good for holding the camper in place while you repair it. The amount of time it will take to do your repair, and the stability of the camper sitting up on bottle jacks, is not a good thing. The jack over time will leak down and pending how big the base is, it can be tippy. I would suggest you raise the camper by "safely" jacking the camper up by placing the jack to the bottom of the main frame rails behind the rear spring hanger (on the rear most axle) and use a steel plate between frame and jack that is dead center on the bottom if the I beam. Do not jack to one side of the I beam you can distort the lower flange. Do not jack in the middle of an axle tube, it will bend the axle tube.
Put 2 x 8's, plywood pieces as shims or concrete pavers under the tires so when you let the camper down, the tires are holding the camper up. This way, the camper is level both front to back (use the tongue jack to level front to back, and use boards/pavers/shims under the tires for left to right. Remove bottle jacks when done. Since the suspension will sag some, it will be trial and error on how many shims to get the camper level with full weight on the tires. You do not have to move the camper to level it. My frame repair post has a lot on supporting the camper during repairs, but in that case, I had to hold the main frame with large jack stands while the repairs where going on.
Hope this helps.
John
__________________
Current Sunlines: 2004 T310SR, 2004 T1950, 2004 T2475, 2007 T2499, 2004 T317SR
Prior Sunlines: 2004 T2499 - Fern Blue
2005 Ford F350 Lariat, 6.8L V10 W/ 4.10 rear axle, CC, Short Bed, SRW. Reese HP trunnion bar hitch W/ HP DC
Google Custom Search For Sunline Owners Club
|
|
|
|
|
09-06-2021, 02:05 PM
|
#20
|
|
Junior Member
Join Date: Aug 2021
Location: New Jersey
Posts: 15
SUN #12825
|
Update - we resolved the sagging floor issue! It was because the sill/bottom plate, floor... all bottom support... was gone on that wall and the support just wasn't there. It had even sagged over the slideout right there. So we screwed a 2 x 4 across the wall studs from the outside and jacked it up - put it a new sill and joists on the edge and plywood in between. It went back to height. It's crazy that these things can move like that.
Since we were resolving the floor there - we followed your method to get at the trough area and replace the joists there and put new subfloor in. You are genius for that tutorial JohnB! It's nowhere near as nice of a job as you did but there's a floor there now. We couldn't get quite the access you achieved but we're were able to chisel out most of the bad and replace "most" of the bad. It was quite the job with a lot of problem solving involved. I'll attach a few pics.
For the seams where the new plywood meets - you filled with the pro star I think it was called. Do you think we could use bondo in the seams and sand to smooth it out? Anything you could recommend we could get at lowes or home depot?
Cleaning the aluminum exterior pieces, then putting back on and then doing the trim in the corner, will replace all rusty screws. Will get butyl tape to redo the corner trim, storage doors and windows. Do you have an idea on the caulking sealant to use on those areas? Again, anything I can buy at a box store to work?
__________________
__________________
|
|
|
|
|
|
|
Currently Active Users Viewing This Thread: 1 (0 members and 1 guests)
|
|
|
 Posting Rules
|
You may not post new threads
You may not post replies
You may not post attachments
You may not edit your posts
HTML code is Off
|
|
|
|
 » Recent Sunline Discussions
 |
|
|
|
|
|
|
|
|
|
|
|
|
|
|
|
|
|
|
|
|
|
|
|
|
|
|
|
|
|


 Linear Mode

