 |
|
 11-13-2012, 07:00 PM
|
#1
|
|
Senior Member
Join Date: Feb 2011
Location: Florida
Posts: 213
SUN #1879
|
Bathroom Floor Repair
OK, so just for the heck of it, here are some pictures of the bathroom floor repair in our new-used T-2753. Comments will refer to the pictures below text. The toilet was apparently leaking but it appeared the damage was still localized to the base of the toilet. Due to the nature of the repair, one or two pics may contain unapealing images.
Removed the toilet and the flange is in bad shape, one screw hole broke off with very little pressure.

After removing the screws, the flange did ot want to come off. After a little research, it turns out it is screwed in to the black tank. Good thing I didn't try too hard to muscle it out. After being in place for years, the flange just was not turning by hand. Luckly, I had some scraps from previous projects around and fashioned an aparatus to give me some more torque. The screwdrivers fit intot he two notches on the flange. Using this "Tool", the flange turned easily and came right off.


The wood around the flange is obviously wasted. It looks like the black tank was holding up the toilet by itself.

Although the particle board under the cabinet is solid, it has rot.
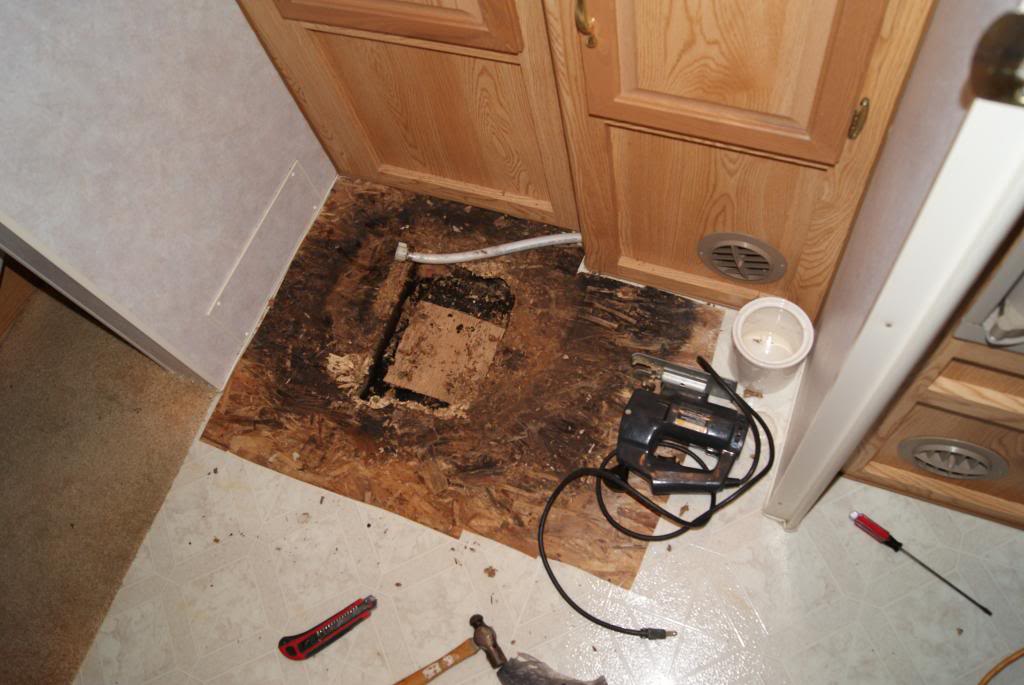
I don't think it shows in this angle but the wood on the joist is dry just under the cabinet... thank goodness.

Here is all the excavation for tonight. You can see that there is a large beam to the right and a small beam to the left. The plan will be to sandwich the bad length of the left board between two new peices of good treated wood. I will probably cut out the rotted part of the right board and screw in replacement wood. I will have to inject Glycol into the OSB with rot and hope it penetrates under the cabinet far enough. Right now it's sitting under a fan while I try to find a place to buy syringes.

__________________
Current RV - 1999 Bounder 36s
Former trailers - '94 T-2770
'02 t-2753
'08 Keystone Sprinter 299BHSS
|

|

|
|
11-13-2012, 07:50 PM
|
#2
|
|
Moderator
Join Date: Nov 2006
Location: Ohio
Posts: 12,658
SUN #89
|
Ohwell
Good work and thanks for taking the time to post pics. These pict-o-grams really help.
Once your done I am going to link your post and EMD_Drivers floor to the FAQ section with the other wood rot fit it posts.
I never knew the toilet flange screwed to the tank. Good info.
Looking forward to your progress.
John
__________________
__________________
Current Sunlines: 2004 T310SR, 2004 T1950, 2004 T2475, 2007 T2499, 2004 T317SR
Prior Sunlines: 2004 T2499 - Fern Blue
2005 Ford F350 Lariat, 6.8L V10 W/ 4.10 rear axle, CC, Short Bed, SRW. Reese HP trunnion bar hitch W/ HP DC
 Google Custom Search For Sunline Owners Club
|
|
|
|
|
11-13-2012, 07:54 PM
|
#3
|
|
Senior Member
Join Date: Jan 2009
Location: Rhode Island
Posts: 1,515
SUN #768
|
Excellent pictures. I hope I am never faced with that problem but it does add to the storehouse of knowledge.
Thanks for posting those pics.
__________________
 Gene & DW Ginny
2002 Sunline T-2363
2008 Toyota 4-runner 4wd 4.7L V-8
Reese Dual Cam straightline - P3 Brake controller
|
|
|
|
|
11-13-2012, 08:08 PM
|
#4
|
|
Moderator Emeritus
Join Date: Jul 2009
Location: South Carolina
Posts: 2,040
SUN #897
|
Some of your pictures look amazingly familiar!
Looks like you have the job well in-hand!
|
|
|
|
|
11-13-2012, 08:59 PM
|
#5
|
|
Moderator
Join Date: Dec 2006
Location: Michigan
Posts: 6,155
SUN #123
|
That tool you made is quite clever! At least your water damage is all localized to the bathroom area. Hopefully you can just seam the flooring to isolate the bathroom and only have to replace in the bathroom.
I had to replace the stand pipe in a previous Sunline because it broke. It's not a fun area to work around!
__________________
2007 T-286SR Cherry/Granola, #6236, original owner, current mileage: 9473.8 (as of 6/18/21)
1997 T-2653 Blue Denim, #5471
1979 12 1/2' MC, Beige & Avocado, #4639
Past Sunlines: '97 T-2653 #5089, '94 T-2251, '86 T-1550, '94 T-2363, '98 T-270SR

|
|
|
|
|
11-15-2012, 09:00 AM
|
#6
|
|
Senior Member
Join Date: Feb 2011
Location: Florida
Posts: 213
SUN #1879
|
Well, nothing exciting or picture worthy. I Applied Glycol untill it seemed to stop soaking in. It took alot! Now I have to let it dry for a long time. I figure at least a week. I will post more pics when I start actuall work on it.
__________________
Current RV - 1999 Bounder 36s
Former trailers - '94 T-2770
'02 t-2753
'08 Keystone Sprinter 299BHSS
|
|
|
|
|
11-15-2012, 11:19 AM
|
#7
|
|
Moderator Emeritus
Join Date: Jul 2009
Location: South Carolina
Posts: 2,040
SUN #897
|
I let mine soak/dry for about a week too.. The wood actually mostly turned from black, back to brown again...
|
|
|
|
|
11-16-2012, 07:34 AM
|
#8
|
|
Senior Member
Join Date: Feb 2011
Location: Florida
Posts: 213
SUN #1879
|
Quote:
Originally Posted by EMD_Driver

I let mine soak/dry for about a week too.. The wood actually mostly turned from black, back to brown again...
|
How long did it take before you started seeing some results? I have so little patience.....
It looks like one part of the OSB is turning back to brown but that could be my imagination.
__________________
Current RV - 1999 Bounder 36s
Former trailers - '94 T-2770
'02 t-2753
'08 Keystone Sprinter 299BHSS
|
|
|
|
|
11-16-2012, 09:01 AM
|
#9
|
|
Moderator Emeritus
Join Date: Jul 2009
Location: South Carolina
Posts: 2,040
SUN #897
|
It was 3-4 days, before I started noticing a difference... I did not spray any OSB though... I removed all the OSB, that had rot/mold in it.. Too much of a health hazard for Kitty.
|
|
|
|
|
01-02-2013, 05:58 AM
|
#10
|
|
Senior Member
Join Date: Feb 2011
Location: Florida
Posts: 213
SUN #1879
|
Taking longer than expected
Well, I expected to have this minor repair done a long time ago but, while following my nose, I found some massive water damage in the rear of the trailer and gutted under the bed and behind the wardrobes. The entire roof needs to be resealed and has some seperation from whatever wood is under it. It's not horriable but makes me sick to my stomach that I trusted the guy who told me it was in good shape. The guy actually has a trailer maintenance business and I didn't have my ladder with me...
Anyway, I resealed half the roof so far and got the leaks. I'm not documenting the repair of the rear because it makes me sick to my stomach and is somewhat overwhelming. I'm not going to be able to do as thorough of a repair as I would like due to financial issues that have hit us and not having a barn to keep it in while ripping the sidding of.
I did however have some time to get back to the bathroom floor which has finally dried all the way out. I had to cut away more of the wood from the 2x4 support than I originally thought. There was alot more damage under the wood where the water had just sat with no where to go.
I notched out the bad parts and had just about 1" of good wood left along a section. I got some good wood and sistered the small support on one side of the toilet and notched and sistered what was left of the large 2x4 support on the other. There are large carriage bolts connecting the 2x4 and new wood. From the factory, the toilet is supported by the flange and OSB. While that is probably more than enough, I put some small sections of 2x3 on either side to give a little extra support and wood for the flange bolts to dig into since I was already in there.
Here is a picture of all the extra wood:

Then I measured out my irregular hole in the OSB and went to work on cutting a peice of plywood to fit. I got it very close but for some reason messed up on 2 measurements. I will have to cut some small plugs then use wood filler all around and sand.
Here it is with the old toilet flange in place untill I get the replacement:
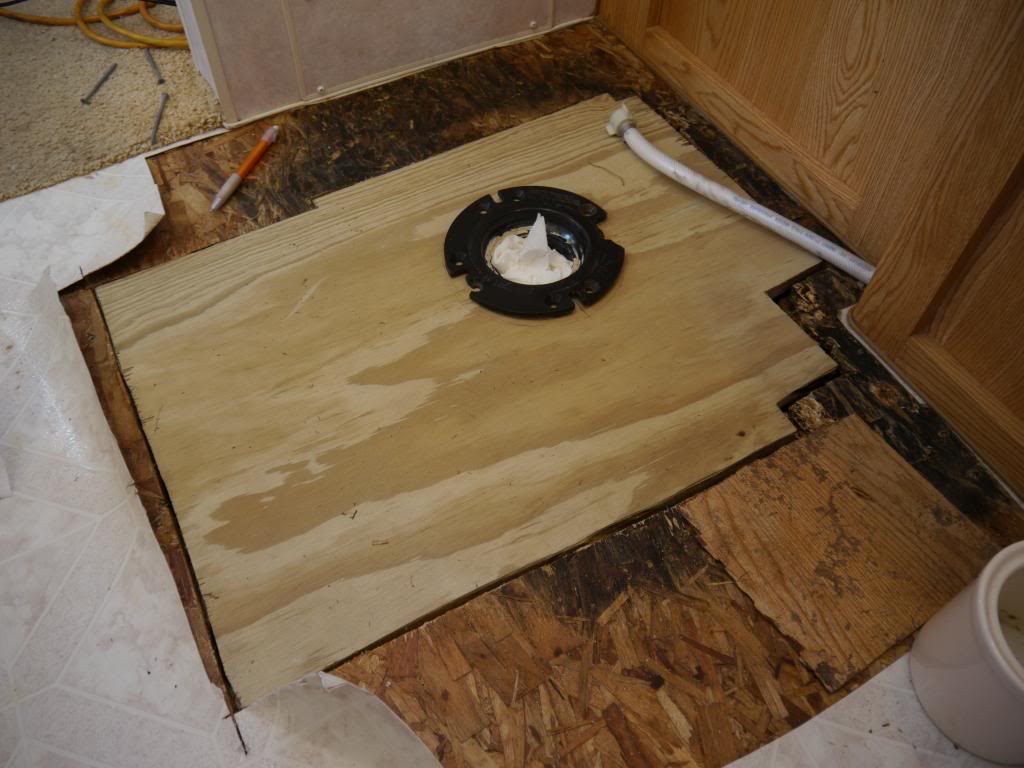
The new plywood sits flush with the old OSB in some areas but is almost 1/8" higher in front of the toilet. All I can think to do is sand down the plywood some and then use wood filler to ease the transition.
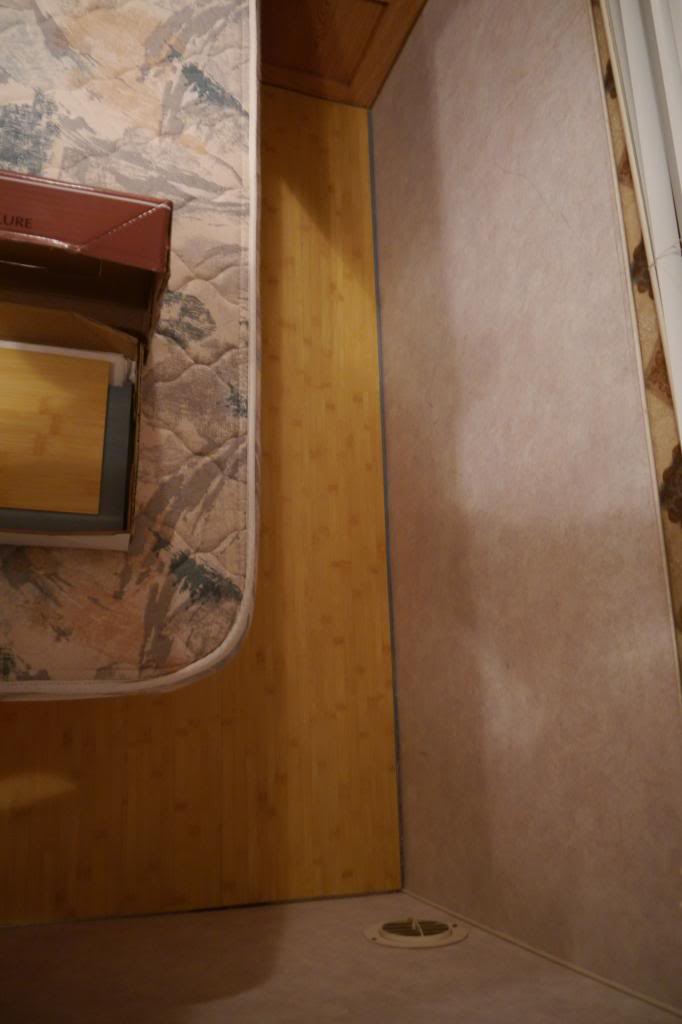
The new flooring has already come in and is waiting in the garage so next job is to take up the carpeting which I know is going to be a pain from removing it out of the storage comaprtment under the bed. Then the alure vinal flooring goes in and it should look great on the inside while I wait for the rear to dry out.
__________________
Current RV - 1999 Bounder 36s
Former trailers - '94 T-2770
'02 t-2753
'08 Keystone Sprinter 299BHSS
|
|
|
|
|
01-02-2013, 07:49 PM
|
#11
|
|
Moderator
Join Date: Dec 2006
Location: Michigan
Posts: 6,155
SUN #123
|
Sorry to hear things are worse than expected. Unfortunately, that's how water damage always seems to work. It starts leaking and before you know it, it's out of control. Hopefully you can get the repair completed soon so you can enjoy your trailer!
Chances are, the guy just didn't do an inspection on it, or he just isn't very experienced. Since the trailer sat outside in Florida since new, I'm not surprised that it leaks if the previous owners just walked away and didn't do maintenance.
__________________
2007 T-286SR Cherry/Granola, #6236, original owner, current mileage: 9473.8 (as of 6/18/21)
1997 T-2653 Blue Denim, #5471
1979 12 1/2' MC, Beige & Avocado, #4639
Past Sunlines: '97 T-2653 #5089, '94 T-2251, '86 T-1550, '94 T-2363, '98 T-270SR
|
|
|
|
|
01-02-2013, 09:54 PM
|
#12
|
|
Senior Member
Join Date: Aug 2010
Location: Virginia
Posts: 210
SUN #1340
|
They oughta put the guy that invented particle board in prison...seriously horrible stuff. Thanks for sharing OhhhWell..don't get mad...get hammerin' and when your through, go down to the guy who sold you this camper, park your camper outside his place and tape up these photos and any you take of the bedroom repair on the the side facing the highway along with a quote (IN BIG LETTERS) " "Name of the the guy who sold you this trailer) told me that it was in good shape...see photos." I'd like to see photos of the finished bedroom area when you find the time to "get 'er done.' Hope things are looking better for you financially.
__________________
 '88 T3200
Permanently situated in Charlotte County VA
|
|
|
|
|
01-06-2013, 06:24 PM
|
#13
|
|
Senior Member
Join Date: Feb 2011
Location: Florida
Posts: 213
SUN #1879
|
Well, the guy runs an RV repair business and specifically told me the roof seals were all great when I asked him. When I looked myself after all this damage, that sure wasn't the case. Only some of the screws over the front cap had ever been resealed.
Drake, yes... something like that is very tempting.
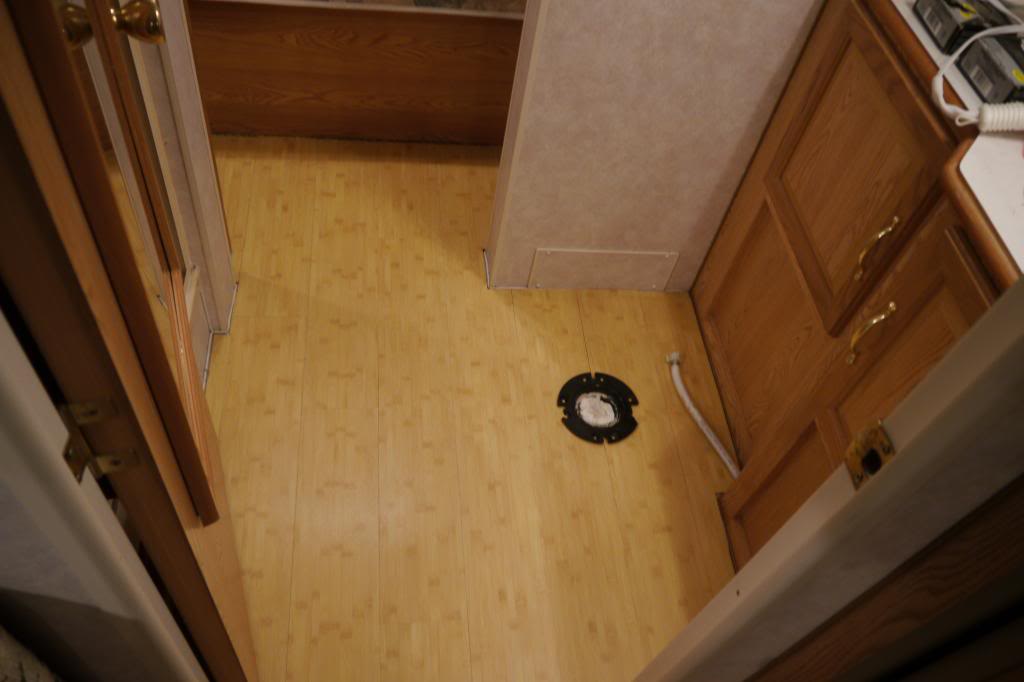
Anyway, the interior is 90% done! All that is left is trim. Post with pictures to follow.
__________________
Current RV - 1999 Bounder 36s
Former trailers - '94 T-2770
'02 t-2753
'08 Keystone Sprinter 299BHSS
|
|
|
|
|
01-06-2013, 06:47 PM
|
#14
|
|
Senior Member
Join Date: Feb 2011
Location: Florida
Posts: 213
SUN #1879
|
Almost done with the interior!
__________________
Current RV - 1999 Bounder 36s
Former trailers - '94 T-2770
'02 t-2753
'08 Keystone Sprinter 299BHSS
|
|
|
|
|
01-06-2013, 07:21 PM
|
#15
|
|
Senior Member
Join Date: Nov 2006
Location: West Virginia
Posts: 446
SUN #96
|
Wow you did a great job on those repairs.. I need to do a check on ours...
__________________
 David & Mary Ann
2018 Ford F350 Dually 6.7L Powerstroke
2006 Sunline Solaris T-264-SR
David & Mary Ann
2018 Ford F350 Dually 6.7L Powerstroke
2006 Sunline Solaris T-264-SR
2012 Palomino Bronco B1500LB
|
|
|
|
|
01-06-2013, 09:06 PM
|
#16
|
|
Senior Member
Join Date: Aug 2010
Location: Virginia
Posts: 210
SUN #1340
|
Wow....you do great work!
__________________
'88 T3200
Permanently situated in Charlotte County VA
|
|
|
|
|
01-06-2013, 11:27 PM
|
#17
|
|
Moderator
Join Date: Dec 2006
Location: Michigan
Posts: 6,155
SUN #123
|
Very nice! Hopefully the quarter round will go pretty quick, even though it'll be LOTS of cuts...
__________________
2007 T-286SR Cherry/Granola, #6236, original owner, current mileage: 9473.8 (as of 6/18/21)
1997 T-2653 Blue Denim, #5471
1979 12 1/2' MC, Beige & Avocado, #4639
Past Sunlines: '97 T-2653 #5089, '94 T-2251, '86 T-1550, '94 T-2363, '98 T-270SR
|
|
|
|
|
01-07-2013, 05:38 AM
|
#18
|
|
Senior Member
Join Date: Nov 2006
Location: New York
Posts: 2,909
SUN #93
|
from a women's perspective....it looks great!!!!!
__________________
Kathy & Leo SUN 093
Central Adirondacks of New York
2013 Rubicon 2900 Toy Hauler
We loved our 2007 T-2499
2010 Ford F-350 4x4 Lariat Super Crew Dually Diesel

|
|
|
|
|
01-08-2013, 09:17 AM
|
#19
|
|
Senior Member
Join Date: Feb 2011
Location: Florida
Posts: 213
SUN #1879
|
Thanks guys. It feels soooo much more home like and welcoming now. The quarter round sure will be alot of cuts. I can already see a few that are going to need to be rather small and precise. I'm not so much looking foreward to that.
I'm also not looking foreward to repairing the toilet either. I let it soak in some clorox cleanup and hosed it out pretty good. Does anyone know if you can get or make a fitting that would allow you to hook a garden hose up to the toilet (With pressure regulator inline of course)?
__________________
Current RV - 1999 Bounder 36s
Former trailers - '94 T-2770
'02 t-2753
'08 Keystone Sprinter 299BHSS
|
|
|
|
|
01-08-2013, 07:23 PM
|
#20
|
|
Senior Member
Join Date: Aug 2010
Location: Virginia
Posts: 210
SUN #1340
|
Might be best to replace it if it is bad shape...especially if the water damage there at the base came from the toilet itself and not from a loose flange or loose water input hose. Those plastic toilets when really stained are pretty tough to salvage.
__________________
__________________
'88 T3200
Permanently situated in Charlotte County VA
|
|
|
|
|
|
|
Currently Active Users Viewing This Thread: 1 (0 members and 1 guests)
|
|
|
 Posting Rules
|
You may not post new threads
You may not post replies
You may not post attachments
You may not edit your posts
HTML code is Off
|
|
|
|
 » Recent Sunline Discussions
 |
|
|
|
|
|
|
|
|
|
|
|
|
|
|
|
|
|
|
|
|
|
|
|
|
|
|
|


 Linear Mode

