As promised, some info on additional changes and mods to our T-2363 so we could use it for 14 months of full-time living.
1. An electric jack installed. I really like the small built-in bubble level on the top as I can level the rig in seconds. It was an Ebay purchase. I felt it was outrageous luxury when I bought it but it has been really nice to have. If anything happened to it I would replace it instantly.
2. We did a pretty major upgrade of some of the 12 VDC components and circuits. Here are some of the changes:
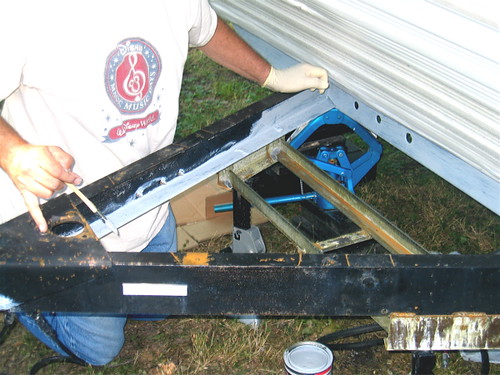
As I stated earlier, we installed two Sams club six volt golf cart batteries wiring in series to give us some real reserve power for 12VDC. We mounted both batteries side by side in one large battery box. We had to modify the battery mounting area by welding on two pieces of 3 inch channel on the bottom of the trailer frame to gain clearance for the large batteries.
Also, we painted all of the trailers frame that is seen and not under the trailer with the Por 15 paint system. I have been pretty pleased so far. Hope to do the rest of the frame (under the trailer) next summer.
I placed a 400 amp T class fuse in the circuit between the batteries. We flattened copper tubing to make copper bus material.
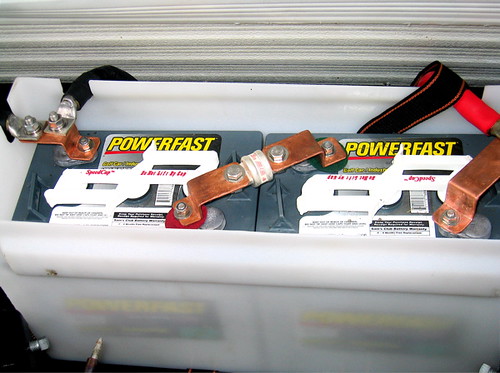
We used 0000 size (four ought) welding cable for our main wiring up to the bus bars. This is very HEAVY DUTY stuff. Proper crimping and soldering of connectors is important. It takes a sludge hammer to put the crimp in the connectors! We ran this from a battery circuit isolator mounted near the alternator on the truck all the way to the batteries with an Anderson fork lift truck connector at the back of the truck to serve as our disconnect. For those who arent well versed on DC power applications, heavy wiring is necessary if you need good charging of trailer batteries from the tow vehicle. This system works fine, no complaints.
We installed a 600 amp marine style master switch under the couch to be able to disconnect the entire trailer from the battery power with the throw of one switch. Being a pilot, I love the idea of being able to kill all DC power with one switch.
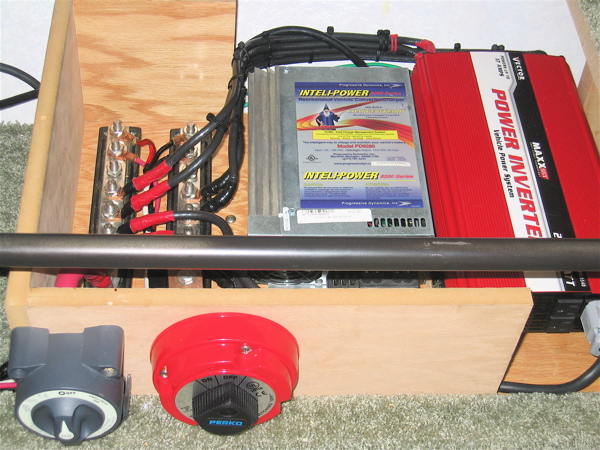
We installed two heavy duty DC bus bars one for + 12VDC and one for the Negative side wires. We wired the bus bars to master switch and then on to the batteries with the same heavy welding cables, ensuring good transfer of power. Our wiring for other things then comes off of these bus bars.
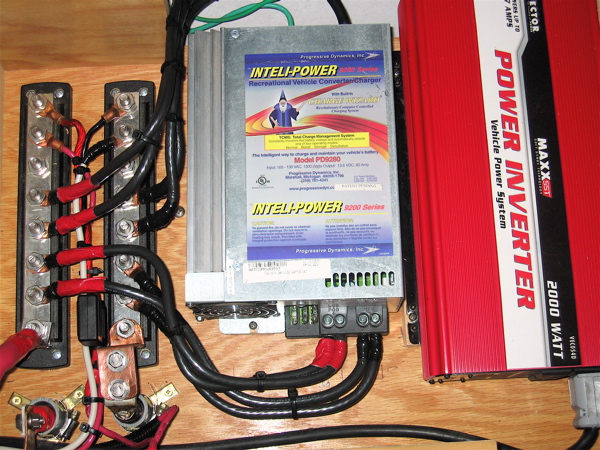
We purchased an 80 amp converter (a refurb unit) that has a smart battery charger circuit. It will recharge our golf cart batteries in a hurry as well as provide hefty amounts of DC for tank and pipe heaters. I just disconnected the AC power feeding the original 30 amp converter and just left it in place in case I ever need it.
We installed a 2,500 watt AC inverter. It is just an fairly inexpensive Vector brand inverter that I purchased off of Ebay. (Actually, they even threw in a second one for no additional cost as they could not confirm they were working units as they had been store display units. They worked just fine.) Most people are unaware how much DC power this thing will swallow. It takes some pretty large wiring to feed this thing. I purchased a special remote on and off switch for this unit for another $15 bucks and mounted the remote switch on the side of my bed so I can turn the inverter on and off without going under the couch where we mounted all our electrical stuff.

My goal with inverter was to be able to use the microwave and watch TV when not hooked up to shore power and in general, have AC when not hooked up to shore power. I decided to use the existing trailer wiring for the AC output. To accomplish this I installed a transfer switch. I did this by cutting the large black ACpower cable used to connect the trailer to shore power. I cut it inside the trailer and mounted a 50 amp transfer switch out of the way. I ran an AC cable from the AC inverter to the transfer switch. When AC inverter power is on, even if the trailer is connected to shore power, it automatically disconnects the cable (thus also insuring that inverter AC is never on the bare pins of the trailer plug!) and it puts inverter output AC to the AC breaker panel of the trailer.. I considered taking it a step or two further and installing another transfer switch to only power the circuits I wanted the inverter AC to power, but ran out of time. So I just turn off those AC circuits I dont want the inverter to power by throwing the breakers to the off position in the panel. I marked with colored tape the breakers I dont want on when using the inverter (like the hot water heater, converter, etc.) and I just place those breakers in the off position, put the frig over to gas, and fire up the inverter.
The microwave takes almost twice as long to cook something on the output of the AC inverter, I assume because it is modified square wave output and not pure sin wave. It works just fine, but takes longer. It powers my TV and DVD fine. Actually, everything I have tried works fine on its modified square wave output. When watching TV late at night, I just reach down and turn the inverter off as I am falling asleep. Dont even need to get out of bed.
We installed a secondary master switch for the DC going to the panel for the DC heaters. I can switch all the heaters on or off at this switch or switch the on and off individually.
We installed another AC circuit breaker in the trailers main AC panel and ran a circuit to a power strip that I plug in all the AC heater plugs and 4 of the 6 trouble lights. I can turn all the AC heaters and these light bulbs on and off either by using the switch on the strip by throwing the breaker.
Thats it for the electrical circuit upgrades.
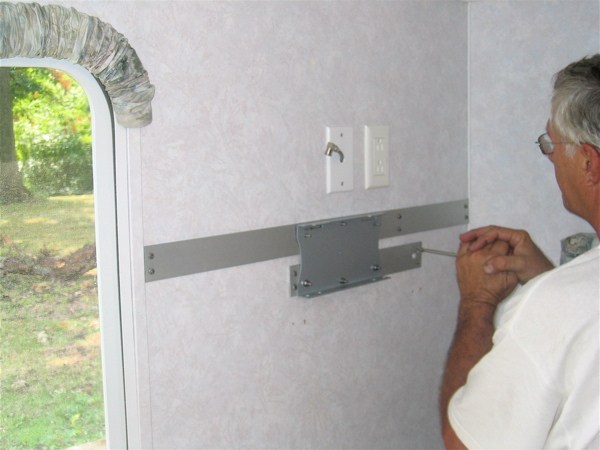
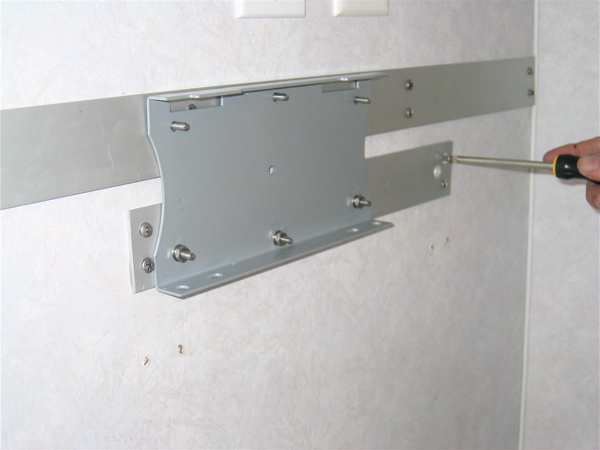
3. We installed a 32 inch Samsung flat screen HDTV on the bedroom wall at the foot of my bed. I used aluminum flatstock screwed into the wall studs and mounted a TV mount that was designed to be as close the wall as possible. Above the TV I installed a small shelf and velco attached my DVD player. I just use the Sunline installed antenna system. It works fine. If I hook up to a campgrounds cable system, I need to move the antenna wire to a different antenna connector on the TV because the TV has one antenna connector for off the air signals and another for cable signals. No big deal but I bought a small manual switch that I will install sometime to make it even easier. I was worried that the flat screen HDTV would not like the vibration and stresses on the mounting points. But I havent had any problem whatsoever.

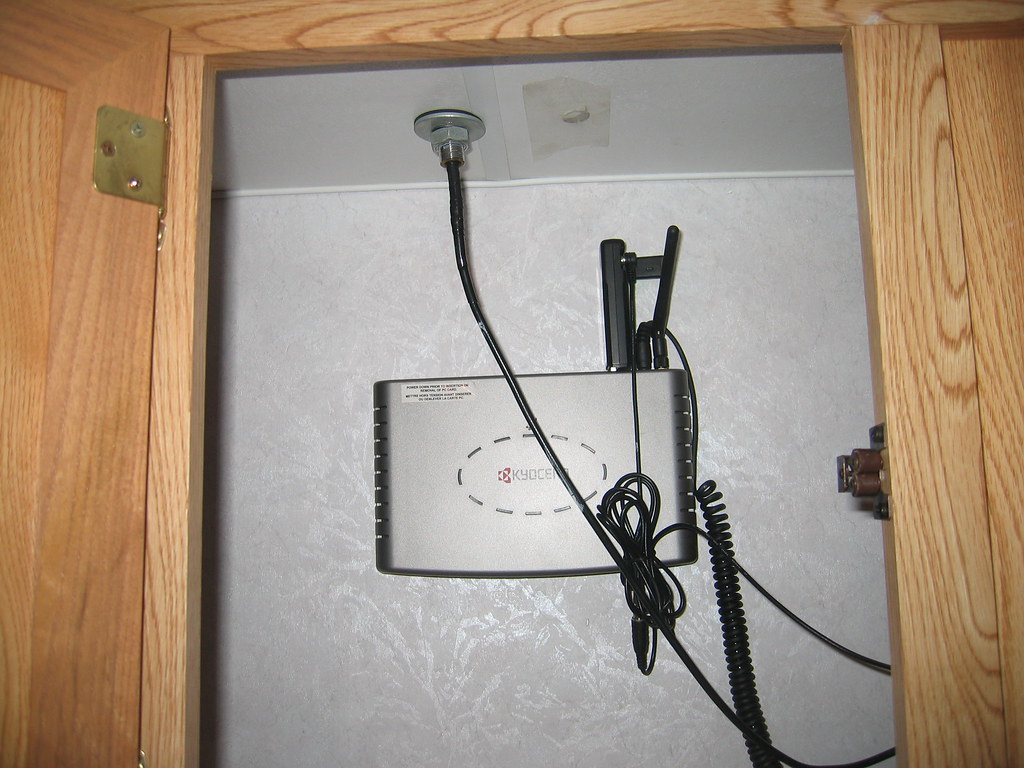
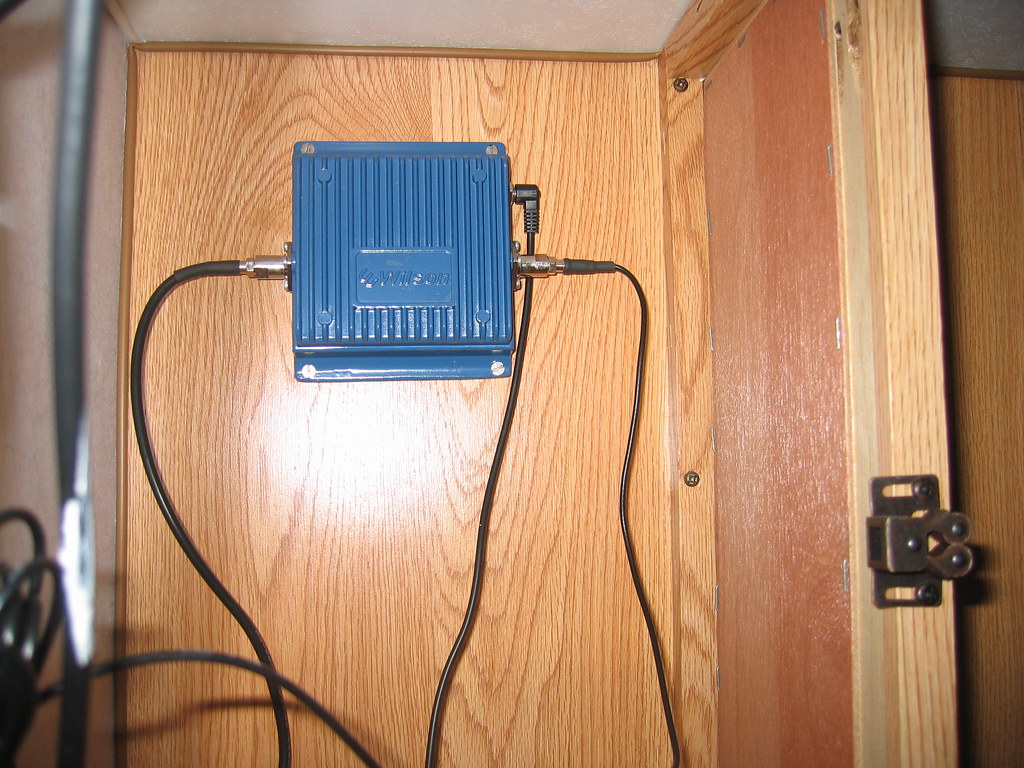
4. For internet, I installed an eternal rv cell phone antenna (Wilson). Because Sunline didnt use any wood plywood on the roof, I mounted it very close to a roof truss so the antenna mount partially rests on the truss and enable us to tighten it down. I made a hole through the rubber roof and ceiling matter inside a cabinet in the bedroom, afterward sealing everything well with self-leveling roofing sealant. I connected the antenna to a cell phone 3 watt amplifier mounted in the cabinet. In fact, all this stuff is behind inside a cabinet over the bed and out of sight. I purchased a USB Sprint card and a KR-1 router with a USB input. A cable connects the amplifier to the sprint card antenna and the router powers the card. Both router and amplifier run off of DC and I let them run all the time. The result is that we are a rolling hotspot. The router transmits in about a 200 circle around the trailer and so we have wifi that we can even use while rolling down the highway in the truck. My son in law, spoke with his parents in Bukina Faso, West Africa using Skype on his computer from the back seat of my truck while we were going 65 mph. Dont you just love technology. I use my laptop without any wires needed in the trailer or truck or sitting on a lawn chair. We didnt WEP protect the system so other campers can check their email, too. The Sprint system is highspeed (Rev A service) in many areas, especially metropolitan areas. In other areas it is faster than dialup but not high speed. Most of the time we are in a high speed area. It is unlimited service for $59. per month. It is not perfect but it is very good.

We also flipped the axles to raise the trailer and give us more ground clearance. I hit bottom three days in a row. First day I tore off one of the V brace. Second day, I tore off the other V brace. The third day I tore off one of the stabilizers. Then I flipped the axles
installed small rubber wheels on the V braces, and have hit only once more with no damage.
In general, I like to keep the appearance of the inside of the trailer nice and all the wiring, transfer swich, and the like is out of sight. The only real compromise I made on appearance was the Velcro to hang the door blankets. The TV mount looks fine, almost like it might have come from the factory that way.
Best regards and hope this post isnt too long. Hope some of this info may help someone else.
Lowell


 Linear Mode


