 |
|
 01-23-2016, 09:24 PM
|
#1
|
|
Moderator
Join Date: Nov 2006
Location: Ohio
Posts: 12,656
SUN #89
|
A Winter Project - Roof Repair (Picture heavy)
We have a new "project" for over the winter.....
My son acquired a really nice looking 2006 T264SR last fall. The inside and frame under the camper are in outstanding shape. It was on a seasonal site before turned into the dealer as a trade. You could tell is was not towed much if any. The roof had some neglect, that was evident from looking at the roof caulk, however there was no issues inside or scent of a smell in the usual suspect areas. And I mean none.
Well.... after washing the roof to put it away for the winter, my son found one area was spongy, really spongy.... Knowing the Sunline bud board roof they have normal sag I said, that could be normal. So I took a look at it. Oh boy.... this soft is not normal. It was literally a rubbery feeling with no structure under it in the front right corner. And it was localized in about a 2 1/2" foot area.
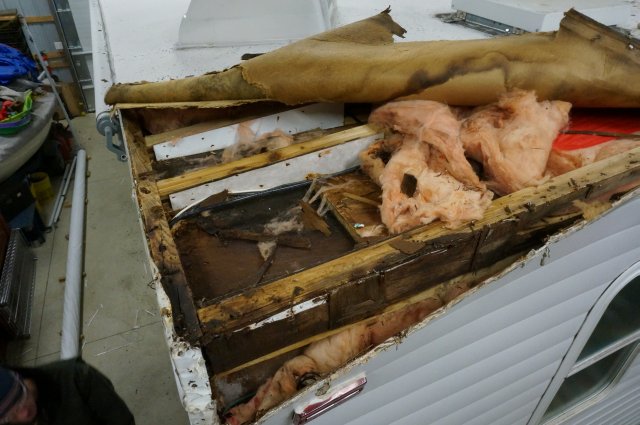
Knowing once you find this, we need to deal with it now and not let it fester, we started into it. We opened up the roof and found dry rot and a prior dried wet area. After seeing this, we looked real hard at all 4 corners. The good news, the front left is rock hard and dry. Can't say that for the other 3.
So we are, "into it" and have been for the last few weeks. The pics will tell the rest. Since we do not have a lot of pics on roof replacement on SOC, this post will hopefully help others fixing, contemplating doing a roof repair or inspecting the roof.
In this case this is total roof replacement and rot repair. The rubber looked really crystallized from neglect of not being cleaned in the front leaking area. The mold must of ate into it. Mine was made in 2003 with lots roof TLC and and looks nothing like this crystallization. My son found a new membrane on Ebay for a good price. And with all the repair we have ahead of us, and to make sure we have all of it, its time to reset the roof wear clock. After we finish this repair my son and his wife will have great, dry and sealed camper. With a new walk on roof no less. I'm envious of the walk on roof...  Son said today, well we can do your to add the walk on roof if your want? Ah...no thanks.... I'll waiting until a total rebuild comes on ours...
I will do this in several posts. The first the damage and taking the camper apart. Then the rebuild process.
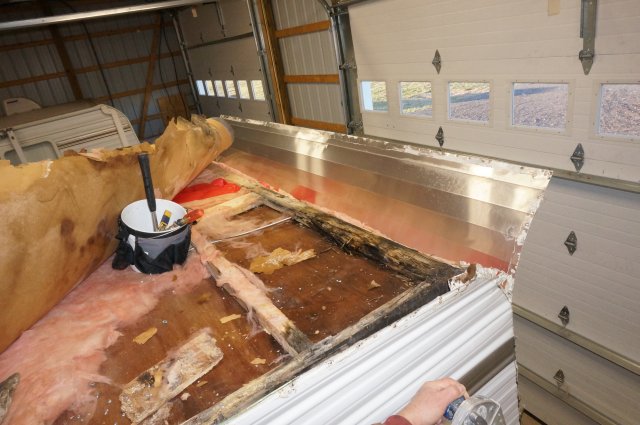
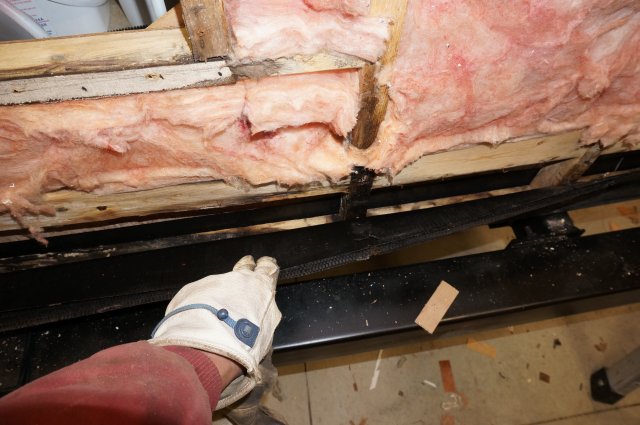
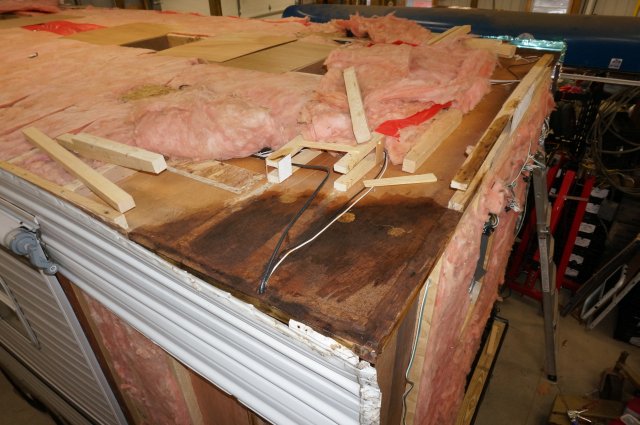
The first problem area. This will compress down a good 3 inches and is springy. The pics do not show it but the feeling it totally different then sound bud board roofing. Think a rubber band feeling.
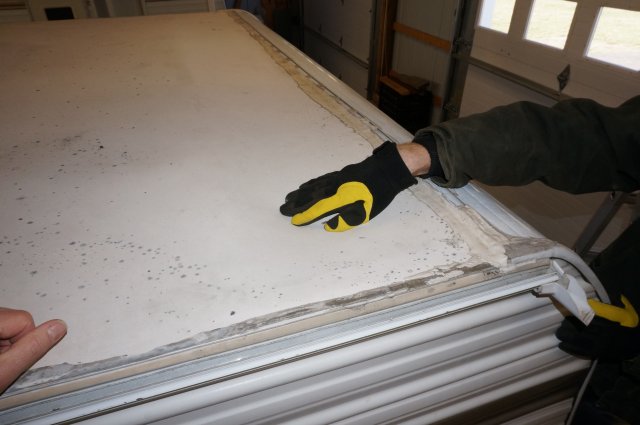
Someone put new sealant on the front and rear seams about a year ago. But the damage was done by then. The gutter were filled with dried goop and the screws rusted and wicking.


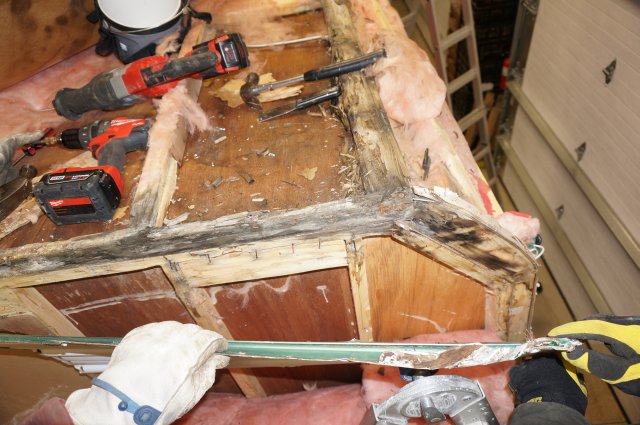
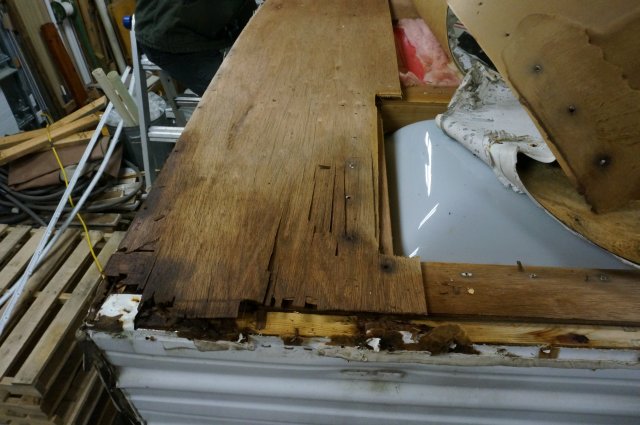
Now to the back of the camper. Here this one was still wet. T he bud board was wet but still semi intact. No springy feeling but wet. And the wet went all the way down the back wall to fester in the Darco membrane at the bottom of the back wall. So out it all came.
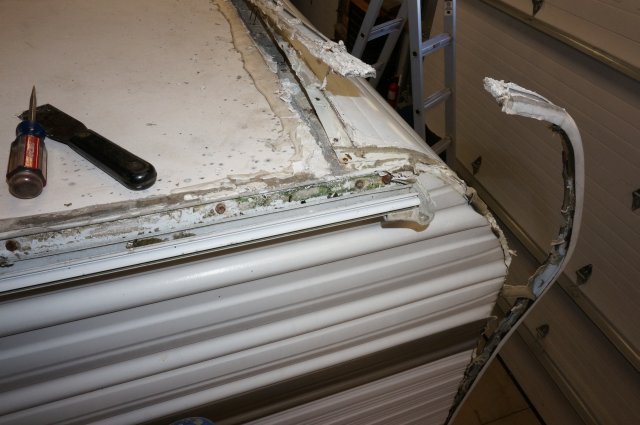
The left rear area. This area went down the back wall too. This looked like gutter screw water wick. And there may have been some rear seam issues.
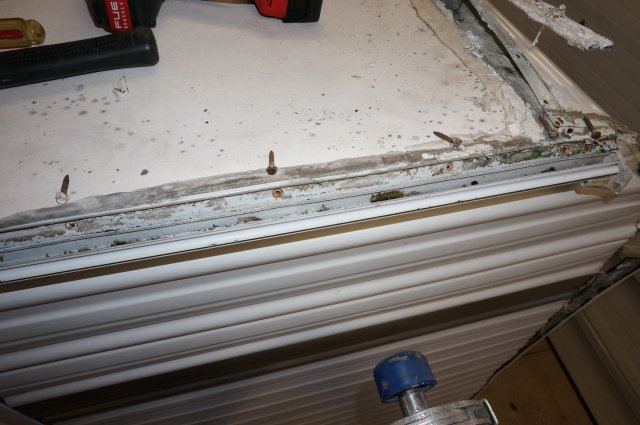
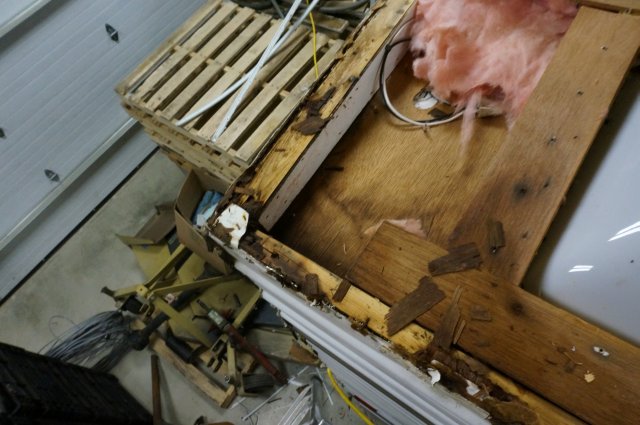
Here is with the gutter rail off. The text book mold in the gutter rail behind the vinyl strip rusting out the screws

This left are went down the left side of the camper down into the lower membrane area of the wall. And it came in the outside shower flange.
And coming in the outside shower flange.
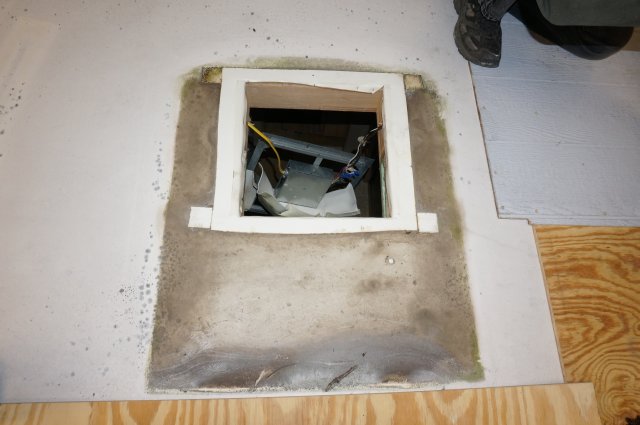
Now to the upper right corner by the bath shower. This area was rear seam leak. By the damage, it was the last one to go. The damage was more contained to the roof area.

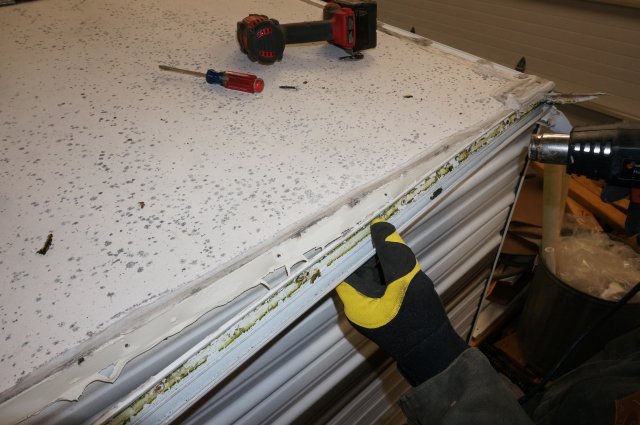
So now to remove the roof. Shower dome and rear vents off

The AC unit off.
Then to get the AC off the roof. Had to think on this one. We created a scaffold 5 feet off the ground. The 2 of us lifted the AC off to the 2 x 12 and then down to the ground. Worked good

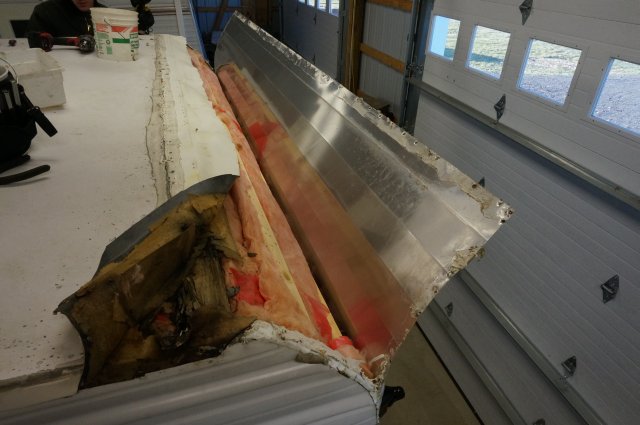
We roller it up from the back to the front
Then up to the front and off the roof.
So now it is all apart dried out and we are into the rebuild process. Will post more on the rebuild on Sunday.
Thanks for looking
John
__________________
Current Sunlines: 2004 T310SR, 2004 T1950, 2004 T2475, 2007 T2499, 2004 T317SR
Prior Sunlines: 2004 T2499 - Fern Blue
2005 Ford F350 Lariat, 6.8L V10 W/ 4.10 rear axle, CC, Short Bed, SRW. Reese HP trunnion bar hitch W/ HP DC
 Google Custom Search For Sunline Owners Club
|

|

|
|
01-24-2016, 05:52 AM
|
#2
|
|
Member
Join Date: Aug 2015
Location: Virginia
Posts: 38
SUN #7676
|
Great pics! I need to jump on mine as well, but finding a garage is the issue. I'll be following this thread closely.
__________________
__________________
Tom & Debbie
2004 Sunline Solaris T-2499
2006 F-350 4WD 6.0L
2005 F-150 4WD 5.4L 3.73 rear
|

|
|
|
01-24-2016, 07:51 AM
|
#3
|
|
Senior Member
Join Date: Nov 2006
Location: New York
Posts: 2,909
SUN #93
|
Thank God you build a pole barn large enough to do what you want and when you want!!!
__________________
Kathy & Leo SUN 093
Central Adirondacks of New York
2013 Rubicon 2900 Toy Hauler
We loved our 2007 T-2499
2010 Ford F-350 4x4 Lariat Super Crew Dually Diesel

|
|
|
|
|
01-24-2016, 05:07 PM
|
#4
|
|
Moderator
Join Date: Nov 2006
Location: Ohio
Posts: 12,656
SUN #89
|
Quote:
Originally Posted by East Coast

Great pics! I need to jump on mine as well, but finding a garage is the issue. I'll be following this thread closely.
|
Thanks East Coast. Finding the garage big enough, yes that is sometimes an issue. Up until the new barn came 2 years ago, all my repairs on the camper were mostly outside other then what I could bring inside my prior work shop. Our T2499 did fit inside after I reworked the overhead door, but it took up half the building and with all the "other stuff" inside, there was not much that could be done on the camper. When out T310SR came, it was 6" too tall and 2 foot too long... All work on it was outside. Winter was hard...
What area on yours has water concerns? If you have wood working tools, and time, any of this if fixable. That is one of the great things about the way these campers are made. Good luck on your camper.
John
__________________
Current Sunlines: 2004 T310SR, 2004 T1950, 2004 T2475, 2007 T2499, 2004 T317SR
Prior Sunlines: 2004 T2499 - Fern Blue
2005 Ford F350 Lariat, 6.8L V10 W/ 4.10 rear axle, CC, Short Bed, SRW. Reese HP trunnion bar hitch W/ HP DC
Google Custom Search For Sunline Owners Club
|
|
|
|
|
01-24-2016, 05:09 PM
|
#5
|
|
Moderator
Join Date: Nov 2006
Location: Ohio
Posts: 12,656
SUN #89
|
Quote:
Originally Posted by Poppy & Nana
Thank God you build a pole barn large enough to do what you want and when you want!!!
|
Yes Kathy, I am thankful. It seems some times no matter how big a building you get, you can always seem to use more room... Too many "big" toys... Maybe sometimes we need less stuff... 
__________________
Current Sunlines: 2004 T310SR, 2004 T1950, 2004 T2475, 2007 T2499, 2004 T317SR
Prior Sunlines: 2004 T2499 - Fern Blue
2005 Ford F350 Lariat, 6.8L V10 W/ 4.10 rear axle, CC, Short Bed, SRW. Reese HP trunnion bar hitch W/ HP DC
Google Custom Search For Sunline Owners Club
|
|
|
|
|
01-24-2016, 06:00 PM
|
#6
|
|
Moderator
Join Date: Nov 2006
Location: Ohio
Posts: 12,656
SUN #89
|
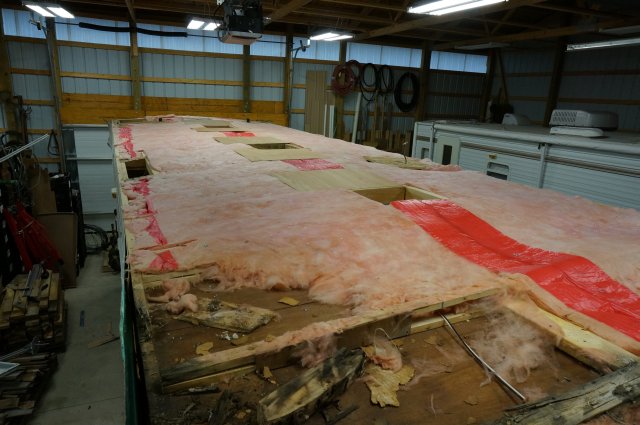
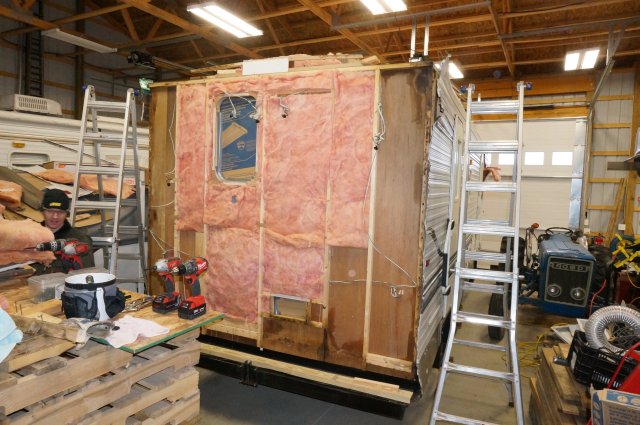
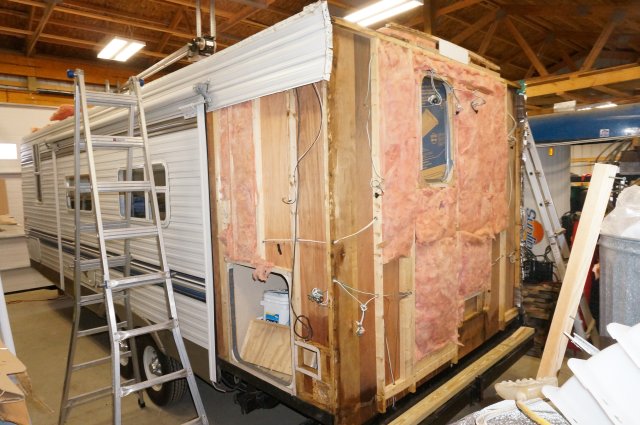
Back wall reconstruction
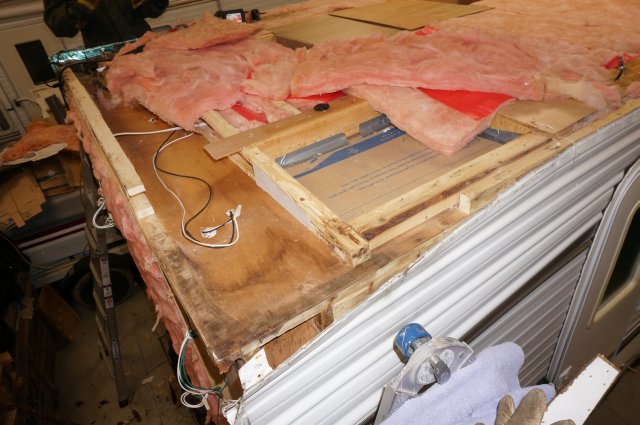
Here is the back wall and the 2 areas on the back roof corners.
Once the wet dried out, I must admit it does look a little better. You have to probe and check all areas that have a hint of what was wet. We replaced and cut back to sound wood on everything with the exception on the luan ceiling. Here is the progress.
We had both the left and right end wall stud go bad as roof water ran down inside to later rest in the bottom of the back wall trapped in the Darco waterproof membrane.
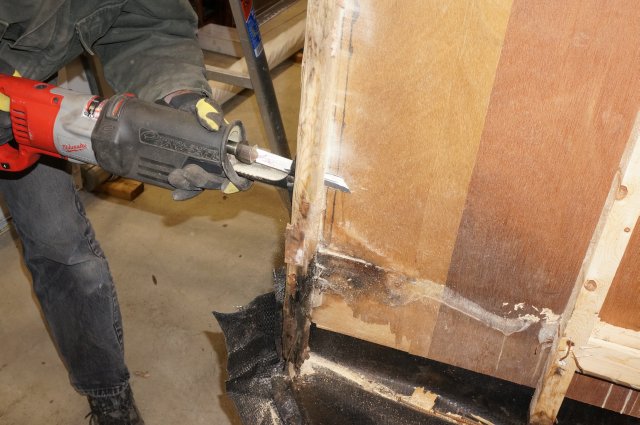
The left side was the worst. The entire length had to go. Some areas the glue was still attached and you can't yank or heavy pry as all the luan wall will come with it. Using a Dremel vibrating tool with the flat saw blade we plunged in behind the stud. Then using a Sawzall with a wood/metal blade to cut through rusted screws & staples, cut down the wall next to the luan wall board until the stud let loose.
The right side, the 6 feet in the middle was still sound but the top and bottom were bad. We just removed those bad sections.
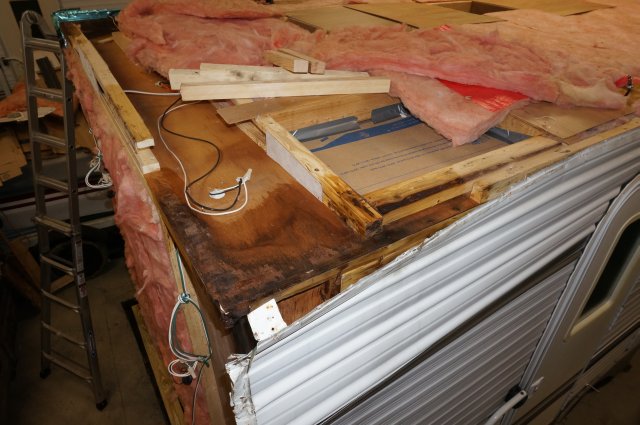
Here is the top left with all the rot cut out

And the top right
Next was to treat the wood that was wet, dried out and still sound wood. And the luan ceiling and wall board. You have to kill the rot fungus to not take a chance on getting dry rot later one. And the epoxy we used also restores soft wood or in this case the thin luan ceiling and wall board. It hardened back up well once it dried.
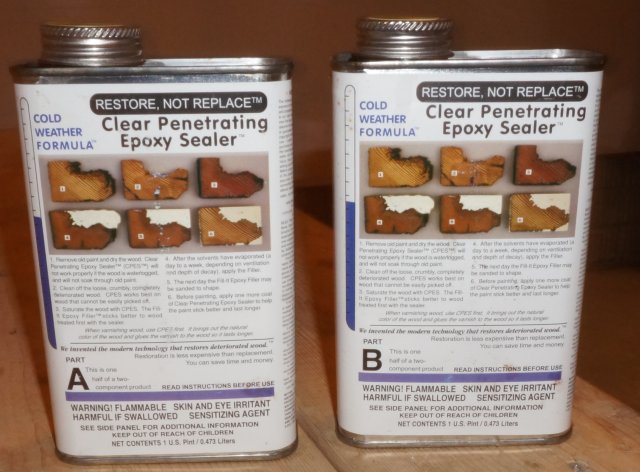
We used the cold weather formula of CPES from Rot Dr. Wood preservation, rot repair, and restoration using epoxy resin on boats and homes.
2 part epoxy. The cold weather formula can be applied down to 32F. We waited until we had 2 plus good nights above freezing. If you ever use this product, you have to use a respirator. The fumes are bad after 10, 15 minutes
You can see here, it turns the wood darker once dried and it hardened up the wood again.
Now comes the reconstruction. You basically reconstruct the rotted out parts and then glue and screw back on. We used cold weather, outdoor construction adhesive. In our case, Loctite sub-floor. Most all wood glues can only be used down to 45F and making sure they cure in that temperature for sure can limit winter time working using those products. Even using cold weather products, we still had to time the application to align to a warm winter day.
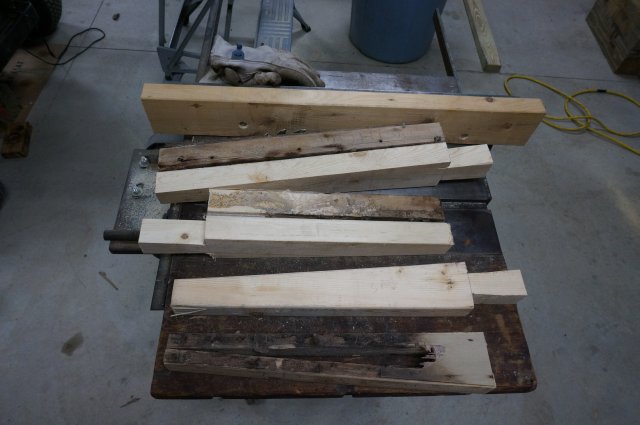
Here is some of the rework. We had 4 rafters that the ends were bad. We cut off the bad end and created a solid splice in that was glued and screwed back together.

Top right completed along with the side top plate.
Left top done. Rafters and top plate
The rear wall we put a 2 x 4 pressure treated down on the bottom rail that is Darco membrane wrapped. It now has tiny staple holes from the original factory install were they rusted out. Figured the treated wood in this location was justified. The holes also let the water back out.
We used a Kreg jig to splice in all the joints. Those jigs work great. Son had one, Dad now needs to get one for sure...

The back is now reconstructed and ready for the siding to go back on.
__________________
Current Sunlines: 2004 T310SR, 2004 T1950, 2004 T2475, 2007 T2499, 2004 T317SR
Prior Sunlines: 2004 T2499 - Fern Blue
2005 Ford F350 Lariat, 6.8L V10 W/ 4.10 rear axle, CC, Short Bed, SRW. Reese HP trunnion bar hitch W/ HP DC
Google Custom Search For Sunline Owners Club
|
|
|
|
|
01-24-2016, 06:44 PM
|
#7
|
|
Moderator
Join Date: Nov 2006
Location: Ohio
Posts: 12,656
SUN #89
|
Back wall siding
Now to the siding on the rear wall. We waited until the weather cooperated again.
We started with the left side wall.
Sunline uses the folded corner method to help create a better water tight seal then just relying on the corner molding. The siding is fold over and stapled to the rear wall corner. This folded edge then gets sealing tape put over it before the rear wall siding is put on.
The siding itself is stapled. You start at the top and work your way down
And the siding on the left side

We still have the cargo hole and the slide trim to put on but we will do that as a time filler task later. Now to the back wall.
First was to mock up and see how it will align with the rework and the new roof sheeting in place of the bud board corrugate it will replace. We use the window cutout and old staple holes on the siding staple tab and the corner siding screw holes. While the siding tabs may not be in the exact same place, they are close. You also check the top along the rafter. When all align, then staple it on.
We C clamped the top siding on to do an alignment check


And too see how the roof sheathing will work with the rear end wall
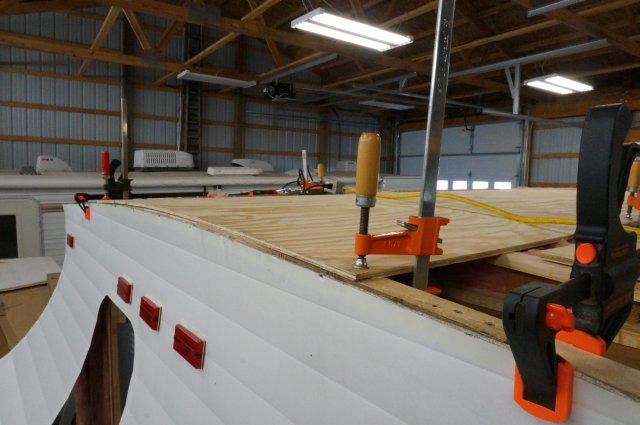
Butyl based sealing tap applied to the corners and the top piece aligned and stapled back on. We only peel off the release liner on the sealing tap as we go with each piece of siding. It is very sticky and do not want to contaminate it by accident.
We keep working out way down the wall.
There is also a wall warp check. It is not uncommon a wall stud is warped out or in. There are 1/8" filler strips at the wall studs Sunline added to account for both stud warp and siding thickness changes. This shows up mostly on the front and rear walls. The corners with the folded siding, the 1/8" thick sealing tape and the wall stud warp required spacers to be check and added. Most need 1, some 2 and some 3, 1/8" shims. They staple on on the wall stud were the siding is stapled on.
We used a straight 8 foot 3/4 pine board as a straight edge. Then add shims as need to create as straight a line as we can.

If you look close at the studs, you can see the gaps. Here is the 1/8" spacer stapled onto the studs

And the rear wall back on. We will leave the corner molding off until the roof goes on.
The back is now done until we start with the roof plywood.
__________________
Current Sunlines: 2004 T310SR, 2004 T1950, 2004 T2475, 2007 T2499, 2004 T317SR
Prior Sunlines: 2004 T2499 - Fern Blue
2005 Ford F350 Lariat, 6.8L V10 W/ 4.10 rear axle, CC, Short Bed, SRW. Reese HP trunnion bar hitch W/ HP DC
Google Custom Search For Sunline Owners Club
|
|
|
|
|
01-24-2016, 07:08 PM
|
#8
|
|
Moderator
Join Date: Nov 2006
Location: Ohio
Posts: 12,656
SUN #89
|
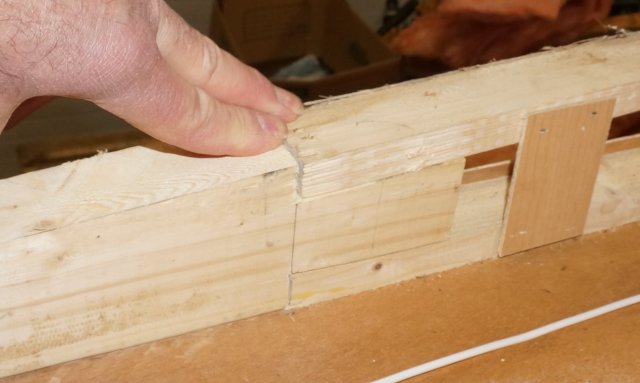
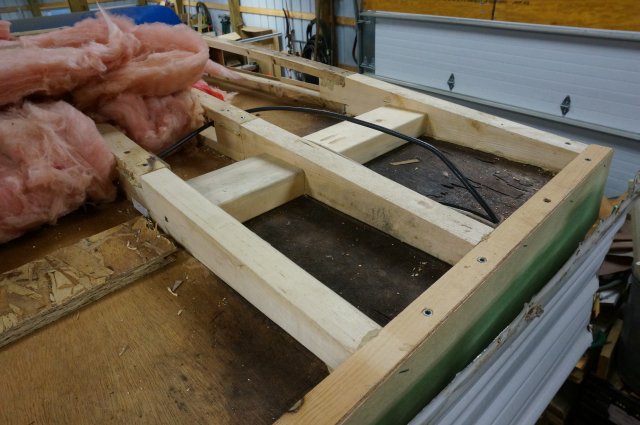
Front right corner correction
Now to move upfront to work on the front right corner. This was today's work.
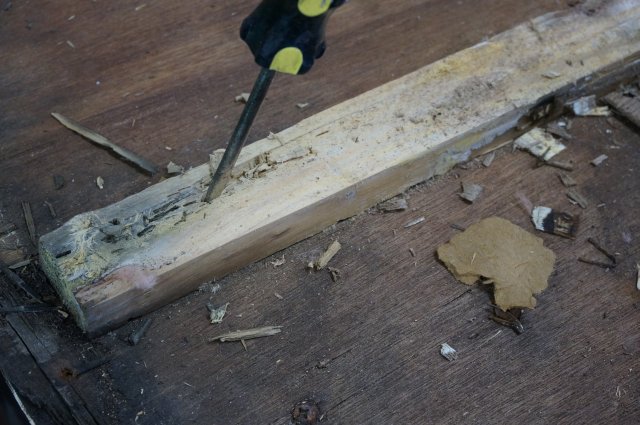
Here is the dried out rotted wood. We start with taking all the bad wood out.

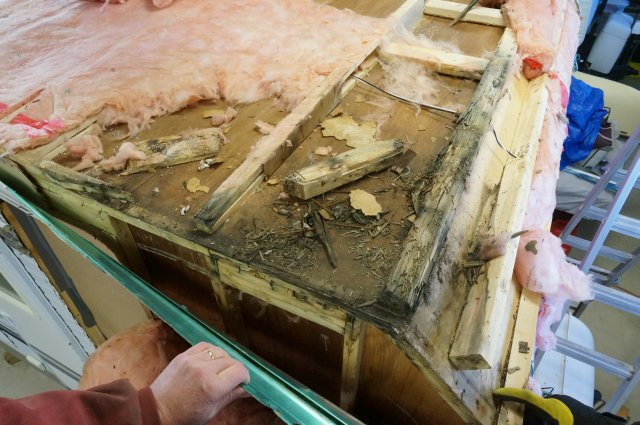
As we were working through this, dry rot was well underway. We had to remove all the wood and top parts of the wall studs.
We were only going to take the top off the one end of the rafter that was questionable and dry rot reared it ugly head under it. So the whole end came off.

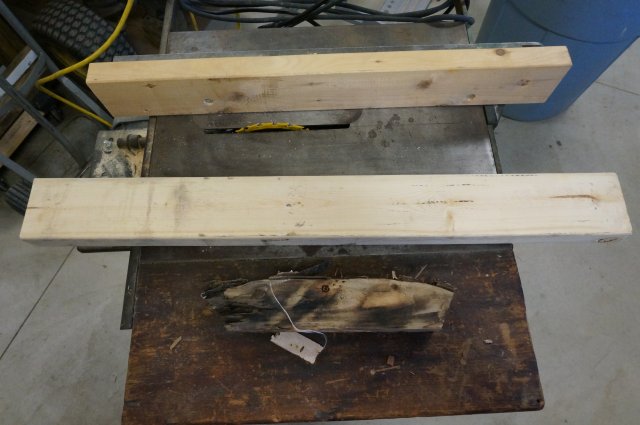
Here is all the rotted wood gone and the start of cutting new replacement wood

Creating the front angled shapes
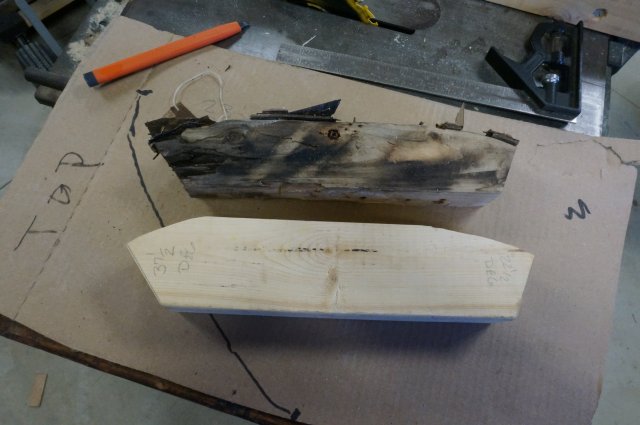
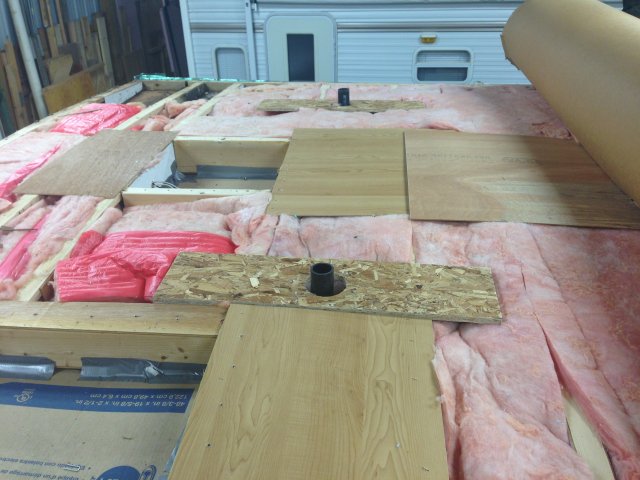
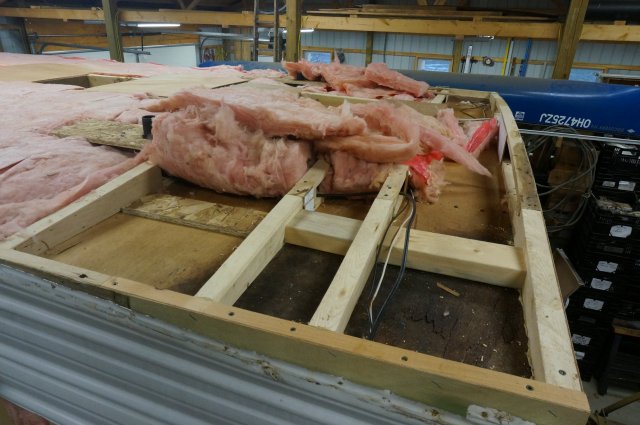
Then to start filling in the rest of the rotted areas. Here are the new wood pieces just resting in place. These have to all come back out to do the Rot Dr treatment when the weather cooperates. Supposed to be Monday night.
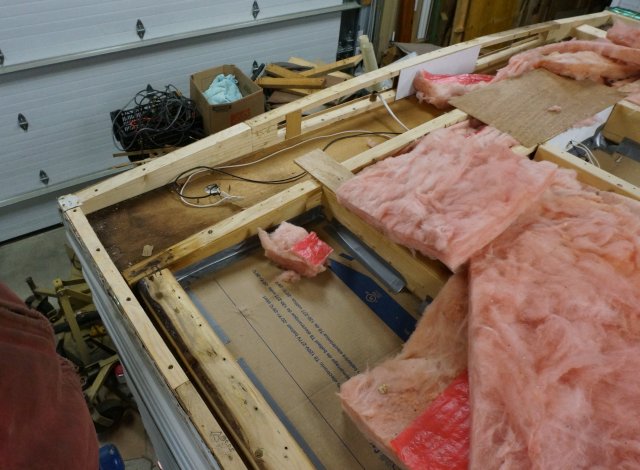
And here is a rafter anomaly we do not exactly understand why. The front rafters start at the front bedroom roof vent and then get lower in height as they move towards the front. This is understood to blend the front to have roof pitch towards the rubber to siding seam. The odd part is the very first rafter after the roof vent. It is only 6 to 8" away and it drops 3/4" in height in that 6 to 8". The next rafter is ~ 16" away and is level with this 3/4 lower one and then the roof will drop approx 2" to the 2 x 3 at the front roof seam.
If you look in this pic, we cut 2 wedge shims 3/4" in the center blended to almost nothing at the walls. They will get glued and attached to the rafters when the roof sheathing goes on.
The original setup worked with the bud board corrugate roofing as it will flex that much, however this hard a drop of 3/4" in 8" will not work with 3/8 plywood. (actually 11/32") There would be a large gap in that area so we shimmed it to blend down hill to the next rafter. It may be that Sunline made a mistake and was supposed to put a higher rafter in this location and put the wrong one in. Don't know. Or there is a reason not apparent right now. Anyone know?
My 2004 T310SR right next to us does not have this hard drop that we can see from the outside. I'll have to investigate further.
This is all the progress to date. More as the work continues.
Thanks for looking.
John
__________________
Current Sunlines: 2004 T310SR, 2004 T1950, 2004 T2475, 2007 T2499, 2004 T317SR
Prior Sunlines: 2004 T2499 - Fern Blue
2005 Ford F350 Lariat, 6.8L V10 W/ 4.10 rear axle, CC, Short Bed, SRW. Reese HP trunnion bar hitch W/ HP DC
Google Custom Search For Sunline Owners Club
|
|
|
|
|
01-24-2016, 07:26 PM
|
#9
|
|
Senior Member
Join Date: Nov 2006
Location: New York
Posts: 2,909
SUN #93
|
John - how long have you and your son been working on this project?
It would have taken us years to get that far!!!!! LOL
__________________
Kathy & Leo SUN 093
Central Adirondacks of New York
2013 Rubicon 2900 Toy Hauler
We loved our 2007 T-2499
2010 Ford F-350 4x4 Lariat Super Crew Dually Diesel
|
|
|
|
|
01-24-2016, 08:04 PM
|
#10
|
|
Moderator
Join Date: Nov 2006
Location: Ohio
Posts: 12,656
SUN #89
|
Quote:
Originally Posted by Poppy & Nana
John - how long have you and your son been working on this project?
It would have taken us years to get that far!!!!! LOL
|
Hi Kathy,
We started Saturday, Jan 2nd. Been working weekends or partial weekends on it. We have apprx 7.5 days into now. Due to the cold and weekends, we are not getting a full 8 hour each one of those days.
I do admit, having son working with me on camper fix'in, makes things go twice as fast. He is a "ripping" the rot out and "I'm a cutting" new wood to go in. And then we are both "a glue'ing and screw'ing"... or scrap'ing. The amount of clean up work getting off the old caulking and clean up is a job it and in itself.
Most all materials are now on order, on their way or already here. Next weekend it is supposed get get up to 45F. Ya Hoo... 
When it comes time to glue the rubber roof down, progress will come to a standstill until the temperatures are right for it. That glue needs the right temps to activate. But we have enough to keep going well before that.
Thanks
__________________
Current Sunlines: 2004 T310SR, 2004 T1950, 2004 T2475, 2007 T2499, 2004 T317SR
Prior Sunlines: 2004 T2499 - Fern Blue
2005 Ford F350 Lariat, 6.8L V10 W/ 4.10 rear axle, CC, Short Bed, SRW. Reese HP trunnion bar hitch W/ HP DC
Google Custom Search For Sunline Owners Club
|
|
|
|
|
01-25-2016, 05:30 AM
|
#11
|
|
Senior Member
Join Date: Nov 2006
Location: New York
Posts: 2,909
SUN #93
|
Great progress in such a short time!!!!!
__________________
Kathy & Leo SUN 093
Central Adirondacks of New York
2013 Rubicon 2900 Toy Hauler
We loved our 2007 T-2499
2010 Ford F-350 4x4 Lariat Super Crew Dually Diesel
|
|
|
|
|
01-25-2016, 06:07 AM
|
#12
|
|
Member
Join Date: Dec 2014
Location: Pennsylvania
Posts: 59
SUN #6969
|
Wow! I hope you got that unit for a good price because it looks like a total rebuild! I love my Sunlines but will never understand why they used such a cheap roof design! I would much rather tow a few extra pounds then have a roof made of cardboard. It had to be more of a cost factor then a weight issue. I would love to own one of your trailers when you are finished with it!
__________________
|
|
|
|
|
01-25-2016, 06:19 AM
|
#13
|
|
Moderator
Join Date: Nov 2006
Location: New York
Posts: 1,920
SUN #98
|
Awesome John, thanks for sharing.
Your son's luck to have his own private warrenty & repair departement
__________________
Mary & Tom (aka Hutch)
2015 Jayco Eagle Premier 361REQS
2014 GMC Sierra 3500HD 4x4 CC D/A
Sunlines: 2005 Solaris T-280SR; 1999 Solaris T-2670; 1998 Saturn T-24A
|
|
|
|
|
01-25-2016, 09:51 AM
|
#14
|
|
Senior Member
Join Date: Jul 2014
Location: Massachusetts
Posts: 279
SUN #6579
|
Re-build
John, you and your son are doing a great job on this project and we thank you for posting the progress. Question, what is the thickness of the plywood you're placing on the roof? Hope I never have to do this repair but, will keep this post for reference.
I think Sunline used the bud board strictly to keep the weight down. Wish they had uses plywood instead and I but a lot of owners feel the same way.
Best wishes and keep posting this project. Thanks!
Dave
__________________
1999 Sunline Solaris T2553--SOLD--
|
|
|
|
|
01-25-2016, 12:08 PM
|
#15
|
|
Member
Join Date: Aug 2015
Location: Virginia
Posts: 38
SUN #7676
|
Quote:
Originally Posted by JohnB
Thanks East Coast. Finding the garage big enough, yes that is sometimes an issue. Up until the new barn came 2 years ago, all my repairs on the camper were mostly outside other then what I could bring inside my prior work shop. Our T2499 did fit inside after I reworked the overhead door, but it took up half the building and with all the "other stuff" inside, there was not much that could be done on the camper. When out T310SR came, it was 6" too tall and 2 foot too long... All work on it was outside. Winter was hard...
What area on yours has water concerns? If you have wood working tools, and time, any of this if fixable. That is one of the great things about the way these campers are made. Good luck on your camper.
John
|
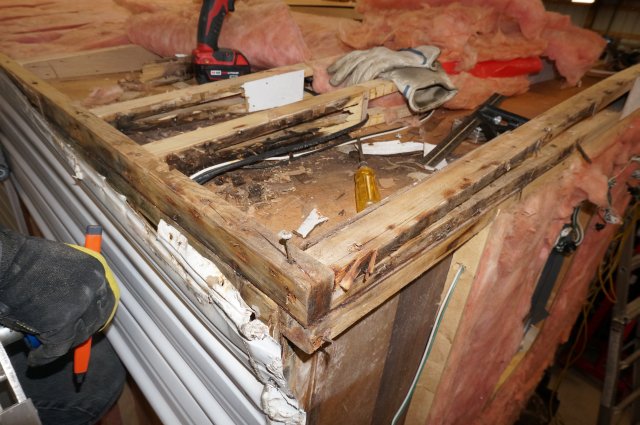
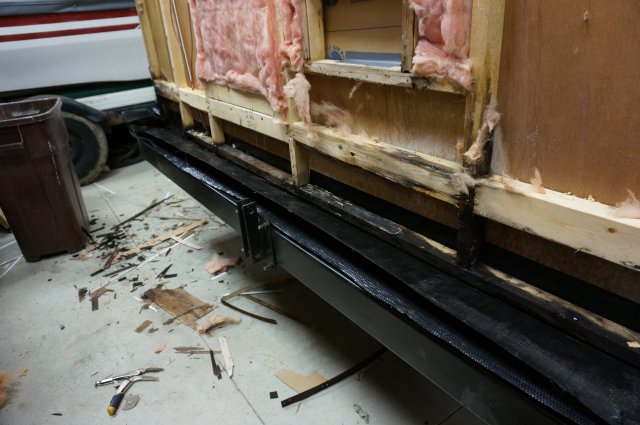
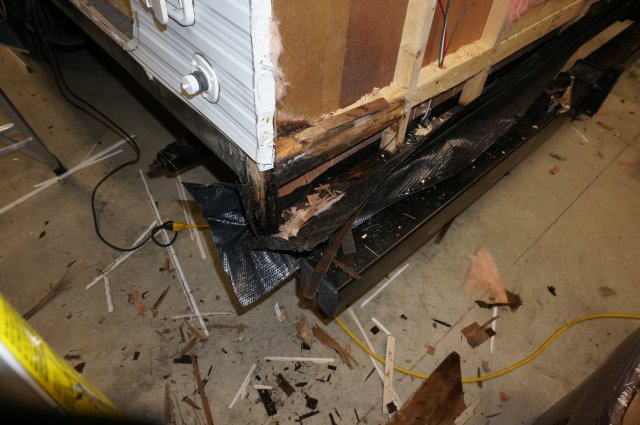
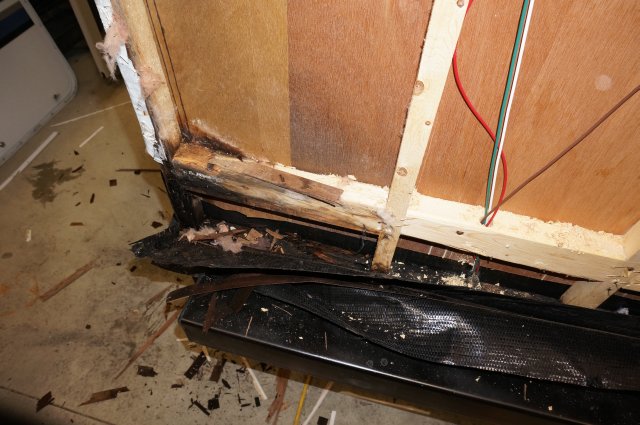
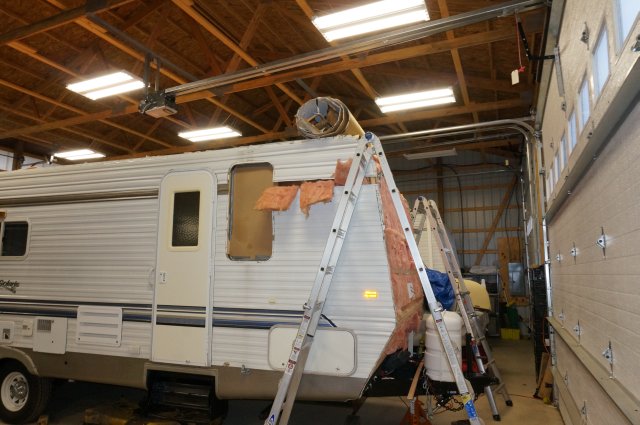
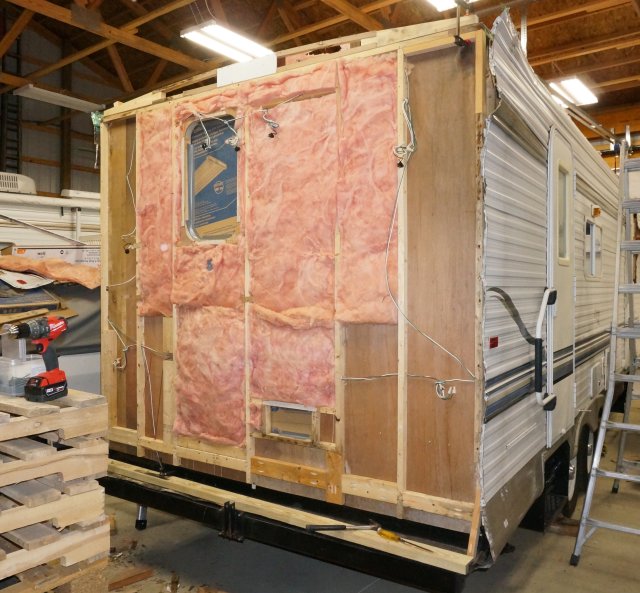
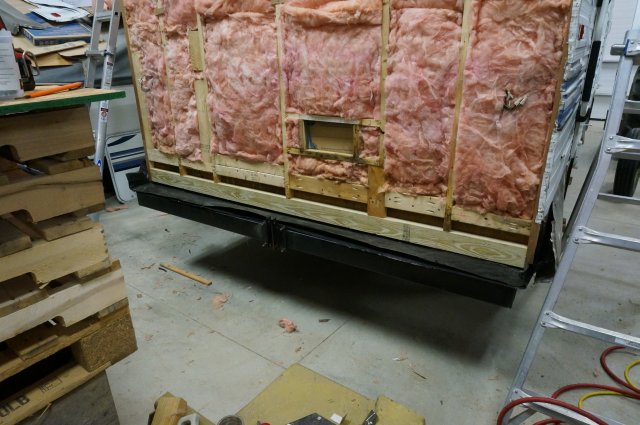
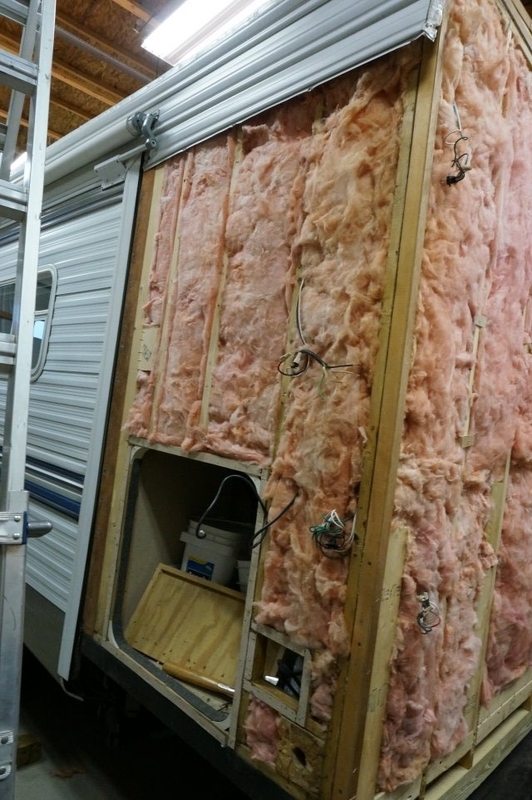
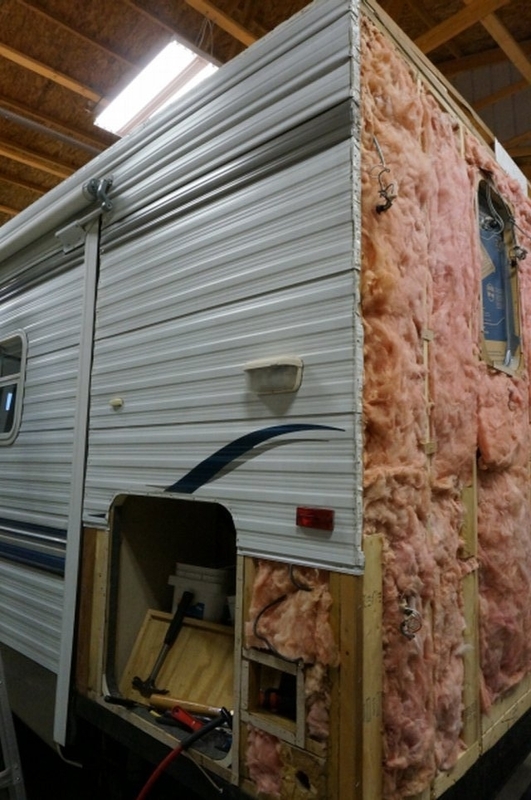
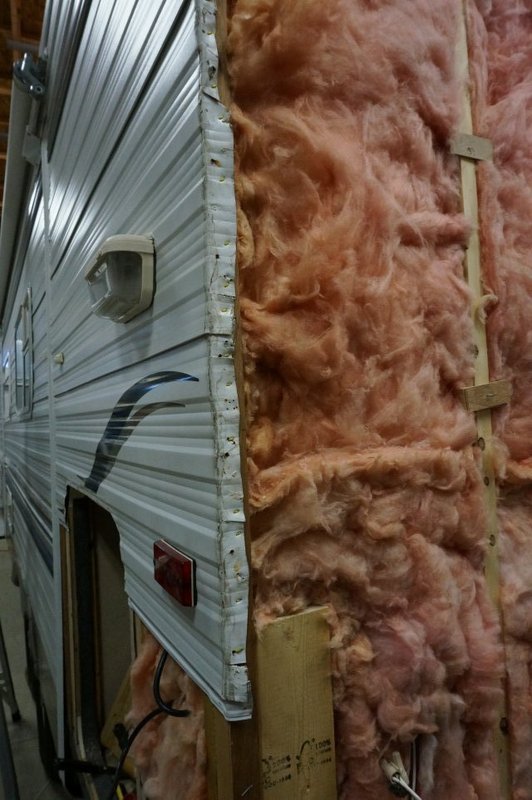
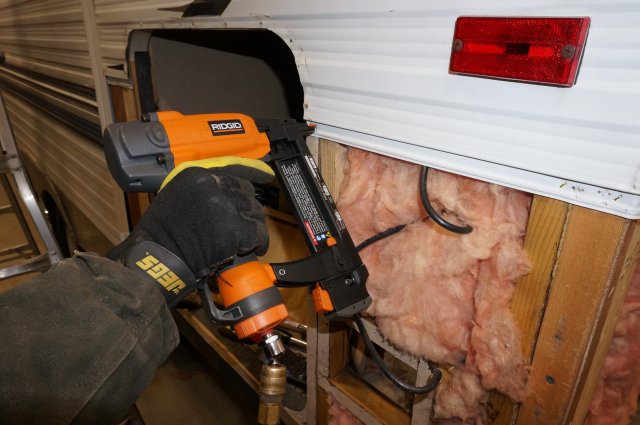
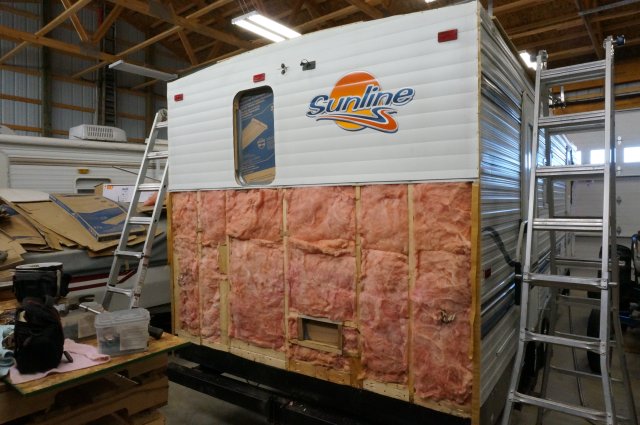
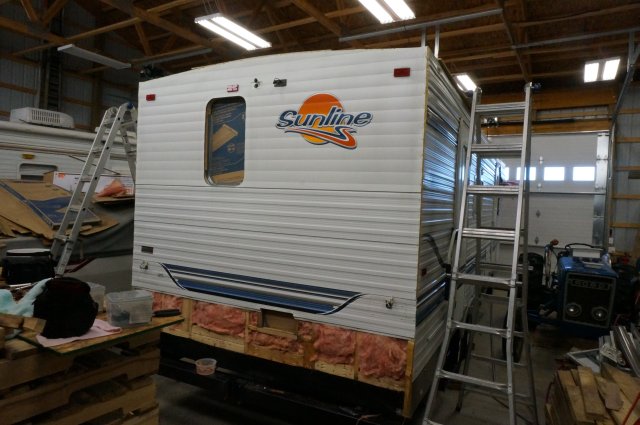
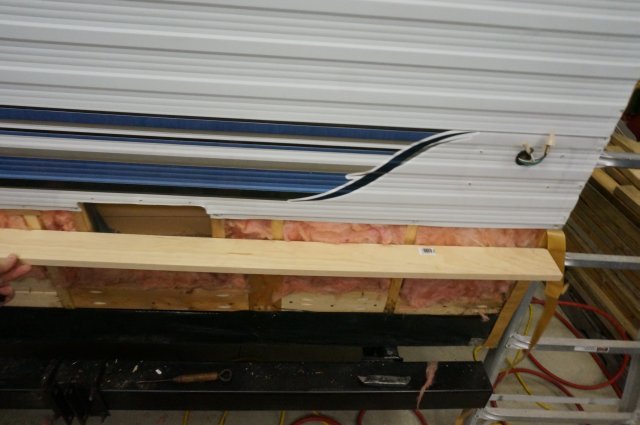
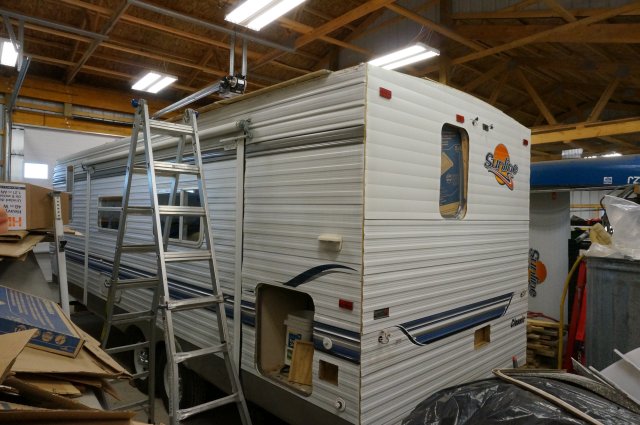
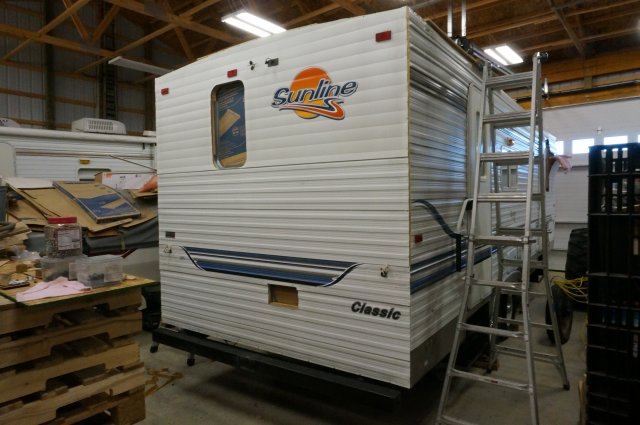
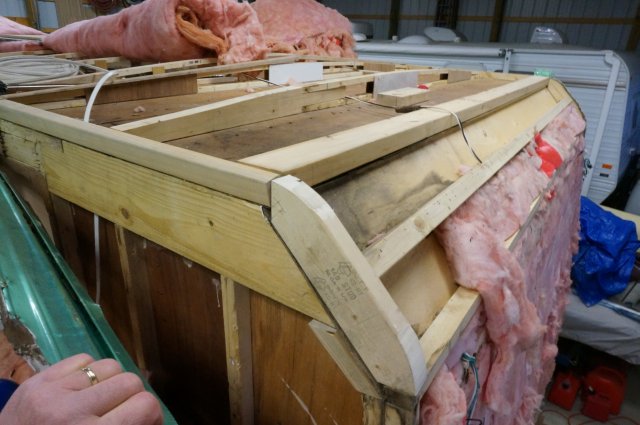
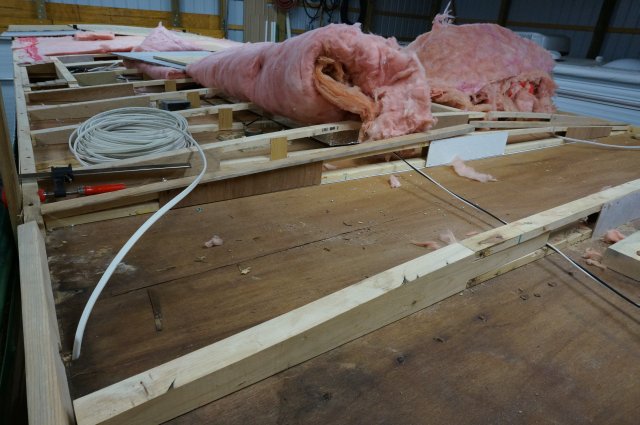
John,
Here's a couple pics that show my main concerns. The previous owner had a leak where the rubber meets the front siding. There is a small indication in the front ceiling seam inside of the cabinet above the bed, but it is not bad at all. The roof membrane is sagging due to the wicking of moisture into the bud board, and I also have concerns for the integrity of the first structure member under the rubber to siding joint. I did create a fillet of sealer to compensate for the sag at the joint and I check it regularly for any cracking. as you can see, I need to recoat the roof as well.
Since a garage enclosure is still up in the air at this point, I'm giving thought to only working this area this summer and saving a complete roof replacement until sometime after retirement which happens the end of this year. Yahoo!
Any cost estimates for the rubber roof membrane material?
Thanks again for your post and pics! Your pics provide wonderful detail of the construction, specifically of where I needed a bit of insight.
__________________
Tom & Debbie
2004 Sunline Solaris T-2499
2006 F-350 4WD 6.0L
2005 F-150 4WD 5.4L 3.73 rear
|
|
|
|
|
01-25-2016, 07:31 PM
|
#16
|
|
Senior Member
Join Date: Jan 2009
Location: Rhode Island
Posts: 1,515
SUN #768
|
John, I am in total awe at the scope of this project. What a masterfull job you and your son are doing.
Thanks for taking all those pictures and sharing them with us.
Gene
__________________
 Gene & DW Ginny
2002 Sunline T-2363
2008 Toyota 4-runner 4wd 4.7L V-8
Reese Dual Cam straightline - P3 Brake controller
|
|
|
|
|
01-25-2016, 08:57 PM
|
#17
|
|
Moderator
Join Date: Nov 2006
Location: Ohio
Posts: 12,656
SUN #89
|
Snip..
Quote:
Originally Posted by Bubbabc
Wow! I hope you got that unit for a good price because it looks like a total rebuild! I would love to own one of your trailers when you are finished with it!
|
Bubbabc, Thanks for the kind words. Greatly appreciated.
Son did get a good deal on the camper. After the materials of this repair, it will still be a good deal for what they will have after repair. Granted we have time invested in the repair, but the cost is materials only. Had not known of the extent of this issue obviously at the time. The inside is in super great condition other then surface dirt which son and wife cleaned up well. The underside of this camper is on incredibly new looking condition and 4 newer tires.
The rubber material looked very questionable. It has many sort of micro structure cracks in it is the only way I can explain it. The prior owner took care of the inside and surrounding outside walls. However I do not think they realized or knew what it takes to maintain an RV roof. And that includes frequent cleaning, sealant checks and sealant touch ups as needed at least 4 times a year once some age gets to it.
After taking up the 3 wet corners it came to a decision, do we replace the roof or try and patch? It needed new roof vents and a new shower dome, not a big deal but they had to come up. The time is really in the rot repair and not so much dealing with a new membrane.
The question came, what else may be infected? Son found a new Dirco Brite Ply membrane very inexpensive. They plan to keep the camper a good long time. With that, the decision was to replace verses try and patch and hope we got it all. We did find one tank vent cover that had some water issues near it and the caulk under the roof TV antenna had water trapped under it but not yet inside the camper. He made the right call to remove the roof, reset the roof time clock and once completed, they will have a camper in outstanding shape with a solid dry, new sealed roof good for 20 years or more before a re-coating when taken care of properly.
These kind of projects are for sure a labor of love. Fix'in is not a problem, we'll get er done.
__________________
Current Sunlines: 2004 T310SR, 2004 T1950, 2004 T2475, 2007 T2499, 2004 T317SR
Prior Sunlines: 2004 T2499 - Fern Blue
2005 Ford F350 Lariat, 6.8L V10 W/ 4.10 rear axle, CC, Short Bed, SRW. Reese HP trunnion bar hitch W/ HP DC
Google Custom Search For Sunline Owners Club
|
|
|
|
|
01-25-2016, 09:45 PM
|
#18
|
|
Moderator
Join Date: Nov 2006
Location: Ohio
Posts: 12,656
SUN #89
|
Quote:
Originally Posted by Relie
John, you and your son are doing a great job on this project and we thank you for posting the progress.
Best wishes and keep posting this project. Thanks!
Dave |
Thanks for the good words Dave. Greatly appreciated.
I'll combine replies on the bud board.
Snip...
Quote:
Originally Posted by Relie
Question, what is the thickness of the plywood you're placing on the roof? Hope I never have to do this repair but, will keep this post for reference.
I think Sunline used the bud board strictly to keep the weight down. Wish they had uses plywood instead and I but a lot of owners feel the same way.
|
and Snip...
Quote:
Originally Posted by Bubbabc
I love my Sunlines but will never understand why they used such a cheap roof design! I would much rather tow a few extra pounds then have a roof made of cardboard. It had to be more of a cost factor then a weight issue.
|
The bud board...yes I too use to be very wondering why they picked that material. Still do not know for sure.
After taking this roof off, I learned more about the bud board. Where the roof was sound still, the bud board was in great shape. This thick solid corrugate structure is tough. And I mean tough.... there is no ripping it and it has a level or structure to it. They had to bond the rubber to the bud board before it was on the camper. At least I would think this is the way to do mass production and get the rubber glued correctly. It is for sure light weight. When son and I carried it off the roof, it was amazing how light the entire roof and rubber were. I guess I would summarize it as; a very tough light weight non walk on roof material.
It is I'm sure cheaper to produce then a walk on roof of OSB or plywood just from a labor standpoint. Maybe they used that to be closer in price competitiveness as they upgraded so many other areas they had to hold price somewhere and it is light weight. What was lost is the walk on roof ability that can still be overcome with a tarp and plywood working sheet to service the roof. Don't really know for sure, just surmising.
Knowing the Sunline brand and the way they built their campers, the bud board roof would not deter me from buying one. That said, if they were still around I would order a walk on roof on the next new one just to have the walk on ability.
Water infiltration is the enemy. And yes when bud board gets wet, it wicks like a sponge to the water source that is available. And we have the proof! The problem is the water infiltration. If this was an OSB roof, it would rot and the glue fall apart like my slide floor did. The rafters would still rot and so would the water run down the wall and leave it's tracks along the way. If plywood was used with exterior glue, it might hold up better but the other parts of the infrastructure would still go just the same.
I'm declaring the standard RV gutter system is part of the down fall of the system. The gutter channel is too small, gets clogged with twigs easy and when filled with water, allows water to rust out the heads of the screws to create mega holes to water wick into the roof. That and the front and rear seams along with the sealants. Having owned a new Sunline and then a used one and now seeing son's 2006, at about year 3, the roof system if stored outside needs constant attention. If you understand how to clean, and maintain the sealants you can just keep ahead of it. If not, the system is designed to allow water infiltration. The majority of the industry is set up the same way. The water infiltration problem is not unique to Sunline.
We considered 1/8 plywood, 1/4 and 3/8" We ended up selecting 3/8" nominal BC and exterior glue plywood. It is really 11/32 thick. It is lighter then OSB and was on sale at $13.90 a 4 x 8 sheet. Needed 6 sheets. 1/4" was the same price on sale.
This site tells some on the weight. It states 3/8 plywood is supposed to be 28.5 pounds per sheet. I can tell by lifting them out of truck, these sure feels lighter then 28.5 lbs. More like 20 to 25#. Must the the amount of glue in it or something. OSB is claimed to be 16% heavier.
Plywood Weight | ThePlywood.com
What we will do when the membrane comes, it to weigh the rubber and then weigh the plywood. We will then weigh the bud board and the rubber still bonded to it. We can then get an better comparison. A guess right now is, the plywood is between 120 to 171# of weight. On this 8,600# GVWR camper, that is not a lot as the cargo capacity is good.
Thanks and good conversion on the roof construction.
John
PS to All: Point in all this, don't let the water get in. If anyone has questions on how to spot and maintain your camper roof, ask away. It is not hard, the biggest issue seems just knowing to do it.
__________________
Current Sunlines: 2004 T310SR, 2004 T1950, 2004 T2475, 2007 T2499, 2004 T317SR
Prior Sunlines: 2004 T2499 - Fern Blue
2005 Ford F350 Lariat, 6.8L V10 W/ 4.10 rear axle, CC, Short Bed, SRW. Reese HP trunnion bar hitch W/ HP DC
Google Custom Search For Sunline Owners Club
|
|
|
|
|
01-25-2016, 09:48 PM
|
#19
|
|
Moderator
Join Date: Nov 2006
Location: Ohio
Posts: 12,656
SUN #89
|
Quote:
Originally Posted by Poppy & Nana
Great progress in such a short time!!!!!
|
Quote:
Originally Posted by PTHutch
Awesome John, thanks for sharing.
Your son's luck to have his own private warranty & repair department |
Quote:
Originally Posted by Gene
John, I am in total awe at the scope of this project. What a masterfull job you and your son are doing.
Thanks for taking all those pictures and sharing them with us.
Gene
|
Kathy, Hutch and Gene,
Thanks for the good words and encouragement. I guess are a "fix'in family".
__________________
Current Sunlines: 2004 T310SR, 2004 T1950, 2004 T2475, 2007 T2499, 2004 T317SR
Prior Sunlines: 2004 T2499 - Fern Blue
2005 Ford F350 Lariat, 6.8L V10 W/ 4.10 rear axle, CC, Short Bed, SRW. Reese HP trunnion bar hitch W/ HP DC
Google Custom Search For Sunline Owners Club
|
|
|
|
|
01-25-2016, 10:04 PM
|
#20
|
|
Moderator
Join Date: Nov 2006
Location: Ohio
Posts: 12,656
SUN #89
|
Quote:
Originally Posted by East Coast
John,
Here's a couple pics that show my main concerns. The previous owner had a leak where the rubber meets the front siding. There is a small indication in the front ceiling seam inside of the cabinet above the bed, but it is not bad at all. The roof membrane is sagging due to the wicking of moisture into the bud board, and I also have concerns for the integrity of the first structure member under the rubber to siding joint. I did create a fillet of sealer to compensate for the sag at the joint and I check it regularly for any cracking. as you can see, I need to recoat the roof as well.
Since a garage enclosure is still up in the air at this point, I'm giving thought to only working this area this summer and saving a complete roof replacement until sometime after retirement which happens the end of this year. Yahoo!
Any cost estimates for the rubber roof membrane material?
Thanks again for your post and pics! Your pics provide wonderful detail of the construction, specifically of where I needed a bit of insight. |
Hi Tom,
Yes, I see what you are referring too. Come good weather time, need to open her up and let it dry out and then address the bad wood.
It is amazing what the vinyl or plastic ceiling paper that is bonded to the 1/8" luan is for sealing out water. Both son and I are shocked at what that thin little layer can hold back from entering the camper. By looking at son's by the time you see water inside, the luan may be totally gone behind it. It is amazing how water tight it is. That and the vinyl round bead in the corners of the ceiling line to the wall. That too holds back the water up in the wall and ceiling. It just never came into the camper yet.
The cost on the rubber. This depends where you get it. Son ordered his off of Ebay. He had a few places tracked down. It should be here later this week some time. If so I will see it on Saturday. I'll report how good the find was. Pricing is all over. From $~ 250 for a 24 foot x 8.5 feet to $750 for similar size. All the same Dicor Brite Ply 40 mill white membrane
__________________
__________________
Current Sunlines: 2004 T310SR, 2004 T1950, 2004 T2475, 2007 T2499, 2004 T317SR
Prior Sunlines: 2004 T2499 - Fern Blue
2005 Ford F350 Lariat, 6.8L V10 W/ 4.10 rear axle, CC, Short Bed, SRW. Reese HP trunnion bar hitch W/ HP DC
Google Custom Search For Sunline Owners Club
|
|
|
|
|
|
|
Currently Active Users Viewing This Thread: 1 (0 members and 1 guests)
|
|
|
 Posting Rules
|
You may not post new threads
You may not post replies
You may not post attachments
You may not edit your posts
HTML code is Off
|
|
|
|
 » Recent Sunline Discussions
 |
|
|
|
|
|
|
|
|
|
|
|
|
|
|
|
|
|
|
|
|
|
|
|
|
|
|
|


 Linear Mode

