 |
|
 09-23-2014, 05:46 PM
|
#21
|
|
Junior Member
Join Date: Aug 2014
Location: Maryland
Posts: 20
SUN #6660
|
Hi John,
Thanks for all of the info. I probably won't be able to give an update until the weekend. It's getting dark in a hurry here!
__________________
__________________
|

|

|
|
09-24-2014, 05:22 AM
|
#22
|
|
Moderator
Join Date: Nov 2006
Location: Ohio
Posts: 12,654
SUN #89
|
Quote:
Originally Posted by ljackson

Hi John,
Thanks for all of the info. I probably won't be able to give an update until the weekend. It's getting dark in a hurry here!
|
No problem, it gets dark over here too quick as well now... I gave you the whole big picture to help back into what might be right or wrong. Your going to need to confirm all the areas to figure out what problem the prior owner was trying to address and if they fixed the correct area. Or some other new issue has cropped up.
Good luck
John
__________________
__________________
Current Sunlines: 2004 T310SR, 2004 T1950, 2004 T2475, 2007 T2499, 2004 T317SR
Prior Sunlines: 2004 T2499 - Fern Blue
2005 Ford F350 Lariat, 6.8L V10 W/ 4.10 rear axle, CC, Short Bed, SRW. Reese HP trunnion bar hitch W/ HP DC
 Google Custom Search For Sunline Owners Club
|
|
|
|
|
09-28-2014, 07:07 PM
|
#23
|
|
Junior Member
Join Date: Aug 2014
Location: Maryland
Posts: 20
SUN #6660
|
Hi John,
I read your last 2 posts and realized I need to provide more background on how things were when I took possession of my camper. When I got it, someone had removed the master rack actuator, and replaced it with a motor mounted to the frame rail and connected to the pinion gear by a homemade tube. There was nothing to control stoppage either in or out. Fortunately my good friend owns a heavy recovery business and had a 2012 keystone that was in a serious accident at his shop. It had 2 lippert systems on it, so I was able to get 4 pinion gears, 2 motors, and 2 master rack actuators. I tell you all this because the master rack actuators were 2 different lengths, and not having anything to reference it to, used the longer one.
When I run the slide out and I get close the end, I just "bump" the wall out in small increments so as not to hurt anything. I have never heard the click of the motor you referred to. When I close the slide, the motor stalls when it closes completely.
I am thinking that one of things I need to do is find out the length of the original master rack actuator, and compare that to the one I have. Would you happen to know what that length is, or know where I could find out?
I can at least provide a couple of answers to questions you ask. My floor is the same as yours with the metal trough and Darco membrane. When the slide is fully out, there is no lean like that shown in your pics. The top and bottom touch simultaneously. When the slide is closed, the outside wall is even from left to right.
Also, I found that the slide arms are not bent.
I guess that's all I have for now. Again, I'd like to thank you for all of your assistance. I don't know how I would be able to get this done without you!
__________________
|
|
|
|
|
09-28-2014, 08:51 PM
|
#24
|
|
Moderator
Join Date: Nov 2006
Location: Ohio
Posts: 12,654
SUN #89
|
Quote:
Originally Posted by ljackson
It had 2 lippert systems on it, so I was able to get 4 pinion gears, 2 motors, and 2 master rack actuators. I tell you all this because the master rack actuators were 2 different lengths, and not having anything to reference it to, used the longer one.
When I run the slide out and I get close the end, I just "bump" the wall out in small increments so as not to hurt anything. I have never heard the click of the motor you referred to. When I close the slide, the motor stalls when it closes completely.
I am thinking that one of things I need to do is find out the length of the original master rack actuator, and compare that to the one I have. Would you happen to know what that length is, or know where I could find out?
|
OK....the rest of the story... yes, this really helps knowing this. I was wondering just how you happened to have a buddy who had a pinion gear for you... I like your bud!!!! 
Out of good fortune, your slide system is built like mine and both being a 2004 model year the conventions of how Sunline built the slide are the same. Or at least it was originally. At this point we can see if we can back into what is still original, what exactly you have and how to see if we can make the combo work.
We really need to help get you to have the system auto stop on the way out. Right now I have no real good idea what you have. So here goes.
You are suppose to have a motor drive and overload clutch made by Venture Systems. Lippert at that time bought the motor and clutch from Venture. On later models, Lippert may have started making them or having them made to their engineering spec as Lippert is molded in the covers of the gear drive. But not on mine or was yours. That overload clutch really needs to in the system or else one slip and large damage can come with the turn down ratio of the ACME screw system. You can still buy parts for the original system, even and entire new motor drive if needed.
To help show this, I measure the force on the main screw to move the slide by the gear ratio. If the slide ever jest stuck, with no clutch in the system you can tear the entire slide drive off the attachment pins.

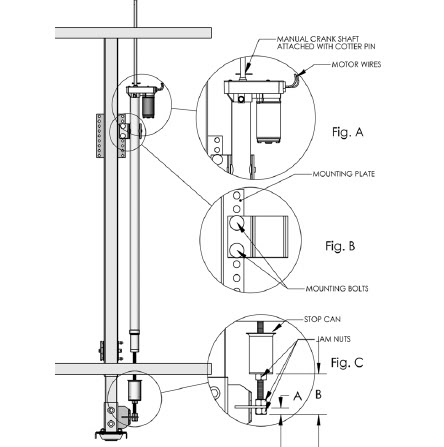
Lets first start with what your is suppose to look like. See here then you go look and take pics of what you have if it is "not" this
The slide motor drive with clutch inside


The end of the master actuator

For your curiosity... the clutch inside. See the pockets in the lower part of the hub. The star plate falls in those pockets to drive with.

During an overload, the star plate being spring force held in pops out and goes, clunk, clunk, clunk

For a full explanation, see this post. Start with post no 17
http://www.sunlineclub.com/forums/f7...s-10564-2.html
So that is the overload clutch, Got one? That linked post may help too as it shows what happens when there is no overload clutch in the works
Now to the stroke, you are suppose to have an approx 40" stroke actuator but you do not us all of that

Does yours have a plate with a lot of location holes in it so you can pick where to mount the motor, like this?
 http://i23.photobucket.com/albums/b3...nt-closeup.jpg
If it does, we need to mount yours so you run out of stroke when the slide it "out" and then mount the motor. This might help show what I can talking about.

Basically the slide master rack needs to be at the end of mechanical stroke when the slide is full "out". And you need a clutch on the motor drive as when you hit that end of mechanical if the clutch doe not trip, you will jam the ACME screw so hard you may not be able to get it unstuck.
Once you get in the right neighborhood of end of stroke, then there are adjustments to tweak it into perfect. But we have to get to that point first.
I'll talk more on the close up questions in the next reply.
__________________
Current Sunlines: 2004 T310SR, 2004 T1950, 2004 T2475, 2007 T2499, 2004 T317SR
Prior Sunlines: 2004 T2499 - Fern Blue
2005 Ford F350 Lariat, 6.8L V10 W/ 4.10 rear axle, CC, Short Bed, SRW. Reese HP trunnion bar hitch W/ HP DC
Google Custom Search For Sunline Owners Club
|
|
|
|
|
09-28-2014, 09:13 PM
|
#25
|
|
Moderator
Join Date: Nov 2006
Location: Ohio
Posts: 12,654
SUN #89
|
Quote:
Originally Posted by ljackson
I can at least provide a couple of answers to questions you ask. My floor is the same as yours with the metal trough and Darco membrane. When the slide is fully out, there is no lean like that shown in your pics. The top and bottom touch simultaneously. When the slide is closed, the outside wall is even from left to right.
Also, I found that the slide arms are not bent.
I guess that's all I have for now. Again, I'd like to thank you for all of your assistance. I don't know how I would be able to get this done without you!
|
Sunline made a slide what when retracted lifts up off the carpet to not tear up the carpet. The metal trough in the camper floor is a cam and the slide room is not made true parallel as viewed from the front or rear.
Look at yours and see what is the same or not. Post pics of what is not.
Slide full out, The bottom (floor) is wider the top (roof). Hard to see here but it is about 2" different then being true parallel. It might be a little more, I forgot the actual dim.
Here is the progression of the way in. The 1st inch or so of retract stroke, the bottom comes in 1st, then then top start to move. You can see here now the camper wall and the slide end wall are more parallel

The slide retracts some more


Now you are approaching the camper wall. See the slide top is now closer to the camper wall
Top touches and bottom still out.

Now bottom is full in and tight to side of camper

You can see inside the floor is up off the carpet


Basically the outside slide flange is not parallel to the inside slide flange on purpose. This is the ~2" difference I'm referring too. The slide floor is not 90 degrees to the outside slide wall so when the slide is retracted and using the floor cam, the slide floor is up off the carpet.
Sunline was not the only brand to use this concept. Most all higher end campers use a methis to not drag the carpet. There are some that are dead true in and out and do drag the carpet on purpose.
What does yours have? If you can provide pics and measurements if yours is not like mine. We need to match the adjusting instructions to match how yours is put together which right now have some unknowns to it.
Do you have any idea what the prior owner ran into to make them try to change that Sunline provided? Trying to get a point of reference on the thought process of changing the system.
Oh, and glad to help. We too learn with you.
John
__________________
Current Sunlines: 2004 T310SR, 2004 T1950, 2004 T2475, 2007 T2499, 2004 T317SR
Prior Sunlines: 2004 T2499 - Fern Blue
2005 Ford F350 Lariat, 6.8L V10 W/ 4.10 rear axle, CC, Short Bed, SRW. Reese HP trunnion bar hitch W/ HP DC
Google Custom Search For Sunline Owners Club
|
|
|
|
|
10-01-2014, 07:19 PM
|
#26
|
|
Junior Member
Join Date: Aug 2014
Location: Maryland
Posts: 20
SUN #6660
|
Thanks for the pics and detail! Unfortunately, I'm working a lot of overtime right now, so progress is getting slow to come by. However, I can say that all of my master rack actuator equipment matches your pictures perfectly. Same everything. My goal on Sunday is to take measurements and set it up like you outlined. Ill let you know how it goes. Take care!
__________________
|
|
|
|
|
10-01-2014, 07:33 PM
|
#27
|
|
Moderator
Join Date: Nov 2006
Location: Ohio
Posts: 12,654
SUN #89
|
I know how "work" can get in the way of our camper habits....
Good luck and we will be here when you get back to this.
John
__________________
Current Sunlines: 2004 T310SR, 2004 T1950, 2004 T2475, 2007 T2499, 2004 T317SR
Prior Sunlines: 2004 T2499 - Fern Blue
2005 Ford F350 Lariat, 6.8L V10 W/ 4.10 rear axle, CC, Short Bed, SRW. Reese HP trunnion bar hitch W/ HP DC
Google Custom Search For Sunline Owners Club
|
|
|
|
|
10-05-2014, 06:14 PM
|
#28
|
|
Junior Member
Join Date: Aug 2014
Location: Maryland
Posts: 20
SUN #6660
|
I made some progress today. Thanks to your information, I was able to determine that the master rack actuator that i had in it was too long. Fortunately I took 2 actuators off of the donor camper, and the other one was perfect. I put it in, and set it so that the clutch trips just before the metal plate behind the slideout trim touches the wall. I have a question: when the slide out is fully extended, the metal trim along the top of the slide out actually drops below the wall. Is that supposed to happen? Unfortunately, I don't have any pics ( I'll try to take some tomorrow ).
I have no clue as to why the previous owner switched away from the actuator system that was original, but it put them in a dangerous position as they had nothing in place to stop the slide out from blowing out the wall. Perhaps the repair shop didn't have the parts to repair it correctly. I have learned through paperwork that was left in the camper that it was an elderly man that owned it, so he could have been the victim of a dishonest repair shop.
__________________
|
|
|
|
|
10-05-2014, 08:55 PM
|
#29
|
|
Moderator
Join Date: Nov 2006
Location: Ohio
Posts: 12,654
SUN #89
|
First off. You have done GREAT!!!!  Good for you. Now your gaining big time. And you really scored with getting your parts stash.
Yes, if the outward stop is not set right, over time the wall can get damaged. The turn down ratio on the slide drive is huge. Lots of power that needs to be controlled.
To your question:
Quote:
Originally Posted by ljackson
I have a question: when the slide out is fully extended, the metal trim along the top of the slide out actually drops below the wall. Is that supposed to happen? Unfortunately, I don't have any pics ( I'll try to take some tomorrow )
|
I do not have an exact pic of what "I think" you are referring too and the camper is up in the barn right now. But I have this one
The slide floor drops down in the metal trough when the slide reaches the last few inches of outward travel. When it drops down, it allows the top aluminum slide flange mounted to the slide to drop down and reach the rubber slide seal and not hit the wall in the process.
The timing is critical to allow this. We have had other members get their timing off and when retracting the slide, the slide would lift vertical before it made it out of the wall pocket and the aluminum flange on the slide would tear into the wall paneling.
This drop action on the way out is intentional as it also acts as a lift action on the way in and when the slide reaches full in, then the slide floor comes up even more off the carpet. And when the slide is out, since the floor drops down, it creates a close to flush slide floor with the main camper.
I do not know if this is what you are seeing or not. Now armed with this info, look at what yours is doing. If it is doing something else, try and capture it in pics.
Here is a picture outside the camper with the slide fully extended looking at the inside. You can see the slide roof is now down and not even touching the slide wiper part of the outside seal. Once the slide room lifts during retract, the wiper will touch the roof on the way in.
Good luck and hope this helps
John
__________________
Current Sunlines: 2004 T310SR, 2004 T1950, 2004 T2475, 2007 T2499, 2004 T317SR
Prior Sunlines: 2004 T2499 - Fern Blue
2005 Ford F350 Lariat, 6.8L V10 W/ 4.10 rear axle, CC, Short Bed, SRW. Reese HP trunnion bar hitch W/ HP DC
Google Custom Search For Sunline Owners Club
|
|
|
|
|
10-08-2014, 05:57 PM
|
#30
|
|
Junior Member
Join Date: Aug 2014
Location: Maryland
Posts: 20
SUN #6660
|
I should be able to get another work day in this Sunday. I'll check in with my progress. Have a great week!
__________________
|
|
|
|
|
10-12-2014, 06:24 PM
|
#31
|
|
Junior Member
Join Date: Aug 2014
Location: Maryland
Posts: 20
SUN #6660
|
I learned some more today. The previous owner had replaced the inside right hand wall at some point. Apparently, they also took the window out, and when they put it back in, they put it in upside down. This of course placed the drains upside down, so the water has been running inside instead of out. The wall needs to be replaced again. I pulled the carpet up in the corner under the couch, and found the wood to be black and wet, but miraculously isn't soft yet. My next step is to take the couch and dinette out and pull the carpet. I am starting to think that Iam going to find that the slide out floor is warped, causing the slide out to not be level. What do you think?
__________________
|
|
|
|
|
10-12-2014, 07:33 PM
|
#32
|
|
Moderator
Join Date: Nov 2006
Location: Ohio
Posts: 12,654
SUN #89
|
Oh boy....
The slide floor is made from 2, 1/2" thick OSB sheets glued together. Looks like this

And wet OSB board turns into this


If you follow this link, you can see my slide floor rebuild, this has a lot of pics in it which may help.
http://www.sunlineclub.com/forums/f7...age-10695.html
If water has been getting inside and the OSB is black, odds are not good the glue is any good or soon will not be. The 1" thick floor may well be swelled 1/4" more by now. To make matters worse, there is a black Darco water proof membrane under the slide. Any water that gets in there cannot get out and rots the floor out.
See this post, This is the condensed version of what to look for outside the camper.
http://www.sunlineclub.com/forums/f7...eck-11086.html
Your slide floor, if it is still original, has those same screw holes. Water can get in those holes and then up into and above the Darco membrane and fester.
Something to check as you may have water on top of the Darco membrane on the bottom of the slide floor. May have came in from the screw holes like mine did or the window leaking down and it found it's way down there.
In my case I replaced the bad end of the slide floor. It is a sound fix. After being through this once, it is now no issue to take the entire slide floor off and put a new one on.
Now to the slide floor being warped, Yes it may be. But tell me what you are seeing as it may not be warped just really out of adjustment and more twisted. After all you have found, taking any faith in that the slide is anywhere close to where it is suppose to be adjusted to may be a small miracle.
If you have the carpet up, place a 4 foot level or other straight tool as a straight edge across the floor from the slide wall all the way off the tongue end. If it is warped in this direction (in and out direction) it will show up. It is suppose to be a straight flat slide floor. The tongues can warp from high weight or being wet
Now warped in the front of the camper to the back direction, this direction normally does not warp but can be adjusted wrong and that can twist the entire slide.
See this vertical adjusting part of the slider arms.
The entire outside wall and 1/2 the slide weight is held by those 2 slide arms. Assuming the slide arms are not bent, how those 2 vertical adjustments are can make the slide nice and true or all twisted as one slide arm is too high or low in relation to the other.
Since you are still in discovery mode... See my slide floor post and do the ice pick probe check. If you find a wet floor and or rot, you will soon be learning all the internals of how the slide is made in the repair process and later how it all is adjusted.
Wishing you the best of luck but I feel this water issue is going to require more rebuild then just the wall. Odds are not great your floor is OK. I really hope I am wrong on this one. But if the floor is bad, OK that too is fixable and we can help with this too.
Hope this helps
John
__________________
Current Sunlines: 2004 T310SR, 2004 T1950, 2004 T2475, 2007 T2499, 2004 T317SR
Prior Sunlines: 2004 T2499 - Fern Blue
2005 Ford F350 Lariat, 6.8L V10 W/ 4.10 rear axle, CC, Short Bed, SRW. Reese HP trunnion bar hitch W/ HP DC
Google Custom Search For Sunline Owners Club
|
|
|
|
|
10-14-2014, 08:23 PM
|
#33
|
|
Junior Member
Join Date: Aug 2014
Location: Maryland
Posts: 20
SUN #6660
|
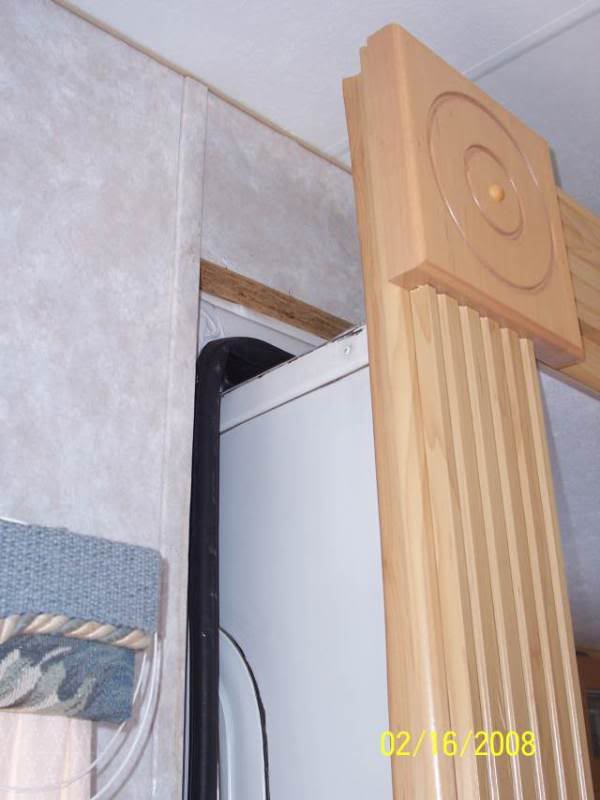
I got home early, so I was able to sneak in some research and take some pics. The good news: I think I caught the water leaking before its too late. I did the ice pick test, and it only went in about 1/4 inch and is hard wood. The bad news: It looks like when they butchered the wall replacement, they replaced the floor, and this is maybe the reason why the slide out is not level.
Here is a pic of the bottom of the wall and floor:
camper 051.jpg
camper 053.jpg
I also included some pics of the left and right corners from the outside to show the difference in gaps:
camper 055.jpg
camper 056.jpg
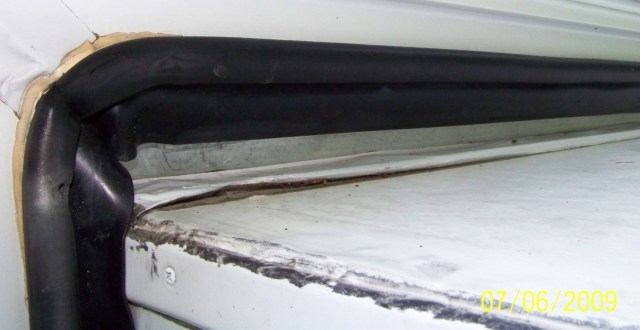
As you can see, it looks as though someone sealed the slide roof, and then closed it while it was still wet, or, while the slide was closed injected caulk in between the slide and body.
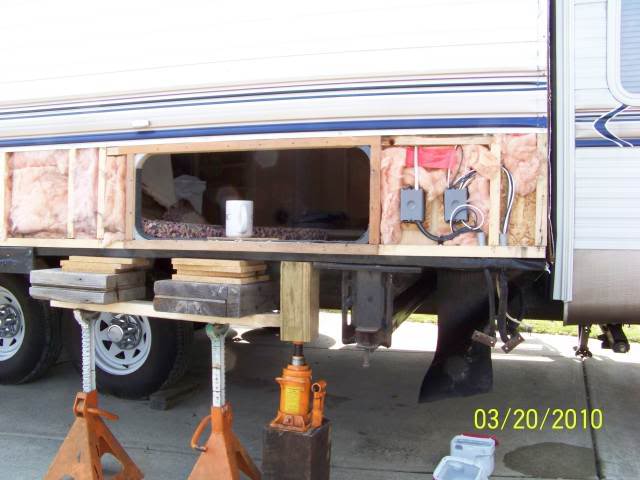
The other thing I learned is that I have no wall extension forward of the wheels. The darco is there, but it looked like a ziploc bag with about an inch of water in the bottom. I cut a hole in it to drain the water. There is no wood all the way up to the floor, just darco. Behind the wheels, the wood feels very strong.
Do you any advice on where to go from here? I am wondering if because the floor is solid I can make adjustments and get the slide level again.
Again, thanks for all of your help. You have been a real lifesaver 
__________________
|
|
|
|
|
10-15-2014, 08:35 PM
|
#34
|
|
Moderator
Join Date: Nov 2006
Location: Ohio
Posts: 12,654
SUN #89
|
Your observation is correct, there for sure appears to be a difference in the gap up at the roof top area between the slide roof and the gasket wiper flap. However to not get tricked by that, measure from the roof, straight up to an edge on the aluminum flange on the side of the camper just above the rubber seal. Do front and back. It may be the seal is not installed even. It would show up on the metal flange for sure if the front and rear area are on an angle.
Here is a pic to show you the area

And look a the slide when it is closed, look at the gap, Slide face flange to the camper flange. See if the closed height difference is the same as the open difference. Or at least in the ball park. This can help tell us if there is a twist in the slide or not.

And when the slide is out, go inside lift the rug flap and look at the slide tongue resting in the trough, does the slide tongue lay flat full length in the slide trough?


And when the slide is full in, measure the main camper floor up to the slide floor both ends. This tells us a lot if this is out of parallel by a lot it will show up here. Ideal is you has tile floor to measure from up to the slide on both ends, if not then try and measure off the carpet but lay a piece of plywood or something to spread out and press on to measure up from there
Quote:
The other thing I learned is that I have no wall extension forward of the wheels. The darco is there, but it looked like a ziploc bag with about an inch of water in the bottom. I cut a hole in it to drain the water. There is no wood all the way up to the floor, just darco. Behind the wheels, the wood feels very strong.
Do you any advice on where to go from here? I am wondering if because the floor is solid I can make adjustments and get the slide level again.
Again, thanks for all of your help. You have been a real lifesaver
|
Need a pic of this or more words. I cannot figure out what you are saying, or hard to believe what I am thinking...
If the floor is hard, (GREAT!!! I'm glad I'm wrong on this) then clean up the mold mess and treat the wood. Suggest this. The CEPS Wood preservation, rot repair, and restoration using epoxy resin on boats, homes and log homes.
It will penetrate, seal and kill the fungus to not dry rot later. It will also harden the wood to help give a level of strength and protection. Heads up: You have to use a respirator on this. There is no way to do this without it. This is like airplane glue on steroids. In about 3 days the smell is all gone just it smells like it will never leave at the start. I bought the respirator they sell as my old one from the pesticide days on the farm was dry rotten.
Once we figure out what the missing wall extension is and how the roof top parallelism is, we can help sort out if we can adjust the slide arms vertical to help what you are seeing.
And thanks for the good words. Glad to help and glad all the learning process I had to go through and pics can help reduce the learning process by a fellow Sunliner.
Good luck
John
__________________
Current Sunlines: 2004 T310SR, 2004 T1950, 2004 T2475, 2007 T2499, 2004 T317SR
Prior Sunlines: 2004 T2499 - Fern Blue
2005 Ford F350 Lariat, 6.8L V10 W/ 4.10 rear axle, CC, Short Bed, SRW. Reese HP trunnion bar hitch W/ HP DC
Google Custom Search For Sunline Owners Club
|
|
|
|
|
10-20-2014, 06:32 PM
|
#35
|
|
Junior Member
Join Date: Aug 2014
Location: Maryland
Posts: 20
SUN #6660
|
Hello again!
I was able to get a few more pics. Hopefully these will help to determine where to go next. But first, about the wall extension: It's probably as crazy as what you are thinking. I forgot to take a picture, but it's pretty easy to describe. Picture your wall extension, wrapped in Darco.Mine looks the same, but there is no wood there. The only thing that was inside the Darco was water. I have no clue how this came to be.
This is a pic of the left side of the wall when closed:
camper 067.jpg
camper 064.jpg
This is the right side:
camper 068.jpg
camper 066.jpg
The left side of the floor when closed:
camper 071.jpg
And the right:
camper 069.jpg
What do you think? There is nothing that seems logical here to me.
Once again, thank you so much for the help
__________________
|
|
|
|
|
10-21-2014, 07:33 PM
|
#36
|
|
Moderator
Join Date: Nov 2006
Location: Ohio
Posts: 12,654
SUN #89
|
Hi,
Please confrim the end of the slide you call "left" is the front both inside and outside the camper? Or not?
I can see the left outside is the front of the camper.
BUT
Inside the camper you show left at 2 inch mark but I see the wall plug which I think is the rear bathroom wall in the T264SR. Does the 2" go with the front of the camper end OR the back (rear) of the camper? Outside looking in, the front is on your left and inside looking out the front is on your right. I need to make sure I know which is the 2" lower end and the higher 2 1/2" end of the camper
Thanks
John
Quote:
Originally Posted by ljackson
Hello again!
I was able to get a few more pics. Hopefully these will help to determine where to go next. But first, about the wall extension: It's probably as crazy as what you are thinking. I forgot to take a picture, but it's pretty easy to describe. Picture your wall extension, wrapped in Darco.Mine looks the same, but there is no wood there. The only thing that was inside the Darco was water. I have no clue how this came to be.
This is a pic of the left side of the wall when closed:
Attachment 2725
Attachment 2727
This is the right side:
Attachment 2726
Attachment 2728
The left side of the floor when closed:
Attachment 2729
And the right:
Attachment 2730
What do you think? There is nothing that seems logical here to me.
Once again, thank you so much for the help |
__________________
Current Sunlines: 2004 T310SR, 2004 T1950, 2004 T2475, 2007 T2499, 2004 T317SR
Prior Sunlines: 2004 T2499 - Fern Blue
2005 Ford F350 Lariat, 6.8L V10 W/ 4.10 rear axle, CC, Short Bed, SRW. Reese HP trunnion bar hitch W/ HP DC
Google Custom Search For Sunline Owners Club
|
|
|
|
|
10-22-2014, 06:30 PM
|
#37
|
|
Moderator
Join Date: Nov 2006
Location: Ohio
Posts: 12,654
SUN #89
|
While you are confirming the front and rear inside floor 2" and 2 1/2" high locations,
Tell me is this what the slide looks like when fully closed and the motor stalls out? If so we need to adjust this. Let me know and I'll will explain how to tweak it in.

__________________
Current Sunlines: 2004 T310SR, 2004 T1950, 2004 T2475, 2007 T2499, 2004 T317SR
Prior Sunlines: 2004 T2499 - Fern Blue
2005 Ford F350 Lariat, 6.8L V10 W/ 4.10 rear axle, CC, Short Bed, SRW. Reese HP trunnion bar hitch W/ HP DC
Google Custom Search For Sunline Owners Club
|
|
|
|
|
10-24-2014, 09:39 PM
|
#38
|
|
Moderator
Join Date: Nov 2006
Location: Ohio
Posts: 12,654
SUN #89
|
Hi again!
From your PM you stated this:
“The 2 inch side is toward the rear of the camper the 2 and a half inch measurement is toward the front.”
OK I can see a pattern here and it does add up, but before we adjust need to clarify a few things as we may need to adjust the retract "in" stroke stop first.
I'll show you what I see. You tell me if I have this mixed up or not.
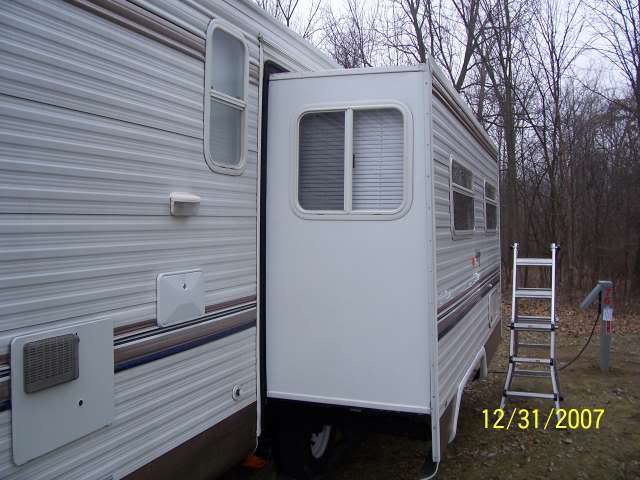
This left outside (Front of camper)
This left outside pic (Front of camper) shows the slide top when “open”, the slide is low when extended as compared to the back of the camper.

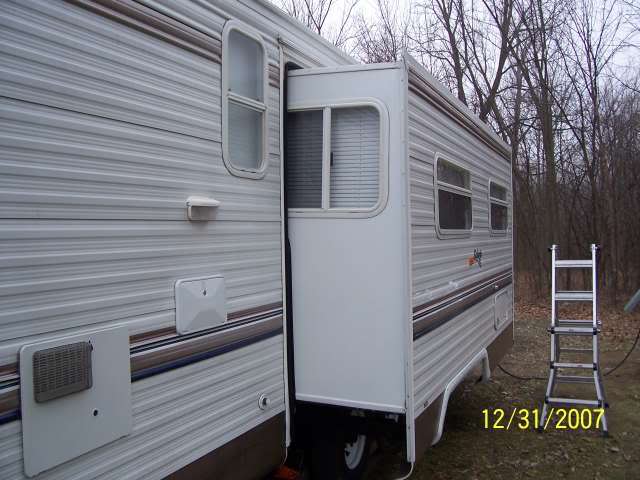
This left outside pic (Front of camper) shows the slide top when “in” (retracted) the slide top is high as compared to the back of the camper. Note: the slide floor is up on the metal trough cam now.

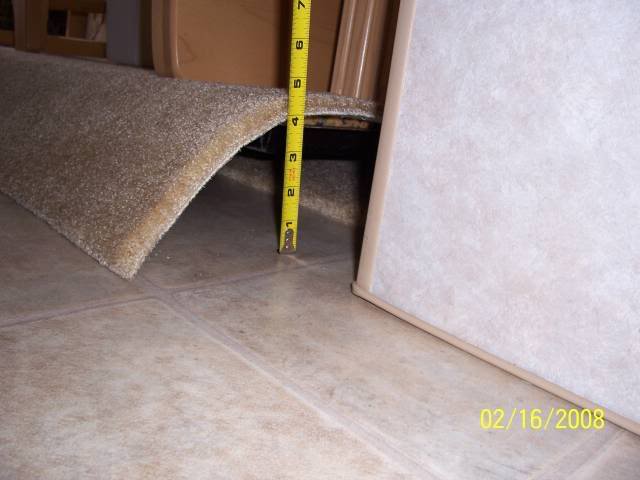
This is the front inside pic (front of camper) shows the slide floor when retracted as high at 2 1/2" as opposed to the back of the camper at 2”

What is going on is, when the outer slide wall is “low” when the slide is “extended”, this translates into the slide floor tongue to be “high” when the slide is “retracted”. The metal trough on the camper floor is a cam and by the outer slide wall being low, it tips the slide floor uphill more when the slide is retracted.
The 2 1/2" high floor in the front of the camper compared to the 2” in the back of the camper suggests 1 or 2 things are not adjusted correctly. This is assuming the slide floor and walls are made correctly which is a fairly safe assumption but lets keep in mind, we know the slide was repaired and maybe not right.
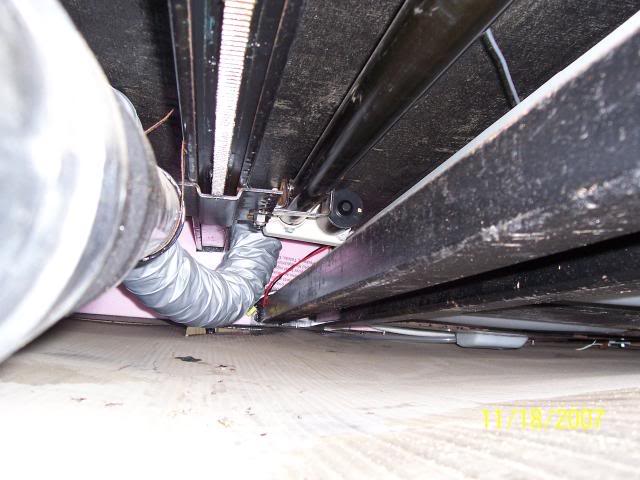
First we need to make sure the full retract "in" of the slide is set correct on both the master rack and the slave rack.
These pic’s shows the slide is not fully retracted as far as it should be and the system is out of time a little.

I can see the top front of the slide is not yet touching the camper, but the top rear side of the slide is touching the camper. Both should touch at the same time. The bottoms are also off.
Did the motor stall out when the slide was full "in" and these pics where taken? Need to know as there is an adjustment for this. We need to advance the master rack to close further before the motor stalls out. And the we need to let the slave slide arm extend outward (retard the timing) a little to allow it to touch a little later.
Need to confirm about these what these pics show when the motor stalls out. Then we need to adjust for this, get the slide to close up right and then go back and check the floor inside when closed for front and rear slide floor tongue height. If there is still a 1/2" difference, we adjust for that with the slide wall elevation adjustment. Basically, right now the slide is out of time a little with the rear of the camper advanced too much in relation to the front. This can cause the slide floor to be in a different position on the cam front and rear. Need to fix that first then deal with the elevation.
__________________
Current Sunlines: 2004 T310SR, 2004 T1950, 2004 T2475, 2007 T2499, 2004 T317SR
Prior Sunlines: 2004 T2499 - Fern Blue
2005 Ford F350 Lariat, 6.8L V10 W/ 4.10 rear axle, CC, Short Bed, SRW. Reese HP trunnion bar hitch W/ HP DC
Google Custom Search For Sunline Owners Club
|
|
|
|
|
10-24-2014, 10:14 PM
|
#39
|
|
Moderator
Join Date: Nov 2006
Location: Ohio
Posts: 12,654
SUN #89
|
To have the slide fully close and stall out the motor when fully closed front and rear, we need to end up with this.
"Both" the front and rear top slide flanges (mounted to slide outside wall) must touch on the top of the camper wall flange at the same time when the slide is moving in. Approx 0 to 1/8" of being the same. To do this, the master rack and the slave rack have to be synced to the same start and end of travel with all the gear backlash accounted for.
We adjust the master rack to stall out the motor on the full retract motion when the slide is full "in" and the stop can touches the frame. This is done by having the slide fully compress the slide seals tight up against the camper, top and bottom "and" then just kiss the stop can against the frame. The stop can is not the main motor stall out stop, the slide flange compressing the seals starts the motor stall out and the stop can is timed at the same end position when the seals fully compress to prevent excess pressure against the camper slide opening over time.
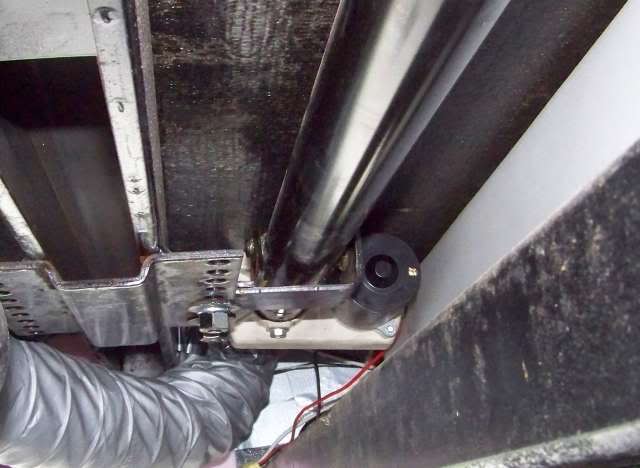
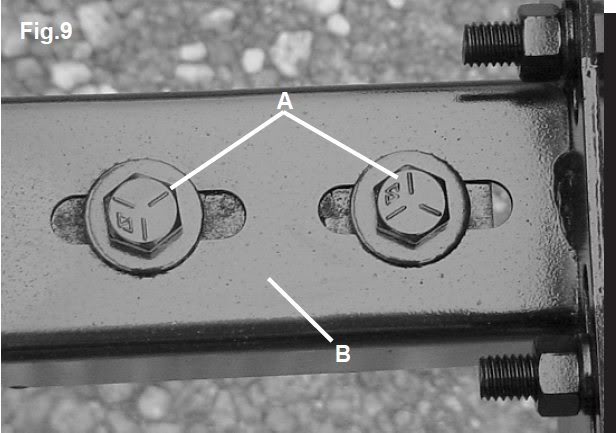
To adjust the master rack to close up the slide wall tighter, you use this adjustment area.
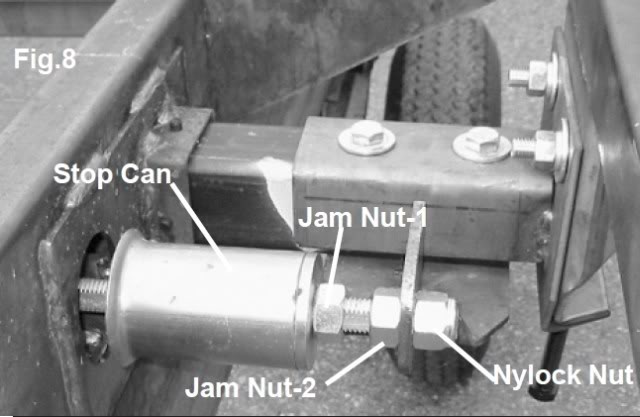
It is assumed the extend out is already set to compress the extend seals and trip the ratchet clutch. This is done with adjusting the nylock nut and jam nut 2. If this is not right, we need to fix this first
To set the retract "in" stop location
1. Extend the slide full out
2. Loosen up the stop can and back it away from the frame. Loosen the stop can jam nut and back out the can.
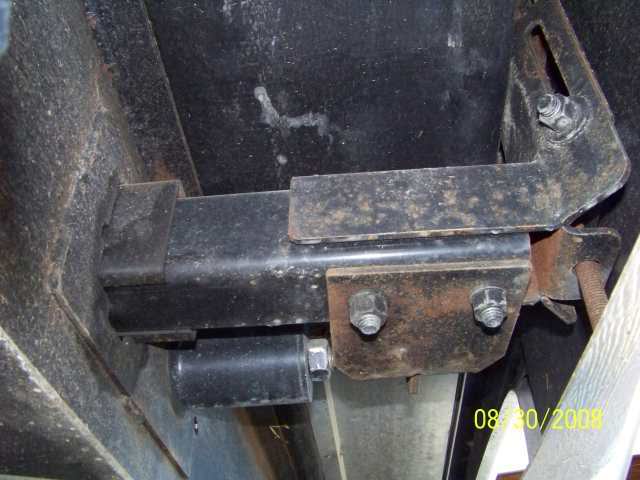
3. In your case the rear slave arm is advanced too far in. We need to retard this a little to not over compress the rear seals when retracting. You can back off this pressure 2 ways. Undo the 1/4" bolt on the square shaft at the master rack, put a large adjustable wrench on the square shaft, rotate 1/4 turn or 1/2 turn to extend the slave rack and put the bolt back in. OR loosen up this slotted adjustment on the slave rack. This is assuming you have some adjustment both ways.(slot centered) If you are bottomed out on the slot, then you need to move the slide to get this in the middle, and then use the sq shaft. Ideally this needs to be in the middle before adjusting so you can tweak between a 90 deg sq shaft hole.
4. Now retract the slide. The master rack end of the slide should touch at the top, start compressing the seal and when the bottom closes up tight the motor will stall out. Seals should be tight top and bottom on the master rack end. Then spin the stop can in to kiss the frame and tighten the jam nut.
5. Now go look at the rear side of the slide. Since you retarded this timing the slide should not yet be fully "in" and should not yet be fully seal compressed. Now unbolt the square shaft, rotate the shaft and close up the slide to where the bolt will fit back in with the seals compressed. You can only get within 90 degree of the shaft so it may not be 100% in and you cannot go to the next hole. If you need fine adjustment between 1 flat of the shaft, use the slotted end of the slave arm to take up the rest.
Open and close the slide. Both front and rear top should touch at the same time and the bottoms come in tight and the motor stalls out, then the stop can kisses the frame.
__________________
Current Sunlines: 2004 T310SR, 2004 T1950, 2004 T2475, 2007 T2499, 2004 T317SR
Prior Sunlines: 2004 T2499 - Fern Blue
2005 Ford F350 Lariat, 6.8L V10 W/ 4.10 rear axle, CC, Short Bed, SRW. Reese HP trunnion bar hitch W/ HP DC
Google Custom Search For Sunline Owners Club
|
|
|
|
|
10-24-2014, 11:02 PM
|
#40
|
|
Moderator
Join Date: Nov 2006
Location: Ohio
Posts: 12,654
SUN #89
|
After the slide is timed to close correct, go measure the slide floor inside with the slide retreated. Check front and rear slide tongue. If you are still 1/2" off, we need to adjust the elevation of the slide wall. If you are within 1/8" difference, it may be about as good as it will get. You can tweak to being dead even if you want.
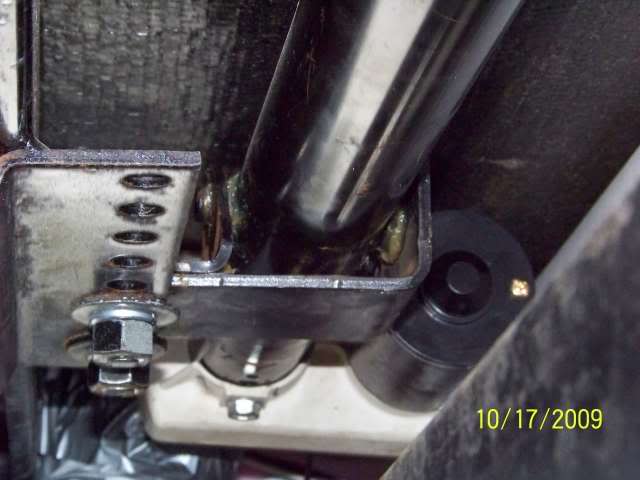
We adjust elevation by this area with the long 1/2" slots for the 2 bolts. Master rack end
Or the slave rack end area with the long 1/2" slots for the 2 bolts

You need to figure out which one to move, the master or the slave. It goes like this.
If you "raise" (move slide up) the slide outer wall at the end of the slide arm, the slide floor tongue when retracted will be "lower" to the slide floor.
If you "lower" the slide outer wall at the end of the slide arm, the slide floor tongue when retracted will the "higher" to the slide floor.
If you raise the slide outer wall at the end of the slide arm, you will come closer inside to dragging the carpet when retracting.
If you raise the slide outer wall too high, the top inside of the slide flange at the outer slide wall can crash into the wall when the slide finishes retracting in the last few inches of lift before it stops moving and the motor stalls out. This happens as the slide lifts up on the way in, went too high, hits the wall board, then comes in and the motor stalls out. It lifted too high and hit before it came in enough.
When adjusting the elevation, go in small increments (1/8") and check inside the end result. Do again a few times until you see what is moving or not.
You will need to look at which end to raise or lower to even out the floor.
From these 4 pics, I'm thinking something might be messed up with the front wall they fixed. It is like the whole front part of the slide is low when extended. The end walls create the vertical support to hold up the wall as the wall is more rigid. Maybe try measuring from bottom of slide floor up to slide roof, both at the camper wall and at the slide outer wall when the slide is extended and see how the front and back wall compare. What ever the rear untouched wall is, the front should be close to matching. If they made the wall wrong in the repair, you should see it in these measurements. There may be a light outward slope to the roof and the wall and slide floor may not be parallel. Or is is suppose to be parallel. I never measured that. The untouched wall should be as factory. If they made the new repaired wall wrong, then you may not be able to adjust your way out of this without goofing up something else. Check and report back
(edited above paragraph 10-25-14 10:00am EST to add more clarity)
Front looks too high when in
Front is lower when out. This looks wrong
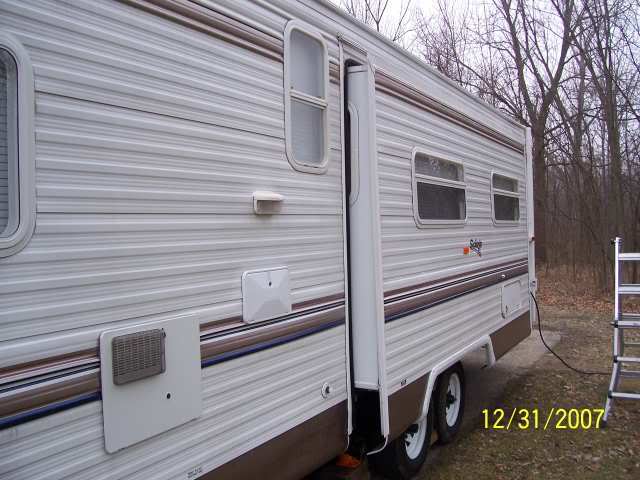
The rear looks correct. Maybe a little low but not bad

The rear hear looks normal when open

Go slow and check as you go if you adjust. Scribe a line where you start so you can go back if needed. Use a jack out by the outer wall to lift some of the weight off the slide so you do not have to use the jack bolt to try and lift all the weight as you go up or down.
Good luck and report back. Take pics of what does not look right Or even what does look right so we can see the end result.
John
__________________
Current Sunlines: 2004 T310SR, 2004 T1950, 2004 T2475, 2007 T2499, 2004 T317SR
Prior Sunlines: 2004 T2499 - Fern Blue
2005 Ford F350 Lariat, 6.8L V10 W/ 4.10 rear axle, CC, Short Bed, SRW. Reese HP trunnion bar hitch W/ HP DC
Google Custom Search For Sunline Owners Club
|
|
|
|
|
|
|
Currently Active Users Viewing This Thread: 1 (0 members and 1 guests)
|
|
|
 Posting Rules
|
You may not post new threads
You may not post replies
You may not post attachments
You may not edit your posts
HTML code is Off
|
|
|
|
 » Recent Sunline Discussions
 |
|
|
|
|
|
|
|
|
|
|
|
|
|
|
|
|
|
|
|
|
|
|
|
|
|


 Linear Mode

