This summer I had a tire failure, 3 actually in all by the time I was done. If you are into the details of tire failures or just want to learn about tire failures, this is one type of tire failure. This is a little long of a post, but there are lots of pics to go with the words and some background.
I caught the first failure here in my yard doing axle maintenance. When I jacked up the camper to put it on jack stands, my left rear tire would not clear the ground on the normal stand height. H’mm OK what’s up?
I looked at the left rear tire and it looked more round across the face than I remembered. Still did not know what the issue was at this point.
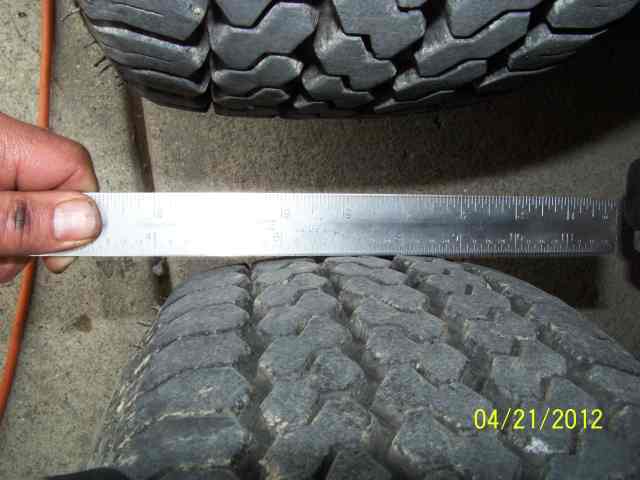
I jacked it up some more and started to take the tires off. I took all 4 tires off and I could see one tire, the left rear looked different. It was more curved across the face of the tire than the rest. Laying it on the ground it showed up more not be square to the sides.

Here is a normal one

After comparing the other 3 to this one rear left I measured the OD of the tire. Yup, it is 1” larger in OD circumference. OK something let loose inside this tire.

I put this bad tire aside, finished up the axle work and put the spare on. I then tried to figure out what was wrong with this tire. Looking on the outside I really did not see anything much that was wrong with it other than about 180 degrees around the outside, the tire progressively was getting larger in OD up to a high spot then starting coming back down. Whatever was wrong with it created an out of round tire.

I demounted the tire and looked inside. Nothing really looked wrong to me inside. I happened to have a fellow RV buddy who is a retired tire engineer who has done tire failure analysis most all of his career. We hooked up and he told me how to section the tire and send it to him. So here is how we did this.

He told me how to cut out the side walls. I was shocked you can cut up a side wall this easy. There is inherent danger in doing this. Heavy gloves and a sharp knife is a must. Once you start cutting it out it sort of unzippers.

Now the other side. A new blade for the next cut.

Now I had a donut. The hard part is cutting through the steel wire in the tire. Ideally you do this on a vertical band saw with a progressive tooth blade. The rubber wants to bite and grab the blade. I did not have a large enough vertical band saw so I used a Sawzz All. Here one really has to clamp this thing down or the rubber will grab and start shaking the saw violently. You do not want any blade pinch as the rubber bites into the blade. Need to back flex it to keep it pulling apart as you cut. I clamped it to some old saw horses and cut it apart.


I marked with the center of the high spot so he could back into it. I also put that high spot in the middle of the sample.


Now I looked at the cross section. Well nothing real exciting at the 90 degree point from the high point that I could see, but again I'm not a tire engineer either to really know exactly what I'm looking at.

So I curled up the sample to fit in a box I could UPS to him. Here it is.

I sent him the tire and then started to investigate if I did something wrong to cause this failure. I always check tire pressure and run max cold side wall pressure at the start of every trip. I even have my own small compressor in the truck if I need it. So under inflation was not the problem.
I do not tow faster than 60 mph. I do not need too, big truck or not this is a safety limit for me. So I was not overrunning the tire 65 mph max speed rating creating excess heat. As FYI, Ohio has a 55 mph towing speed limit.
I use white tires covers when the camper is stored at home. I can say the first year they were only 50% covered until I have my present tire covers in place. There really was not much tire cracking. No side wall cracks, some very fine cracks in tread cracks and there was a number of stone cuts in the valleys of the treads.
These tires are 3.5 years old at this point made by Denman. They where made in Mexico. Denman was a big heavy equipment tire manufacture here in Ohio and known for quality tires. Do not know why the factory was in Mexico unless they may have subbed out the manufacturing of ST radial tires as the heavy tires (road graders, construction equip. etc) were made here in Ohio to my knowledge. They did end up selling the company after I bought my tires and changed the ST Express radial to an overseas import tire like most of the other US companies have to offer lower sales cost.
Next was weight. I had not been to the scales in about 1.5 years and I added some upgrades. So I loaded the camper with stuff for a campout and full fresh water as we do haul water to some camps. Went to the scales and weighed each axle with WD engaged. I could not get each wheel position at the scales so when I came home I used my force jack to get each wheel position. Here is the weight chart.
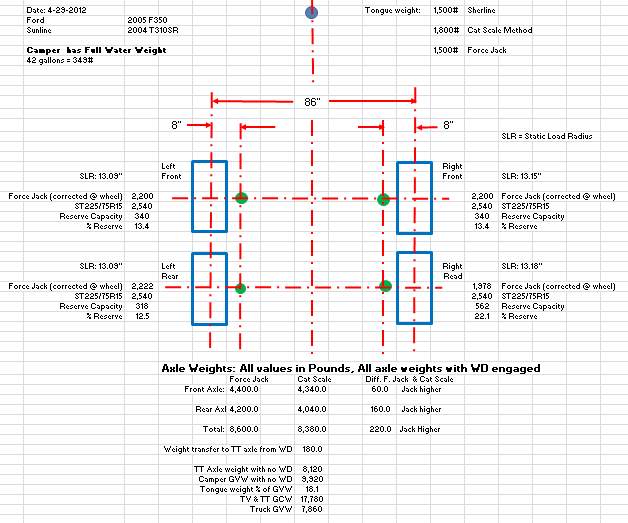
The failed tire location has 12.5% extra tire capacity or 318# from max load. There is some error in this data as my force jacked weighed a little heavy. It did however show me that the 4 tire locations are different. The front axle was pretty equal, the rear axle very different. My fresh tank sits right over the front axle which may have had something to do with the front being more even. At this point, weight did not seem to point to a glaring problem.
Since I could not find anything wrong, yet anyway, I bought a new Maxxis tire for the spare and we headed off on vacation. My tire buddy also was on vacation so he did not yet have my tire done.
On vacation I was 800 miles from home on the NYS Thruway and while gassing up, OMG… This tire right side rear tire does not look good. Dang, it looks like the failed one. So we pulled over in the truck lot and took it off and put the spare on. Yup, it let go too like the 1st one.


I was lucky a 2nd time I caught the failure before it let go. If you are going to have to change a tire on the road, the NYS Thruway makes a good changing spot… OK so now I have no spare…. I’m thinking of where I can get one when I get to my Mom’s house?? Well…. No luck finding one close by. We did make it home OK. Another 800 miles.
When we made it home I was already working on changing tires to LT tires. When I jacked up the camper to take off the ST’s, OH boy, another one…. The tread was bulged. This tire would not even roll correct it wobbled so bad it would fall over.

So I dodged a 3rd bullet. I could not see this when it was on the camper, only when I took the weight off. The damage did not yet progress far enough or it was not out in the open where I could see it.
Soon my tire engineer buddy was done investigating the 1st tire I sent him. The tire failed for what is called “detachment” or what is nick named sometimes “slipped belts”. It is where the tread separates where the steel belts are in the tire tread from the main tire. Basically the tire unbonded itself inside the tread. Here is his analysis pictures.
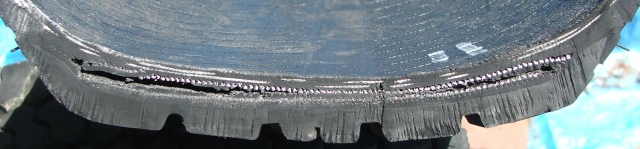
He sectioned the tire sample I sent him and knowing what to look for started to see clues of the problem. You can see small separations at the yellow arrows.
His description was;
“Cut 1 was my initial cut away from the identified bulge area. There are small detachments identified. If this was all that was found in the tire it would not be a serious issue.”


Then he sectioned again and he found the entire area let go.
His description was;
“Cut 2 location was identified by careful measurement of tread depth and I found a location with more wear than in other areas. The large detachments between the belts on both shoulders can be seen”
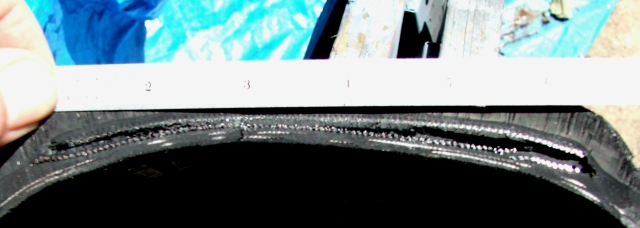
Here is his scale pushed down in each end measuring the detachment separation length.
His description was;
“Detach 1a & 1b show the length of the detachment to be over 11" long”


His description was;
” Detach 2a &2b show the detachment on the opposite shoulder to be about 2" long”


And this one really shows the detachment separation.
His description was;
“Detach Width shows the width of the two detachments relative to the tread width”
I asked him how did this happen? His response:
Why detachment?
There are a number of things that can cause this. They would primarily be a breakdown of the rubber that coats the steel. This could be due to a manufacturing error or simply the selection of a lower strength rubber which cannot tolerate the forces applied to the tire. Only lab testing can determine that. Sometimes detachments can be initiated by tread cuts or punctures but that does not seem to be the case of the tire I inspected. Detachments are one of the more difficult conditions to analyze as there is a need for a lot of additional background information and data.
From this investigation I have a perfect case to file a report with the NHTSA as I used the tires within the ratings. I have since filed 3 complaints, 1 for each tire. I’ll create a post on how to do this filing. It is the only way we as RV’ers can help this cause of trailer tire failures become more known to the right people who can help.
There is now a growing understanding that for tandem trailer applications that a 20% more tire capacity reserve is needed to help hold up to the service of a multi axis trailer. In my case I am towing heavy, l not overloaded, in relation to my tire capacity. When I upgraded I targeted to get as close as I could to the 20% reserve at the heaviest loaded tire and I upgraded to LT tires. While LT tires may not be for everyone, knowing your weights of each tire location and where you are in relation to the tire capacity reserve is something you can do. You can also not tow over 65 mph on ST tires, keep them at max side wall cold pressure at the start of each trip and use white tires covers over them when the camper is in storage.
Hope this helps someone in the future.
John


 Threaded Mode

