 |
|
 09-19-2017, 06:52 PM
|
#41
|
|
Moderator
Join Date: Nov 2006
Location: Ohio
Posts: 12,658
SUN #89
|
GREAT!!!! Good job Mike. Let there be light! (under the camper) 
__________________
Current Sunlines: 2004 T310SR, 2004 T1950, 2004 T2475, 2007 T2499, 2004 T317SR
Prior Sunlines: 2004 T2499 - Fern Blue
2005 Ford F350 Lariat, 6.8L V10 W/ 4.10 rear axle, CC, Short Bed, SRW. Reese HP trunnion bar hitch W/ HP DC
 Google Custom Search For Sunline Owners Club
|

|

|
|
09-28-2017, 07:56 AM
|
#42
|
|
Member
Join Date: Feb 2016
Location: Pennsylvania
Posts: 59
SUN #8084
|
I'd be happy to post photos but I don't think I can do that through my phone. I imagine I have to upload them to my computer first.
__________________
__________________
|
|
|
|
|
09-28-2017, 08:05 AM
|
#43
|
|
Member
Join Date: Feb 2016
Location: Pennsylvania
Posts: 59
SUN #8084
|
Before and after pics. Hope the upload works.
__________________
|
|
|
|
|
09-28-2017, 11:53 AM
|
#44
|
|
Moderator
Join Date: Nov 2006
Location: Ohio
Posts: 12,658
SUN #89
|
Mike,
Your camper looks great!!!! And there is space now under the camper...
We where camping this past weekend with some fellow SOC members and they too had one of the low slung Sunline campers. Brought back old memories of our T-2499. I loaned them some of my extra wood blocks to lift the rig to get into the dump pipe. It was a good 8" above grade. Seems the dirt around that area must of settled and the only choice was to drive up on blocks or do a mega slinky shuffle of the dump hose trying to get the thing to drain up hill....
Thanks for sharing the pics. It is great to see some of the older Sunlines all cleaned up. Your TLC shows well.
John
__________________
Current Sunlines: 2004 T310SR, 2004 T1950, 2004 T2475, 2007 T2499, 2004 T317SR
Prior Sunlines: 2004 T2499 - Fern Blue
2005 Ford F350 Lariat, 6.8L V10 W/ 4.10 rear axle, CC, Short Bed, SRW. Reese HP trunnion bar hitch W/ HP DC
Google Custom Search For Sunline Owners Club
|
|
|
|
|
09-28-2017, 12:43 PM
|
#45
|
|
Member
Join Date: Feb 2016
Location: Pennsylvania
Posts: 59
SUN #8084
|
Thanks! I strive to keep it clean inside and out.
__________________
|
|
|
|
|
10-12-2017, 05:31 AM
|
#46
|
|
Senior Member
Join Date: Aug 2006
Location: Maryland
Posts: 838
SUN #37
|
OK, that's it! we just returned from a trip out to the Eastern shore and while leaving Pocomoke River state park Milburn Landing area, we stopped at the dump station. Actually, it's a poor excuse for a dump station because it's a narrow one lane affair, on a curve with big pine trees on both sides. Then to make matters worse, the edge of the pavement drops off and the surface has warped. Well, we left in darkness because we wanted to get out early. This was truly a recipe for disaster. Pulling out again, we scraped bottom and bent another stabilizer jack.
So today, I'm ordering two axle flip kits. Reading the instructions JohnB provided in a previous post, I see Dexter recommends a wiring kit p/n K71-399-00. But I can't find any description or photos on any site that sells it. Does anyone know what I'd be getting for an additional $30.00 or so? And do I need one of these kits for each axle?
Also, the instructions call for removing spring eye bolts from front and rear hangers and then dropping front of spring (which I assume they mean for a tandem axle set up), but only the front for a single axle. Maybe it's their wording that's confusing, because it seems to me that only one spring eye bolt from each axle would be removed to pull the axle out. If that's good enough for a single axle, seems like it would be the same for each axle on a tandem set up. Can anyone confirm this?
Thanks,
Rich
__________________
 1992 T-2470 (now residing in South Carolina)
Current Sunline-2007 Solaris 2499
2018 Silverado 1500 w/Max Trailering pkg.
|
|
|
|
|
10-12-2017, 06:11 AM
|
#47
|
|
Member
Join Date: Feb 2016
Location: Pennsylvania
Posts: 59
SUN #8084
|
Best thing I could have done for our trailer. We just came back from a 4 hr haul to Oswego, NY and we had no glitches whatsoever. I did not need any "wiring kit" to complete our progect. The wiring had enough slack to easily compensate for the raised distance. I did have to remove the wiring from inside the axle tubes however because the new saddles mounted right at the exit points on the ends of the tubes. No issue at all. Just pull them through and zip tie the wires to the exterior of the axle after re-install. Our tandem axle trailer required me to remove the frontmost and rearmost spring bolts only for axle removal. Just be sure the yrailer is jacked and supported high enough to allow the swap. You will need ample clearance to perform the task. HAVE FUN! It was an enjoyable progect for me. Keep us posted.
__________________
|
|
|
|
|
10-12-2017, 09:06 AM
|
#48
|
|
Moderator
Join Date: Dec 2006
Location: Michigan
Posts: 6,155
SUN #123
|
Quote:
Originally Posted by vcrt

So today, I'm ordering two axle flip kits.
|
I mean, while you're at it Rich, it would be a good time to also install the Dexter wet bolt kit!
__________________
2007 T-286SR Cherry/Granola, #6236, original owner, current mileage: 9473.8 (as of 6/18/21)
1997 T-2653 Blue Denim, #5471
1979 12 1/2' MC, Beige & Avocado, #4639
Past Sunlines: '97 T-2653 #5089, '94 T-2251, '86 T-1550, '94 T-2363, '98 T-270SR

|
|
|
|
|
10-12-2017, 10:03 AM
|
#49
|
|
Moderator
Join Date: Nov 2006
Location: Ohio
Posts: 12,658
SUN #89
|
Quote:
Originally Posted by vcrt
So today, I'm ordering two axle flip kits. Reading the instructions JohnB provided in a previous post, I see Dexter recommends a wiring kit p/n K71-399-00. But I can't find any description or photos on any site that sells it. Does anyone know what I'd be getting for an additional $30.00 or so? And do I need one of these kits for each axle?
Also, the instructions call for removing spring eye bolts from front and rear hangers and then dropping front of spring (which I assume they mean for a tandem axle set up), but only the front for a single axle. Maybe it's their wording that's confusing, because it seems to me that only one spring eye bolt from each axle would be removed to pull the axle out. If that's good enough for a single axle, seems like it would be the same for each axle on a tandem set up. Can anyone confirm this?
Thanks,
Rich
|
Hi Rich,
For quick ref, these are the instructions you are talking about?
http://l.b5z.net/i/u/6149609/f/Instr...059-551-00.pdf
And here is this wiring kit that are talking about. DEXTER Electric Brake Parts Kit #K71-399-00
Looking at that wiring kit, the only thing you would use is the wire connectors. The rest you will not use. I think what they meant was is to use a good water proof connection like shown in that kit. If you can accomplish that through other means, then you do not have to buy the kit.
Now to the actual install. You used these words
Quote:
|
Maybe it's their wording that's confusing, because it seems to me that only one spring eye bolt from each axle would be removed to pull the axle out.
|
Where you actually going to pull the physical axle tube out from under the camper? You are not really pulling out the axle from the camper sideways and then putting it back in. More of moving it forward and then back over the spring.
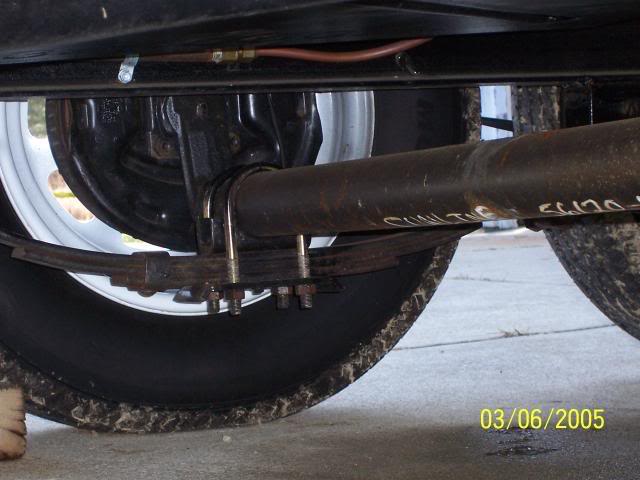
This pic is from my 2004 T-2499 so it is the same as yours.
And here is a post from SunlineFan with more trailer over/under conversion pics in it http://www.sunlineclub.com/forums/f6...-kit-8167.html
What I think the instructions appear to be saying is, unhook the wires, take out the front and rear spring hanger bolts. Support the axle. Note: The equalizer and the spring ends at the shackles are still attached.
Then you lay down, (pivot down) the front spring unhooked from the hanger to the ground, the equalizer end of the spring is still attached. This allows you then with a helper, one on each end, to move the axle tube and brake drums forward off the end of the spring to the front of the spring end laying on the ground. Then pivot up the spring, and move the axle back underneath the spring so the axle is now under the spring.
For the rear axle, you do the same process just you move the axle to the back of the camper to do the switch.
In order to move the axle tube, it will be heavy with the brake drums on it, you may need 2 floor jacks to hold and roll it OR put it on a dolly or creeper or something to hold and roll it forward and back. Again a helper on both ends of the axle makes this easier.
There is another possible way pending what you have to work with. In order to do this conversion, you either need to move the axle back and forth over/under the spring, OR leave the axle in place on 2 floor jacks and move the springs. This sort of depends on the tools you have and if you have a helper or not. I have not done one of these, but since I do most all work myself, I would think through moving the springs and leave the axle in place supported on the floor jacks. The axle tube is light, but the brake drums are heavy and there are 2 of them all attached. The top heavy underslung axle will want to roll down when unhooked, so take care and let it down easy until the brake drums are on the floor. Granted moving the springs, you need to deal with more spring bolts taking them out, but it is the trade off of moving the axle tube.
A separate heads up, when removing a spring bolt, you need to have a wrench on the head of the spring bolt and hold the bolt from turning and take the nut off. If not, the bolt can rotate and it will tear out the serrations holding it from spinning in the hanger. Also be prepared for a galled up spring bolt nut. You may need a new one.
An important part to remember, there is a front and back to and axle tube and the brakes. Make sure when you are all done, the wire hole in the axle tube (where the brake wires come out) is still pointing to the back of the camper. The axle tube has a toe setting to it and the brakes have a need for left and right hand. The instructions talk about making sure the top of the tube so it is still up when you are done. On an underslung axle this is not so hard to mix up, on a straight axle someone can get it mixed up easier. Bottom line, the wire hole always needs to be on the rear side of the axle tube.
One point not mentioned on the instructions, the camper needs to be jacked up high enough on blocks or stands so when you are done, the trailer is high enough off the ground to get the tires back on. If you do not do this in the beginning, then you are going to have to jack it up after you convert to get the tires back on.
Maybe take a few pics when you are doing this to show the axle moving. We have a lot of folks who have done this, but not how they moved the axles or the springs.
Hope this helps
John
__________________
Current Sunlines: 2004 T310SR, 2004 T1950, 2004 T2475, 2007 T2499, 2004 T317SR
Prior Sunlines: 2004 T2499 - Fern Blue
2005 Ford F350 Lariat, 6.8L V10 W/ 4.10 rear axle, CC, Short Bed, SRW. Reese HP trunnion bar hitch W/ HP DC
Google Custom Search For Sunline Owners Club
|
|
|
|
|
10-12-2017, 03:53 PM
|
#50
|
|
Senior Member
Join Date: Aug 2006
Location: Maryland
Posts: 838
SUN #37
|
Jon,
Yes, I installed the wet bolt kit when I first bought this camper.
John,
Yes, that's the instruction pdf I mentioned.
I was planning on removing the front axle front spring eye bolts and moving the axle to the front, under and then back into the new position, then doing the opposite procedure on the rear so the equalizer bolts would stay in place.
Thanks for everyone's tips.
Rich
__________________
__________________
1992 T-2470 (now residing in South Carolina)
Current Sunline-2007 Solaris 2499
2018 Silverado 1500 w/Max Trailering pkg.
|
|
|
|
|
|
|
Currently Active Users Viewing This Thread: 1 (0 members and 1 guests)
|
|
|
 Posting Rules
|
You may not post new threads
You may not post replies
You may not post attachments
You may not edit your posts
HTML code is Off
|
|
|
|
 » Recent Sunline Discussions
 |
|
|
|
|
|
|
|
|
|
|
|
|
|
|
|
|
|
|
|
|
|
|
|
|
|
|
|


 Linear Mode

