 |
|
 05-18-2011, 03:19 AM
|
#1
|
|
Senior Member
Join Date: Mar 2011
Location: New York
Posts: 460
SUN #1953
|
Spot - our "new" Sunspot!
We bought this 1979 sunspot last Saturday from Gaelen, and have already started work on it. First order of business is rebuilding the hubs. they're not too bad, but I think the wrong seal was used. I'm going to NAPA today to get rebuild kits and will find out. NAPA has two kits for 1 1/16" axles, so I bet it would be easy to maybe get the wrong kit. I'm going to bring a nice clean hub with me to find out too!
The springs were flipped on this trailer to get it higher, and I hope maybe this weekend to bring it back to original height. That means removing the axle, grinding off the weld tacks that hold the spring seats on, moving them 180 degrees, tacking them back on and re-installing. I may do some spring maintenance at the same time, we'll see. Actually they don't make any noise, maybe I should just leave them alone!
Next I want to re-wire Spot. The original wiring was cut up front and a 4 pole flat trailer connector and wiring was installed back to standard utility tail lights. I want to get OEM RV tail lights and use the old harness to follow for all new wiring. This baby is 32 years old, it sure couldn't hurt!
Over time, we will re-install electric brakes, add seats that convert to a bed along with a table, and build a new pantry to our needs and wants. Basically we have a clean slate here. What would be incredibly helpful along those lines would be seat and table measurements from you folks with stock Sunspots. If you could just take a tape out and measure the seats for me, maybe take some pics of where they sit, measure where the foot of the table sits, and how big the top is and how it works when the bed is made up. Any info greatly appreciated!
Bottom line? Once I get these hubs rebuilt, she's ready to roll without really anything else done. We'll be at a teardrop and tiny travel trailer meet in the norhtern Adirondacks with Spot next month, and will be camping at Keuka State Park in the Finger Lakes of NY with her in mid July for a week and a half. We've been tent campers for 40 years, so we understand the lifestyle. Spot is just a big step up! 
More soon!
Frank
__________________
2009 GMC Canyon with factory tow package & new fangled brake controller
2008 Subaru Outback
1983 Sunline T-1550
Image to come as soon as I figure out how to flatten a pic!
|

|

|
|
05-18-2011, 09:46 AM
|
#2
|
|
Senior Member
Join Date: Mar 2011
Location: New York
Posts: 460
SUN #1953
|
Figured out my hub problem. Someone used the wrong seals. The one in there was 1.978", the correct one is 1.987". Also, the one in there was only 0.185" wide, the right one should be 0.4". As a result of the worng seal being in there, the seals were spinning in the hub, and the inner bearings were spinning when they were NOT supposed to be! Simple fix, NAPA part # 28 is the correct seal and bearing kit. Outer bearings were fine, but both inners were not.
Also got the rear hatch open and can see I have a bit of wiring to do. No biggie, but I do want to figure out how to power a few lights with 12V.
Frank
__________________
__________________
2009 GMC Canyon with factory tow package & new fangled brake controller
2008 Subaru Outback
1983 Sunline T-1550
Image to come as soon as I figure out how to flatten a pic!
|
|
|
|
|
05-21-2011, 03:03 PM
|
#3
|
|
Senior Member
Join Date: Mar 2011
Location: New York
Posts: 460
SUN #1953
|
I just found out I was very wrong. The correct seal is 14840, not the 12404 in the NAPA kit. Tapped it in okay, but the i.d. is smaller and will not fit all the way onto the stub. Too late to hit NAPA today, so I'll be at their door first thing tomorrow. Also discovered when I rebuilt the hubs that one of the lug bolt holes is 9/16. Must have stripped at some time and was drilled then tapped to the next bigger size. Now I understand why I needed a different socket for that lug bolt.
Soon as I can raise 300 bucks, I think I'll get a new axle with all the brake stuff I need anyways.
Frank
__________________
2009 GMC Canyon with factory tow package & new fangled brake controller
2008 Subaru Outback
1983 Sunline T-1550
Image to come as soon as I figure out how to flatten a pic!
|
|
|
|
|
05-21-2011, 08:13 PM
|
#4
|
|
Moderator
Join Date: Nov 2006
Location: Ohio
Posts: 12,649
SUN #89
|
Frank, a 9/16 lug nut? Did they drill out the rim for that one hole? or is there enough clearance in the c'sunk hole to go over any of the holes.
Sounds like your gaining on the seals.
__________________
Current Sunlines: 2004 T310SR, 2004 T1950, 2004 T2475, 2007 T2499, 2004 T317SR
Prior Sunlines: 2004 T2499 - Fern Blue
2005 Ford F350 Lariat, 6.8L V10 W/ 4.10 rear axle, CC, Short Bed, SRW. Reese HP trunnion bar hitch W/ HP DC
 Google Custom Search For Sunline Owners Club
|
|
|
|
|
05-21-2011, 10:49 PM
|
#5
|
|
Senior Member
Join Date: Mar 2011
Location: New York
Posts: 460
SUN #1953
|
Haven't got that far yet John, but that is a question rolling around in my head too. I marked the 9/16 hole in the one hub, so once I get the right seals this a.m., I will find out. Unfortunately, they are lug bolts NOT nuts, which I've always thought are kind of a pain!
Frank
__________________
2009 GMC Canyon with factory tow package & new fangled brake controller
2008 Subaru Outback
1983 Sunline T-1550
Image to come as soon as I figure out how to flatten a pic!
|
|
|
|
|
05-24-2011, 03:55 AM
|
#6
|
|
Senior Member
Join Date: Mar 2011
Location: New York
Posts: 460
SUN #1953
|
Moved the springs
Sunday I finished rebuilding the hubs, installed them, put the wheels and tires back on, and then moved Spot over in front of my shop. I removed the axle, ground the spring seats off the axle, bought new spring seats at Tractor Supply, welded them on 180 degrees from where the others were, and now Spot's springs are where they were when Spot was built - under the axle. With that done, I cleaned the interior to get ready for some dis-assembly and future construction. The floor is only 73" long, so initially we'll get a 6' air mattress or sleeping bag pad, and if that's not possible we'll buy some high density foam. Good thing I'm just under 6'!
I have the OEM hub caps sitting on my shop bench right now for a bit of minor dent repair and then a good cleaning, polishing and waxing. I've yet to really wash or clean the exterior either. Maybe this weekend. I've ordered all new wiring, a new junction box, new levels, and 4 scissor jacks. Yesterday I got new stop/turn/tail lights (along with white plastic angle brackets) in the mail to replace the old utility trailer style ones. All existing wiring is coming out, new 12V wiring being installed, along with auxiliary power for back up lights (I have yet to purchase). New 110V wiring will be added as well. We're still hashing over plans for the new built interior, but as long as there's room on the floor to sleep, all is good for now!
I have to do a bit of research on trailer doors. This one is falling apart, and needs to be rebuilt.
More to come...
Frank
__________________
2009 GMC Canyon with factory tow package & new fangled brake controller
2008 Subaru Outback
1983 Sunline T-1550
Image to come as soon as I figure out how to flatten a pic!
|
|
|
|
|
05-24-2011, 09:06 PM
|
#7
|
|
Moderator
Join Date: Nov 2006
Location: Ohio
Posts: 12,649
SUN #89
|
Frank
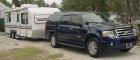
That pic makes Spot look long and low.... Looking good.
Your gaining. Doing good. Looking forward to seeing your progress
John
__________________
Current Sunlines: 2004 T310SR, 2004 T1950, 2004 T2475, 2007 T2499, 2004 T317SR
Prior Sunlines: 2004 T2499 - Fern Blue
2005 Ford F350 Lariat, 6.8L V10 W/ 4.10 rear axle, CC, Short Bed, SRW. Reese HP trunnion bar hitch W/ HP DC
Google Custom Search For Sunline Owners Club
|
|
|
|
|
05-25-2011, 04:09 AM
|
#8
|
|
Senior Member
Join Date: Mar 2011
Location: New York
Posts: 460
SUN #1953
|
Thanks John! So now it's re-wiring, cleaning, figuring out how to mount 4 scissor jacks I have coming, and taking the door off to fix or rebuild. I have a feeling the door will take the most time.
Frank
__________________
2009 GMC Canyon with factory tow package & new fangled brake controller
2008 Subaru Outback
1983 Sunline T-1550
Image to come as soon as I figure out how to flatten a pic!
|
|
|
|
|
05-28-2011, 10:24 AM
|
#9
|
|
Senior Member
Join Date: Mar 2011
Location: New York
Posts: 460
SUN #1953
|
Fits in the garage now!
First chance I had to try Spot in the garage, and lo and behold, since swapping the springs back under the axle, presto zippo! We live in a raised ranch, and my shop is the basement right behind the garage, so this makes it ideal for working on Spot. Success!
Still working at getting my classic speedboat rigged, but may get that done today, maybe tomorrow morning before I'm done.
Got to discuss interior plans with Gail a bit, got some more ideas. Right now I just want to get the jacks on and my new lights RV taillights installed. Jacks install make take some time.
Hope you're all doing well.
Frank
__________________
2009 GMC Canyon with factory tow package & new fangled brake controller
2008 Subaru Outback
1983 Sunline T-1550
Image to come as soon as I figure out how to flatten a pic!
|
|
|
|
|
05-30-2011, 11:36 AM
|
#10
|
|
Senior Member
Join Date: Mar 2011
Location: New York
Posts: 460
SUN #1953
|
Newly rebuilt door!
With a "brushed" aluminum exterior skin even! Had to 1/2 rebuild the frame, stuffed it with cardboard, re-assembled, installed. Took me about 5 hours, including cutting the holes in the .082 aluminum sheet. Next? Jacks!
Frank
__________________
2009 GMC Canyon with factory tow package & new fangled brake controller
2008 Subaru Outback
1983 Sunline T-1550
Image to come as soon as I figure out how to flatten a pic!
|
|
|
|
|
05-30-2011, 01:05 PM
|
#11
|
|
Senior Member
Join Date: Jan 2011
Location: Florida
Posts: 1,279
SUN #1830
|
Mighty fine looking door you got there.
I wonder what a 'box style" camper would look like if it were polished metal like the Airstream is. All shiney might werk.
jim
__________________
Beverly & Jim
Sebring, Florida
1991 T-2363 Solaris
|
|
|
|
|
05-31-2011, 03:31 AM
|
#12
|
|
Senior Member
Join Date: Mar 2011
Location: New York
Posts: 460
SUN #1953
|
I think it would look great, but the heck with shiny Jim. It was all I could do to sand this two ways diagonal to get the brushed look. Bad shoulders. Base coat/clear coat is easier!
Frank
__________________
2009 GMC Canyon with factory tow package & new fangled brake controller
2008 Subaru Outback
1983 Sunline T-1550
Image to come as soon as I figure out how to flatten a pic!
|
|
|
|
|
06-01-2011, 08:14 PM
|
#13
|
|
Moderator
Join Date: Dec 2006
Location: Michigan
Posts: 6,155
SUN #123
|
Quote:
Originally Posted by Jim-Bev-2363

Mighty fine looking door you got there.
I wonder what a 'box style" camper would look like if it were polished metal like the Airstream is. All shiney might werk.
jim |
Someone here a while back took all the striping/decals off a Sunspot, and I thought it looked terrible afterwards. Not sure if they were going to do anything after that.
__________________
2007 T-286SR Cherry/Granola, #6236, original owner, current mileage: 9473.8 (as of 6/18/21)
1997 T-2653 Blue Denim, #5471
1979 12 1/2' MC, Beige & Avocado, #4639
Past Sunlines: '97 T-2653 #5089, '94 T-2251, '86 T-1550, '94 T-2363, '98 T-270SR

|
|
|
|
|
06-02-2011, 03:04 AM
|
#14
|
|
Senior Member
Join Date: Mar 2011
Location: New York
Posts: 460
SUN #1953
|
If the striping was to come off, I would paint Spot. The thing is is, there are SO many holes in it, dents, stuff like that I could fix, but once I did, it would look worse probably! That is unless I painted it...
Frank
__________________
2009 GMC Canyon with factory tow package & new fangled brake controller
2008 Subaru Outback
1983 Sunline T-1550
Image to come as soon as I figure out how to flatten a pic!
|
|
|
|
|
06-02-2011, 04:14 AM
|
#15
|
|
Senior Member
Join Date: Mar 2011
Location: New York
Posts: 460
SUN #1953
|
Hey, hand me that roll of red wire!
Get a load of this. Some previous owner spliced red wire into every wire coming out of the sheath in the back. Makes it easy to follow...
I was going to just throw these new rv lights on I bought, but am taking a step back, especially seeing I need to get ready for the salt mines, er, work. I took both right side clearance lights off too. They appear to be originals. I can't get the wire out very far, and have to wait till tonight when I have a hand to see when I pull it if any wires in the lower compartment move. The rear marker light has two power and two ground, so I'm sure that's where the front marker light is getting it's power. I'm getting new marker lights today, as I do eventually want them working. They don't right now, but everything else did. apparently putting these new rv lights on is going to take a bit more time than I expected... 
The other thing is I plan on through bolting these lights as opposed to using wood or sheet metal screws. It's easy to do in this lower compartment, it's just tough finding 4" long #10 machine screws (for the long side). I guess I'll buy some threaded rod to do it. That would work.
I removed the right rear buckboard door to take to a hardware store to see of they can get the door knob off. I sure can't figure it out. I want to replace both door knobs with a common lock set. There are no keys for Spot as it now stands, other than the lower compartment the wiring is in because I replaced the lock. Got a surprise removing that door too - there's a spring in that hatch opener. Wonderful.
We're getting there!
Frank
__________________
2009 GMC Canyon with factory tow package & new fangled brake controller
2008 Subaru Outback
1983 Sunline T-1550
Image to come as soon as I figure out how to flatten a pic!
|
|
|
|
|
06-02-2011, 07:49 AM
|
#16
|
|
Senior Member
Join Date: Jan 2011
Location: Florida
Posts: 1,279
SUN #1830
|
LOL @ the doorknob. Maybe a sledgehammer, LOL!
I just went to look at some knobs in this house. Not so sure I could get them off and I even installed the ones on the outside doors. Take camera and get pictures.
Will the lights be where you can always get to the throughbolts to remove them, if they ever need removing? Mounting them almost permanently might cause troubles later on. Even if you just want to replace caulking behind them access would be good.
One color wiring might save manufacturers money if installers didn't have to learn all those colorcodes. 
__________________
Beverly & Jim
Sebring, Florida
1991 T-2363 Solaris
|
|
|
|
|
06-02-2011, 08:18 AM
|
#17
|
|
Senior Member
Join Date: Mar 2011
Location: New York
Posts: 460
SUN #1953
|
Darn Jim, I plum forgot to get some #10 threaded rod. Drat! Yes, I can easily get at the stop/tail/turn lights by thru-bolting them. The machine screws come right into the little hatch where the water tank and pump used to be. Not so with the marker lights. Have to use regular sheet metal screws there.
One color wiring 
Door knob is going to come off soon as I can get to it with a bigger screwdriver, hammer, cold chisel, cut-off wheel on my 4 1/2" angle grinder or if all else fails, my trusty hacksaw. All I want to do is replace both the chuckboard door knob (with no attachment screws on the inside) and the entrance door knob ( with attachment screws on the inside) with commonly keyed sets. Makes me nervouse not having keys for door knobs that could be accidentally locked inside, then the door shut. Oh, oh!
I'll figure it out, just need time. Not sure when that will be. Leaving tomorrow morning with my classic speed boat for a get together out on Silver Lake, and not done with that yet either. Can't do it tonight, have to run to Albany on 3 widely spaced errands, the primary one being picking up a new 14" chop saw. Old one bit the dust. I need it to cut some angle steel to mount the scissor jacks.
Why does everything take 5 times longer than I planned?!?
Frank
__________________
2009 GMC Canyon with factory tow package & new fangled brake controller
2008 Subaru Outback
1983 Sunline T-1550
Image to come as soon as I figure out how to flatten a pic!
|
|
|
|
|
06-02-2011, 09:16 AM
|
#18
|
|
Senior Member
Join Date: Jan 2011
Location: Florida
Posts: 1,279
SUN #1830
|
It sounds like you have two kinds of knobs. One that has the snaplock holding the knob on the inside of the door and the one with the two screws showing on the inside that will just unscrew to take the werkings apart. damnifiknow!
Your tag line sounds about right. You have a tad more than you have time for, LOL!
Take a break.
jim
__________________
Beverly & Jim
Sebring, Florida
1991 T-2363 Solaris
|
|
|
|
|
06-02-2011, 09:20 AM
|
#19
|
|
Senior Member
Join Date: Mar 2011
Location: New York
Posts: 460
SUN #1953
|
I took off the entrance door knob when I rebuilt that door Jim. Easy to do, just like one I would install at home. I showed the other one to a local rv guy, he didn't know (?), then tried a local hardware store, he didn't know. I know - angle grinder with cut-off wheel, and hacksaw if necessary. One way or the other, they are BOTH getting replaced.
Frank
__________________
2009 GMC Canyon with factory tow package & new fangled brake controller
2008 Subaru Outback
1983 Sunline T-1550
Image to come as soon as I figure out how to flatten a pic!
|
|
|
|
|
06-02-2011, 12:43 PM
|
#20
|
|
Senior Member
Join Date: Jan 2011
Location: Florida
Posts: 1,279
SUN #1830
|
WEll, isn't that just a little more frustration than you had?
Atleast you have experience now at rebuilding doors. (said in my best cheerful voice)
It does make me feel better that all I'm doing right now is adding window tint.
jim
__________________
Beverly & Jim
Sebring, Florida
1991 T-2363 Solaris
|
|
|
|
|
|
|
Currently Active Users Viewing This Thread: 1 (0 members and 1 guests)
|
|
|
 Posting Rules
|
You may not post new threads
You may not post replies
You may not post attachments
You may not edit your posts
HTML code is Off
|
|
|
|
 » Recent Sunline Discussions
 |
|
|
|
|
|
|
|
|
|
|
|
|
|
|
|
|
|
|
|
|
|
|
|


 Linear Mode

