 |
 10-18-2022, 11:23 AM
|
#1
|
|
Junior Member
Join Date: Oct 2022
Location: Maryland
Posts: 8
SUN #13474
|
Roofing question
Hi everyone. I am new here, Thanks for letting me join.
We are new to owning a Sunline camper. We purchased a 2006 T-2499 yesterday and noticed the roof was very soft and drooping in a few areas. There are a few signs of water leaks in the roof area. I read the roof was made with a cardboard type of backing and the roof was unwalkable except on the rafters.
My questions are, has anyone replaced that type of roof? If so, what can we expect as far as a cost. Is there anyone that can perform that type of work in Maryland?
We really like the camper and don't want it to get beyond repair.
Thank you for all your input.
__________________
__________________
|

|

|
|
10-18-2022, 02:58 PM
|
#2
|
|
Moderator
Join Date: Nov 2006
Location: Ohio
Posts: 12,654
SUN #89
|
Welcome Capthacker!
Congrats on your new Sunny! That is a nice camper.
On replacing the roof and dealing with wall water damage, these campers are all very fixable. We have several folks who have done large restore projects on them and they end up with a great camper. And once fixed, and the owner understands how to care for them, they are better made then many brand new ones and can last as long as you want it if you can keep up the maintenance.
You are correct, the roof is made up of an EPDM rubber bonded to a heavy thick fiberboard product and then pulled over the rafters. You need to place a tarp down to protect the rubber from abrasion and use small sheets of manageable size plywood to service the roof to spread your weight out. I use 24" x 48" by 3/8" small sheets or 30" x 48 x 3/8". Small enough to haul up a ladder, large enough to span the rafters.
I don't want to overload you with a lot of info on your first post, but we can help with the how to on doing the repair yourself.
Cost, the roof only can run $5,000 to $7,000 now in Covid pricing to have this hired out by a smaller repair shop. More at a larger dealership if they will even do it. The large dealers are slammed with work now. That cost is only the roof, wall water damage would be extra.
If you have have basic wood tools with some level of power tools, know how to use them, a place to to the work (inside is best, but outside has been done) some money for materials and the will and time (it will take time) to do this, it is very doable. Materials pre Covid for a DIY'er was less then $1.000 for a roof replace not paying for any labor. The labor is the big hitter. With current prices, the materials will be more, how much depends on how far you want to take the repair.
These 2 posts may help show you what it involved and if this is something you want to take on.
This is a 2006 T264SR (a slide model) with a total new walk on roof added, new membrane, all new roof plastic, a front wall and rear wall water damage repair. While this is a bigger camper then yours, everything in the post will apply really closes to your camper. https://www.sunlineclub.com/forums/f...avy-16834.html
This one is a 2004 T1950, a non slide model. This is made like yours, just smaller. This was a total restoration with major water damage. Exact costs show up on each work day, again all pre-covid. The camper is finished, I just never made it to finishing the post. But the roof is all in that post.
https://www.sunlineclub.com/forums/f...avy-17684.html
And here is one of my project campers still in process. This is a 2007 T2499, the same as yours. But this post only shows taking a portion of it apart. It sits in my barn now very dried out waiting in line for the next restore to come. This camper needs a lot more work, the entire floor from the back wall to the bathroom has to be replaced on top of walls rebuilt and the the roof replaced from a bad install by a dealer.
https://www.sunlineclub.com/forums/f...y-19318-2.html
Also, pending how good or bad your roof is, you may not need a total new roof. Localized repairs have been done successfully. We can show you how to do this too. But, we need more from you in pictures and some investigation before you can make a decision to do a local repair or the whole roof. There are ways to inspect the camper for water damage before ever taking them apart. This process will help guide you on what to expect before you take very much apart and then you can decide what you want to do.
This should get you started, read over some of that and ask away.
Hope this helps
John
__________________
Current Sunlines: 2004 T310SR, 2004 T1950, 2004 T2475, 2007 T2499, 2004 T317SR
Prior Sunlines: 2004 T2499 - Fern Blue
2005 Ford F350 Lariat, 6.8L V10 W/ 4.10 rear axle, CC, Short Bed, SRW. Reese HP trunnion bar hitch W/ HP DC
 Google Custom Search For Sunline Owners Club
|
|
|
|
|
10-19-2022, 05:53 PM
|
#3
|
|
Junior Member
Join Date: Oct 2022
Location: Maryland
Posts: 8
SUN #13474
|
Thank you for your input.
I will send you more photos tomorrow of the roof.
Quote:
Originally Posted by JohnB

Welcome Capthacker!
Congrats on your new Sunny! That is a nice camper.
On replacing the roof and dealing with wall water damage, these campers are all very fixable. We have several folks who have done large restore projects on them and they end up with a great camper. And once fixed, and the owner understands how to care for them, they are better made then many brand new ones and can last as long as you want it if you can keep up the maintenance.
You are correct, the roof is made up of an EPDM rubber bonded to a heavy thick fiberboard product and then pulled over the rafters. You need to place a tarp down to protect the rubber from abrasion and use small sheets of manageable size plywood to service the roof to spread your weight out. I use 24" x 48" by 3/8" small sheets or 30" x 48 x 3/8". Small enough to haul up a ladder, large enough to span the rafters.
I don't want to overload you with a lot of info on your first post, but we can help with the how to on doing the repair yourself.
Cost, the roof only can run $5,000 to $7,000 now in Covid pricing to have this hired out by a smaller repair shop. More at a larger dealership if they will even do it. The large dealers are slammed with work now. That cost is only the roof, wall water damage would be extra.
If you have have basic wood tools with some level of power tools, know how to use them, a place to to the work (inside is best, but outside has been done) some money for materials and the will and time (it will take time) to do this, it is very doable. Materials pre Covid for a DIY'er was less then $1.000 for a roof replace not paying for any labor. The labor is the big hitter. With current prices, the materials will be more, how much depends on how far you want to take the repair.
These 2 posts may help show you what it involved and if this is something you want to take on.
This is a 2006 T264SR (a slide model) with a total new walk on roof added, new membrane, all new roof plastic, a front wall and rear wall water damage repair. While this is a bigger camper then yours, everything in the post will apply really closes to your camper. https://www.sunlineclub.com/forums/f...avy-16834.html
This one is a 2004 T1950, a non slide model. This is made like yours, just smaller. This was a total restoration with major water damage. Exact costs show up on each work day, again all pre-covid. The camper is finished, I just never made it to finishing the post. But the roof is all in that post.
https://www.sunlineclub.com/forums/f...avy-17684.html
And here is one of my project campers still in process. This is a 2007 T2499, the same as yours. But this post only shows taking a portion of it apart. It sits in my barn now very dried out waiting in line for the next restore to come. This camper needs a lot more work, the entire floor from the back wall to the bathroom has to be replaced on top of walls rebuilt and the the roof replaced from a bad install by a dealer.
https://www.sunlineclub.com/forums/f...y-19318-2.html
Also, pending how good or bad your roof is, you may not need a total new roof. Localized repairs have been done successfully. We can show you how to do this too. But, we need more from you in pictures and some investigation before you can make a decision to do a local repair or the whole roof. There are ways to inspect the camper for water damage before ever taking them apart. This process will help guide you on what to expect before you take very much apart and then you can decide what you want to do.
This should get you started, read over some of that and ask away.
Hope this helps
John |
__________________
|
|
|
|
|
11-14-2022, 07:29 AM
|
#4
|
|
Junior Member
Join Date: Nov 2022
Location: South Carolina
Posts: 3
SUN #13491
|
New member here and warm greetings to all! Nice to find this post as it's exactly what I need to know and is current so I'll check the links shortly to learn what I need to do. I'm an experienced carpenter/remodeler/mechanic to include mobile homes but this is my introduction to RV's/ travel trailers.
The nice folks I work for picked up a 93 Solaris for me to stay in on their jobsites and I am very impressed with the condition and quality of this one. Previous owners stated that it spent most of it's life stationary under an awning and it certainly seems that way. It won't see much road use (got that covered) but this is the first time I've seen this exact type of roof, although I've dealt with EDPM roofs on buildings before. Previous owners did tell a fib in stating there were no leaks, in the first rain it poured inside. As best I can tell from water stains on the ceiling the awning it was under kept most of the water away but now in the open I've got some ceiling panels to replace inside at the front and a sag in the roofing with a tear in the membrane funneling water in. I've temporarily gummed it up with elastomeric caulking but it needs a proper repair.
On the trailer itself I haven't checked much but it was kept very clean and seemingly not abused. You'd think 5 years old to see it, not 30. The fridge was replaced but the rest seems original. Some corner braces were added to the doors, one crank-out window is binding at one corner and won't close, the electrical seems OK. Will have to check the rest as soon as I can. Paint is in great shape outside but stripes and decals are cracked and faded, no dents or damage. Rear bumper is rusted out inside but intact. Unbelievably good condition for a 30 year old and well worth the near-restoration I have planned for it. Just got to get the roof fixed first.
(PS to add): BTW I have all the original paperwork in the original binder too.
Phil
__________________
|
|
|
|
|
11-15-2022, 06:49 PM
|
#5
|
|
Moderator
Join Date: Nov 2006
Location: Ohio
Posts: 12,654
SUN #89
|
Welcome Sawmaster!
Congrats on your new Sunny! Sounds like you have a project ahead of you. Your skill list fits perfectly to a good sound repair. We can help with the "how to" and "what to use" or at least a few versions that you can take and tweak to your situation.
Consider creating a post on just your camper repair in the Maintenance and Repairs section. Pics go a long way also showing us what you are up against. And we can comment on them.
Model number, do you know the model? It would start with a T- (4 digit number) If you cannot find it, you can back into it by matching up the floor plan with the 1993 Sunline sales brochure. Our brochures are in our FILES section.
To get to the files section, you need to be logged into the forum.
At the top of the forum are tabs, look for the word "FILES" click it.
Once into the files section, scroll down to the "Sunline Brochures" section. Go in there and find a sale brochure for the camper you are looking at and down load a copy. Scroll to the Solaris section since you said yours was a Solaris, and look at the floor plans and the model number next to it.
Here is another tip, before tearing into the "inside" of the camper, suggest you see this post first. These campers are not built like a house,. They are built from the outside in. It is often you can do less damage, and less repair, by taking the camper apart from the outside and doing the repair then tearing in from the inside and still have to take the outside apart to complete the repair. https://www.sunlineclub.com/forums/f...tml#post155103
And, heads up, you cannot walk on the roof without taking support precautions or you can damage any usable roofing or worst case, come right through ceiling. Also rotted raters are something to be on the look out for and cautions about. Opening the roof from a ladder on the side of the camper and folding over the membrane. It allows you to see what is rotted and what is not. If the ceiling is bowing down, heads up, odds are high there is rot up there. But this is all repairable.
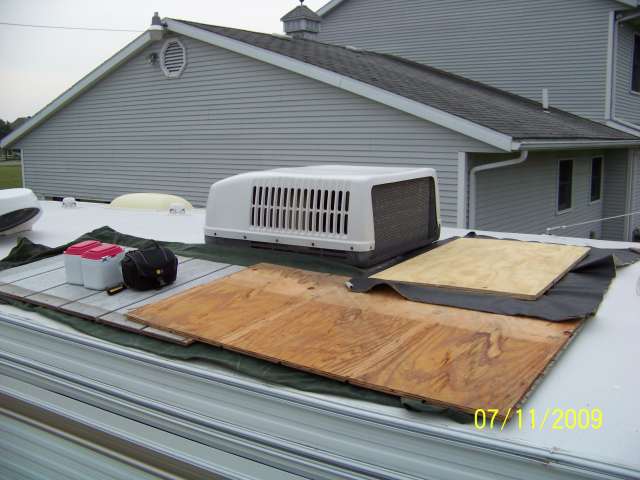
To service the roof with known good rafters, you start with putting a tarp or other protective material on the rubber to prevent abrasion damage to the rubber. Then use manageable size pieces of 3/8" thk or thicker plywood long and wide enough to span the rafters. Then kneel etc. on the plywood. I use 30" x 48 or 24" x 48 pieces, manageable enough to haul up the ladder, but yet wide enough to span the rafters which are "mostly" on 16" centers. Here is a pic of servicing the roof AC unit as an example.
A solid step ladder to climb up on the roof area. Getting on and off is the most dangerous, keep your weight towards the camper, on and off the roof.

Manageable sheets of plywood
Hope this helps
John
PS, I like the screen name. 
__________________
Current Sunlines: 2004 T310SR, 2004 T1950, 2004 T2475, 2007 T2499, 2004 T317SR
Prior Sunlines: 2004 T2499 - Fern Blue
2005 Ford F350 Lariat, 6.8L V10 W/ 4.10 rear axle, CC, Short Bed, SRW. Reese HP trunnion bar hitch W/ HP DC
Google Custom Search For Sunline Owners Club
|
|
|
|
|
11-16-2022, 02:54 AM
|
#6
|
|
Junior Member
Join Date: Nov 2022
Location: South Carolina
Posts: 3
SUN #13491
|
Thanks John!
Yes, I've been reading since my post about your approach to restoration and repairs, and I think I understand what I need to do now. As best I can tell at this point my water damage is going to be at the front, and hopefully only there. I haven't done a thorough inspection yet but it does seem the previous owners parked my T-2653 under an awning as they claimed to have done, but apparently the front wasn't covered well by that. Ceiling sags there tell me there will be truss repairs needed; something I've done on mobile homes which is pretty much the same as here.
One 'trick' I've learned with those is to not follow the original 'plan' of truss construction using several pieces of plywood spaced out to create the truss arch, but to use long pieces. Not only is it stronger but you have the perfect pattern to fasten the 1X4's to. Line up the 1X4's at one end, glue and nail the straight chord at the bottom, then bend the top chord into shape as you glue and fasten it. Flip over and do the other side. If the top chord springs past parallel to the bottom use a bar clamp to pull it in. If you cut the top 1X4 long you can trim it to the perfect length once it's all done. The factory method using small pieces of plywood is strictly a cost-cutting measure- adequate but not optimum- but we can do better with hardly any weight or cost added.
Another house trailer 'trick' I've adopted is to make a few small knife slits in the middle of the undersheet (Darco) so that any water getting in can get out, and that also lets you see dripping water from leaks long before it puddles and makes a mess of things. I'm not sure how this would work on a travel trailer though- any thoughts on that?
This is going to be a longer-term project for me as I have to live in mine while the work goes on, and I can't count on it being stationary for any period longer than a month. Being in upstate SC means that there's really no dry season and sometimes heavy rains and storms spring and summer. I'll have to tarp it when the whole roof is opened.
The current visual damage inside is the two front Marlite (aka Abitibi) ceiling panels being intact but water-stained, and the roof membrane has no support under it at the front which allowed a sag and a tear in the membrane at that same spot. Huge leak in the first rain which has been caulked and rubber-taped over now. Last nights rain shows it's still leaking moderately but nowhere near as much. The sill band is likely rotted where the front awning bracket attaches; one lag will tighten but the other spins. Definitely going to have framing repairs needed at the front which may extend into floor repairs.
Will do pics soon, but what I need right now is a patch- the permanent fix will come late winter to early summer. I'm thinking that since the ceiling panels need replacing I might be able to slip in some luan under the membrane once it's opened then re-do the roof patching which with the sag then gone should hold me till I can address this properly. Absolutely need your thoughts on that.
On the trailer overall otherwise there's apparently not much needing restoration,mostly old plastic failing outside and some splits beginning in the vinyl flooring, all to be expected at this age. Of course a thorough inspection is needed which will happen ASAP but TBH I don't expect much work will be needed- the awning it lived under seems to have saved it from the usual ravages and the careful usage has kept everything inside almost like new. Unbelievably nice for it's age and a lucky find for sure!
Phil
__________________
|
|
|
|
|
11-16-2022, 12:24 PM
|
#7
|
|
Moderator
Join Date: Nov 2006
Location: Ohio
Posts: 12,654
SUN #89
|
Hi Phil,
I'll insert some comments here, and then will following up with more pics and things later, I'm running short on time right now.
Quote:
Originally Posted by Sawmaster
Thanks John!
Yes, I've been reading since my post about your approach to restoration and repairs, and I think I understand what I need to do now. As best I can tell at this point my water damage is going to be at the front, and hopefully only there. I haven't done a thorough inspection yet but it does seem the previous owners parked my T-2653 under an awning as they claimed to have done, but apparently the front wasn't covered well by that. Ceiling sags there tell me there will be truss repairs needed; something I've done on mobile homes which is pretty much the same as here.
|
For sure, having the camper under some sort of cover had greatly helped save it. The front and rear seams of a camper are high up on the list of the problem hot spots. As the camper is towed, the entire camper flexes and it flexes at the 4 corners the most. As the camper ages, the sun starts breaking down the sealants and the owner has to stay on top of it, or else, a leak starts. After about year 3 on a new camper, the sun damage and flexing can start the beginning of crack that as time goes on, is a leak if caulk maintenance has not been done. And sadly, in some cases, not so much on Sunlines, but other brands, the roof caulk leaks can start in year 2 or 1.
Once you get past getting the roof leak under control, we should tall on all the siding joints, they need sealing up and the rest of the roof caulking that needs a check and touchup or replace.
Quote:
Originally Posted by Sawmaster
One 'trick' I've learned with those is to not follow the original 'plan' of truss construction using several pieces of plywood spaced out to create the truss arch, but to use long pieces. Not only is it stronger but you have the perfect pattern to fasten the 1X4's to. Line up the 1X4's at one end, glue and nail the straight chord at the bottom, then bend the top chord into shape as you glue and fasten it. Flip over and do the other side. If the top chord springs past parallel to the bottom use a bar clamp to pull it in. If you cut the top 1X4 long you can trim it to the perfect length once it's all done. The factory method using small pieces of plywood is strictly a cost-cutting measure- adequate but not optimum- but we can do better with hardly any weight or cost added.
|
I for sure what to talk more on making rafters. I'm hoping to find a wood worker who has dealt with bending wood and stress relieving it. More on this later with pics. The process you are describing above does not seem to fit the Sunline rafters, but it may be able to be adapted. I want to fully understand what the mobile home rafter looked like and how you created a better fix for it. I have about 8 feet of project camper roof that needs all new rafters and ceiling board. I have the ceiling board but have to figure out a better way to form the rafters then my first time I made them.
Quote:
Originally Posted by Sawmaster
Another house trailer 'trick' I've adopted is to make a few small knife slits in the middle of the undersheet (Darco) so that any water getting in can get out, and that also lets you see dripping water from leaks long before it puddles and makes a mess of things. I'm not sure how this would work on a travel trailer though- any thoughts on that?
|
This Darco draining topic has come up before. While draining the Darco helps stop rot spread, on a camper that is towed, it creates a water entry issue when towing in the rain or on wet roads. More on this later too, we had thought of a "duct bill drain" Something like this, gravity can allow water to get out, but not back in. https://www.amazon.com/Transparent-S...V/ref=dp_fod_1
Quote:
Originally Posted by Sawmaster
This is going to be a longer-term project for me as I have to live in mine while the work goes on, and I can't count on it being stationary for any period longer than a month. Being in upstate SC means that there's really no dry season and sometimes heavy rains and storms spring and summer. I'll have to tarp it when the whole roof is opened.
|
Understand the situation. The big trap has come before... I used to have to do it that way until the new barn came. We have others also using the tarp. That said, pending how good or bad your entire roof is, there are options on the repair to do this in sections. I have done several localized roof repairs that are permanent short of a total reroof. More on this later.
Quote:
Originally Posted by Sawmaster
The current visual damage inside is the two front Marlite (aka Abitibi) ceiling panels being intact but water-stained, and the roof membrane has no support under it at the front which allowed a sag and a tear in the membrane at that same spot. Huge leak in the first rain which has been caulked and rubber-taped over now. Last nights rain shows it's still leaking moderately but nowhere near as much. The sill band is likely rotted where the front awning bracket attaches; one lag will tighten but the other spins. Definitely going to have framing repairs needed at the front which may extend into floor repairs.
|
Yes, the way Sunline did the weight savings rubber roofs, when water gets in, it wicks across the membrane backer board, they called "budboard". Over time the backer board (Unicore, think heavy thick corrugate fiber board) deteriores and there is nothing left to support the membrane.
I looked up Marlite (aka Abitibi)ceiling panels, you mean this stuff? https://marlite.com/ That looks interesting, I did not read it all, but it looks like FRP panels. What Sunline used and many of the other RV manufactures was 1/8" luan plywood covered with a vinyl paper. It comes premade in 4 x 8 sheets. I have bought a bunch of this but I had to travel to Elkhart IN to get it from RV surplus places. It is amazing how long that vinyl paper will last until water comes through it from the infancy stages of a leak. More on this later too. We are always looking for wall panels, they are not easy to find like they used to be when wall paneling went out of style.
Quote:
Originally Posted by Sawmaster
Will do pics soon, but what I need right now is a patch- the permanent fix will come late winter to early summer. I'm thinking that since the ceiling panels need replacing I might be able to slip in some luan under the membrane once it's opened then re-do the roof patching which with the sag then gone should hold me till I can address this properly. Absolutely need your thoughts on that.
|
I can help on this, I have done this before and have pics of what I did. I had to create a patch on the rear wall to roof transition area on one of my project campes, this one leaked on the rear seam. The patch is still holding and when I get to restoring the entire camper, the patch will go away. The patch was about 3 feet running length and 8 ft wide. Ideally we need some pics of what the roof top looks like and the inside ceiling to help better to know if what I did will work in your case. I have also done a 6 ft running length x 8 ft permanent patch repair verses a total reroof on a good friends camper a year ago. Can share more on this with pics later.
Quote:
Originally Posted by Sawmaster
On the trailer overall otherwise there's apparently not much needing restoration,mostly old plastic failing outside and some splits beginning in the vinyl flooring, all to be expected at this age. Of course a thorough inspection is needed which will happen ASAP but TBH I don't expect much work will be needed- the awning it lived under seems to have saved it from the usual ravages and the careful usage has kept everything inside almost like new. Unbelievably nice for it's age and a lucky find for sure!
Phil
|
Your camper sounds like the perfect candidate for a restore camper. Plus you come with the skills and tools, we can help with the what to do. And we need to talk about all the other sealants that are 30 years old and potential leaks that need to get sealed. The roof membrane and the siding by "itself" are good for no leaks short of an object poking a hole. But, any hole or penetration's in the siding or the roofing membrane; screws, cutouts, windows, doors, moldings, vents, etc. have sealants that fail over time. It won't take that much to seal them all back up, pending how long you want to keep the camper, but it is more knowing to do it. Camper siding penetration's leaks can be as bad or worse then roof leaks.
I sent you a PM, have a look. I'll be back later with more on the roof patch.
John
__________________
Current Sunlines: 2004 T310SR, 2004 T1950, 2004 T2475, 2007 T2499, 2004 T317SR
Prior Sunlines: 2004 T2499 - Fern Blue
2005 Ford F350 Lariat, 6.8L V10 W/ 4.10 rear axle, CC, Short Bed, SRW. Reese HP trunnion bar hitch W/ HP DC
Google Custom Search For Sunline Owners Club
|
|
|
|
|
11-16-2022, 12:26 PM
|
#8
|
|
Moderator
Join Date: Nov 2006
Location: Ohio
Posts: 12,654
SUN #89
|
Phil,
In case you need this,
There are 3 ways to add pics to a post.
1. Upload pics to a specific post attaching them at the end of the post. can only get 6 pics per reply, but can do as many replies as needed to get all the pics up.
2. Linking them in from a public viewable web photo hosting service you have.
See here for 1 and 2 https://www.sunlineclub.com/forums/f...html#post86041
3. You can upload pics to the forum in your own personal photo album. Then link them to anywhere in the text of a post. See here on how to create an album. https://www.sunlineclub.com/forums/f...html#post87945
If you still get stuck, let us know. Pic's go a long way in helping show things you are working on, and we really like seeing Sunline pics!
Hope this helps
John
__________________
Current Sunlines: 2004 T310SR, 2004 T1950, 2004 T2475, 2007 T2499, 2004 T317SR
Prior Sunlines: 2004 T2499 - Fern Blue
2005 Ford F350 Lariat, 6.8L V10 W/ 4.10 rear axle, CC, Short Bed, SRW. Reese HP trunnion bar hitch W/ HP DC
Google Custom Search For Sunline Owners Club
|
|
|
|
|
11-16-2022, 12:48 PM
|
#9
|
|
Junior Member
Join Date: Nov 2022
Location: South Carolina
Posts: 3
SUN #13491
|
Again much thanks. I'm going to start a new thread for mine to keep the forum in better order for all. I've seen most of the pics and have read a lot of the text on your restoration thread, which by the way is extremely well done so that everything is completely understandable without ever becoming boring. If you're not a technical writer you might have missed your calling!
Phil
__________________
__________________
|
|
|
|
|
|
Currently Active Users Viewing This Thread: 1 (0 members and 1 guests)
|
|
|
 Posting Rules
|
You may not post new threads
You may not post replies
You may not post attachments
You may not edit your posts
HTML code is Off
|
|
|
|
 » Recent Sunline Discussions
 |
|
|
|
|
|
|
|
|
|
|
|
|
|
|
|
|
|
|
|
|
|
|
|


 Linear Mode

