 |
|
 09-13-2018, 05:45 AM
|
#1
|
|
Member
Join Date: Sep 2018
Location: Virginia
Posts: 39
SUN #10865
|
T260SR slide
Just bought this trailer and noticed when the slide is out the inside trim touches on the drive side(front of trailer) but can put a couple fingers between the wall and trim. Dose this the drive has slipped or has someone not putthe drive shaft back right going to that side. Any thoughts before I dig into it.
__________________
__________________
|

|

|
|
09-17-2018, 09:50 PM
|
#2
|
|
Moderator
Join Date: Nov 2006
Location: Ohio
Posts: 12,651
SUN #89
|
Hi maint1,
I will try and help but need some more info to help better. Sunline changed brands of the slide drive system over the years. Since you have a T260SR, what year is the camper?
Do you know if the slide drive system is a Barker brand or the Lippert? Knowing the year of the camper helps us narrow it down too.
Need you to explain this some more. Maybe a word of two are missing. You said,
Quote:
|
the slide is out the inside trim touches on the drive side(front of trailer) but can put a couple fingers between the wall and trim.
|
Do you mean, the front side wall of the slide touches OK inside the camper but the "rear" side wall you can put a couple of fingers in the space on the "inside" of the rear wall slide seal? Can't figure out where you have the space, on the front wall or the rear wall etc. and it is on the top or bottom or both.
A few big picture general things.
Before doing any slide system adjustments, several areas of the slide the slide system needs to be checked as the adjustments are not intuitive and direct. Many adjustments are an indirect adjustment and while it looks like it may fix the issue at hand, that adjustment may throw something else out of adjustment as the wrong adjustment was made.
If you are having issues with the slide extending out and not sealing to the wall, odds are high the slide may not be sealing correctly when the slide is retracted in. Try this, retract the slide all the way in. Go outside and look at the front and rear slide flanges as they seal to the camper. Are both ends of the slide (front and rear) sealing the same level of compression on the slide seals? And look at the top and bottom of the side walls. Is the compression tight at the top and a lot less at the bottom etc?
Also when the slide is closed, go outside the camper and look at the gap at the front and rear and the top of the slide where the slide room flanges mate with the camper wall flanges. Is the gap the same at the front and back walls, is the gap parallel between the slide room flange and the camper flange, is the top of the slide room flange parallel to the top of the camper wall flanges? The slide room "should" be evenly positioned front and rear walls and even (parallel) spaced at the top of the slide to the camper. The gap all the way around should be even (parallel) and not on and angle. While the slide will work with some out of parallelism, it helps point to what may be the issue if we know how the slide fits in the camper when the slide is closed up.
In this case, pictures go a long way in explaining what you are seeing and better understanding what you are up against. Please post some pictures of the problem area and of the slide mechanical drive which pulls the slide in and out. This helps show us the brand you have and then we can help tell you better how to adjust and where to look next.
Hope this helps
John
__________________
Current Sunlines: 2004 T310SR, 2004 T1950, 2004 T2475, 2007 T2499, 2004 T317SR
Prior Sunlines: 2004 T2499 - Fern Blue
2005 Ford F350 Lariat, 6.8L V10 W/ 4.10 rear axle, CC, Short Bed, SRW. Reese HP trunnion bar hitch W/ HP DC
 Google Custom Search For Sunline Owners Club
|
|
|
|
|
09-18-2018, 10:14 AM
|
#3
|
|
Member
Join Date: Sep 2018
Location: Virginia
Posts: 39
SUN #10865
|
2001 Sunline 260 SR slide
Thanks John, It is a 2001 Look at the slide from the inside with it out the front trim (right side)is almost touching the out side wall, the back end (left side) is farther out. Check the out side and front and back measure the same. The drive is a rack and pinion type with drive motor on the front and drive rod going to the other side. Look like the seals touch and we have been through a lot of rain here in Va. and have not seen a leak. The only thing I have found so far is across the back below the floor under the lower edge of the siding seems weak and soft. Also found a suspension link worn out, going to replace the equalizers and links and pins with greaseable ones. Is a great looking rig for its age. Will try to post pic. if I can not good at that. Thanks again JohnB
__________________
|
|
|
|
|
09-19-2018, 07:05 AM
|
#4
|
|
Member
Join Date: Sep 2018
Location: Virginia
Posts: 39
SUN #10865
|
t-260SR
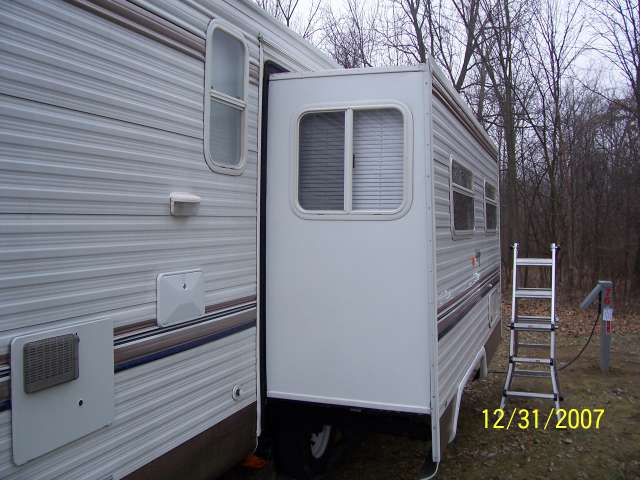
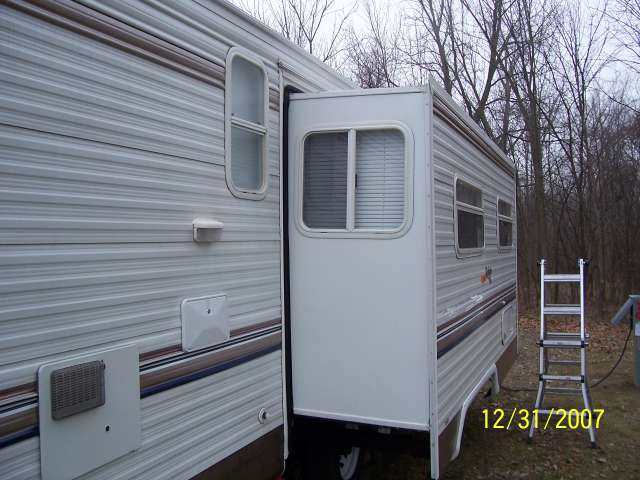
Looked closer and the only part of the slide inside trim that is out some is the back top corner, the bottom on both sides is touching the wall. tryingto send a picture of the slide drive so you can tell which it is
__________________
|
|
|
|
|
09-19-2018, 08:53 PM
|
#5
|
|
Moderator
Join Date: Nov 2006
Location: Ohio
Posts: 12,651
SUN #89
|
Hi,
The pic really helps.

I had forgotten the 2001 campers had a different brand of slide drive know as the " Dewald "posi-lok" electric rack and pinion slide out system".
Look and see if there is a square shaft drive to the auxiliary rack from the motor master drive rack. I cannot see it in your pic. Should look like this diagram. This way we can confirm what slide drive system you have.

Any pics of that slide drive shaft setup would really help us see what you have.
This post from 2012 has some more info on the Dewald system which appears to have been bought out by Power Gear. And searching it seems Lippert may have bought the Dewald hydraulic system. But yours is the electric system and Lippert already has their own.
http://www.sunlineclub.com/forums/f7...tml#post103532
If you can confirm that your slide drive is that Dewald looking system, I might have a service manual on it I can link you to for future help. Let me know.
Now to the issues of the slide touching.
Quote:
Originally Posted by maint1

Looked closer and the only part of the slide inside trim that is out some is the back top corner, the bottom on both sides is touching the wall. tryingto send a picture of the slide drive so you can tell which it is
|
I want to confirm what you are saying as this is not a "normal" slide issue from the slide drive being out of adjustment. But it may be from other reasons yet TBD.
Tell me if I have this wrong or right.
You are stating the "top rear side wall" inside slide flange is not touching but the front top slide flange is? Did I get that right?
And the bottom of the inside slide flange is touching on the front and rear walls?
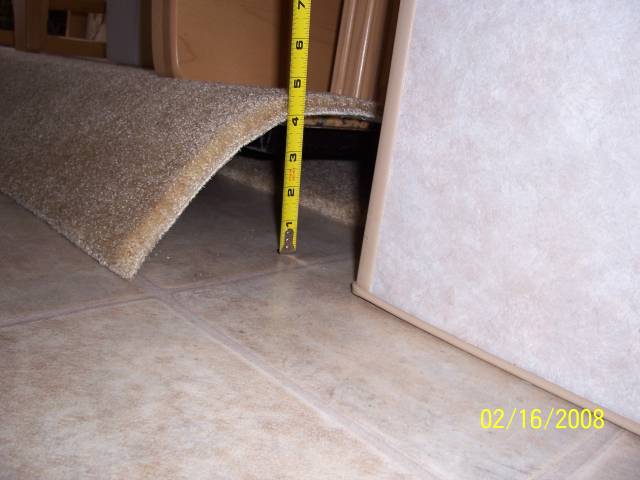
And can you measure how much the top rear is not to touching by? 1/8", 1/4", 1/2" etc.
Also confirm the when the slide is closed, the outside of the camper appears to have compressed the slide seals even on both the front and rear walls from top to bottom (up and down)?
You also said this,
Quote:
|
The only thing I have found so far is across the back below the floor under the lower edge of the siding seems weak and soft.
|
Tell us more on this soft floor. Is this on the actual slide room floor that you can feel when the slide room is extended out or is this on the main camper floor? Pictures really help on this if you can post some of the soft area.
The 2 issues of the slide top not touching and the soft floor "might" be connected OR 2 totally different issues. Need more info.
Hope this helps
John
__________________
Current Sunlines: 2004 T310SR, 2004 T1950, 2004 T2475, 2007 T2499, 2004 T317SR
Prior Sunlines: 2004 T2499 - Fern Blue
2005 Ford F350 Lariat, 6.8L V10 W/ 4.10 rear axle, CC, Short Bed, SRW. Reese HP trunnion bar hitch W/ HP DC
Google Custom Search For Sunline Owners Club
|
|
|
|
|
09-20-2018, 06:12 AM
|
#6
|
|
Member
Join Date: Sep 2018
Location: Virginia
Posts: 39
SUN #10865
|
drive square shaft
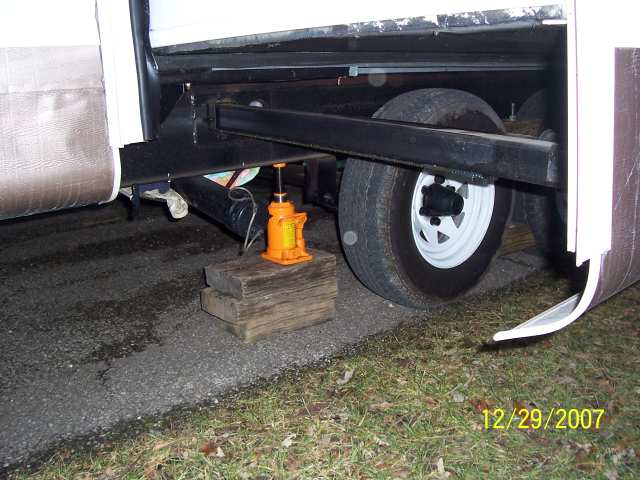
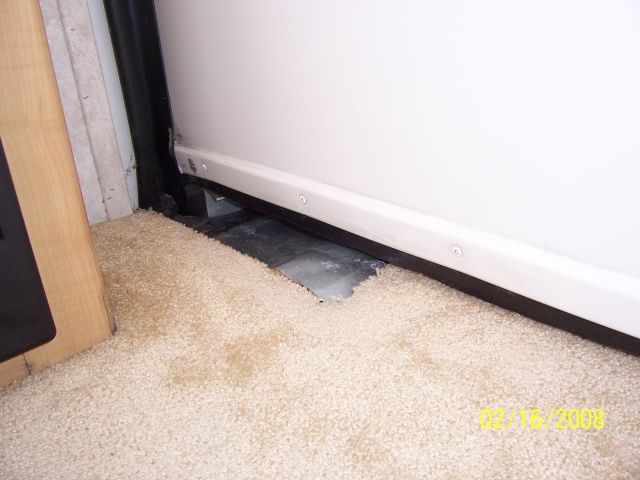
John I dose have a square shaft driving the other side. Closed it and now the front seem out more at the top so it needs some sort of adj. I hope. The soft area is not on the slide or the floor it is the area of the body below the floor across the back in front of the rear bumper Pic is the other side of the slide the square shaft drives it. Have some slide lub. ordered. Would put more pictures but one is all it will let me put, may be doing something wrong. Thanks, Rado
__________________
|
|
|
|
|
09-20-2018, 08:14 PM
|
#7
|
|
Moderator
Join Date: Nov 2006
Location: Ohio
Posts: 12,651
SUN #89
|
Hi Rado,
Let's first help on uploading pics to the forum. By being able to do this is very helpful for you and us to see what you are against.
There are a few ways to get pics into a post,
1. They can be direct uploaded to the forum and "attach" pictures as a file to your post.
2. You can create a "Photo Album" of your own here on the forum and then link those pics to a post.
3. If you have an online photo server that allows "linking" of pics from that photo server to ours, you can link them in.
You were doing item 1. Attaching picture files at the end of a reply so I will help some on this.
Attaching files:
If you are responding to and existing post, you need to be in the "Advanced" reply mode and not the Quick reply mode so the right info boxes show up. If you are starting a new post, you are automatically in the advanced mode.
See here for the "advanced" replay mode button

Once you are in the advanced reply mode, the "attach" feature adds the pics at the end of the reply.
Scroll down and look for this set of pic boxes under "Additional Options" and click the "Manage Attachments" button.

The manage attachments button will bring up a selection box to allow you to upload 6 files to the end of a post from your PC hard drive. You click the "Choose File" button.
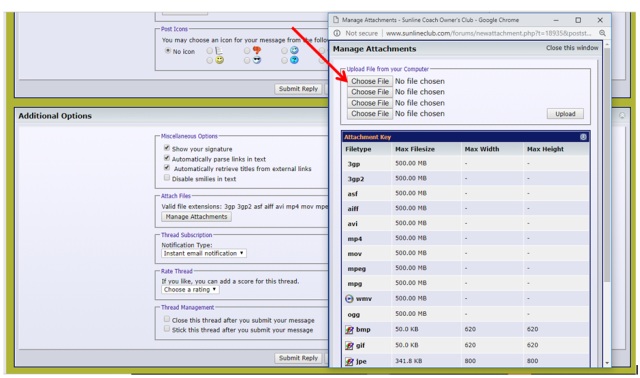
The choose file button takes you to your PC hard drive subdirectories. Go to the folder where your pictures are located. Then click on the picture you want to add, and click "open"

The open button then creates a path from your PC to the forum and you can see the one file in the "open file from your computer" box. But...then you have to press the "Upload" button to upload the picture to the forum.

You can add extra pictures, upload them and keep uploading files until you get to 6 files. If you want more then 6, then create another reply and get up to 6 more. You will see the files once they are uploaded in the "current attachments" and "attach files" boxes.

When you are done adding the pictures, close the pop up window by clicking "close this window"
The pics are then attached to your posting. You can "preview" the post to see how they look and then "submit reply" the post will view on the forum.
See if that helps. Sorry for the blurry pics. I will see if I can fix that for the future.
John
__________________
Current Sunlines: 2004 T310SR, 2004 T1950, 2004 T2475, 2007 T2499, 2004 T317SR
Prior Sunlines: 2004 T2499 - Fern Blue
2005 Ford F350 Lariat, 6.8L V10 W/ 4.10 rear axle, CC, Short Bed, SRW. Reese HP trunnion bar hitch W/ HP DC
Google Custom Search For Sunline Owners Club
|
|
|
|
|
09-20-2018, 09:11 PM
|
#8
|
|
Moderator
Join Date: Nov 2006
Location: Ohio
Posts: 12,651
SUN #89
|
Quote:
Originally Posted by maint1
John I dose have a square shaft driving the other side. Closed it and now the front seem out more at the top so it needs some sort of adj. I hope.
|
It seems you do have the Dewald slide drive system. This is good to know in case we get into adjustments.
Before I can suggest any adjustments, we have to figure out the actual problem. It seems that the area that is not tight moves back and forth from the back top wall to the front top wall of the slide room.
Before I can suggest what the cause may be, we need to confirm how your slide room was made. I have not been up close on a 2001 super slide flush floor camper so I need you to confirm that your slide room is built to lift the slide floor up off the carpet inside when closed.
See here for some pic's from a 2004 camper. I know the 2003's worked like this too. Just do not know if there where design changes between the 2001 and the 2003.
When the slide is extended out, looking from the front or back of the camper the top of the slide room (the roof area) and the bottom (the floor area) are not the same width. The top of the slide room is about 2 to 3" narrower than the bottom. This is on purpose. It is hard to see in this pic, but a tape measure will find it real quick. Please confirm yours is narrower on the top then the bottom and approx how much.
When the slide is out, the slide support arms are at an angle to the slide floor. This again is on purpose. See here. Is yours like this?
Next is when the slide closes, have someone close it while you are outside watching.
Once the slide starts to come in (retract) the slide floor will start to raise up and the outside wall of the slide will come more closer to plumb. Not true level just yet, but it will move more towards level.
Now watch carefully, when the "top" of the slide just touches the top of the camper wall, stop the slide and look at it. Does it look like this? The top is touching the camper but the bottom if about approx 1 to 2" short of reaching the camper.
After you confirmed the top of the slide room touches first, and the bottom of the slide room is still a few inches away, have the helper press the button again to complete the slide retract motion. The slide room should then be squeezed tight to the camper like this and true itself up to be parallel with the rest of the camper when fully retracted. You might have to open and close it a few times to see all this.
Then go inside the camper and look at the floor of the slide. It should be up off the carpet at least at the center of the camper area. See here
Yours may also have a metal trough which is made like a cam to lift the slide off the carpet. See mine, see if yours is like this. You can see the metal on the floor at the ends of the slide. This is the slide fully in.
When the slide is all the way out, the floor drops down close to flush with the rest of the camper. Like this
This hump in the metal is the actual lifting cam

If you went outside and the slide is about half open you can see the metal trough better. Like this. The red line is the contour of the trough.
When the slide is all the way out, the floor is down flat tight to camper floor and you see no trough at all from the outside.
Please confirm your slide works like this. Or tell me how it works if it is different. Again pics really help here.
I need to make sure yours is a cam operated flush floor slide room that lifts up off the carpet like I described before we can sort out why the top is popping open some when closed.
Also, please tell us approx how much is the slide open at the top? 1/8", 1/4", 1/2" or more.
Hope this helps
John
__________________
Current Sunlines: 2004 T310SR, 2004 T1950, 2004 T2475, 2007 T2499, 2004 T317SR
Prior Sunlines: 2004 T2499 - Fern Blue
2005 Ford F350 Lariat, 6.8L V10 W/ 4.10 rear axle, CC, Short Bed, SRW. Reese HP trunnion bar hitch W/ HP DC
Google Custom Search For Sunline Owners Club
|
|
|
|
|
09-20-2018, 09:25 PM
|
#9
|
|
Moderator
Join Date: Nov 2006
Location: Ohio
Posts: 12,651
SUN #89
|
Quote:
Originally Posted by maint1
The soft area is not on the slide or the floor it is the area of the body below the floor across the back in front of the rear bumper
|
I think I know what you are referring too. Please confirm this is where the soft area is.
At the back of the camper is the bumper. If you crawl under the camper at the back by the bumper and look up, you will see what looks like black plastic (called Darco) which is a plastic membrane.
The Darco on slide campers wraps the bottom of the rear wall of the camper. This is just in front of the metal bumper. It sort of looks like they wrapped a 2 x 4 with the black plastic. This wrapped section would be about 3 or 4" below the bottom of the floor of the rest of the camper and stops at the bottom bumper. If you squeeze this hanging down black plastic area and is it mushy, that tells us something. If it is very hard all the way across, that also tells use something.
Take a few pics of the part that you are feeling is soft. It helps a lot better then the words in this case.
Hope this helps
John
__________________
Current Sunlines: 2004 T310SR, 2004 T1950, 2004 T2475, 2007 T2499, 2004 T317SR
Prior Sunlines: 2004 T2499 - Fern Blue
2005 Ford F350 Lariat, 6.8L V10 W/ 4.10 rear axle, CC, Short Bed, SRW. Reese HP trunnion bar hitch W/ HP DC
Google Custom Search For Sunline Owners Club
|
|
|
|
|
09-21-2018, 06:48 AM
|
#10
|
|
Member
Join Date: Sep 2018
Location: Virginia
Posts: 39
SUN #10865
|
Hi John, First I was downloading the pictures as you said, but it would only let me download 1. Had a message, will have to try again can not remember the message. I do know that the floor of the slide raises up when coming in. Will check on watching it from the outside. The back in front of the bumper seems soft most of the way across.
__________________
|
|
|
|
|
09-21-2018, 01:05 PM
|
#11
|
|
Member
Join Date: Sep 2018
Location: Virginia
Posts: 39
SUN #10865
|
Looks like the trough on ours is on the slide it dose not show on the outside when 1/2 open. Two more questions: Do you recommend jacks under the slide when out for a few days in a row. #2 Where should you place a jack to get both wheels of the ground, going to replace links and equalizer on suppression. Thanks sorry for all the question but it seems you are THE MAN!
__________________
|
|
|
|
|
09-21-2018, 03:16 PM
|
#12
|
|
Member
Join Date: Sep 2018
Location: Virginia
Posts: 39
SUN #10865
|
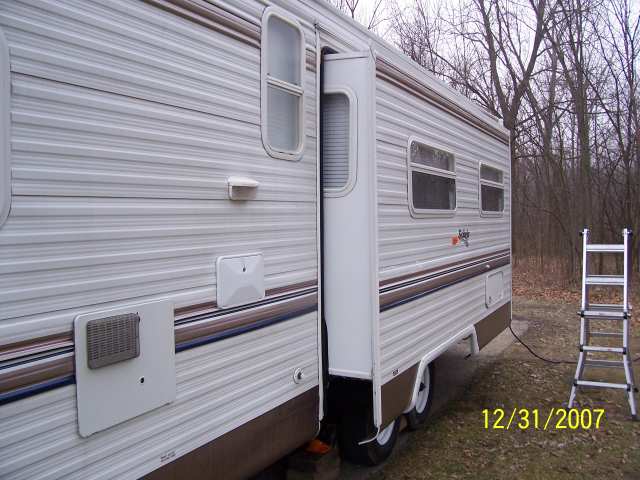
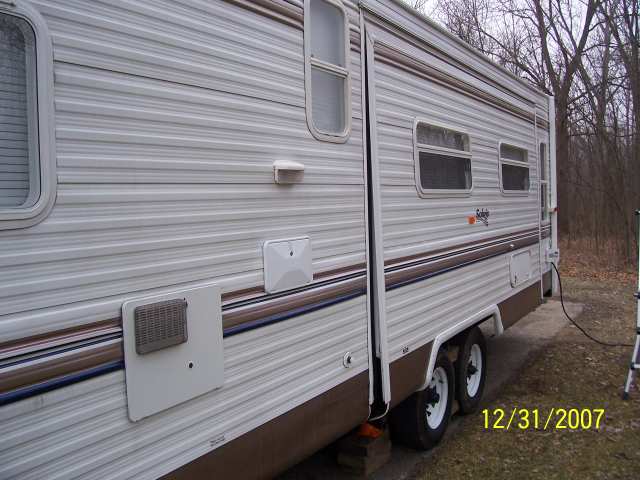
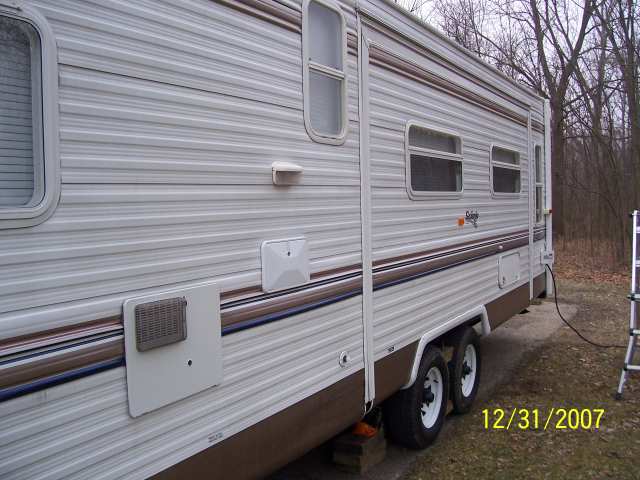
pictures
First one is inside the taper is on he floor with slide out
Second is under with the slide about half out.
__________________
|
|
|
|
|
09-21-2018, 07:33 PM
|
#13
|
|
Moderator
Join Date: Nov 2006
Location: Ohio
Posts: 12,651
SUN #89
|
Quote:
Originally Posted by maint1
Hi John, First I was downloading the pictures as you said, but it would only let me download 1. Had a message, will have to try again can not remember the message.
|
It seems you may have worked through this at you attached 2 very good pic's in your last post.
In order to upload more than one pic, I had to go into the "choose file" and then "upload" one at a time.

As I can only select 1 pic at a time on my hard drive and "open" to bring the path up to the forum software.

I would "choose" the first pic, then select it on my hard drive, "open" to bring up the path the forum, then go get 2 more. Choose, select, open 2 more times and I would have 3 pics with file paths. Then "upload" all 3 at once.
OR "choose" the first pic, then select it on my hard drive, "open" to bring up the path the forum, and do an "upload". That brings up only 1 picture but then I can go add more. You can keep adding more until you get 6 of them to come up if wanted.
Hoping this helps
John
__________________
Current Sunlines: 2004 T310SR, 2004 T1950, 2004 T2475, 2007 T2499, 2004 T317SR
Prior Sunlines: 2004 T2499 - Fern Blue
2005 Ford F350 Lariat, 6.8L V10 W/ 4.10 rear axle, CC, Short Bed, SRW. Reese HP trunnion bar hitch W/ HP DC
Google Custom Search For Sunline Owners Club
|
|
|
|
|
09-21-2018, 08:08 PM
|
#14
|
|
Moderator
Join Date: Nov 2006
Location: Ohio
Posts: 12,651
SUN #89
|
Quote:
Originally Posted by maint1
I do know that the floor of the slide raises up when coming in. Will check on watching it from the outside.
|
Quote:
Originally Posted by maint1
Looks like the trough on ours is on the slide it dose not show on the outside when 1/2 open.
Two more questions: Do you recommend jacks under the slide when out for a few days in a row. #2 Where should you place a jack to get both wheels of the ground, going to replace links and equalizer on suppression. Thanks sorry for all the question but it seems you are THE MAN!
|
Quote:
Originally Posted by maint1
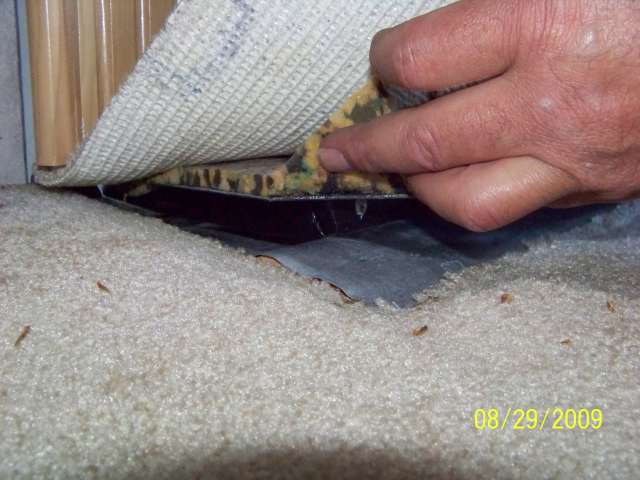
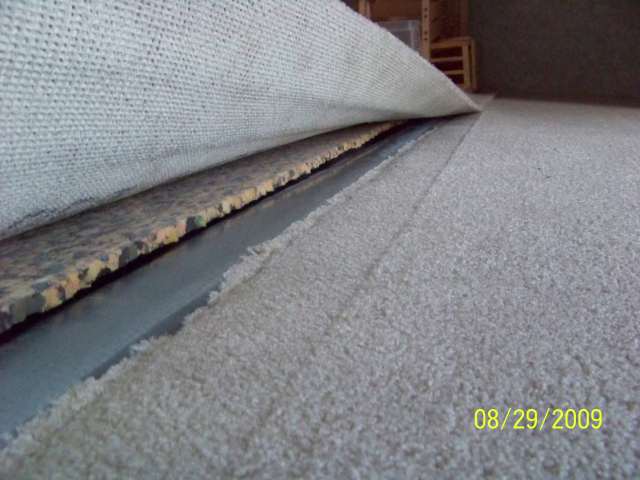
First one is inside the taper is on he floor with slide out
Second is under with the slide about half out.
|
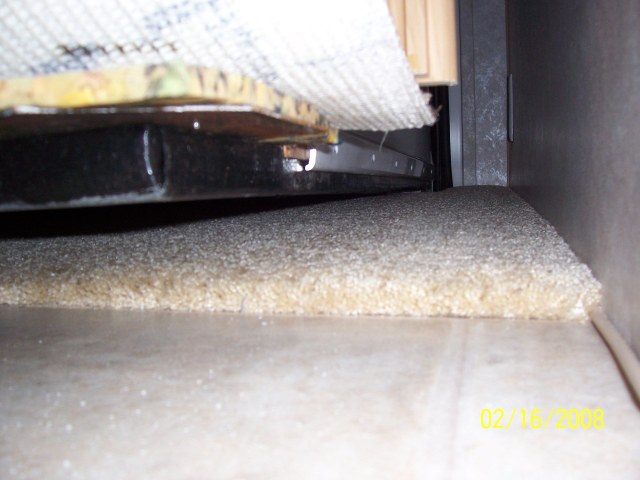
This pic confirms you have the flush floor design slide. It is not a lot different then my 2004 camper.

And this pic helps a lot also. I can see part of the slide drive system and I can see the cam (metal trough area) looks like mine. The reason you cannot see the metal trough what I showed in my pic is the angle the picture was taken. If you shine a flashlight up in there when the slide if half way open you should see the metal trough

Now we know how the slide room works. It works like all the 2001 to 2007's as far as the slide room that is. There have been some changes, the slide drive system brand changed, the metal trough changed, the Darco plastic bottom has changed, but the main mechanical action of the slide is the same as the slide retracts in and out of the camper.
Now we can maybe hone in some on the issue of the "top" front and rear corners not sealing to the wall at times.
First, please tell us the approx. distance the top corners are not touching by? and take a pic of the top corner not touching. Really need to know that amount.
In your first post you said this:
Quote:
Quote:
Originally Posted by maint1
Just bought this trailer and noticed when the slide is out the inside trim touches on the drive side(front of trailer) but can put a couple fingers between the wall and trim. Dose this the drive has slipped or has someone not putthe drive shaft back right going to that side. Any thoughts before I dig into it.
|
|
Are you seeing 3/4" to 1" air space at the top of the wall? That could be a couple of fingers. Please confirm.
Next is, this is how the slide room should be sealing up inside.
As the slide is extending out, the top wall corners of the slide room will touch camper wall, first. See here the slide room moving out.
When the slide room reaches the wall it looks like this.
While the top will touch, the bottom of the slide room at the floor will exposed about 2 to 3" of more travel needed before the slide room is completely out.
Please look at yours and tell me if the above happens?
Also when extending it out, while on the inside look at the top of the slide front and rear walls and see if:
- The top of the slide touches the wall first.
- Then the bottom continues to close until it meets the wall.
- When the bottom touches the wall, does the top then pop out the few fingers worth of space?
- OR is the few fingers of space there because the slide room top corner, "never" touched the wall in the first place?
We need to know if the top of the room is moving away from the wall when the bottom seals up or never made it to the wall. Very important to know and this is a a different problem possibly for which it occuring.
See what you can find and please take some pics of these 2 areas:
1. The slide top corner not touching.
2. More pics of the slide drive system. Both inside the camper frame and outside the camper frame. Need the slide arm with the motor drive and the auxiliary drive side driven by the sq shaft.
Hope this helps
John
__________________
Current Sunlines: 2004 T310SR, 2004 T1950, 2004 T2475, 2007 T2499, 2004 T317SR
Prior Sunlines: 2004 T2499 - Fern Blue
2005 Ford F350 Lariat, 6.8L V10 W/ 4.10 rear axle, CC, Short Bed, SRW. Reese HP trunnion bar hitch W/ HP DC
Google Custom Search For Sunline Owners Club
|
|
|
|
|
09-21-2018, 08:40 PM
|
#15
|
|
Moderator
Join Date: Nov 2006
Location: Ohio
Posts: 12,651
SUN #89
|
Quote:
Originally Posted by maint1
Two more questions:
Do you recommend jacks under the slide when out for a few days in a row.
#2 Where should you place a jack to get both wheels of the ground, going to replace links and equalizer on suppression.
|
Some answers and then some to your questions....
I do not recommend using the jack stands under the slide for any length of time. Days, months or years. On the first day into camp, the tires cool down over night and the camper can shift in position. After a few days or longer ground shifts can change. By putting a rigid foot under the slide to hold it up will not move while the entire camper does move. Thus there is then the potential of upward force on the slide room forcing it into a position it is not supposed to be in. The slide seals, the slideroom drive arms, the actual slide room it self can be affected in a negative way if there is much of any ground shifting. Sunline was good to us, they used the heavier slide arms to support all the weight. They will hold the slide very well all by themselves.
To jack the camper up off the ground so both wheels are up, ideally you jack on the frame behind the rear axle hanger. Do not place the jack more than 18" behind the rear axle hanger. Also when jacking, make sure you lift in the center of the I beam frame. Use a piece of metal if needed between the frame and jack. Do not jack offset to one side. The bottom flanges of the I beam frame are very weak and can easily bend if lifting the weight of the camper off center.
If you are using a bottle jack, odds are high you will need wood blocks to get the jack up high enough to touch the frame. Even if you are using a floor jack, odds are high wood blocks on top of the jack plate will be needed.
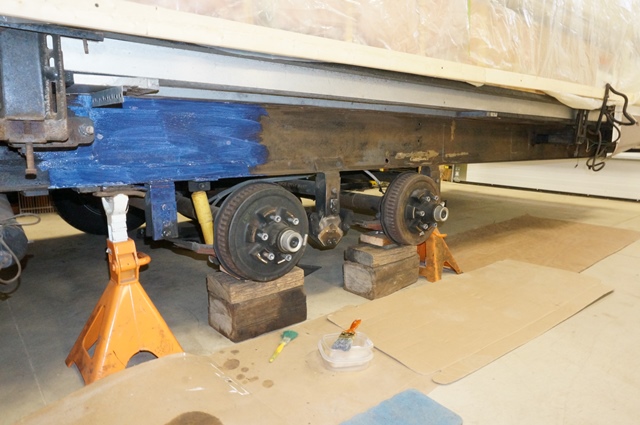
Do not jack on the axle tube. They are very thin and can bend if jacking under them incorrectly. If you absolutely have to jack up a wheel by the axle, the jack is placed directly under the leaf u bolt spring plate centered in the middle of the U bolts so you are lifting as the axle is loaded to the leaf spring. There may be a small stud sticking out of the spring in your way, it is the spring pilot bolt to center the springs on the axle seat.
Once the camper is up and both wheels off the ground, the suspension is hanging down from the camper. You have to put a wood block or something under the axle spring seat area so the axle tube will not drop suddenly due to shackle flop when you unhook them. If you are only jacking up one side at a time, that axle tube from the other side is still very loaded with weight.
See here for the floor jack method on solid flooring (concrete). Jack behind the rear hanger, put 2 jack stands in place.

Then install 2 bottle jacks under the leaf spring plate, not to lift the camper, but to hold the axle tube when you unhook the shackle.
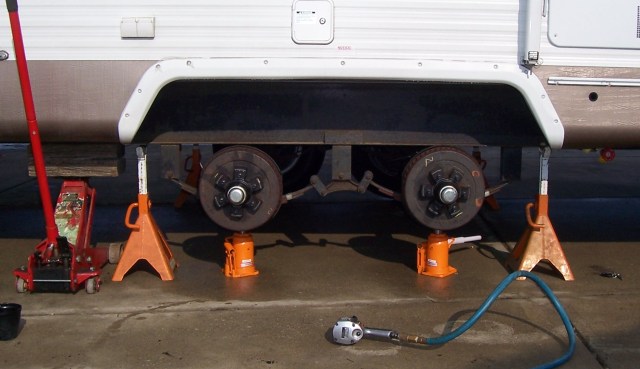
Here is using wood blocks under the axle spring plates
Hope this helps
John
__________________
Current Sunlines: 2004 T310SR, 2004 T1950, 2004 T2475, 2007 T2499, 2004 T317SR
Prior Sunlines: 2004 T2499 - Fern Blue
2005 Ford F350 Lariat, 6.8L V10 W/ 4.10 rear axle, CC, Short Bed, SRW. Reese HP trunnion bar hitch W/ HP DC
Google Custom Search For Sunline Owners Club
|
|
|
|
|
09-21-2018, 09:00 PM
|
#16
|
|
Moderator
Join Date: Nov 2006
Location: Ohio
Posts: 12,651
SUN #89
|
Quote:
Originally Posted by maint1
The back in front of the bumper seems soft most of the way across.
|
What you are describing sounds like a water infection. There are several ways the infection can be caused, the roof molding seal leaking, a cracked shower dome, degraded roof caulking, a corner molding leak, a window seal leak, a cargo door flange leak and the list goes on.
I would start at the roof. Using a step ladder on solid ground go up and look at the rear corners. Feel the roof in the corner areas of both sides. The roof on the camper is not a direct walk on roof unless precautions are taken. Meaning there is no supporting OSB board under the rubber to walk on. There is a corrugated material called bud board which holds the rubber in place. This is semi flexible but semi stiff if you press down on it.
If a leak occurs, the bud board will absorb water and wick across a portion of the roof. Over time the coragate bud board will deteriorate and release from the rubber. This will feel like an old tire tube. Real spongy with very little effort pressing on it. Reach from the step ladder and feel the roof. If you get that rubber band tire tube feel, a leak was or is still ongoing. Take pics of the caulking, that is also part of the story.
The water gets in the walls from the roof and travels down to the basement of the camper where it can't get out. Often you will not see any signs of water damage inside the camper, yet an active leak can be ongoing.
If you really want to know if there is a water infection, recommend getting a pinless moisture meter and scanning the camper. They cost about $40 and are a great tool sorting this out. See this post on moisture meters.
http://www.sunlineclub.com/forums/f7...per-17613.html
If your back wall is water infected, it can be repaired. You do this from the outside working inward. Not from the inside out. This post will show the 2006 T264SR, the next design upgrade of your 2001 T260SR with a back wall water infection and how it was fixed. This also had a new roof put on, but it will show the back wall. I have other pics of a 2005 T264SR with a rear wall repair and we only repaired the existing rubber if this is the issue you are having and do not want to do a whole roof job. http://www.sunlineclub.com/forums/f7...avy-16834.html
Hope this helps. If you find you have the rubber band issue on the roof, start a new post on just that topic.
John
__________________
Current Sunlines: 2004 T310SR, 2004 T1950, 2004 T2475, 2007 T2499, 2004 T317SR
Prior Sunlines: 2004 T2499 - Fern Blue
2005 Ford F350 Lariat, 6.8L V10 W/ 4.10 rear axle, CC, Short Bed, SRW. Reese HP trunnion bar hitch W/ HP DC
Google Custom Search For Sunline Owners Club
|
|
|
|
|
09-22-2018, 03:42 PM
|
#17
|
|
Member
Join Date: Sep 2018
Location: Virginia
Posts: 39
SUN #10865
|
260 slide
John the jacking is the way I thought but good to check with someone who has done it. On the slide have more pictures. Watched from inside and the bottom on the rear part touches first and the top starts to move in but as the slide finishes it starts to come out. The front side is touching and is even from top to bottom. It looks like at some point someone has adjusted the rear outward because I can see the outline of washers in a different place. Thanks
__________________
|
|
|
|
|
09-22-2018, 06:42 PM
|
#18
|
|
Moderator
Join Date: Nov 2006
Location: Ohio
Posts: 12,651
SUN #89
|
Hi Rado,
Good news!!! I see 4 pics attached to your reply.  I think we are gaining on how to upload more than 1 pic. Yeh!!!
Good, it sounds like you have handle on how to jack up the camper. Now to the slide.
I quoted your wording here and broke it up into important parts to make sure I can follow what you are saying. What I'm reading is not the normal way the slide is supposed to work. Must confirm we understand what it is doing before we declare an adjustment.
Quote:
Originally Posted by maint1
On the slide have more pictures.
Watched from inside and the bottom on the rear part touches first
and the top starts to move in
but as the slide finishes it starts to come out.
The front side is touching and is even from top to bottom.
It looks like at some point someone has adjusted the rear outward because I can see the outline of washers in a different place. Thanks
|
I am going to rephrase this with added content. Please confirm I have this correct to what you are seeing.
When extending the slide room out:
The rear slide room vertical wall flange (by the bathroom) of the slide touches the camper wall at the "bottom" first when the slide is moving out.
After touching on the bottom, the rear slide room wall flange continues to move to being clamped closed and it straightens up to the wall. The top of the slide room then will touch the wall.
Then before all the slide motion moving out stops, the top of the slide room flange pops back away from the wall leaving about 2 fingers worth of gap. The bottom of the rear wall is still touching.
Please confirm I have that exactly correct. Or tell me what I have wrong. What I described is not normal at all.
Did you check the front slide wall flange? I know you said it was even when all done, but did the top touch first and then the bottom close up to the wall? Or is this same strange bottom touching first going on there too?
Please take a picture of where these washer rust witness lines are showing up. Good find, I was going to get asking that as rust lines tell a story something moved.
Before I type a bunch much more on what may be wrong, please confirm I have the above correct.
If by any chance you can take a short phone video of this rear slide wall action would be helpful. How to get it to me we can work through. Just make it as short in duration as you can showing just as the slide room touches the wall the first time up until all motion stops.
Hope this helps
John
__________________
Current Sunlines: 2004 T310SR, 2004 T1950, 2004 T2475, 2007 T2499, 2004 T317SR
Prior Sunlines: 2004 T2499 - Fern Blue
2005 Ford F350 Lariat, 6.8L V10 W/ 4.10 rear axle, CC, Short Bed, SRW. Reese HP trunnion bar hitch W/ HP DC
Google Custom Search For Sunline Owners Club
|
|
|
|
|
09-23-2018, 11:02 AM
|
#19
|
|
Member
Join Date: Sep 2018
Location: Virginia
Posts: 39
SUN #10865
|
You have it correct except the top never touch the inside wall. I do not think I can get a video that will show the action because this side is so close to the water tank wall. Did notice that if you raise the carpet the ramp on the back of the slide is more exposed then the front (pic.) Also just noticed that when the slide is closed it is not even in the opening(pic) also have pic of the adjustment that looks like someone made. Hard to get good pictures to day. Raining.
__________________
|
|
|
|
|
09-23-2018, 10:53 PM
|
#20
|
|
Moderator
Join Date: Nov 2006
Location: Ohio
Posts: 12,651
SUN #89
|
Good observations on the carpet and the rust witness lines. Some of this is starting to add up.
I need this info to help confirm this. Please answer each question by number/letter so I can line up the answers.
1. This rust witness lines showing movement, which slide arm is this from? The rear arm or the front?

2. This picture which show more metal exposed, confirm this is the rear slide wall area?

3. This picture which show less metal exposed, is this the front slide wall area?

4. This pic of the master rack, is this at the front wall?

5. When you said this,
Quote:
|
Also just noticed that when the slide is closed it is not even in the opening(pic)
|
I'm assuming this lines up with this picture.

That pic looks like the rear wall of the slide room. Is it?
6. What does the front of the slide room look like when the rear wall looks like the pic you posted? Take pic of the front and post.
7. And lastly need you to check these and give us dimensions. These pics are from my camper so you can see what I am talking about.
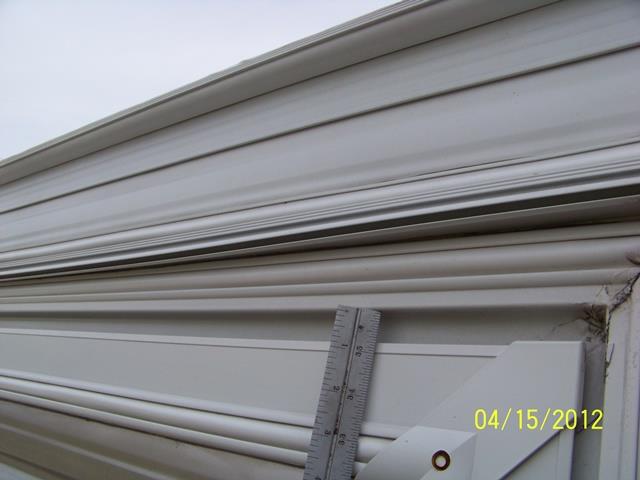
7A. See this pic. with the slide closed. Looking at the same elevation (height) on the camper, (you can count the siding ripples above the decal if needed) what is the gap between the slide room flange and the camper wall flange at both the front wall and the rear wall?
7B. Look at the front top of the slide to the top header molding on the camper wall. What is the gap at the front?
7C. Look at the rear top of the slide to the top header molding on the camper wall. What is the gap at the rear?
8. Please confirm, when the slide room extended out, does the slide room "front" wall touch first at the top or the bottom of the camper wall? You stated the rear wall touches at the bottom first. Need to confirm where the front touches first.
9. In this picture there is a jack bolt at the end of the slide arms which helps when adjusting the slide up and down or on an angle. There are slots in the mounting plates to allow vertical adjustment. There is a jack bolt at the front and the rear slide arm.
9A. See if the thread end of the jack screw is actually touching the plate above it supporting weight.
9B. See if the amount of thread exposed at the bottom from the hex head to the bottom of the slide arm plate dimension is the for the same front and rear slide arm. Need to know if this has been adjusted unequal and tell me the actual dimensions.

Sorry for all these questions and I know this is going to take some time. This is very hard to do with out being at the slide to see it first hand. So I have to ask for all these dimensions. I suspect you have a few things out of adjustment, not just one. We need to know all this before we can make adjustments.
Hope this helps. You are learning well how your slide is built and soon very possibly on how to adjust it.
John
__________________
Current Sunlines: 2004 T310SR, 2004 T1950, 2004 T2475, 2007 T2499, 2004 T317SR
Prior Sunlines: 2004 T2499 - Fern Blue
2005 Ford F350 Lariat, 6.8L V10 W/ 4.10 rear axle, CC, Short Bed, SRW. Reese HP trunnion bar hitch W/ HP DC
Google Custom Search For Sunline Owners Club
|
|
|
|
|
|
|
Currently Active Users Viewing This Thread: 1 (0 members and 1 guests)
|
|
|
 Posting Rules
|
You may not post new threads
You may not post replies
You may not post attachments
You may not edit your posts
HTML code is Off
|
|
|
|
 » Recent Sunline Discussions
 |
|
|
|
|
|
|
|
|
|
|
|
|
|
|
|
|
|
|
|
|
|
|
|
|
|


 Linear Mode

