Journey with Confidence RV GPS App RV Trip Planner RV LIFE Campground Reviews RV Maintenance Take a Speed Test Free 7 Day Trial ×
Sunline RV Forum
Sunline User Photos

Go Back   Sunline Coach Owner's Club > Model Specific Forums > Sunline Slide Room Travel Trailers
Click Here to Login

Join Sunline Club Forums Today


Reply
 
Thread Tools Search this Thread Display Modes
Old 06-08-2021, 12:08 PM   #1
Senior Member
 
Join Date: Jun 2016
Location: Pennsylvania
Posts: 186
SUN #8473
roger66ogden is an unknown quantity at this point
Gray water tank removal

Hi All.
Gray water tank is cracked where the camper drain enters the top of the tank. The drain pipe is held in place by strapping and it is drawn down so much that the pipe is bowed downward which is probably what caused the crack. Does the vent pipe slide up out of the tank without having to undo the vent cap / flashing on the roof? What would be the best material/product to use for the repair? Should I stop drill the crack prior to repairing to keep the crack from growing?
__________________

__________________
Roger
2001 T320SR
2021 Ram 2500 Big Horn SLT
roger66ogden is offline   Reply With Quote
Old 06-09-2021, 07:59 PM   #2
Senior Member
 
Join Date: Jun 2016
Location: Pennsylvania
Posts: 186
SUN #8473
roger66ogden is an unknown quantity at this point
After reading several posts about abs repair I was wondering if the material at the following link would be an acceptable repair material. https://www.rvupgradestore.com/RV-Ho...-p/11-0062.htm
__________________

__________________
Roger
2001 T320SR
2021 Ram 2500 Big Horn SLT
roger66ogden is offline   Reply With Quote
Old 06-11-2021, 07:45 AM   #3
Senior Member
 
Join Date: Jun 2016
Location: Pennsylvania
Posts: 186
SUN #8473
roger66ogden is an unknown quantity at this point
Photo

This is a picture of the crack.
Attached Images
File Type: jpg IMG_20210608_134704782_HDR.jpg (93.9 KB, 10 views)
__________________
Roger
2001 T320SR
2021 Ram 2500 Big Horn SLT
roger66ogden is offline   Reply With Quote
Old 06-12-2021, 05:10 AM   #4
Senior Member
 
jim44646's Avatar
 
Join Date: Jul 2012
Location: Ohio
Posts: 1,126
SUN #4040
jim44646 is an unknown quantity at this point
You can also use a shavings from a abs fitting mixed with acetone or abs cement. Clean area good and v groove crack and fill with the slurry and let sit. A few layers may be necessary. They will melt together.
__________________
Jim and DW Darlene
2001 T-2553 Sunline Solaris
2006 GMC Sierra Duramax 2500HD 4X4
Firestone Transforce AT tires
Reese Dual Cam Sway Control
jim44646 is offline   Reply With Quote
Old 06-12-2021, 05:19 AM   #5
Senior Member
 
jim44646's Avatar
 
Join Date: Jul 2012
Location: Ohio
Posts: 1,126
SUN #4040
jim44646 is an unknown quantity at this point
You can also use ground up pieces of an abs fitting mixed with acetone or abs cement to make a thick slurry. Clean area good and v groove crack. Fill crack slurry and let sit may need several coats. They will melt together. For added strength imbed a piece of fiberglass screen into last coats.
__________________
Jim and DW Darlene
2001 T-2553 Sunline Solaris
2006 GMC Sierra Duramax 2500HD 4X4
Firestone Transforce AT tires
Reese Dual Cam Sway Control
jim44646 is offline   Reply With Quote
Old 06-12-2021, 05:49 AM   #6
Senior Member
 
Join Date: Jun 2016
Location: Pennsylvania
Posts: 186
SUN #8473
roger66ogden is an unknown quantity at this point
Thanks Jim.i believe I am going to attempt to fix the tank without removing it.
__________________
Roger
2001 T320SR
2021 Ram 2500 Big Horn SLT
roger66ogden is offline   Reply With Quote
Old 06-12-2021, 05:47 PM   #7
Senior Member
 
jim44646's Avatar
 
Join Date: Jul 2012
Location: Ohio
Posts: 1,126
SUN #4040
jim44646 is an unknown quantity at this point
It's quite possible if you can get to it. Probably better not to remove, could do more damage.
Good luck.my leak was by the outlet, still holding.
__________________
Jim and DW Darlene
2001 T-2553 Sunline Solaris
2006 GMC Sierra Duramax 2500HD 4X4
Firestone Transforce AT tires
Reese Dual Cam Sway Control
jim44646 is offline   Reply With Quote
Old 06-15-2021, 07:45 PM   #8
Senior Member
 
Join Date: Jun 2016
Location: Pennsylvania
Posts: 186
SUN #8473
roger66ogden is an unknown quantity at this point
Thanks Jim. I will give it a try without removing the tank. I think with the correct bit in my cordless Dremel I should be able to drill stop and put a groove in as you said.
__________________
Roger
2001 T320SR
2021 Ram 2500 Big Horn SLT
roger66ogden is offline   Reply With Quote
Old 06-17-2021, 07:43 PM   #9
Moderator
 
JohnB's Avatar
 
Join Date: Nov 2006
Location: Ohio
Posts: 12,649
SUN #89
JohnB is on a distinguished road
Hi Roger,

Here is a post on the process Jim is talking about.
https://www.sunlineclub.com/forums/f...zel-18665.html

About 3 weeks ago I did a repair on a grey water tank just like that on a friends camper. I never made it to posting about it yet, but did 2 main things in addition to the post above.

The friend had been having a repeating failure, tried the ABS method 3 times and the connection still cracked. They also do cross country towing so lots of bumps and humps.

My first thought when seeing this, why did it crack in the first place? and keep cracking?

What I found was, in this situation the piping was too rigid into the tank. This camper had frame flexing going on due to the floor plan and the frame method. That pipe flexing in and out of the tank, over time created crack. I created a flexible connection in two directions to take the pipe pressure off the pipe connection. I cut the pipe close to the outlet of the tank, about 6 to 8" and installed a rubber Fernco fitting with a 1/8 to 3/16" gap between the pipes. https://www.fernco.com/plumbing/flexible-couplings

There was also a 90 degree bend in the discharge pipe, I cut into the pipe after the 90 to take out even move direct impact into the tank and put in a second Fernco.

Your one pic, looks like over time, the discharge pipe was being pulled in a certain direction to create that yanked out tank crack. Have a look, post more pics of the discharge pipe all the way to the dump valve. Something flexed the discharge pipe to make it fail in that direction. See if you can sort that out.

Next was the pipe fix. I took Jim's lead can created a fiberglass screen reinforced patch. Since I had cut the discharge pipe about 6-8" away from the tank, I create a round donut of screen that had flaps on it to attach to the pipe and the larger circle to the tank. Just do a 90 deg X slit of the screen to match the 1 1/2" OD of the pipe. The slits create attachment ears to the pipe. The larger screen OD then went over the tan crack.

Drain the tank and make 100% sure no water is in the crack. This is hard to do as water wicks into that crack. With the discharge pipe cut, it lets water out and air in. It took about 4 hours until it would stop weeping. I tested each time with a paper towel at the crack and wiggling the discharge pipe. The paper towel kept soaking up the water. It did finally stop. They needed to use the camper the same day, so I had to force dry it. If you have a few days, it might dry on it's own but still test with paper towel and wiggle the pipe to open the crack and see if it is totally dry.

Use a Dremel tool and grind out the crack, not 100% into the tank, but about 50 to 70% so the solvent weld will get into the wall thickness.

I did 3 coats. The first coat had screen in it, let it cure 24 hours. The second coat had screen in it, let it cure 24 hours. The 3 coat had no screen.

The mix had to be thick and enough to totally coat and embed the screen.

Jim tipped me off on the screen idea and it really helped make that joint stronger. That and getting rid of the stress in the pipe in the first place with the Fernco's.

I have pics of all this, but I am away for a while with the pics at home.

Let us know how it goes.

John
__________________
Current Sunlines: 2004 T310SR, 2004 T1950, 2004 T2475, 2007 T2499, 2004 T317SR
Prior Sunlines: 2004 T2499 - Fern Blue
2005 Ford F350 Lariat, 6.8L V10 W/ 4.10 rear axle, CC, Short Bed, SRW. Reese HP trunnion bar hitch W/ HP DC

Google Custom Search For Sunline Owners Club
JohnB is offline   Reply With Quote
Old 06-17-2021, 08:24 PM   #10
Senior Member
 
Join Date: Jun 2016
Location: Pennsylvania
Posts: 186
SUN #8473
roger66ogden is an unknown quantity at this point
Hi John
The crack is on the top of the tank where the inlet pipe goes into the tank. There's a pipe strap that is attached to the cross member with self tapping screws and it is drawn down so tight that the pipe is bowed.
Roger.
__________________
Roger
2001 T320SR
2021 Ram 2500 Big Horn SLT
roger66ogden is offline   Reply With Quote
Old 06-18-2021, 06:54 AM   #11
Moderator
 
JohnB's Avatar
 
Join Date: Nov 2006
Location: Ohio
Posts: 12,649
SUN #89
JohnB is on a distinguished road
Quote:
Originally Posted by roger66ogden View Post
Hi John
The crack is on the top of the tank where the inlet pipe goes into the tank. There's a pipe strap that is attached to the cross member with self tapping screws and it is drawn down so tight that the pipe is bowed.
Roger.
Yup! There has to be a cause... You have to fix the cause an then repair. While I'm away from my main PC with all my pics on it, it dawned on me, I have the camera with me and the pics are still on it.

These may help go with my words above. This is on my friends 2005 T1950. This floor plan has a unique left rear jogged frame rail that can allow that corner of the camper to flex. The grey water tank pipe is rigid to the camper frame. High towing mileage and I feel this setup is what created the issue.

Here is the setup starting at the tank.


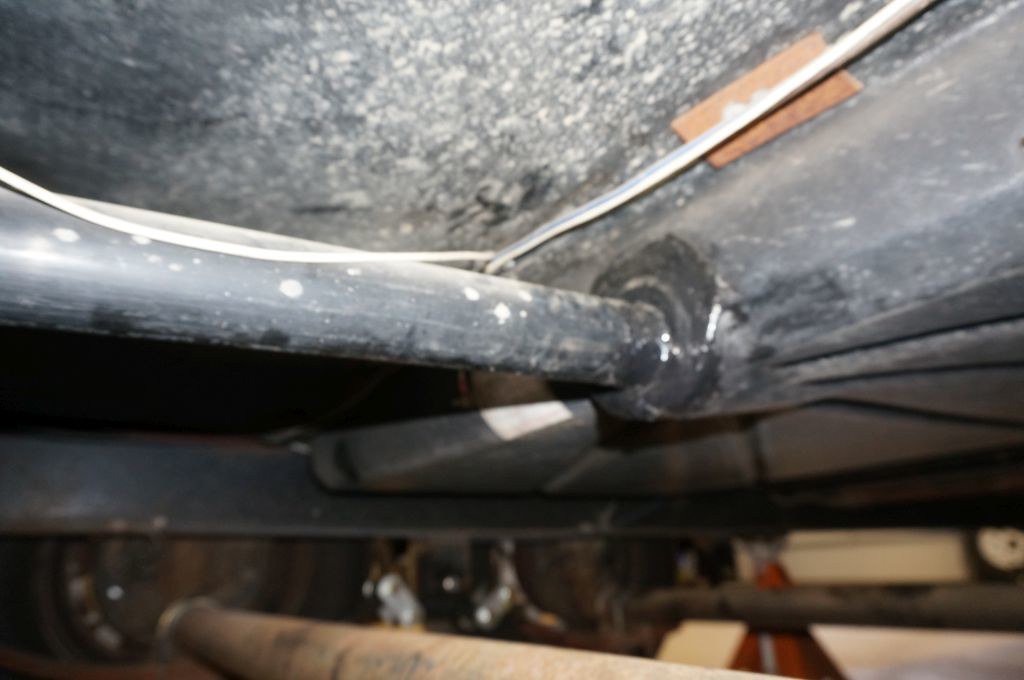
The first hard pipe strap at the discharge of the tank


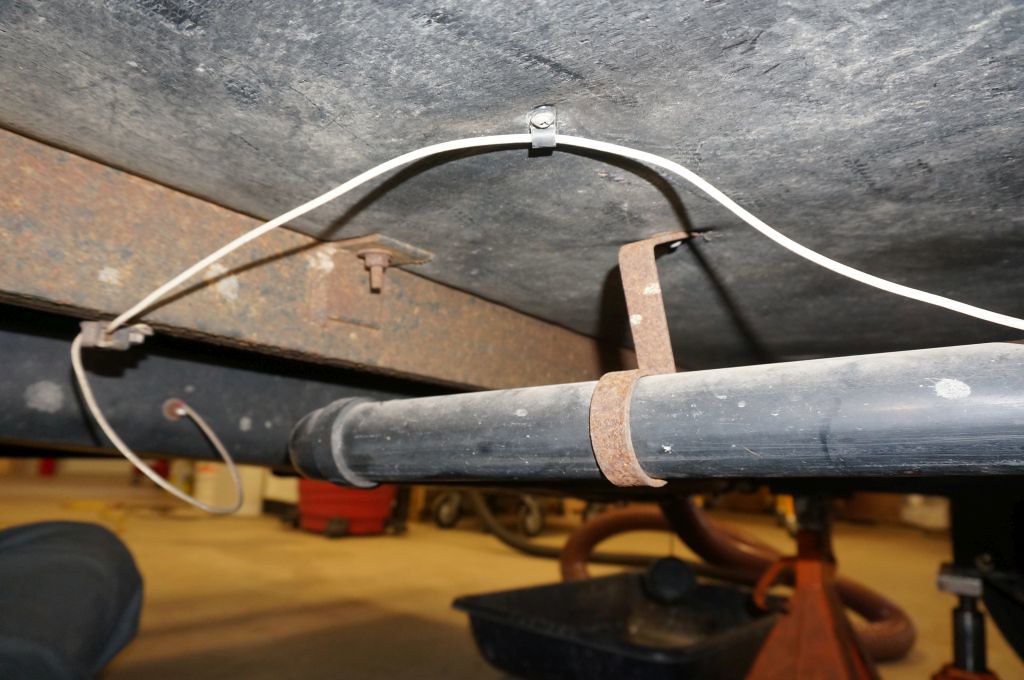
The tie in with 2nd hard strap to the dump valve area.


The as found 3rd repair leaking. The good news they used the ABS repair method so the plastic was no contaminated with foreign materials. I could grind it away and back to original ABS with the crack still there.


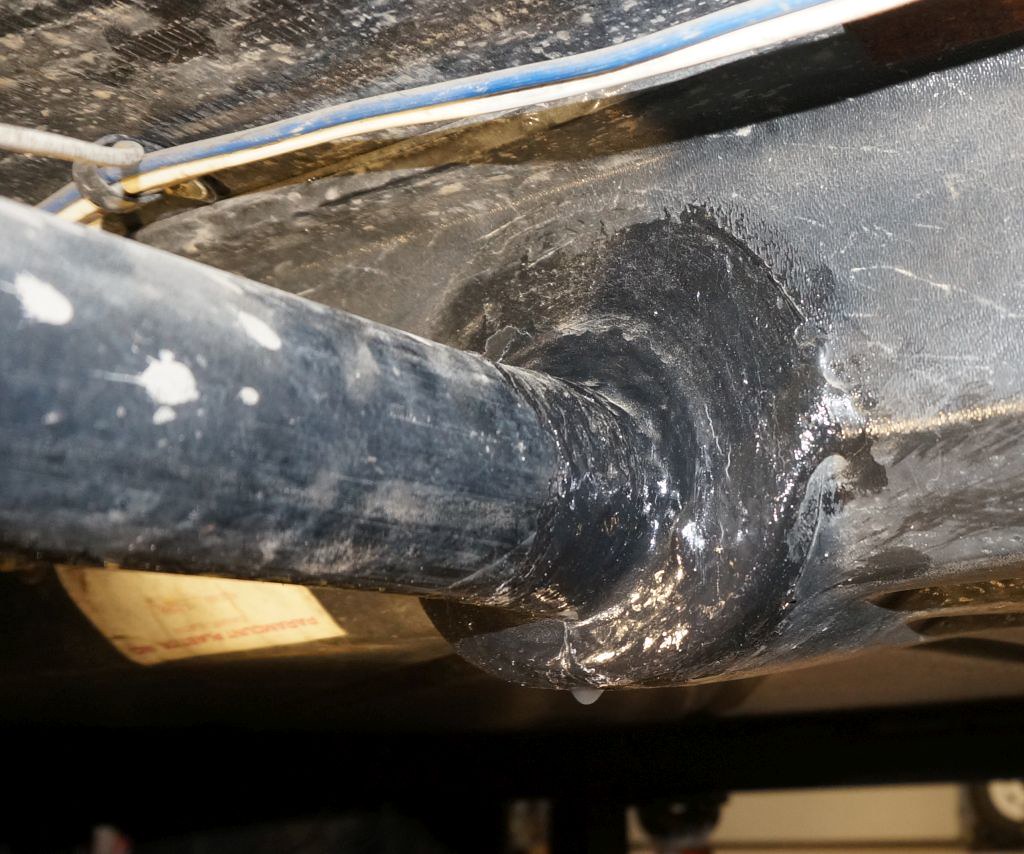
You can see the crack on the left side of the pic, there was a hair line split at the 6:00 location too. This is after grinding out the older repair and going deeper into the tank wall, but not breaking through.


Now to the fiberglass screen reinforcement. Screen blank over the top of a 1 1/2 to 1 1/2" Fernco fitting.


Slit the screen to fit over the pipe. Make a cross cut 2 ways 90 deg to each other the ID of the Fernco


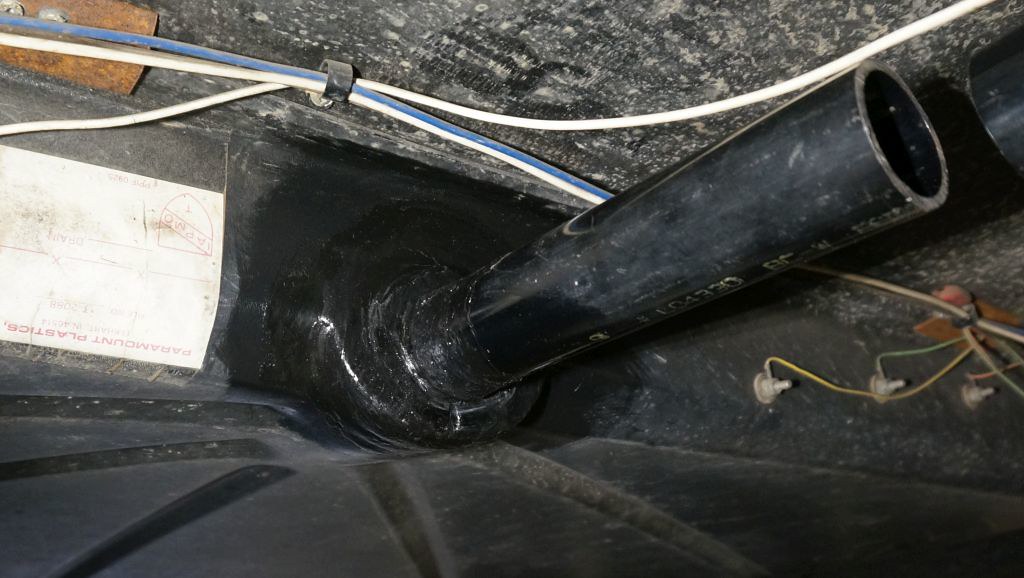
Now to cut the pipe at the tank.


Pipe/crack ground out, acetone cleaned, ready to start ABS repair.


Screen test fit and slit corners to allow screen to flex under tank


Slit corners allows bottom flaps to fold under tank


Here is the first ABS coat. You can see the screen embedded. As it cures, the finish gets smoother as it slowly all melts together around the screen.


After 24 hours, repeated a second coat with screen and the 3rd coat, 24 hours later, a plain 3r coat no screen. Sorry no final close up of the 3rd coat, it came out good.

Now the pipe Fernco connections and new pipe hanger to flex in the correct direction to help mitigate stress into the tank pipe connection.

Two Fernco's strategically placed with a flex clamp.


Your setup will be a little different, but figured the pics will give you something to build on.

Hope this helps.

John

PS. Please post what you came up with, this pipe stress crack problem may be larger then we think. We do not have many posts on pipe stress cracking. Most times the whole tank dump fitting gets broke off in a crash/pothole etc. event. The repair can be similar, the cause is different.
__________________
Current Sunlines: 2004 T310SR, 2004 T1950, 2004 T2475, 2007 T2499, 2004 T317SR
Prior Sunlines: 2004 T2499 - Fern Blue
2005 Ford F350 Lariat, 6.8L V10 W/ 4.10 rear axle, CC, Short Bed, SRW. Reese HP trunnion bar hitch W/ HP DC

Google Custom Search For Sunline Owners Club
JohnB is offline   Reply With Quote
Old 06-18-2021, 11:33 AM   #12
Senior Member
 
Join Date: Jun 2016
Location: Pennsylvania
Posts: 186
SUN #8473
roger66ogden is an unknown quantity at this point
Thanks for all the great help John. I will get pictures of the before and after and post them. And what I did to correct it
__________________

__________________
Roger
2001 T320SR
2021 Ram 2500 Big Horn SLT
roger66ogden is offline   Reply With Quote
Reply


Currently Active Users Viewing This Thread: 1 (0 members and 1 guests)
 

Posting Rules
You may not post new threads
You may not post replies
You may not post attachments
You may not edit your posts

BB code is On
Smilies are On
[IMG] code is On
HTML code is Off
Trackbacks are Off
Pingbacks are Off
Refbacks are Off


Similar Threads
Thread Thread Starter Forum Replies Last Post
leaking gray water tank..I think!!! Chuckles Repairs and Maintenance 20 06-20-2012 09:03 AM
Gray water tank leak RockDodger Repairs and Maintenance 4 08-07-2011 02:26 AM
Gray water tank bob Repairs and Maintenance 2 09-07-2009 10:39 AM
Hole in Gray Water Tank of 1988 Saturn T1550 ScottK Sunline Travel Trailers 12 06-22-2008 09:01 PM
Full gray water tank and leak. MikeM Sunline Travel Trailers 9 08-10-2007 01:49 PM


» Featured Campgrounds

Reviews provided by

Disclaimer:

This website is not affiliated with or endorsed by Sunline RV or any of its affiliates. This is an independent, unofficial site.


All times are GMT -6. The time now is 04:04 AM.


×