 |
|
 02-07-2018, 06:52 PM
|
#401
|
|
Senior Member
Join Date: Sep 2016
Location: Virginia
Posts: 814
SUN #8893
|
Thanks JohnB!
I did not warm the butyl first. And I totally forgot to put extra butyl in the corrugations. I did that everywhere else and forgot with the trim. I was rushing to get it on because Amy has an hour and a half drive home. Shoot! I can't believe I forgot!
The gaps on the curb side was worse but I started packing the gaps with butyl in preparation for the rain. I can put more in and I will need to do the same on the front. I put butyl on the inside of the trim like your picture. I did both trim pieces the same. Not sure why one is oozing and the other is not.
It will be in the 50s again on Friday. Maybe I can get some time in then. 63 on Sunday but it is suppose to rain. The weather is so unpredictable right now. At least no snow though.
Thanks,
Tommie
__________________
__________________
|

|

|
|
02-07-2018, 06:59 PM
|
#402
|
|
Moderator
Join Date: Nov 2006
Location: Ohio
Posts: 12,654
SUN #89
|
OK Good. Sounds like you have a plan. And I know about the "I forgot's" It seems they hit me more now they they use too....
Hope all goes well. It will. And hope you feel better.
Thanks
John
__________________
__________________
Current Sunlines: 2004 T310SR, 2004 T1950, 2004 T2475, 2007 T2499, 2004 T317SR
Prior Sunlines: 2004 T2499 - Fern Blue
2005 Ford F350 Lariat, 6.8L V10 W/ 4.10 rear axle, CC, Short Bed, SRW. Reese HP trunnion bar hitch W/ HP DC
 Google Custom Search For Sunline Owners Club
|
|
|
|
|
02-09-2018, 12:06 PM
|
#403
|
|
Senior Member
Join Date: Sep 2016
Location: Virginia
Posts: 814
SUN #8893
|
Thanks JohnB! I think I am just getting anxious as I am hoping nothing goes wrong now that I am coming towards the home stretch.
Thanks,
Tommie
__________________
|
|
|
|
|
02-15-2018, 11:21 AM
|
#404
|
|
Senior Member
Join Date: Sep 2016
Location: Virginia
Posts: 814
SUN #8893
|
Good afternoon,
In the 70s here today...woohoo!
Working on the corner trim today. Will take some pics later. Warming up the metal seems to be helping a little, but only a little.
Took a break from the trim. Got the gasket replaced on the bathroom vent. The old one was in bad shape, far beyond cleaning.


Since I have the tarp off a little bit I decided to inspect the roof a little. Found some problem areas that will need tending to.


And I just love the tin can vent cover! Lol.

Thats all for now. Thanks for reading.
Tommie
Sent from my iPhone using Tapatalk
__________________
1987 Sunline T1550
2012 Ford Expedition EL Limited 5.4L V8, 4WD
"Twenty years from now you will be more disappointed by the things that you didnt do than by the ones you did do..." Mark Twain]
|
|
|
|
|
02-15-2018, 12:07 PM
|
#405
|
|
Moderator
Join Date: Dec 2006
Location: Michigan
Posts: 6,155
SUN #123
|
Looks good Tommie! Yeah that old seal was pretty nasty, good call on replacing it.
The roof seams are interesting. Almost looks like someone just painted them thick with house paint, for them to split in such a clean line along the flex point.
The tin can is interesting, definitely would be Tin Can Tourist approved. Sadly it probably functions better than the correct part would, since the plastic on that will get brittle and break.
__________________
2007 T-286SR Cherry/Granola, #6236, original owner, current mileage: 9473.8 (as of 6/18/21)
1997 T-2653 Blue Denim, #5471
1979 12 1/2' MC, Beige & Avocado, #4639
Past Sunlines: '97 T-2653 #5089, '94 T-2251, '86 T-1550, '94 T-2363, '98 T-270SR

|
|
|
|
|
02-15-2018, 04:29 PM
|
#406
|
|
Senior Member
Join Date: Sep 2016
Location: Virginia
Posts: 814
SUN #8893
|
Thanks Sunline Fan! I had no idea how bad it was until I took it off. I was replacing it because I was to lazy ...LOL...to take it off and clean it and then put it back on.
I probably won't be dealing with the tin can right now. The previous owner did leave a brand new replacement that I can put on later on down the road. I need to deal with the cracks first.
Thanks,
Tommie
__________________
|
|
|
|
|
02-15-2018, 04:58 PM
|
#407
|
|
Senior Member
Join Date: Sep 2016
Location: Virginia
Posts: 814
SUN #8893
|
A little improvement. Not sure if this will suffice. I can try taking more pics tomorrow if needed. The screws only budged a little and I can't get them to go any further even with it heated. Spent the afternoon filling all of the gaps with butyl tape and trimmed up the excess so that I can see how far I was able to get the trim on.


Diamond plate looks pretty good though.

Thanks,
Tommie
__________________
|
|
|
|
|
02-15-2018, 05:31 PM
|
#408
|
|
Senior Member
Join Date: Sep 2016
Location: Virginia
Posts: 814
SUN #8893
|
Another lesson learned!
Another lesson learned! You cannot paint over porcelain. Or at least I was not successful in doing so. I spray painted the stove top and it looked really good when I was done but over time it chipped really easily. After a while, it did not look good at all.

I was able to scrape off the paint with a putty knife and clean up the stove top with acetone. It doesn't even look like it had been spray painted black. The original color does blend with the curtains so I guess I will leave it as is.

Made a stove top cover out of plywood and non-slip cabinet liner since we probably won't be using the stove much. It ain't pretty but it will do what I need it to, more counter space.

Thanks for looking.
Tommie
__________________
|
|
|
|
|
02-15-2018, 06:14 PM
|
#409
|
|
Moderator
Join Date: Nov 2006
Location: Ohio
Posts: 12,654
SUN #89
|
Quote:
Originally Posted by Thomascine

A little improvement. Not sure if this will suffice. I can try taking more pics tomorrow if needed. The screws only budged a little and I can't get them to go any further even with it heated. Spent the afternoon filling all of the gaps with butyl tape and trimmed up the excess so that I can see how far I was able to get the trim on.
|
Hi Tommie,
Those pics do not look bad. Since you did not put the extra butyl filler pieces in you may not get a lot more ozz out.
You did the right thing, using butyl pack tight any extra spaces on the edges and trim to clean.
To add a layer of extra protection, use the non leveling Dicor caulking over the top of the exposed butyl. You need to put enough on to touch the siding and the molding having the butyl totally covered.
It will also help if you use a rag with mineral spirits to wipe the molding and the siding and it will take off any strings of butyl off the siding or the molding. Then use a high flash cleaner to take any residue of mineral spirits off.
If you have not seen it yet, this post shows one method on how to apply the Dicor. http://www.sunlineclub.com/forums/f7...tml#post137746
Your diamond plate come out very well. Good Job!!
Yes, good catch on the roof cracks in the sealants. That is the stage to get them. Actually a little earlier but good you had the tarp on.
Your vent cover looks real good now. Yeh, those seals get really nasty over time if they do not get at least an annual cleaning.
Your gaining!!! 70 degrees... Wow.. We did have 60F here today and rain. Since this heat wave hit so fast, the barn is in sweat mode today. Concrete, steel, most anything that can conduct heat or cold. But glad to get the extra warmth. Been working on our camper for the last few days and the next week or 2 we are supposed to be at least above freezing so I can keep at it.
Thanks
John
__________________
Current Sunlines: 2004 T310SR, 2004 T1950, 2004 T2475, 2007 T2499, 2004 T317SR
Prior Sunlines: 2004 T2499 - Fern Blue
2005 Ford F350 Lariat, 6.8L V10 W/ 4.10 rear axle, CC, Short Bed, SRW. Reese HP trunnion bar hitch W/ HP DC
Google Custom Search For Sunline Owners Club
|
|
|
|
|
02-15-2018, 06:31 PM
|
#410
|
|
Senior Member
Join Date: Sep 2016
Location: Virginia
Posts: 814
SUN #8893
|
Thanks JohnB!
It is supposed to be in the 70s again tomorrow and dry part of the day so I may be able to clean up the butyl and add some dicor, at least on the corner trim. I have used the info in the link you provided when rehabbing the door. It worked pretty well for me except I am not good with a caulk gun so I may put down some painters tape before starting.
Thanks for all of the info. Much appreciated.
Tommie
__________________
|
|
|
|
|
03-28-2018, 09:21 AM
|
#411
|
|
Senior Member
Join Date: Sep 2016
Location: Virginia
Posts: 814
SUN #8893
|
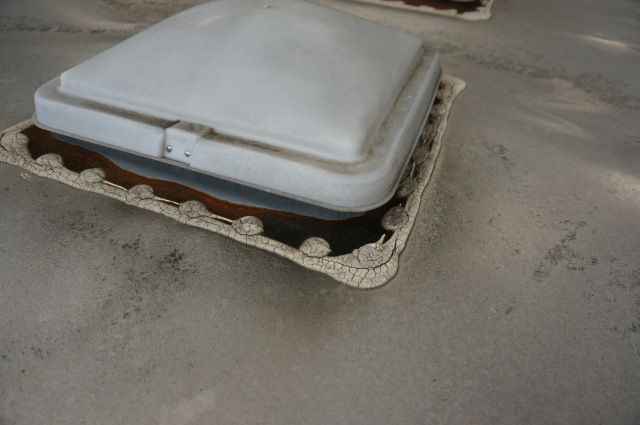
Well it should be in the 70s today. So I decided to do some work on the roof. Im cleaning around the bathroom vent. Whats on here does not look like caulk at all. It looks like something that was painted on with a brush. Not sure what it is. 
There are small cracks starting to develop in it. Do you think Ill be able to caulk over top of it?
Thanks,
Tommie
Sent from my iPhone using Tapatalk
__________________
1987 Sunline T1550
2012 Ford Expedition EL Limited 5.4L V8, 4WD
"Twenty years from now you will be more disappointed by the things that you didnt do than by the ones you did do..." Mark Twain]
|
|
|
|
|
03-28-2018, 10:52 AM
|
#412
|
|
Senior Member
Join Date: Sep 2016
Location: Virginia
Posts: 814
SUN #8893
|
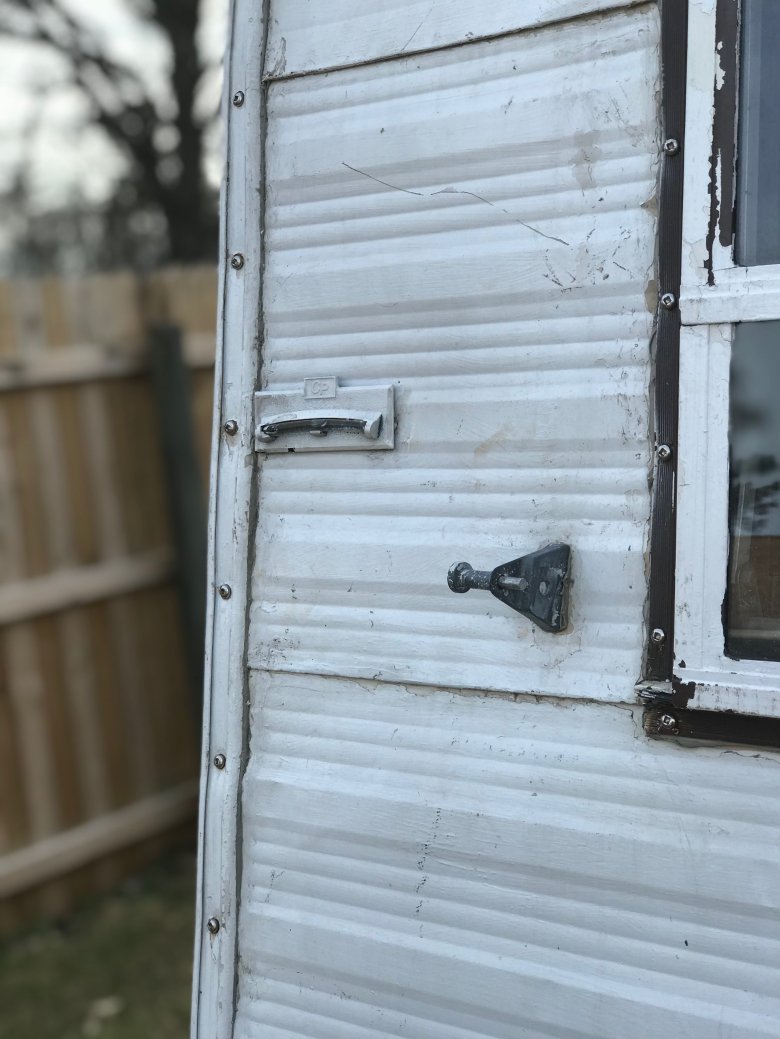
Refrigerator vent


My project list is growing. 
Tommie
Sent from my iPhone using Tapatalk
__________________
1987 Sunline T1550
2012 Ford Expedition EL Limited 5.4L V8, 4WD
"Twenty years from now you will be more disappointed by the things that you didnt do than by the ones you did do..." Mark Twain]
|
|
|
|
|
03-28-2018, 12:16 PM
|
#413
|
|
Moderator
Join Date: Nov 2006
Location: Ohio
Posts: 12,654
SUN #89
|
My working on metal camper roofs is limited and has been on non Sunline brands. However the methods are similar.
On the roof hatch vent area, I do not know what coating they put on there. It does not look that bad from the pic, in person it may be something different. Any cracks in the coating should be addressed. I'm seeing 2 choices depending on how bad the majority of it is.
It must be totally cleaned first. The patch will not stick to any dirt and I know this is hard on a rough surface. Just make sure you get it as totally clean as possible and enough clean that the tiny specs left are just that, tiny specs.
Dicor caulking over a cracked area if this is a small area is an option. It will bond to aluminum well.
If the cracked area is large, and the coating is sound and not brittle or coming up, means it is well bonded, then Eternabond tape is an option. Ideal is if you can primer it with Eternaprime first but if it is very clean and you do not have the primer, then E bond direct is OK.
On the fridge vent, that is a problem and a leak path waiting to leak. That coating looks very crumbled. It is going to be work to get it back to the non crumbled stage. Once you have managed to get through all the crumbled back to sound roof and sound fridge vent (it looks plastic like the newer ones) then you can Dicor self leveling re caulk it.
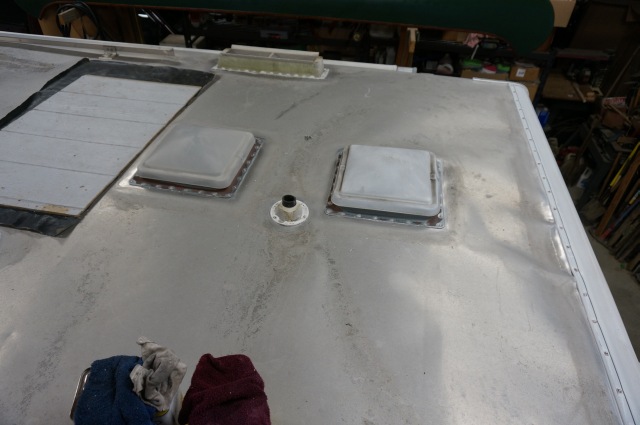
The metal camper roof I have worked on was one entire piece for the roof. The fridge vents, end seams, side seams and vent hatches were all Dicor chalked from the factory. All the chalk was shot, so heat gun and scraper along with mineral spirits followed by a high flash cleaner worked well. Then I re - dicor'ed it.
Here is what it started out like
All cleaned up, ready for new caulk
And for reasons unknown...I cannot find the new caulked applied pics...
Others with metal roof repair may have suggestions too.
Hope this helps
John
__________________
Current Sunlines: 2004 T310SR, 2004 T1950, 2004 T2475, 2007 T2499, 2004 T317SR
Prior Sunlines: 2004 T2499 - Fern Blue
2005 Ford F350 Lariat, 6.8L V10 W/ 4.10 rear axle, CC, Short Bed, SRW. Reese HP trunnion bar hitch W/ HP DC
Google Custom Search For Sunline Owners Club
|
|
|
|
|
03-28-2018, 12:30 PM
|
#414
|
|
Senior Member
Join Date: Sep 2016
Location: Virginia
Posts: 814
SUN #8893
|
Water Damage Assessment and Repair
Thanks JohnB. The Bathroom vent is not bad at all. I was going to ask if I could just eternal bond tape over it and youve already answered that. The refrigerator vent is another story. The original caulk is brown and really hard almost like cement. Then there is some black stuff on top of that. I am wondering if at some point someone tried to put tar over the original caulk. I also found a crack in the refrigerator vent on the side that faces the curb. I am thinking that it may need to be replaced. The top opening is approximately 19 3/4 x 5 1/8. Is this standard size?
Thanks,
Tommie
Sent from my iPhone using Tapatalk
__________________
1987 Sunline T1550
2012 Ford Expedition EL Limited 5.4L V8, 4WD
"Twenty years from now you will be more disappointed by the things that you didnt do than by the ones you did do..." Mark Twain]
|
|
|
|
|
03-28-2018, 02:47 PM
|
#415
|
|
Moderator
Join Date: Nov 2006
Location: Ohio
Posts: 12,654
SUN #89
|
This is the standard Dometic roof vent stack. You can search for better pricing. https://www.amazon.com/Dometic-33126...ator+roof+vent
It says it is 27 x 12 x 7 inches but have no idea where they measure it from.
The fridge install manual for our model fridge says the roof hole is supposed to be 5 1/2" x 23 3/4" so their declared vent dimensions may be the outside of it. And I think most Dometic's use the same vent. But your dimension sound smaller but again all where they are being measured from.
Measure your old one and see if it lines up. If needed I have a new one up in the barn rafters and I can measure for you.
They also sell other aftermarket ones https://www.rvupgradestore.com/Ventm...-p/71-7931.htm
https://www.rvupgradestore.com/Camco...-p/22-0721.htm
Those were fast hits. I buy a fair amount from RV Upgrades and have had good experiences with them when the prices align right.
Hope this helps
John
PS. did you try the heat gun on any of the gunk around the fridge vent? warm and scrape.
__________________
Current Sunlines: 2004 T310SR, 2004 T1950, 2004 T2475, 2007 T2499, 2004 T317SR
Prior Sunlines: 2004 T2499 - Fern Blue
2005 Ford F350 Lariat, 6.8L V10 W/ 4.10 rear axle, CC, Short Bed, SRW. Reese HP trunnion bar hitch W/ HP DC
Google Custom Search For Sunline Owners Club
|
|
|
|
|
03-28-2018, 09:31 PM
|
#416
|
|
Senior Member
Join Date: Sep 2016
Location: Virginia
Posts: 814
SUN #8893
|
Thanks JohnB. I was able to find an exact match of what I currently have. I hope that means the holes will line up.
https://smile.amazon.com/gp/product/...KIKX0DER&psc=1
I did use heat. It helped me get the white caulking off. I will work on trying to get the vent base off tomorrow. It should be warm enough. 80 degrees tomorrow. Keeping my fingers crossed.
Thanks,
Tommie
__________________
|
|
|
|
|
03-29-2018, 06:41 AM
|
#417
|
|
Moderator
Join Date: Nov 2006
Location: Ohio
Posts: 12,654
SUN #89
|
So there are other sizes?? Good to know. Let us know how this comes out
80 degrees... send some of that up here! We are in wet, wet and more wet right now. Missing the sun...
__________________
Current Sunlines: 2004 T310SR, 2004 T1950, 2004 T2475, 2007 T2499, 2004 T317SR
Prior Sunlines: 2004 T2499 - Fern Blue
2005 Ford F350 Lariat, 6.8L V10 W/ 4.10 rear axle, CC, Short Bed, SRW. Reese HP trunnion bar hitch W/ HP DC
Google Custom Search For Sunline Owners Club
|
|
|
|
|
03-31-2018, 02:04 PM
|
#418
|
|
Senior Member
Join Date: Sep 2016
Location: Virginia
Posts: 814
SUN #8893
|
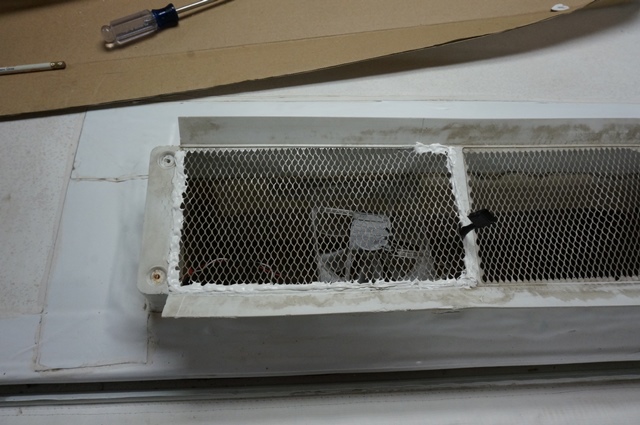
Hello,
Was able to finally get the refrigerator vent off and the area cleaned up. The new vent cover came in and it appears to be an exact match.


Sent from my iPhone using Tapatalk
__________________
1987 Sunline T1550
2012 Ford Expedition EL Limited 5.4L V8, 4WD
"Twenty years from now you will be more disappointed by the things that you didnt do than by the ones you did do..." Mark Twain]
|
|
|
|
|
03-31-2018, 08:34 PM
|
#419
|
|
Moderator
Join Date: Nov 2006
Location: Ohio
Posts: 12,654
SUN #89
|
Hi Tommie,
Looking good on the fridge vent replacement.
Question: Did they have any type of smaller screen on top? Not as small as a window screen but more like 1/8" squares verses what the plastic shows that looks close to 1/2" squares.
Only reason I'm asking is bee and hornet entry. I do not know if this ia a problem in your area, up here it is. Mud daubers too like to get in. Our has the Domestic screen on top that are approx 1/8" triangles. See here
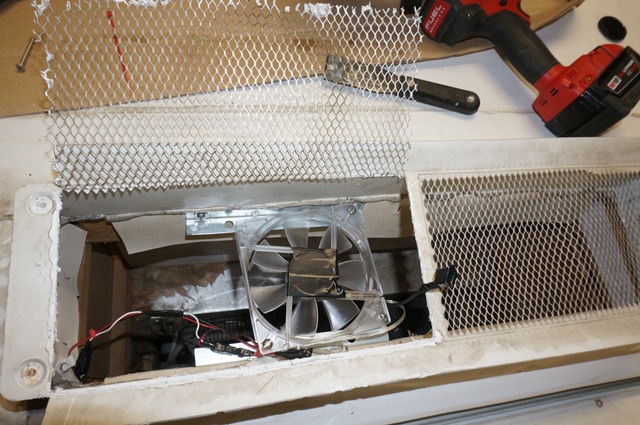
Those pics are from a fridge fan upgrade but you can see the Dometic screen. Down on the side cover for the fridge, I added Camco stainless screens too to keep the bees out. That screen is also larger then window screen, more like 3/32" squares. Window screen "might" be too dense and restrict air flow. I have never tried it, just assuming as I have always seen larger the window screen.
Not saying you have to add this, just if bees are a big thing in your area this is how it has been solved before.
On a side note, good job on the Eternabonding. Looks good. To pass on a tip, to prevent dirt from sticking to the gray exposed edge of the Eternabond sealant, apply a thin film of Dicro over that exposed edge to seal it over. Lay a very small bead of caulking down and using a wet soapy finger, smooth it over. Tap down any high puddles with wet soapy finger then smooth out.
Your doing great!!!
Thanks for sharing
John
__________________
Current Sunlines: 2004 T310SR, 2004 T1950, 2004 T2475, 2007 T2499, 2004 T317SR
Prior Sunlines: 2004 T2499 - Fern Blue
2005 Ford F350 Lariat, 6.8L V10 W/ 4.10 rear axle, CC, Short Bed, SRW. Reese HP trunnion bar hitch W/ HP DC
Google Custom Search For Sunline Owners Club
|
|
|
|
|
03-31-2018, 08:55 PM
|
#420
|
|
Senior Member
Join Date: Sep 2016
Location: Virginia
Posts: 814
SUN #8893
|
Thanks JohnB.
It's funny you should ask about the screen. I was looking at that earlier before I put the cover on. We have bees, wasps and hornets in this area. Wasps make nests around the front porch all the time. I thought I had a piece of screen in the garage but couldn't find it so I may have to get a small piece. I was going to use my glue gun to attach it.
I do remember you mentioning applying Dicor to the edges of the Eternabond in other posts. I started putting the Dicor on the Eternabond today. I found some air pockets in the Eternabond in the process. Tried to smooth them out but no luck. Woohoo! Almost done.
Thanks for all of the information.
Tommie
Update: Good to know about the window screen being too dense. I think that is what I had.

__________________
|
|
|
|
|
|
|
Currently Active Users Viewing This Thread: 1 (0 members and 1 guests)
|
|
|
 Posting Rules
|
You may not post new threads
You may not post replies
You may not post attachments
You may not edit your posts
HTML code is Off
|
|
|
|
 » Recent Sunline Discussions
 |
|
|
|
|
|
|
|
|
|
|
|
|
|
|
|
|
|
|
|
|
|
|
|


 Linear Mode

