 |
 04-23-2008, 09:15 AM
|
#1
|
|
Senior Member
Join Date: Mar 2008
Posts: 351
SUN #549
|
T2363 Water Leak Repair
As I had posted earlier in Modifications, we were replacing the carpet in our T2363 because the front carpet was stained by the prior owner and would not come clean. Since the carpet we chose is sold in 12' wide rolls we only had to buy an additional 2 linear feet to have enough carpet to do the rear also.
First I removed the bed, fresh water tank, pump, etc so I could replace the carpet. When we pulled up the old carpet, we found that the floor had mildew stains against the rear wall:

I also found that the very bottom 1/2" or so of the paneling was soft. It was obvious we had a water leak in the rear wall.
This past Saturday, I got outside early and began disassembly. Removed the rear window, water heater, the aluminum trim in the rear, and finally the siding. Here's what I found:


With it all apart, it was easy to determine the source of the leak. When the rubber roof membrane was installed at the factory, it was cut even with the roof in the rear. The manufacturer recommends that the membrane extend down the walls approximately 1" to assist in preventing water infiltration. Despite the aluminum trim, putty tape and lap sealant covering the edge, water still managed to work it's way in at the two rear corners. The center (high spot) was dry. Once the water found a way in, the cardboard-like underlayment (I've seen it called "bud board", regardless it is a pressed paper product) used under the rubber membrane soaked up the water like a sponge. The remainder of the water made it's way down to the bottom of the wall where it was trapped by the membrane used to seal the underside of the trailer (in the rear, that membrane is brought up the wall about 6"). The water sat there and rotted out the base of the rear wall, about 12" of the door side wall, the rear floor support and about 2" of the rearmost flooring.
I trimmed off the bottom 6" of the paneling due to rot and mold growth. Then I removed the rotten wood from the structure.

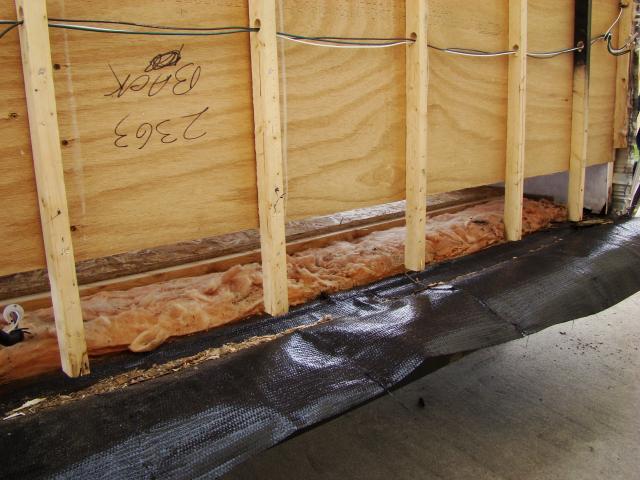
Once that was out, I ripped down some lumber to match the sizes Sunline used to construct the walls. Then I began replacing and reinforcing the structure. I used some plain white paneling to replace what I had to cut out of the rear wall - this will only be used as a spacer, once the carpet is replaced, I'll make up a wide base molding and trim the bedroom in it, completely hiding the mismatched paneling.


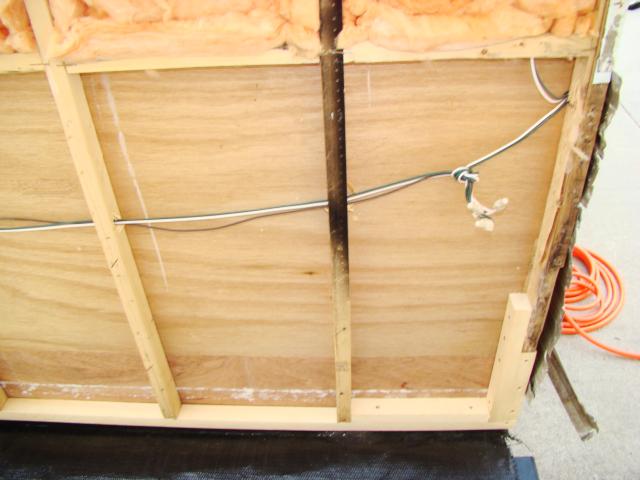
This shows what was replaced on the side wall:

I did get the water heater, siding and rear window reinstalled on Sunday as well. Unfortunately, it was beginning to drizzle, so I was in a rush to get it tarped up and had no time to get any pictures of it reassembled. I Will have plenty more pictures after this weekend.
Now I need to figure out how I'm going to address the roof. The roof construction is 1/8" plywood, covered in the "bud board" which is then covered in the rubber roof membrane. Approximately 2' of the bud board and plywood in each rear corner are destroyed due to the water ingress. I will attempt to fix what's there, although I am fully prepared to strip the roof, redeck it and lay down a new piece of rubber.
I went over this trailer very well when we bought it, and completely missed this damage. The rear paneling was only soft right where it met the floor, and I didn't notice it due to the carpeting. The floor was not yet rotten enough to be "soft". There was NO mold or mildew like odor, and the carpet was not wet at all. This was certainly an old, slow leak, and I'd put money on it leaking since it left the factory. Must have been the last roof installed on a Friday!
In hindsight, there was one small sign of a problem, in the rear right corner - the rubber was just slighly wavy due to the deterioration of the underlay. I had read that rubber sometimes gets wavy from the sun/heat or improper cleaning and that it was nothing to worry about. Now I know better - any sign of loose rubber roofing material should be checked throughly for water ingress.
I'm lucky that we decided to replace the carpet, which is how I found the damage. With the rot as bad as it was at the base of that rear wall, total failure was not too far off with the stresses of it bouncing down a highway.
I was able to repair the damage with under $50 in materials, however, there's a good 30 hours of labor there and I haven't addressed the roof yet (I'm estimating another $500 in materials to reroof the trailer). If I had to pay someone to have this repaired, there's no way I could afford it at $100 an hour. I would have likely been in a position where I would have had to junk the trailer and take the loss on what I paid for it. I've only owned this thing three weeks, and I've never been camping in an RV before - I hope I enjoy it after all this work!
Folks, inspect your roof often! I'll have more updates soon.
- Frank
__________________
|

|

|
 04-23-2008, 09:46 AM
|
#2
|
|
Moderator
Join Date: Dec 2006
Location: Michigan
Posts: 6,155
SUN #123
|
That's very interesting Frank. Thanks for taking the time to get all the pics. I'll be pulling my carpet out hopefully this weekend, and I hope I don't find anything like that. I have the same bedroom layout as you and I have a little rippled spot on the back wall just in front of the nightstand. I've never thought much about it as I don't think it's water damage, but maybe I'll end up pulling out farther back than I'd hoped.
BTW, what's the deal with that one stud that's all black? Is that mold or burn marks? It's the one that's second in from the door side and has the wire going through it.
Jon
__________________
__________________
2007 T-286SR Cherry/Granola, #6236, original owner, current mileage: 9473.8 (as of 6/18/21)
1997 T-2653 Blue Denim, #5471
1979 12 1/2' MC, Beige & Avocado, #4639
Past Sunlines: '97 T-2653 #5089, '94 T-2251, '86 T-1550, '94 T-2363, '98 T-270SR

|

|

|
 04-23-2008, 11:05 AM
|
#3
|
|
Moderator
Join Date: Nov 2006
Location: New York
Posts: 1,920
SUN #98
|
Frank,
WOW amazing work. Thanks for sharing the pictures with us.
Hutch
__________________
Mary & Tom (aka Hutch)
2015 Jayco Eagle Premier 361REQS
2014 GMC Sierra 3500HD 4x4 CC D/A
Sunlines: 2005 Solaris T-280SR; 1999 Solaris T-2670; 1998 Saturn T-24A
|

|

|
 04-23-2008, 11:27 AM
|
#4
|
|
Moderator
Join Date: Dec 2006
Location: Pennsylvania
Posts: 2,285
SUN #128
|
When I was on a ladder cleaning black streaks I noticed a little puddle of water in the corner of the roof. It dips down a little there for some reason...looks kinda iffy, and even more so now. The QUE had the same low corner area. Has anyone else noticed a dip right at the corners on the roof? I was also wondering about the black stud.
__________________
Pam
Lance 1475 "Snoopy"
2012 GMC Sierra 3500HD 4x4 D/A
2012 Arctic Fox 30U, SUNLINES - 2006 2753 "Tweety", 2007 QUE "QUEtSE", 2364, 1660
|

|

|
 04-23-2008, 12:00 PM
|
#5
|
|
Moderator
Join Date: Nov 2006
Location: New York
Posts: 1,920
SUN #98
|
Quote:
|
Originally Posted by Quetse
.. I noticed a little puddle of water in the corner of the roof. ... Has anyone else noticed a dip right at the corners on the roof?
|
Pam,
We have a similar low spot at the corners of our roof where water will puddle.
We had the Sealtech leak test done on our Sunline last year because I had the same concerns. No leaks showed up, so hopefully we're good.
Quote:
|
Originally Posted by Quetse
I was also wondering about the black stud.
|
So was I 
Hutch
__________________
Mary & Tom (aka Hutch)
2015 Jayco Eagle Premier 361REQS
2014 GMC Sierra 3500HD 4x4 CC D/A
Sunlines: 2005 Solaris T-280SR; 1999 Solaris T-2670; 1998 Saturn T-24A
|

|

|
 04-23-2008, 12:46 PM
|
#6
|
|
Moderator
Join Date: Dec 2006
Location: Michigan
Posts: 6,155
SUN #123
|
I've always had the same roof issue, sometimes worse than others. I've never had a problem as a result of it though, that I can remember anyway. If I recall, my 270 has a small dip on each corner and a small valley in the center. But then the roof goes up into the seam, so water can't go up into it.
Jon
__________________
2007 T-286SR Cherry/Granola, #6236, original owner, current mileage: 9473.8 (as of 6/18/21)
1997 T-2653 Blue Denim, #5471
1979 12 1/2' MC, Beige & Avocado, #4639
Past Sunlines: '97 T-2653 #5089, '94 T-2251, '86 T-1550, '94 T-2363, '98 T-270SR

|

|

|
 04-23-2008, 04:22 PM
|
#7
|
|
Senior Member
Join Date: Mar 2008
Posts: 351
SUN #549
|
The bum spot on my roof wasn't really a dip, it's more of a slightly wavy spot. If you (gently) smack it open handed, it feels a little less solid than the surrounding area. I'll take some pictures up there once I get the tarp off again.
Anyone really nervous or in doubt could remove the rear aluminum trim bar and inspect the roof edge. It'll be quite obvious if there's water getting in there. Make sure to replace the putty tape (or butyl) before reinstalling the trim.
The black stud - it looks REALLY bad in the picture, but it's just black spray paint! Don't know the source, it could have been on the end of the lumber bundle..
- Frank
__________________
|

|

|
 05-27-2008, 06:41 PM
|
#8
|
|
Senior Member
Join Date: Mar 2008
Posts: 351
SUN #549
|
I'm really past due on an update for you guys. Finally had some time today to organize, resize and upload some pictures. So here we go!
Got the siding back on:

Here's why it leaked, you can see where the rubber roofing material is cut flush against the rear of the roof. This allowed for real easy water ingress if the roof sealant wasn't 100%:
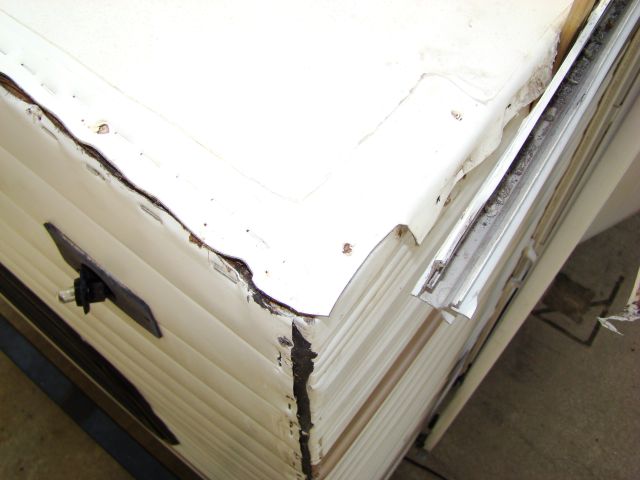
Here's the entry point of the water:
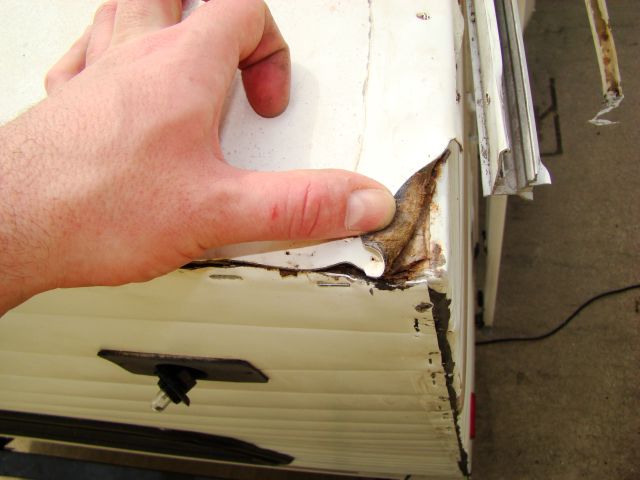
I used Eternabond RoofSeal tape to get it water tight again. The white on white is a little tough to see, but if you look real close it's visible. I went across the entire back first, let that wrap over the sides 1" and down the rear wall 1". I then ran Eternabond 8" up each side, again wrapping down the sides of the walls. Now water should run down the walls and not into the roof:

Then the roof trim was installed, and the edges and scews got a coat of Dicor self leveling sealant. When I have more free time, I will seal all the roof seams with the Eternabond. It was dusk at this point, and the Eternabond is much more visible:
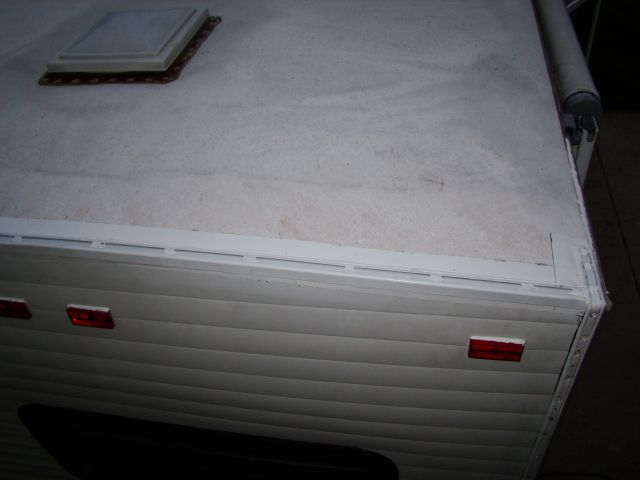
Trim back on, lights reinstalled:

Now we go back inside and start the finish work..
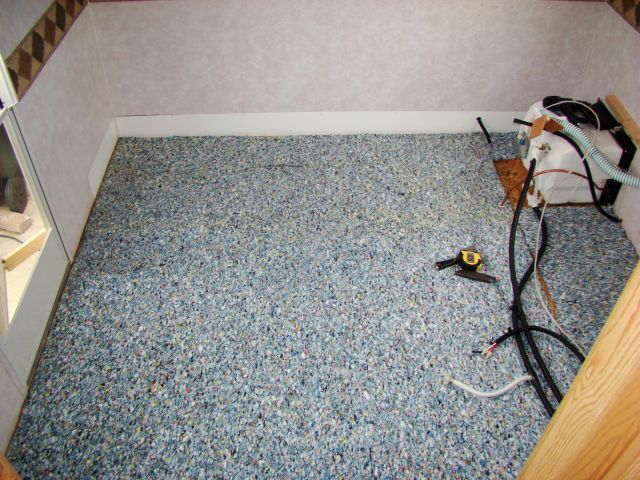
First, lay down the carpet padding:

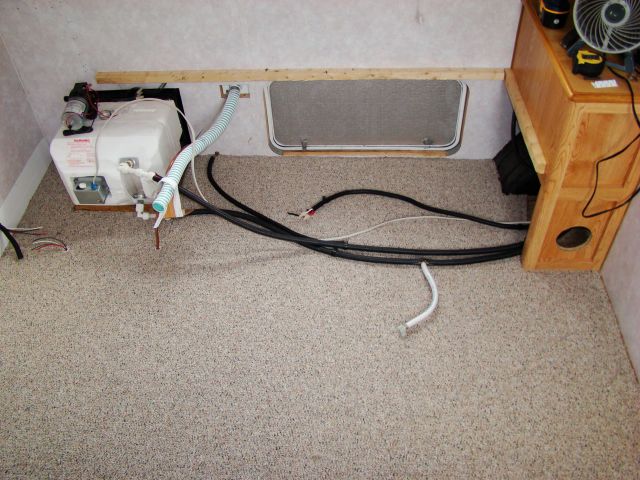
And then the carpet:

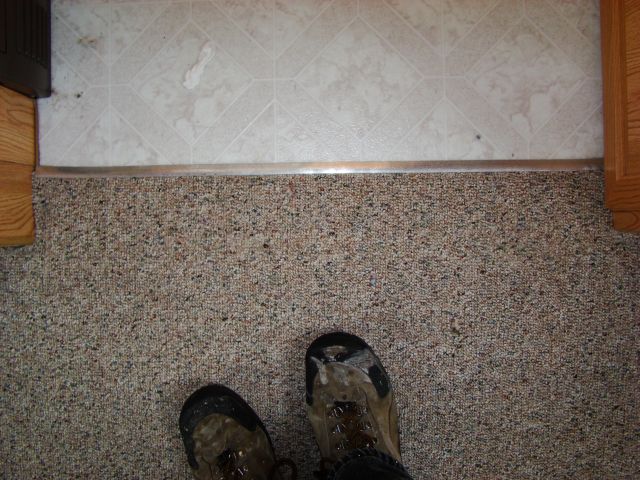
Used carpet bar for the transition to the linoleum, just like up front:
Then I reinstalled the rearmost corner cabinet. These are attached from the outside in. When I had the siding off, I removed the screws holding the cabinet and installed cross-braces between the wall studs so I could reinstall the cabinet from the *inside* instead. Couldn't get to the frontmost cabinet easily, so I left it alone and carpeted around it:
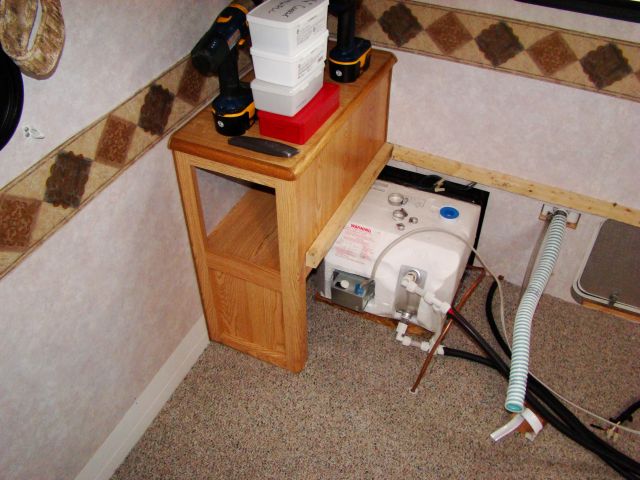
Get the bed back in place and nailed down:

And finally reconnect all the plumbing, reinstall the fresh water tank and pump:

And that's it! It's back the way it was.
Although the rear corner of the roof now has a gentle wave to it, the structure was sound. Had there been some structural problems up there, I would have ripped the whole roof off. I was tempted to do it anyway, but it's hard to get extra hands to help, and the job isn't cheap. I've never camped in an RV before, so if I really enjoy it, I'll re-roof the trailer at a later date. For now, it's watertight and plenty sturdy.
The only thing remaining at this point is to make up some trim to cover the mis-matched paneling. I've been busy doing lots of other stuff to the trailer, so I will hopefully get that trim done this coming weekend.
- Frank
__________________
|

|

|
 05-28-2008, 06:31 AM
|
#9
|
|
Senior Member
Join Date: Aug 2007
Location: Maine
Posts: 160
SUN #379
|
Awesome job, Frank!
I'm going to start tearing out my rear kitchen this week to get at a leak and repair the soft floor. Hope my results are as good as yours. I'll post photos.
__________________
Chris & Tara
Ben & Jerry (The 2 Beagles)
2017 F-150 Crew Cab
2003 2570
|

|

|
 05-28-2008, 12:12 PM
|
#10
|
|
Moderator
Join Date: Nov 2006
Location: New York
Posts: 1,920
SUN #98
|
Frank,
Excellent job. Thanks for taking the pictures and sharing them with us.
Hutch
__________________
Mary & Tom (aka Hutch)
2015 Jayco Eagle Premier 361REQS
2014 GMC Sierra 3500HD 4x4 CC D/A
Sunlines: 2005 Solaris T-280SR; 1999 Solaris T-2670; 1998 Saturn T-24A
|

|

|
 05-28-2008, 07:36 PM
|
#11
|
|
Senior Member
Join Date: May 2008
Location: Ontario
Posts: 663
SUN #597
|
What can I say?
Quote:
|
I've never been camping in an RV before - I hope I enjoy it after all this work!
|
You'll probably sleep like a baby and even enjoy the pitter patter of rain drops on your roof!
Henry
__________________
2019 F150 3.5L Max Tow
2014 Arctic Fox 22G
2005 Sunline T-2499

|

|

|
 05-01-2017, 09:46 AM
|
#12
|
|
Moderator
Join Date: Dec 2006
Location: Michigan
Posts: 6,155
SUN #123
|
Frank! Haven't heard from you in a long time. How's this repair holding up?
__________________
2007 T-286SR Cherry/Granola, #6236, original owner, current mileage: 9473.8 (as of 6/18/21)
1997 T-2653 Blue Denim, #5471
1979 12 1/2' MC, Beige & Avocado, #4639
Past Sunlines: '97 T-2653 #5089, '94 T-2251, '86 T-1550, '94 T-2363, '98 T-270SR

|

|

|
 09-13-2017, 02:38 PM
|
#13
|
|
Member
Join Date: May 2010
Location: New York
Posts: 56
SUN #1108
|
Thank you for posting this. Just found a soft wall in the back left corner of the bedroom in out 2363. Thought water maybe was getting in from the tailight. Now I will check the corner of the roof. Thanks so much.
__________________
__________________
KathleenNY
2002 Sunline Solaris T-2363
2005 Chevrolet Tahoe
|

|

|
 |
|
Currently Active Users Viewing This Thread: 1 (0 members and 1 guests)
|
|
|
 Posting Rules
|
You may not post new threads
You may not post replies
You may not post attachments
You may not edit your posts
HTML code is Off
|
|
|
|
 » Recent Sunline Discussions
 |
|
|
|
|
|
|
|
|
|
|
|
|
|
|
|
|
|
|
|
|
|
|
|


 Linear Mode


