Journey with Confidence RV GPS App RV Trip Planner RV LIFE Campground Reviews RV Maintenance Take a Speed Test Free 7 Day Trial ×
Sunline RV Forum
Sunline User Photos

Go Back   Sunline Coach Owner's Club > Technical Forums > Repairs and Maintenance
Click Here to Login

Join Sunline Club Forums Today


Reply
 
Thread Tools Search this Thread Display Modes
Old 01-08-2021, 01:32 PM   #1
Junior Member
 
Join Date: Nov 2020
Location: New York
Posts: 6
SUN #12378
beautysbeast is an unknown quantity at this point
super newbie

hey there! my fiancé and I are beginning to renovate a 1989 T1770 (I think); we are SO excited! However, we have literally no idea what we are doing. Any advice on where to start? We have to replace some walls because of water damage and I'm not sure on how insulated it is or if we should pull up the floor or not so I would love any information you guys can provide! thanks so much!
__________________

__________________
beautysbeast is offline   Reply With Quote
Old 01-08-2021, 08:05 PM   #2
Moderator
 
JohnB's Avatar
 
Join Date: Nov 2006
Location: Ohio
Posts: 12,651
SUN #89
JohnB is on a distinguished road
Hi and welcome!

Congrats on your new Sunny! Good times ahead.

It sounds like you have a project, and you have come to the right place! This is the place for Sunline info.

A few things before you tear into your Sunny repairing it. First is an understanding of how campers are built and create a plan and sequence for the repair. Campers are built very different then a house, which is built from the inside out. So in a house, replacing bad wall board, you take the walls down inside and fix it all from the inside.

Campers are built from the outside in as it is easier and stronger to build then that way. It is very different then house build. In many cases you can do extra work by just tearing into a bad wall from the inside without knowing how to repair all the damage in the wall. Many times is is better and needed to start at the outside and work your way in so you can preserve as much of the camper is possible.

Suggest this, if you can post inside/outside pics of your camper, and the areas that you know are bad and need fixing. We can then help give you a better overall plan on possible leak sources and how to approach the repair in what sequence. The plan may be, to start on the outside of the camper and work inwards, or start on the inside. It all "depends" on what the damage is and how bad it is. The main goal is to try and save as much of the old camper as you can. It takes less time then totally starting over.

If you need help posting pics, just ask, we can help and pics are a big piece of helping us see what you are up against and how we can better help you.

In the mean time, see this link which has links to other active and some past camper restorations. This can help explain some of the process and the order it was done in.

https://www.sunlineclub.com/forums/f...tml#post152848

Hope this helps.

John
__________________

__________________
Current Sunlines: 2004 T310SR, 2004 T1950, 2004 T2475, 2007 T2499, 2004 T317SR
Prior Sunlines: 2004 T2499 - Fern Blue
2005 Ford F350 Lariat, 6.8L V10 W/ 4.10 rear axle, CC, Short Bed, SRW. Reese HP trunnion bar hitch W/ HP DC

Google Custom Search For Sunline Owners Club
JohnB is online now   Reply With Quote
Old 02-07-2021, 02:29 PM   #3
Junior Member
 
Join Date: Nov 2020
Location: New York
Posts: 6
SUN #12378
beautysbeast is an unknown quantity at this point
John,

I'm so grateful for your response and support!!

I am having some trouble figuring out how to upload pictures.
Could you help me out with that?

Thanks!
Katelyn
__________________
beautysbeast is offline   Reply With Quote
Old 02-08-2021, 07:13 AM   #4
Junior Member
 
Join Date: Nov 2020
Location: New York
Posts: 6
SUN #12378
beautysbeast is an unknown quantity at this point
exterior pictures

I think I figured out how to post pictures!

Here are pictures of the outside of my camper.
Attached Images
File Type: jpg IMG_9042.jpg (100.8 KB, 3 views)
File Type: jpg IMG_9043.jpg (99.8 KB, 2 views)
File Type: jpg IMG_9047.jpg (106.5 KB, 2 views)
File Type: jpg IMG_9048.jpg (88.7 KB, 2 views)
File Type: jpg IMG_9046.jpg (78.3 KB, 2 views)
File Type: jpg IMG_9044.jpg (80.7 KB, 2 views)
__________________
beautysbeast is offline   Reply With Quote
Old 02-08-2021, 07:18 AM   #5
Junior Member
 
Join Date: Nov 2020
Location: New York
Posts: 6
SUN #12378
beautysbeast is an unknown quantity at this point
interior pictures

here are some pictures of the interior! I'm not sure why they're sideways, sorry!


Let me know what your thoughts are and if you need any additional pictures!
I will also be filming a video walkthrough soon so I'll post that here as well!
Attached Images
File Type: jpg IMG_9036.jpg (119.5 KB, 2 views)
File Type: jpg IMG_9037.jpg (109.9 KB, 2 views)
File Type: jpg IMG_9038.jpg (95.9 KB, 2 views)
File Type: jpg IMG_9039.jpg (107.2 KB, 2 views)
File Type: jpg IMG_9041.jpg (106.7 KB, 2 views)
__________________
beautysbeast is offline   Reply With Quote
Old 02-08-2021, 10:53 PM   #6
Moderator
 
JohnB's Avatar
 
Join Date: Nov 2006
Location: Ohio
Posts: 12,651
SUN #89
JohnB is on a distinguished road
Hi Katelyn,

I see you figured out one of the ways on how to upload pics to our site. For the future,

There are 3 ways to add pics.

1. Upload pics to a specific post attaching them at the end of the post. This method you did already.

2. Linking them in from a public viewable web photo hosting service you have.

See here for 1 and 2 https://www.sunlineclub.com/forums/f...html#post86041

3. You can upload pics to the forum in your own personal photo album. Then link them to anywhere in the text of a post. See here on how to create an album. https://www.sunlineclub.com/forums/f...html#post87945

If you still get stuck, let us know. Pic's go a long way in helping show things you are working on, and we really like seeing Sunline pics!

On the pictures being rotated, this comes from the camera you are using being rotated. Cell phones do this often. Most times, if you take pics with your camera/phone in the normal photo taking position, they will upload correctly. If you rotate the camera, then issues come.

I'm not the wizard on this, but modern day digital cameras store the camera position it was taken in, buried in the code of the picture. When the photo is uploaded to our software, it reads the picture rotation number. If the camera took the picture in its normal "0" degrees position, then it posts it that way. If the camera was rotated, so you could see it better at the time of taking, then it stamps the picture XXX degrees from 0 and it posts that XXX degrees.

There are ways to edit the picture degrees with photo editing software, so when you save the picture, it resets the photo to 0 degrees from the way you edited it. I use a program called Ifran view, a free software that allows sizing and rotation, cropping of pics that can then be saved off edited. If you want to get into this, I can help explain this method. OR the other good forum member Tinstaafl, who helped me figure out my issue with rotated pics.


Hope this helps

John
__________________
Current Sunlines: 2004 T310SR, 2004 T1950, 2004 T2475, 2007 T2499, 2004 T317SR
Prior Sunlines: 2004 T2499 - Fern Blue
2005 Ford F350 Lariat, 6.8L V10 W/ 4.10 rear axle, CC, Short Bed, SRW. Reese HP trunnion bar hitch W/ HP DC

Google Custom Search For Sunline Owners Club
JohnB is online now   Reply With Quote
Old 02-09-2021, 05:37 AM   #7
Junior Member
 
Join Date: Nov 2020
Location: New York
Posts: 6
SUN #12378
beautysbeast is an unknown quantity at this point
John,

Thank you so much for that! I will keep that in mind for the pictures I post next.

As far as our camper reno goes - where do you think we need to start?

Katelyn
__________________
beautysbeast is offline   Reply With Quote
Old 02-10-2021, 03:30 PM   #8
Moderator
 
JohnB's Avatar
 
Join Date: Nov 2006
Location: Ohio
Posts: 12,651
SUN #89
JohnB is on a distinguished road
Quote:
Originally Posted by beautysbeast View Post
As far as our camper reno goes - where do you think we need to start?

Katelyn
Hi Katelyn,

Where to start on the renovations, this is how I would approach it.

First, inspect the whole camper to assess how much water damage is present and where. The first time doing this, it will take some time. There are two ways to do this.

1. The ideal way is to use a moisture meter. They now cost about $45. This tool is a real need for anyone owning a camper or thinking of buying one. The meter can scan walls, floors, and ceiling from the camper's inside without removing anything. The meter scans about 3/4" deep into what is behind it and creates a percent of wetness. From the meter number, you can tell how much is damaged and what is not. This link will help some on which to buy and some on how to use it. https://www.sunlineclub.com/forums/f...per-17613.html

Here is some more on the meter to a fellow new member wanting to buy a camper. Lowes now sells the meter I list as well.
https://www.sunlineclub.com/forums/f...ner-19999.html


2. The second way is to strategically remove some screws outside the camper in the right place to look for rusted screws. When water damage happened inside a camper's wall, it starts rusting the screws on the threads from the wet wood. Over time, the rust continues to grow on the threads. As the rust advances, it will result in rusting to the outside of the screw head. That may sound strange as one may think the screw exposed outside will rust first at the heads. The threads of the screw sitting in wet wood 24/7 nonstop rust faster than the head of the screw exposed part of the time to rainwater.

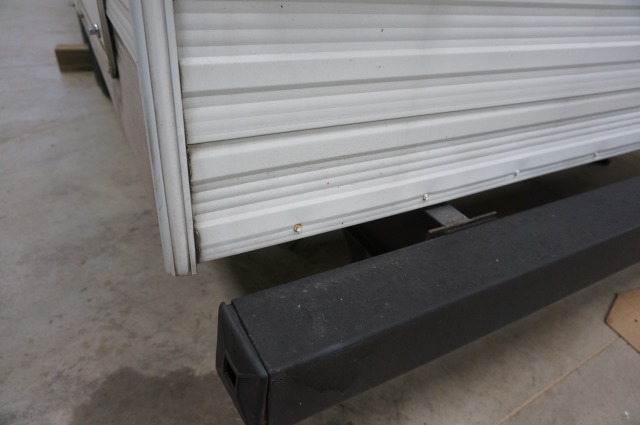
The back and the front wall of the camper at the bottom of the wall has a series of screws holding the bottom siding piece. You can remove the screws and have a look. Then put the screw back in, assuming the screw is still intact and the wood it is screwed into has enough strength left to accept a screw. See here.

These screws are at the back wall. Your camper should have them too.


Here they are at the front wall


This picture shows mild rusting screws. They all started rusting from inside the wall. With advanced screw rusting, there are no threads left, or brown rust goo comes on the threads from active wood rot.


This is a goo'ey one. Active rot ongoing.


Ideally, when you remove them, place the screw next to the hole it came out of and take some pics of how bad or good the screws are in relation to the camper. You may find, one end of the wall is rusted, the other end not.

See here, this is on a roof molding, your camper does not have the molding, but it shows the water damage on the left and then stops towards the center of the camper


This screw removal method tells you the wood behind this area has had a water infection.

The corner moldings have screws that can tell the same thing about water infection behind this area. The corners have different ways they leak, but the result is wet wood rusting the screws. See here on a rear corner molding. Your camper is built like this too. The screws are behind a vinyl screw cover if your cover still exists. The cover gets old and brittle and falls out sometimes. The odds are you will break the old cover getting it off. A roll of new cover stip is about $15 to $30 for 50 feet of it pending style and brand.


The same screw removal method can be done to doors, older style camper windows with screws outside, etc.

The screw removal process does not cost any money as the meter does; removing the screws helps tell part of the story. The method is limited as you cannot tell how far the water damage went up or down the wall, just that you have the problem.

Using the moisture meter, you scan the entire camper, make a sketch of each wall, and write the readings down on the sketch. You can see almost everything with the moisture meter.

The goal of the inspection is to tell you how water infected the camper is and where. From the inspection and understanding of what you found, you plan how to repair the camper. The info you find may tell you, this repair is too much for us. You learned this before you started tearing into the camper. You may want to try and sell it as is, still intact.

If you have the ability, time, and "want" to fix the camper, have basic knowledge of wood tools, and use them, you can fix the camper. It will take time and lots of time. But, you may be able to repair it in sections, splitting the time up. Fix the worst area first, seal the rest of the camper to stop leaking, have fun camping. Then come back at it again and do the next big section. It can be gratifying seeing your hard work in the campground sitting around the campfire admiring your hard work.

We can help you interpret what the inspection means, what it will take to correct it, and we have many posts of club members with many pictures of how they fixed their camper, all willing to help.

One thing I suggest, do not start the project by ripping the camper apart from the inside. Campers are not built like houses; they are assembled at the factory from the inside out. The cabinets are screwed in from the outside and the ceiling down. You cannot get to those screws from the inside.

Many times, pending the water damage, it is better to take the siding off first, remove/repair the bad wood studs, etc. and leave the inside wall board intact. If the wallboard is rotted out gone, the wall studs behind them are also, and the siding still needs to come off to repair the wall as the siding is stapled to the wall studs. Taking the siding off may look daunting at first, but it comes off relatively easy with some understanding. We can help show you how to do that.

Once you know where the water damage is, we can show how to take the camper apart and what area may be easier or harder to do.

Hope this helps.

John
__________________
Current Sunlines: 2004 T310SR, 2004 T1950, 2004 T2475, 2007 T2499, 2004 T317SR
Prior Sunlines: 2004 T2499 - Fern Blue
2005 Ford F350 Lariat, 6.8L V10 W/ 4.10 rear axle, CC, Short Bed, SRW. Reese HP trunnion bar hitch W/ HP DC

Google Custom Search For Sunline Owners Club
JohnB is online now   Reply With Quote
Old 02-10-2021, 03:56 PM   #9
Moderator
 
JohnB's Avatar
 
Join Date: Nov 2006
Location: Ohio
Posts: 12,651
SUN #89
JohnB is on a distinguished road
From your pics, I can see this and speculative what may have happened.

At the entry door, the caulking is deteriorated which is very common on a camper this old. The entire camper has some level of deteriorated sealants. The 2 holes in the siding are a leak location. Water will get in those 2 holes. You can put gorilla tape over those 2 holes now to buy you some time to fix it right later. The caulk, when the time comes to redo this, lets talk so you use the right caulking. Do no use silicone, it is the wrong caulk for this application, it will not last. You may find you have to pull the door frame out, and then it can be resealed with high grade butyl tape and Proflex RV caulk.


This picture has the looks of a window flange leak, or the roof screws/seam leak or both. Odds are high this whole wall is wet behind this area.


This picture is of cracked, missing vinyl screw strip cover. The cover comes in different widths. Pull a small piece out, press it flat and measure the width. 1" wide, 3/4" wide, is common but your older camper may have a different width. We can help you source the cover once you know the size.


This appears to be the left rear wall of the camper in the shower. Is that correct? This area shows signs of ceiling damage and for sure the wall. There may be a left rear corner molding leak, the roof hatch leak from before they changed the new fan/vent that shows up in the pics. And some may be from using the shower itself. The older campers did not have a very good wall surround for the shower. The moisture meter can scan that whole wall and tell you quick what is behind it. The wall panel looks to be delaminating. It is 1/8" thick luan plywood. If you shine a light and a mirror, you might be able to see behind the wall panel as it looks' to be released from the wall.


You did good on the pics! We can see a lot in them to try and help better

John
__________________

__________________
Current Sunlines: 2004 T310SR, 2004 T1950, 2004 T2475, 2007 T2499, 2004 T317SR
Prior Sunlines: 2004 T2499 - Fern Blue
2005 Ford F350 Lariat, 6.8L V10 W/ 4.10 rear axle, CC, Short Bed, SRW. Reese HP trunnion bar hitch W/ HP DC

Google Custom Search For Sunline Owners Club
JohnB is online now   Reply With Quote
Reply

Tags
1989, newbie, renovation


Currently Active Users Viewing This Thread: 1 (0 members and 1 guests)
 

Posting Rules
You may not post new threads
You may not post replies
You may not post attachments
You may not edit your posts

BB code is On
Smilies are On
[IMG] code is On
HTML code is Off
Trackbacks are Off
Pingbacks are Off
Refbacks are Off


Similar Threads
Thread Thread Starter Forum Replies Last Post
Super Cute 2007 T-195SR For Sale TurtleBax Sunlines For Sale 6 07-23-2018 04:04 PM
Super Simple, No-Mess Chicken Pot Pie OTW Recipes 0 02-10-2017 03:37 AM
Scored classic 5th, 18 1/2' 1986 Super Clean Split Sunline 5th Wheels 16 12-06-2013 09:12 AM
Ford Super Duty/Excursion TT Mirror and OH Cab Light Install Sunline Fan Towing and Tow Vehicles 10 06-27-2011 11:32 PM
Ford Super Duty Recall MACK C-85 Towing and Tow Vehicles 3 01-03-2011 03:30 PM


» Featured Campgrounds

Reviews provided by

Disclaimer:

This website is not affiliated with or endorsed by Sunline RV or any of its affiliates. This is an independent, unofficial site.


All times are GMT -6. The time now is 10:47 AM.


×