 |
 08-13-2022, 06:45 PM
|
#1
|
|
Junior Member
Join Date: Aug 2022
Location: Massachusetts
Posts: 7
SUN #13368
|
Started ripping into the floor! Of my 1550
So i picked this beauty up and it the floor was soft from pretty much the end of the fernace and the back of the sink to the back wall plus it sat for a few years  if anyone has any tips on how to go about redoing all the frame work or has any good pics id appreciate it im new at all this and just learning as i go
__________________
|

|

|
|
08-14-2022, 11:42 AM
|
#2
|
|
Moderator
Join Date: Nov 2006
Location: Ohio
Posts: 12,649
SUN #89
|
Hi,
You have some major floor rot. Not sure what it looked like before you took the floor joists out, do you have any pics of that? It can help lead to where the leak started.
I’ll be back later. Signal too low right now
John
__________________
__________________
Current Sunlines: 2004 T310SR, 2004 T1950, 2004 T2475, 2007 T2499, 2004 T317SR
Prior Sunlines: 2004 T2499 - Fern Blue
2005 Ford F350 Lariat, 6.8L V10 W/ 4.10 rear axle, CC, Short Bed, SRW. Reese HP trunnion bar hitch W/ HP DC
 Google Custom Search For Sunline Owners Club
|
|
|
|
|
08-14-2022, 03:58 PM
|
#3
|
|
Moderator
Join Date: Nov 2006
Location: Ohio
Posts: 12,649
SUN #89
|
Hopefully the internet signal holds out for this.
Im not sure how far you want to take your repair, but here are some thoughts to think through. I have restored several of the newer Sunlines and did other water damage repairs on a few other brands. A floor rotted like yours typically comes from a leak above the floor but not always. A Damaged water heater tank or plumbing leak can raise havoc too, but that rot emanates from the heater or fitting and spreads out and is often more localized.
The floors I have seen totally gone have come from roof or siding leaks where a screw, molding or opening was cut into the siding. The siding itself is pretty good at keeping water out, but any openings in the siding or corner joints are classic leak points as the camper ages. The reason Im bringing all this up is, before the floor is fixed you have to find the leak sources, there is often several leak sources that took out the floor the first time. If you do not address those leak areas, your new floor will start being damaged after the first rain the camper is in.
See this reply of mine to another new member who also has a soft floor. So far he has not been back to respond, but I talk to a moisture meter there and getting one. With the meter you can scan and see which wall has moisture inside it but yet the wall board does no yet look too bad. A leak from above in a wall cavity runs down until it hits the floor. Then water starts to spread out across the floor and over time, years, start rotting the wall studs and floor. You notice the floor as you walk on it , but the walls can be as bad or at least the bottom 1 to 2 feet vertically. The insulation acts like a mop to hold water and the rot just starts. And keeps going as when the next rain comes, more water keeps wicking into the walls and floor etc..
https://www.sunlineclub.com/forums/f...tml#post158099
I sense you will need to take off the bottom siding at the walls that the floor damage goes up too. Then you can see how many wall studs have damage and the outside band board of the floor that has to be repaired. The siding can be removed carefully to be reused along with corner moldings etc. we can help with how to do that, but the realization can be, your floor repair just doubled in size to fix other water damage.
The floor system holds up the walls. If you do not fix the bottom of the wall and floor, in time the walls will have support issues. To make this repair last, you need to address the walls also.
See these 3 restore posts. They are close to the age of your camper. And Sunline changed wall and floor building methods as the year went by. I have many rebuild posts, and they can help too, but these 3 will get you started to see what this can turn into. And then you figure out what you want or do. Keep going with the repair or plan B.
A post by Yellowjacket on his T1550
https://www.sunlineclub.com/forums/f...tml#post149737
A post by Thomascine on hers
https://www.sunlineclub.com/forums/f...tml#post135493
A post by Sunline Fan on his 1979 camper still in the restore process
https://www.sunlineclub.com/forums/f...tml#post143808
While the floor plans may be different, the way they leak and were built are the same methods yours has.
Hope this helps. Let us know if you need more help on how to do the walls etc.
John
__________________
Current Sunlines: 2004 T310SR, 2004 T1950, 2004 T2475, 2007 T2499, 2004 T317SR
Prior Sunlines: 2004 T2499 - Fern Blue
2005 Ford F350 Lariat, 6.8L V10 W/ 4.10 rear axle, CC, Short Bed, SRW. Reese HP trunnion bar hitch W/ HP DC
Google Custom Search For Sunline Owners Club
|
|
|
|
|
08-14-2022, 10:32 PM
|
#4
|
|
Junior Member
Join Date: Aug 2022
Location: Massachusetts
Posts: 7
SUN #13368
|
I started digging in a little more today to see where the leak came from or started and it seems like above the fridge from the side of the ac have a little water damage but the walls themselves seem pretty solid all the way down im aware i will have to pull off the bottum outter pieces to redo the floor and also look into exactly where the leak came from and fix that also which i do plan on fixing everything in this camper and making it 100% waterproof and solid the camper did sit tilted back for a few years atleast which seems to be about right as to where the water damage was all towards the back of the camper i also found a couple screw holes that were never covered inwhich created some water damage to both front corners above the marker lights
__________________
|
|
|
|
|
08-23-2022, 06:04 PM
|
#5
|
|
Moderator
Join Date: Nov 2006
Location: Ohio
Posts: 12,649
SUN #89
|
Hi Just1650,
Did you ever get the lower siding off to see the bottom part of the wall studs?
I have been out camping for the last many weeks and had no internet access in many places to log on. Not sure where you are now on your project to help better. Let us know.
Thanks
John
__________________
Current Sunlines: 2004 T310SR, 2004 T1950, 2004 T2475, 2007 T2499, 2004 T317SR
Prior Sunlines: 2004 T2499 - Fern Blue
2005 Ford F350 Lariat, 6.8L V10 W/ 4.10 rear axle, CC, Short Bed, SRW. Reese HP trunnion bar hitch W/ HP DC
Google Custom Search For Sunline Owners Club
|
|
|
|
|
08-25-2022, 09:15 PM
|
#6
|
|
Junior Member
Join Date: Aug 2022
Location: Massachusetts
Posts: 7
SUN #13368
|
I haven't unfortunately I've been super busy at work working 10+ hour days but I plan on removing the bottom panel on the back and both sides I also realized all the seals around the windows and fridge access and water heater access are all dryed out so that's a huge leak in itself I have to remove the inside roof panels also and see what's going on up there I've been measuring everything and taking things apart inside carefully so I can put the pieces back that don't have water damage and so I have the measurents of the stuff I have to build new I'm up in the air about the rear couch/bed I kind of want to build the base the size of a twin size bed and also create some more storage space and instead of the bunks over the windows I want to just make solid cabinets but with the original face pieces
__________________
|
|
|
|
|
08-27-2022, 06:13 PM
|
#7
|
|
Moderator
Join Date: Nov 2006
Location: Ohio
Posts: 12,649
SUN #89
|
Quote:
Originally Posted by Just1650

I haven't unfortunately I've been super busy at work working 10+ hour days but I plan on removing the bottom panel on the back and both sides I also realized all the seals around the windows and fridge access and water heater access are all dryed out so that's a huge leak in itself
I have to remove the inside roof panels also and see what's going on up there
I've been measuring everything and taking things apart inside carefully so I can put the pieces back that don't have water damage and so I have the measurents of the stuff I have to build new
I'm up in the air about the rear couch/bed I kind of want to build the base the size of a twin size bed and also create some more storage space and instead of the bunks over the windows I want to just make solid cabinets but with the original face pieces
|
Hi,
We totally understand being busy with "life" when working on a camper. The fun projects (the camper) has to wait for when time allows.
First off, I totally agree about the "all" the siding penetrations for windows, doors, fridge panels etc. are a leak potential spot. From my camper restoration work, I have found that while the roof gets a lot of attention for leaks, siding leaks due to failing sealants are equally as bad. On a camper your age, all of the siding penetration's have some level of sealant deterioration. That may not all be leaking, but all need to be either taken apart and new commercial grade butyl tape added and or caulked using the correct caulk. (Proflex RV or Dicor non sag sealants)
I know you are new to this camper build situation, so let me help explain some how the camper is built and where it gets it structural strength from. I know you keep saying, you are going to take the ceiling and wall panels down from the inside, and the floor which is already out in a major part of the camper.
When I do a restore, I start from the outside of the camper and work inward. This means the roof comes off most times, then the siding where I need to rebuild a wall. And anything mounted in the wall has to come out, like window etc. For me, this creates is a better way due into the way the camper is built when you are going to rebuild the area. And in my case, I have a shop that can accommodate the camper being all apart and it not be an issue.
This was not always the case, I used to have to use a big blue tarp to do outer wall repairs as I did not have the new barn then. I'm not telling you, you have to take the camper apart from the inside, but I will point out some of the issues you are going to have to overcome if you do. And I'm not sure there is a good answer for every area, but with positive thinking, the will to get it done, you may come up with something to over come these issues. At least think through all this before your tear into it.
I'm going to start with how the camper is built at Sunline or most any camper brand. They start with the metal frame. This frame is very "flexible" in this stage. They are always weight conscience and then there is cost. The frame all by itself will feel flimsily if you are not used to camper frames. They cannot afford to create a solid metal frame with very low deflection and keep cost and weight down to a minimum that a small tow vehicle can handle the camper. The frame has two main frame rails the length of the living space (the box), it allows the leaf springs to mount to it and a trailer A frame at the front. There are cross members that allow the floor to be supported and screwed to the floor. Then there are outriggers on the sides of the frame that reach to the very width edge of the camper. These outriggers help hold up the walls and the floor.
The floor system is a structural part of the camper. The way it was made changed over the years which way the floor joists ran. Some years went front to back like yours, and later the floor joists went left to right. On top of the floor joists was the flooring, many times it was OSB board and I'm not sure what model year it turned into full length of the camper regardless of length. That floor system would have the floor top (OSB) glued and screwed and or stapled to the floor joists. Then the floor system was bolted to the metal frame. The wood floor system created rigidity in the flexible metal frame. Now the frame and floor was rigid enough when the two were combined to accept walls.
This camper is a 2004 Sunline and the floor joists run left to right, but you can see the process.
The very flexible frame. There is not much there.

The floor joists and outer band boards in place,

The new decking on top. I used exterior glue BC plywood. The is deck glued/construction adhesive, screwed to the joists and then the entire wood floor system bolted to the metal frame.
Insulation added in this case,

Now the decking and we have a more rigid metal frame from twisting and a more rigid deck to walk and stand on.

Next up, are the walls.
The walls, these are also structural and this is where it starts to get complex on how to do a total repair by only removing the inside wall board and leaving the siding on. The wall is created by the wood studs cut to size and then stapled together. The size of the wall studs changed over the years. The early walls may used 3/4" thick wood by some width. Later years they used 1 1/2" wood by 1" wide or wider when the need came for studding/framing. See here on one of my rebuilds I am making a whole new rear wall to replace the old rotted out one.
I have an 8' x 8' work table on top of saw horses. Rip your wall studs to size, lay them in the correct location and then staple them together, the 1" wide x 1" long staples where on both sides of the studding. This creates a skeleton of the wall, and still not very rigid as far and not turning into a parallelogram from flex, but very strong if you press down vertical on the wall. You can also use pocket holes screws (Kreg screws) in place of the 1" staples, it just takes a little longer to do the fastening.

The new wall frame next to the old one

Next is to make the wall rigid from flexing and add structure to the wall itself. The inside wall board is glued and some level of tiny fine wire staples to the wood frame. I bought new 4 x 8 ft x 1/8" luan wall board and glued it to the frame and fastened it with those tiny fine wire stables at the joints and the window opening areas. The openings in the wall where routed out.
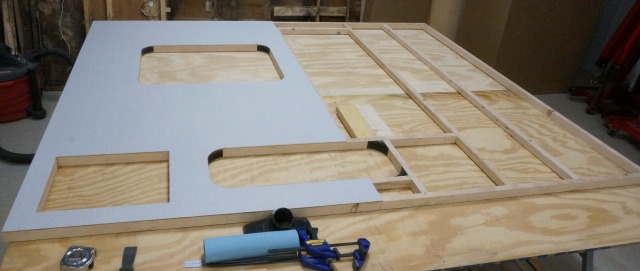

Here is a test fit on the back of the camper

You will also see the corner joints from rear wall to side wall. The rear wall screws to the side walls when the siding is off.
I'll jump to the next reply to make this one not any longer then it is now.
__________________
Current Sunlines: 2004 T310SR, 2004 T1950, 2004 T2475, 2007 T2499, 2004 T317SR
Prior Sunlines: 2004 T2499 - Fern Blue
2005 Ford F350 Lariat, 6.8L V10 W/ 4.10 rear axle, CC, Short Bed, SRW. Reese HP trunnion bar hitch W/ HP DC
Google Custom Search For Sunline Owners Club
|
|
|
|
|
08-27-2022, 08:00 PM
|
#8
|
|
Moderator
Join Date: Nov 2006
Location: Ohio
Posts: 12,649
SUN #89
|
Next is how the wall rests on the floor. This is another structural joint. On this newer campers, the walls rest on top of the floor system. On your older one, I believe the walls screw to the side of the floor outer band board.
The wall bottom boards or plate is screwed from the outside into the floor band board. This is why the siding at the bottom layer has to come off, the wall studs may be rotted out and so is the floor outer band board. That all has to be rebuilt. How much siding has to come off at the bottom is TBD as how much of the wall has to be rebuilt.
Next up is how the roof and ceiling are made and how the roof loads from the rafters get into the walls. Take note of this as this is where taking the camper apart from the inside creates issues on how to rebuild it.
The ceiling is a subassembly. They start with rafters, in your case they may be solid and I'm not sure if they even have any arch in them. I'm not sure what year Sunline went from a flat roof to an arched roof. Or yours has only a little arch.
The rafters span the full width of the outside walls. The weight of the roof is supported by the rafters that then puts the weight into the side walls. Pending the year built, there was an outer band board on the ceiling subassembly that fit around the perimeter of the wall and was attached to the rafters and the ceiling board.
The ceiling board creates a structure that holds all the rafters together and the outer band board. The rafters are glued/construction adhesive and stapled again with the fine wire staples to the bottom of the rafters and the outer band board. Then the entire sub assembly sits on top of the walls.
The ceiling board is sandwiched between the top of the wall and the bottom of the rafter. The ceiling board creates rigidity starting at the walls as that sandwich effect between the top of the wall and the bottom of the rafters is very stable.
Once the ceiling board is cut loose or rotted loose from the wall area, there is a level of rigidity lost as it is no longer fastened to the top of the wall. If the top of the wall plate is rotted or a rafter end/outer band board is rotted, that is a loss of structural strength also. And then there is the siding and the roof that is stapled and screwed to the outer band board of the roof subassembly and the wall studs. If you remove all the wood inside to repair rot, how do you get the siding stapled back to the walls studs when the siding is still on the camper? The metal siding and the metal roof also adds rigidity to the camper. All those staples to the wall studs, and all that thin metal creates and adds to the structure and rigidity.
See here for one of the new roof/ceiling subassemblies. This is a newer camper with arched rafters, but the concept is similar to yours as far as strength, just there is more roof water run off and a stronger rafter system per weight.
The ceiling rafters in a stapled assembly less the ceiling board

The rafter assembly less the ceiling board test fit on top of the walls.

The ceiling board with construction adhesive to the rafters and stapled as needed with the fine wire staples.

The ceiling holes cut out

The entire ceiling subassembly screwed to the top of the walls in place. The screws from the ceiling assembly come down from the top with the roof off.


Next up is the cabinets or interior walls, some are from the floor to ceiling, some hang from the ceiling, some are floor up to counter height. The interior walls and cabinets are screwed down from the above the ceiling board into interior walls or top cabinets. The cabinets against the walls are screwed in from the outside, through the wall board and then into the cabinet. Lower cabinets are screwed into the floor. The ceiling board and the wallboard being screwed into the cabinets and inside walls, creates rigidity into the entire camper. Those screws through the wall board are outside behind the siding. With the siding off, it is easy to get to. With the siding on, there is an issue on how to tie the cabinets and inside walls all together.
Rotted wall studs need to be replaced, pending how much rot up the wall is replaced creates how to get the siding stapled back to the wall stud. How do you do this up the length of the wall if the siding is still half or three quarters on? The siding has to be fastened or it can buckle or bellow towing down the road plus there is a loss of rigidity in the camper.
I know that is a lot to absorb, take some time and think about all this. Ask away for any clarification and any ideas on how to overcome the issues are more then welcome. And if you determine you have to leave the siding or roof on, how do you over come the issue of attaching everything that use to be attached from the outside? Maybe there is a way, not sure how to do that just yet, but in time a solution may present itself.
Hope this all helps
John
__________________
Current Sunlines: 2004 T310SR, 2004 T1950, 2004 T2475, 2007 T2499, 2004 T317SR
Prior Sunlines: 2004 T2499 - Fern Blue
2005 Ford F350 Lariat, 6.8L V10 W/ 4.10 rear axle, CC, Short Bed, SRW. Reese HP trunnion bar hitch W/ HP DC
Google Custom Search For Sunline Owners Club
|
|
|
|
|
|
Currently Active Users Viewing This Thread: 1 (0 members and 1 guests)
|
|
|
| Thread Tools |
Search this Thread |
|
|
|
| Display Modes |
 Linear Mode Linear Mode
|
 Posting Rules
|
You may not post new threads
You may not post replies
You may not post attachments
You may not edit your posts
HTML code is Off
|
|
|
|
 » Recent Sunline Discussions
 |
|
|
|
|
|
|
|
|
|
|
|
|
|
|
|
|
|
|
|
|
|


