 |
|
 03-08-2010, 10:57 AM
|
#41
|
|
Moderator
Join Date: Nov 2006
Location: Ohio
Posts: 12,651
SUN #89
|
Quote:
|
Originally Posted by Viking
As I was reading about your troubles with the slides, a thought came to mind (it doesn't happen too often these days).
If the issue is wicking moisture, would a watershedding spray, such as silicone, help prevent that?
Also, on unprotected edges of plywood or similar materials, would waterseal, such as Thompson's, help seal and prevent absorption.
Roar
|
Roar,
I have no troubles. Only opportunities
.  . This one is not that bad. We will overcome. Heck learning a bunch more I never knew before in the process.
All of your suggestions have merit. Actually in typing my last note to Rich on the drip edge hanging down, a thought just fly in
. Have been focusing on the drip edge going straight down from the bottom of the slide. That is the easiest way to create a water tension break and drip point. However in my case I will have that aluminum strip off that holds the siding to the side of the slide and covers the top of the Darco. If I can figure out a way to create a drip bump there that will wick away from the camper and still not cut the slide seal on the way in and out, I may be able to expand on that thought.
Basically the problem is just like a normal house roof. At the edge of the roof a drip edge is installed to help keep the roof water from wicking up under the shingles and rotting out the face board. Here on these slides we have a vertical wall and a 90 degree corner on the bottom. The rain just follows the 90 degree right around the corner along the bottom until the drips break tension and fall off about 1 to 2 inches in board. And after talking with you, a piece of white aluminum roofing drip edging may just come home with me from the store. Cut off the bottom drip edge and use that. It is about the right width and even baked on white. 
Your thoughts on breaking up the surface tension are valid. If it cant stick it will fall off.
Thanks for the idea!
John
__________________
__________________
Current Sunlines: 2004 T310SR, 2004 T1950, 2004 T2475, 2007 T2499, 2004 T317SR
Prior Sunlines: 2004 T2499 - Fern Blue
2005 Ford F350 Lariat, 6.8L V10 W/ 4.10 rear axle, CC, Short Bed, SRW. Reese HP trunnion bar hitch W/ HP DC
 Google Custom Search For Sunline Owners Club
|

|

|
|
03-08-2010, 12:46 PM
|
#42
|
|
Senior Member
Join Date: Mar 2009
Posts: 249
SUN #809
|
Quote:
|
Originally Posted by JohnB
Good luck with your new camper, So when does it come in? New campers are always good times.
|
Supposedly it is coming off the production line mid-April. I'm supposed to get a VIN# and production date this week. We don't have any trips scheduled till mid-May so that gives me enough time for a shake-down trip or two. The wife is quite excited. Me, not so much, as I am more the type that looks forward to the time when everything goes smoothly and out of habit, and I don't have to think so hard all the time!
Jeff
__________________
__________________
Jeff, Laurie, + kids
Three time former Sunline owner
2011 Big Horn 3670RL Fifth Wheel
2012 Chevrolet Silverado 3500HD D/A DRW, Classy Chassis Conversion, aka "Garage Queen II"
Hensley Trailersaver BD3 Air Hitch
|
|
|
|
|
03-08-2010, 06:15 PM
|
#43
|
|
Senior Member
Join Date: Sep 2006
Location: Pennsylvania
Posts: 347
SUN #62
|
John I do have the coated bottom without the darco,I have the nylon strip and a roller that the slide rolls on,unfortunately John I don't remember exactly how mine is different,it's been over a year since I worked on mine and my camper is under a cover yet so I can't go out and look,but by looking at your pics your slide looks just like mine when it is retracted and extended the trough just looks to be slightly different, hopefully the weather stays decent and I can get the cover off and check it out before you get to that point of your repair,sorry I can't be of more help right now.
__________________
05 sunline 267sr
01 F-250 V-10 4x4 Lariat supercab SB auto 4:30 LS
draw-tite 1200# trunnion wd,friction sway control,prodigy
happy camping Rich,Maryellen,Josh and Jake
https://www.campingpa.com/
|
|
|
|
|
03-08-2010, 07:07 PM
|
#44
|
|
Moderator
Join Date: Nov 2006
Location: Ohio
Posts: 12,651
SUN #89
|
Rich
Thanks. No worries, if you can get to it, great but the main thing you helped with is the idea. I can't see how to attach to the bottom with my metal trough setup but after thinking about it enough one on the side made from white alum roofing drip edge might just do the trick.
We where out in the camper tonight looking at our fridge and I took advantage of the slide being out to look at the seals. I "think" a side mount drip edge can work. Will know more when I tear into it.
Thanks a million
John
__________________
Current Sunlines: 2004 T310SR, 2004 T1950, 2004 T2475, 2007 T2499, 2004 T317SR
Prior Sunlines: 2004 T2499 - Fern Blue
2005 Ford F350 Lariat, 6.8L V10 W/ 4.10 rear axle, CC, Short Bed, SRW. Reese HP trunnion bar hitch W/ HP DC
Google Custom Search For Sunline Owners Club
|
|
|
|
|
03-14-2010, 05:17 PM
|
#45
|
|
Moderator
Join Date: Nov 2006
Location: Ohio
Posts: 12,651
SUN #89
|
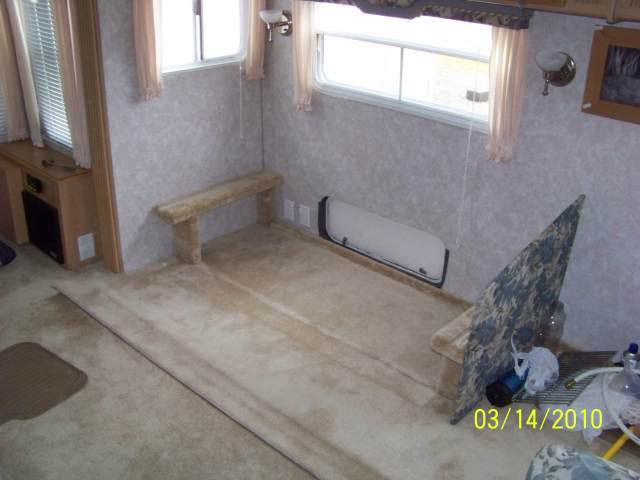
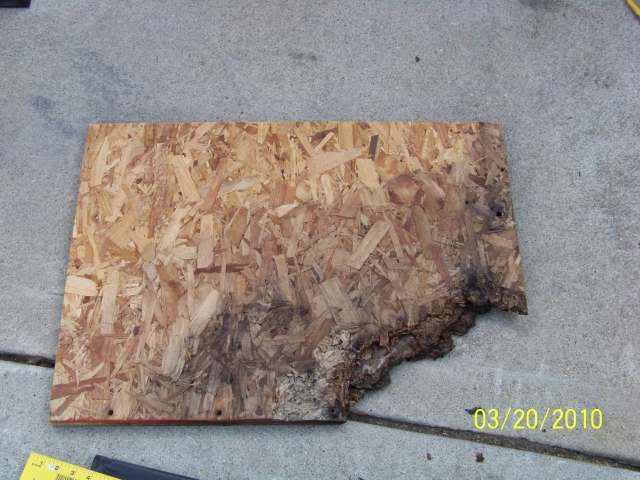
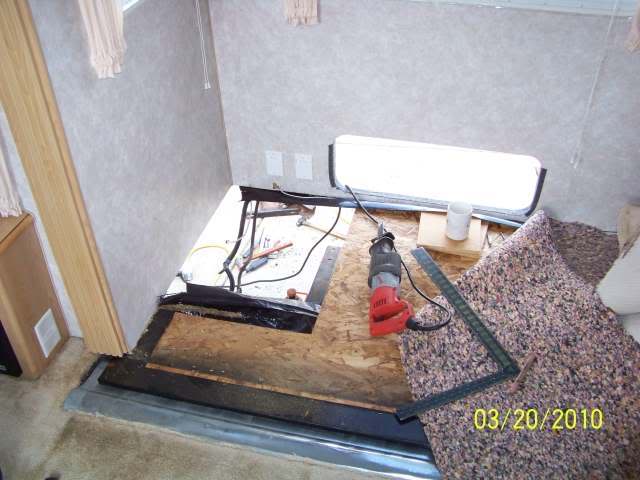
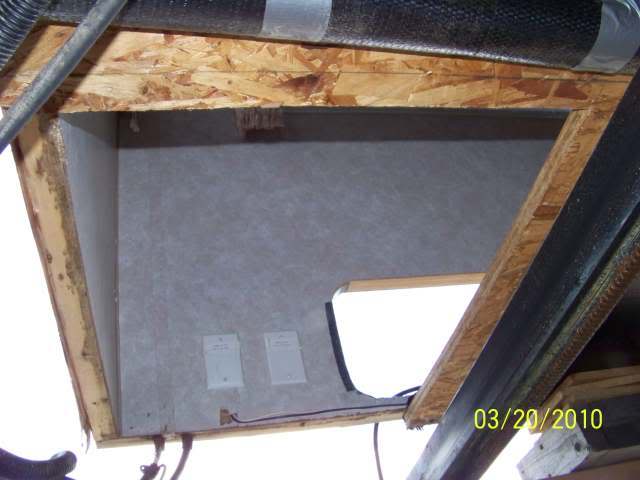
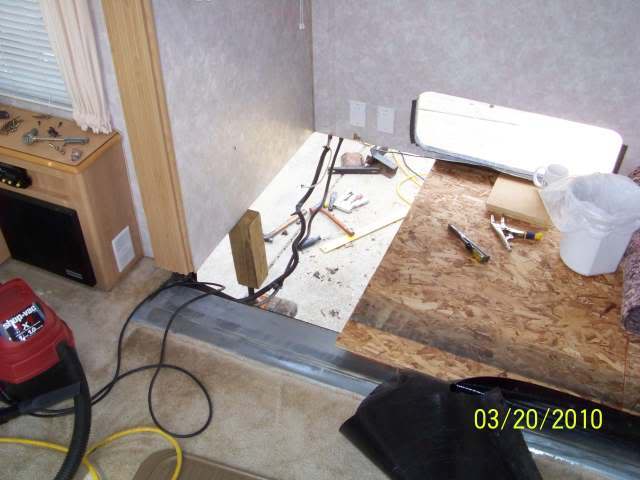
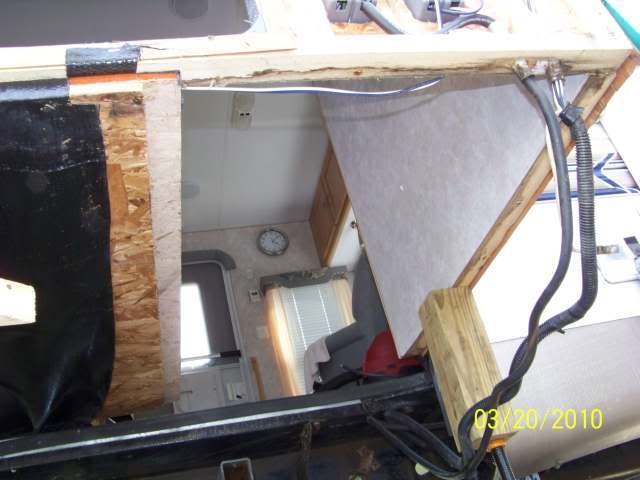
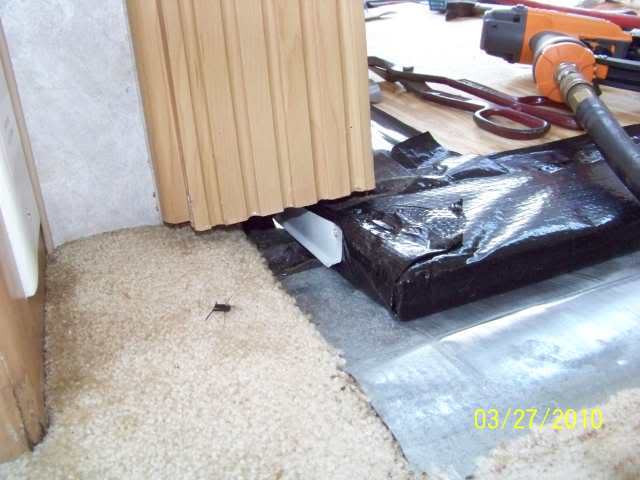
Did some inside work today to prep for next weekend when the outside starts coming apart and the repair process begins.
The wet did make it up to the carpet. The rot thru the floor where there was no Darco on top is where is shows to have come in. Will know more next weekend on if the wall sill plate has any issues. The pics below show the events of the day. All went well expect for getting 1 carpet holding strip up
.ERRRR more with the pics.
The couch area on the inside ready to start.

Couch removed

Cargo hole organizer ready to remove

Cargo hole organizer removed. Was made to just wedge in the location.

Carpet boards ready to remove
Carpet wedge board removed. My goodness, 17 screws hidden in the carpet. This was an hour task to find them all.
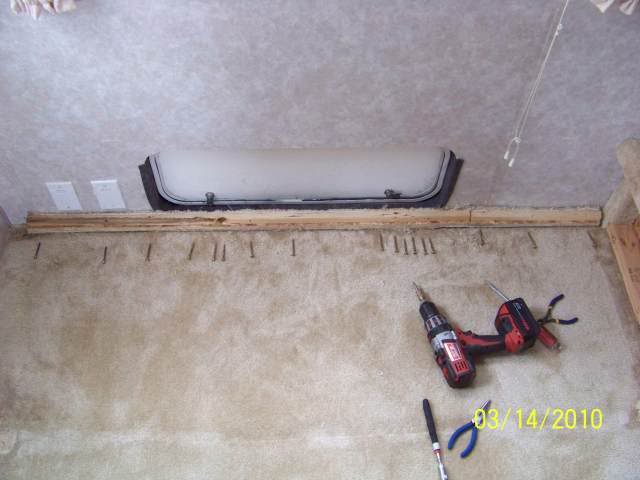
And end profile. This wedges the carpet so it will not walk away from wall I do believe.
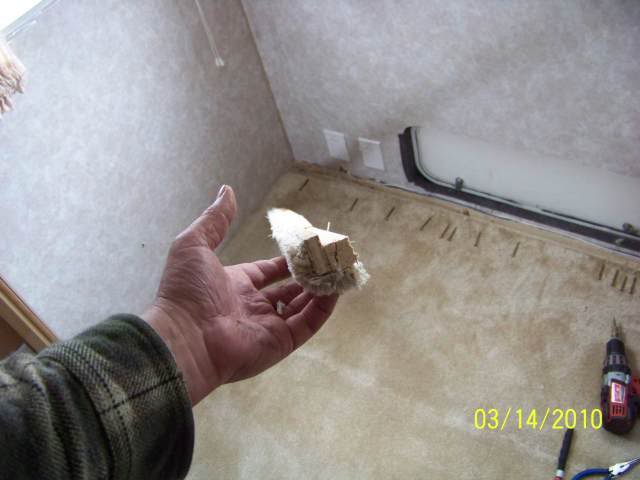
Some moisture wicked to the carpet board.

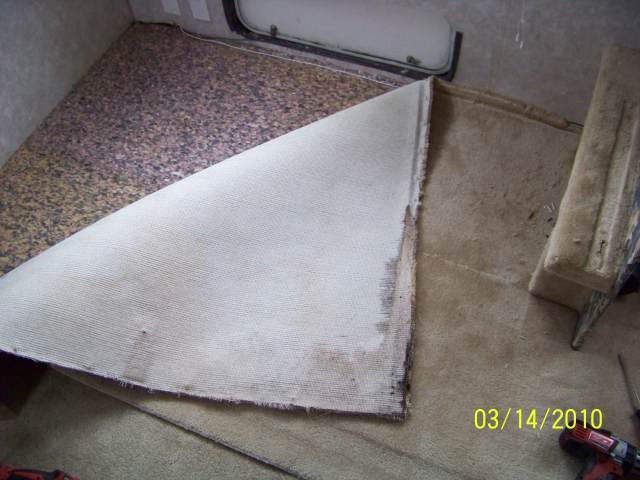
Rug up. Some moisture on the end where the floor rotted clean thru.
Pad ready to lift

Pad up and ready to lift metal slide end plate.
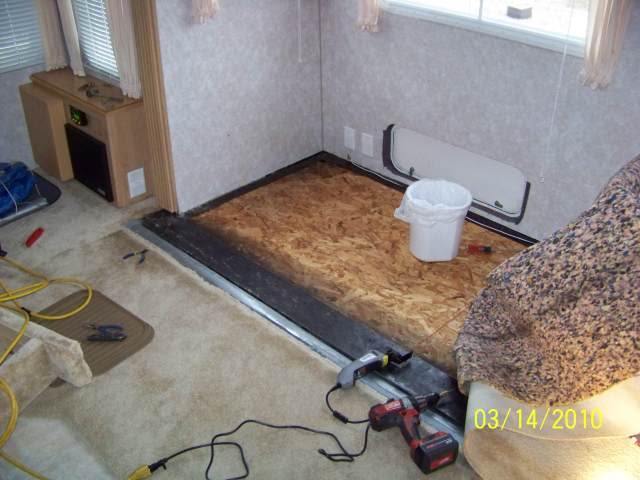
Slide end plate removed.

The rot area.

Close up of rot area.

A test of the repair material to see if it will be wide enough to cover all rot area.

Well that is all for right now.
My Polyethylene under belly and Flex mend tape arrived from a mobile home supply house. However have a problem. It is the wrong thickness. It is 0.002 or 2 mil thick. The Darco that is on the slide is 0.015 or 15 mil thick. Now have to figure out where to get the thicker material. Anyone know of an on line place?
Thanks
John
__________________
Current Sunlines: 2004 T310SR, 2004 T1950, 2004 T2475, 2007 T2499, 2004 T317SR
Prior Sunlines: 2004 T2499 - Fern Blue
2005 Ford F350 Lariat, 6.8L V10 W/ 4.10 rear axle, CC, Short Bed, SRW. Reese HP trunnion bar hitch W/ HP DC
Google Custom Search For Sunline Owners Club
|
|
|
|
|
03-20-2010, 08:38 PM
|
#46
|
|
Moderator
Join Date: Nov 2006
Location: Ohio
Posts: 12,651
SUN #89
|
Made some more progress today. At least all the rot is now gone and prepped for reinstall. I need the Darco vapor barrier to finish up now. Suppose to ship out early next week. That was a challenge tracking it down to find the right stuff.
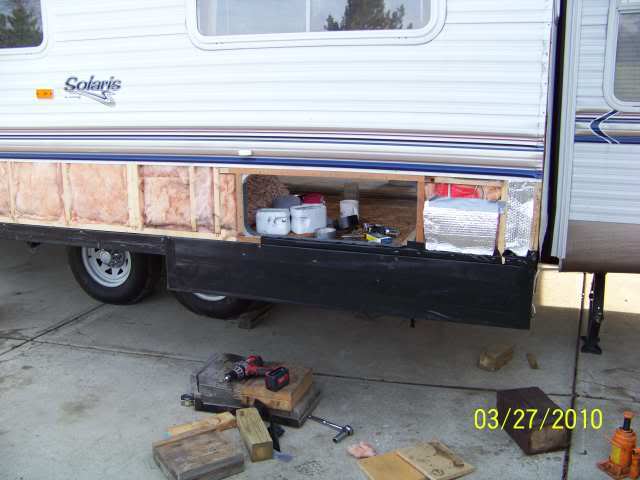
Ill let the pictures do the talking. The slide side ready to start to take apart.

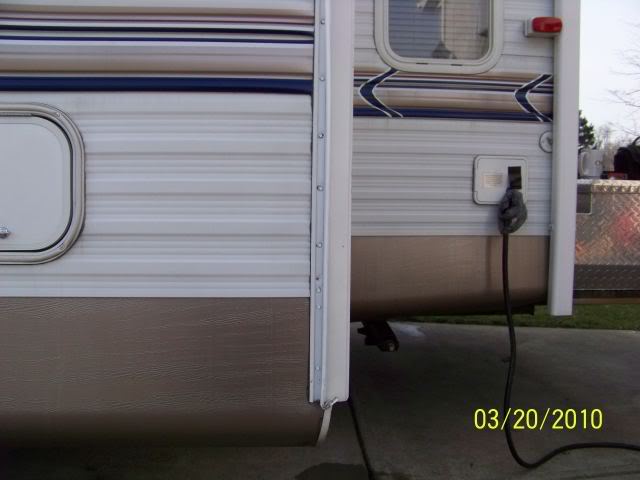
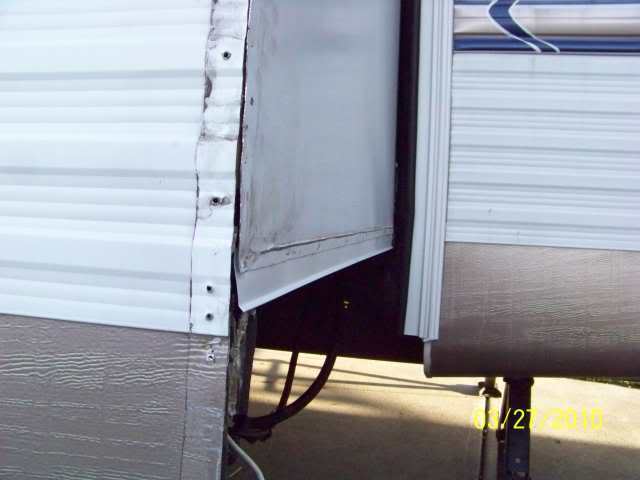
Fender skirt off

Slide flange started to remove
Flange removed.

End pic on how siding is matched to side. The corner flange and putty does all the sealing. I will use Butyl sealing tape on the repair.
Now to those staples
This is how I figured out how to get them off and not destroy the siding. Need to gently work under them with a fine tipped screw driver.


Then a pair of needle nose Vise Grips and yank


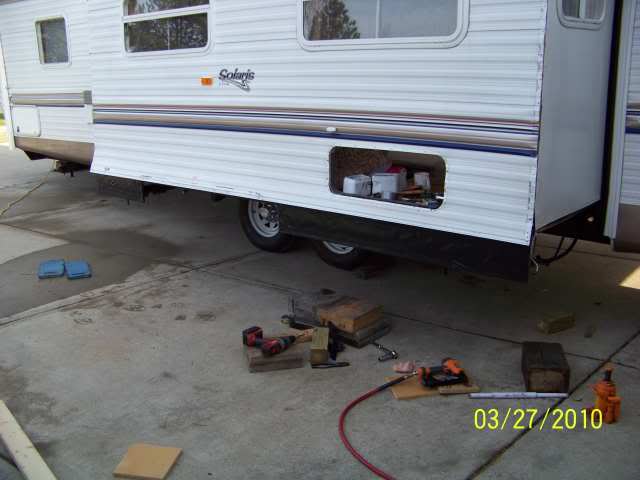
Now the cargo hole prep
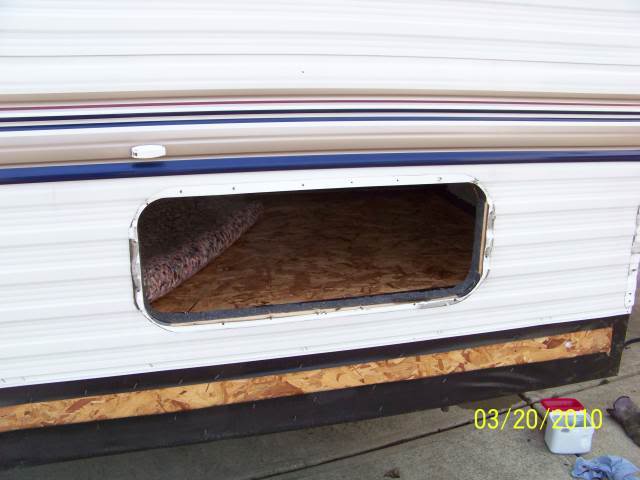
And the lower siding off
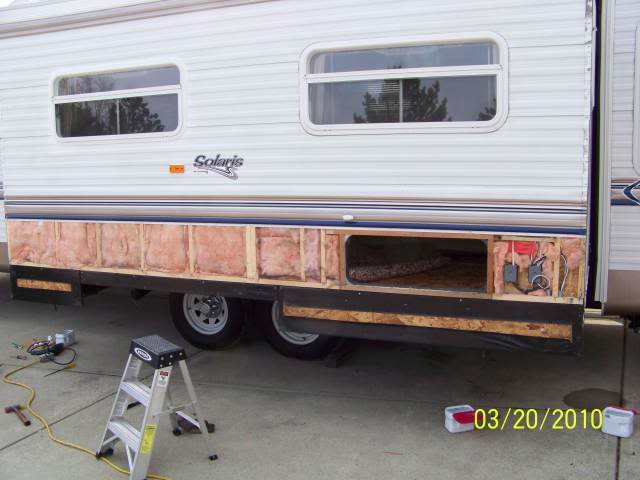
And the end strip

This can be a problem area if water gets behind that strip, will work this different when rebuilding
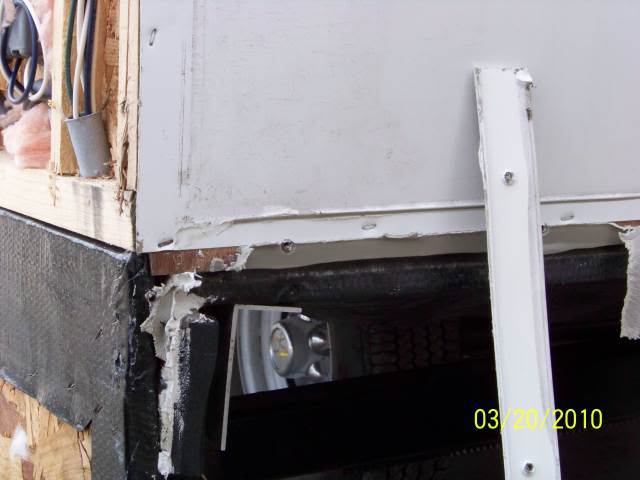
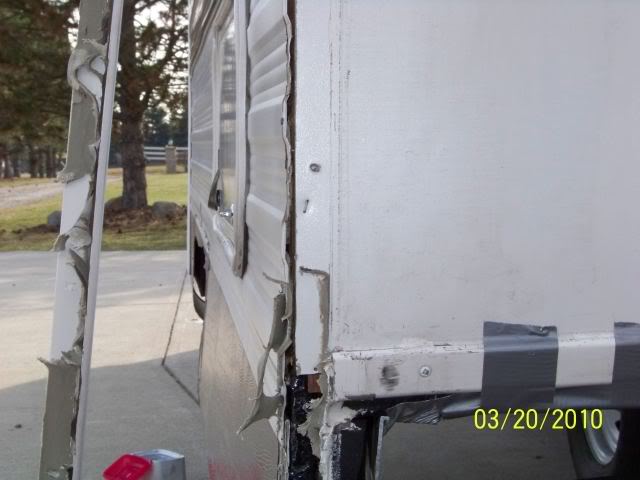
Now I can see the full extent of the situation


Prepping to cut out the rot spot. Need to remove the slide arm.
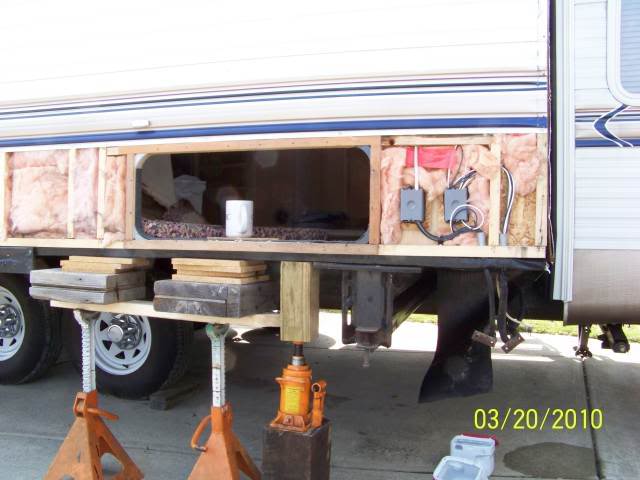
Lay out the cut pattern and out it comes
Inside looking out.
Bottom looking up
While the rot was not in the last 12 inches after cutting out that rot spot I could tell the edge was swelled along the wall as the board was thicker then the rest. Hmm, nah it has to go too. So out it came. And started to prep the lap joint for the splice
You can see the joint prep here. 1 1/2 overlap, 1/2" deep. That will be glued and scewed to make a complete joint.
And now to prep the new 3/4" pressure treated plywood patch for the lap joint

And prep the end chamfer to match the old one.

And to glue and screw a 1/4" exterior grade plywood top to make up a 1 thick floor patch. This was a challenge finding the right thickness wood. 3/4 is no longer 3/4, now it is 25/32. And 1/4 is no longer 1/4 it is 7/32. But I did this time find the older right thicknesses. Going to the lumber yard sure is not like it use to be. 
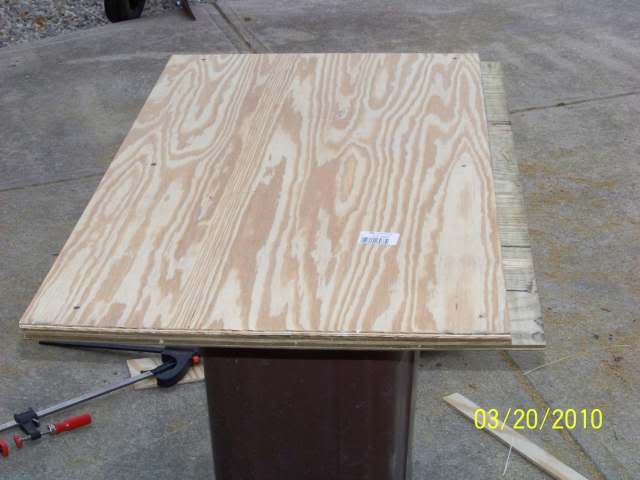
Now for a test fit

Inside

Bottom looking up. Fit in well.

I also used Rot Doctor CPES to treat the sill plate and any other wood spot that where hard but had signs of water staining to kill any fungus and not end up with dry rot.
 http://www.rotdoctor.com/
All for now. Im beat
.To many ups and downs. More next weekend.
John
__________________
Current Sunlines: 2004 T310SR, 2004 T1950, 2004 T2475, 2007 T2499, 2004 T317SR
Prior Sunlines: 2004 T2499 - Fern Blue
2005 Ford F350 Lariat, 6.8L V10 W/ 4.10 rear axle, CC, Short Bed, SRW. Reese HP trunnion bar hitch W/ HP DC
Google Custom Search For Sunline Owners Club
|
|
|
|
|
03-21-2010, 08:52 AM
|
#47
|
|
Senior Member
Join Date: Mar 2009
Posts: 249
SUN #809
|
John, what a fantastic write up and great job taking photos along the way. I'm learning a lot. This type of repair will be applicable to many brands, I expect.
I have to admit I was skeptical this would be a doable fix but I should not have doubted you. It seemed that it would be a tough challenge to have a strong enough connection to the patch since there is no other way to reinforce the joint, due to the limitations imposed by the fact the whole thing has to move smoothly when sliding out.
Out of curiosity, how much more work would it have been to replace the entire slideout floor?
__________________
Jeff, Laurie, + kids
Three time former Sunline owner
2011 Big Horn 3670RL Fifth Wheel
2012 Chevrolet Silverado 3500HD D/A DRW, Classy Chassis Conversion, aka "Garage Queen II"
Hensley Trailersaver BD3 Air Hitch
|
|
|
|
|
03-21-2010, 09:00 AM
|
#48
|
|
Senior Member
Join Date: Mar 2008
Posts: 351
SUN #549
|
Nice work, John!
Boy, does that bring back some memories.. I removed the staples the same way - simple, but effective, and no damage.
Were you able to confirm the point of water ingress?
A thought on that end strip - could you seal that exposed edge with a piece of eternabond and then reinstall the strip? If you kept the edge of the eternabond just below the strip level I don't think you'd even know it was there.
CPES is well liked by the folks on that camper building forum I follow. A treatment of that should strengthen what's there and make it all but impervious to water.
You'll have it all back together in no time!
- Frank
__________________
|
|
|
|
|
03-22-2010, 09:14 PM
|
#49
|
|
Moderator
Join Date: Nov 2006
Location: Ohio
Posts: 12,651
SUN #89
|
Quote:
|
Originally Posted by ihsolutions
I have to admit I was skeptical this would be a doable fix but I should not have doubted you. It seemed that it would be a tough challenge to have a strong enough connection to the patch since there is no other way to reinforce the joint, due to the limitations imposed by the fact the whole thing has to move smoothly when sliding out.
Out of curiosity, how much more work would it have been to replace the entire slide out floor?
|
Jeff
Thanks for the good words.
I feel the joint is sound in relation to what I had there. In fact after standing in the hole and being able to lift up the rest of the floor by hand and move it around, the patch is stronger then the original. It is amazing the strength of plywood over the OSB board. My biggest concern was the end match up at the trough area so when the slide comes in, the lift action gets started right. I was expecting something more complex then what was there, which was nothing more then a 1/4 x 1/4 chamfer on the edge.
I still have to do the Darco wrap and that may be the trickiest part of the fix. Have a plan for the wrap and joint. Ill let you know hopefully this weekend how it comes out. One source of my Darco is to show up this week from General RV in Mi. The other source is still in the works.
To do the entire floor, that thought crossed my mind several times. Especially as I was standing in the hole in the camper looking at it all. The front end of the of the slide is solid and dry as I checked it again on Saturday. If it had a hint of wet the whole floor would be gone by now as this floor job is not that bad once you do it once and know what to look for. I estimate for me, it would be 2 days more work to get the entire floor out. 1 day inside and 1 day outside. Then I have to reconstruct the inside which is about 1 to 2 days more. Since Im a 1 man band at this repair deal, speed is the one thing that suffers. 2 or 3 guys who have been thru this before and with the right equipment Im sure can yank and install in about 2 to 2 1/2 days the entire deal.
Everything is a judgment call and on this one, the patch will be as sound if not stronger then the original due to the materials. If I ever need to do the entire floor, I will change the way the floor works to the newer system that Sunline started in 2005 and like your Heartland is using including a trough change. For me, if I change the entire floor I would change the trough too. More investigation to find one. So for now, Ill stick with the original setup. If floor the lasts all the way until I do a total TT rebuild, then Ill upgrade. If it dies before then, then I deal with it.
I saw the Heartland at a RV shows a few weeks ago and that plastic strip on the ends you where talking about. It looks more like an edge protector then a drip edge. It might work as a drip spot but it is not setup like a normal drip edge. It may not be thought of that way and more to just cover up the end of the plastic coated board.
So the rebuild continues.
John
__________________
Current Sunlines: 2004 T310SR, 2004 T1950, 2004 T2475, 2007 T2499, 2004 T317SR
Prior Sunlines: 2004 T2499 - Fern Blue
2005 Ford F350 Lariat, 6.8L V10 W/ 4.10 rear axle, CC, Short Bed, SRW. Reese HP trunnion bar hitch W/ HP DC
Google Custom Search For Sunline Owners Club
|
|
|
|
|
03-22-2010, 09:42 PM
|
#50
|
|
Moderator
Join Date: Nov 2006
Location: Ohio
Posts: 12,651
SUN #89
|
Quote:
|
Originally Posted by frank
Were you able to confirm the point of water ingress?
A thought on that end strip - could you seal that exposed edge with a piece of eternabond and then reinstall the strip? If you kept the edge of the eternabond just below the strip level I don't think you'd even know it was there.
- Frank
|
The leak was for sure entered thru the holes in the Darco that the screws hold the floor up. Wicked up from the bottom with no drip edge. When I get this done, I'll do a special post on the problem area and some things that can be done now to prevent the future problem so others can stop this now before they encounter the same problem.
I think 2 things got me. Well 3 actually.
1. The holes in the Darco from the floor screws. Problem 1.
2. The slide was left open sitting on the dealers lot for long periods of time. Increased the odds for rain to get up under there.
3. The camper before me was on a seasonal site. There was not much road miles on this camper before I got it. Again long periods of time being open in the rain increasing the odds.
Areas 2 and 3 are speculation but does not take much to build that story. And part of this is just plain bad luck. What ever condition the rear slide area was subjected to the front was as well. The front has the same holes, yet none what so ever damage. The camper may have been tilted to the back and more water ran off the back side, down the side wall, under the slide floor and wicked in. Once in, there is no way out. This rot is probably 3 to 4 years old. There was nothing left to the chuck in the middle. When I dried it out it totally fell apart. So the infection was there most likely before I ever got it, just the infection maybe not have been as advanced yet and I had no clue to ever even look there before I bought it. The slide is always closed when not out camping since we have had it and we have not camped that much in this TT in the rain.
Here are the holes from a few pages back.


The side strip and Eternabond. First Im doing the Darco wrap different so there will be no holes in it. Next Im doing a spin off of a drip edge that Rich2500 pointed me onto that should work with my slide setup. Then butyl tape, the side strip and Eternabond or Dicro on the top of the strip to prevent anything from ever getting behind it.
The only down side to the Eternabond in this spot is the excess goo that seeps out of it. Since the slide travels so far in and out, odds may be not in my favor that the goo will not get on the slide seals and make a mess. I have not ruled out the Eternabond yet, Ill let you know come this weekend if all goes as planned.
Thanks
John
__________________
Current Sunlines: 2004 T310SR, 2004 T1950, 2004 T2475, 2007 T2499, 2004 T317SR
Prior Sunlines: 2004 T2499 - Fern Blue
2005 Ford F350 Lariat, 6.8L V10 W/ 4.10 rear axle, CC, Short Bed, SRW. Reese HP trunnion bar hitch W/ HP DC
Google Custom Search For Sunline Owners Club
|
|
|
|
|
03-23-2010, 04:57 AM
|
#51
|
|
Senior Member
Join Date: Sep 2006
Location: Pennsylvania
Posts: 347
SUN #62
|
lookin good John,thought I would point out another potential problem area, in your pics the 11th pic shows the lower wall extension that is wrapped in darco, all except for the center you see the osb exposed.I'm pointing this out John because the one corner of that piece is getting rotten on my trailer,it is solid up towards the floor(telling me I don't have a leak from the top down) but rotten down towards the bottom,but from your pics I can see why,if towing on wet roads the water would get slung up between that extension piece and the outer lower siding and because that osb is not fully wrapped it would allow water petrusion.thanks to your pics I now can understand the reasoning to my problem and see what I need to do to fix this problem.
__________________
05 sunline 267sr
01 F-250 V-10 4x4 Lariat supercab SB auto 4:30 LS
draw-tite 1200# trunnion wd,friction sway control,prodigy
happy camping Rich,Maryellen,Josh and Jake
https://www.campingpa.com/
|
|
|
|
|
03-27-2010, 08:28 PM
|
#52
|
|
Senior Member
Join Date: Sep 2006
Location: Ontario
Posts: 503
SUN #43
|
John, the repair job looks awesome. Can't wait to see the finihed product. Also looking forward to hearing about what you are doing to help prevent this in the future.
Jeff, as per your question about removing the slide room, that is exactly what the dealer did in order to replace our slide floor before we purchased the unit. They had to remove the slide with a forklift and they also removed all of the windows from the unit as well. I sent John the pictures and will post them in the next few days for everyone to see.
Thanks to John and his posts a few months ago I knew to check the slide floor before purchasing the unit and found the problem so the dealer had to replace the floor instead of myself.
__________________
2018 GMC Denali 3500HD Dually
2018 Grand Design 384GK
Formerly,
2003 F311SR
2005 T-2753
|
|
|
|
|
03-28-2010, 07:54 AM
|
#53
|
|
Member
Join Date: Feb 2009
Posts: 97
SUN #784
|
Hey John...
As always, outstanding post...thank you for the education/sharing!!!
Last year I had problems with water getting into the slide area just above the wheels from the water flying off the tires up and onto the underside slide and being driven into the coach. This apparently is a common problem with the 264 model as I quickly learned from all the wonderful folks here on the forum. The fix is/was very simple by adjusting the aluminum flange bracket to seal tightly to foam gasket attached to the trailer frame when in the closed position.
Sooo, after making that fix and understand the dynamics of the wheels throwing water up and onto the underside of the slide, and then add the driving wind from forward movement at whatever speed....kind of scary. Do you think this could have played a role in your causing your problem? Have you towed in the rain with it yet?
Also..My brother just purchased a new 2010 fifth wheel (SOB)..The slide mechanics are somewhat similar to mine, but they have installed approx. 1/16" thick white plastic membrane/sheet to the entire underside of both slides. I thought it was a simple cleaver way to aid in sliding and protecting the slide...as long as water never finds its way under it because it certainly will never breathe (dry out)!
__________________
Joe
2005 Sunline 264SR
2005 Chevy 1500HD 4X4 6.0 4WS
|
|
|
|
|
03-28-2010, 08:47 PM
|
#54
|
|
Moderator
Join Date: Nov 2006
Location: Ohio
Posts: 12,651
SUN #89
|
Well did some more repair work this weekend in-between the sunshine and rains
Here is the progress. Ill do this in pics mostly.
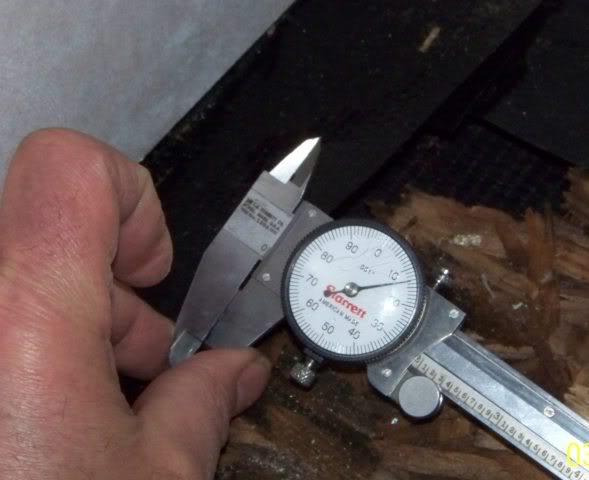
From what I tracked down with the help of Sunline Fan, Sunline used the actual trade name Darco Floor Shield polypropylene vapor barrier. It measures around 0.012 to 0.013 thick. (12 to 13 mil thick).
Finding this was one of the hardest things of this entire repair. Thinking I had the correct stuff, I ordered some Flex Mend brand polyethylene underbelly material from Aberdeen Home Repair & Construction. Very good service. http://www.mobilehomerepair.com/Order2.html#catalog I bought both the material and the 4 wide repair tape. This material looks just like Darco, totally waterproof however only 0.002 (2 mil) thick. I can see this working great for a rip in your existing underbelly, however for me on my slide floor, as the main layer this is too thin. So the search continued.
If you do a search on Darco on the web what you find is that many, many TT manufactures use it and declare it as one of there claims to fame. However I could not using 3 search engines find the manufacture as Darco advertised on the web. So I started calling RV dealers in hopes of finding a lead. In my surrounding area they only carry the Flex mend type repair tape in various widths. I even called Jayco direct since I have no TT manufacture any more and I know they use it. They referred me back to the Jayco dealership net work and they can order it from them as she stated it is unlikely any will stock it. I did and no they do not stock it nor know what Im referring to at least in my area. So you can go to your dealer who reps your brand and order it most likely.
A tip from Sunline Fan turned me onto General RV in Wixom, Michigan who actually had a roll they got in from Keystone. http://www.generalrv.com/wixom-general-rv.aspx That one branch stocks it and only that one in the General RV dealers. The next hurdle is how to ship it. It is beyond UPS/FED EX as it is 9 feet long. It ships truck freight. Since I needed a partial width they cut it in 1/2 for me, rolled it up in a awning tube and showed up in 2 days. Thank goodness. And even then I had no idea nor did they if it was Darco.
I have since found who makes Darco, National Shelter Products http://www.nationalshelter.com/index.html and the Floor Shield brand is no longer made any more, it is now Darco Floor Brace which is even better and the next generation material. They only sell to manufactures which is why you will not find it on the open web for sale direct. So anyone looking for this, maybe my trail can help them. There may be other places in how and where to buy this, but this is where I ended up at General RV.
So here is the install. I first did not want to repeat the exact original method so I started with the best of both worlds. I wrapped the patch board in the 2 mil Flex mend so the patch to the wall sill would be wrapped and protected for the future. It saved my wall from totally rotting out. And I then screwed right thru it like original to attach the floor to the sill plate.
Then I took the new material from General which is also 12 mil thick and slid it in place up into inside. This creates a double wrap and no holes where the floor screws are located. There is a inside and outside to this material, you can see it in the grain. The outside is more smooth and looks like it is coated, the inside heavy graining of interwoven fibers.

This was a little tricky but Im pleased with the outcome. You have to jack up the slide to get it in place and you have to also get the vapor barrier under the jack post. I did the inside nose first of the slide floor.


Once I had it inside, I duct taped it to the floor for temporary and then went and fiddled with the jack to put it on top of the vapor barrier where I wanted it.
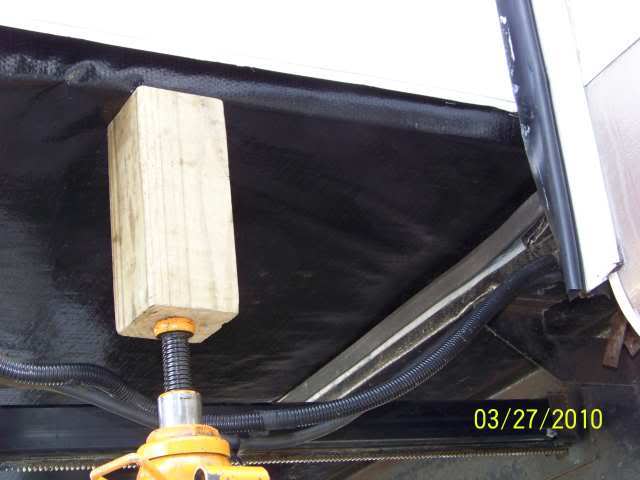
You are now tight at the jack post and you start working it in all directions with inside as well to get the wrinkles out. Then at the ends staple it in place and keep working it.


Now your left with an overlapping joint. Here I used the 4 wide Flex mend tape cut long enough for the splice. Start at the outside and slowly peel back, press, no wrinkles and do not touch down where you do not want it


Then up to the point it goes inside. Here DW helped so I did not crinkle it all up sneaking under the floor. You need the slide jacked up enough to give you some room. Then sneak it inside and gently pull the backing off while keeping the black material taught. Your peeling the back off right in the exact right spot so when it touches, it sticks in the right place.


Then by using a portable heater, warm it, (dont use a heat gun, too hot, ) and rub the tape to make it permanent. I was pleased the way this turned out. Worked good.

Now it was onto the siding. The lower fender boards where not 100% wrapped and a tip from Rich2500 where he had rot, I added material here and taped the seams so water does not fly up behind the fender and rot this board out. Mine where dry and solid at this point so I could fix this.
The before when I took it down.

The after

Now to the siding. Since I had a cargo hole in the piece I had to match that hole exactly. Started out with a screw part way in each end to check all is in the right place.
Then I stapled the siding on. I used electrical linemens pliers to flatten out the pulled edges of the old staple holes. I bought a new 18 gage air stapler and WOW, these things work well. Now I know why they staple everything
Speed and ease of use. These are galvanized and outdoor staples. They seem to have a coating on them to help in insertion.
Now the lower gold siding

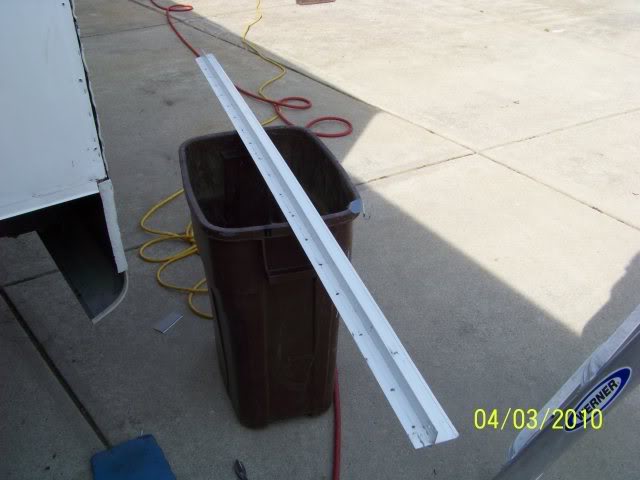
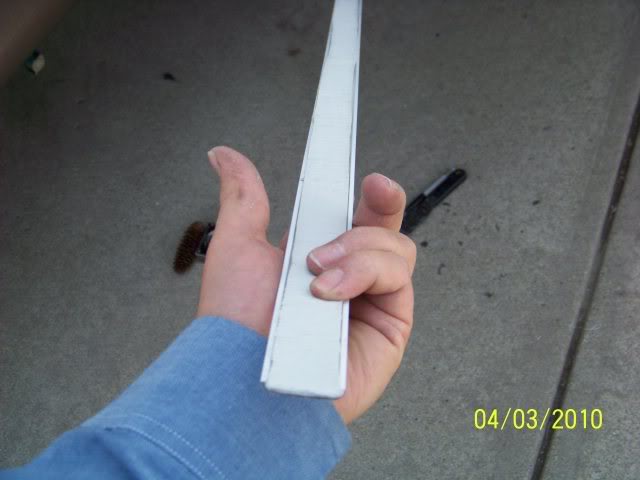
And now to the addition of a drip edge. I found in Home Depot an extra wide aluminum drip edge with a hemmed smooth edge.
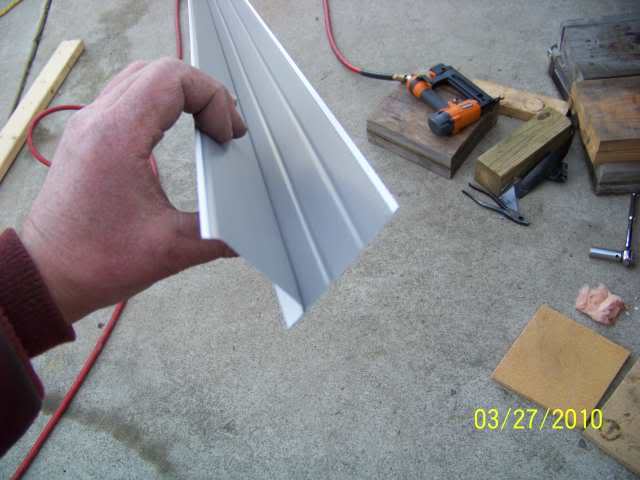
I cut a length long enough to do the full width of the slide. A trick from doing aluminum house siding is to score the metal with a sharp utility knife and then back flex it to crack it off, nice and long and flat. I used a 2 x 4 on edge to hold it.


Now a test fit on how it might go. Yup this will work.
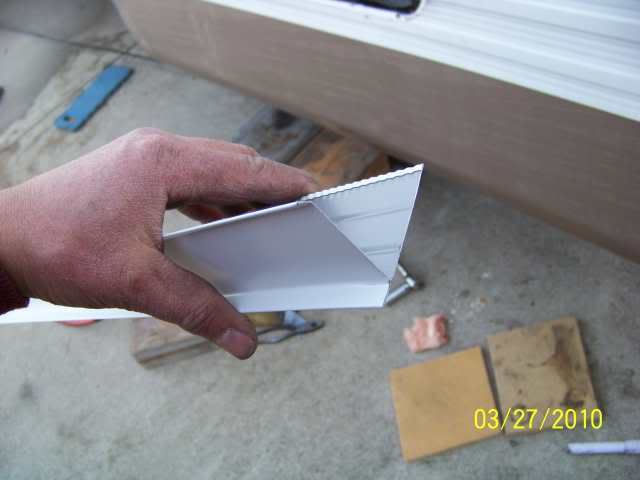
Now it has to go past the inside slide flange so I have to trim it.

And fasten it on the inside.
And on the outside. This is what it looks like ready to have the top molding installed.
This concluded Saturday and duct taped the exposed ends and tarped the entire slide like the week before. Sunday brought rain so it was inside work.
The floor cleaned up ready to put the carpet back down.

There is a steel plate that goes on the top of floor to hold the carpet edge. This also helps stiffen up the floor patch joint with the metal over the top of it.


Now the carpet back down. I used rug holding strips to hold it down. The side of the rug I had to cut it get it out as it went under the wall and it seems to shrink about 1/4 so a hold down strip went there too.


Now my under the couch cargo hole organizer back in.

And the inside all cleaned up and back together.

So now we sit and wait until the rains stop and I can finish up the outside. More as the progress comes.

John
__________________
Current Sunlines: 2004 T310SR, 2004 T1950, 2004 T2475, 2007 T2499, 2004 T317SR
Prior Sunlines: 2004 T2499 - Fern Blue
2005 Ford F350 Lariat, 6.8L V10 W/ 4.10 rear axle, CC, Short Bed, SRW. Reese HP trunnion bar hitch W/ HP DC
Google Custom Search For Sunline Owners Club
|
|
|
|
|
03-28-2010, 08:49 PM
|
#55
|
|
Moderator
Join Date: Nov 2006
Location: Ohio
Posts: 12,651
SUN #89
|
Quote:
|
Originally Posted by rich2500
lookin good John,thought I would point out another potential problem area, in your pics the 11th pic shows the lower wall extension that is wrapped in darco, all except for the center you see the osb exposed.I'm pointing this out John because the one corner of that piece is getting rotten on my trailer,it is solid up towards the floor(telling me I don't have a leak from the top down) but rotten down towards the bottom,but from your pics I can see why,if towing on wet roads the water would get slung up between that extension piece and the outer lower siding and because that osb is not fully wrapped it would allow water petrusion.thanks to your pics I now can understand the reasoning to my problem and see what I need to do to fix this problem.
|
Rich
THANK YOU for this tip. Timing is evreything. I have corrected that in my repair and found a drip edge too. This site makes this all possible.
Thanks
John
__________________
Current Sunlines: 2004 T310SR, 2004 T1950, 2004 T2475, 2007 T2499, 2004 T317SR
Prior Sunlines: 2004 T2499 - Fern Blue
2005 Ford F350 Lariat, 6.8L V10 W/ 4.10 rear axle, CC, Short Bed, SRW. Reese HP trunnion bar hitch W/ HP DC
Google Custom Search For Sunline Owners Club
|
|
|
|
|
03-28-2010, 09:01 PM
|
#56
|
|
Moderator
Join Date: Nov 2006
Location: Ohio
Posts: 12,651
SUN #89
|
Quote:
|
Originally Posted by jsms264
Sooo, after making that fix and understand the dynamics of the wheels throwing water up and onto the underside of the slide, and then add the driving wind from forward movement at whatever speed....kind of scary. Do you think this could have played a role in your causing your problem? Have you towed in the rain with it yet?
Also..My brother just purchased a new 2010 fifth wheel (SOB)..The slide mechanics are somewhat similar to mine, but they have installed approx. 1/16" thick white plastic membrane/sheet to the entire underside of both slides. I thought it was a simple cleaver way to aid in sliding and protecting the slide...as long as water never finds its way under it because it certainly will never breathe (dry out)!
|
Hi Joe
Thanks for the good words. Hmm I have heard of the problem you had with the aluminum edge not being tight enough however that one leak is not the area where I have the problem.
My rot is way in the back, far away from the wheels. The T310 and the T264 have a different slide to wheel relationship. But yes water flys all over under there and if it is not a tight seal, water is coming in under the slide. Well flaps are on the future mods list as slide campers do not have any in ours.
Ironically this weekend as the snow was melting off the top of the slide I tipped the nose down so it would not run in the repair area. I looked under the front of the slide as water was running down the face of the slide. Sure enough I saw it wicking under and right over the tape I put on the holes on the front I have not fixed yet. I have convinced myself that is what got me on the back end. Ill mock this up as a test so we can all see as I want to test my drip edge to see if it shifts the problem.
The plastic sheet bottom slides. Yes I saw that at the RV show a few weeks ago. It was on a bed room slide 5er. But the main dinette slide was still Darco wraped. Maybe the high up slide they put the plastic sheet for more looks and protection as it is like 5 ½ feet off the ground verses about 30???
John
__________________
Current Sunlines: 2004 T310SR, 2004 T1950, 2004 T2475, 2007 T2499, 2004 T317SR
Prior Sunlines: 2004 T2499 - Fern Blue
2005 Ford F350 Lariat, 6.8L V10 W/ 4.10 rear axle, CC, Short Bed, SRW. Reese HP trunnion bar hitch W/ HP DC
Google Custom Search For Sunline Owners Club
|
|
|
|
|
03-29-2010, 12:14 PM
|
#57
|
|
Senior Member
Join Date: Mar 2008
Posts: 351
SUN #549
|
Looking good, John. Nice work!!
You'll be out camping before you know it.
- Frank
__________________
|
|
|
|
|
03-31-2010, 05:20 AM
|
#58
|
|
Senior Member
Join Date: Sep 2006
Location: Pennsylvania
Posts: 347
SUN #62
|
very nicely done John,that drip edge looks like it should work out well,I actually considered the same drip edge on my trailer but instead decided on the pvc angle,no need to thank me John for anything,just makes me feel good that I may have been able to save you or anybody another repair later down the road and besides that I have gotten lots of info out of your post to see what will be involved in replacing that rotted board on my trailer.I actually plan on making a post on my repair once I get to it because I'm going to be making a reinforcement bracket to hopefully eliminate the flexing on the end corner trim down towards the bottom,I have already installed a piece of angle screwed up into the floor and into the lower fender board and that has made a world of difference,but while it's apart I want to do something to make it stronger.
__________________
05 sunline 267sr
01 F-250 V-10 4x4 Lariat supercab SB auto 4:30 LS
draw-tite 1200# trunnion wd,friction sway control,prodigy
happy camping Rich,Maryellen,Josh and Jake
https://www.campingpa.com/
|
|
|
|
|
04-03-2010, 08:46 PM
|
#59
|
|
Moderator
Join Date: Nov 2006
Location: Ohio
Posts: 12,651
SUN #89
|
Hi Folks
The weather has sure cooperated over the last few days and I took advantage of working on the slide nights after work and have now finished this up today. YEH!!!! I am very pleased with the outcome. There is a lot on the how to pics so I will make 2 posts. One the rest of the fixing and then a second of the actual problem in action and my new fix.
So on with the show.
Here is where we left of. Needing to put the slide corner flange on. Need to clean up all dirt and left over putty off. I used paint thinner to cut the grit then after it was all off, a very quick paper towel wipe with acetone to get the residual paint thinner off. You need to get the thinner off as it will dissolve putty tape.

Here is flange area when I took it off. See the dirt behind the old putty tape on the siding? Well the putty tape was not sealing hard against the siding. I have switched to butyl sealing tape over the putty and I filled in strips in the corrugations of the siding to offset the issue that was there with the outside world able to get almost all the way inside.


A side view

The slide flange must be cleaned as well to accept new sealing tape.
And you roll the tape on

Do both edges and take off the protective paper

To install this edge, I started at the top. You have to work both sides at once. 1 screw in the side, then 1 screw in the end and keep working it to the bottom that way. The sealing tape will oozz out and it should.


Now you trim off the excess. I use a plastic pot scrubber. This kind works well for this. It does not scratch the camper and the sealing tape can be taken off the scraper fairly easy.

With a down stroke I score it
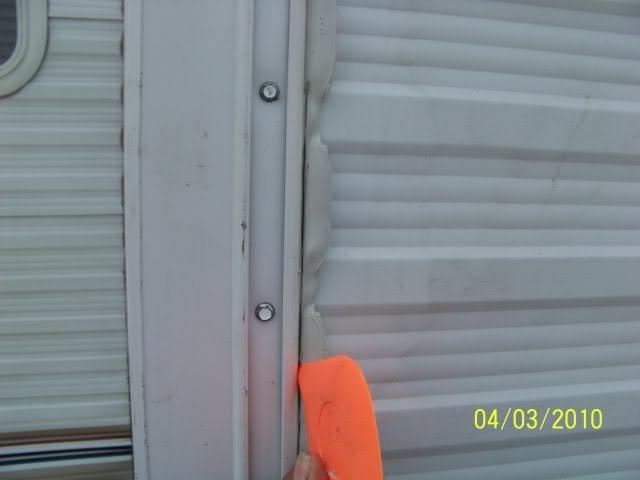
Then an up stroke to peel up the excess

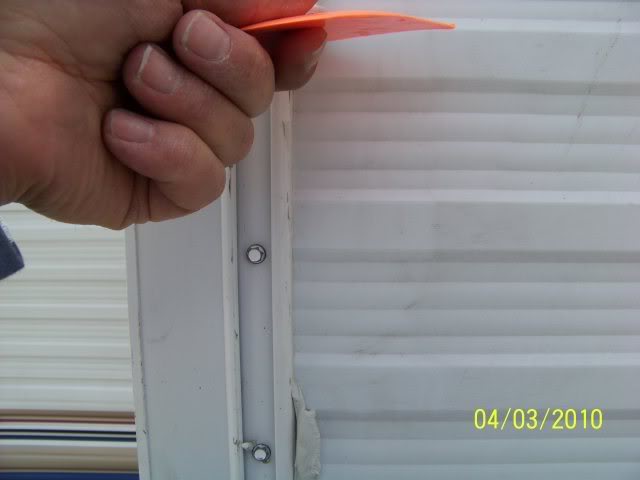
If you have any stringers stuck all over, roll up a ball of the tape and dab it off. Works good. A fellow camepr buddy tipped me off on this on Eternabond and it works here too.

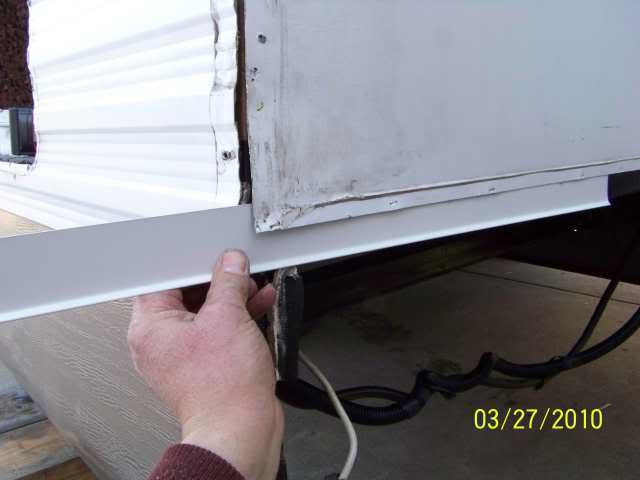
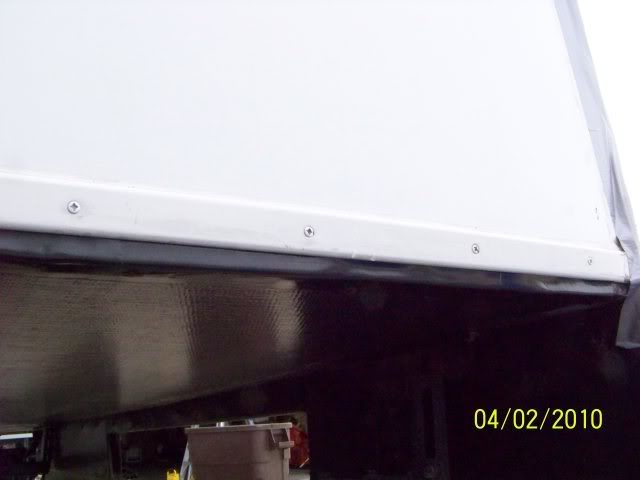
Now we put the lower slide molding strip on. And it has to be taped up too.
I also Eternabond the corners and that lower strip. I start at the top and work down. I have also Counter sunk the screw holes and used flat heads to make that surface flat tap works against my slide seals.
And you use a roller to set the Eternabond.

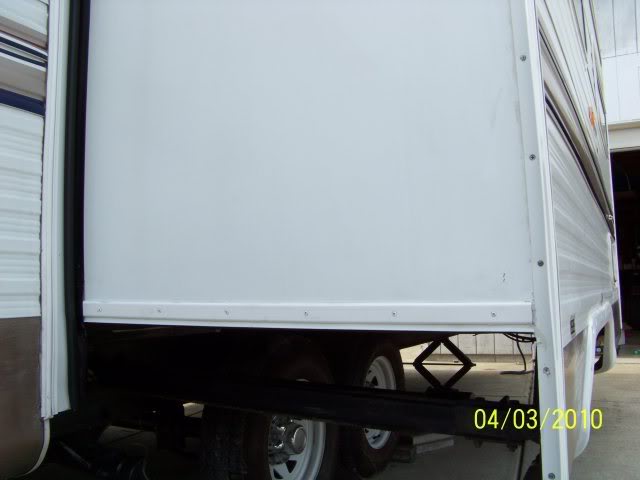
Here is the back of the slide finished.

Now I moved to the front of the slide. This slide floor is solid but still has those exposed screw holes in the Darco. So I used Flex Mend to seal over them and went with a piece all the way inside and up the side of the slide as well. You have to jack up the slide a little to get the Flex mend to sneak inside under the slide floor. Then very lightly only on the edge, duct tape the Flex mend where you want it before peeling off the backing paper. I learned that trick after goofing up a piece
.

You start peeling back the paper and working it as you go.


Now cut off the excess paper and put a small piece of duct tape to hold it up. Let the jack down and bring the slide in. Then go back inside and finish up.


When the slide is in you can reach to the duct tape and then get at the end piece to wrap it around the nose of the slide. I lifted the metal plate on that end as well so I could put the tape up on top.
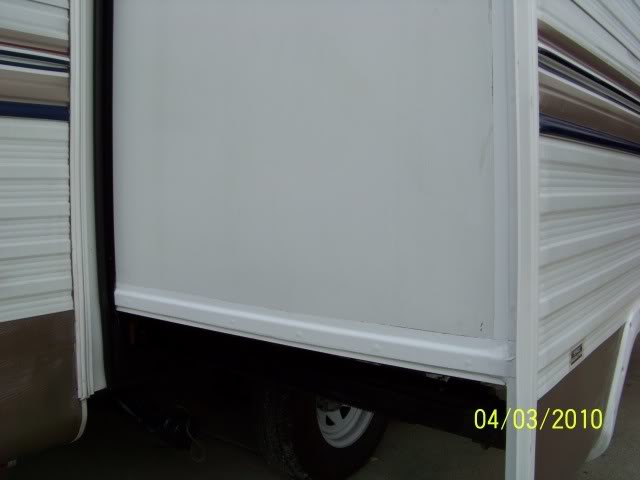
Now put the slide back out use gentle heat from a heater (not a heat gun) warm and rub the Flex mend to set the sealant. And finish up the drip edge like I did on the back side. Here is the front all done.
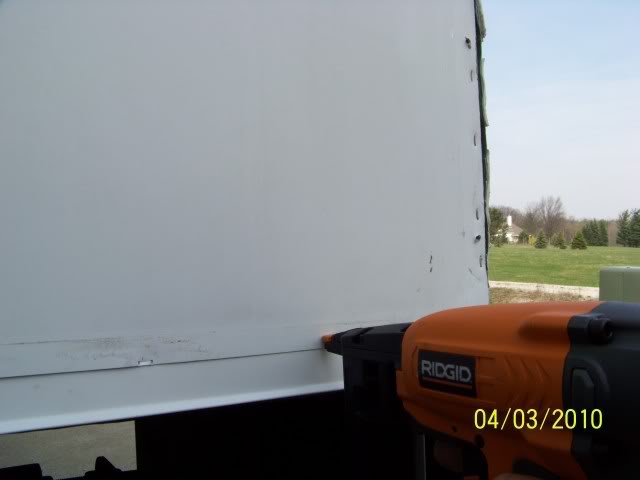
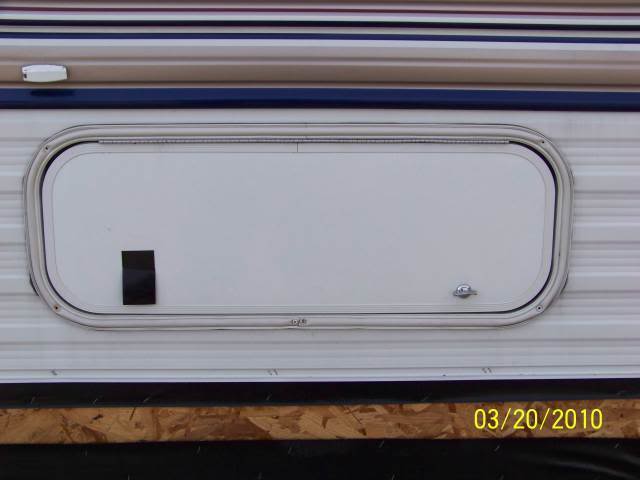
Now a cargo hole to put in. Same thing, clean up the camper, clean up the cargo hole, apply sealing tape and fasten on.


Put the vinyl strip on and your done.

Now to a fender. Here I tape the camper and then put the fender on. And trim the excess tape.


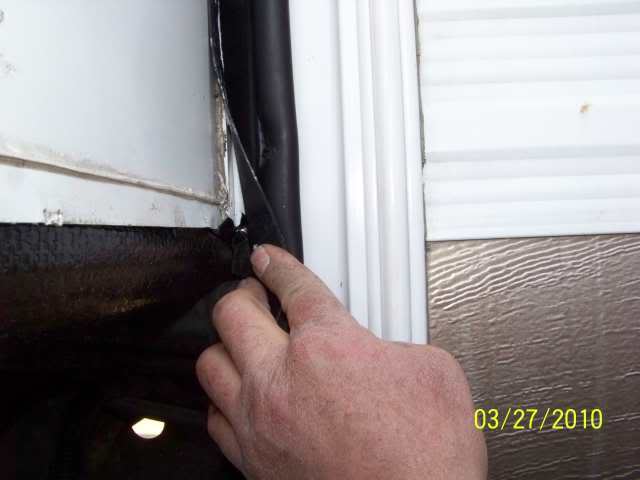
There is a lower aluminum angle that creates a seal along the side of the camper, that needs to go back on and the electrical cables and how they are held.
And presto, all done. WOW
.

Hope this Pict-o-gram helps some folks in the future.
Thanks
John
__________________
Current Sunlines: 2004 T310SR, 2004 T1950, 2004 T2475, 2007 T2499, 2004 T317SR
Prior Sunlines: 2004 T2499 - Fern Blue
2005 Ford F350 Lariat, 6.8L V10 W/ 4.10 rear axle, CC, Short Bed, SRW. Reese HP trunnion bar hitch W/ HP DC
Google Custom Search For Sunline Owners Club
|
|
|
|
|
04-03-2010, 08:46 PM
|
#60
|
|
Moderator
Join Date: Nov 2006
Location: Ohio
Posts: 12,651
SUN #89
|
As promised I took pics of this wicking water in action so folks know what to look for. And of my new drip edge that diverts the water off the bottom of the slide.
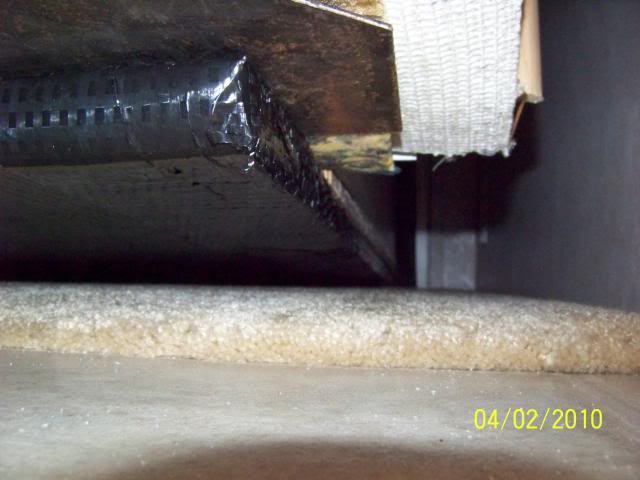
First a recap on the problem. This slide floor is made that screws are installed to go up from the bottom outside to hold the slide floor to the walls of the slide. In order to do that they drill thru the Darco and in doing so a hole is made. Several actually about every 6 inches along the side of the slide.
Last Friday it snowed about 3 and I tipped the camper nose down. The slide was open from the repairs and I took the tarp off. As the snow melted it ran off the slide roof in a water stream right down the side of the slide. I went and looked at it and sure enough there is the wicking action going on. OMG!! ! Good thing I did a temporary tape job over the holes in this front area. If I had not, It would of drenched this front end under the Darco as well.
So in order for this to occur, the slide needs to be open, and it is raining out heavy enough to create a stream of water running down the side of the slide. Then the stream needs to land in the area of one of those screw holes. When the stars align, water wicks into those holes and gets above the Darco. Once in it can get out. So it sits in there and festers until you notice the rot. Hopefully sooner then later....
Here I let the picturea do the talking.
Here is rot area I had

And the series of holes

Now to set the stage. I poured water down the side of the slide to create this. You can try it on yours. (So yes, you can try this at home
..) Here is the front with my floor holes temporarily taped up so you can see what this looks like.
Now pour the water down the side of the slide.

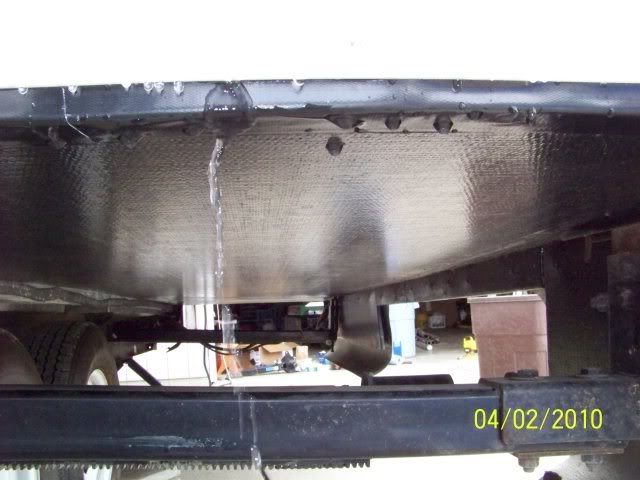


If that water steam lines up with a screw hole in the Darco, you have problems. The water wicks under about 1 before it breaks tension.
Now lets look at my new drip edge in action. Works good. No water on the bottom of the slide.


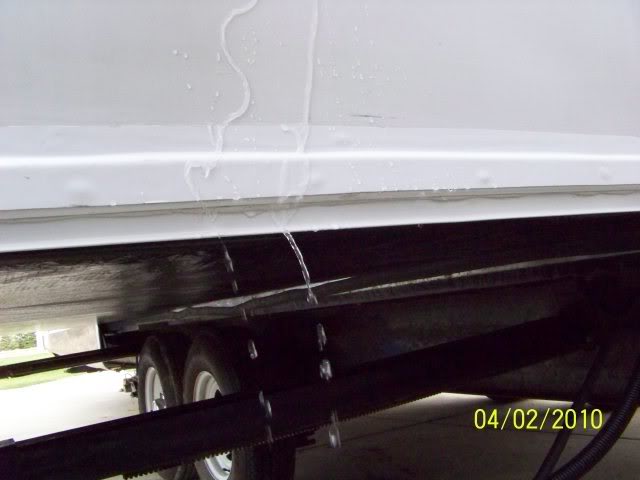
And some looking up shots to see the water break tension and fly off the drip edge. Sorry of the over exposure, there is so much white even a 8.0 F stop could not tone it down.


Hope this helps someone in the future. If your slide has holes in this area, now it the time to plug them up.
John
__________________
Current Sunlines: 2004 T310SR, 2004 T1950, 2004 T2475, 2007 T2499, 2004 T317SR
Prior Sunlines: 2004 T2499 - Fern Blue
2005 Ford F350 Lariat, 6.8L V10 W/ 4.10 rear axle, CC, Short Bed, SRW. Reese HP trunnion bar hitch W/ HP DC
Google Custom Search For Sunline Owners Club
|
|
|
|
|
|
|
Currently Active Users Viewing This Thread: 1 (0 members and 1 guests)
|
|
|
 Posting Rules
|
You may not post new threads
You may not post replies
You may not post attachments
You may not edit your posts
HTML code is Off
|
|
|
|
 » Recent Sunline Discussions
 |
|
|
|
|
|
|
|
|
|
|
|
|
|
|
|
|
|
|
|
|
|
|
|
|
|


 Linear Mode

