 |
 07-27-2020, 08:02 AM
|
#1
|
|
Junior Member
Join Date: Mar 2020
Location: North Carolina
Posts: 13
SUN #11818
|
RV ladder addition
I am installing a ladder on the rear wall of my 2000 Sunline TT, model T2553. I need to find out where the interior studs are located so the ladder is adequately supported.
Is there a schematic anywhere that will show me where the studs might be? At this point, Im relying on sound (tapping for a thud) and assuming there is support lumber around the rear window.
Any suggestions?
__________________
__________________
|

|

|
|
07-27-2020, 08:19 AM
|
#2
|
|
Senior Member
Join Date: Sep 2016
Location: Maine
Posts: 154
SUN #8853
|
No schematics anywhere. I usually rely on a visual inspection on the interior wall. Usually you can see the staples holding the paneling in place. Sometimes a stud finder on the interior will help. Search some of the water damage repair or rebuilding posts on this site and you'll get an idea of the internal construction.
Gary G
__________________
__________________
1990 StarRay T170
2008 Chevy Silverado 1500
|
|
|
|
|
07-28-2020, 12:09 PM
|
#3
|
|
Senior Member
Join Date: Jun 2011
Location: New Jersey
Posts: 544
SUN #2366
|
If your Sunline didn't come with a ladder, you might not have a walk-on roof.
__________________

2015 RAM 1500 Express HEMI 4x4
2007 Sunline T-257sr
2004 Sunline T-2475
2000 Sunline M-2470
1989 Sunline T-170
|
|
|
|
|
07-29-2020, 07:31 AM
|
#4
|
|
Moderator
Join Date: Nov 2006
Location: Ohio
Posts: 12,649
SUN #89
|
H Kfalcetti,
Most RV ladders use wall mounts and touch down on the roof as well for a mount. Is that the type you wanted to use? Sunline did have an "option" for a partial or full walk on roof but it had to be special ordered at the time of order. A guess is, 95 to 98% of the travel trailers did "not" have the walk on roof option. And most that had the walk on feature, the ladder came with the camper, but maybe not all of them. They would also add reinforcing pads in the wall as the wall studs are only 1" wide to hold the ladder weight.
Most all Sunline roofs are not a direct walk on roof without taking special precautions for spreading out your body weight as the roof structure does not exist for a full walk on situation between the roof rafters. We can help tell you how to do this, if yours is not a direct walk on roof.
Have you checked the roof to feel that is is solid "all over" like it has 3/8" OSB board under it? Check it from a ladder at the side reaching onto the roof. The normal Sunline rubber roof of a year 2000 camper has a corrugate board the rubber is bonded too and them they pull it over the rafters. There is no man sized standing in one spot weight bearing roof material to hold that concentrated weight between the rafters. And as such, nothing in the roof to hold the ladder if you made it past the wall studs. The Sunline rubber roof will feel semi stiff, but it will move down in the open areas with some low pushing force against it. It will not feel rock hard like plywood is under it. If you find a spot that feels like a rubber band/tire tube, caution as that can be a leak spot and there the roof sub-straight (the corrugate material) is compromised.
This is what your roof system looks like if you have the normal non walk on roof. This camper is being repaired from water damage and we are rolling up the roof right off the camper.
Starting at the back wall
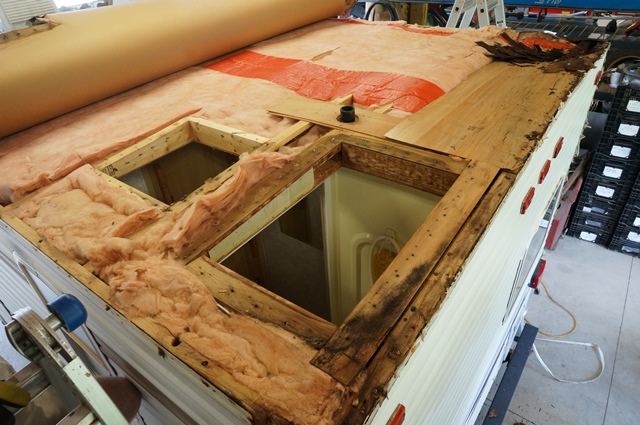
Part way down the roof, notice the plywood sheets laying on top of the rubber to be able to work on the roof to get the vents off

The roof all off with some of the insulation lifted to show the roof system

Hope this helps.
John
__________________
Current Sunlines: 2004 T310SR, 2004 T1950, 2004 T2475, 2007 T2499, 2004 T317SR
Prior Sunlines: 2004 T2499 - Fern Blue
2005 Ford F350 Lariat, 6.8L V10 W/ 4.10 rear axle, CC, Short Bed, SRW. Reese HP trunnion bar hitch W/ HP DC
 Google Custom Search For Sunline Owners Club
|
|
|
|
|
07-30-2020, 06:15 AM
|
#5
|
|
Junior Member
Join Date: Mar 2020
Location: North Carolina
Posts: 13
SUN #11818
|
Dear John,
Thanks for your extensive reply and valuable information. I have found exactly what you described on my Sunline: only rubber bonded to corregate board, making it non-walkable. Because it looked as though the membrane was no longer attached to the trusses in some places, (rippling of the membrane), I decided to replace the roof prior to finding water intrusion. I also want to be able to clean and inspect the roof regularly in the future.
As such, I have removed the original material, replaced the fiberglass insulation, added a layer of Reflectix, and installed new decking using 3/8 plywood. I have marked the plywood where the trusses are located because the 3/8 wood still feels a bit spongy between them. These marks will be transferred to the rooftop once the new membrane is installed. I used smaller pieces of plywood spanning the trusses to support my weight while working in the centermost areas, as suggested.
For the ladder, I added a small piece of 3/4 plywood, attached to the underside of the 3/8 deck, between the edge of the roof and the first truss, where the ladder will be attached, providing a landing area so to speak, and to give additional support to the roof attachment. I suppose Ill have to trust my gut with the wall attachments, using sound and pressure to determine structural locations. At this point, Im planning to mount the ladder supports close to the window edge and along the bottom edge of the back wall, as those areas seem to be the most stable. I cant think of any way to add reinforcing pads to the walls without ripping apart the inside, which Im not willing to do at this time. Ill have to trust that my weight of <150lbs will not cause the wall attachments to fail!
Thanks for your valuable assistance.
Karen
__________________
|
|
|
|
|
07-31-2020, 08:12 AM
|
#6
|
|
Moderator
Join Date: Nov 2006
Location: Ohio
Posts: 12,649
SUN #89
|
Hi Karen,
Oh, you are doing did a roof replace, good for you! Did not know this, thus the explanation on how the roof is made and it is non walk-able. That roof manufacturing concept was unique to Sunline and many/most new folks to the Sunline brand do not know about it. So I took the time to explain, but you already knew this, and are past the roof support issues now!
To your ladder, it seems you have the roof touch down area covered with reinforcement pads for the screws. Good. On the rear wall, here is a thought that may help. I have seen RV ladders before and the styles of how they are made a little different.
*Some have the bottom legs straight down and just stop at the bottom hanging in mid air with the 2 legs pointing down. There is no support. These type have little supports up the length of the ladder to attach to the wall.
*Other types have a bottom mount that curves and goes into a wall mount. They also have supports to the wall up the ladder. The very bottom is attached. Sort of like this one
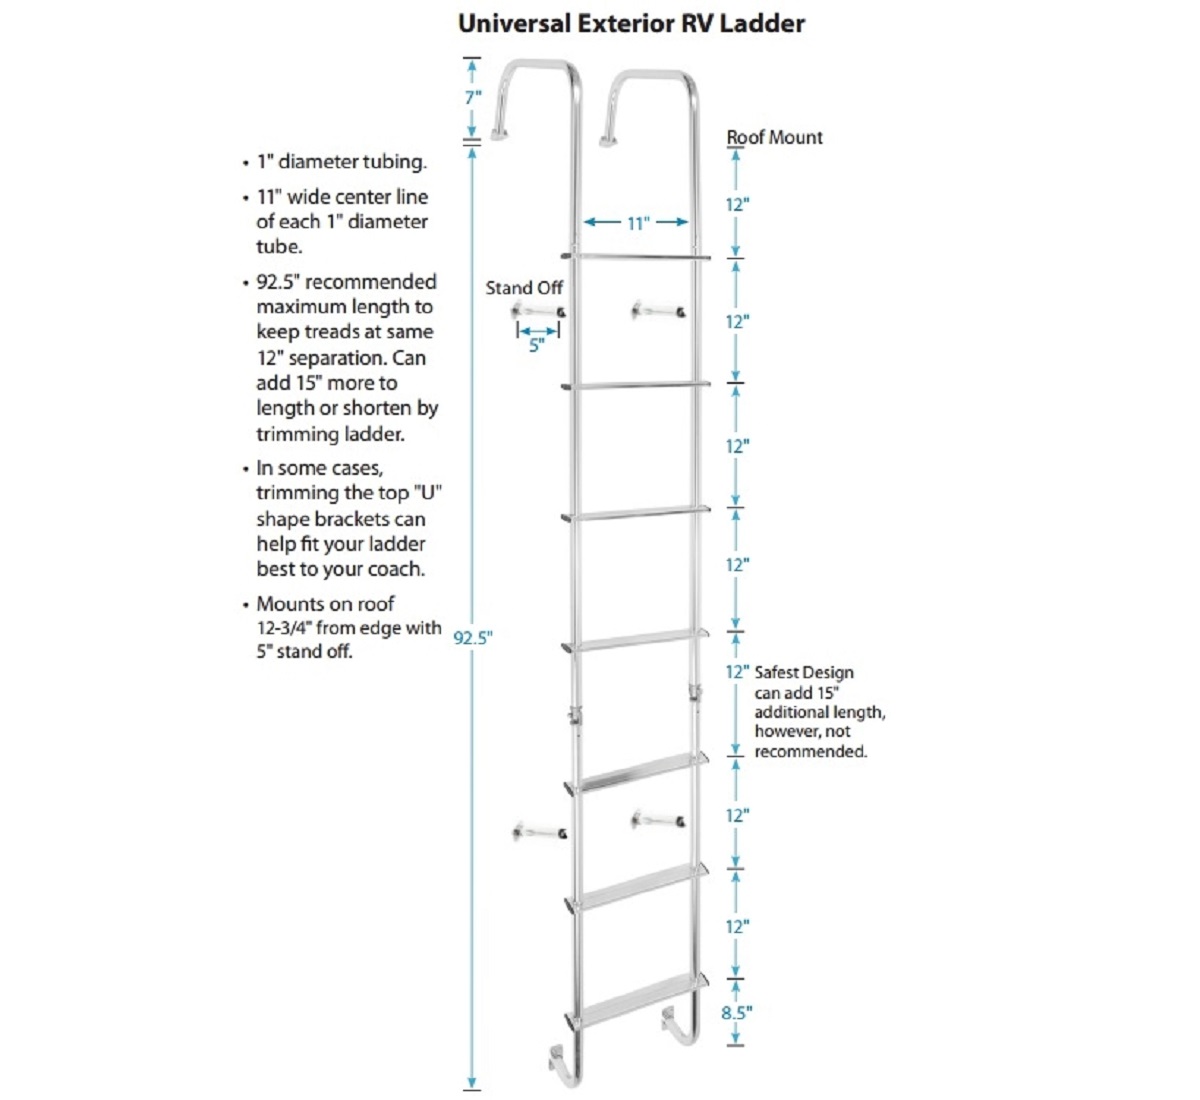
From Stromberg https://www.strombergcarlson.com/pro...oor-rv-ladder/
Which type do you have, or are planning to buy and is there a bottom support to the wall or the legs are straight down into air?
I have had your vintage of camper apart before and know of the wood heavier supports at the floor level that may help the ladder support tie in.
Can you post a pic of the back wall showing the bumper and the bottom of the back wall? and the whole wall where you want to mount the ladder? I may have some pics of the wood behind the siding to help show you want could be there.
Hope this helps
John
PS. Thanks for sharing the pics of your roof progress. 
__________________
Current Sunlines: 2004 T310SR, 2004 T1950, 2004 T2475, 2007 T2499, 2004 T317SR
Prior Sunlines: 2004 T2499 - Fern Blue
2005 Ford F350 Lariat, 6.8L V10 W/ 4.10 rear axle, CC, Short Bed, SRW. Reese HP trunnion bar hitch W/ HP DC
Google Custom Search For Sunline Owners Club
|
|
|
|
|
08-04-2020, 07:04 PM
|
#7
|
|
Junior Member
Join Date: Mar 2020
Location: North Carolina
Posts: 13
SUN #11818
|
RV ladder addition
anything behind the aluminum siding. I intend to mount them at the lowest point possible, which I presume is the floor of the camper. I found a smaller structural point midway between the bumper and the bottom of the camper, which Ill use for one set of the stand-outs on the ladder, and the on the top of the window. If you can suggest better places, Id be most happy to use them.
The pics are not in the order I wanted them in. One is of the extra support added on the roof landing area. One is of the ladder temporarily in place, with the stand-outs taped where I plan to mount them. The other two are the back of the camper before and after painting.
Looking forward to your response.
Karen Falcetti
__________________
|
|
|
|
|
08-04-2020, 11:20 PM
|
#8
|
|
Moderator
Join Date: Nov 2006
Location: Ohio
Posts: 12,649
SUN #89
|
Quote:
Originally Posted by Kfalcetti

anything behind the aluminum siding. I intend to mount them at the lowest point possible, which I presume is the floor of the camper. I found a smaller structural point midway between the bumper and the bottom of the camper, which Ill use for one set of the stand-outs on the ladder, and the on the top of the window. If you can suggest better places, Id be most happy to use them.
The pics are not in the order I wanted them in. One is of the extra support added on the roof landing area. One is of the ladder temporarily in place, with the stand-outs taped where I plan to mount them. The other two are the back of the camper before and after painting.
|
Hi Karen,
This may help. Sorry it is so long, but this is complex to explain in a few words. I am not 100% positive your camper floor system is built like what I am going to show below, but there are a few things you can check if it is built which way. I'll explain more below.
I also know a fellow Sunline club member who has a 2001 T-2553. Last summer he had the back wall siding off to correct water damage. He might by chance have a picture of the wall stud layout with the siding off. I will send him a message and if he has something, he should respond to your post.
There is a difference I "think" though between the year 2000 and 2001 non slide campers. The rear wall on your 2000 camper appears to have a slant to it about half way down the wall and the wall slant inwards towards the bumper. The year 2001, it appears that may have did away with the slanted rear wall and just went straight down with it. The brochure also reflects an overall length change. 2000 T2553 is 25' 11" long, 2001 T2553 is 26' 4" long. By straightening out the rear wall, the camper would get longer, yet the floor plan is the same. I bring this up in case as the member with the 2001 T2553 the studding may be slightly different at the slant area. I suspect Sunline would of created that slant on yours like they do on the front of the camper, with 2 full width wall studs at the bend area. I'll post pics below.
Here is what I "think" your floor system is made up like. Sunline has used 2 x 3's (nominal size) and in some cases 2 x 4's (nominal size) for floor joists for some time. In the earlier models, they placed the 2 x 3's flat on top of the camper steel frame, the 3" wide dimension was placed on top of the frame and the 2" dim pointing up. This is a 1997 T2653 camper with the floor joists laying flat, 2" direction is vertical) on top the steel frame.

This is from Kitty and Gary's rebuild post https://www.sunlineclub.com/forums/f...avy-14275.html
Then, as time went by from 1997, Sunline changed the floor joist system to be 2 x 3's with the 2" side on the camper frame and the 3" side standing up vertical. This is where I do not know what model year past 1997 they started standing the 2 x 3's up. I do know for sure that by the 2004 models, the 2 x 3's were standing up. 2004 was a design change year and the floor change may have come with it.
See here, this is one of my project campers I and restoring, a 2004 T1950 non slide camper. One thing that does hold true, the method of building the camper was the same per model year except for the floor plan changes. Meaning, all non slide campers in the 5,500# and 7,000# class non slide campers, had the same floor design.
You can check yours with what I am going to show here. The importance of this to is get the bottom of the ladder screwed into the heavy structure of the floor joist.
This 2004 camper has the 2 x 3 floor joists and are standing up, the 3" side is vertical.
Here at the back wall, are qty 2, 2 x 3"s are staked standing up. In either design 3" side laying flat and standing up, you want to screw into that bottom floor joist.

Here is the rest of the stack up. A 1/2" thick floor decking is over the top of the floor joists.

On top of the floor decking, they place the walls on top of the floor. The bottom wall sill board is 1" tall.

Here is with the wall board on

Here is the vertical stack up on thickness starting from the bottom of the floor joist at the metal trailer frame going up. A model year 2004 to 2007 confirmed.
Floor joist. 2 x 3 (Nominal) with 3" vertical. Actual is 1 1/2" wide by 2 1/2" vertical.
Floor decking, actual 1/2" thick vertical
Rear wall sill plate, actual 1" thick vertical
--------
2 1/2 + 1/2 +1 = 4" actual from bottom of floor joist up to the top of rear wall sill plate.
On this floor setup, you want the bottom ladder screws in the 2 1/2" tall floor joist. Ideally semi centered and not on the edge. Do not get into the 2 1/2 to 3" vertical area as that is the floor OSB wood and it will not hold a screw in that direction.
If you have the older floor joists, the 2 x 3's are lying flat, you only have 1 1/2" vertical wood as opposed to the 2 1/2" when they flip up vertical on the 2 x 3.
Since you have a rear cargo door under the bed in the back of the camper, open the cargo hole door and try and measure down from the door frame to the top of the floor inside the camper. Then measure from the same point on the cargo door frame to the bottom of the floor joist. Subtract the 2 numbers to get the floor system thickness.
On a floor with the floor joist standing up 2 1/2" actual + 1/2" floor decking is 3" thick bottom of floor joist to top of floor.
On a floor with the floor joist standing up 1 1/2" actual + 1/2" floor decking is 2" thick bottom of floor joist to top of floor.
There is an entire 1" difference between the two designs. You should be able to back into which you have to know where to put the bottom ladder screws into.
Next area. The first ladder post support up from the bottom. By the tape in this pic, it looks like you found a left to right wall studs at the bend of the rear wall (rear wall straight, then bent inwards joint). Is that correct?
I suspect Sunline made that joint bend just like they did on the front wall, like this.
At the bend area, they have 2, wall studs 1 1/2" wide (wall depth) by 1" thick (vertical dim) that span left to right of the camper. They butt them up against each other and there is an air space between them due to the angle.
Your rear wall bend area should be just like the front wall. See here. You want to put the screw in the middle of the top or bottom left to right wall stud at the bend area. You should be able to feel it being solid the full width of the camper to know you found that left to right wall stud. It will only be 1" tall in the direction you are putting the screw into, so try and find the center of it.


Your attaching ladder support post point over the top of the window, that location may have some issues to it with way I can see (which is hard to) in the pic.
The window wood frame is made square. In the radius corners, they place a plastic corner block. The corner block is a filler to allow the window to compress the putty tape window seal tight with the clamp flange inside the camper. That plastic block has no structural support to be able to hold a screw if you end up screwing into it.
Point: The support to the left side of the window looks like it may land in the radius corner block, does it? I cannot tell from that small pic so far away.

This is what the plastic corner blocks look like

They staple them in the square corner of the window frame to make the frame curve match the window. See the black corner blocks in the wood window frame.

Your other post support on the right, the one over the window frame, I have a bad feeling the screws are going to go into air at that location not being able to see the actual foot of the post support. The window wood frame is only 1" tall, the actual metal frame window flange will consume about 75% of the 1" tall wood frame clamping the metal window to the wood frame. That only leaves approx 1/4" (which could be 3/16" to 1/8") of wood exposed above the metal frame of the window. My thoughts are, a screw in that last 1/4" of wood will split the wood if the post bracket can even have the screw that close to the edge of the window.
As of right now, and with out closer pics of the support post bracket, I'm not seeing a good way attach those 2 upper ladder support post by the window.
I'll think some more on it and maybe the other member with the 2001 T2553 has a pic of the rear wall with the siding off.
Hope this helps
John
PS, You may want to do a screw check on the bottom piece of siding on the back wall. Take each hex head screw out in the siding just above the bumper. Look at the screw threads, If they are "all" nice and shinny like new, then there is no water damage to the wood floor joist at the back wall. If you see rust, or worse goo on the threads, post pics of the rust/goo so we can take a estimate on what to do. You really do not want to screw the ladder into a water damaged joist, it will not hold for long. You can put the screws back in if they area good, or replace if they are badly rusted.
__________________
Current Sunlines: 2004 T310SR, 2004 T1950, 2004 T2475, 2007 T2499, 2004 T317SR
Prior Sunlines: 2004 T2499 - Fern Blue
2005 Ford F350 Lariat, 6.8L V10 W/ 4.10 rear axle, CC, Short Bed, SRW. Reese HP trunnion bar hitch W/ HP DC
Google Custom Search For Sunline Owners Club
|
|
|
|
|
08-07-2020, 06:05 PM
|
#9
|
|
Moderator
Join Date: Nov 2006
Location: Ohio
Posts: 12,649
SUN #89
|
Hi Karen,
I may have come up with a better location to mount your ladder top wall support posts. See if this helps.
From my last post above, I saw some issues with mounting the top 2 wall supports at the top of the window. Since that last posting, we went camping and I have been thinking about this. The can be a better option for mounting those top 2 wall supports.
Here are your 2 pics.
The top of the window mocked up attaching points that I see having some problems in that area.
What I am going to suggest is, move those 2 wall supports from above the window, up to the top of the rear wall cross member. This will be just above the 3 red lights in the top middle of the rear wall.

First, I found these 2 campers with rear mounted ladders that sparked the idea on how to do this on your Sunline.
Here is how Forest River mounted theirs. The upper wall post supports are up high. In this case, just below the top 3 red clearance lights.

Here is how Keystone mounts one of theirs. In this case just above the 3 red lights.

Both of these campers had the ladder mounted at the factory and they planed in support to attach the top 2 wall posts. The point to see, they wall posts are spread out, and not really equally spaced.
Now to your camper. You will need to find the top cross member of the rear wall of the camper. That 1 " wide (tall as looking at it) x 1 1/2" deep (the wall thickness) runs the full width of the camper over the top of all of the rear wall studs. It will be above the 3 red lights on your camper. The ceiling board is right at the top of the rear wall cross member. The rear roof rafter rests on top ceiling board, which is on top of the rear wall cross member. The top rear wall cross member is very stiff and supportive, as the ceiling and the rafter are creating cross bracing to help stiffen that area if you pull on it with the ladder.
Here are some pics of what it would look like with the siding off. Press the siding to feel just "above" the 3 red lights to find the "bottom" of that 1" wide rear top cross member. Then go 1/2" up and your mounting screws will be in the middle of that cross member.
As a point of reference, the end of the rafter is 1 1/2" tall. The ceiling board is 1/8" thick. The top wall cross member is 1" thick. You can pull a string or chalk line across the back of the camper starting at the top of the rafter roof line on farthest left and right side ends, then measure down 1 1/2" + 1/8" +1" = 2 5/8" down from the top of "original" Sunline roof rafter at the left and right wall ends. Pull the string tight at those 2 locations. Since you put plywood on top of the rafter, you will need to account for that if you are measuring above the top of the rafter. This string method is a second way to compare with feeling the rear wall to find the bottom edge of the top rear wall cross member.
This is the 2004 T1950 I am restoring to show the rear wall top cross member below the rafter but above the 3 lights.

This is a 2005 T2363 made the same way. Sunline created a wall pocket for the 3 red lights. Not sure all Sunlines have the wall pocket for the 3 lights, but they all have the top wall cross members.
As found with water damage

Rebuilt water damage

If I lost you in the words on how to find that top rear wall cross member, let me know, I'll try and explain, point to, better.
Another way to find the bottom of the rear wall cross member is to take off one of the red lights in the middle and poke/feel up until to hit the wood. Then measure from the light hole up from the inside and transpose to the outside. It is probably 2" not more then 3" up from the top of the red light hole.
Consider all this, "ideas" or thoughts for you to build on to help you make decision on where to mount your ladder.
Hope this helps
John
__________________
Current Sunlines: 2004 T310SR, 2004 T1950, 2004 T2475, 2007 T2499, 2004 T317SR
Prior Sunlines: 2004 T2499 - Fern Blue
2005 Ford F350 Lariat, 6.8L V10 W/ 4.10 rear axle, CC, Short Bed, SRW. Reese HP trunnion bar hitch W/ HP DC
Google Custom Search For Sunline Owners Club
|
|
|
|
|
08-07-2020, 08:18 PM
|
#10
|
|
Junior Member
Join Date: Mar 2020
Location: North Carolina
Posts: 13
SUN #11818
|
Ladder addition
Dear John,
I am in awe of the amount of valuable information you have provided! I cant thank you enough for the time youve taken to help me! Not to dis FB groups because I use them a lot for info and opinions, but I would never have gotten so many useful suggestions from any of those groups. Im so glad I found your site. Ive actually been reading ... and learning from ... many of the other posts in the forums.
I very much like your suggestion to use the wall pocket framing for the ladder supports. I was uneasy about screwing anything into the area around the windows due to the potential for causing leaks but wasnt aware of any other options. This will certainly be a much better option! Im just a little worried my ladder placement may be too far to the left to hit that board. Due to the cargo door, freshwater inlet door and license plate locations, where Ive placed it is the only area that avoids conflict with them. I gave brief consideration to moving the spare tire to the left but due to its weight, I thought it might mess up the balance of the trailer. Also, there isnt much space available on the right side anyway.
Im currently trying to finish up the roof this week, as my rubber membrane just arrived yesterday. Poor thing has been covered with a tarp since May 15th. As soon as the membrane is done, I will send pics of the ladder installment and whether or not the wall pocket idea worked out. Have attached a closer photo of the back so you can see proposed ladder placement.
With deepest appreciation,
Karen
__________________
|
|
|
|
|
08-09-2020, 05:42 PM
|
#11
|
|
Moderator
Join Date: Nov 2006
Location: Ohio
Posts: 12,649
SUN #89
|
Quote:
Originally Posted by Kfalcetti
Dear John,
I am in awe of the amount of valuable information you have provided! I can’t thank you enough for the time you’ve taken to help me! Not to dis FB groups because I use them a lot for info and opinions, but I would never have gotten so many useful suggestions from any of those groups. I’m so glad I found your site. I’ve actually been reading ... and learning from ... many of the other posts in the forums.
I very much like your suggestion to use the wall pocket framing for the ladder supports. I was uneasy about screwing anything into the area around the windows due to the potential for causing leaks but wasn’t aware of any other options. This will certainly be a much better option! I’m just a little worried my ladder placement may be too far to the left to “hit” that board.
Due to the cargo door, freshwater inlet door and license plate locations, where I’ve placed it is the only area that avoids conflict with them. I gave brief consideration to moving the spare tire to the left but due to its weight, I thought it might mess up the balance of the trailer. Also, there isn’t much space available on the right side anyway.
|
Hi Karen,
Wow, thank you for your kind words. I'm humbled.  We have a really great group of camper folks here on Sunline club from all different backgrounds, and they are glad to help as we can. Our cyber campfire burns bright! You can now join in to help others from your experience.
Bellow are some things to help clear up some confusion maybe, and to help give you some options. Lets take the easy one first.
The spare tire, the 2000 T-2553 trailer frame has no issue on the back of the camper I am aware of. If it will help your ladder mount, you can slide the spare tire to the left or right without frame concern or that you will shift the balance of the camper.
That said, wow, you do have many obstacles to overcome on the back wall. The fresh tank fill, the fresh tank drain, the rear cargo hole door, the spare tire and the stop/turn lights are all contending for the same wall with your ladder. Your last pic really helped us see what you are up against.
This pic of yours, I can see how tall the spare tire is to the rear stop lights. See the decal area. The tire goes above the rear center area decal. That means the spare tire will not fit under the right or left stop light. Plus on the left there is a license plate to contend with.

I took your pic and drew on it so we can talk to it. Your original location may be the best option to avoid everything you have to contend with. But, I went out on a limb and created a suggestion, you will have to see if it actually will work though. The dotted lines are cross members I will talk to below.

The spare tire is a problem to contend with in any location on the rear wall. Right now, to get into the cargo hole, you have to pull the pin and tip the tire down to get in the cargo area. It works. The thought is, can you slide the tire mount on the bumper over to the left, but not to block the licence plate? I'm not sure it will work, but maybe a mock up dry run may help prove it can or won't work. With the tire more to the left, then you have to contend with the tire when adding fresh water, but maybe easier then the cargo hole. If that works, then maybe the ladder will fit at the right side of the window? Again you will need to decide, just throwing out ideas here, which may or may not work.
From a mounting to the camper standpoint, the anchor points would be in the same left to right cross members regardless of where you mount the ladder. By your response above, maybe I did not explain it well enough. I'll show now with pics.
See the dotted red lines on the wall wood cross members (see pic below) they all span the full width of the camper. One at the top of the rear wall, the other at the bottom of the rear wall. That cross member is 1" tall vertically. You would need to feel to find the edge and then go up 1/2" from the edge and be in the middle of it. The bottom wall cross member is screwed to the floor joists behind it. I may have not explained it well enough that the siding is only supported by the 1" bottom cross member, as that cross member is then screwed to the floor joist. But, both cross members, the top and the bottom, are full width of the camper, so you can mount anywhere along those cross members.

At the bend in the rear wall, the middle ish area, feel to find the 1" tall vertical cross member, find the edge, move 1/2" in and that is the mounting location. See here, this is a front wall bend, but I "suspect" Sunline used the same method on the rear wall. You can pick the top of the bend or the bottom of the bend, just not right in the middle of the bend as there is only air there and no wood. See pic below what I suspect your rear wall at the bend area looks like. Again those cross members go full width of the rear wall.

If you find those 3 cross members, then pic the best option for use on where to mount the ladder along the rear wall to content with all the things that are in the way.
Also suggest, at the bottom of the rear wall, take out each screw along the bottom left to right span of the siding just above the bumper, and look for rusted threads or goo'ey threads on the screws. These screws, see pic below. If you have rusted threads, line up the screws along the rear bumper and take a pic so we can see where the rusted screws are in relation to the holes in the siding and the back of the camper. Then we can talk about what to do with that area.
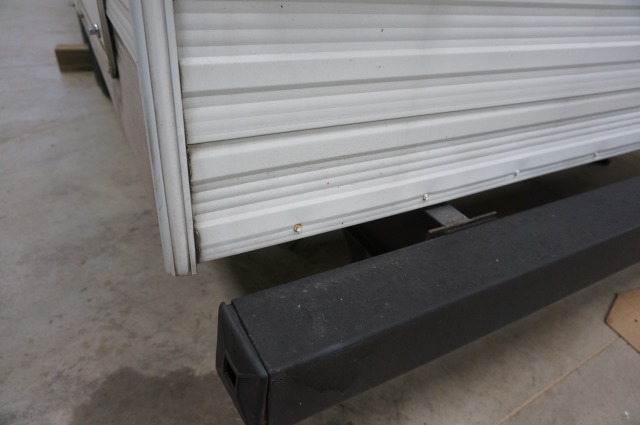
You can put the screws back in when done. The rusted threads comes from water in the wall at some point in the campers life. The bottom ladder mount needs to be solid into good sound wood as it is holding the largest of the support loads.
Hope this helps
John
__________________
Current Sunlines: 2004 T310SR, 2004 T1950, 2004 T2475, 2007 T2499, 2004 T317SR
Prior Sunlines: 2004 T2499 - Fern Blue
2005 Ford F350 Lariat, 6.8L V10 W/ 4.10 rear axle, CC, Short Bed, SRW. Reese HP trunnion bar hitch W/ HP DC
Google Custom Search For Sunline Owners Club
|
|
|
|
|
09-14-2020, 03:38 PM
|
#12
|
|
Junior Member
Join Date: Mar 2020
Location: North Carolina
Posts: 13
SUN #11818
|
Ladder addition
Dear John,
Took a lot of time composing this and then forgot to send. Lol....
I will absolutely remove those lower screws to determine their condition. I had to smile when you described the process and why. What an ingenious way to figure out what might be going on inside the walls! Im very curious about what Ill find!
I may be wrong, but I dont believe water damage has been an issue with this camper. I was extremely relieved as I removed each section of the old roof and found good, solid wood beneath. The only questionable area was in the right rear corner, where it looked as though a problem may have been starting to take hold. Aside from this one corner, everything was solid.
I did find a lot of mold on the pressed paper the old membrane was attached to, and in a few areas, there was mold on the fiberglass insulation, but the wood was never involved. My progress with this roof replacement has been pretty slow, due to family emergencies out of state, and if I am honest, my age. So even though the roof has been covered with a tarp, the mold may be due to it being exposed to the ridiculously high humidity levels in this area during the four months Ive been working on it.
I treated the wood in these moldy areas anyway with hydrogen peroxide, just in case there were mold spores present that werent visible yet. If any of those lower screws are rusty, I believe theyll be located on the right side. Ill get back to you soon with pics of the screws.
I did however have a water heater leak this summer on the left side of the camper rear and those screws may have been involved. I have included pics of the screws and the installed ladder.
Thanks for the info about the spare tire. If Id had this info sooner, I would have moved the tire to the left because I could have opened the fresh water inlet door without lowering the tire. Unfortunately, I had already installed the extra support for the ladder under the plywood, and the rubber membrane when I read your suggestion. Oh well. Maybe on my next camper.
I cant express how helpful youve been with this project. A simple Thank you is totally insufficient but all I can offer at this time. I hope the rest of your year is as successful as my summer has been (thanks to your help).
Karen Falcetti
__________________
|
|
|
|
|
09-17-2020, 09:40 AM
|
#13
|
|
Moderator
Join Date: Nov 2006
Location: Ohio
Posts: 12,649
SUN #89
|
Hi Karen,
First off, you are doing great work!!! The roof looks great and so does the ladder install. It looks you found all the left to right cross members on the back wall. GREAT!!!
A few comments on your last post. The rear wall bottom siding screws. These

The good news, the rust is dry, at the moment. I can tell by the color and the dust on the bumper.
Now the news. At sometime in the campers life, a quantity of water was laying along the back wall under the floor area. With the screw threads fully rusted, it points to the screw was in a level of moist wood.
If the rust was a darker brown, or goo'ey, that can point to an active wetness in the wood below the floor still on going. I see the 2 screws you show are right near the fresh tank drain valve. It might be a prior owner had some level of a leak in the fresh tank system that flowed across the floor and to the back wall and down between the wall board into under the floor. They may have mopped up the floor inside, but the wall water may have been left there. Over time, the water evaporated out as the leak source was gone.
Another possibility is a corner molding leak. The 4 corner moldings are notorious for allowing a leak to get in while towing, or just water running off the roof gutters. If you want to look further, take all the screw out and check across then whole rear wall. If the rust gets worse/darker and gooey by the corners, then the corner molding is a suspect. Since your roof had low signs of a leaking, that is really good, but the corner moldings can leak in as bad as a roof leak.
You can pull out the vinyl screw cover strip on the corners, and do a screw check on them too. The same rusting concept applies. A clean shiny screw is good wood that is not wet will last almost forever that way. The rust colors help point to water made it way in the wood. How much and how long is the question.
Since you screwed in the ladder mounts in the bottom, and if they tightened up good, then the wood is still in acceptable shape. If it was rotted, the screw would never hold. Also, there are ways to seal up the corner moldings, and window and every other molding on the camper if you are interested. They all can be water leak sources.
On the mold on the backing of the old roof membrane, this comment.
Quote:
|
I did find a lot of mold on the pressed paper the old membrane was attached to, and in a few areas, there was mold on the fiberglass insulation, but the wood was never involved. My progress with this roof replacement has been pretty slow, due to family emergencies out of state, and if I am honest, my age. So even though the roof has been covered with a tarp, the mold may be due to it being exposed to the ridiculously high humidity levels in this area during the four months Ive been working on it.
|
I have an explanation for that and I found the same issue on 2 Sunlines I did new roofs on. I have pics of all this and was going to do a post on it, but I'll give you some here now.
If campers are used during the spring or fall when the furnace needs to run, and the windows get all fogged up with dripping wet condensation, that is when what I am going to describe below can happen.
Excess moisture in a camper does build up during times when the heat runs and people are inside. One nights sleep with it going down to 50F or so and the heat runs, is the time when a lot of moisture builds up inside the camper. Many people never realize the excess moisture issue in a camper as they do not always deal with it at home. A house has very large space, a camper is very small and condensed. Most folks never open a roof vent at night while they are sleeping in these conditions as they feel it will let the heat out.
It is true, the heat will go out if the roof vent is open about 1" up, but without that vent being open, the majority of moisture stays locked up inside the camper. Moister air seeks and migrates towards lower humidity areas naturally. On a cool night, it is drier outside then inside where it is warmer. Since a large amount of the moisture cannot get out of the camper, it still keeps trying, and it ends up going up into the camper attic above the ceiling. Small openings in the ceiling board, by the roof AC unit, the ceiling AC ducts if it has any, the shower steam dome, the roof top crack up antenna handle, ceiling light fixtures, crank up roof vents and others all have tiny cracks that moisture can work its way up into the attic.
Once the moisture is up in the attic, it can't get out as the rubber or metal roof will not let it get out. So the moisture stays trapped up their. Mold will grow in 14 days if the conditions are right. Wetness is the first big ingredient. The end result, mold forms on the brown bud board of the rubber roof, the wood rafters, the screws if the ceiling lights rust and you can see signs of water staining on the brown roof bud board. The water stains are some of the paths the moisture created on the way up into the attic.
After seeing this, I started adding attic roof vents to any of my camper roof projects to allow the moisture to get out. It also helps get rid of some of the trapped heat in the attic in the summer sum making for a cooler camper.
If folks are interested in this attic mold topic, I'll dig up the pics I got and create a post on it sooner rather then later.
You are doing great on fixing up your Sunny. Looking forward to seeing more progress.
And, thanks for the good words and thanks. Our cyber campfire burns bright here on Sunline Owners Club and the more we talk and share, the better we all learn about things.
John
__________________
Current Sunlines: 2004 T310SR, 2004 T1950, 2004 T2475, 2007 T2499, 2004 T317SR
Prior Sunlines: 2004 T2499 - Fern Blue
2005 Ford F350 Lariat, 6.8L V10 W/ 4.10 rear axle, CC, Short Bed, SRW. Reese HP trunnion bar hitch W/ HP DC
Google Custom Search For Sunline Owners Club
|
|
|
|
|
09-18-2020, 05:10 PM
|
#14
|
|
Junior Member
Join Date: Mar 2020
Location: North Carolina
Posts: 13
SUN #11818
|
Dear John,
Lots of good info, as usual... Because the original, 20 yo A/C Unit wasnt working, I decided to discard it completely. At some point in the future (when I have $800 to spare), Ill replace it but for now Im using a maxxaire fan deluxe and a portable a/c unit. This portable unit has a dehumidifier function, as well, so I think Im in good stead for heating season.
Ive actually been concerned about moisture build-up in the ceiling, especially because I added a layer of Reflectix, making it even harder for moisture to dissipate. I would be interested in reading about your attic roof vents. I presume they can be added after the fact?
Also, I have already begun to re-do the four corner moldings. Havent done them all yet but will finish this winter. Im also planning to remove all the windows and re-seal them as well. I think the rubber gaskets that surround the glass also needs replacing. It appears to have shrunk, is faded, and in some areas I see small cracks. Ill have to replace one Window entirely because it doesnt work quite as smoothly as it should. It kinda thumps a few minutes after closing it, indicating that its catching on something. I worry that eventually it will begin leaking if it ever decides to stop thumping closed all the way.
In spite of all this work, done and planned, I really think I lucked out on this camper. I believe its still in very good condition and will serve me well as my full-time home for many years to come! Id love to meet You and other Sunline owners sometime. Do you ever have rallys or weekend gatherings?
Im leaving for the Minn sugar beet harvest in two days, so will have to sign off for now. So many last minute preparations to take care of yet! Thanks again for all your help. I dont think it would have come out so well without it!
Stay safe and healthy!
Karen
__________________
__________________
|
|
|
|
|
|
Currently Active Users Viewing This Thread: 1 (0 members and 1 guests)
|
|
|
| Thread Tools |
Search this Thread |
|
|
|
| Display Modes |
 Linear Mode Linear Mode
|
 Posting Rules
|
You may not post new threads
You may not post replies
You may not post attachments
You may not edit your posts
HTML code is Off
|
|
|
|
 » Recent Sunline Discussions
 |
|
|
|
|
|
|
|
|
|
|
|
|
|
|
|
|
|
|
|
|
|


