 |
|
 02-26-2022, 12:08 PM
|
#41
|
|
Junior Member
Join Date: Dec 2021
Location: Florida
Posts: 25
SUN #13056
|
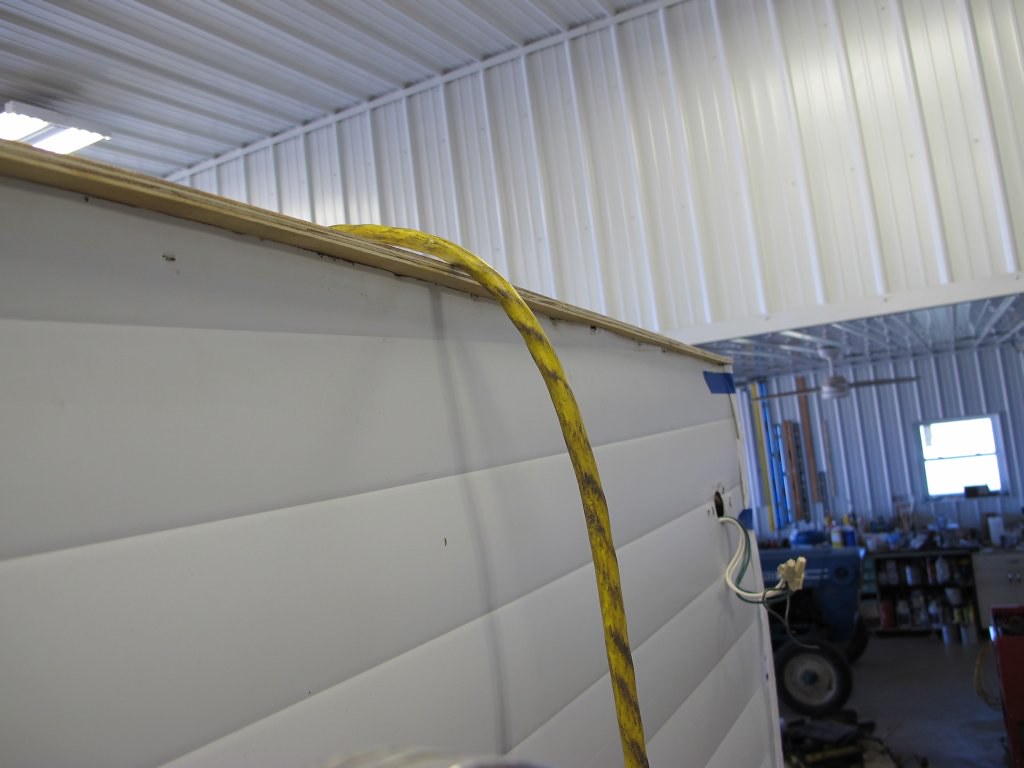
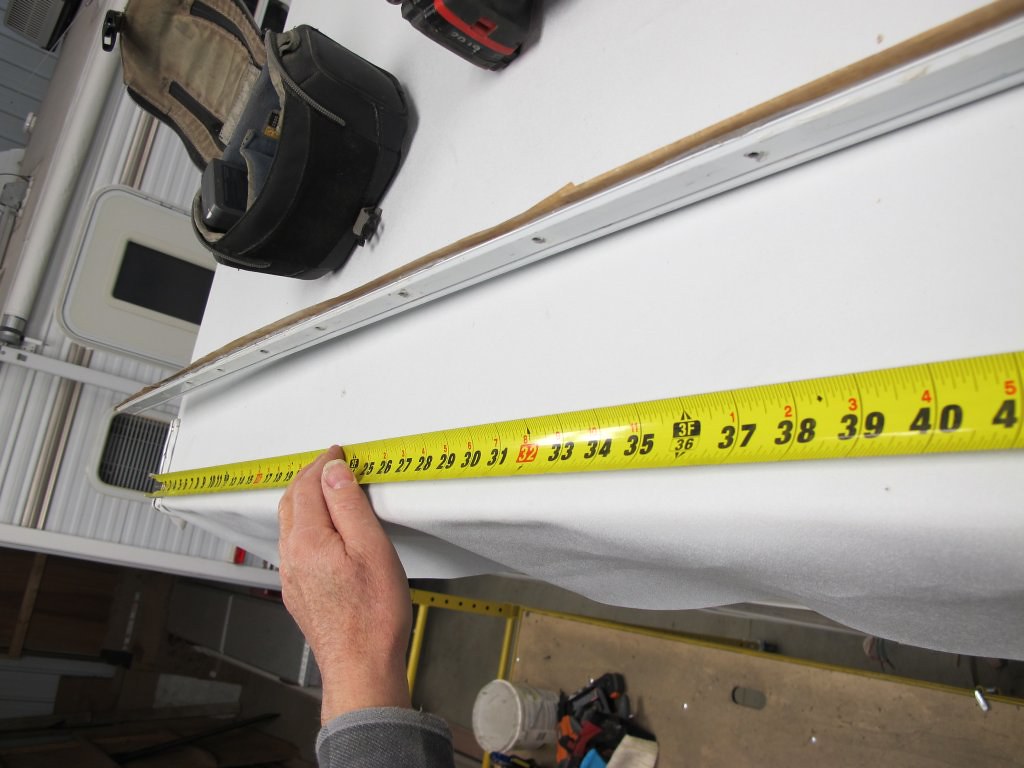
The front along the ridge crown has a slope. Is this typical? I have a low point in the front left. I attached photos. I will send the variances along the ridge at the front soon.
__________________
__________________
|

|

|
|
02-26-2022, 01:55 PM
|
#42
|
|
Moderator
Join Date: Nov 2006
Location: Ohio
Posts: 12,654
SUN #89
|
Hi Sunnyfamily,
Thank you for the extra pictures and inside ceiling measuring. I will explain more on what I feel happened to your camper, and one approach on how to repair the rear bedroom ceiling later tonight. It will take some time to compose what happened, and then how to correct it. But I'm willing to help do this for you.
So that I can explain it better, if you can, yet today if possible, please take a couple of overall pictures of the bedroom roof system (outside looking over the rafters) to show from the rear wall (rafter 0) all the way to the good rafter 6. Take a picture from the left side looking over the rear damaged area, and then another picture from the right side looking over the damaged area. I can then if needed, draw on your pictures and upload them again on how much you need to repair to better help explain the wording.
This camper is a different model/floor plan (2004 T1950) but it shows an example of the roof rafters before the new decking goes on and how I need to see yours in pictures. It would shows from the back of your camper at rafter 0, up yo your rafter 6, and from the full left side wall to the full right side wall. Your close up's are good, but seeing the whole damaged area helps greatly.


And, if you have time, start reading this post on how I made rafters, and the problems I had with the method I used. This link is going to drop you into reply no. 53 of that restoration post. You can see the little # 53 in the top right corner in the blue bar at the top of that reply.
https://www.sunlineclub.com/forums/f...tml#post151216
Read/skim over from post 53 all the way up to reply 67. You only need to read the areas that talk about the roof. The shower installing etc. in the middle of those replies you can skip over if wanted.
I will talk more in detail later tonight on how to feel you need to rebuild the rafters and the ceiling over the bedroom to fix the sagging rafter situation.
I will be back later,
Hope this helps
John
__________________
Current Sunlines: 2004 T310SR, 2004 T1950, 2004 T2475, 2007 T2499, 2004 T317SR
Prior Sunlines: 2004 T2499 - Fern Blue
2005 Ford F350 Lariat, 6.8L V10 W/ 4.10 rear axle, CC, Short Bed, SRW. Reese HP trunnion bar hitch W/ HP DC
 Google Custom Search For Sunline Owners Club
|
|
|
|
|
02-26-2022, 07:53 PM
|
#43
|
|
Junior Member
Join Date: Dec 2021
Location: Florida
Posts: 25
SUN #13056
|
I only have R0 through R4 rafters to show right now. Ill be working on her tomorrow and will take from right and left.
__________________
|
|
|
|
|
02-26-2022, 10:39 PM
|
#44
|
|
Moderator
Join Date: Nov 2006
Location: Ohio
Posts: 12,654
SUN #89
|
I will start answering the easier questions to answer first.
Quote:
Originally Posted by Sunnyfamily

The front along the ridge crown has a slope. Is this typical? I have a low point in the front left. I attached photos. I will send the variances along the ridge at the front soon.
|
The front of the camper has a built in downward slope of the rafters on purpose. The decking will follow the rafters. Like shown in this picture.

That downward decking slope is typical. It allows the water to run off the front of the camper and blend into the front siding. But your setup has other issues I'll explain.
Pending the camper floor plan, Sunline did this transition a little different. See on this 2004 T1950, the first rafter at the end of the roof at the front of the camper is laying flat. That first rafter allows the front wall siding to blend into the roof and a place to hold the screws for the front wall roof cap molding between the roof membrane and the front wall siding.

The second from the front on this floor plan is also lying flat. I had to create a mini rafter cap to attach to that 2nd flat rafter to allow the new decking to blend into the first rafter smoothly. See the rafter cap, and it now added on top of the 2nd flat rafter.
The rafter cap was ripped from a solid 2 x 4 at the correct height in the center and then blended to almost nothing at the ends. You can see the cuts that were done on a table saw.

Here is the rafter cap by itself.

Here is the rafter cap installed on the 2nd rafter from the front. The rafter cap is glued and screwed to the 2nd flat rafter. The 3rd rafter from the front is full height of the roof like all the other rafters all the way to the back wall. The 4 ft level shows the rafter heights are now in a straight line sloped down hill to the first rafter. This allows the decking to be screwed to the 2nd rafter cap.

Since you are using 7/16" thick decking, you need to blend the thicker decking into the front siding. This roof on a 2006 T264SR has the same issue of the 2nd rafter being lower in height, but Sunline made a lower height rafter in place of laying the 2nd rafter flat.
You can see the gap under the level, that is the 2nd rafter which is lower in height.

And here is the rafter cap installed on top of the shorter rafter to make a smooth transition.

Your T2363 most likely is built with the 2nd rafter laying flat like the 2004 T1950 was above. This 2005 T2363 in the pic shows the 2nd rafter as being flat. Did you account for this when the sheet of plywood was attached? The rafter cap raises the rafter up to meet the plywood and give it support. If you did not do this, suggest you take that sheet up and add the rafter cap.
See here how I corrected the 2nd rafter on this 2005 T2363. Consider doing this on yours if you have not done it already.
Here is the front flat rafters on the 2005 T2363

You can see the 2nd rafter gap not making a smooth transition.

A close up

The rafter cap have been cut.

The rafter cap, glued and screwed to the 2nd flat rafter. Make sure the length of the screws do not poke through the ceiling board.


You mentioned this
Quote:
|
I have a low point in the front left.
|
I did not see the low point you are referring too, but I did see this. This is not correct and will create a ponding water problem at the front seam. (not good)
The siding does not make a smooth transition to the top of the roof decking and the front siding is heavily screwed down without the membrane under it.

I suggest to consider doing this to correct the problem. First, add the rafter cap to the 2nd flat rafter if you have not already done so.
Next is to remove all the screws in the front siding into the deck and rework the area to look like this.
On this camper (2006 T264SR) we used 3/8" decking, you have 7/16" decking which is a little thicker but you can do the same correction.

You need to plane, saw and or power sand a lead in chamfer on the front edge of the decking to create a smooth transition of the siding up onto the top of the decking.
You can see the lead in better here

The siding up to the top of the decking will look like this

1. The front siding does not get screwed down to the decking directly, the roofing membrane goes over the front of the decking and lays down in the front wall. The membrane is stapled to the front wall joists/first rafter to hold down the membrane.

2. Butyl sealing tap is installed on the roof membrane. Then the front siding goes over the top of the membrane and sealed to the membrane. The siding is stapled to the decking at the very edge only. The staples have to be under the flat cap molding that goes on last.

3. The flat cap molding then screws down through the siding, through the membrane and into the first rafter. Butyl sealing tape is used between the top of the siding and the bottom of the front cap molding.


4. The gutter rail and the corner moldings then go on.

5. The front cap molding then gets Dicor self leveling lap sealant installed as the last step. The lap sealant "must" touch the roof membrane and the molding up high. The sealant will shrink a little as it cures, and the bead of caulk has to be large enough and touching both the rubber and the molding well to not shrink away from either.


All the screws get covered in lap sealant.
I showed the entire front seam so you understand how this all fits together. You can put 2 or 3 screws in the siding to hold it down to the roof until the membrane is installed.
If you have not seen this post, it may help you. This is a full walk on decked roof with 3/8" plywood. It shows the roof membrane and plywood install process.
https://www.sunlineclub.com/forums/f...avy-16834.html
Hope this helps
John
__________________
Current Sunlines: 2004 T310SR, 2004 T1950, 2004 T2475, 2007 T2499, 2004 T317SR
Prior Sunlines: 2004 T2499 - Fern Blue
2005 Ford F350 Lariat, 6.8L V10 W/ 4.10 rear axle, CC, Short Bed, SRW. Reese HP trunnion bar hitch W/ HP DC
Google Custom Search For Sunline Owners Club
|
|
|
|
|
02-26-2022, 10:42 PM
|
#45
|
|
Moderator
Join Date: Nov 2006
Location: Ohio
Posts: 12,654
SUN #89
|
Quote:
Originally Posted by Sunnyfamily
I only have R0 through R4 rafters to show right now. I’ll be working on her tomorrow and will take from right and left.
|
This picture is a good one. I now can see why the rafters have sunk.

I will wait for your side pictures to see all of the damaged area before I suggest two ways on how to help the sagging rafters. The more pics I can see, the better it gets to understand the whole problem.
__________________
Current Sunlines: 2004 T310SR, 2004 T1950, 2004 T2475, 2007 T2499, 2004 T317SR
Prior Sunlines: 2004 T2499 - Fern Blue
2005 Ford F350 Lariat, 6.8L V10 W/ 4.10 rear axle, CC, Short Bed, SRW. Reese HP trunnion bar hitch W/ HP DC
Google Custom Search For Sunline Owners Club
|
|
|
|
|
02-27-2022, 09:04 AM
|
#46
|
|
Junior Member
Join Date: Dec 2021
Location: Florida
Posts: 25
SUN #13056
|
John, you are a master craftsman. I love your attention toon quality. Here are the right, left and center photos from the rear. Thank you for your guidance. I am blessed to be talking with you here.
__________________
|
|
|
|
|
02-27-2022, 10:16 PM
|
#47
|
|
Moderator
Join Date: Nov 2006
Location: Ohio
Posts: 12,654
SUN #89
|
Hi SunlineFamily,
First off, thankyou for your good words, they are very much appreciated. And you are very welcome. You are doing a great job, this is very involved process and you are doing great. Keep up the good work.
I will comment on what and how I believe your rafters have sagged down. The rear bedroom roof had a bad leak, for a very long time. Water in the attic of the camper started rot in many parts of the roof system. The ceiling board, the outer perimeter wood at the walls, and the very important rafters. Specially in your case the rafter side plates.
First, lets talk about three basic parts of the truss style roof rafter. See the picture and take note of the rafter side plates.

The side plates are “critical” to the truss rafter to create structural strength and stiffness of the rafter. Each rafter has three large plates, glued and stapled on each side of the rafter creating six per rafter. Without these side plates, the rafter is weak and will not hold its shape or straightness. By your pictures, every one of the rafters from 0 to 6 has some or many missing side plates.
The water damage rotted the thin rafter side plates, and they lost a large amount or all of their structural strength. The side plates were glued to the chords and stapled when new. The glue bonded the wood very well, and small staples were used to hold them in place until the glue set. The water damage deteriorated the glue and started to delaminate the plates even if they did not rot totally through. During removing the rotted wood in the attic, what was left of some of the side plates may have been removed, leaving very little strength left. If you had any decking screwed on, and then weight on the decking, it could have aggravated the problem worse. The wood chords being wet and having damaged side plates can also allow the rafter to sag as roof weight was on the roof at that time.
Also let’s look at the new wood rafter that was made in rafter location 1. I’m pretty sure the day it was made, the bottom cord was most likely straight. Maybe you know. But after a few days, the bottom cord now has a bow in it and is no longer straight. And the rafter lost height when in the camper. There are no side plates on that new rafter. And there was no water damage. I have seen this sag happen before, even if there were side plates on the rafter, but it can be a lot worse if there are no side plates. There are two issues going on with the new rafter in location 1, but for the moment we will talk about the missing all side plates.
Let’s look at your pics. I circled the location where the side plates are missing that can be seen in the picture. There may be more, just they may not be able to be seen in the pics. The red circles are the missing side plates or damaged looking side plates.
The right rear picture with rafter numbers on them

The left rear picture

Looking straight on from the back.

Here is an explanation of what could have occurred with your new rafter. Wood has moisture in it and stress builds in the wood fibers when the wood is bent. Stress in the wood, is like a tree branch that has been pulled down by hand. The branch bends when pulled, stress in the wood rises. When you let go of the branch, the limb wants to pop back up in the air. The wood wants to return to its natural state that has lower stress.
See this picture of how I started making rafters in 2020. I believe this was similar to how your rafter 1 was made. The bottom cord is flat, and you bend the top cord over a block in the center. In my case, I stapled the side plates on to hold the shape.

When I was done stapling the plates on, the bottom cord was perfectly straight. That was until about 2 days later. I came back to look at then the bottom cord was bowed. It measured 1/2” bowed up on the ends. The side plates stopped the top cord from sagging, but the rafter was no longer straight. The stress in the wood from bending on the top cord was so high, that it pulled the flat bottom cord up at the ends. The stresses equalized in that bowed shape and I had several rafters I could not use. I was able to straighten them after a lot of extra work and I had a wall in the camper I could pull them down against to make them work.
I learned I have to stress relive the top chord in a curved shape, before I assemble the rafter. I am rebuilding another Sunline now, and I have to create the stress relived top chords. And I have to create a system to do that. I will not get to building those rafters most likely until this coming winter.
Your rafters are now sagged down, and the wood has dried. This complicates the repair. So now what do you do with your 5 sagging rafters? I have a few thoughts; you will have to talk with your helper how he can help make these. I do not know the tools he has access to. I can explain more detail if these sound like something you want to try.
1. You can try and straighten the old rafters and add the side plates. I would give this a 40% chance of working, and I would test it on rafter no. 5 first before trying any of the others. Inside the camper, you cut a 2 x 4 or other board to span from the floor up to the bottom of the rafter so that the bottom of rafter is straight. Go a little above straight in the center, by approx. 1/16” to 1/8” Insert the 2 x 4 to hold up the rafter straight. Then glue and install the side plates. Let the system set like this overnight. In the morning remove the 2 x 4 and see if the rafter holds straight. If it does, wait 3 to 5 more days and make sure it stays straight. Again, this may not work but it is the easiest to do it if works.
2. Buy 2 x 4's or wider southern yellow pine lumber 8 feet long with no large knots. Make a template of the side profile of a good rafter. Trace the template onto the board, saw the profile making a solid rafter. Replace all the old bad rafters.
I cannot yet come up with an easy way for you to stress relive the top chord after bending it to not have the same problem I had, and you had with the rafter bowing afterwards. I will be making a wet heat system, to heat up the wood, wet, for a period TBD at a temp TBD, then remove the wood from the heater and bend the wood into the wanted arch shape and held in that position. Let the top chord dry held in that arched position. If the chord remains curved and stays curved after being released from holding, then I will build up the rafter. Bending wood is an old art/science. I have not yet perfected the how to but will in time.
Something else to consider, you have no ceiling board left. And the ceiling board goes under the rafters at the top of the wall. The ceiling board is to be glued and stapled to the bottom of the rafters, so the rafters do not twist and help hold them in location. And by the ceiling board going over the top of the wall plate, it holds the ceiling board tight. You can rebuild the entire rafter 0 to rafter 5 with the new ceiling board all the way to the outside of the camper left to right and then install the new sub assembly onto the roof. Then put the decking on. You would use solid cut rafters for this since we do not know how to stress relieve the top chord of a truss rafter just yet.
It would look like this. You cut out the old ceiling assembly and install the new. Finding 1/8” luan or other wood ceiling board may be a challenge, but the lumber yards may have something, and you can paint the white on it. I had access to actual RV ceiling board.
The roof as I found it.

Remove the ceiling assembly,


The sub assembly

Installed on the camper in one piece.
Hope this helps. If there is something you need more explanation on to better understand, just ask.
John
__________________
Current Sunlines: 2004 T310SR, 2004 T1950, 2004 T2475, 2007 T2499, 2004 T317SR
Prior Sunlines: 2004 T2499 - Fern Blue
2005 Ford F350 Lariat, 6.8L V10 W/ 4.10 rear axle, CC, Short Bed, SRW. Reese HP trunnion bar hitch W/ HP DC
Google Custom Search For Sunline Owners Club
|
|
|
|
|
02-27-2022, 10:38 PM
|
#48
|
|
Moderator
Join Date: Nov 2006
Location: Ohio
Posts: 12,654
SUN #89
|
Something else to add, just so you know. This one is OK, but do not do in other locations.
In this picture, the new rafter is "not" resting on the top plate of the left wall. The new rafter is fastened to an added piece of wood in the red circle off the side of the wall by screws of some kind in the thin wood. In this location being close to the rear wall, and that one end of the rafter is supported by a cabinet under the rafter, it is Ok for that one rafter.
I suggest not to do this practice of adding on a board inside the wall perimeter in other locations as the wall itself is supposed to support the rafter directly. See the green circle. The green arrow is where all the weight loads from the rafter/roof presses down on the 1/2" ledge of the exposed top plate of the wall. There are no screws holding the thin rafter loads, it is all the rafter wood itself being held buy a solid wall under the rafter.

Hope this helps.
John
__________________
Current Sunlines: 2004 T310SR, 2004 T1950, 2004 T2475, 2007 T2499, 2004 T317SR
Prior Sunlines: 2004 T2499 - Fern Blue
2005 Ford F350 Lariat, 6.8L V10 W/ 4.10 rear axle, CC, Short Bed, SRW. Reese HP trunnion bar hitch W/ HP DC
Google Custom Search For Sunline Owners Club
|
|
|
|
|
02-28-2022, 09:25 AM
|
#49
|
|
Junior Member
Join Date: Dec 2021
Location: Florida
Posts: 25
SUN #13056
|
Ok. I’m going for new rafters from 2x4 method and replacing the Luan ceiling board left to right. Thank you John!!
__________________
|
|
|
|
|
02-28-2022, 10:07 PM
|
#50
|
|
Moderator
Join Date: Nov 2006
Location: Ohio
Posts: 12,654
SUN #89
|
Quote:
Originally Posted by Sunnyfamily
Ok. Im going for new rafters from 2x4 method and replacing the Luan ceiling board left to right. Thank you John!!
|
You are welcome.
This is a good choice and will create a better long term repair.
I will post a few things to maybe help in creating the rear ceiling sub assembly on Tuesday. My link to the rebuild of the 2004 T1950 has most all of it, I just learned a few things since to pass along.
__________________
Current Sunlines: 2004 T310SR, 2004 T1950, 2004 T2475, 2007 T2499, 2004 T317SR
Prior Sunlines: 2004 T2499 - Fern Blue
2005 Ford F350 Lariat, 6.8L V10 W/ 4.10 rear axle, CC, Short Bed, SRW. Reese HP trunnion bar hitch W/ HP DC
Google Custom Search For Sunline Owners Club
|
|
|
|
|
03-02-2022, 04:19 AM
|
#51
|
|
Junior Member
Join Date: Dec 2021
Location: Florida
Posts: 25
SUN #13056
|
John, this is wonderful help. I look forward to your sub assembly experience. God bless you!
__________________
|
|
|
|
|
03-09-2022, 07:19 AM
|
#52
|
|
Junior Member
Join Date: Dec 2021
Location: Florida
Posts: 25
SUN #13056
|
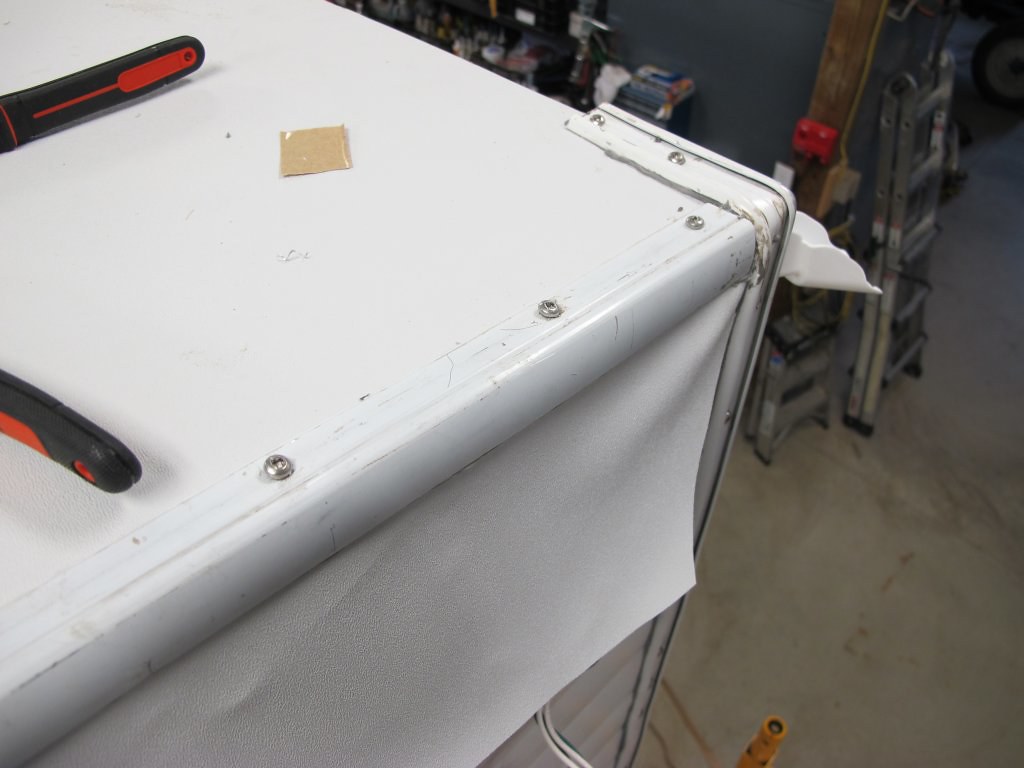
Aluminum trim change from increased height of plywood
Good Morning! I notice I must change the trim up both side of the rear. I cannot find 1 1/2 inch only 1 1/4 inch width. I did not measure height yet. I believe there is a lip of aluminum to round the edge. I see there is a triangle cut necessary at the bend over the roof. Here is a photo. Does anyone have a source for this aluminum?
__________________
|
|
|
|
|
03-09-2022, 10:23 PM
|
#53
|
|
Moderator
Join Date: Nov 2006
Location: Ohio
Posts: 12,654
SUN #89
|
Quote:
Originally Posted by Sunnyfamily
Good Morning! I notice I must change the trim up both side of the rear. I cannot find 1 1/2 inch only 1 1/4 inch width. I did not measure height yet. I believe there is a lip of aluminum to round the edge. I see there is a triangle cut necessary at the bend over the roof. Here is a photo. Does anyone have a source for this aluminum?
|
Hi Sunnyfamily,
I am not sure where you measured the 1 1/2" from on your old molding, I have several 2004's to 2007 Sunlines here and they all have 1 1/4" wide screw strip side x 5/8" leg corner moldings. Check and see if yours is actually 1 1/2".
Here are the part numbers for the 1 1/4 x 5/8"
AP Products 021-85001-8 RV Aluminum Medium Leg Corner Molding - White - 8 ft.
Here is one place to buy them from, I have used them before they are a good seller, only problem is they are west coast. Freight may be ~ $40.
https://pantherrvproducts.com/ap-pro...ng-white-8-ft/
Here is the AP Products catalog. See page 31
https://approducts.net/3d-flip-book/...parts-catalog/
The cost of these moldings is all over the map now. Search for those part numbers. I bought them pre-covid for a fraction of the cost.
I will offer a low cost option for you, as this is what I do on the corners when I install new roof decking or any camper restoration. I reuse the old corners, but mounted differently.
Remove the entire corner, take all the screws out. Use a heat gun to warm the old putty tape (warm the molding), and using an all side dull stiff putty knife, carefully pry off the molding. Add more heat to the old putty tape as you remove it and it will release. Try not to bend the molding, add more heat to get it to release.
Clean off the old putty tape and install new fresh commercial building butyl tape on the molding. The old corner has high odds the old seal is bad and is a leak source into the wall corner.
After the roof membrane is installed, use the old molding starting at the top of the roof like the old molding was. The molding will be high by the thickness of the new rood decking. I think you used 7/16" decking. The bottom of the molding down at the bottom of the camper siding, will be up higher by 7/16" on the siding, but that is normally OK at the bottom.
These 2 links will drop you into cleaning up and installing the original molding on a 3/8" decked roof. I suggest you remove the front corner moldings and re-do the old putty tape to new butyl also. All the corner moldings are a known leak source.
https://www.sunlineclub.com/forums/f...tml#post131768
https://www.sunlineclub.com/forums/f...tml#post131986
Hope this helps,
John
__________________
Current Sunlines: 2004 T310SR, 2004 T1950, 2004 T2475, 2007 T2499, 2004 T317SR
Prior Sunlines: 2004 T2499 - Fern Blue
2005 Ford F350 Lariat, 6.8L V10 W/ 4.10 rear axle, CC, Short Bed, SRW. Reese HP trunnion bar hitch W/ HP DC
Google Custom Search For Sunline Owners Club
|
|
|
|
|
04-07-2022, 11:36 AM
|
#54
|
|
Junior Member
Join Date: Dec 2021
Location: Florida
Posts: 25
SUN #13056
|
Quote:
Originally Posted by JohnB
You are welcome.
This is a good choice and will create a better long term repair.
I will post a few things to maybe help in creating the rear ceiling sub assembly on Tuesday. My link to the rebuild of the 2004 T1950 has most all of it, I just learned a few things since to pass along.
|
Hello John and Friends,
I made 6 rafters from 2x4s and installed them at the he rear. I made the crown on rafter 2 and leveled up the low spots with self leveling dicot and 1/8 luan. I sanded the edges too. I attached a few photos.
I am now going to plane the leading front edge and you depicted in thread #44 above.
You were correct. The trim is 1-1/4 and I bent it back into shape.
Thanks for helping me!!
__________________
|
|
|
|
|
04-08-2022, 10:01 PM
|
#55
|
|
Moderator
Join Date: Nov 2006
Location: Ohio
Posts: 12,654
SUN #89
|
Quote:
Originally Posted by Sunnyfamily
Hello John and Friends,
I made 6 rafters from 2x4’s and installed them at the he rear. I made the crown on rafter 2 and leveled up the low spots with self leveling dicot and 1/8 luan. I sanded the edges too. I attached a few photos.
I am now going to plane the leading front edge and you depicted in thread #44 above.
You were correct. The trim is 1-1/4” and I bent it back into shape.
Thanks for helping me!!
|
Hi Sunnyfamily,
You and your helper are moving right along and doing well. He did a nice job on cutting the solid rafters.
I'll make one comment on the front of the roof where you used the Dicor to fill a low spot. The filling of the low spot was good as you do not want water to pond in that area, you want the decking in place as such so roof water flows off the roof. There is one comment I'll mention on the Dicor method you used, as far a a filler, it will work but there is one thing to confirm. I am not sure of the membrane glue you bought, they make a few different types. The Dicor brand and the Alfa brands I have used are water based adhesives used on EPDM & TPO membranes. They need a porous substrate to bond to if you are using the wet method, the wood decking fits that need and it will adhere to the membrane. Those types of glues may have/ most likely will have, an issue trying to bond to the Dicor you used as a filler if you are using the wet method in that area.
But, I have seen some glues go over the top of older glued decking and still bond that are not porous, like the Dicor would be. I saw that glue used on a PVC membrane, I never used it, I just saw it being used on the Etrailer website.
What brand glue did you get? And I thought you had a PVC membrane. Read up on the glue instructions if it will bond to non-porus sub straights (decking). The Alfa glue I have is listed for both porous and non porous, but the application method has to be different between the two methods. I use the wet method, apply to the decking only thick and lay the dry membrane over the wet roof. That allows me to squeeze out the air bubbles and move the membrane it a little if needed.
The dry method works more like contact cement, you apply the glue to both parts thinner (roof and decking) and let it dry, then assembly them. The bond is formed when the dried glue on both parts touch. I find it more controllable using the wet method, I never attempted the dry method on an object as large as a roof. I have used contact cement (the dry method) on Formica countertops, but they are not as big, and once they touched there was no moving the Formica.
I'm, just mentioning this before it comes up when you get to putting the membrane on so it does not catch you off guard. If you have to do the dry method, then you may only have to do it in the area of the Dicor and then switch to the wet method.
Hope this helps and keep up the good work.
John
__________________
Current Sunlines: 2004 T310SR, 2004 T1950, 2004 T2475, 2007 T2499, 2004 T317SR
Prior Sunlines: 2004 T2499 - Fern Blue
2005 Ford F350 Lariat, 6.8L V10 W/ 4.10 rear axle, CC, Short Bed, SRW. Reese HP trunnion bar hitch W/ HP DC
Google Custom Search For Sunline Owners Club
|
|
|
|
|
04-08-2022, 10:50 PM
|
#56
|
|
Moderator
Join Date: Nov 2006
Location: Ohio
Posts: 12,654
SUN #89
|
I'll mention the rear wall to roof molding also. If I recall you used 7/16" decking. I just finished last week doing a 3/8" walk on roof and I have some pics to share dealing with the rear wall to roof molding that may help you. Sunline changed the molding type a few times as I have seen 2004/2005 models with different molding then 2006 & 2007 models.
The molding I am talking about is L shaped and part of it hangs down the rear wall and part of it screws onto the roof. The concern is the walk on decking is thicker then what Sunline used as the budboard roof and the rear wall siding is already cut to fit the buboard setup.
On this last camper with the 3/8" decking I shaved the last 6" of the deck to taper towards the back wall to about 1/4". This allows more of the L shape to seal to the rear wall siding. Your decking being 7/16" is even higher. See here in pics what I did. You can try your own molding over the back wall and see if you feel you need to taper the decking.
Here is the last decking sheet to go on. I used a portable power planner and that took created the wedge real easy. I have in the past used a 3" wide belt sander and done it also. A good and sharp hand plane is also doable, it just takes a lot more work, push.

You can see the taper here

Here is the last sheet of decking up on the roof. You can see the plywood layer colors on the tapered area.

I leave that last back wall sheet about 1/2" longer on purpose and trim in place. I have never found the back wall to be a true straight line, trimming in place creates a perfect fit easy. I used a router with a trim bit with a bearing on the end, but you can draw a line on the sheet, take the sheet down and use a saber saw to trim it off to. I did that before the router bit came.

Here is the molding over the deck and down the back wall. This is a 2007 T289SR Sunline. Note, this is still without the 1/8" butyl tape and the roof membrane on yet, so the L down the back wall will be a little less. With this molding and the tapered decking, I will have enough overlap down the back wall to create a good siding seal. The taper helped make this.

Here are a few tips on the membrane and the rear wall molding. I run the membrane different then Sunline did who stopped on the roof at the back wall. I wrap the membrane down the back wall helping create a more waterproof setup long term. The water has a harder time getting into the back wall and it does not cost anymore to add this. It can still leak if the caulking is bad, just this slows down the water infection.
Gutter rails on first and completed except the last screw by the gutter spout. Membrane overhangs the back wall and I make a fold at the corner as a test fit.

Lift the flap, apply 1" wide x 1/8" butyl tape to the siding.


Fold over flap, press into the butyl tape, one staple only in the fold to hold it in place until the molding goes on.

Corner molding and gutter spouts go on both sides of the camper.

Then comes the top molding, roof to rear wall. Since the corner moldings are moved slightly from the factory install location, the rear roof molding may be too long to fit between the corner moldings. I learned the hard way, measure the arch length first between the two corner moldings, then cut the molding "before" you mount it. I have cut the molding in place in the past, it is easier to cut before you mount it.
I found I have had to cut off about 1/8" of the molding length from the last 5 roof jobs I have done. The others I cut in place and it was about 1/16" off of each side.

I also have changed the method of how to screw the molding down. I started on my first two roof jobs to screw done the molding starting in the middle and work the screws towards the ends. This method you have to be dead centered when you start and trim the ends to fit once you make it to the corner molding. That method does work, but this premeasured way seems to work faster/better.
Pre-check you cut the molding length right first. Then start as one end tight to the corner molding with the screws. Butyl tape is lined on the inside of the molding both directions.

Work towards the middle with the screws. The other end will be up off the roof due to the arch in the roof.

You have to be careful to not have the screws tip towards the back wall as they can come out the siding being on too much and angle. The screws need to go straight down or slight angle towards the front of the camper.
You will notice, the molding wants to twist, you have to deal with this, using adjustable jaw pliers, twist the molding back to straight before you start putting in more screws past the center. Try and not mark up the molding, use cloth etc. on the molding if needed between the pliers. Mine just fit right on a new set of pliers at the edges so I did not scratch the molding. The old set I had to use a glove or cloth on the molding and the pliers on the cloth.


Start at the center and work your way to the end. The precut molding fits where it should.

For those curious, here is the whole roof not yet caulked.

Hope this helps
John
__________________
Current Sunlines: 2004 T310SR, 2004 T1950, 2004 T2475, 2007 T2499, 2004 T317SR
Prior Sunlines: 2004 T2499 - Fern Blue
2005 Ford F350 Lariat, 6.8L V10 W/ 4.10 rear axle, CC, Short Bed, SRW. Reese HP trunnion bar hitch W/ HP DC
Google Custom Search For Sunline Owners Club
|
|
|
|
|
04-20-2022, 05:12 PM
|
#57
|
|
Junior Member
Join Date: Dec 2021
Location: Florida
Posts: 25
SUN #13056
|
Yes. You know right where I am and provided next stepsJohn. Thank you. I used the adhesive from Bristol LaSalle with the PVC as the recommended. It seems to be dry as you described.
Yes. Indeed, I watched the etrailer video and followed the dicor fill as they showed. I am ready to trim.
__________________
|
|
|
|
|
04-21-2022, 04:44 PM
|
#58
|
|
Junior Member
Join Date: Dec 2021
Location: Florida
Posts: 25
SUN #13056
|
Quote:
Originally Posted by Sunnyfamily
Yes. You know right where I am and provided next stepsJohn. Thank you. I used the adhesive from Bristol LaSalle with the PVC as the recommended. It seems to be dry as you described.
Yes. Indeed, I watched the etrailer video and followed the dicor fill as they showed. I am ready to trim.
|
Xtrm90
__________________
|
|
|
|
|
04-21-2022, 07:51 PM
|
#59
|
|
Moderator
Join Date: Nov 2006
Location: Ohio
Posts: 12,654
SUN #89
|
Quote:
Originally Posted by Sunnyfamily
Xtrm90
|
OK, you are using the LaSalle Bristol glue. I saw that being used on the Etrailer video where they area using the wet method of applying t he glue over the old prior glued roof with the old glue still there. Not bare wood decking which is odd as it is an acrylic water based glue. This video, scroll down to see the link. https://www.etrailer.com/RV-Roof-Rep...142711440.html
LaSalle Bristol does not seem to make it easy to find a product data sheet or even a safety data sheet on XTRM EXP 90 Adhesive on line to read.
Read the label on the can and see what is says.
You can call LaSalle Bristol or Etrailer as ask them if their adhesive will bond on the large area of Dicro patch you have. While the Etrailer showed a small spot of self leveling sealant being used, if the glue does not bond to that small an area, the small spot may not be as much as issue as the large area you have.
Let us know how you make out.
John
__________________
__________________
Current Sunlines: 2004 T310SR, 2004 T1950, 2004 T2475, 2007 T2499, 2004 T317SR
Prior Sunlines: 2004 T2499 - Fern Blue
2005 Ford F350 Lariat, 6.8L V10 W/ 4.10 rear axle, CC, Short Bed, SRW. Reese HP trunnion bar hitch W/ HP DC
Google Custom Search For Sunline Owners Club
|
|
|
|
|
|
|
Currently Active Users Viewing This Thread: 1 (0 members and 1 guests)
|
|
|
 Posting Rules
|
You may not post new threads
You may not post replies
You may not post attachments
You may not edit your posts
HTML code is Off
|
|
|
|
 » Recent Sunline Discussions
 |
|
|
|
|
|
|
|
|
|
|
|
|
|
|
|
|
|
|
|
|
|
|
|


 Linear Mode

