 |
|
 01-07-2022, 06:13 PM
|
#21
|
|
Junior Member
Join Date: Dec 2021
Location: Florida
Posts: 25
SUN #13056
|
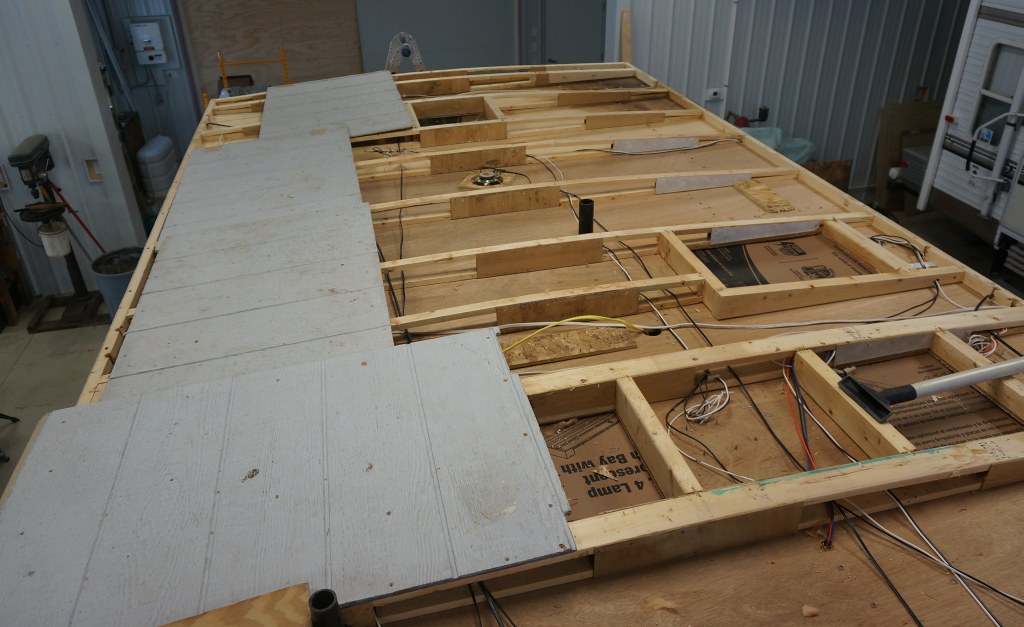
A second photo
__________________
__________________
|

|

|
|
01-08-2022, 11:46 AM
|
#22
|
|
Moderator
Join Date: Nov 2006
Location: Ohio
Posts: 12,649
SUN #89
|
Hi Sunnyfamily,
Pictures are worth a million words. Some comments.
1. Not sure when the picture above in your last reply was taken, but the top vent cover on the fridge vent is broke off in that pic. That is not good as rain water will get into the top of the back of the fridge compartment and create water damage issues over time, both for the fridge and the camper wood walls. If you have not replaced the top cover, suggest doing so real soon. If you are using the fridge, heat has to escape out the roof opening. Do not put plastic or other solid cover over the open roof hole when the fridge in operation. That could be a hazard if the heat cannot escape. If the fridge is off, then covering the open roof hole is OK. Just do not forget and have someone turn on the fridge.
This Camco cover will fit the older Dometic roof base.
A local RV dealer may have a cover also to fit. https://www.amazon.com/Camco-Trailer...22/ref=sr_1_2?
2. The main roof, not sure of the history or your camper, but seeing what it is there now, you have had a roof leak ('s) for some time. The fiberboard backing that the EPDM membrane was glued too, is comprised and there is little to no support to shed water off the rubber membrane. I can see the drooping of the membrane between the rafters as that occurs when the fiberboard backing is deteriorated. The fiberboard membrane can and does wick water when wet across it. The water damage will spread from a leak much greater then the one or more small water entry points. There was an attempt to slow down the leaking with some roof repair tape and possible a paint type of coating. That repair was not successful.
At this point, you may have water damaged roof rafters and some of the ceiling board may be water affected. After seeing your pics, the only repair I can see that will last, is to open up the whole roof, let is dry out, repair the water damaged wood, install new decking and a new membrane. Take extreme caution while taking the roof apart to not place a persons weight on a rafter until you know if is not rotted to badly.
3. With the amount of roof damage, odds are high the back wall of the camper has a level of water damage inside the walls. The front wall may have the same water issue. The roof leak water works into the attic and then down the corners of the back/front wall and only stops when it hits the black plastic membrane under the floor. When the water pools down in the bottom, water damage starts rotting the rear wall and floor wood. Since the corner moldings come off when doing the roof repair, you can remove the bottom few pieces of camper siding on the front and rear walls to see how bad the water damage is. And then address the damage from the outside of the camper.
There is also a moisture meter that will scan the ceiling, walls and floor without taking anything apart so you can access how large the damage is before taking the camper apart. Knowing how much damage there is, may change you mind to repair the camper or not. See here for more on the meter.
https://www.sunlineclub.com/forums/f...per-17613.html
Here are some posts which may help in so show the roof and wall repair. All of the damage I see in your pics, or what you have not yet shown, is repairable. It only becomes practical cost wise to have free or extremely low cost labor. If you have work working tools and can use them in a place to allow the repair, you can do this yourself. But it will take time.
This post shows a total roof, front and rear wall repair. While it is a slide camper and is built slightly different, the methods shown will apply. It will also give you a perceptive on the size of a roof job and wall repair.
https://www.sunlineclub.com/forums/f...avy-16834.html
This post is more of a total camper restoration repair, but it shows how the non slide campers are built and includes, a new roof decking/membrane, front and rear wall repair. Your 2004 T2363 is built the same as this 2004 T1950 with the exception of the floor plan changes.
https://www.sunlineclub.com/forums/f...avy-17684.html
This post will help show how to repair walls and ceilings from the outside of the camper and not from the inside of the camper. Repairing water damage from the outside in many cases is less work/cost/time then ripping the inside apart to get to the damage.
https://www.sunlineclub.com/forums/f...tml#post155103
Hope this helps and feel free to ask any questions.
John
__________________
Current Sunlines: 2004 T310SR, 2004 T1950, 2004 T2475, 2007 T2499, 2004 T317SR
Prior Sunlines: 2004 T2499 - Fern Blue
2005 Ford F350 Lariat, 6.8L V10 W/ 4.10 rear axle, CC, Short Bed, SRW. Reese HP trunnion bar hitch W/ HP DC
 Google Custom Search For Sunline Owners Club
|

|
|
|
01-28-2022, 06:40 AM
|
#23
|
|
Junior Member
Join Date: Dec 2021
Location: Florida
Posts: 25
SUN #13056
|
John, thank you very much. I wouldn’t be doing this without you and your good guidance. I want this camper for my family so I’m all in.
I will buy the vent you suggested. Thank you for your research. I will work from the outside in also. i’ve gathered tools and materials I saw on the forum and your good links. For the roof I chose pressure treated 2x2’s, 6 mil poly, 30 r factor fiberglass batting that is 10 inches to be squished to 2 inches, 11/16” a/c plywood and 27 mil PVC membrane and it’s manufacturer’s Adhesive (2 gal) and butyl tape.
I plan to remove the items from the top and template with a stiff cardboard before removing the roof. I have a question about the ceiling. I bought poly wall and a roll of headliner material. The poly wall seems flimsy. Is this a good choice?
I’m in a park while doing this project and the RV’ing people are very nice and helpful. I am trying to keep my labor costs low, but, I am a woman up in years with a hip ready for replacement and I will be running with the project.
I bought my Sunny from a friend and I was told about the roof repair you described and I expected to finish the rear wall. The back room/bedroom flooring layment was done and I was provided the floor covering by the seller. I didn’t expect to be replacing the roof and am quite intimidated to expose the unit to the open weather.
I bought the moisture meter as suggested in the forum and while there is no leak in the remaining mid and front, it is wet and the ceiling is wavy in delamination at the front end.
I look forward to reading the links you sent. God bless you and the Sunny Club! I’m happy to be a member!
__________________
|
|
|
|
|
01-29-2022, 08:26 AM
|
#24
|
|
Moderator
Join Date: Nov 2006
Location: Ohio
Posts: 12,649
SUN #89
|
Quote:
Originally Posted by Sunnyfamily

John, thank you very much. I wouldn’t be doing this without you and your good guidance. I want this camper for my family so I’m all in.
|
You are very welcome. I'm glad to help as I can.
Quote:
Originally Posted by Sunnyfamily
I will buy the vent you suggested. Thank you for your research. I will work from the outside in also. i’ve gathered tools and materials I saw on the forum and your good links. For the roof I chose pressure treated 2x2’s, 6 mil poly, 30 r factor fiberglass batting that is 10 inches to be squished to 2 inches, 11/16” a/c plywood and 27 mil PVC membrane and it’s manufacturer’s Adhesive (2 gal) and butyl tape.
|
The first 4 items in your list, I'm trying to help and comment in a friendly way.
The pressure treated 2 x 2's for the roof. I'm not sure where you are using them. A standard nominal 2 x 2 measures 1 1/2" x 1 1/2". Are you using this for back wall studs or are you using them in the ceiling? The roof system does use 1" wide x 1 1/2" outer perimeter wood at the ends of the rafters and it does rot out often. If this is replaced, it still needs to be 1" wide where it sets on top of the walls, as the rafters also sit on top of the walls in the last 1/2" of usable wall width. Tell me how you are using the 2 x 2's?
If you have someone who will saw the 2 x 2 into a 1" wide x 1 1/2" actual board, then yes you can start with a 2 x 2. But if they have a saw, they can cut them out of wider wood too, 2 x 6, 2 x 8, 2 x 10's etc and may save some cost.
As to using pressure treated wood, it is usable but you should make sure the staples and fasteners you use are compatible with the pressure treated wood or over time, corrosion starts on the fastener. And if the pressure treated wood touched the aluminum, ideally you will need a barrier placed between the siding and the wood to prevent corrosion.
I know there is a thought that using pressure treated wood is a good thing in a camper, as it resists rot. But, in the big picture, if you have a leak, there are a lot of other items that will rot and be damaged that are not pressure treated. Any leak is a bad thing. The pressure treated costs more, many of the lumber yards store it outside and it's wet, it can be all warped up from the wet. I myself use untreated wood; spruce, pine or fir (SPF) or southern yellow pine (SYP) and put the money saved from pressure treated into high quality sealants to seal the camper up better to not leak. Not saying not use what you have, just know the needs for using it and when you buy more, think do I really have to have pressure treated?
6 mil poly, what is this used for? Is this for a large tarp to cover the camper during taking it apart, or are you using it as part of the rebuild?
The R30 insulation squished down into 2", what are your thoughts to going that route? I know finding insulation in a lumber yard last summer was hard to find due to Covid, but are you are doing the squish down that much on purpose for some other reason? I can sense some long term problems from doing that. That much squish creates a force pushing on the 1/8" thin ceiling board over time. It may wave the ceiling over time. You can tear off the 10" into less thickness layers and I do that often as finding R7, 2" thick is hard to find. I buy R11 - R15 (3 1/2") unfaced and tear it in half. In the center of the roof arch, the full 3 1/2" can be used, then ends where it tapers down to 1 1/2" then I tear the thickness in half.
There is an entire debate on squishing insulation down, the best is to use the full cavity thickness with no squish. But some squish is allowed in certain places. These 2 links I found explain it better, but I did not see any of them taking R30 down to 2".
https://diy.stackexchange.com/questi...n-is-too-thick
https://www.jlconline.com/how-to/ins...rglass-batts_o
The 11/16" AC plywood, is that a typo, did you mean 7/16"? If it is 11/16" that points to the metric modern day of 23/32 or what used to be 3/4" plywood. What was the thought on going that thick if you where using the 11/16"?
The 11/16 (old 3/4") being that thick will give you a problem at the rear wall as the molding that goes from the roof deck down the back wall will not adequately cover the siding the roof is so thick. There will be an exposed piece of back wall siding that will need to be addressed with a longer leg molding or some other method to deal with the extra thick roof decking. I can make 11/32" (3/  decking work with the existing Sunline moldings, but going to 11/16" decking I can foresee it having issues to overcome.
You PVC roofing will do you well. PS. Make sure to screw down the decking and not staple it down. More on why if needed.
Quote:
Originally Posted by Sunnyfamily
I plan to remove the items from the top and template with a stiff cardboard before removing the roof. I have a question about the ceiling. I bought poly wall and a roll of headliner material. The poly wall seems flimsy. Is this a good choice?
|
Your template idea, what is the thought for doing this? I have never used the old roof membrane as a template, and if you do, it shrinks in size once you remove it. Not sure what your thoughts are on needing a template. I can help explain/ show pics on how to do this and not need a template.
The Poly wall and the headliner material, please post a link or tell me the brand, SKU etc so I can look them up and comment better. The wording can mean a lot of different products, some may work, others not so much. Need to see just what you are wanting to use.
Quote:
Originally Posted by Sunnyfamily
I’m in a park while doing this project and the RV’ing people are very nice and helpful. I am trying to keep my labor costs low, but, I am a woman up in years with a hip ready for replacement and I will be running with the project.
|
It's good you have nice and helpful folks around you. Just a friendly heads up, make sure the camp owner agrees you can do this large of a roof project at the campground. Some may allow this, others may not, it depends on the camp.
I'm not sure your role in the project, the king pin keeping it all going, or the worker bee up on the roof. This is also a good time to call on relatives, son's, nephews, brothers and even nieces and daughters can help on some tasks. If they are close enough, and they have wood working skills and tools, this is a good thing. Making apple pies etc, food goes a long way in keeping the help happy and motivated! 
We have had several women take on big camper projects. More power to them! And we can help as we can. I'm not a spring chicken either, I'm retired, but the body still works and time is on my side for these kind of projects. Just letting you know, getting up on the camper roof is a lot of twisting, climbing, kneeling and going up and down a ladder carrying weight. I used to do all my camper roof work off a ladder, and the twisting on my lower back over hours on end, created great discomfort. From this, I acquired rolling scaffolds and those twisting problems went away, but I'm just letting you know, find someone to help do the heavy lifting on the roof. Your hip will thank you. There is plenty you can do on the ground with cleaning up moldings, siding, organizing, chasing down parts, and a host of other need to do things.
Quote:
Originally Posted by Sunnyfamily
I bought my Sunny from a friend and I was told about the roof repair you described and I expected to finish the rear wall. The back room/bedroom flooring layment was done and I was provided the floor covering by the seller. I didn’t expect to be replacing the roof and am quite intimidated to expose the unit to the open weather.
|
Yes, when it comes time to open up the roof, a thought through plan is a need. Getting a large tarp with grommets on the side that bungie cords can attach may be part of your plan. And then there is a need to have "something" on the roof to create a water shed effect over the exposed rafters to keep the tarp from falling down into between them and ponding mega gallons of water that will not drain off. Lets talk about how to do this. I do have some pics on how this is done as I have done some outside.
Quote:
Originally Posted by Sunnyfamily
I bought the moisture meter as suggested in the forum and while there is no leak in the remaining mid and front, it is wet and the ceiling is wavy in delamination at the front end.
I look forward to reading the links you sent. God bless you and the Sunny Club! I’m happy to be a member!
|
The wavy delamination, that is a concern. See if you can post a few pics, they help show what you are up against. It will help to know before you open the roof up what to expect. If you are in FLA. and a prior owner stopped an older leak a few years back, the water may have dried up, the damage was done and the moisture meter will not pick up dried up old leaks, only wet leaks present at the time. But there are other ways to know if a leak was there from the outside/inside. There are signs on what to look for from prior water damage. Post some pics and we can get into this if your want to.
Yes, we are a good group of campers! And we try and help, just ask. I know I have made many life long friends from our club.
Hope this helps
John
__________________
Current Sunlines: 2004 T310SR, 2004 T1950, 2004 T2475, 2007 T2499, 2004 T317SR
Prior Sunlines: 2004 T2499 - Fern Blue
2005 Ford F350 Lariat, 6.8L V10 W/ 4.10 rear axle, CC, Short Bed, SRW. Reese HP trunnion bar hitch W/ HP DC
Google Custom Search For Sunline Owners Club
|
|
|
|
|
01-29-2022, 05:43 PM
|
#25
|
|
Senior Member
Join Date: Nov 2018
Location: Pennsylvania
Posts: 328
SUN #10986
|
Quote:
|
If you have someone who will saw the 2 x 2 into a 1" wide x 1 1/2" actual board, then yes you can start with a 2 x 2. But if they have a saw, they can cut them out of wider wood too, 2 x 6, 2 x 8, 2 x 10's etc and may save some cost.
|
Just a note on this. Pressure treatment doesn't get the chemicals the whole way through the wood, so any cutting you do needs at least a surface treatment afterward, to provide optimum protection against decay. Ripping wider planks means that you need to apply that treatment to two surfaces rather than one in this scenario.
Totally no big deal in this context; just thought I'd toss that in because I can.
Aside from that, great advice as usual.
__________________
|
|
|
|
|
02-09-2022, 03:28 PM
|
#26
|
|
Junior Member
Join Date: Dec 2021
Location: Florida
Posts: 25
SUN #13056
|
 Trusses
Did you suggest the truss to be cot from one piece of wood?
I returned the R30 as you suggested John. No squishing the 3.5 inch insulation necessary. Just trimming the ends to 1.5 inches. Thank you very much. Should I use the 6 mil on top and bottom on the insulation for a vapor barrier? I found the 1 x2s do returned the 2x2 pressure treated. They love my returns! Lol
__________________
|
|
|
|
|
02-09-2022, 03:34 PM
|
#27
|
|
Junior Member
Join Date: Dec 2021
Location: Florida
Posts: 25
SUN #13056
|
I too bought a rolling scaffold. I needed to not work on a ladder. I put some 8 foot pvc 4c4 sleeves on top and under the tarp. These have helped keep the rain from ponding.
__________________
|
|
|
|
|
02-09-2022, 03:36 PM
|
#28
|
|
Junior Member
Join Date: Dec 2021
Location: Florida
Posts: 25
SUN #13056
|
I didn’t need to template John because a man living full time in his RV at the Park has been a blessing to measure and cut the trusses and plywood.
__________________
|
|
|
|
|
02-09-2022, 03:45 PM
|
#29
|
|
Junior Member
Join Date: Dec 2021
Location: Florida
Posts: 25
SUN #13056
|
Yes John. Plywood is 7/16. I really appreciate your experience. Can you tell me which screws to use on trusses and plywood? Also, the truss at the rear is taller than the others. Is this normal?
__________________
|
|
|
|
|
02-09-2022, 09:28 PM
|
#30
|
|
Moderator
Join Date: Nov 2006
Location: Ohio
Posts: 12,649
SUN #89
|
Quote:
Originally Posted by Sunnyfamily
Did you suggest the truss to be cot from one piece of wood?
I returned the R30 as you suggested John. No squishing the 3.5 inch insulation necessary. Just trimming the ends to 1.5 inches. Thank you very much. Should I use the 6 mil on top and bottom on the insulation for a vapor barrier? I found the 1 x2s do returned the 2x2 pressure treated. They love my returns! Lol
|
On the rafter, if the wood is still mechanically sound, no rot, but water stained only, you can rebuild the rafter side plates with new thin plywood sheets glued and stapled to the side of the rafter. And you treat the water stained wood on the rafter with S1 to prevent future dry rot. This also means the very ends of the rafter that attaches to the wall "must be" good. You only do the repair method if the wood is good. If there are any questions on good or not, make new. Here is where I buy the S1 wood treatment https://www.rotdoctor.com/products/s1.html
I have cut some rafters out of solid wood. I would suggest southern yellow pine, no. 1 grade lumber, and the big part, very small or better no knots in the rafter. You might have to start with a 2 x 6 x 8 ft long, or get a 2 x 12 x 8ft and make more then one from the same board. You have to match the side profile of the original arch of the rafter you are replacing. You can use a good rafter in the back of the camper to trace the arched profile as they are all the same arch in the rear section. Lumber prices are getting nuts again. I can buy Southern yellow pine, grade no 1 cheaper then I can pine, spruce or fir, grade 2 which is soft wood and not as strong, but it seems to be more wanted.
I have made new truss style rafters that mimic the Sunline rafters. It was a learning experience, the hardest part is there needs to be a method to pre-arch the top cord before you attach it to the bottom cord and put the side plates on. When I do this again, I need to prefect the bending process, maybe steam heated wood, I'm not sure yet. Here is what I did the last time. For you, I suggest either repairing what you have if the wood is mechanically sound or cut new rafters from a solid board. The learning curve on bend wood takes much time and experimenting.
https://www.sunlineclub.com/forums/f...tml#post151216
On using a moisture barrier in the attic, my thoughts are "no". Campers are not built like a home with vents in the soffit and ridge vents to allow air flow above the insulation in the attic to let moisture to get out. Campers are made such that installing plastic in the attic is going to trap moisture as it cannot get out.
I have added attic vents to campers and now add them on any camper I restore. It lets a good amount of trapped moisture and heat out of the attic. It helps the camper stay cooler in the summer hot months and drier in the months the heat needs to run in the camper. See this post on how I do this https://www.sunlineclub.com/forums/f...-do-19983.html
Good you returned the treated wood and insulation.
Hope this helps
John
__________________
Current Sunlines: 2004 T310SR, 2004 T1950, 2004 T2475, 2007 T2499, 2004 T317SR
Prior Sunlines: 2004 T2499 - Fern Blue
2005 Ford F350 Lariat, 6.8L V10 W/ 4.10 rear axle, CC, Short Bed, SRW. Reese HP trunnion bar hitch W/ HP DC
Google Custom Search For Sunline Owners Club
|
|
|
|
|
02-09-2022, 09:51 PM
|
#31
|
|
Moderator
Join Date: Nov 2006
Location: Ohio
Posts: 12,649
SUN #89
|
Quote:
Originally Posted by Sunnyfamily
Yes John. Plywood is 7/16. I really appreciate your experience. Can you tell me which screws to use on trusses and plywood? Also, the truss at the rear is taller than the others. Is this normal?
|
I use #6 x 1 1/4" lg flat or bulge head screws that are zinc plated. I can only seem to get them locally with Philips heads. They work, just a Torqs or square bit drive head is more favorable.
Here is a 5# box at Home Depot https://www.homedepot.com/p/Grip-Rit...4GS5/100146518
In case you did not know, I predrill the plywood (not the rafter) with a 1/8" bit, and I counter sink the wood. I use a drill stop so the 1/8" bit does not go deep into the rafter. I do not want a wood bulge sticking up where the membrane glues over from mashing the head down without a countersunk hole. And you "have" to do a sharp edge putty knife test over every screw head to make sure none stick up. Very important of the membrane will poke a hole at that high screw over time. Check every one and hand tighten the last little bit as needed. Also do not sink the heads too far below the surface either. That leave holes under the membrane. You are targeting to be flush with the head to the plywood but no more then 1/64" - 1/32" below the surface. See this post for more on the drill and counter sink https://www.sunlineclub.com/forums/f...tml#post148383
The rear rafter, at the back wall, it "not" normally taller. It is the same height as the rest of the rafters. When you remove the molding at the back wall roof line, it will expose that rafter. If may be the other rafter that were damages sank making it look like the rear wall rafter was higher.
If you are still seeing the rear rafter taller in the middle then the rest, post some pictures with a long straight edge along the center to the other rafters. Something is not right/normal if yours is taller.
__________________
Current Sunlines: 2004 T310SR, 2004 T1950, 2004 T2475, 2007 T2499, 2004 T317SR
Prior Sunlines: 2004 T2499 - Fern Blue
2005 Ford F350 Lariat, 6.8L V10 W/ 4.10 rear axle, CC, Short Bed, SRW. Reese HP trunnion bar hitch W/ HP DC
Google Custom Search For Sunline Owners Club
|
|
|
|
|
02-09-2022, 09:55 PM
|
#32
|
|
Moderator
Join Date: Nov 2006
Location: Ohio
Posts: 12,649
SUN #89
|
Quote:
Originally Posted by Sunnyfamily
I returned the R30 as you suggested John. No squishing the 3.5 inch insulation necessary. Just trimming the ends to 1.5 inches. Thank you very much. Should I use the 6 mil on top and bottom on the insulation for a vapor barrier?
|
I meant to say this in the prior note, do not get the insulation with the paper on it (They call it Kraft). You ideally want "unfaced" insulation. If there is a shortage and you cannot find unfaced, then get the Kraft and tear off the paper. That paper is a moisture barrier and it will be as bad as putting the plastic up in the attic.
Hope this helps. Glad you found a helper to cut the wood sheets and help you.
John
__________________
Current Sunlines: 2004 T310SR, 2004 T1950, 2004 T2475, 2007 T2499, 2004 T317SR
Prior Sunlines: 2004 T2499 - Fern Blue
2005 Ford F350 Lariat, 6.8L V10 W/ 4.10 rear axle, CC, Short Bed, SRW. Reese HP trunnion bar hitch W/ HP DC
Google Custom Search For Sunline Owners Club
|
|
|
|
|
02-24-2022, 03:07 PM
|
#33
|
|
Junior Member
Join Date: Dec 2021
Location: Florida
Posts: 25
SUN #13056
|
Rafter height discrepancy
Here are photos of the height changes along the ridge John. The plywood meets the sides but mid has sunk. What is the best approach to remedy?
__________________
|
|
|
|
|
02-24-2022, 06:34 PM
|
#34
|
|
Moderator
Join Date: Nov 2006
Location: Ohio
Posts: 12,649
SUN #89
|
Hi Sunnyfamily,
I need some help, more pics and or explanation/confirmation on this picture of yours.

Is the 2 x 2 in the picture spanning down the "center" of the roof, starting at the center of the back wall and then forward down the center of the camepr towards the front?
This other picture of yours, shows what might be a missing rafter to the right of the picture.

You have to address this sunken problem or you will have water ponding on the roof and that is not good. I'm sure you may know this, and we can help on how to fix this, but I need to understand what the rafters look like under the plywood you have laying on the roof in your pic.
I'm assuming the plywood is not "yet" screwed to the roof. Yes/no? Please move the last sheet that is sunk out of the way to expose the rafters, and move the sheet just ahead of the sunk sheet towards the front so I can see the rafters starting at the back wall all the way forward until you have good rafters at the correct height.
Take some pics of what the rafter situation looks like with a straight board spanning from the back wall, down the center of the camper, to the first good height rafter. Needs pics looking from the left or right side of the camper across the entire roof/ceiling outside AND at the back wall showing the rafters/ceiling looking forward down the center of the camper. Need to see from the left wall to the right side wall and everything in-between. I need to see how good or bad the problem is and I can tell from the straight board down the center. If you have no board that long, pull a rope or colored string tight to make a straight line.
You need to address the sinking rafter support and I have to see what you have now in or to make a better recommendation.
Hope this helps
John
__________________
Current Sunlines: 2004 T310SR, 2004 T1950, 2004 T2475, 2007 T2499, 2004 T317SR
Prior Sunlines: 2004 T2499 - Fern Blue
2005 Ford F350 Lariat, 6.8L V10 W/ 4.10 rear axle, CC, Short Bed, SRW. Reese HP trunnion bar hitch W/ HP DC
Google Custom Search For Sunline Owners Club
|
|
|
|
|
02-25-2022, 07:58 PM
|
#35
|
|
Junior Member
Join Date: Dec 2021
Location: Florida
Posts: 25
SUN #13056
|
Im so happy to receive your direction and guidance John. Thank you. I will upload more but, here are 3 photos. Yees my rigid center line device spans 21 feet. It has a black string at the center 5 feet. The view is looking toward the rear. The next highest point is 89 inches from the rear exterior. Each of 5 rafters beginning at 89 inches had a sag that measured 7/8, 1 3/4, 1 7/8, 1 and 7/8.
__________________
|
|
|
|
|
02-25-2022, 10:04 PM
|
#36
|
|
Moderator
Join Date: Nov 2006
Location: Ohio
Posts: 12,649
SUN #89
|
Quote:
Originally Posted by Sunnyfamily
Im so happy to receive your direction and guidance John. Thank you. I will upload more but, here are 3 photos. Yees my rigid center line device spans 21 feet. It has a black string at the center 5 feet. The view is looking toward the rear. The next highest point is 89 inches from the rear exterior. Each of 5 rafters beginning at 89 inches had a sag that measured 7/8, 1 3/4, 1 7/8, 1 and 7/8.
|
These are very good pics. I'll wait for more to help see better the situation. Posting more in these cases rafter then less really helps, I can see more. Also If possible, take a few pics to show the whole back of the roof from the last good rafter all the way to the back wall. The close ups are good, but seeing the whole roof area helps too.
Please confirm I understand your note correctly in blue to be this:
Starting 89 inches from the back wall towards the front,
5. 89" distance: Top of Rafter at 89" is 7/8" low from straight line.
4. Rafter 4 is the next towards the back of the camper is 1 3/4" low from straight line.
3. Rafter 3 is the next beyond rafter 4 towards the back wall is 1 7/8" low.
2. Rafter 2 is the next beyond rafter 3 towards the back wall is 1" low
1. Rafter 1 is the next beyond rafter 2 towards the back wall is 7/8" low.
0. Is rafter 0, the rafter right at the back wall?
Confirm I have the above correct, or explain what is not correct.
Since this is a T2363 and all the damage is in the back of the camper, confirm the damage is all above the rear bedroom?
Is there any damage of low rafters in the small hallway between the bathroom and the fridge?
Here is a 2005 T2363 I restored in 2019. See the rafter numbers with the back wall rafter being rafter 0. We will need to talk about the rafter numbers and this will help get the message across. Confirm this numbers match up with your sag numbers.

__________________
Current Sunlines: 2004 T310SR, 2004 T1950, 2004 T2475, 2007 T2499, 2004 T317SR
Prior Sunlines: 2004 T2499 - Fern Blue
2005 Ford F350 Lariat, 6.8L V10 W/ 4.10 rear axle, CC, Short Bed, SRW. Reese HP trunnion bar hitch W/ HP DC
Google Custom Search For Sunline Owners Club
|
|
|
|
|
02-25-2022, 10:06 PM
|
#37
|
|
Moderator
Join Date: Nov 2006
Location: Ohio
Posts: 12,649
SUN #89
|
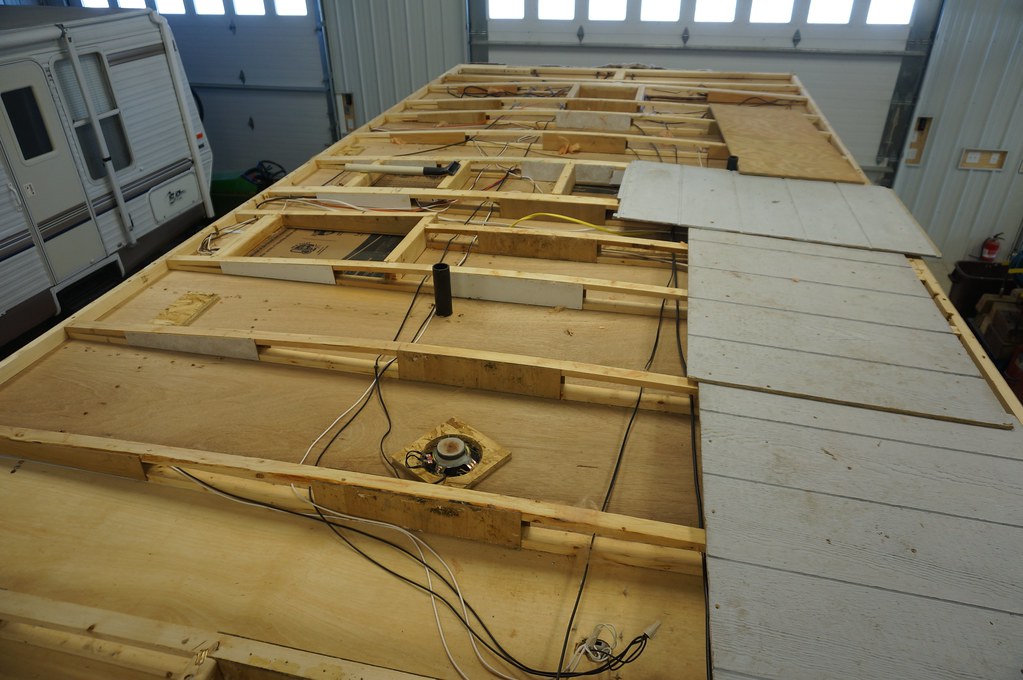
Here are some more rafter pics to help show what yours was like before the damage.
Closer view of back wall and over part of the rear bedroom

View looking forward from back area.
__________________
Current Sunlines: 2004 T310SR, 2004 T1950, 2004 T2475, 2007 T2499, 2004 T317SR
Prior Sunlines: 2004 T2499 - Fern Blue
2005 Ford F350 Lariat, 6.8L V10 W/ 4.10 rear axle, CC, Short Bed, SRW. Reese HP trunnion bar hitch W/ HP DC
Google Custom Search For Sunline Owners Club
|
|
|
|
|
02-25-2022, 10:09 PM
|
#38
|
|
Moderator
Join Date: Nov 2006
Location: Ohio
Posts: 12,649
SUN #89
|
While you are checking, if you go inside the camper and hold an approx. 4 to 6 ft long straight edge along the ceiling left to right at the rafter areas, and front to back across the rafter, you should see the same to similar sag inside the camper as you do on the roof top.
Confirm this is the case. What you are showing points tp the rafters have sunk down in the center. Need to make sure we see what would be expect inside the camper.
__________________
Current Sunlines: 2004 T310SR, 2004 T1950, 2004 T2475, 2007 T2499, 2004 T317SR
Prior Sunlines: 2004 T2499 - Fern Blue
2005 Ford F350 Lariat, 6.8L V10 W/ 4.10 rear axle, CC, Short Bed, SRW. Reese HP trunnion bar hitch W/ HP DC
Google Custom Search For Sunline Owners Club
|
|
|
|
|
02-26-2022, 11:51 AM
|
#39
|
|
Junior Member
Join Date: Dec 2021
Location: Florida
Posts: 25
SUN #13056
|
Rafter numbering
Yes John, I numbered as you did. One point of clarity
my high point is at rafter R6. R5 has the 7/8 sag.
__________________
|
|
|
|
|
02-26-2022, 11:58 AM
|
#40
|
|
Junior Member
Join Date: Dec 2021
Location: Florida
Posts: 25
SUN #13056
|
Interior sag at Rafter R5
I attached the variance at my adherence screw. The measurement at 12 from the right side and 31 from the left. My rigid adherence device was 59 long in open space clearing the cabinet on the left and window trim valance on the right. Yes indeed John, it is sagging interior as well. I leveled the camper and the interior rigid device prior to measuring sag.
__________________
__________________
|
|
|
|
|
|
|
Currently Active Users Viewing This Thread: 1 (0 members and 1 guests)
|
|
|
| Thread Tools |
Search this Thread |
|
|
|
| Display Modes |
 Linear Mode Linear Mode
|
 Posting Rules
|
You may not post new threads
You may not post replies
You may not post attachments
You may not edit your posts
HTML code is Off
|
|
|
|
 » Recent Sunline Discussions
 |
|
|
|
|
|
|
|
|
|
|
|
|
|
|
|
|
|
|
|
|
|


