 |
|
 05-22-2021, 09:45 AM
|
#1
|
|
Junior Member
Join Date: May 2021
Location: Texas
Posts: 18
SUN #12635
|
Roof conversion questions
Hello everyone I just found this site a few weeks ago and I am a few weeks away from converting my soft budboard epdm roof to a 3/8 inch plywood epdm roof and I was wondering if anyone has any suggestions and tips from people who have already have done the conversion.my rv is a sunline 2004 sole and the roof is on its last leg I have had multiple leaks and it is definitely time for a restoration. I was also wondering if you gap the joints of the plywood 1/8 inch or are they going to be as tight as possible? I am pretty much wondering if it's like a building roof where it could buckle over time.also what are the best screws to use for the roof as well? But yeah just wondering what everyone else did so I dont make the same mistakes and it will hopefully go smoother.
__________________
__________________
|

|

|
|
05-22-2021, 10:20 PM
|
#2
|
|
Moderator
Join Date: Nov 2006
Location: Ohio
Posts: 12,654
SUN #89
|
Welcome Skywalker14!
I have done several re-roofs on the Sunnies and may be able to help you.
To your first question, 3/8 decking in place of the bud board, this post will show just that. This camper floor plan and model was setup on an 8,600# GVWR. It has the extra weight carrying capacity to handle the 3/8" walk on deck.
https://www.sunlineclub.com/forums/f...avy-16834.html
A tip on the weight of using 3/8" to 3/16", the camper can handle the 3/8", but it does weigh more then the original bud board. The walk on roof comes with all it's positives comes with the extra weight tradeoff. You can use the 3/8", just you will loose some of the cargo capacity before you reach the max loaded camper weight. Sunline was good to us and offered good cargo capacity, just noting you will loose some, not a show stopper, just realize it and load accordingly.
By going with nominal 1/4" which now a days is close to 3/16", you loose less cargo capacity but still will be slightly heavier the original bud board. And you loose the full walk on feature and need to use small plywood sheets to service the roof. In some cases, the owner needs/want the full weight carrying ability, so to them they can deal with the lighter non walk on roof. It's a personal choice.
Joints in the plywood decking, in this case the wood shrinks more then it expands. Remember, the decking is supposed to be dry, wet wood does expand a lot. Dicor, the roof material manufacture states any decking gap over 1/16" need to be addressed. And they now recommend using fiberglass mesh dry wall tape over the seams to deal with the gap. The glue goes through the mesh and the mesh holds the membrane up enough to jump the gap.
The post above, we fitted the decking closer then the 1/16", many dead where tight, a few at 1/32". We did not tape them as I could not find the fleece tape Dicro had in the old instructions. On a following roof job phone call about where to but this fleece tape, they told be about the mesh tape and they no longer use the fleece tape as the newer membrane glues will not stick to it.
Decking screws, I use #6 x 1" or 1 1/8" long flat head screws on the 3/16 thick or the 3/8 decking. The head wants to be dead flush or slight below, ideally no more then 1/64" to max 1/32" The glue will not stick to the screw head and a poke hole will be over the screw if the head is too deep.
I use a countersink with a depth stop that puts the head dead flush. Then putty knife sharp edge test over the screw to check the head does not stick up. If they stick up, you address it. A cordless drill chuck clutch works well to set most of then right on, but the wood is not always the same stiffness and they are up a hair. The putty knife will find them and then by hand screw the last little bit. Do not use the drill, you will pop the head trying to re-tighten. Any head sticking up will create a stress point and that spot will wear through first. Not using the countersink, the plywood will bulge up and create a high spot and that can create a problem.
Some places use staples on the decking, I do not recommend that. Nor does many roof membrane manufacturers on an RV that tows down the road. The day those staples start backing out, you will have a hole in the membrane sooner or later. I have a project camper with a new PVC roof a shop put on and the staples are up 1/8" in a few places. They also cracked the PVC with the awning brackets making a 2 holes on day one allowing water into the wall cavity. It's fast to staple, but the risk is high. Do it the long way and countersink and screw it down if you want to keep the camper.
I have pics of all the above if you want to see them, let me know I'll hunt them up and the weight difference of decking to bud board.
Another tip/heads up. I suspect you have/had a roof leak which is why the new roof is coming. Odds are high the roof water went down the front and rear walls, and maybe into the side walls too. Fix the wall damage from the outside of the camper before doing the roof repair. You have all the corner moldings and front and rear seam moldings off for the roof job, it does not take that much more to take the front and rear siding off and fix the water damage. I suggest not to take the camper apart from the inside. That creates more work, time and damage to the inside. You can save a lot of ceiling and wall board from the outside. If you want more info on this, feel free to ask away.
Hope this helps and good luck.
John
PS, Consider taking pics and creating a post on your restore work really helps others on the forum and we can help you see better what you are up against.
__________________
Current Sunlines: 2004 T310SR, 2004 T1950, 2004 T2475, 2007 T2499, 2004 T317SR
Prior Sunlines: 2004 T2499 - Fern Blue
2005 Ford F350 Lariat, 6.8L V10 W/ 4.10 rear axle, CC, Short Bed, SRW. Reese HP trunnion bar hitch W/ HP DC
 Google Custom Search For Sunline Owners Club
|

|
|
|
05-23-2021, 08:56 AM
|
#3
|
|
Junior Member
Join Date: May 2021
Location: Texas
Posts: 18
SUN #12635
|
Wow thanks John for all of the detailed information.yeah I have had 1 leak on the slide out roof( due to an old screw poking through from the inside out) and I had gutted that out and redid the interior slide out roof and sealed the hole on the outside.its been probably 2 or 3 years since then and no leaks there.but a few weeks ago I had a leak in the front right corner in the storage above the queen bed and I never found a hole where it was coming in so I had to just coat the entire corner with sealant to protect it from leaking again till I could restore the roof.the rain must had come in and saturated the insulation and it took a few days to finally dry out. And then I know the back two corners are gone they had been spongy since we had bought the rv new back in 2004(this is my parents rv and they handed it down to me) we ended up just putting sealant to protect the corners better. I figured there is water damage definitely on the back wall but I do not know about the other walls.a few more questions about your build I know you replaced the rotted studs and trusses what wood do you recommend using(soft,hard,2x4,pine,birch,etc)? Did you replace any of the wood that has been water stained black or just rotted wood? What r value insulation did you use in your build did you have to replace it all or just a few pieces? I have been living in the rv for the past 11 years and have been trying to keep up with the repairs. Thanks again for all of the useful info it definitely will help make this a smooth operation hopefully.
__________________
|
|
|
|
|
05-24-2021, 10:04 PM
|
#4
|
|
Moderator
Join Date: Nov 2006
Location: Ohio
Posts: 12,654
SUN #89
|
Quote:
Originally Posted by Skywalker14

a few more questions about your build I know you replaced the rotted studs and trusses what wood do you recommend using(soft,hard,2x4,pine,birch,etc)?
Did you replace any of the wood that has been water stained black or just rotted wood?
What r value insulation did you use in your build did you have to replace it all or just a few pieces? I
have been living in the rv for the past 11 years and have been trying to keep up with the repairs. Thanks again for all of the useful info it definitely will help make this a smooth operation hopefully.
|
The camper was made with SPF wood and very small knots size. SPF = Spruce, Pine, Fir. Softwoods. I use the SPF when I restore a camper. It is not the wood that is the problem, it is sealing up the camper so the water does not get to the wood.
On replacing rotted wood. The method of how much rot you cut our versus take out the entire wall stud, floor joist etc. comes down to a judgement call always. As a big picture rule, I replace a lot, but not all as it depends on how much extra work there is to replace and entire 8 ft board for only 3 inches of damage on one end. If the rot is small, and I can sister on (fasten next to it) or add on to to it, then I cut out the rot and attach on good wood verses taking out the entire piece. If the rot is compromised a most of the item, then I replace the entire item.
Any wood that is still sound, poke with an ice pick and it is good and hard, but has water staining, light stain to black stain, I treat that wood with a Rot Dr product called S1. https://www.rotdoctor.com/products/s1.html The S1 stops future dry rot and stiffens the wood. It encapsulates the mold spores in the wood left by being wet, and does not allow them to grow. If you want to keep the camper a good long time, this treatment stops the future dry rot process.
The black stain can be present but if it is just stained and not started rotting, I treat it if I am going to save that board.
The walls use 1 1/2" thick insulation in your 2004 camper. That is about R7.
The floor is made from 2 x 3's which is 2 1/2" thick. That insulation is about R10 ish.
The ceiling varies as the roof is arched. At the ends there is only 1 1/2" thick, so R7, but the middle area can accept 3 1/2" or R13. Sunline sort of did the R7 over the whole roof. But on some rebuilds we have added extra where the attic space is more in the center area.
It is really hard to find 1 1/2" R7 unfaced rolled insulation. It is not in the big box stores. In this case, I buy R13 and peel it in half to create R7
Some Home Depots/Lowes have R7 batt but the cost for the shorter piece is higher. It comes to a trade off of cost verses peeling apart R13 that is more available.
Hope this helps
John
__________________
Current Sunlines: 2004 T310SR, 2004 T1950, 2004 T2475, 2007 T2499, 2004 T317SR
Prior Sunlines: 2004 T2499 - Fern Blue
2005 Ford F350 Lariat, 6.8L V10 W/ 4.10 rear axle, CC, Short Bed, SRW. Reese HP trunnion bar hitch W/ HP DC
Google Custom Search For Sunline Owners Club
|
|
|
|
|
05-25-2021, 05:29 PM
|
#5
|
|
Junior Member
Join Date: May 2021
Location: Texas
Posts: 18
SUN #12635
|
Thanks again John for some more valuable information.i will definitely be getting some of that rot doctor epoxy resin it seems like it will come in handy.from just looking at the rv and feeling the walls I feel like everything is still solid for the most part but when I open everything up I am sure it is going to be a different story. If I have anymore questions i will definitely seek you out for advice it seems you are the expert on these types of rvs.
__________________
|
|
|
|
|
05-26-2021, 10:44 PM
|
#6
|
|
Moderator
Join Date: Nov 2006
Location: Ohio
Posts: 12,654
SUN #89
|
Thanks for the good words Skywalker14. Much appreciated.
Good luck on your project and if you need any help, let me know.
John
__________________
Current Sunlines: 2004 T310SR, 2004 T1950, 2004 T2475, 2007 T2499, 2004 T317SR
Prior Sunlines: 2004 T2499 - Fern Blue
2005 Ford F350 Lariat, 6.8L V10 W/ 4.10 rear axle, CC, Short Bed, SRW. Reese HP trunnion bar hitch W/ HP DC
Google Custom Search For Sunline Owners Club
|
|
|
|
|
05-31-2021, 04:28 PM
|
#7
|
|
Junior Member
Join Date: May 2021
Location: Texas
Posts: 18
SUN #12635
|
Quote:
Originally Posted by JohnB
Thanks for the good words Skywalker14. Much appreciated.
Good luck on your project and if you need any help, let me know.
John
|
Hey john I was thinking about the fitment of the 3/8 plywood with the wall siding and termination bars.did you have any fitment problems with putting the termination bar on with 3/8 plywood(as the roof would be thicker)will the termination bar cover the top of the siding or would I have to adjust the wall siding up higher to fit properly.what spots should I expect to have fitment problems with the thicker roof.sorry about all the questions I am just trying to prepare for everything so I dont get caught off guard.
__________________
|
|
|
|
|
06-02-2021, 09:12 PM
|
#8
|
|
Moderator
Join Date: Nov 2006
Location: Ohio
Posts: 12,654
SUN #89
|
Quote:
Originally Posted by Skywalker14
Hey john I was thinking about the fitment of the 3/8 plywood with the wall siding and termination bars.did you have any fitment problems with putting the termination bar on with 3/8 plywood(as the roof would be thicker)will the termination bar cover the top of the siding or would I have to adjust the wall siding up higher to fit properly.what spots should I expect to have fitment problems with the thicker roof.sorry about all the questions I am just trying to prepare for everything so I dont get caught off guard.
|
Sorry for late getting back to you, been out camping. YEH!!!
I did not have any problems with going to 3/8" but I did have to make some accommodations for it.
The front roof seam from the front siding to the roof top, I sanded the plywood to a featured edge to blend that transition. See here. Notice the decking is above the siding line. The gutter rail will go right back on where it came off.


The front seam molding over top of the blended decking and rubber membrane

You do have to cut a custom shim to raise the height of one rafter at the front. See here the gap under the level. The budboard would flex to that but not 3/8" decking.

This link drops you into the post talking about that shim
https://www.sunlineclub.com/forums/f...tml#post131173
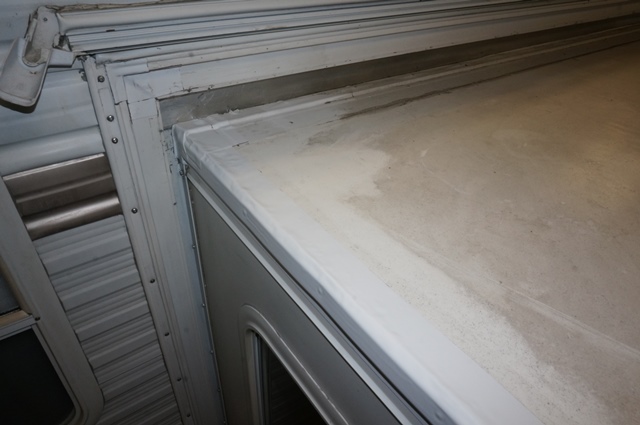
You can see here, the gutter rail is lower then the roof top by 3/8". That is OK, some campers have 3 to 6" of roofing down the side of the camper before the gutter on some large 5th wheels.

BUT, you have to sand a radius on the sharp edge of the top of the plywood at the gutter rail area to not stress the rubber. I have also changed the method on how to fill the gap that is going to exist between the wall edge and the end of the plywood sheet. The 8 ft sheet comes up a little short and the entire length of the camper is wavy anyway.
The first decking job I did I caulked with Dicor non sag that uneven joint. It worked OK but it took 3 coats and 3 days between coats to fill it.

I have send changed to filling that gap with 3/16" thick x 1/2" wide butyl tape. I have pics of this, I have to hunt them up as they show up on future roofs after the 3/8 decked one I linked in the first post. When you get to that area, lets talk if I did not post the pics yet.
The back wall, there you have to take note as the rear wall siding has to go back on where it came off. The window openings have to line up and the siding cannot be raised.
Make sure when you staple that top roof line edge of siding on, the staples are right at the top of the siding, or else they will be exposed. They are only about a heavy 1/16" to max 1/8" into the sheet (down the wall)
It is hard to see in these pics, but the siding is 3/8" down from the top of the decking. The rear molding has to cover the 3/8" plus the staples before the molding stops. The molding will be 3/8" higher then it was originally. But it does work. I also caulk the exposed butyl gap at the back wall, the gap of the molding to the siding that is filled with butyl. Can use Proflex RV or Dicor non sag. on that siding exposed butyl seam.

I wrapped the rubber down the back wall to add more sealing ability. The rear seam can be a bugger of leak if any of the caulking is compromised. Just as bad as the front seam. Sunline stopped the rubber and budboard at the top back of the roof. Not sure why, but any water leaking under the molding goes right down the back wall. Wrapping the rubber down the back wall helps the water if is did get in, divert it outside the back wall. Granted the water will still wick through the screw holes, but anything that can help, take it. At least that is how I do all my rear wall roof to wall transitions.

If you go any thicker then 3/8" you will need a longer leg rear molding. What is there now just works, but is works soundly.
Hope this helps
John
__________________
Current Sunlines: 2004 T310SR, 2004 T1950, 2004 T2475, 2007 T2499, 2004 T317SR
Prior Sunlines: 2004 T2499 - Fern Blue
2005 Ford F350 Lariat, 6.8L V10 W/ 4.10 rear axle, CC, Short Bed, SRW. Reese HP trunnion bar hitch W/ HP DC
Google Custom Search For Sunline Owners Club
|
|
|
|
|
06-03-2021, 05:54 PM
|
#9
|
|
Junior Member
Join Date: May 2021
Location: Texas
Posts: 18
SUN #12635
|
Quote:
Originally Posted by JohnB
Sorry for late getting back to you, been out camping. YEH!!!
I did not have any problems with going to 3/8" but I did have to make some accommodations for it.
The front roof seam from the front siding to the roof top, I sanded the plywood to a featured edge to blend that transition. See here. Notice the decking is above the siding line. The gutter rail will go right back on where it came off.
The front seam molding over top of the blended decking and rubber membrane
You do have to cut a custom shim to raise the height of one rafter at the front. See here the gap under the level. The budboard would flex to that but not 3/8" decking.
This link drops you into the post talking about that shim
https://www.sunlineclub.com/forums/f...tml#post131173
You can see here, the gutter rail is lower then the roof top by 3/8". That is OK, some campers have 3 to 6" of roofing down the side of the camper before the gutter on some large 5th wheels.
BUT, you have to sand a radius on the sharp edge of the top of the plywood at the gutter rail area to not stress the rubber. I have also changed the method on how to fill the gap that is going to exist between the wall edge and the end of the plywood sheet. The 8 ft sheet comes up a little short and the entire length of the camper is wavy anyway.
The first decking job I did I caulked with Dicor non sag that uneven joint. It worked OK but it took 3 coats and 3 days between coats to fill it.
I have send changed to filling that gap with 3/16" thick x 1/2" wide butyl tape. I have pics of this, I have to hunt them up as they show up on future roofs after the 3/8 decked one I linked in the first post. When you get to that area, lets talk if I did not post the pics yet.
The back wall, there you have to take note as the rear wall siding has to go back on where it came off. The window openings have to line up and the siding cannot be raised.
Make sure when you staple that top roof line edge of siding on, the staples are right at the top of the siding, or else they will be exposed. They are only about a heavy 1/16" to max 1/8" into the sheet (down the wall)
It is hard to see in these pics, but the siding is 3/8" down from the top of the decking. The rear molding has to cover the 3/8" plus the staples before the molding stops. The molding will be 3/8" higher then it was originally. But it does work. I also caulk the exposed butyl gap at the back wall, the gap of the molding to the siding that is filled with butyl. Can use Proflex RV or Dicor non sag. on that siding exposed butyl seam.
I wrapped the rubber down the back wall to add more sealing ability. The rear seam can be a bugger of leak if any of the caulking is compromised. Just as bad as the front seam. Sunline stopped the rubber and budboard at the top back of the roof. Not sure why, but any water leaking under the molding goes right down the back wall. Wrapping the rubber down the back wall helps the water if is did get in, divert it outside the back wall. Granted the water will still wick through the screw holes, but anything that can help, take it. At least that is how I do all my rear wall roof to wall transitions.
If you go any thicker then 3/8" you will need a longer leg rear molding. What is there now just works, but is works soundly.
Hope this helps
John |
So the front seam you did plywood siding membrane then termination bar or do you tuck the membrane under the siding? I thought you were suppose to use some kind of tape to cover side siding edge(where you used lap sealant) from fraying and tearing membrane.yeah I was going to use a router and round over the plywood on the edges or would it delaminate should I just sand the edge down a little instead.i was looking at the back molding the other day that was why I was wondering about fitment would it be better if I thin the back plywood a little so the back molding fit a little lower on the back wall or would it make it weaker back there.my back siding has no window but I do have the top lights like yours i have the bathroom in the rear. So is the antenna the only thing you reinforced? Also i was reading your post and was wondering what you did with you ac ducts you said you were going to refill something or pack it,I thought it just sat on a ac gasket. Thank you very much for the info again I am feeling more comfortable with the transition.i feel like the most of the time will be removing and fixing rot.
__________________
|
|
|
|
|
06-04-2021, 09:27 PM
|
#10
|
|
Moderator
Join Date: Nov 2006
Location: Ohio
Posts: 12,654
SUN #89
|
Hi Sky,
A few clarifications,
Quote:
Originally Posted by Skywalker14
So the front seam you did plywood siding membrane then termination bar or do you tuck the membrane under the siding?
|
No, not exactly like that.
1. You start with the plywood decking sanded on a lead in angle to make the front siding lay down nice and smooth. This pic is only to show how the siding will lay over the front decking, this pic does not yet have the membrane on.
2. The front siding is then raised back up out of the way and the rubber membrane is placed, and glued in place and stapled to the front 2 x 3 of the roof at the front side, not on the top down.
Here it the front 2 x 3 (actual 1 1/2" x 2 1/2") laying flat, the rubber staples are in the 1 1/2 side at the front and "not" down onto the 2 1/2" side. The old one is stapled down like this, look as you are removing the old roof.

3. Here you and see the membrane over the top of the decking, and "under" the front wall siding. You can also see there is butyl tape on the underside of the membrane which will seal the front siding to the top of the rubber.

The siding will be stapled down on top of the rubber next near the edge of the siding. The molding will cover the staples.
4. And here in the finishing process. The rubber is under the front siding, the front flat seam molding caps both the siding and the rubber down the middle of that molding/transition strip.

Here is another post on my T1950 I recently did the roof on. In this case the decking is 3/16" actual (1/4" nominal) but the steps are the same for the front seam molding. The roof membrane starts on post #97
https://www.sunlineclub.com/forums/f...tml#post154533
And finishes up on post 103 here, scan the other pics from #97 to #103
https://www.sunlineclub.com/forums/f...tml#post154679
[QUOTE=Skywalker14;155636]
I thought you were suppose to use some kind of tape to cover side siding edge(where you used lap sealant) from fraying and tearing membrane.[/url]
I have seen some people put tape (~ 2" wide) over that edge like you are referring too, but that is not the practice from my understanding when using the newer water based glues. Dicor 901BA will only bond rubber to a porous substrate. Point is, if you tape the wall to roof edges, the membrane will not be glued down over that tape. That is a lot of unglued roofing at an area that really needs to be held good. Maybe, the older glues allowed the rubber to stick to the tape, not sure why or how that practice came about.
This link takes you to the latest method I use. I sand a radius on the wood decking for the rubber to not be damaged. Glue down the membrane, let it dry overnight at least, Then the next day or when you get it, lift the rubber and insert butyl tape to fill the void of the decking not coming exactly to the edge of the wall. The butyl will touch the rubber, over the wood and touch the siding, then rolled to be more flat. Extra butyl is then put on the siding to seal the rubber to the siding. Sunline did not do that step on the budboard roofs. See here on the Dicro install directions. Click the installation tab They show pics of sealing the entire membrane to the body of the camper. https://dicorproducts.com/product/di...ber-roofing-2/
https://www.sunlineclub.com/forums/f...tml#post154611
The only thing I changed from those pics is, to use 3/16" thick x 1/2" wide in place of 1" wide x 1/8" thick over the wood area. The 1" will work, but the 1/2" works better
Quote:
Originally Posted by Skywalker14
yeah I was going to use a router and round over the plywood on the edges or would it delaminate should I just sand the edge down a little instead.
|
You can use the router but bear in mind, all those sheet ends do not line up. You will be routing down 4 ft sheet end, then an abrupt move to jump onto the next sheet. And that may still work, just the sander may be more forgiving bending in the slight offset in the sheets. I use a 3" x 21" handheld corded belt sander. After every sheet you put down, the sheet ahead and behind will not be a nice inline line up. The walls are wavy and the sheet may not be exactly square to the wavy wall. How to line up the decking sheets to align with the rafter to splice them, is another topic. The rafters are not on exactly 16" centers. Some are, many are not. And then the rafters are not square to the side walls. Putting a 4 x 8 ft sheet that is almost dead square, onto a roof that is out of square, the end results is the you might get 1 or 2 sheets to line up, but getting everyone to line exactly is not going to happen. You want the 8 ft direction as tight as you can, the 4 ft direction will suffer a little letting the 8 ft take precedence.
Quote:
Originally Posted by Skywalker14
i was looking at the back molding the other day that was why I was wondering about fitment would it be better if I thin the back plywood a little so the back molding fit a little lower on the back wall or would it make it weaker back there.my back siding has no window but I do have the top lights like yours i have the bathroom in the rear.
|
The rear molding is a 90 degree molding. If you taper the decking, then that joint is no longer close to 90 deg. The joint will be greater the 90 deg. You could taper a little, my gut feeling is, if you taper the 3/8 to 1/4" thick, took 1/8" of the decking out on an angle, The molding may not seal well. 1/32 to 1/16" I could see working. But if you have no windows, you can gain 1/16" easy by raising the siding up. Do not get carried away as the bottom siding piece will be up higher then, then it ever was. Taking all 3/8 and lifting the sheet, that maybe an issue as water run off at the bottom of the siding would be touching the Darco and if any pin hole from and old staple is there, water may get in. Now the bottom siding acts as a drip edge of sorts to have the water drip at the bottom most part.
Quote:
Originally Posted by Skywalker14
So is the antenna the only thing you reinforced?
|
With the 3/8 decked roof, did you see any reinforcing under the decking in my pics? I do not recall having to reinforce the antenna on the 3/8 deck. I have to do that on the 1/4" deck as it for sure is not thick enough to hold the screws.
Quote:
Originally Posted by Skywalker14
Also i was reading your post and was wondering what you did with you ac ducts you said you were going to refill something or pack it,I thought it just sat on a ac gasket. Thank you very much for the info again I am feeling more comfortable with the transition.i feel like the most of the time will be removing and fixing rot.
|
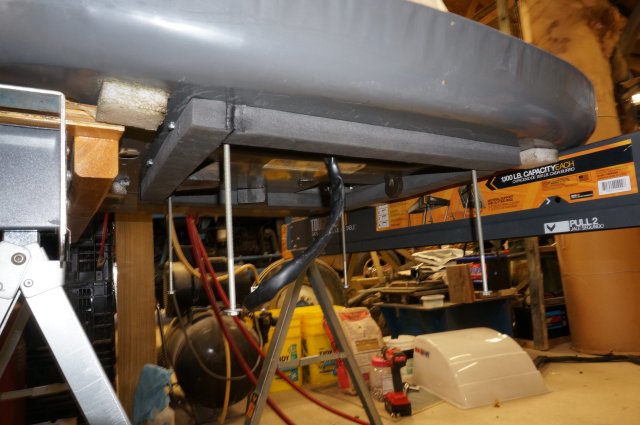
H'mm, on the AC ducts, I'm not recalling packing the ducts, I would of taped with HVAC tape any joints with holes that could blow in the attic. And we did add extra insulation in the center of the attic as it was deep enough. There is only a gasket on the outside to seal the AC unit to the roof. But there are dense styrofoam pads to help take some weight off the gasket. The pads are resting on the roof and the bottom pan of the AC unit. They are at each corners of the gaskets and 2 on the long overhang area by the compressor. If those pads are not in there, make new ones from closed cell foundation insulation board. Without the pads, the bouncing from towing could beat the rubber foam seal flat enough to start leaking. A new gasket is compressed to half the thickness on install.
Hope this help and your welcome.
John
__________________
Current Sunlines: 2004 T310SR, 2004 T1950, 2004 T2475, 2007 T2499, 2004 T317SR
Prior Sunlines: 2004 T2499 - Fern Blue
2005 Ford F350 Lariat, 6.8L V10 W/ 4.10 rear axle, CC, Short Bed, SRW. Reese HP trunnion bar hitch W/ HP DC
Google Custom Search For Sunline Owners Club
|
|
|
|
|
06-05-2021, 07:18 AM
|
#11
|
|
Junior Member
Join Date: May 2021
Location: Texas
Posts: 18
SUN #12635
|
I see so the membrane will be sandwiched between the butyl tape one strip under the membrane and one strip under the siding to create a tight seal. I guess I will sand the edges instead of routing if nothing is going to line up that well.i will try to just leave the rear plywood edge 3/8 and not taper it because I dont want to risk raising the wall siding and risk ruining the darco. I must of been looking at your 1/4 roof post for the antenna reinforcement. For the ac I understand now you were talking about the styrofoam pads you had to make.so do the pads go under the ac gasket or on top of the ac gasket?
__________________
|
|
|
|
|
06-05-2021, 08:13 PM
|
#12
|
|
Moderator
Join Date: Nov 2006
Location: Ohio
Posts: 12,654
SUN #89
|
Quote:
Originally Posted by Skywalker14
I see so the membrane will be sandwiched between the butyl tape one strip under the membrane and one strip under the siding to create a tight seal. I guess I will sand the edges instead of routing if nothing is going to line up that well.i will try to just leave the rear plywood edge 3/8 and not taper it because I dont want to risk raising the wall siding and risk ruining the darco. I must of been looking at your 1/4 roof post for the antenna reinforcement.
For the ac I understand now you were talking about the styrofoam pads you had to make.so do the pads go under the ac gasket or on top of the ac gasket?
|
On the AC foam pads, there are 6 of them. 4 at the four corners of the gasket itself and 2 out by the heavier cantilevered end of the roof unit. Which is the compressor end.
The pads go between the bottom of the metal pan and the top surface of the rubber membrane.
Here is a pic of the 4 at the gasket corners. Dometic used white dense closed cell foam pads. These pics have a new gasket installed ready to put the unit up on the roof.
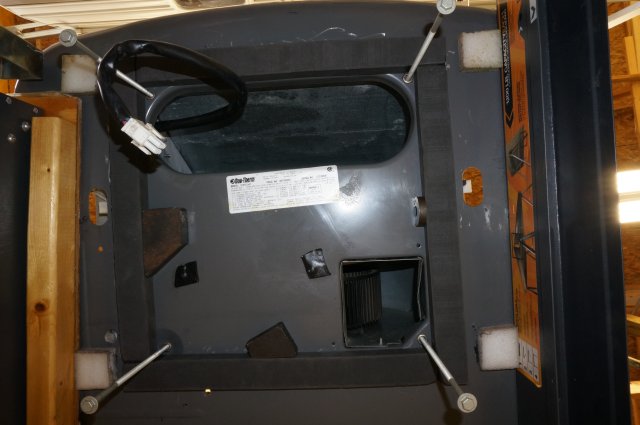
I used the pink insulation board that is rated for outside foundations at the lumber yard and trim the block to the correct size and thickness, then mount it with double sided tape. The 2 back by the compressor, I have to wait until the unit is mounted on the roof and the gasket compressed to the right height. Then cut the block to the right thickness and insert it.
I cannot seem to find any pics on line of the 2 rear blocks on my photo server. If you need a pic, let me know.
Hope this helps
John
__________________
Current Sunlines: 2004 T310SR, 2004 T1950, 2004 T2475, 2007 T2499, 2004 T317SR
Prior Sunlines: 2004 T2499 - Fern Blue
2005 Ford F350 Lariat, 6.8L V10 W/ 4.10 rear axle, CC, Short Bed, SRW. Reese HP trunnion bar hitch W/ HP DC
Google Custom Search For Sunline Owners Club
|
|
|
|
|
06-06-2021, 11:03 AM
|
#13
|
|
Junior Member
Join Date: May 2021
Location: Texas
Posts: 18
SUN #12635
|
Quote:
Originally Posted by JohnB
On the AC foam pads, there are 6 of them. 4 at the four corners of the gasket itself and 2 out by the heavier cantilevered end of the roof unit. Which is the compressor end.
The pads go between the bottom of the metal pan and the top surface of the rubber membrane.
Here is a pic of the 4 at the gasket corners. Dometic used white dense closed cell foam pads. These pics have a new gasket installed ready to put the unit up on the roof.
I used the pink insulation board that is rated for outside foundations at the lumber yard and trim the block to the correct size and thickness, then mount it with double sided tape. The 2 back by the compressor, I have to wait until the unit is mounted on the roof and the gasket compressed to the right height. Then cut the block to the right thickness and insert it.
I cannot seem to find any pics on line of the 2 rear blocks on my photo server. If you need a pic, let me know.
Hope this helps
John |
I understand now the pics are lifesavers makes me feel like I have converted 6 roofs in my life.😀
__________________
|
|
|
|
|
06-06-2021, 07:00 PM
|
#14
|
|
Moderator
Join Date: Nov 2006
Location: Ohio
Posts: 12,654
SUN #89
|
Glad the pics helps. They do fill in the blanks when words can have so many different meanings and contexts.
To add to this, when remove the AC unit, you will need a new gasket when you put the AC back on. I use an actual Dometic gasket verses and aftermarket one. Yes they do cost more, but I know they work correct. Some of the aftermarket gaskets I have heard keep sinking over time and then the bolts loosen up. That is not a good thing.
There may be some brands of aftermarket gaskets that work, but I have not been gutsy enough to just try one. Dealing with having to change it as it failed and I saved a few bucks, do not really entice me. If you are going to try an aftermarket one, do some research on that brand and how many years that data was for.
I know the Dometics have been on campers I worked on that are 16 plus years old, and the gaskets did not sink beyond the initial compression over time. Yes, the gasket is never going to spring back to original shape, but they did not lose the initial set distance.
When you get into your roof project, post some pics. Always looking to learn and see new things. And they help when asking questions.
John
__________________
Current Sunlines: 2004 T310SR, 2004 T1950, 2004 T2475, 2007 T2499, 2004 T317SR
Prior Sunlines: 2004 T2499 - Fern Blue
2005 Ford F350 Lariat, 6.8L V10 W/ 4.10 rear axle, CC, Short Bed, SRW. Reese HP trunnion bar hitch W/ HP DC
Google Custom Search For Sunline Owners Club
|
|
|
|
|
06-09-2021, 05:54 PM
|
#15
|
|
Junior Member
Join Date: May 2021
Location: Texas
Posts: 18
SUN #12635
|
Quote:
Originally Posted by JohnB
Glad the pics helps. They do fill in the blanks when words can have so many different meanings and contexts.
To add to this, when remove the AC unit, you will need a new gasket when you put the AC back on. I use an actual Dometic gasket verses and aftermarket one. Yes they do cost more, but I know they work correct. Some of the aftermarket gaskets I have heard keep sinking over time and then the bolts loosen up. That is not a good thing.
There may be some brands of aftermarket gaskets that work, but I have not been gutsy enough to just try one. Dealing with having to change it as it failed and I saved a few bucks, do not really entice me. If you are going to try an aftermarket one, do some research on that brand and how many years that data was for.
I know the Dometics have been on campers I worked on that are 16 plus years old, and the gaskets did not sink beyond the initial compression over time. Yes, the gasket is never going to spring back to original shape, but they did not lose the initial set distance.
When you get into your roof project, post some pics. Always looking to learn and see new things. And they help when asking questions.
John
|
Yeah I was going to go with dometic for the ac gasket I never have good luck with anything aftermarket. Another question I had was about the slide out I was going to change that roof as well at some point and was wondering if that could be changed to 3/8 inch plywood or would it be to tall to retract back in.the roof feels pretty solid but the epdm material has seen better days.does the slide use luan wood or does it use the the bud board on that as well.when I gutted the slide out I believe I saw luan on the other side of the roof studs.
__________________
|
|
|
|
|
06-11-2021, 06:42 PM
|
#16
|
|
Moderator
Join Date: Nov 2006
Location: Ohio
Posts: 12,654
SUN #89
|
Quote:
Originally Posted by Skywalker14
Yeah I was going to go with dometic for the ac gasket I never have good luck with anything aftermarket.
Another question I had was about the slide out I was going to change that roof as well at some point and was wondering if that could be changed to 3/8 inch plywood or would it be to tall to retract back in.the roof feels pretty solid but the epdm material has seen better days.does the slide use luan wood or does it use the the bud board on that as well.when I gutted the slide out I believe I saw luan on the other side of the roof studs.
|
In 2004 time frame, and newer and maybe even older, the slides used 1/8" luan for the roof. There was no budboard on the slide. The EPDM was glued direct to the luan.
Here is a repair on a 2004 camper I was doing, you can see the luan.

I would say going to 3/8" decking on the slide may cause more issues than it solves. There is not a lot of open space between the slide roof and the aluminum slide flange molding. I know you can jack up the slide at least 3/8" while it is still in the camper, but not much more than 1/2" and you will bottom out on the roof. By adding the extra 1/4" above the factory 1/8", you lose some of the forgiveness in being able to adjust the slide up or lift it for servicing if needed.
I'm not saying your camper may not work with 3/8", but you will be close. And the slide roofs are not normally walk on roof setups as you can reach from the sides.
What was your thoughts on wanting to go 3/8" on the slide?
John
__________________
Current Sunlines: 2004 T310SR, 2004 T1950, 2004 T2475, 2007 T2499, 2004 T317SR
Prior Sunlines: 2004 T2499 - Fern Blue
2005 Ford F350 Lariat, 6.8L V10 W/ 4.10 rear axle, CC, Short Bed, SRW. Reese HP trunnion bar hitch W/ HP DC
Google Custom Search For Sunline Owners Club
|
|
|
|
|
06-11-2021, 07:12 PM
|
#17
|
|
Junior Member
Join Date: May 2021
Location: Texas
Posts: 18
SUN #12635
|
Quote:
Originally Posted by JohnB
In 2004 time frame, and newer and maybe even older, the slides used 1/8" luan for the roof. There was no budboard on the slide. The EPDM was glued direct to the luan.
Here is a repair on a 2004 camper I was doing, you can see the luan.
I would say going to 3/8" decking on the slide may cause more issues than it solves. There is not a lot of open space between the slide roof and the aluminum slide flange molding. I know you can jack up the slide at least 3/8" while it is still in the camper, but not much more than 1/2" and you will bottom out on the roof. By adding the extra 1/4" above the factory 1/8", you lose some of the forgiveness in being able to adjust the slide up or lift it for servicing if needed.
I'm not saying your camper may not work with 3/8", but you will be close. And the slide roofs are not normally walk on roof setups as you can reach from the sides.
What was your thoughts on wanting to go 3/8" on the slide?
John |
No I was just wondering if it was possible since I was buying 3/8 plywood anyways to just get a couple.more sheets.i would never walk on the slide anyways but in Texas last year we had a freak snow storm and we had a bunch of wet heavy snow sitting on the roof and I was just thinking to make it as strong as i could but i will just stick with the luan. On my slide I have this white tape material over the long edges of the slide would you know what that tape is. Also what is the process to swap the slide epdm can I swap it without doing any adjustments to the slide
__________________
|
|
|
|
|
06-17-2021, 05:10 PM
|
#18
|
|
Moderator
Join Date: Nov 2006
Location: Ohio
Posts: 12,654
SUN #89
|
Quote:
Originally Posted by Skywalker14
On my slide I have this white tape material over the long edges of the slide would you know what that tape is. Also what is the process to swap the slide epdm can I swap it without doing any adjustments to the slide
|
The white tape is called, butyl slide tape that Sunline used. I have not yet found the brand/version they used. The top layer lifted in places on mine. And seeing that, I use Eternabond Roof Seal instead.
Here is the Ebond web site. EternaBond RoofSeal
I use the 2 or 4" wide pending where I am using it. You can buy it at many places. I just caution to not buy it from Amazon. I used them once in a hurry and it will be the last time. The warehouse packers do not know how to ship that sticky product. It gets all beat up in the box the way they pack it, or lack of packing it.
Their are 2 places I get it from online, commercial roof supply houses. They know how to ship super sticky products and not get all goo'ed up when they arrive.
Best Materials https://www.bestmaterials.com/Eternabond.aspx
Big Rock Supply https://www.bigrocksupply.com/OneSte...Roof-Tape.html
You can look at local commercial roofer supply houses too to avoid the freight.
On changing the roof rubber on the slide, the rubber part is the same as the main roof, getting to all the edges of the rubber is more involved. I'm sure the dealers pull the slide out of the camper. I was prepared to pull mine out too, just I could work around it when I was doing camper main frame repair.
For the glue to work, you have to change the sub straight, but you said you where anyway. The glue will not bond to old hard glued surfaces, it needs a porous surface. Technically, you can scrape and get off old glue, but an entire slide is painful to do that. I did local areas OK, just not an entire slide roof.
Now to get to the slide roof rubber edges. You have to pull all the slide flanges on the outside wall as the rubber goes down the side walls. And you remove the roof line slide end wall moldings.
Will look like this. These are from a 2004 T310SR. Your 2004 Sole should be similar.

You can see the rubber folded for over the edge.

And you most likely have to un-staple the top most part of side siding to get to the rubber


You can see here how far down behind the siding the rubber goes.

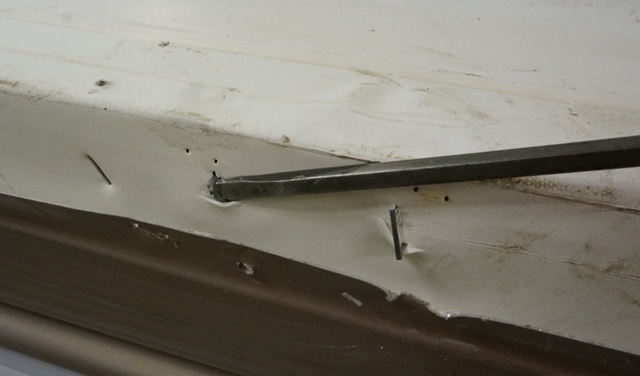
Then.. you have to take at least the top inside slide flange off as that clamps rubber to the inside edge of the roof. Start with removing the rubber slide seals. There are 6 to 7 screws that hold the slide seal onto the main camper slide wall flanges on your 2004. Two screws are at the top outer corners of the black rubber seal, you can see the screw heads here, remove the screws.

Your slide may have one screw along the top center of the seal in the middle of the slide length. Take it out too.
Then we is a screw at the bottom of each vertical front and rear wall. Looks like this buried near the rubber bulb part of the seal. Once all the screws are out, then pull off the seal. Take care to not rip the corners apart if plan on reusing it.

To get the top inside flange off, you need to take the two vertical side molding faces off the slide. And then the long top molding face that exposes the inside top metal slide flange. It will be work, limited space from ceiling to top of slide, but it can be done.
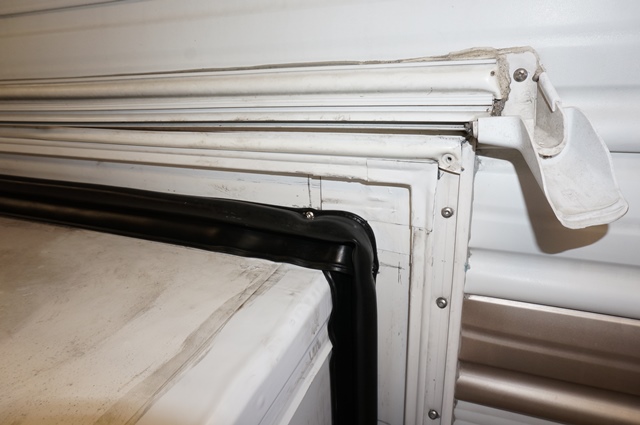
It may be easier to get the screws out from the outside. Inside reaching over the flange may be a challenge. You can see the area where the screws would be under the slide tape.
This pic has new Ebond on it already.
You can see the silver aluminum flange here on the end. I was putting the wall end moldings on, but you can see the flange where the screws would be

You will/might have to loosen the top 12 to 18" of length of the inside end wall flanges to get the rubber out behind them. The roof rubber goes down the end wall about 1 to 1 1/2". While I have had the slides apart before, I have not yet had to replace the entire luan/rubber roof, yet anyway.
I will get pics for you if wanted, just let me know, on how to take the inside fancy moldings off the face of the slide. I am working on 2006 slide now for a friend, rotted main floor from a leaking bottom slide seal, but I had to take the face boards off. They interlink with each other. Once you know how to get them apart, it is not that bad. I have had them off my 2004 T310SR over the years, the first time is the learning curve.
Hope all that helps
John
__________________
Current Sunlines: 2004 T310SR, 2004 T1950, 2004 T2475, 2007 T2499, 2004 T317SR
Prior Sunlines: 2004 T2499 - Fern Blue
2005 Ford F350 Lariat, 6.8L V10 W/ 4.10 rear axle, CC, Short Bed, SRW. Reese HP trunnion bar hitch W/ HP DC
Google Custom Search For Sunline Owners Club
|
|
|
|
|
06-17-2021, 05:17 PM
|
#19
|
|
Moderator
Join Date: Nov 2006
Location: Ohio
Posts: 12,654
SUN #89
|
You mentioned the slide roof was bad. Got any pics? As long as their is no water damage under the rubber, and the black layer of the rubber is still intact, I may have a possibly easier way to restore that slide roof then replacing the decking and rubber. The white layer can be in bad shape, that is OK for the coating.
I have tested two high silicone rubber roof coating products and soon will be using one of them on the main roof. They could work on the slide too, One has a 50 year warranty, the other a life time warranty. That means no slide tape, no removing any slide flanges, no removing rubber. But you have to meticulously clean the slide roof to get a good bond.
Before I type a bunch on this, let me know if this is a route you want to investigate and the pics of what you have so I can see if it would be a viable option.
John
__________________
Current Sunlines: 2004 T310SR, 2004 T1950, 2004 T2475, 2007 T2499, 2004 T317SR
Prior Sunlines: 2004 T2499 - Fern Blue
2005 Ford F350 Lariat, 6.8L V10 W/ 4.10 rear axle, CC, Short Bed, SRW. Reese HP trunnion bar hitch W/ HP DC
Google Custom Search For Sunline Owners Club
|
|
|
|
|
06-17-2021, 06:36 PM
|
#20
|
|
Junior Member
Join Date: May 2021
Location: Texas
Posts: 18
SUN #12635
|
Quote:
Originally Posted by JohnB
You mentioned the slide roof was bad. Got any pics? As long as their is no water damage under the rubber, and the black layer of the rubber is still intact, I may have a possibly easier way to restore that slide roof then replacing the decking and rubber. The white layer can be in bad shape, that is OK for the coating.
I have tested two high silicone rubber roof coating products and soon will be using one of them on the main roof. They could work on the slide too, One has a 50 year warranty, the other a life time warranty. That means no slide tape, no removing any slide flanges, no removing rubber. But you have to meticulously clean the slide roof to get a good bond.
Before I type a bunch on this, let me know if this is a route you want to investigate and the pics of what you have so I can see if it would be a viable option.
John
|
Man that does seem like a pain with the tight spaces would there be any butyl tape to apply for the slide like under the inside metal flange or is it just screwed down and then eternabond taped over the top. The slide roof seems solid as could be but I have three low spots where water puddles up and sits.i had put some dicor roof coating on it when I did the roof a year or so ago but when the water sits on there it makes the coating bubble up and separate from the roof to where it just wants to peel I still have no black looking marks of the epdm it is still white just like my roof the epdm has spider cracks look to it. A few years ago a misc screw poked through from under the epdm and that was my leak I believe it is right on the seam of the two luan boards under the epdm I ended up taking lap sealant and coated the seam and all of the edges with lap sealant and it has held up great so far no more leaks there but it is something I have to always check before rain comes.what are the coatings you mentioned I will probably fix the roof first to see how that goes before the slide I will buy extra epdm depending on which route to take.i did have a question about the butyl tape under the membrane does the butyl go under the membrane where the termination bar will go to sandwich the membrane or would it go where the membrane will be stapled like the front would it go where the membrane is stapled to the front stud or right under the termination bar?
__________________
__________________
|
|
|
|
|
|
|
Currently Active Users Viewing This Thread: 1 (0 members and 1 guests)
|
|
|
 Posting Rules
|
You may not post new threads
You may not post replies
You may not post attachments
You may not edit your posts
HTML code is Off
|
|
|
|
 » Recent Sunline Discussions
 |
|
|
|
|
|
|
|
|
|
|
|
|
|
|
|
|
|
|
|
|
|
|
|


 Linear Mode

